1
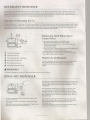
Installation Instruction
PN 17-1021
WQP8-9122
MAJESTIC APPLIANCES DIV OF MSI
3201 Northwest Lower River Road, #9, Vancouver, WA 98660 USA
WWW.majesticappliances.com
READ CAREFULLY AND KEEP THESE INSTRUCTIONS.
BEFORE INSTALLATION
Read these instructions
completely
CONTENTS
and carefully.
Material You Will
IMPORTANT
Observe
all governing
codes and ordinances.
Note to Installer
Be sure to leave these instructions
and local inspectors
use.
for the consumers
Note to Consumer
Keep these instructions
future reference.
eed
1
Tools
1
Unit Dimensions
2
Prepare the Location
2
Conner Installation
2
Ways of Drain Connections
2
Prepare Electrical
3
Electrical
Wiring
Requirement.
3
with your Owners Manual for
Skill level
Installation
of this dishwashers require basic mechanical
and electrical skills. Improper installation can result in
product failure which is not covered under the Product
Warrant.
IMPORTANT
The dishwasher must be installed to allow for future
removal from the enclosure ifservice is required.
Before
You Begin--Examine
the dishwasher carefully,
if the product is damaged, you should immediately contact
your dealer.
FOR YOUR SAFETY
Read carefully all WARNINGS and CAUTIONS
instructions which will guarantee your safety.
in this
Prepare Water Line
4
Adjust Door Balance
4
Remove Toekick
4
Install Power Cord
5
Position
5
Water Line and House Wiring
Insert Drain Hose through Cabinet
and Connect Water Line
5
Slide Dishwasher
5
into Cabinet
Level Dishwasher,
Secure to Cabinet.
.'
6
Connect Drain Hose
7
Connect Power Supply
8
Pre- Test Check List
8
Dishwasher
9
Wet Test
Replace Toekick
9
Literature
9
........................................
r---------------------------------------------------------------------------------------------------------r---
Installation
Preparation
MATERIALS YOU WILL NEED
o 2 #8 flat head wood screws, 5/8" long to secure
dishwasher to underside of countertop or to side of
cabinetry (Taped to top or side of dishwasher)
E
Wood Screws
o
Side and top trim pieces
o
Ferrule, compression nut and 90
Elbow (3/8"NPT
external thread on one end, opposite end sized to fit
water supply)
Thread seal tape
Trim Pieces
0
o
o UL Listed
Ii
wire nuts
Waste Tee
Materials
For New Installations
Only:
o
o
o
Air gap for drain hose, if req uired
o
Screw type Hose clamps
o
Strain
o
o
Hand shut-off
o
Coupler
Waste tee for house plumbing,
Electrical
MID)
~
@])eiU)
~
Hand
Shut-off
Valve
Thread
Seal Tape
cable or power cord, if applicable
relief for electrical
90 0 Elbow, Ferrule
and Compression
nut
connection.
Electrical Cable
(or Power cord)
Water line 3/8" min. copper or 112" min. Plastic
(plastic must be tested for temperature
and pressure)
for extending
6" Adjustable
Hot Water Line
valve (recommended)
drain line, if applicable
~~
0
Strain
Relief
TOOLS
o Head screwdriver
o 5/16" and" nutdriver
rn
Coupler
I"
wrench
Level
Level
Carpenters
Measuring
square
tape
Safety glasses
Flashlight
Hole Saw Sei
o
Bucket to catch water when flushing
o
15/16" socket (optional
o
o
Gloves
o
o
Wire Nuts
if applicable
Screw Tape
Hose Clamps
o
o
o
o
o
o
Air Gap
Carpenters
Square
the line
for skid removal)
Tubing Cutter
Tubing cutter
Drill and approprivate
Flashlight
Safety Glasses
bits
Gloves
Hole saw set
6" Adj ustable
Wrench
Measuring
Tape
Drilland
1
Bits
Installation
Preparation
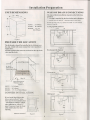
UNIT DIMENSIONS
WAYS OF DRAIN CONNECTIONS
The type of drain installation depends on the following
question.
Air gap is required by the local codes and ordinances
23"
o
o
33"-35'
Waste tee less than 18" minimum
DEPTH:
23"(5S0mm)
WIDTH:
lS"(450mm)
A) air gap with waste tee
HEIGHT:
r-0
33"-35"
(S40-S90mm)
A
Figure 1
PREPARE THE LOCATION
The dishwasher should be installed in the kitchen near
the sink, which will easier connect the water and drain
suppJy lines.
A build-in dishwasher must be enclosed on the top, both
sides and the back.
33"35-112"
Underside
of
Countertop
to Flo
Figure 4
B) air gap with disposer
r-0
A
r
,/------'-----i
Figure 5
6"
Min. IS"
Floor must be Even
With Room Floor
Figure 2
DEPTH:
24"(610mm)
WIDTH:
lS"(460mm)
HEIGHT:
33"-35-1I2"(S40-900mm)
CONNER INSTALLATION
If you install the dishwasher
into a corner, allow 2" min.
Clearance between dishwasher
and adjacent cabinet, wall or
other appliances. Allow 22"
min. Clearance from the front
of the dishwasher for door
opening.
Minimum
Clearance
¥
above the floor.
Ifboth answers are yes, choose A and B. Or you should
choose C and D ..
Figure 6
D) disposer
~
C
I/r.---------"II
~
22"
Figure 3
Figure 7
2
Installation
Preparation
PREPARE ELECTRICAL WIRING
A WARNING!
FORPERSONALSAFET~
Remove house fuse or open circuit
plug with this appliance.
breaker
before beginning
installation.
Do not use an extension
cord or adapter
GROUNDING
INSTRUCTIONS--Power
Cord Models
This appliance must be grounded. In the event of a malfunction or breakdown, grounding will reduce the risk of
electric shock by providing a path ofleast resistance for electric current. This appliance is equipped with a cord
having an equipment-grounding
conductor and a grounding plug. The plug must be plugged into an appropriate
outlet that is installed in an accordance with all local codes and ordinances.
A WARNING!
Improper connection of the equipment-grounding
conductor can result in a risk of electric shock .Check with a qualified
electrician or service representative if you are in doubt wether the appliance is properly grounded. Do you modify the plug
provided with the appliance; Hit will not fit the outlet, have a proper outlet installed by a qualified electrician.
GROUNDING
INSTRUCTIONS--Cable
Direct
This appliance must be connected to a grounded metal, permanent wiring system ,or an equipment-grounding
conductor must be run with the circuit conductors and connected to the equipment-grounding
terminal or lead on
appliance.
ELECTRICAL REQUIREMENT
This dishwasher is designed for operation on an adequately wired individual 120VAC, 60HZ, and connected to an
individual, properly grounded branch circuit, protected by a 15 or 20 amp circuit breaker or time-delay fuse.
lf the electric supply provided does not meet the above specifications,
it is recommended
that a licensed electrician
install an approved outlet.
Your dishwasher circuit should not be used for any other appliance while the dishwasher is in operation as the
dishwasher requires the full capacity ofthe circuit.
lf the wall socket you plug the dishwasher's
power cord into is controlled by a switch, turn off the switch before
installation.
1 The power-supply
socket for the appliance shall be
installed in a cabinet or on a wall adjacent to the
undercounter
space in which the appliance is to be
installed.
2 There shall be an opening through the partition
between the compartments specified in 1 that is .
large enough for the attachment plug to pass through.
The longest dimension of the opening shall not be
more than 38mm.
3 The edges of the opening specified in 2 shall, ifthe
partition is wood, be smooth and rounded, or, if the
partition is metal, be covered with an edge protector
provided for this purpose by the manufacturer;
and
4 Care shall be exercised, when the appliance is
installed or removed, to reduce the likelihood of
damage to the power-supply
cord.
Figure 8
ELECTRICAL
CONNECTION
Electrical connection is on the right front of dishwasher.
For cable direct connections the cable must be routed as shown. Cable must extend a minimum of24" from the rear
wall. For power cord connections, install a 3-prong grounding type receptacle in the sink cabinet rear wall, 6" min.
Or 16" max. From the opening, 6" to 16" above the floor.
3
Installation
Instructions
ADJUST DOOR BALANCE
PREPARE WATER LINE
The line may enter from either
the shaded area.
side, rear or floor
Our company have adjusted door balance well. If you
do not satisfy the tension of spring or after installing
the door panel, you may adjust the spring
* if door drops open when released, increase spring
tension. If door closes when released, decrease tension.
within
The line may pass through the same hole as the eledtrical
cable and drain hose. Or, cut an additional.
Ifpower cord
with cord with plug is used, water line must not pass
through power cord hole.
-----,1/
I,
I '
I
"
/f' f / ,
=====£t
I
//
,
I
~:~n"
o;~: 5"j-
II Shut-off. Hole
~ Valve,.}
(
HODI=
= = =c::r_-_-_,
H
Increase
Spring
,
4~"+5'~: ,4" ",
-I
Spring
'Ienston
1-- -,
--------
I
:: 2
From
Cabine
,T
;- t~:::~~.
,
/1
/
~
I
----t------
I
I
19" From Wall
K
2" From Floor
Cabinet
Face--
Figure 10
Figure 9
WATER LINE CONNECTION
ADJUSTMENT
Note to Consumer
If door does not open easily or fall too quickly, you
should adjust the tension of door spring. Pull out bolt
and insert it into lower or higher hole, the spring
tension will be increase or decrease. If you do not
satisfy the tension still, repeat the process.
Midea dishwasher
could use both hot water and cold wate
.
* Turn off the water supply.
* We suggest you installing a hand shut-off
valve in an
accessible location, such as under the sink.
* Water connection is on the left side of the dishwasher.
Install the hot water inlet line, using no less than 3/8"
O.D. Copper tubing. Route the line as shown and extend
forward at least 19" from rear wall.
* Flush water line to clean out debris.
* The water pressure must be O.04~1 Mpa.
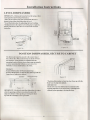
REMOVE TOEKICK
Remove
the toe kick.
Figure 11
4
Installation
Instructions
INSTALL POWER CORD
POSITION WATER LINE
AND HOUSE WIRING
Skip this step if dishwasher
will be direct wired or has
a factory installed power cord.
The power cord and connections
must comply with
the National Electrical
Code, Section 422 and/or
local codes and ordinances.
A
Position water supply line and house wiring on the
floor ofthe opening to avoid interference
with base of
dishwasher
and components
under dishwasher.
C
Remove
Junction Box
Cover
Insert Power
Cord Wires Thr
Strain Relief
{D-~"d_::::~---i
B
Check That White, Black and
Green Dishwasher Wires Are Threaded
Thru Small Hole in Bracket
D
UseULListed
Wire Nuts
Figure 12
Figure 13
* Connect incoming
power cord white (or ribbed) to
dishwasher
white, black (or smooth) to black and
Ground to dishwasher
green wire. Use UL listed wire
nuts of appropriate
size.
* Replace j unction box cover. Be sure wires are not
pinched under the cover.
INSERT DRAIN HOSE AND
CONNECT WATER LINE
SLIDE DISHWASHER INTO CABINET
Upright the dishwasher
and position in the front of
opening. Insert drain hose into cabinet wall hole.
If a power cord is used, guide the end through a
separate hole.
DO NOT PUSH AGAINST FRONT PANEL WITH KNEES.
DAMAGE WILL OCCUR.
Slide dishwasher
into the opening a few inches at a time.
Figure 15
As you proceed, pull the drain hose through the opening
under the sink. Stop pushing when the dishwasher is a few
inches forward of adjacent cabinetry.
Make sure drain hose is not kinked under the dishwasher
and there is no interference
with the water line and wiring
or any other component.
Figure 14
Connect
the water line of dishwasher
into user water line.
5
I
Installation
Instructions
LEVEL DISHWASHER
IMPORTANT-- Dishwasher must be level for proper dish
rack operation and wash performance.
* Place level on door and rack track inside the tub as
shown to check that the dishwasher is level.
* Level the dishwasher by adjusting the four leveling.
* If adjustment to the right rear leveling leg is required,
loosen junction box bracket screw and rotate bracket
clockwise.
Check
Level
Front
to Back
t~k~~~~~~
Check Level
"'==..JT:c:--"\----j
\,rI
Side To Side
Turn Legs
to Adjust
Figure 16
Figure 15
POSITION DISHWASHER,
SECURE TO CABINET
The dishwasher must be secured to the countertop or
the cabinet sides. When countertops are made of wood
use Method 1. Some models are supplied with side
mounting brackets for use when countertops are granite
or other materials that will not accept screws. Use
Method 2 to secure dishwasher at the sides.
Method 1
Secure Dishwasher
To Wood countertop
Position dishwasher so that the door lines up with the
front face of adjacent cabinet.
Brackets
Wood Countertop
~
:
:
je
je
Figure 17
Figure 18
/
~~~r
* Position dishwasher
front face of adjacent
3/4"
so that the door lines up with the
cabinet.
IMPORTANT:
Check to be sure the dishwasher is centered in the
opening and there is no interference with adjacent
cabinets when opening or closing the door
IMPORTANT--Check
to be sure the dishwasher is center
ed in the opening and there is no interference with
adjacent cabinets when opening or closing the door
top with the 2 Phillips screws provided ..
6
Installation
CONNECT
Instructions
WATER SUPPLY
90
IMPORTANT-- Check to be sure that dishwasher does. not rub or
contact the fill hose or water supply line.
*Wrap 90· Elbow with thread seal tape.
* Install a 90· elbow onto the water valve.
*Do not over tighten 90° elbow, water valve bracket could bend
or water valve fitting could break.
*Position the end of the elbow to face the left.
*Connect water supply line to 90° elbow.
Ifwater supply line could not be connected to 90° elbow directly,
with a ferrule and compression nut.
*Slide compression nut, then ferrule over end of water line.
*Insert water line into 90° elbow.
*Slide ferrule against elbow and secure with compression nut.
7
0
Elbow
Thread
Figure 19
Seal Tape
Installation
CONNECT
FOLLOW
Instructions
DRAIN LINE
ALL LOCAL CODES AND ORDINANCES.
If a longer drain hose is required, add up to 42 /I oflength for a total of 10 ft. length to the factory installed
hose. Use 5/8" or 7/8" inside diameter hose and a coupler to connect the two hose ends. Secure the
connection with hose clamps.
-=1JCQ~P
Hose Clamp
Figure 20
* Secure the drain hose to the air gap, waste tee or disposer with clamps.
NOTE: TOTAL DRAIN HOSE LENGTH
MUST NOT EXCEED
10 FEET FOR PROPER
DRAIN OPERATION.
* Connect drain line to air gap, waste tee or disposer using either previously determined
Method
1--Air gap with waste tee of disposer
Figure 22--air gap with disposer
Figure 21--air gap with waste tee
Figure 23--waste
Figure 24--disposer
tee
.-
IMPORTANT
If drain plug of disposer or waste tee has not been
removed, the dishwasher will not drain.
Remove
Hopper
Plug
-4J
~
Disposer
Waste tee
Figure 25
8
method.
Installation
Instructions
CONNECT POWER SUPPLY
PRE-TEST CHECK LIST
Skip this step if equipped with power cord
verify that power is turned off at the source.
Review this list after installing your dishwasher
to avoid
charges for a service call that is not covered by your
warranty
1 Remove junction
box cover.
2 Secure house wiring to the back ofthe
box with a strain relief.
o Check
back junction
D Open door and rEmove
3 Locate the three dishwasher
wires, (white, black and
Green) with stripped ends. Insert dishwasher
wires
through the small hole in the junction box. Use wire
nuts to connect incoming ground to green, white to
white and black to black.
D Locate
Manual
packaging.
in the literature
for operating
package.
Instruction.
D Check door opening and closing. If door does not
open and close freely or tends to fall, check spring
cable routing.
D Check to be sure that wiring is secure under the
Dishwasher,
not pinched or in contact with door
springs or other components.
A
C
Remove
Junction Box
Cover
Insert Power
Cord Wires Thru
Strain Relief
and Tighten
D Check door alignment
level dishwasher
·--------------------l
Ground
------
~
:
with tub. If door hits tub,
D Pull lower rack out, about halfway.
Check to be sure
it does not roll back or forward on the door. If the rack
moves, adjust leveling legs.
Black
'
B
Check That White, Black and
Green Dishwasher Wires Are Threaded
Thru Small Hole in Bracket
D Check door alignment
reposition dishwasher
D
with cabinet.
If door hits cabinet,
D Check that door spring does not contact
fill hose, wiring or other components.
Use UL Listed
Wire Nuts
Figure 26
A
all foam and paper
the ownerD s Manual
D Read the ownerDs
4 Replacejunction
box cover. Check to be sure that
wires are not pinched under the cover
([]
to be sure power is OFF
water line,
D Verify water supply and drain lines are not kinked
in contact with other components.
Contact with
motor or dishwasher
frame could cause noise.
WARNING!
DAdd 1.5 quarts of water to the bottom ofthe
dishwasher
to lubricate the pump seal.
Ifhouse wiring is not 2-wire with ground, a ground must
be provided by the installer. When house wiring is
aluminum, be sure to use UL Listed anti-oxidant
compound and aluminum -to-copper Connectors
D Turn on water supply. Check for leaks. Tighten
connections
if needed.
9
or
Installation
DISHWASHER
o Turn
WET TEST
on power supply(or
if equipped)
Instructions
REPLACE TOEKICK
plug power cord into outlet,
o Start with normal wash.
o Check to be sure that water
enters the dishwasher
Ifwater does not enter the dishwasher,
check to be
sure that water and power supply is turned on.
o Check
for leaks under the dishwasher.
If leak is
found, turn power supply off, then tighten connections
Turn on power again after leak is corrected.
o Check
for leaks around the door. A leak around the
door could be caused by door rubbing or hitting
against adjacent cabinetry Reposition
the dishwasher
if necessary
o Check
drain lines when draining. If leaks are found,
turn power of f, correct as necessary.
o When
draining is over ,open dishwasher
door and
make sure water has drained. If not, check that
disposer plug Has been removed and/or air gap is
not plugged.
Align the toekick with the bottom
is against the floor.
o Let
dishwasher
run through another fill and drain
cycle. Check again for leaks and correct as required.
LITERATURE
Be sure to leave complete literature e package and
installation instructions with the consumer.
10-----------------
edge and make sure it
Instruction Manual
PN 17-1021
WQP8-9122
o:
.,
~
MAJESTIC APPLIANCES DIV OF MSI
3201 Northwest Lower River Road, #9, Vancouver, WA 98660 USA
WWW.majesticappliances.com
Safety Information
I
We& You,
A Service Partnership
Thank you for buying this product. As a home
appliances producer, we are proud of our quality
products and we are committed to providing dependable
service. We are able to utilize our global resources in
creating innovation that makes housework lighter and
easier, and provide a truly comfortable home for you to
relax and enj oy.
Read this Msnual
This manual contains sections of Safety
Instructions,Operating
Instructions,
Installation
Instructions
and Troubleshooting
Tips etc. Carefully reading it before using the
dishwasher will help you to use and maintain
the dishwasher properly.
Before Calling for Service
Operating Instructions
Control Panel
Dishwasher Features
Wash Cycle Table
Detergent Dispenser
Rinse Aid Dispenser.
Loading the Dishwasher Rack
Turning On the Appliance
Filtering System
Caring for the Dishwasher
2
2
3
5
5
6,7
7
8
8,9
To review the section on Troubleshooting
Tips
will help you to solve some common problems
by yourself and not need to ask for the hel p of
professional
technicians.
[fYou Need Service
If you can not solve the problems by yourself
after reading the section of Troubleshooting
Tips.please contact the professional
technicians of the service center. We are happy
to help you with your questions,24
hours a
day,7 days a week.
Troubleshooting Tips
Before calling for service
10,11
IMPORTANT SAFETY INFORMATION
READ ALL INSTRUCTIONS BEFORE USING
When using your disbwasber, follow the below basic precautions.
A
WARNING! HYDROGEN GAS IS EXPLOSIVE
Under certain conditions, hydrogen gas may be produced in a hot-water system that has not been used for two
weeks or more. HYDROGEN GAS IS EXPLOSIVE.
If the hot-water system has not been used for such a period, before using the dishwasher turn on all hot-water
faucets and let the water flow from each for several minutes. This will release any accumulated hydrogen gas.
As the gas is flammable,
do not smoke or use an open flame during this time.
GROUNDING INSTRUCTIONS
Power Cord Models
This appliance must be grounded. In the event of a malfunction or breakdown, grounding will reduce the risk
of electric shock by providing a path of least resistance for electric current. This appliance is equipped with a
cord having an equipment -grounding conductor and a grounding plug. The plug must be plugged into an
appropriate outlet that is installed in an accordance with all local codes and ordinances.
A WARNING!
Improper connection of the equipment-grounding
conductor can result in a risk of electric shock .Check with a qualified
electrician or service representative
if you are in doubt wether the appliance is properly grounded. Do you modify the plug
provided with the appliance; If it will not fit the outlet, have a proper outlet installed by a qualified electrician.
Cable Direct
This appliance must be connected to a grounded metal, permanent wiring system ,or an equipment-grounding
conductor must be run with the circuit conductors and connected to the equipment-grounding
terminal or lead
on appliance.
A
WARNING! PROPER USE
Do not abuse, sit on, or stand on the door or dish
rack of the dishwasher.
Do not operate your dishwasher unless all
enclosure panels are properly inplace. Open the
door very carefully if the dishwasher is operating,
there is a risk of water squirting out.
Do not touch the heating element during or
immediately after use.
Do not place any heavy objects of stand on the door
when it is open. The appliance could tip forward.
Do not wash plastic items unless they are marked
dishwasher safe or the equivalent. For plastic
items not so marked, check the manufactures
recommendations.
When loading items to be washed:
1) Locate sharp items so that they are not likely to
damage the door seal;
2) Load sharp knives with the handles up to reduce
the risk of cut-type injuries.
Use only detergent and rinse additives designed
for an automatic dishwasher. Never use soap,
laundry detergent, or hand washing detergent
in your dishwasher. Keep these products out of
children.
Keep child away from detergent and rinse aid, keep
child away from the open door of the dishwasher,
there could still be some detergent left inside.
The door should not be left in the open position
since this could present a tripping hazards.
When using your dishwasher, you should prevent
plastic item from contacting with heating element.
II
If the supply cord is damaged, it must be replaced
by the manufacturer
or its service agent or a
similarly qualified person in order to avoid a
hazard.
11
Please dispose of packing
During installation, the power supply must not
be excessively or dangerously bent or flattened.
properly.
Use the dishwasher only for its intended function.
Remove the door to the washing compartment when
removing an old dishwasher from service or discarding it.
To reduce the risk os injure, do not allow children to
play in or on a dishwasher.
materials
11
Do not tamper with controls.
READ AND FOLLOW THIS SAFETY INFORMATION CAREFULLY
SAVE THESE INSTRUCTIONS
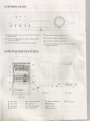
CONTROL PANEL
o
1
~
~C:=:====~~~~6=~=~~~==~
7
1
Power ON Light: To come on when the ON/OFF Button is
pressed down.
2
Rinse Aid Warning Light: To come on when dispenser
needs to be refilled.
3
0
/OFF Button: To turn on/off the power supply.
DISHWASHER
FEATURES
2
4
Rapid Button:
S
Plus Button:
6
Door Handle:
7
Washing Program Selector:
to select wash cycles.
Only used with cycle")'
Only used with cycle
",
"0" .
Pull it to open the door.
Turn the knob clockwise
~
WASH CYCLE TABLE
Program
Cycle
Normal
0
Plus
Button
ormal Wash
(lEe-EN 50242)
Intensive
0
ormal Wash
~
Economic
"---./
"---./
Light Wash
Rinse
/11j»
Rapid
Button
Description
of Cycle
Detergent
pre/main
For normally soiled loads,
such as pots, plates,glasses
and lightly soiled pans.
standard daily cycle.
Pre-rinse
Wash (60 "C)
Rinse
Rinse (72 "C)
Drying
4/20 gr.
For the heaviest soiled loads,
such as pots,pans,casserole
dishes and dishes that have
been sitting with dried food
on them for a while.
Pre-rinse( 50 "C)
Wash (60 "C)
Rinse
Rinse
Rinse (72 "C)
Drying
4120 gr.
For lightly soiled loads,such
as plates,glasses,bowls
and
lightly soiled pans.
Wash (60 "C)
Rinse
Ri nse (72 "C)
Drying
Cycle Selection
Information
2
2
Rinse
Rinse (68 "C)
DrYing
For lightly soiled loads,
such as glasses, crystal and
fine china.
Rinse (45 "C)
Rinse (7? "C)
Drying
15 gr.
A shorter wash for lightly
soiled loads that do not
need drying.
Rinse(45 "C)
Rinse (50 "C)
Drying
15 gr.
To rinse dishes that you
plan to wash later that day .
Pre-rinse
Glassware
Rapid
20 gr.
For dishes that need to be
rinsed and dried only.
Rinse
Glass
Rinse
Aid
Glassware
Soak
:::9
. . ..
Soak
WASH CYCLE ADJUSTMENT BUTTONS
Plus Button
This button (see" Control panel" ) is used with the normal cycle in the case where pots and pans with dry caked-on food must be
washed.
This is not recommended
for delicate items in so far as the high temperature could make their surfaces opaque or lighten
decorative colors after repeated washing.
Rapid Button
This button (see" Control panel" )when pressed with wash cycle 4(glassware)makes
temperature (50°C) and eliminates the drying phase.
it possible
to run the wash cycle at a lower
.
Overflow Protection
Your Midea dishwasher has an overfill protection device which could automatically
shuts off the inlet valve and starts the drain
pump if the water overflow. If this occurs, turn off the main water supply before calling a service. Ifthere is water in the base pan
because of an overfill or small leak, the water should be removed before restarting the dishwasher.
3
DETERGENT
DISPENSER
The dispen er must be refilled before the start of each wash cycle according to the instructions provided in the" Wash Cycle
Table" .Our dishwashers use less detergent and rinse aid than conventional
dishwashers.
Generally, only one tablespoon of
detergent is needed for a normal wash load. Also, more heavily soiled items need more detergent. Always add the detergent just
before tarting dishwasher, otherwise it could get damp and will not dissolve properly.
Amount of Detergent to Use
THE WATER ISN'T TOO HARD, YOU MAY ALSO PREVENT THE FORMATION OF DEPOSITS BY ADDING DETERGENT
e amount of detergent needed can vary due to differences in water hardness. To determine the water hardness in your area, contact
_0
local water utility or area water softening company. The harder the water, the more detergent you may need. Remember, you
." ould adjust the amount of detergent you use by little by little until you find the correct amount.
2
3 4
Removing
Hard Water Spots
From Dishes
1 Main
2
3
4
5
6
To remove hard water spots, try the following:
Run dishes through a normal wash program.
Remove all metal dishware, such as cutlery, pans, etc.,
from the dishwasher.
Do not add detergent.
Pour two cups of vinegar into a bowl and set the bowl face
up on the lower rack of the dishwasher.
Run the dishes through a normal wash program.
If this doesn't work, try the same process with 1 4 cup of
citric acid crystals instead of vinegar.
Wash Detergent
Dispenser
Prewash
RinseAid
Lid lever
Detergent
Proper Use of Detergent
Compartment
Level Indicator
Use only detergent specifically made for u e in di hwashers.
Keep your detergent fresh and dry. Don' put powder
detergent into the dispenser until You're ready to wash
dishes.
Rinse Aid Compartment
Detergent
Compartment
Lid
A WARNING!
Dishwasher
detergent
RINSEAID
is corrosive!
Take care to keep it out of reach of children.
DISPENSER
The rinse aid is released during the final rinse to prevent water
from forming droplets on your di hes that can leave spots and
streaks. It also improves drying by allowing water to "sheet"
off the dishes.
Our dishwashers are designed to use liquid rinse aids. The
rinse aid dispenser is located inside the door next to the
detergent dispenser. To fill the dispenser, open the cap and
pour the rinse aid into the dispenser until the level indicator
turns completely black. The dispenser holds about 100 ml of
liquid rinse aid.
To open the dispenser, turn the cap to the "open" (left)
arrow and lift it out.
Pour the rinse aid into the dispenser, being careful not
to overfill.
Replace the cap by inserting it aligned with "open" arrow
and turning it to the "close" (right) arrow.
Be careful not to overfill the dispenser, because this could
cause over sudsing. Wipe away any spills with a damp cloth.
Don't forget to replace the cap before you close the
dishwasher door.
If you have soft water, you may not need rinse aid for it may
cause a white film to develop on your dishes.
<7
Adjusting Rinse Aid Dispenser
A measured amount of rinse aid is released during the final rinse. As with
detergent, the amount of rinse aid needed for your dishes depends on the
hardness of the water in your area. Too much rinse aid can result in lather of
foaming and cause cloudiness or steaks on your dishes. If the water in your
area is very soft, you may not need rinse aid. If you do, you can dilute the
rinse aid with an equal amount of water.
The rinse aid dispenser has six settings. Always start with the dispenser set
on" I ". If spots and poor drying are problems, increase the amount of rinse
aid dispensed by removing the dispenser lid and rotating the dial to "2". If the
dishes still are not drying properly or are spotted, adjust the dial to the next
higher number until your dishes are spot-free. We suggest you to set on "4" .
When to Refill the Rinse Aid Dispenser
If there is no rinse aid warning light in the control panel, you can judge the amount of rinse aid by the following means. The
black dot on the rinse aid dispenser indicates the amount of rinse aid in the dispenser. As the rinse aid diminishes, the size of
the black dot decreases. You should never let the rinse aid get below 1/4 full.
\\1//
As
aid
•
~
the rinse aid diminishes, the size of the black dot on the rinse
level indicator changes, as illustrated below.
Full
3/4 full
@ 1/2full
1/4 full- Should refill to eliminate spotting
Empty
o
o
Loading the Dishwasher Racks.
For best periotmsnce of the dishwasher, follow these loading guidelines. Features and appearance of racks and
silverwere baskets may vary from your model.
How to use the Upper Rack
The upper rack is designed to hold more delicate and lighter dishware such as glasses, coffee and tea cup and saucers,
as plates, small bowls and shallow pans(as long as they are not too dirty).
Position the dishes and cookware so that they do not get moved by the spray of water.
The upper rack can be adjusted for height by putting wheels of different height into the rails.
1 Cups
2 Small
3 Large
serving bowl
serving bowl
4
Glasses
5
Saucers
6
Dish
7
Plates
s
as well
How to use the Lower Rack
We recommend that you place large items which are most difficult to clean into the lower rack: pots, pans, lids,
serving dishes and bowls, as shown in the figure to the right.
It is preferable to place serving dishes and lids on the side of the racks in order to avoid blocking the rotation ofthe
top spray arm.
Pots, serving bowls, etc, must always be placed top down.
Deep pots should be slanted to allow water to flow out.
The bottom rack feature fold down tine rows so that larger or more pots and pans can be loaded.
1
2
1
>z:
>z:
7
:7
:7
:oz:::
?
"'"
Oval platter
Dinner plates
3
Soup plates
4
Dessert dishes
:5
Silverware
basket
SILVERWARE BASKET
Silverware should be placed in the silverware basket with handles at the bottom: If the rack has side baskets, the spoon should
be loaded individually into the appropriate slots, especially long utensils should be placed in the horizontal position at the
front of the upper rack.
1 4
1 4
1 4
5
5
5
2
1 4
1 4
4 4
5
5
5
2
7
4
8 3
1 3
5
5
3
2
1 3
1 3
6 3
3
3
2
6
2
2
2
2
~
Soup spoons
5
6
3
Dessert
7
Gravy ladle
4
Teaspoons
8
Serving fork
i
Forks
spoons
Knife
Serving spoon
A WARNING!
Do not let any item extend through bottom.
TURNING ON THE APPLIANCE
Starting a wash cycle ...
Make sure that the plug for the appliance
is inserted
into the wall socket.
Z
Make sure that the water supply is turned on to full pressure.
A
Load the dishwasher(see
Pour in the detergent(see
the section entitled,
the section entitled,
" Loading the Dishwasher"
).
" Salt, Detergent and Rinse Aid" ).
5
Turn the knob located on the right of the control panel in the clockwise direction until the number or the symbol for the cycle
setting is aligned with the reference mark (see the section entitled, " Wash Cycle Table" ).
6
Press the ONI OFF button, and the ONIOFF light will turn on. At this point, the wash cycle will begin.
6
Canceling or modifying
a wash cycle setting ...
Premise:
A cycle that i underway can only he modified if it has only been
have already been relea ed. and the appliance may have already drained the
must be refilled ( ee the paragraph entitled" Loading the Detergent").
Press the 0
OFF burton. and the 0 light will turn off. Rotate the knob in
the section entitled."
rarting a wash cycle ... " ). Then, turn the dishwasher
running for a short time. Otherwise, the detergent may
wash water. If this is the case, the detergent dispenser
the clockwise direction to the desired cycle setting (see
back on using the on the ON/OFF button.
At the End oftbe Wash Cycle
When the knob stops turning and is aligned with a STOP mark(see figure), the cycle has finished.
Turn off the appliance using the ON/OFF button, shut off the water supply and open the door of
the dishwasher. Wait a few minutes before unloading the dish washer to avoid handling the
dishes and utensils while they are still hot and more susceptible to breakage. They will also dry
better.
Forget to Add a Dish?
A forgotten dish can be added any time before the detergent cup opens.
1 Pull the door handle.
2 Do not open the door until the water spray action stops. Steam may rise out of the dishwasher.
3 Add forgotten dishes.
4 Push the door to close it. When the door is close rightly a click will be sound.
FILTERING SYSTEM
For your convenience,
we have placed the drain pump and filtering system within easy reach inside the tub. There are three
components of the filtering system: the main filter, the coarse filter, and the fine filter.
1 Main
filter
Food and soil particles trapped by this filter are pulverized
spray arm and washed down the drain.
1
2
3
by a special jet on the lower
2
Coarse filter
Larger items, such as pieces of bone or glass, that could clog the drain are trapped in the
coarse filter. To remove an item caught in this filter, gently squeeze the tabs on top of this
filter and lift it out.
3
Fine filter
This filter holds soil and food residue in the sump area and prevents
redeposited on the dishes during a cycle.
it from being
CARING FOR THE DISHWASHER
10 clean the control panel use a lightly dampened cloth then dry thoroughly. To clean the exterior use a good
appliance polish wax.
Never use sharp objects, scouring pads or harsh cleaners on any pett oi the dishwasher.
Protect Against Freezing
If your dishwasher is left in an unheated place during the winter, ask a service technician to:
1Cut off electrical power to tbe dishwasher.
4 Reconnect
the water inlet pipe to the
water valve.
Remove fuses or trip circuit breaker.
2 Turn off the water supply and disconnect
the
water inlet pipe from the water valve.
3 Drain water from tbe inlet pipe and water valve.
(Use a pan to catch the water.)
7
5 Remove
the plastic sump cover in the
tub the bottom and use a sponge to
soak up water in rubber boot.
Cleaning the Spray Arms
It is necessary to clean the spray arms regularly for hard water chemicals will clog the spray armjets and bearings. To remove the
spray arm, screw off the nut to take out the washer on top of the spray arm and remove the arm. Wash the arms in soapy and warm
water and use a soft brush to clean the jets. Replace them after rinsing tbem thoroughly.
Cleaning the Filters
------------------
Filter assembly
For best performance and results, the filter assembly must be cleaned.
The filter efficiently removes food particles from the wash water, allowing it to be recirculated
during the cycle. For this reason, it is a good idea to remove the larger food particles trapped in
the filter after each wash cycle by rinsing tbe semicircular
filter and cup under running water.
To remove the filter assembly, pull on the cup handle in the upward direction. The entire filter
assembly should be cleaned at least once a month.
To clean the coarse filter and tbe fine filter, use a cleaning brush. Then, reassemble the filter
parts as shown in the figures left and reinsert the entire assembly in the dishwasher,
positioning in its seat and pressing downward.
The dishwasher must never be used without the filters. Improper replacement of the filter may
reduce the performance
level of the appliance and damage dishes and utensils.
A WARNING!
. Tever run the dishwasher
without the filters in place.
Cleaning the Door
(~------------~
1
To clean the edge around the door, you should use only a soft warm, damp rag. To prevent
penetration of water into the door lock and electrical components, do not use a spray cleaner
of any kind.
Also, never use abrasive cleaners or scouring pads on the outer surfaces because they will
scratch the finish. Some papers towels can also scratch or leave marks on the surface.
A WARNING!
ever use a spray cleaner to clean the door panel fgr it could damage the door lock and electrical components. It is not allowed to
use the abrasive agent or some paper towel because of the risk of scratching or leaving spots on the stainless steel surface.
Cleaning the Drain Pump
Something will occasionally
move into the filters and the drain pump. If this occurs, the drain pumps
employed in our dishwashers are designed to automatically
reverse, ejecting the item back into the
sump area or down the drain. If you have to remove an obstacle from the drain pump, before you
remove the filters, you should turn off the power; Then remove the small black insert from the sump
area. (You might want to remove any standing water first). Scoop out the item that is probably in the
sump area and causes the obstruction. Remember to replace the black insert before you put the filters
back in.
How to Keep Your Dishwasher
in Shape
After Every Wash
When You Go on Holiday
After every wash, turn offthe water supply to the appliance
and leave the door slightly ajar so that moisture and odors
are not trapped inside.
When you go on holiday, it is recommended
that you run a
wash cycle with the dishwasher empty and then remove
the plug from the socket, turn off the water supply and
leave the door of the appliance slightly ajar. This will help
the seals last longer and prevent odors from forming
within the appliance.
No Solvents or Abrasive
Products
Cleaning
To clean the exterior and rubber parts of the dishwasher, do
not use solvents or abrasive cleaning products. Rather, use
only a cloth and warm soapy water. To remove spots or
stains from the surface of the interior, use a cloth dampened
with water and a little white vinegar, or a cleaning product
made specifically for dishwashers.
Seals
One of the factors that cause odors to form in the
dishwasher is food that remains trapped in the seal
Periodic cleaning with a damp sponge will prevent this
from occurring.
BEFORE CALLING FOR SERVICE
'Iioublesbooting Tips
Review the charts on the following pages may make you be free of calling for service.
'What To Do
Problem
Possible Causes
Dishwasher doesn't
nm
Fuse blown, or the
circuit breaker acted
Replace fuse or reset circuit breaker. Remove any other
appliances sharing the same circuit with the dishwasher
Power supply is not
turned on
Make sure the dishwasher is turned on and the door is
closed securely.
Make sure the power cord is properly plugged into the
wall socket.
Water pressure is low
Check that the water supply is connected properly and
the water is tumed on.
Drain pump doesri t
stop
Overflow
The system is designed to detect an overflow. When it
does, it shuts off the circulation pump and turns on the
drain pump.
Noise
Some audible sounds are
normal
Sound from soft food shredding action and detergent cup
opening.
Utensils are not secure
in the baskets or something
small has dropped into
the basket
To ensure everything is secured in the dishwasher.
Motor hums
Dishwasher has not been used regularly. If you do not use it
often, remember to set it to fill and pump out every week,
which will help keep the seal moist.
Improper detergent
Use only the special dishwasher detergent to avoid suds.
Suds in the tub
If this occurs, open the dishwasher and let suds evaporate.
Add 1 gallon of cold water to the tub. Close and latch the
dishwasher, then drain out the water by slowly tuming the
Dial until a drain period is reached. Repeat if necessary.
Spilled rinse agent
Always wipe up rinse agent
spills immediately.
Stained tub interior
Detergent with
colorant was used
Make sure that the detergent is the one without colorant.
Dishes are not dried
Rinse agent dispenser
is empty
Make sure that the rinse agent dispense is filled.
Dishes and flatware
not clean
Improper program
Select stronger program
Improper rack loading
Make sure that the action of the detergent dispenser and
spray arms are not blocked by large dishware.
Spots and filming
on glasses and
flatware
1Extremely hard water
2 Low inlet
temperature
3 Overloading the
dishwasher
4 Improper loading
5 Old or damp powder
detergent
6 Empty rinse agent
dispenser
7 Incorrect dosage of
detergent
To remove spots from glassware:
1Take out all metal utensils out of the dishwasher.
2 Do not add detergent.
3 Choose the longest cycle.
4 Start the dishwasher and allow it to run for about
18 to 22 minutes, then it will be in the main wash.
5 Open the door to pour 2 cups of white vinegar
into the bottom of the dishwasher.
6 Close the door and let the dishwasher complete
the cycle. If the vinegar does not work: Repeat
as above, except use 114cup (60 ml)of citric acid
crystals instead of vinegar.
BEFORE CALLING FOR SERVICE ...
Problem
Possible Causes
What To Do
Cloudiness on
glassware
Combination of soft
water and too much
detergent
Use less detergent if you have soft water and select a
shortest cycle to wash the glassware and to get them clean.
Yellow or brown film
on inside surfaces
Tea or coffee stains
using a solution of 1/2 cup of bleach and 3 cups warm water
to remove the stains by hand.
A
WARNING
You have to wait for 20 minutes after a cycle to let the heating
elements cool down before cleaning interior; otherwise, bums
will happen.
Iron deposits in water
can cause an overall film
You have to call a water softener company for a special filter.
White film on inside
surface
Hard water minerals
To clean the interior, use a damp sponge with dishwasher
detergent and wear rubber gloves. ever use any other cleaner
than dishwasher detergent for the risk offoarning or suds.
Detergent left in
dispenser cups
Dishes block detergent
cups
Re-Ioading the dishes properly.
Steam
Normal phenomenon
There is some steam coming through the vent by the door
latch during drying and water draining.
Black or gray
marks on dishes
Aluminum utensils have
rubbed against dishes
Use a mild abrasive cleaner to eliminate those marks.
Water standing in
the bottom of the tub
This is normal
A small amount of clean water around the outlet on
the tub bottom at the back of the tub keeps the water
seal lubricated.
Water doesn't pump
out of the tub
Drain is clogged
Make sure the kitchen sink is draining well.
If the dishwasher drains into a disposer, run it clear.
Dishwasher leaks
Overfill dispenser or rinse Be careful not to overfill the rinse aid dispenser.
aid spills
Spilled rinse aid could cause oversudsing and lead
to overflowing. Wipe away any spills with a damp cloth.
Dishwasher isrl t level
---10
Make sure the dishwasher is level.
WHEN THE DISHWASHER HAS AN OVERFLOW
The dishwasher is designed to detect an overflow. When it does, water in the float container should
be let out. Deal with as follows:
Uninstall the Dishwasher
It is necessary to uninstall the dishwasher when it has an overflow. Before uninstall the dishwasher,
read the INSTALLATION INSTRUCTION carefully.
Remove the toekick.
Loose the countertop mounting brackets from the countertop of the cabinet.
WARNING!
Before uninstall the dishwasher, the power supply should be shut off. And the machine is not on operating.
Pull the Dishwasher
out of the Cabinet
After uninstall the dishwasher, pull it out of the cabinet carefully.
Let out the Water in the Float Container
Pull out the plug from the float container.
Make the water in the float container let out, and with
a cup or an other container to keep the water.
Stuff the hole of the float container with the plug when
all of the water let out.
Install the Dishwasher
/
Float Container
Plug
--11