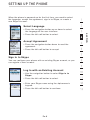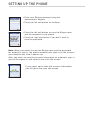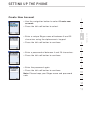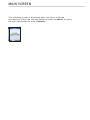
1
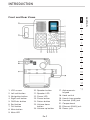
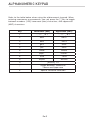
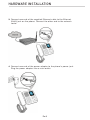
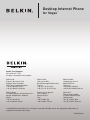
Desktop Internet Phone
for Skype
TM
User Guide
F1PP010EN-SK
SAFETY INSTRUCTIONS
Please read the following instructions carefully before starting to use
the F1PP010EN-SK.
• Always read the safety instructions carefully.
• Keep this User Guide for future reference.
• Keep the unit away from humidity.
• Place the unit on a reliable flat surface before setting it up.
• If any of the following situations arise, have the unit checked by a
service technician:
– The unit has been exposed to moisture.
– Th
e unit has been dropped and damaged.
– The unit has obvious signs of breakage.
•D
o not place the basic unit in a damp room at a distance of less than
1.5m from a water source. Keep water away from the telephone.
•D
o not use the telephone in environments where there is a risk of
explosions.
• Maintain the telephone in an environment-friendly manner.
Note: Skype does not allow emergency calls. Such calls should be
made with a traditional telephone or a mobile phone.
Content
1. INTRODUCTION . . . . . . . . . . . . . . . . . . . . . . . . . . . . . . . . . . . . . . . . . . . . . . . . . . 1
Package Contents . . . . . . . . . . . . . . . . . . . . . . . . . . . . . . . . . . . . . . . . . 1
Front and Rear Views . . . . . . . . . . . . . . . . . . . . . . . . . . . . . . . . . . . . . . 2
2. ALPHANUMERIC KEYPAD . . . . . . . . . . . . . . . . . . . . . . . . . . . . . . . . . . . . . . . . . 3
3. HARDWARE INSTALLATION . . . . . . . . . . . . . . . . . . . . . . . . . . . . . . . . . . . . . . . . 4
4. SETTING UP THE PHONE . . . . . . . . . . . . . . . . . . . . . . . . . . . . . . . . . . . . . . . . . . 6
Select Language . . . . . . . . . . . . . . . . . . . . . . . . . . . . . . . . . . . . . . . . . . 6
Accept Agreement . . . . . . . . . . . . . . . . . . . . . . . . . . . . . . . . . . . . . . . . . 6
Sign In to Skype . . . . . . . . . . . . . . . . . . . . . . . . . . . . . . . . . . . . . . . . . . 6
Log In with an Existing Account . . . . . . . . . . . . . . . . . . . . . . . . . . . 6
Create New Account . . . . . . . . . . . . . . . . . . . . . . . . . . . . . . . . . . . . . . . 8
5. MAIN SCREEN . . . . . . . . . . . . . . . . . . . . . . . . . . . . . . . . . . . . . . . . . . . . . . . . . . . 9
6. MENU SCREEN . . . . . . . . . . . . . . . . . . . . . . . . . . . . . . . . . . . . . . . . . . . . . . . . . 10
7. CONTACTS . . . . . . . . . . . . . . . . . . . . . . . . . . . . . . . . . . . . . . . . . . . . . . . . . . . . . 11
Call a Skype Contact . . . . . . . . . . . . . . . . . . . . . . . . . . . . . . . . . . . . . . 11
Send Voicemail . . . . . . . . . . . . . . . . . . . . . . . . . . . . . . . . . . . . . . . . . . 12
View Profile . . . . . . . . . . . . . . . . . . . . . . . . . . . . . . . . . . . . . . . . . . . . . 12
Advanced Options . . . . . . . . . . . . . . . . . . . . . . . . . . . . . . . . . . . . . . . . 13
Rename a Contact . . . . . . . . . . . . . . . . . . . . . . . . . . . . . . . . . . . . . 13
Remove a Contact . . . . . . . . . . . . . . . . . . . . . . . . . . . . . . . . . . . . . 13
Block/Unblock a Contact . . . . . . . . . . . . . . . . . . . . . . . . . . . . . . . . 14
Request Contact Details . . . . . . . . . . . . . . . . . . . . . . . . . . . . . . . . 14
Add a Contact . . . . . . . . . . . . . . . . . . . . . . . . . . . . . . . . . . . . . . . . . . . 14
8. HISTORY . . . . . . . . . . . . . . . . . . . . . . . . . . . . . . . . . . . . . . . . . . . . . . . . . . . . . . . 16
9. STATUS . . . . . . . . . . . . . . . . . . . . . . . . . . . . . . . . . . . . . . . . . . . . . . . . . . . . . . . . 17
Change Status . . . . . . . . . . . . . . . . . . . . . . . . . . . . . . . . . . . . . . . . . . . 17
Mood Message . . . . . . . . . . . . . . . . . . . . . . . . . . . . . . . . . . . . . . . . . . 18
Select My Profile . . . . . . . . . . . . . . . . . . . . . . . . . . . . . . . . . . . . . . . . . 18
Select Details to Be Shown . . . . . . . . . . . . . . . . . . . . . . . . . . . . . . 18
Private Details . . . . . . . . . . . . . . . . . . . . . . . . . . . . . . . . . . . . . . . . 19
Switch User . . . . . . . . . . . . . . . . . . . . . . . . . . . . . . . . . . . . . . . . . . . . . 19
Sign Out . . . . . . . . . . . . . . . . . . . . . . . . . . . . . . . . . . . . . . . . . . . . . . . . 20
10. SEARCH . . . . . . . . . . . . . . . . . . . . . . . . . . . . . . . . . . . . . . . . . . . . . . . . . . . . . . 21
11. SERVICES . . . . . . . . . . . . . . . . . . . . . . . . . . . . . . . . . . . . . . . . . . . . . . . . . . . . . 22
12. SETTINGS . . . . . . . . . . . . . . . . . . . . . . . . . . . . . . . . . . . . . . . . . . . . . . . . . . . . . 23
General Settings . . . . . . . . . . . . . . . . . . . . . . . . . . . . . . . . . . . . . . . . . 23
Change Password . . . . . . . . . . . . . . . . . . . . . . . . . . . . . . . . . . . . . 24
Content
Auto Sign In . . . . . . . . . . . . . . . . . . . . . . . . . . . . . . . . . . . . . . . . . .
Language . . . . . . . . . . . . . . . . . . . . . . . . . . . . . . . . . . . . . . . . . . . .
Software Updates . . . . . . . . . . . . . . . . . . . . . . . . . . . . . . . . . . . . .
Reset . . . . . . . . . . . . . . . . . . . . . . . . . . . . . . . . . . . . . . . . . . . . . . .
Call Divert . . . . . . . . . . . . . . . . . . . . . . . . . . . . . . . . . . . . . . . . . . . . . .
Call Forwarding . . . . . . . . . . . . . . . . . . . . . . . . . . . . . . . . . . . . . . .
Forward to Voicemail . . . . . . . . . . . . . . . . . . . . . . . . . . . . . . . . . . .
Set Welcome Message for Skype Voicemail . . . . . . . . . . . . . . . . .
Privacy . . . . . . . . . . . . . . . . . . . . . . . . . . . . . . . . . . . . . . . . . . . . . . . . .
Set Allowed Calls . . . . . . . . . . . . . . . . . . . . . . . . . . . . . . . . . . . . . .
SkypeIn Calls . . . . . . . . . . . . . . . . . . . . . . . . . . . . . . . . . . . . . . . . .
Blocked Users . . . . . . . . . . . . . . . . . . . . . . . . . . . . . . . . . . . . . . . .
Tones Setting . . . . . . . . . . . . . . . . . . . . . . . . . . . . . . . . . . . . . . . . . . .
Incoming Call Alert . . . . . . . . . . . . . . . . . . . . . . . . . . . . . . . . . . . .
Ring Tone . . . . . . . . . . . . . . . . . . . . . . . . . . . . . . . . . . . . . . . . . . .
Ring Volume . . . . . . . . . . . . . . . . . . . . . . . . . . . . . . . . . . . . . . . . .
Notification Tones . . . . . . . . . . . . . . . . . . . . . . . . . . . . . . . . . . . . .
Set Keypad Tones . . . . . . . . . . . . . . . . . . . . . . . . . . . . . . . . . . . . .
Time and Date . . . . . . . . . . . . . . . . . . . . . . . . . . . . . . . . . . . . . . . . . . .
Manage Blocked Users . . . . . . . . . . . . . . . . . . . . . . . . . . . . . . . . . . . .
Network . . . . . . . . . . . . . . . . . . . . . . . . . . . . . . . . . . . . . . . . . . . . . . . .
Set Network Type . . . . . . . . . . . . . . . . . . . . . . . . . . . . . . . . . . . . .
25
25
26
26
27
27
28
28
29
29
29
30
30
30
31
31
32
32
33
33
34
34
Phone Settings . . . . . . . . . . . . . . . . . . . . . . . . . . . . . . . . . . . . . . . . . . 35
Brightness . . . . . . . . . . . . . . . . . . . . . . . . . . . . . . . . . . . . . . . . . . . 35
Timeout . . . . . . . . . . . . . . . . . . . . . . . . . . . . . . . . . . . . . . . . . . . . . 35
Information . . . . . . . . . . . . . . . . . . . . . . . . . . . . . . . . . . . . . . . . . . . . . . 36
Advanced . . . . . . . . . . . . . . . . . . . . . . . . . . . . . . . . . . . . . . . . . . . . . . . 37
Software Updates . . . . . . . . . . . . . . . . . . . . . . . . . . . . . . . . . . . . . 37
Network Proxy . . . . . . . . . . . . . . . . . . . . . . . . . . . . . . . . . . . . . . . . 38
Skype Ports . . . . . . . . . . . . . . . . . . . . . . . . . . . . . . . . . . . . . . . . . . 38
Firmware Page Options . . . . . . . . . . . . . . . . . . . . . . . . . . . . . . . . . . . . 39
Firmware Upgrade . . . . . . . . . . . . . . . . . . . . . . . . . . . . . . . . . . . . . . . . 39
Firmware Page Login Password Change . . . . . . . . . . . . . . . . . . . . . . 40
13. Compliances . . . . . . . . . . . . . . . . . . . . . . . . . . . . . . . . . . . . . . . . . . . . . . . . 41
INTRODUCTION
Thank you for purchasing the Belkin Desktop Internet Phone for Skype
F1PP010EN-SK. This phone is designed for making calls over the Internet,
using the Skype ® software. The Belkin Desktop Internet Phone for Skype (the
phone) enables you to use your normal Skype account to make Skype calls
without using a computer.
Note: Please make sure you have a working Internet connection.
Belkin recommends connecting the F1PP010EN-SK to an available LAN port
on a router.
Package Contents
-F1PP010EN-SK Belkin Desktop Internet Phone for Skype
-One handset with curl cord
-One detachable stand
-One Ethernet cable
-One power adapter
-User Manual on CD-ROM
-Quick Installation Guide
En-1
INTRODUCTION
1.
2.
3.
4.
5.
6.
7.
8.
9.
LCD screen
Left soft button
Navigation button
Right soft button
OK/Enter button
End button
Call button
Mute button
Mute LED
section
Front and Rear Views
10.
11.
12.
13.
14.
15.
Speaker button
Speaker LED
Pause LED
Pause button
Return button
V olume down
button
16. Volume up button
En-2
17. A
lphanumeric
keypad
18. Hook switch
19. H ands-free speaker
20. H andset (RJ9) jack
21. Compartment
22. E thernet (RJ45) jack
23. Power jack
ALPHANUMERIC KEYPAD
Refer to the table below when using the alphanumeric keypad. When
entering usernames or passwords, you can press the
key to toggle
between numbers (123), lowercase (abc) characters, and uppercase
(ABC) characters.
Key
Lowercase (abc)
Uppercase (ABC)
1
.,?!-_@1
.,?!-_@1
2
abc2
ABC2
3
def3
DEF3
4
ghi4
GHI4
5
jkl5
JKL5
6
mno6
MNO6
7
pqrs7
PQRS7
8
tuv8
TUV8
9
wxyz9
WXYZ9
0
[SPACE] + 0
*
Toggle between: Numerical/
Lowercase/Uppercase
#
Special character selection
En-3
HARDWARE INSTALLATION
Follow the steps below to install the Desktop Internet Phone for
Skype.
2. C onnect the handset to the handset (RJ9) jack as shown.
En-4
section
1. M ount the stand to the rear of the phone as shown.
HARDWARE INSTALLATION
3. C
onnect one end of the supplied Ethernet cable to the Ethernet
(RJ45) jack on the phone. Connect the other end to the network
router.
4. C
onnect one end of the power adapter to the phone’s power jack.
Plug the power adapter into a main outlet.
En-5
SETTING UP THE PHONE
When the phone is powered up for the first time, you need to select
the language, accept the agreement, sign in to Skype, or create a
new Skype account.
Select Language
• P
ress the navigation button up or down to select
the language of the user interface.
Accept Agreement
• P
ress the navigation button down to read the
agreement.
• Press the left soft button to accept.
Sign In to Skype
You can configure your phone with an existing Skype account, or you
can register a new account.
Log In with an Existing Account
• U
se the navigation button to select Sign in to
Skype.
• Press the left soft button to select.
• E
nter your Skype name using the alphanumeric
keypad.
• Press the left soft button to continue.
En-6
section
• Press the left soft button to select.
SETTING UP THE PHONE
• E
nter your Skype password using the
alphanumeric keypad.
• Press the left soft button to continue.
• P
ress the left soft button to save the Skype name
and the password in the phone.
• P
ress the right soft button if you don’t want to
save the password.
Note: When you select to save the Skype name and the password
for automatic sign in, the phone automatically signs in to the account
you entered every time it powers up.
After you select to save the account information for automatic sign in,
you will be signed in and taken to the main idle screen.
If you select not to save the account information,
you will go to the main idle screen.
SETTING UP THE PHONE
Create New Account
• U
se the navigation button to select Create new
account.
• Press the left soft button to select.
• Press the left soft button to continue.
• Enter a password of between 4 and 20 characters.
• Press the left soft button to continue.
• Enter the password again.
• Press the left soft button to continue.
Note: Please keep your Skype name and password
safe.
section
• E
nter a unique Skype name of between 6 and 32
characters using the alphanumeric keypad.
MAIN SCREEN
The following screen is displayed after you log in to Skype
successfully. Press the left soft button to enter the Menu, or press
the right soft button to enter Contacts.
MENU SCREEN
On the main display, press the left soft button to enter the Menu. Use
the navigation button to select options, and press the left soft button
to select.
• C ontacts: Browse your Skype contacts.
• H
istory: View your missed calls, incoming and
outgoing calls, voicemail, and contact requests.
• A
dd contact: Add Skype users or SkypeOut
numbers to your contact list.
• S earch: Search for Skype users.
• S
ervices: Displays information about your Skype
credit balance, your SkypeIn account, and your
Skype Voicemail.
• S
ettings: Change Time and Date, Tones, Network
Settings, Call Divert, Display Properties, etc.
section
• S
tatus: Change your Skype status (Offline, Online,
Skype Me, Away, Not Available, Do Not Disturb,
Invisible, Switch User, or Sign Out).
CONTACTS
Your Skype contacts are stored in your Skype account. When you
log in with an existing Skype account, all your contacts will be
automatically downloaded to the contact list on the phone.
Call a Skype Contact
• F
rom the main display, press the right soft button
to open the contacts list or press the left soft
button to enter the Menu and select Contacts.
• A list of your Skype contacts appears.
• Press the left soft button to select Options.
• Use the navigation button to select Call.
• Press the left soft button to select.
• Lift the handset and press
button.
• The call will be made.
• T o end the call, hang up the handset and press
button.
Notes:
• I f you do not lift the handset, the phone will automatically go to
hands-free mode.
• Y
ou can also make calls without entering the Options menu. Select
a contact from your contact list and press
button to call.
CONTACTS
Send Voicemail
Use this option to send a voicemail message to the selected contact.
• F
rom the main display, press the right soft button
to open the contacts list or enter the Menu and
select Contacts.
• A list of your Skype contacts appears.
• Press the left soft button to select Options.
• U se the navigation button to select Send Voicemail.
• Press the left soft button to select.
section
View Profile
• G
o to Contacts, use the navigation button to
select the contact whose profile you want to view.
• Press the left soft button to select Options.
• Use the navigation button to select View Profile.
• Press the left soft button to select.
• U
se the navigation button to browse the user
information of the contact.
CONTACTS
Advanced Options
The Advanced options menu enables you to rename, remove, block/
unblock, or add a contact.
• G
o to Contacts, use the navigation button to
select a contact to view.
• Press the left soft button to select Options.
• Use the navigation button to select Advanced.
• Press the left soft button to continue.
Rename a Contact
• U
se the navigation button to select Rename in
Advanced options.
• Press the left soft button to continue.
• E
nter a new name for the contact using the
alphanumeric keypad.
• Press the left soft button to confirm.
Remove a Contact
• U
se the navigation button to select Remove in
Advanced options.
• Press the left soft button to continue.
• Y
ou can select to remove and block the contact,
or remove the contact only.
CONTACTS
Block/Unblock a Contact
• U
se the navigation button to select Block/
unblock in Advanced options.
• Press the left soft button to continue.
• Y
ou can select to block or unblock the selected
contact.
Request Contact Details
• U
se the navigation button to select Request
details in Advanced options.
• Press the left soft button to continue.
Add a Contact
• U
se the navigation button to select Add a contact
in Advanced options.
• Press the left soft button to continue.
• U
se the navigation button to select to add a
contact by Skype name or Phone number.
• Press the left soft button to select.
section
• Y
ou can select a contact and send a text
message as a request to the user to view his/her
status or profile.
CONTACTS
• T
o add a contact by Skype name, enter the Skype
name using the alphanumeric keypad.
• Press the left soft button to continue.
• T
o add a contact by Phone number, enter
the Contact’s name and number using the
alphanumeric keypad.
• Pr ess the left soft button to continue.
HISTORY
• Press the left soft button to enter the Menu.
• Use the navigation button to select History.
• P
ress the left soft button to enter the History
menu.
• U
se the navigation button to select an option,
and then press the left soft button to select.
The following options are available in the History menu.
Description
All calls
View all calls
Missed calls
View missed calls
Incoming calls
View incoming calls
Outgoing calls
View outgoing calls
Voicemails
View voicemails
Contacts requests View contacts requests
section
Option
STATUS
• Press the left soft button to enter the Menu.
• Use the navigation button to select Status.
• P
ress the left soft button to enter the Status
menu.
• Y
ou can change your Skype status, define a mood
message, select the profile details to be shown to
other users, switch user, or sign out of Skype.
Change Status
• U se the navigation button to select Change status.
• Press the left soft button to continue.
• U
se the navigation button to select Offline, Online,
Skype me, Away, Not available, Do not disturb,
or Invisible.
• Press the left soft button to select.
STATUS
Mood Message
You can enter a message about yourself to be displayed to all your
contacts.
• U se the navigation button to select Mood message.
• Press the left soft button to continue.
• E
nter your Mood message using the alphanumeric
keys.
• Press the left soft button to confirm.
Select My Profile
Select Details to Be Shown
• U
se the navigation button to select Details
shown to all.
• Press the left soft button to continue.
• U
se the navigation button to select an item and press
the left soft button to continue.
• Y
ou can select to show Skype name, full name,
gender, birth date, country/region, state/province,
city, language, etc. to other contacts.
section
Select the details to be displayed to all your contacts and private
details that are not shown to others.
STATUS
Private Details
• U se the navigation button to select Private details.
• Press the left soft button to continue.
• S elect the private details to be displayed to your contacts.
Switch User
• Use the navigation button to select Switch user.
• Press the left soft button to continue.
• P
ress the left soft button to save your password
on the device or the right soft button not to save.
• A
fter signing out, enter a new Skype name or use
the navigation button to select an existing user on
the list.
• Press the left soft button to sign in.
STATUS
Sign Out
• U se the navigation button to select Sign out.
• Press the left soft button to continue.
• Press the left soft button to confirm sign out.
section
SEARCH
You can search for a Skype contact by entering the Skype name or
e-mail address of the Skype user.
• Press the left soft button to enter the Menu.
• Use the navigation button to select Search.
• Press the left soft button to continue.
• E
nter the Skype name or e-mail address using the
alphanumeric keypad.
• A
ll the matched results will be shown. If more
than one match is found, use the navigation
button to select the correct contact.
• Press the left soft button to continue.
• U
se the navigation button to select Add to
contacts (add user to contact list), View profile
(view the user’s profile), Call (call the user), or
Search again (search one more time).
En-21
SERVICES
You can view your Skype credit balance, your SkypeIn account, and
Skype Voicemail. If the services are not active, or you need to buy
extra credit, please go to www.skype.com for details.
• Press the left soft button to enter the Menu.
• Use the navigation button to select Services.
• Press the left soft button to continue.
• U
se the navigation button to select Skype Credit,
SkypeIn, or Skype Voicemail.
section
En-22
SETTINGS
• Press the left soft button to enter the Menu.
• Use the navigation button to select Settings.
• Press the left soft button to continue.
• Y
ou can configure the general settings, set call
divert, change the time and date, etc.
General Settings
In the General settings menu, you can change the Skype password, set
automatic sign in, change language of user interface, update software,
or reset the phone.
SETTINGS
Change Password
• U se the navigation button to select Change password.
• Press the left soft button to continue.
• E nter the old password using the alphanumeric keypad.
• Press the left soft button to continue.
• E nter a new password, between 4 and 20 characters.
• Press the left soft button to continue.
• Enter the password again.
• Press the left soft button to confirm.
section
SETTINGS
Auto Sign In
You can select to sign in to Skype automatically or let the phone
prompt for your Skype name and password every time you turn it on.
• U se the navigation button to select Auto sign in.
• Press the left soft button to continue.
• S elect Automatically sign in or Prompt for password.
• Press the left soft button to confirm.
Language
• U se the navigation button to select Language.
• Press the left soft button to continue.
• U
se the navigation button to select the language
you require.
• Press the left soft button to confirm.
SETTINGS
Software Updates
• U
se the navigation button to select
Software updates.
• Press the left soft button to continue.
• U
se this option to update the software automatically.
To use this option, make sure that you have checked
for the automatic software updates via Settings>
Advanced> Software updates.
Reset
• Use the navigation button to select Reset.
• Press the left soft button to continue.
section
• S
elect Reset all to reset all phone settings, or
select to preserve the network configurations and
reset other settings.
SETTINGS
Call Divert
In the Call divert menu, you can choose to divert all your calls to a
telephone number, another Skype name, or Skype voicemail.
Call Forwarding
• U se the navigation button to select Call Forwarding.
• Press the left soft button to continue.
• S
elect Yes to forward unanswered calls to a
telephone number or Skype name.
• P ress the left soft button to continue.
• E
nter the telephone number or Skype name using
the alphanumeric keypad.
• Press the left soft button to confirm.
SETTINGS
Forward to Voicemail
• Use the navigation button to select Voicemail.
• Press the left soft button to continue.
• S
elect Yes to forward unanswered calls to
Skype voicemail.
• Press the left soft button to continue.
Set Welcome Message for Skype Voicemail
• I n Call divert menu, use the navigation button to
select Welcome message.
• Press the left soft button to continue.
section
• Record your voice message.
SETTINGS
Privacy
In the Privacy menu, you can configure privacy settings for calls,
SkypeIn calls, and blocked users.
Set Allowed Calls
• Use the navigation button to select Calls.
• Press the left soft button to continue.
• S
elect allow calls from anyone, only contacts on
your list, or specified contacts.
• Press the left soft button to confirm.
SkypeIn Calls
• U se the navigation button to select SkypeIn Calls.
• P
ress the left soft button to continue and set the
allowed SkypeIn calls.
SETTINGS
Blocked Users
• Use the navigation button to select Blocked users.
• P
ress the left soft button to continue and browse the
information of the blocked users.
Tones Setting
In the Tones menu, you can set the incoming call alert, ring tone,
ring volume, vibrating alert, notification tones, and keypad tones.
Incoming Call Alert
• Select Tones in Settings.
• Press the left soft button to continue.
• Press the left soft button to continue.
• S
elect ringing (continuously), ring once, beep
once, or turn off the ringtone.
section
• U
se the navigation button to select Incoming call
alert.
SETTINGS
Ring Tone
• Use the navigation button to select Ring tone.
• Press the left soft button to continue.
• T
here are three preset ring tones. Use the
navigation button to select your desired ring tone.
Ring Volume
• Use the navigation button to select Ring volume.
• Press the left soft button to continue.
• U se the navigation button to adjust the volume level.
• Press the left soft button to confirm.
SETTINGS
Notification Tones
• U se the navigation button to select Notification tones.
• Press the left soft button to continue.
• Use the navigation button to select Off or On.
Set Keypad Tones
• Use the navigation button to select Keypad tones.
• Press the left soft button to continue.
• Use the navigation button to select Off or On.
section
SETTINGS
Time and Date
In the Time and Date menu, you can configure time, date, and
time zone.
• Select Time and Date in the Settings menu.
• U
se the navigation button to select time, time zone, daylight savings,
time format, time separator, date, date format, and date separator.
• Press the left soft button to configure each setting.
Manage Blocked Users
• S elect Manage blocked users in the Settings menu.
• P
ress the left soft button to continue. You can browse
the information of the blocked Skype contacts.
En-33
SETTINGS
Network
In the Network menu, you can configure the network connection type,
IP address, subnet mask, default gateway, and DNS information of
the phone.
Set Network Type
• Select Network in Settings.
• Press the left soft button to continue.
• S
elect DHCP, Static IP, PPPoE, or PPPoE Static
IP for the network connection method used by the
phone.
• U
nless you are using DHCP, you must enter your IP
address, subnet mask, gateway, and primary and
secondary DNS addresses.
section
En-34
SETTINGS
Phone Settings
In the Phone settings menu, you can configure the brightness of the
phone display screen and screen timeout.
Brightness
• Use the navigation button to select Brightness.
• Press the left soft button to continue.
• U se the navigation button to adjust the brightness level.
Timeout
• Use the navigation button to select Timeout.
• Press the left soft button to continue.
• U
se the navigation button to select 1, 2, 3, or 5 min
for screen timeout.
SETTINGS
Information
To display phone information, select Menu, then Settings:
• Select Information in Settings.
• Press the left soft button to continue.
• P
ress the navigation button up and down to view the
information, including serial number of the phone,
product ID, software version, software date, hardware
version, MAC address, and copyright.
section
SETTINGS
Advanced
In the Advanced settings menu, you can set the software-update
settings and configure network proxy and Skype ports.
Software Updates
• U se the navigation button to select Software updates.
• Press the left soft button to continue.
• U
se this option to set how the phone will check for
software updates.
SETTINGS
Network Proxy
• Use the navigation button to select Network proxy.
• Press the left soft button to continue.
• C
onfigure the proxy type for your phone. You can
select no proxy, HTTPS, or SOCKS5. When HTTPS
or SOCKS5 is selected, you can enter the host name
and port number, and select to enable or disable the
proxy authentication.
Skype Ports
• Use the navigation button to select Skype ports.
• Press the left soft button to continue.
section
• C
onfigure the port number for incoming connections
and the alternative port numbers.
SETTINGS
Firmware Page Options
Advanced users can log in to the firmware page of the Belkin Desktop
Internet Phone for Skype and can also manually update the firmware
of the phone by selecting and uploading the newer firmware file.
Users can also change the firmware page login password in the
firmware page.
• L
og in to the firmware page by typing the IP address of the Desktop
Internet Phone for Skype in the URL address bar and pressing
return.
• A
window will pop up with a login prompt for a Skype name and
password. The default Skype name is “admin”, and the default
password is blank. Press the login button to display the firmware
page.
Firmware Upgrade
Advanced users can also upgrade the firmware of the phone by
downloading it from the Belkin technical support website and then
manually uploading the firmware file onto the phone.
• C
lick on the “Browse” button to select the new firmware file that
you want to upload.
• C
lick on the “Update” button to upgrade the firmware of the
Desktop Internet Phone for Skype. The phone will reboot after the
firmware has been uploaded onto the phone.
SETTINGS
Firmware Page Login Password Change
Users can also change the firmware page login password.
• Type in the Old Password
• Type in the New Password
• Retype the New Password
• Click on the “Change” button.
section
Compliances
Compliances
Federal Communication Commission Interference Statement
This equipment has been tested and found to comply with the limits
for a Class B digital device, pursuant to Part 15 of the FCC Rules.
These limits are designed to provide reasonable protection against
harmful interference in a residential installation.
FCC Caution: Any changes or modifications not expressly approved
by the party responsible for compliance could void the user’s
authority to operate this equipment.
Japan VCCI Class B
EC Conformance Declaration
Marking by the above symbol indicates compliance with the Essential
Requirements of the R&TTE Directive of the European Union (1999/5/
EC). This equipment meets the following conformance standards:
• EN 60950-1 (IEC 60950-1) - Product Safety
For information on product disposal please refer to
http://environmental.belkin.com
En-41
Information
Technical Support
You can find technical-support information on our website,
www.belkin.com, by navigating to the tech-support section.
If you want to contact technical support by phone, please call the
number you need from the list below*.
*Local rates apply.
Country
Number
Internet adress
AUSTRIA
0820 200766
http://www.belkin.com/uk/networking/
BELGIUM
07 07 00 073
http://www.belkin.com/nl/networking/
CZECH REPUBLIC
239 000 406
http://www.belkin.com/uk/networking/
DENMARK
701 22 403
http://www.belkin.com/uk/networking/
FINLAND
00800 - 22 35 54 60
http://www.belkin.com/uk/networking/
FRANCE
08 - 25 54 00 26
http://www.belkin.com/fr/networking/
GERMANY
0180 - 500 57 09
http://www.belkin.com/de/networking/
GREECE
00800 - 44 14 23 90
http://www.belkin.com/uk/networking/
HUNGARY
06 - 17 77 49 06
http://www.belkin.com/uk/networking/
ICELAND
800 8534
http://www.belkin.com/uk/networking/
IRELAND
0818 55 50 06
http://www.belkin.com/uk/networking/
ITALY
02 - 69 43 02 51
http://www.belkin.com/it/support/tech/issues_more.asp
LUXEMBOURG
34 20 80 85 60
http://www.belkin.com/uk/networking/
NETHERLANDS
0900 - 040 07 90
€0.10 per minute
http://www.belkin.com/nl/networking/
NORWAY
81 50 0287
http://www.belkin.com/uk/networking/
POLAND
00800 - 441 17 37
http://www.belkin.com/uk/networking/
PORTUGAL
707 200 676
http://www.belkin.com/uk/networking/
RUSSIA
495 580 9541
http://www.belkin.com/networking/
SOUTH AFRICA
0800 - 99 15 21
http://www.belkin.com/uk/networking/
SPAIN
902 - 02 43 66
http://www.belkin.com/es/support/tech/networkingsupport.asp
07 - 71 40 04 53
http://www.belkin.com/se/support/tech/networkingsupport.asp
08 - 48 00 02 19
http://www.belkin.com/uk/networking/
UNITED KINGDOM
0845 - 607 77 87
http://www.belkin.com/uk/networking/
OTHER COUNTRIES +44 - 1933 35 20 00
En-42
section
SWEDEN
SWITZERLAND
Desktop Internet Phone
for Skype
TM
Belkin Tech Support
UK: 0845 607 77 87
Europe: www.belkin.com/support
Belkin Ltd.
Express Business Park
Shipton Way, Rushden
NN10 6GL, United Kingdom
+44 (0) 1933 35 2000
+44 (0) 1933 31 2000 fax
Belkin SAS
130 rue de Silly
92100 Boulogne-Billancourt,
France
+33 (0) 1 41 03 14 40
+33 (0) 1 41 31 01 72 fax
Belkin GmbH
Hanebergstrasse 2
80637 Munich
Germany
+49 (0) 89 143405 0
+49 (0) 89 143405 100 fax
Belkin Iberia
C/ Anabel Segura, 10 planta baja, Of. 2
28108, Alcobendas, Madrid
Spain
+34 91 791 23 00
+34 91 490 23 35 fax
Belkin Italy & Greece
Via Carducci, 7
Milano 20123
Italy
+39 02 862 719
+39 02 862 719 fax
Belkin B.V.
Boeing Avenue 333
1119 PH Schiphol-Rijk,
Netherlands
+31 (0) 20 654 7300
+31 (0) 20 654 7349 fax
© 2008 Belkin International, Inc. All rights reserved. All trade names are registered trademarks of
respective manufacturers listed.
PM00284ea