1
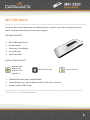
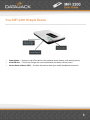
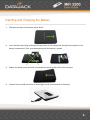
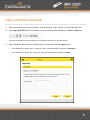
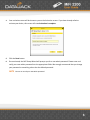
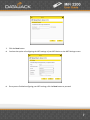
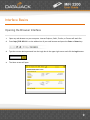
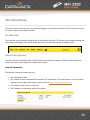
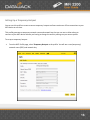
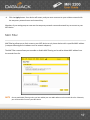
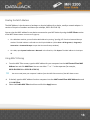
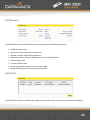
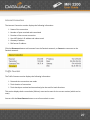
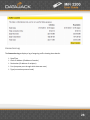
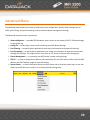
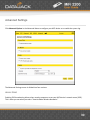
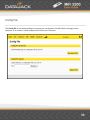
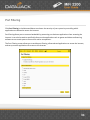
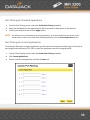
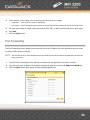
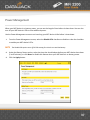
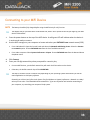
1
MiFi 2200 Basics
This device offers more freedom than ever before. No wires, no cables—just access to your data when you
need it. The power of the internet is truly at your fingertips.
Package Contents
·
MiFi 2200 Hotspot Device
·
AC Wall Charger
·
Lithium Ion (Li-Ion) Battery
·
microUSB Cable
·
Quick Start Guide
System Requirements
Windows® 2000
Windows® XP
Windows® Vista
Windows® 7
Mac OS® X (10.3.9+)
·
100 MB of Hard Drive Space; 128 MB of RAM
·
Internet Browser (e.g., Internet Explorer, Safari, Firefox, Opera, Chrome)
·
Wireless interface (802.11 b/g)
Linux® (2.4 & 2.6)
By using DataJack’s wireless internet service, you agree to comply with the Terms of Service. You are encouraged to review these
terms on our website at www.datajack.com/terms.
2
Your MiFi 2200 Hotspot Device
·
·
·
Power Button — Powers on and off the device. Also indicates power, battery, and roaming activity.
microUSB Port — The AC wall charger that was included with your device connects here.
Service Status Indicator (LED) — Provides information about your mobile broadband connection.
3
Inserting and Charging the Battery
1.
Slide open the door at the bottom of the device.
2.
Insert the battery by lining up the gold contact points on the battery with the gold contact points in the
battery compartment. Then, press down gently until the battery is seated.
3.
Replace the battery cover and slide it closed while pressing gently until it locks into place.
4.
Connect the microUSB end of the AC wall charger to the microUSB port of the device.
4
Initial Connection and Setup
1.
2.
Open any web browser on your computer. Internet Explorer, Safari, Firefox, or Chrome will work fine.
Enter http://192.168.1.1 in to the address bar of your web browser and press the Enter or Return key.
An onscreen wizard will appear and guide you through the activation of your MiFi Device.
3.
When requested, please enter the default admin password and click the Login button.
·
If you ordered your device prior to January 20, 2012, your default admin password is afnconnect
·
If you ordered your device after January 20, 2012, your default admin password is admin
5
4.
Your activation status will be shown to you on the Activation screen. If you have already called to
activate your device, this screen will state Activation is complete.
5.
Click the Next button.
Once activated, the MiFi Setup Wizard will prompt you for a new admin password. Please enter and
verify your new admin password into the appropriate fields. We strongly recommend that you change
your password to something other than the default password.
6.
NOTE
Be sure to record your new admin password.
6
7.
8.
Click the Next button.
You have the option of configuring the WiFi settings of your MiFi device on the WiFi Settings screen.
9.
Once you are finished configuring your WiFi settings, click the Next button to proceed.
7
10.
The MiFi Setup Wizard is now complete. After you click the Finish button, your device will restart and
you must reconnect to your wireless network and enter the network key you created.
8
Interface Basics
Opening the Browser Interface
1.
2.
Open any web browser on your computer. Internet Explorer, Safari, Firefox, or Chrome will work fine.
Enter http://192.168.1.1 in to the address bar of your web browser and press the Enter or Return key.
3.
Type the current admin password into the Login box in the upper right corner and click the Login button.
4.
The Home screen will open.
9
The Home Screen
The Home screen is the first screen you see after logging in to the browser interface. It the main point of entry
for all your work in the browser interface.
The Menu Bar
The menu bar runs horizontally along the top of the browser interface. This allows you to navigate through the
menu items, and displays information about your device’s connection strength and battery level.
Home Screen Sections
The Home screen is divided into two sections that you can expand or collapse. Click the solid black pointer
next to the section title to expand or collapse each section.
Internet Connection
The Internet Connection section tells you:
·
Your connection status.
·
The number of bytes received and transmitted. This information is for reference only. For an accurate
reading of your usage, please login to your account at www.datajack.com/myaccount.
The duration of the current connection.
The IP address of and subnet mask for the device.
·
·
10
WiFi
The WiFi section tells you:
·
·
The profile currently in use.
The network name (also known as the SSID).
·
·
·
The security method in use.
The number of users currently connected to the device.
The IP address of and subnet mask for the wireless browser interface.
To change WiFi settings, use the WiFi menu. See WiFi Menu (page 13)
11
Password Settings
Password settings allow you to change the admin password that gives access to the browser interface for your
MiFi Device.
Create a New Admin Password
1.
2.
3.
Type your current admin password into the Current Password box.
Type the new password (must have 4 to 64 characters) in the New Password box, and then again in the
Verify New Password box.
Click the Apply button.
12
WiFi Menu
The WiFi menu has three components:
† WiFi Profiles — to view or change settings for your secure profile or to set up a Temporary Hotspot.
† MAC Filter — to allow only certain devices to connect to the MiFi device.
† Status — to view profile information, see who is connected to the MiFi device, and view the WiFi log.
You can also retrieve your Network Key from this screen.
WiFi Profiles
Click WiFi Profiles on the WiFi menu to configure your secure profile or set up a Temporary Hotspot.
13
The WiFi Profile page displays the following information:
† Profile — The profile currently being used.
† Network Name (SSID) — Name of the network you are connected to. You can change the name to
something more descriptive if you want, or if other devices are in use within range of yours.
† 802.11 Mode — The type of wireless networking you are currently using.
† Channel — The radio channel that the device is using to broadcast it’s SSID. This should usually be set
to Auto (default) and left unchanged. Available channels are 1 through 11.
† Security — The type of security the profile is using. This applies to the Secure and the Temporary
Hotspot profiles.
† Authentication — Locked to Open Access for all profiles.
† Encryption — Displays the type of encryption for the security type in use.
† Network Key — Passcode or password used to access the network.
14
Choosing a Profile
Select a profile from the Profile list:
† Secure — This is the profile you should use most of the time. You can set up this profile with the
security measures you need to use your MiFi device safely.
† Temporary Hotspot — This profile allows you to set up a secure temporary hotspot to allow others in
your work area (maximum of five) to go online at the same time.
† Open — This profile does not require a password to connect to your MiFi device. Any user who can see
your network name (SSID) can connect to your MiFi device.
Setting Security
You can use WEP (64-bit or 128-bit), WPA Personal/PSK, WPA2 Personal PSK, or WPA/WPA2 Mixed Mode
security.
Some WiFi clients become confused if the security is changed and the network name is not. If you change
security settings and do not get asked for the new network key when you try to reconnect, delete the existing
“old” network name from your “Preferred Networks” list. Then you can reconnect.
TIP
1.
2.
3.
4.
From the WiFi Profile screen, select Secure as the Profile.
Select a security protocol from the Security list. (The Encryption box displays the corresponding
encryption level)
Enter a new network key in the Network Key box. (Permissible characters are listed in gray just under the
Network Key box)
Click the Apply button. Your device will restart, and you must reconnect to your wireless network using
the new Network Key.
NOTE
Be sure to record your Network Key.
15
Setting Up a Temporary Hotspot
You can use this profile to create a secure temporary hotspot to allow a maximum of five connections to your
MiFi device at one time.
This profile generates a temporary network name and network key that you can use to allow others to
connect to your MiFi device without you having to change the security settings on your secure profile.
To set up a temporary hotspot:
1.
From the WiFi Profile page, select Temporary Hotspot as the profile. You will see a new (temporary)
network name (SSID) and network key.
16
2.
Click the Apply button. Your device will restart, and you must reconnect to your wireless network with
the temporary network name and network key.
Members of your workgroup can now use the temporary network name and network key to connect to your
MiFi device.
MAC Filter
MAC filtering allows you to limit access to your MiFi device to only those devices with a specified MAC address
(a unique code assigned to hardware such as network adapters).
The MAC Filter screen allows you to enable or disable MAC filtering and to add or delete MAC address from
the trusted client list.
NOTE
Do not enable MAC filtering unless you have added your own MAC address to the trusted client list. Otherwise,
you will be unable to access your MiFi device.
17
Finding the MAC Address
The MAC Address is also known as a hardware or physical address for a device, usually a network adapter. It
consists of six pairs of numbers and letters (for example, 00-21-9B-1C-64-34).
You can view the MAC address for any device connected to your MiFi device by using the WiFi Clients section
of the WiFi Status screen. See WiFi Clients (page 20)
·
On a Windows machine, you can find the MAC address by running “ipconfig /all” from the Command Prompt
window. The MAC address is referred to as the Physical Address. (Select Start > All Programs (or Programs) >
Accessories > Command Prompt to open the Command Prompt window)
·
On a Mac, open System Preferences > Network. In the Show list, click Airport. The MAC address is the Airport
ID.
Using MAC Filtering
1.
TIP
2.
3.
From the MAC Filter screen, type the MAC address for your computer into the Add Trusted Client MAC
Address box and click Add Client. You can use either “:” or “-“ as the separator (for example,
00:21:9B:1C:64:34 or 00-21-9B-1C-64-34).
You can cut-and-paste your computer’s address from the WiFi Clients section of the WiFi Status screen.
If desired, type the MAC address for other computers into the Add Trusted Client MAC Address box and
click Add Client.
Select the Enable MAC Filter check box and click the Apply button.
18
WiFi Status
WiFi Status provides you with information about your wireless network, and is divided into three sections.
19
WiFi Network
The WiFi Network section of the WiFi Status screen displays the following information:
† Profile currently in use.
† Name of the network you are connected to.
† Number of clients connected to the device.
†
†
†
†
†
Maximum number of clients allowed to connect to your MiFi device
Channel being used.
Current wireless mode.
Security type and encryption for the current profile.
Network Key link (click to retrieve the network key)
WiFi Clients
The WiFi Clients section of the WiFi Status page shows the clients that are currently connected to the device.
20
WiFi Log
Click the WiFi Log button to view a listing of WiFi events (most recent first).
WWAN Menu
The WWAN menu displays information about your DataJack network connection, and provides tools for
technical support.
The WWAN menu has three components:
† Configuration — to reactivate your device, or update your PRL.
† Diagnostics — to view the status of your connection to the DataJack network, view information about
your MiFi device, or view an event log about your connections to the DataJack network.
† Status — to view information about your internet connection, to view traffic counters, or to view an
internet connection log.
21
Configuration
Click Configuration in the WWAN menu to reactivate your device, update your PRL, or update the firmware of
your device.
The WWAN Configuration Screen
Select from the following options on the WWAN Configuration screen:
† Click Activate Device to reactivate your device for use on the DataJack network.
† Click Update PRL to update your Preferred Roaming List.
TIP
You should update your PRL about every three months to make sure you have the latest enhancements from
DataJack.
22
Diagnostics
Click Diagnostics in the WWAN menu to access status information about your internet connection and device.
The WWAN Diagnostic screen is divided into three sections.
23
WWAN Connection
The WWAN Connection section displays the following information:
† Connection status:
o
Connected — connected and transmitting data
o
Dormant — connected but not transmitting data
o
Disconnected — not connected to the network
o Not Activated — device is not activated. You will need to run Setup Wizard on the Home Screen to activate
your MiFi device. See Home Page Sections (page 10)
† Type of network (technology) you are connected to.
WWAN Modem
The WWAN Modem section displays the following information:
† Manufacturer — manufacturer of your MiFi device.
† Model — model name or number of your MiFi device.
†
†
†
†
†
†
NOTE
Firmware Version — current internal software (firmware) version.
ESN — unique number the network uses to identify your MiFi device.
MDN — public ID for your specific wireless service.
MSID — internal ID your network uses to identify your account.
NAI — address of your MiFi device on the network.
PRL Version — to verify that your PRL (preferred roaming list) is the most current.
Do not click the Reset Modem button unless you have received an MSL number from technical support.
24
WWAN Event Log
The WWAN Event Log section lists network connection events and times when they occurred. DataJack
Technical Support may use this log for troubleshooting.
25
WWAN Status
The WWAN Status screen displays information about your internet connection.
This screen is divided into three sections.
26
Internet Connection
The Internet Connection section displays the following information:
† Status of the connection
† Number of bytes received and transmitted
†
†
†
†
Duration of the current connection
Your MiFi device’s IP address and subnet mask
Gateway IP address
DNS server IP address
Click the Disconnect button to disconnect from the DataJack network, or Connect to reconnect to the
DataJack network.
Traffic Counters
The Traffic Counters section displays the following information:
† Date and time connection was made
† Total duration of connection
† Total data bytes received and transmitted, plus the total for both directions
This section displays both a cumulative (lifetime) count and a count for the current session (which can be
reset).
You can click the Reset Counter button to set all counts back to zero.
27
Connection Log
The Connection Log to display a log of outgoing traffic showing these details:
†
†
†
†
†
Date/Time
Client IP Address (IP address of sender)
Destination (IP address of recipient)
Port (computer port through which data was sent)
Type (connection protocol used)
28
Advanced Menu
The Advanced menu allows you to back up and restore your configuration, specify router settings such as
DHCP; port filtering, and port forwarding, and to customize power management settings.
The Advanced menu has seven components:
† Advanced Options — to enable SSID broadcast, auto-connect to the network, DHCP, VPN passthrough,
or the system log.
† Config File — to back up or restore a file containing your MiFi device settings.
† Port Filtering — to specify which applications can access the internet and through which port(s).
† Port Forwarding — to specify which applications can access your computer through the internet and
through which port(s). You might use this if you have an FTP server or play certain online games.
† Power Management — to customize your MiFi device’s power-saving settings.
† TCP/IP — to view or change the IP address and subnet mask for your MiFi device, and to view the MAC
address and DHCP address range for your MiFi device.
† System Status — to view information about your MiFi device and to view the system log. You can also
restart your MiFi device or restore it to its factory default settings here.
29
Advanced Settings
Click Advanced Options in the Advanced Menu to configure your MiFi device or to enable the system log.
The Advanced Settings screen is divided into four sections.
Access Point
Enabling SSID broadcasting allows others nearby computers to see your MiFi device’s network name (SSID).
This is what you see when you select “View Available Wireless Networks.”
30
Disabling SSID broadcasting provides additional security but you will have to re-renable it if you lose your
automatic connection.
† Select the SSID broadcast enable checkbox to enable SSID broadcasting, or clear the checkbox to
disable SSID broadcasting, and then click the Apply button.
3G Modem
Enabling auto-connect allows your MiFi device to connect to your network automatically when it is turned on.
† Select the Auto-connect enable checkbox to enable auto-connection, or clear the checkbox to disable
auto-connection, and then click the Apply button.
Router
Enabling the DHCP server allows your MiFi device to automatically assign a local IP address to a new device
joining your network (such as a wireless printer or an additional laptop). When the DHCP server is disabled,
you will have to assign static IP addresses to all devices on your network.
† Select the DHCP Server enable checkbox to enable the DHCP server, or clear the checkbox to disable
the DHCP server, and then click the Apply button.
VPN passthrough is required if you are going to connect to a VPN (such as a corporate system).
† Select the VPN Passthrough enable checkbox to enable VPN passthrough, or clear the checkbox to
31
disable VPN passthrough, and then click the Apply button.
NOTE
Please check with your Corporate IT department for supported VPN protocols.
System
The System section allows you to select your preferred language, date format, and time format, and to turn on
the system log.
1.
In the Language list, select the language you wish to use.
2.
In the Date/Time Format list, select the date format (U.S. or European) and the time format (12-hr or 24hr) that you want to use.
Optionally, you can select the System log enable checkbox if you want to create a system log.
Confirm your selections and click the Apply button.
3.
4.
32
Config File
Click Config File in the Advanced Menu to back up your configuration file (MiFi device settings) to your
computer, or to restore a saved configuration file from your computer.
33
Port Filtering
Click Port Filtering in the Advanced Menu to enhance the security of your system by controlling which
applications are allowed to access the internet.
Port filtering allows you to conserve bandwidth by preventing non-business applications from accessing the
internet. It can also be used to specifically allow certain applications such as games and video conferencing
software to use certain ports to access their online components.
The Port Filtering screen allows you to enable port filtering, allow selected applications to access the internet,
and set up custom applications for access to the internet.
34
Port Filtering for Standard Applications
1.
2.
3.
From the Port Filtering screen, select the Enable Port Filtering checkbox.
Select the checkboxes for the applications for which you want to allow access to the internet.
Confirm your selections and click the Apply button.
NOTE
Your MiFi device uses standard ports for these applications. If you have applications that do not use the
standard ports or that are not listed under Allowed Applications, click the Custom Applications button.
Port Filtering for Custom Applications
To set up port filtering for a custom application, you will need to know the port numbers (up to five ports or
port ranges) and the protocol (TCP, UDP, or both) the application uses for its outgoing traffic.
1.
From the Port Filtering screen, select the Enable Port Filtering checkbox.
2.
Click Custom Applications.
Enter a name for the application and click the Ports link.
3.
35
4.
5.
Enter the port or port range. You can enter up to five ports or port ranges.
·
Single port — enter the port number in both fields.
·
Port range — enter the beginning port number in the left field and the ending port number in the right field.
6.
For each port number or range, select the protocol (TCP, UDP, or both) used by that port or port range.
Click Hide.
7.
Click the Apply button.
Port Forwarding
The Port Forwarding screen allows you to enter the local static IP address for each application that you want
to receive traffic from the internet.
NOTE
1.
2.
3.
You will need to set up static IP addresses on your WLAN for each device that has an application to which you
want to forward.
From the Port Forwarding screen, select the checkbox for the application you want to enable.
Type the local static IP address of the device hosting the application into the IP Address on WLAN box.
Click the Apply button when you are finished adding applications.
36
Power Management
When your MiFi device is on battery power, you can set the length of time before it shuts down. You can also
turn off your MiFi device’s LEDs to save additional power.
Use the Power Management screen to set how long your MiFi device is idle before it shuts down.
1.
From the Power Management screen, select the Disable LEDs checkbox to disable or clear the checkbox
to enable your MiFi device’s LEDs.
NOTE
The Disable LEDs option turns off all LEDs except for critical errors and low battery.
2.
Under the Battery Power section, select the time that should elapse before your MiFi device shuts down
(2 to 60 minutes); or click Never to disable this feature when your MiFi device is on battery power.
3.
Click the Apply button.
37
Connecting to your MiFi Device
NOTE
The default SSID for your MiFi device is DATAJACK xxxx, where ‘xxxx’ represents the last four digits of your MiFi
device’s ESN number.
TIP
1.
2.
3.
4.
TIP
The battery should be fully charged before using the MiFi device for the first time.
Press the power button on the top of the MiFi device. A solid green LED will indicate when the device is
in service and ready to connect.
Use the WiFi manager on your computer to locate and select your DATAJACK xxxx network name (SSID).
·
From a Windows PC: Open the Control Panel and select the Network and Sharing Center. Select the Connect
to a network option. Choose DATAJACK xxxx from the list of available networks.
·
From a Mac computer: Select System Preferences > Airport. Choose DATAJACK xxxx from the Network Name
dropdown menu.
Click Connect.
Enter your 10-digit network key when prompted for a security key.
·
On some MiFi devices, your default network key will match the ESN number on the device.
·
Otherwise, the default network key will be 1234567890
The steps to connect to a Wi-Fi network vary depending on your operating system and whether you use the
native application or third-party software.
Generally you click an icon (often in the System Tray for Windows or System Preferences > Network on a Mac)
where you can select “View Available Wireless Networks.” If you are unfamiliar with wireless networking on
your computer, try consulting your computer’s help system.
38
Troubleshooting your MiFi Device
For a more complete listing of errors and possible solutions, please visit www.datajack.com/faqs to find upto-date FAQs and user guides for this device.
Problem
Solution
Ensure the following:
The device has no power
No service / Limited or no
connectivity
·
The battery is properly seated.
·
The battery is fully charged. Charging requires at least 2.5 hours.
Try the following:
· Reorient your device.
· If you are inside a building or near a structure that may be blocking the
signal, change the position or location of the device.
Power Button LED is blinking
amber
Please contact customer service for advanced troubleshooting.
My SSID does not show up in
the wireless network list
Ensure that the MiFi is powered on and wait about 15 seconds for the
network to appear by refreshing the available wireless networks list.
NOTE
You cannot use your MiFi device while roaming in Canada, Mexico, or other destinations outside of the US.
39
LED Status Indicators
Your MiFi device has two LED indicators. They operate as follows:
Service Status LED
None
Indicates
---
MiFi is powered off
Green — Solid
MiFi is powered on but not transmitting or receiving
Green — Slow Blinking
MiFi is powered on but no service available
Green — Intermittent Blinking
MiFi is transmitting and receiving data
Power Button LED
Indicates
None
---
MiFi is powered off
Blue — Solid
MiFi is powered on and looking for roaming
Green — Solid
MiFi is powered on and fully charged
Green — Glowing
MiFi is in hibernate mode
Red — Blinking
MiFi battery is critically low
Amber — Solid
MiFi battery is charging
Amber — Blinking
Contact DataJack Customer Service
40
Technical Specifications
Environmental Specifications
Operating Temperature:
14°F to 113°F
Storage Temperature:
-4°F to 77°F
Vibration Stability:
5 Hz to 500 Hz, 0.1 octave/second
Drop:
3.28 foot drop, no damage — fully operational
Mechanical Specifications
Dimensions (W x D x H):
59mm x 9mm x 89mm
Weight:
2.05 oz / 58 g
Battery Pack:
1150 mAh
LED:
Three: DataJack brand, power, and 3G service indicators
CDMA Technology
CDMA Specification:
CDMA Rev A, Rev 0, 1XRTT
Band Designation:
800/1900 Mhz
Transmit Band:
824.7-848.31Mhz / 1851.25-1908.75Mhz
Receive Band:
869.7-893.31MHz / 1931.25-1988.75MHz
41
Regulatory Information
This device is designed to be activated on the DataJack network and has a software programming lock that, in part,
protects many of the device’s features and functions against tampering and unauthorized reprogramming. This device
will work with DataJack services—service plans and other services/options must be purchased separately. This device
operates within the CDMA frequency band of 800 MHz/1.9 GHz. This device will not operate on any iDEN network.
Coverage is not available everywhere. This product meets current FCC Radio Frequency Emission Exposure Guidelines.
FCC Equipment Authorization ID number: PKRNVWMIFI2200
Federal Communications Commission Notice (FCC)
Electronic devices, including computers and wireless modems, generate RF energy incidental
to their intended function and are therefore subject to FCC rules and regulations.
Trademarks
·
DataJack and the logo are trademarks of DataJack.
·
Windows is a registered trademark of Microsoft Corporation.
·
Mac OS is a trademark of Apple Inc., registered in the United States and other countries.
·
All other marks are the property of their respective owners.
Copyright
©2012 DataJack. DataJack and the logo are trademarks of DataJack. Other marks are the property of their
respective owners.
42
Contacting DataJack Customer Service
Our friendly customer service representatives are available Monday – Friday from 8AM to 9PM (CT), and on
weekends and holidays from 9AM to 2PM (CT).
Call us toll-free at 1-888-693-4522
Email us at [email protected]
Visit us online at www.datajack.com
DataJack, Inc.
14911 Quorum Drive Suite 140
Dallas, TX 75254
43