1
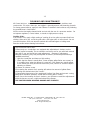
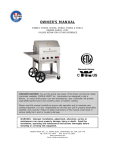
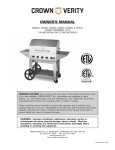
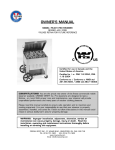
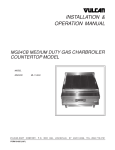
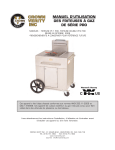
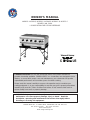
OWNER’S MANUAL
MODELS: MCB30-P, MCB36-P, MCB48-P, MCB60-P & MCB72-P
REVISED JAN, 2009
*PLEASE RETAIN FOR FUTURE REFERENCE
CONGRATULATIONS! You are the proud new owner of the finest commercial
portable charbroiler available. CROWN VERITY Inc. charbroilers are designed to last a
lifetime...or more! With proper care and maintenance, your charbroiler will provide
unparalleled performance and countless years of outdoor cooking.
Please read this manual carefully to ensure safe operation and to maximize your
cooking enjoyment. It is your responsibility to see that your grill is properly assembled,
installed, and cared for. Failure to follow instructions in this manual could result in
serious bodily harm and/or property damage.
WARNING: Improper installation, adjustment, alteration, service or
maintenance can cause property damage, injury or death. Read the
installation, operating and maintenance instructions thoroughly before
installing or servicing this equipment.
CROWN VERITY INC., 37 ADAMS BLVD., BRANTFORD, ON. CAN. N3S 7V8
TEL: (519) 751-1800
FAX: (519) 751-1802
www.crownverity.com
Email: [email protected]
TABLE OF CONTENTS
Setting-Up the MCB-P
. . . . . . . . . . . . . . . . . . . . . . . . . . . . . . . . . . . . . . . . .2
Setting-Up Remote Propane Cylinders . . . . . . . . . . . . . . . . . . . . . . . . . . . . . . 3
Typical Remote Propane Cylinder Installation . . . . . . . . . . . . . . . . . . . . . . . . . 4
Installation & Set-Up . . . . . . . . . . . . . . . . . . . . . . . . . . . . . . . . . . . . . . . . . . 5
Clearances To Combustibles . . . . . . . . . . . . . . . . . . . . . . . . . . . . . . . . . . . . . 6
Storage . . . . . . . . . . . . . . . . . . . . . . . . . . . . . . . . . . . . . . . . . . . . . . . . . . . 7
Cylinders & Regulators . . . . . . . . . . . . . . . . . . . . . . . . . . . . . . . . . . . . . . . . 8
Transportation & Storage of LP Cylinders . . . . . . . . . . . . . . . . . . . . . . . . . . . 9
Hoses & Regulators
. . . . . . . . . . . . . . . . . . . . . . . . . . . . . . . . . . . . . . . . . 10
Leak Testing . . . . . . . . . . . . . . . . . . . . . . . . . . . . . . . . . . . . . . . . . . . . . . . 11
Prior To Use and Lighting Instructions . . . . . . . . . . . . . . . . . . . . . . . . . . . . 12
Operating and Shut Down Instructions . . . . . . . . . . . . . . . . . . . . . . . . . . . . 13
Tips and Techniques
. . . . . . . . . . . . . . . . . . . . . . . . . . . . . . . . . . . . . . . . . 14
Cleaning and Maintenance . . . . . . . . . . . . . . . . . . . . . . . . . . . . . . . . . . . . . 15
Troubleshooting Guide . . . . . . . . . . . . . . . . . . . . . . . . . . . . . . . . . . . . . . . . 16
Frequently Asked Questions about MCB’s . . . . . . . . . . . . . . . . . . . . . . . . . . 17
Parts and Components . . . . . . . . . . . . . . . . . . . . . . . . . . . . . . . . . . . . . . . 18
CROWN VERITY INC., 37 ADAMS BLVD., BRANTFORD, ON. CAN. N3S 7V8
TEL: (519) 751-1800
FAX: (519) 751-1802
www.crownverity.com
Email: [email protected]
1
IF
1)
2)
3)
4)
FOR YOUR SAFETY
YOU SMELL GAS:
Shut off gas supply to appliance.
Extinguish any open flame.
Open lid or remove storage cover(s).
If odour continues, immediately call your gas supplier.
DO NOT store or use gasoline or other flammable vapours and liquids in the
vicinity of this or any other appliance.
• Never check for leaks with a match or open flame.
• An LP cylinder not connected for use shall not be stored in the vicinity of this or any
other appliance.
• This appliance shall only be used in a well ventilated space and shall not be used in a
building, garage, or any other enclosed area.
WARNING! Keep any electrical supply cord and fuel supply hose(s) away from any hot
surfaces.
DO NOT use your charbroiler if there is evidence of damage (cuts, cracks, burns) or
excessive wear to the hose.
DO NOT obstruct the flow of combustion and ventilation air to the charbroiler.
DO NOT store a spare LP (propane) cylinder under or near your charbroiler.
DO NOT leave your charbroiler unattended while in operation.
DO NOT allow children to play on or near your charbroiler.
DO NOT use under the influence of alcohol or drugs.
DO NOT use this charbroiler until you have read and understood all of the information in
this manual.
This appliance has been tested according to
ANSI Z83.1 2002/CSA1.8 2002
This outdoor cooking gas appliance is not intended to be installed in or on
recreational vehicles and/or boats.
CROWN VERITY INC., 37 ADAMS BLVD., BRANTFORD, ON. CAN. N3S 7V8
FAX: (519) 751-1802
TEL: (519) 751-1800
www.crownverity.com
Email: [email protected]
2
SETTING-UP THE MCB-P
Caution: Beware of pinch points when handling
1)• Do not Transport grill units in set-up position
• Tables are designed to travel only short distances on smooth surfaces when set-up
and loaded
• Tables have a safe, static working load of 325 lbs.
• Use extreme caution when moving set-up units. Do not move while in operation or
while hot.
2) Set-up the grill in a safe location:
• 10 feet from propane cylinders larger than 20lbs., flammable materials,
buildings or dwellings, building openings, exhausts or intakes and vehicles.
• Do not set-up the grill indoors, near evacuation/emergency routes, stairways or
vehicular and pedestrian routes etc.
• Do not allow the gas hose(s) to be subjected to damage from trampling, vehicular
and mechanical movement etc.
• Observe clearances to combustibles
• Casters must be locked when connected for use
• Always level the char-broiler and fill the water pan with 1 inch of water
ATTACHING QUICK DISCONNECT FITTING TO MCB
Retract Sleeve
Fig. 1
To connect
retract sleeve of socket.
Fig. 2
Insert gas inlet
Release Sleeve
Fig. 3
Release sleeve and push
socket until sleeve snaps
forward locking gas inlet in
socket.
CROWN VERITY INC., 37 ADAMS BLVD., BRANTFORD, ON. CAN. N3S 7V8
TEL: (519) 751-1800
FAX: (519) 751-1802
www.crownverity.com
Email: [email protected]
3
SETTING-UP REMOTE PROPANE CYLINDERS
*MAXIMUM INDIVIDUAL CYLINDER CAPACITY: 100 LBS. PROPANE *
Cylinders installed and connected for use with an MCB-P shall be located and installed in
a safe location and in a secure manner.
Propane cylinders must be located and secured against tip-over:
• 10 feet from the char-broiler itself and any other sources of ignition such as
electrical equipment, vehicles and other fuel burning appliances or equipment, building
intakes and exhausts
• All propane cylinders connected for use shall be secured against accidental
tipping by attaching them to a suitable object with a rope, chain, strap or other
suitable device. Crown Verity Inc. offers a specialized cylinder retaining cart that
addresses all tipping issues. Please contact your dealer and inquire about the RPS
cart. The plastic cylinder base ring that is supplied with the MCB-P is only
suitable for cylinders with a maximum capacity of 20 lbs. LP and does not
negate the necessity to provide additional security against tip-over.
• Hose(s) connected for use to LP cylinders shall be safely routed to provide
maximum protection from contact with hot, sharp or abrasive surfaces and areas,
from vehicular, pedestrian and mechanical damage
• Crown Verity Inc. recommends cordoning-off the area of the cylinder(s), hose(s) and
the char-broiler with barricades, bright marker tape or similar. Do not route hoses
across evacuation/emergency, pedestrian or vehicle routes.
Any temporary propane supply system must be installed in accordance with local codes
or, in the absence of local codes: ANSI/NFPA 54 1999/ANSI Z 223.1 1999 National
Fuel Gas Code, or CSA B.149.2: Propane Installation code.
Consult your local propane distributor, fire prevention agency, safety authority and exhibit
officials for installation requirements. Additional requirements other than those listed in
this manual may be required.
Recommendations listed in this instruction manual are considered to be minimum
safety requirements.
CROWN VERITY INC., 37 ADAMS BLVD., BRANTFORD, ON. CAN. N3S 7V8
FAX: (519) 751-1802
TEL: (519) 751-1800
www.crownverity.com
Email: [email protected]
4
PROPANE CYLINDER(S)
Building
10’-0” Minimum
10’-0” Minimum
10’-0” Minimum
Mobile Charbroiler
Vehicle
TYPICAL REMOTE PROPANE CYLINDER INSTALLATION
CROWN VERITY INC., 37 ADAMS BLVD., BRANTFORD, ON. CAN. N3S 7V8
TEL: (519) 751-1800
FAX: (519) 751-1802
www.crownverity.com
Email: [email protected]
5
INSTALLATION & SET-UP
THE INSTALLATION OF THIS APPLIANCE MUST BE IN ACCORDANCE WITH:
1) All applicable local codes, or in the absence of local codes;
2) i) Canada: must conform to current National Standard CSA B149.1&.2 - natural
gas/propane installation code.
ii) U.S.A.: must conform to national Fuel Gas Code, ANSI Z223.1, 1999 or latest
edition.
WARNING!
DO NOT operate this appliance under overhead, unprotected construction. This
appliance shall be used only in a well ventilated space and shall not be used in a building,
garage, or any other enclosed area.
Minimum clearance to adjacent combustible materials:
• 12 inches from side(s)
• 24 inches from back (See Fig. 1 pg. 6.)
• This appliance is not suitable for use on combustible floors without the table unit.
• Always level your MCB front to back & side to side.
• Always keep the area surrounding your charbroiler clear of all combustible materials,
gasoline, or other flammable liquids.
• Use your charbroiler OUTDOORS in a well-ventilated space, preferably 10 ft. from
dwellings or outbuildings.
• Casters must be locked when appliance is in operation.
• Always keep 1” of water in grease trays.
• Do not transport grill units in set-up position.
• Do not overload tables. (325lb. max. static load).
CROWN VERITY INC., 37 ADAMS BLVD., BRANTFORD, ON. CAN. N3S 7V8
TEL: (519) 751-1800
FAX: (519) 751-1802
www.crownverity.com
Email: [email protected]
6
FIG 1
CLEARANCES TO COMBUSTIBLES
24”
12”
FIG 2
12”
BURNER ASSEMBLY DETAIL
VENTURI
AIR INLET
5/16” x 5/8”
APPROX
BURNER VALVE
ORIFICE
1/2”
SCREW
CROSS-OVER
BURNER
AIR SHUTTER
CROWN VERITY INC., 37 ADAMS BLVD., BRANTFORD, ON. CAN. N3S 7V8
TEL: (519) 751-1800
FAX: (519) 751-1802
www.crownverity.com
Email: [email protected]
7
STORAGE
DAY TO DAY STORAGE:
• Always turn off the gas supply valve and disconnect supply hose.
• If you have not purchased the roll top(s) with your unit, your charbroiler is supplied with
a protective cover(s). Install the cover(s) to protect your grill from the elements. Never
attempt to light your charbroiler unless the lid(s) are open or the cover(s) are
removed.
• See stacking diagrams.
Caution: Beware of pinch points when handling
LONG TERM STORAGE:
To prepare your charbroiler for long term storage, follow these steps:
Preparation:
• Clean the inside of your charbroiler.
• Clean the burner(s), then lightly oil.
• Clean the cooking grids, lightly oil, (cooking oil) store indoors.
• Store LP cylinders outdoors out of reach of children, away from sources of heat, and
sources of ignition.
• Cover the charbroiler if left outdoors.
• Cover the supply hose connection(s) with cap(s) or plastic bag and elastic.
CROWN VERITY INC., 37 ADAMS BLVD., BRANTFORD, ON. CAN. N3S 7V8
TEL: (519) 751-1800
FAX: (519) 751-1802
www.crownverity.com
Email: [email protected]
8
CYLINDERS AND REGULATORS
LP GAS CYLINDER:
When purchasing a cylinder for your gas charbroiler, it must be constructed and marked
in accordance with the specifications of:
a) Canada - The Canadian Transport Commission
b) U.S.A. - The U.S. Department of Transportation
The cylinder must also be equipped with:
a) A shut-off valve terminating in a proper cylinder valve outlet specified in current
standards:
1) Canada: CAN/CGA - 1.6 - M88 - Outdoor Gas Grills - Amend. 1.
2) U.S.A.: ANSI/CGA-V-1-1977: Compressed gas cylinder valve outlet and inlet
connections.
b) A safety relief valve having direct communication with the vapour space of the cylinder.
c) A collar to protect the cylinder shut-off valve.
d) An arrangement for vapour withdrawal.
e) A bottom ring for securing to the cylinder support assembly.
WARNING!
• Always turn off the cylinder valve when your charbroiler is not in use.
• Handle cylinder valves with care.
• Never connect an unregulated LP gas cylinder to the charbroiler.
• Never store a spare cylinder under or near your charbroiler, or subject any cylinder to
excessive heat.
• Always keep cylinder(s) securely fastened in an upright position.
CROWN VERITY INC., 37 ADAMS BLVD., BRANTFORD, ON. CAN. N3S 7V8
TEL: (519) 751-1800
FAX: (519) 751-1802
www.crownverity.com
Email: [email protected]
9
TRANSPORTATION AND STORAGE OF LP CYLINDERS
Although safe to use when properly handled, careless handling of a propane gas cylinder
could result in fire, explosion, and/or serious injury.
THEREFORE:
Always use the protective cap provided with your cylinder whenever it is not connected to
your charbroiler.
• Do not store in a building, garage or any other enclosed area. Store only in a well
ventilated area.
• Do not store in the vicinity of any gas burning apparatus or in any high heat area such
as a closed car or trunk.
• Do not smoke while transporting a cylinder in your vehicle.
• Do transport and store cylinder(s) in an upright position. Do not tip on its side.
• Do store out of reach of children.
WARNING!
FILLING: For safety reasons, the LP gas cylinder, if supplied with your charbroiler, has
been shipped empty. The cylinder must be purged of air and filled prior to using on your
charbroiler. When getting your cylinder filled:
• Allow only qualified LP gas dealer to fill or repair cylinder(s).
• Do not allow the cylinder to be over filled.
• Make sure the LP gas dealer checks the cylinder for leaks after filling.
CROWN VERITY INC., 37 ADAMS BLVD., BRANTFORD, ON. CAN. N3S 7V8
FAX: (519) 751-1802
TEL: (519) 751-1800
www.crownverity.com
Email: [email protected]
10
HOSES AND REGULATORS
WARNING! - Propane Gas Models: Your charbroiler is designed to operate on L.P.
(propane) gas at a pressure regulated at 11” water column. The regulator(s) supplied
with this charbroiler is/are set to this pressure and must be used.
CYLINDER CONNECTIONS:
• Never connect a propane gas grill to an unregulated propane gas supply or other gas.
Do not attempt to alter the hose or regulator in any way.
• Do not allow the hose to come in contact with any hot surfaces of the charbroiler.
• Visually inspect the entire length of the hose assembly before each use for any
evidence of damage (cuts, cracks, burns) or excessive wear. If found, replace the
assembly before using your charbroiler. Only a hose assembly as specified in the parts
list for your charbroiler should be used.
• The connection fitting must be protected when disconnected from the propane
cylinder. If the fitting is allowed to drag on the ground, damage to the fitting may occur
resulting in leaks or an incomplete connection. Dirt could also enter the small inlet
hole, blocking gas flow completely.
• Always disconnect hose at quick-connect coupling when storing charbroiler.
• The outlet pressure setting for the pressure regulator provided with the appliance is
11” water column for propane.
CROWN VERITY INC., 37 ADAMS BLVD., BRANTFORD, ON. CAN. N3S 7V8
FAX: (519) 751-1802
TEL: (519) 751-1800
www.crownverity.com
Email: [email protected]
11
LEAK TESTING
Leak testing must be performed:
i) before lighting your charbroiler for the first time.
ii) every time the propane cylinder is refilled, or any gas component is changed, or
iii) at least once per year.
Perform the leak test outdoors in a well-ventilated area, away from any open flame, heat
or ignition sources. DO NOT SMOKE! Use only a 50/50 mixture of liquid soap and
water for leak testing. Do not use a match or open flame.
THE FOLLOWING MUST BE CHECKED:
• Cylinder valve including threads into tank.
• All cylinder welds.
• Regulator fitting(s) and cylinder connection.
• All hose connections.
• All valve connections.
1)
2)
3)
4)
Open gas supply valve to the charbroiler.
Brush soap solution on all connections and components listed above.
Observe each place for growing bubbles, which indicate a leak is present.
Tighten any leaking connection until a repeat test shows no evidence of leakage (shut
off gas supply while correcting the leaks).
DO NOT USE THE CHARBROILER IF ANY LEAKS CANNOT BE STOPPED. TURN
OFF THE GAS SUPPLY VALVE, REMOVE ANY GAS CYLINDER, AND CALL A
QUALIFIED GAS APPLIANCE SERVICE PERSON FOR PROPER REPAIRS.
WARNING! - NATURAL HAZARD - SPIDERS Spiders and other insects are
attracted by the smell of gas and could make webs or nests in the burners. This
could partially or completely block the flow of gas through the venturis and is
indicated by a smoky, yellow flame, and/or a burner that is difficult or impossible to
light. Ultimately, it may cause the gas to burn outside the venturis, which can
seriously damage your grill. If this happens: immediately shut off the propane at the
cylinder, or natural gas at the main shut-off valve. To prevent and/or correct this
occurrence, periodically check the venturis for obstructions by inserting a pipe
cleaner or flexible wire through the air inlet of the burner, and twisting it (see fig. 2,
pg.6). Ensure venturi tubes are properly “seated” over the orifices.
CROWN VERITY INC., 37 ADAMS BLVD., BRANTFORD, ON. CAN. N3S 7V8
TEL: (519) 751-1800
FAX: (519) 751-1802
www.crownverity.com
Email: [email protected]
12
PRIOR TO USE AND LIGHTING INSTRUCTIONS
WARNING!
Do not use your charbroiler until you have read and understood all the information in this
manual, and you are assured:
• There are no leaks in the gas supply system (see “Leak Testing” section).
• The burner is properly assembled with the venturi tubes seated over the valve outlets
(orifices) (Fig. 2, page 6).
• That any electrical supply cords and/or gas supply hoses are kept away from all hot
surfaces.
• Your charbroiler is positioned in a safe location (see “Installation” section).
CAUTION!
• Always open the lid(s)or remove storage cover(s) before attempting to light your
charbroiler.
• Do not bend directly over the grill when lighting.
• Make sure all valves are OFF. Slowly open LP cylinder valve. Do not snap open.
Wait 15 seconds before opening a burner valve. This will allow the pressure to
stabilize in the system, allowing the flow-limiting device to reset itself.
• If ignition does not immediately occur, turn off all burner and pilot valves, wait 5
minutes, and repeat.
LIGHTING INSTRUCTIONS:
1) Open all lids on the charbroiler.
2) Ensure that all valve handles are in the OFF position (clockwise).
3) Turn on the gas supply valve. WAIT 15 SECONDS.
4) Turn the lighter tube (pilot) valve to the ON position. (Note: two lighter tubes are
provided on larger models - one for the left side and one for the right side).
5) Insert a match or barbecue lighter into the hole(s) provided on the end(s) of the
charbroiler.
6) Visually check to ensure the lighter tube is burning.
7) Once the lighter tube has been lit, any other main burners can be lit. (Push in and
turn to “high”) The unlit burners will then light automatically.
8) Visually check to ensure that all burners that are intended to be ON are lit.
9) Adjust individual burners as desired.
CROWN VERITY INC., 37 ADAMS BLVD., BRANTFORD, ON. CAN. N3S 7V8
TEL: (519) 751-1800
FAX: (519) 751-1802
www.crownverity.com
Email: [email protected]
13
OPERATING AND SHUT DOWN INSTRUCTIONS
OPERATING:
Main burner valves are adjustable over a full range from completely ON to completely
OFF. Note: burner valves lock when shut off. To open burner valves, you must push in and
turn counter clockwise. Do not force the controls, damage to the valves or knobs may
result.
Note: If the heat output from the charbroiler seems abnormally low; it may be caused by
the regulator flow-limiting device being activated by (i) improper lighting procedures, or (ii)
a substantial leak in the gas system. If the former is suspected; shut off the cylinder
valve and all burner valves, then carefully follow lighting procedures step by step, ensuring
all valves (including pilot) are OFF before beginning. If the latter is suspected; perform the
leak test procedure to determine if a leak has caused the flow-limiting device to activate.
• If the burner flames go out when your charbroiler is in operation; immediately turn off
all control valves. Wait 5 minutes to clear the gas before attempting to re-light the
charbroiler. If the problem persists: check the troubleshooting guide (pg.16)
• Visually check the flames every time you light your charbroiler. A good flame should be
mostly blue. If the flame is abnormally small or mostly yellow: shut off the charbroiler
and check the venturi tubes for blockage, (Fig. 2, page 6) then check the
troubleshooting guide (pg.16).
SHUT DOWN INSTRUCTIONS:
1) Turn all burner and pilot valve knobs to the OFF position.
2) Turn the LP supply valve to the OFF position.
3) Ensure all burners are extinguished.
4) Close lid(s) or install protective cover(s) until future use.
5) Disconnect LP cylinder(s) from the charbroiler when not in use.
6) Take care; your charbroiler is still hot.
CROWN VERITY INC., 37 ADAMS BLVD., BRANTFORD, ON. CAN. N3S 7V8
TEL: (519) 751-1800
FAX: (519) 751-1802
www.crownverity.com
Email: [email protected]
14
TIPS AND TECHNIQUES
BREAKING IN YOUR GRILL:
Before cooking on your Crown Verity Inc. charbroiler for the first time; operate it on high
for 10 minutes with the lid(s) open, then with the lids closed for a further 10 minutes to
ensure any dirt or protective oil has burned off. This will ensure the flavour of your food.
For best cooking results, always preheat your charbroiler.
CONTROLLING FLARE-UPS:
Some flare-up during grilling is desirable since the burning juices from the meat creates
the smoke which gives barbecued food its unique flavour and appearance. However,
excessive flare-up can not only ruin your food, it may lead to a dangerous condition,
particularly if a build-up of grease in your charbroiler ignites, resulting in an uncontrolled
grease fire. We suggest adding about 1” of water to the grease tray(s) prior to cooking.
This will cool the falling grease and facilitate clean-ups.
To Minimize flare-ups:
• Trim excess fat from meats before cooking.
• Cook fatty meats (chicken and pork) on low setting or by indirect method.
• Check that grease tray(s) is in place & add 1” of water.
• Do not cover cooking grids with foil, or use broiling pans. Allow drippings to fall into the
grease tray(s).
CROWN VERITY INC., 37 ADAMS BLVD., BRANTFORD, ON. CAN. N3S 7V8
TEL: (519) 751-1800
FAX: (519) 751-1802
www.crownverity.com
Email: [email protected]
15
CLEANING AND MAINTENANCE
All Crown Verity Inc. charbroilers are easily cleaned because of their stainless steel
construction. For minor clean-ups, we suggest a general-purpose mild cleansing formula.
For heavy grease build-up, apply an oven cleaner to stainless steel surfaces only, following
the manufacturer’s instructions.
MCB’s can be thoroughly cleaned inside and out with the use of a pressure washer. Do
not expose regulators, control valves, or decals to high-pressure spray.
Cooking Grids:
Prior to each use, apply a light coating of cooking oil to the grids to prevent food from
sticking. After each use, scrub the grids with a stiff nylon pad, or brass brush. Do not
use steel brushes. Grids can also be washed with mild detergent or baking soda.
Exercise caution when cleaning hot surfaces
ADJUSTING AIR SHUTTERS:
Crown Verity Inc. charbroilers are equipped with adjustable air shutters on the
burner/venturi assembly. The air shutters are factory set for use with both natural
gas and LP gas and should not need adjustment. However, if adjustment
becomes necessary, they may be adjusted as follows: (should be performed by a
qualified technician)
• Light the charbroiler and leave on high setting.
• Check that the flame is mostly blue - some random yellow flecks are normal, as
is a muffled “pop” when the burner is turned off. If the flames are mostly yellow,
or the flames are noisy and lift off the burner ports, venturi air shutters require
adjusting as follows:
a) Loosen air shutter screw.
b) Increasing the amount of air opening will reduce the amount of yellow flame,
producing the desired short blue “cones”.
c) Decreasing the amount of air opening will “soften” the flame and correct a noisy,
lifting flame condition (however, should still be mostly blue in colour).
Note: Due to the location of the air shutters, you will have to make the adjustments
while the burners are off, re-light and observe the flames.
USE CAUTION WHEN WORKING AROUND HOT SURFACES
CROWN VERITY INC., 37 ADAMS BLVD., BRANTFORD, ON. CAN. N3S 7V8
TEL: (519) 751-1800
FAX: (519) 751-1802
www.crownverity.com
Email: [email protected]
16
TROUBLESHOOTING GUIDE
WHAT HAPPENS
1) Burners will not light
WHAT TO LOOK FOR
Out of propane? Improper lighting procedures? Is
cylinder valve turned on? Regulator assembly not fully
tightened to cylinder valve? Gas piping system is full of
air - Bleed out system, wait five minutes and repeat
lighting procedures.
2) Flames blow out on low
Has charbroiler been sufficiently preheated before
turning to low? Is the venturi properly seated over the
orifice? - Inspect both venturis and burner holes for
obstructions and check for proper air shutter opening
on venturis.
3) Burners are not hot enough
Leaving burner valve open before opening cylinder valve
or leak in system causing flow control device to
activate. - Follow proper lighting sequence or correct
leak in system. Inspect venturi for obstructions and
alignment. Make sure burners are clean.
4) Flashback (flame coming up
venturi around
console/control knobs)
Immediately shut off gas supply at cylinder valve. Allow
charbroiler to cool. Check venturis and orifices for
obstructions. (See fig. 2, pg. 6.) Excessive grease
build-up around control valves has caused a grease
fire. - Clean charbroiler. If problem persists, contact
qualified service person.
5) Grease dripping from base
Has grease tray been installed? Is charbroiler level?
Excessive grease build-up - Clean unit.
6) Charbroiler goes out after a
period of time
The cylinder pressure has dropped below operating
pressure due to freeze-up. Long periods of “full open”
operation will cause this. Remedy: exchange cylinder
with a new full one.
7) Excessive flare-up
Overload of fatty meat. - Clean charbroiler. Add water
to grease tray(s) (Level unit first). See tips and
techniques page 14.
17
FREQUENTLY ASKED QUESTIONS ABOUT MCB’S
Q. My charbroiler works great when it’s completely lit but I have problems getting all the
burners to light. Do I have a gas leak in the system causing the flow-limiting device to
activate?
A. Not likely. Make sure all burner valves (including pilot valve) are OFF (clockwise). Open
the LP cylinder valve. Wait 15 seconds before attempting to light pilot. This will allow the
pressure in the gas piping system to equalize and will allow the flow-limiting device to
reset itself. The device will activate every time the cylinder valve is opened to a nonpressurized piping system, and it takes a few seconds to re-set itself before it can handle
the large amounts of gas required to run an MCB. Remember: when this device
activates it still allows a small amount of gas to pass through (enough to run the pilot
tube and one burner adequately). The reason the flow-limiting device activates is because
when an LP cylinder valve is opened to a non-pressurized piping system, the rate of gas
flow exceeds (for a split second) the capacity of the device. All MCB piping systems will
equalize within 15 seconds prior to lighting attempts. However, if a burner or pilot valve
is left open, the device cannot reset itself because it has no back-pressure with which to
do so.
Q. My charbroiler takes forever to light. Why is that?
A. The piping system fills with air when cylinders or supply hoses are disconnected, and it
takes some time to bleed the air out of the system through the small pilot orifice holes.
Be patient.
Q. How long will my L.P. cylinder last?
A. Good question, the formula used to calculate this accounts for only two thirds of the
cylinder’s capacity. Not to say that MCB’s won’t work after the first two thirds of the
propane are used up, but that the pressure in the cylinder begins to drop significantly at
that level. Using this formula, With a twenty pound cylinder (full) and using the average
maximum input (amount of gas used) for MCB’s. We came up with an average cylinder
life of 3 to 3-1/2 hrs.
CROWN VERITY INC., 37 ADAMS BLVD., BRANTFORD, ON. CAN. N3S 7V8
TEL: (519) 751-1800
FAX: (519) 751-1802
www.crownverity.com
Email: [email protected]
18
ITEM PART #
PARTS AND COMPONENTS
41
I
40
Y
R T
CROWN
VERITY
INC
CROWN
VE
Y
R T
I
CROWN
39
CROWN
VERITY
INC
*
20
22
*
21
7
23
24
25
*
31
32
33
*
53
8
9
DESCRIPTION
2005 Roll Dome Handle – 12"
2105 Roll Dome Handle – 18"
2 2080 Burner Knob
3 2090 Pilot Knob
4 2030 Control Valve – Propane
5 2050 Control Valve – Natural Gas
2
56
18
55
6 2040 Control Valve – Pilot
A
3
7 2032 Burner Orifice – Propane
8 2052 Burner Orifice – Natural Gas
PARTS & SERVICE
9 2042 Pilot Orifice – Propane
19
10 2044 Pilot Orifice – Natural Gas
Technical Assistance, Parts and Service – please11 call
Verity Inc.
2060 Crown
Burner
12
2070
Radiant
51
at 1-888-505-7240 or (519) 751-1800.
*
13 3032 Lighter Tube – 36” & LH 72” MCB
Our Customer Service Representatives40 will
assist you.
41 gladly
14 4032 Lighter Tube – LH 48” MCB
15 4033 Lighter Tube – RH 48” MCB
34 35 36 37 38 *
49
16 6032 Lighter Tube – 30” & LH 60” MCB
17 6033 Lighter Tube – RH 60” MCB
42 43
18 7033 Lighter Tube – RH 72” MCB
50 *
44
A
52
19 2105 Push Handle – 18”
VE
For
1
11
1
54
10
57
2
12
3
4
5
26
6
27
28
29
*
20
13
14
15
17
18
*
*
47
45
SECTION A-A
46
16
48
30
*
21
22
23
24
25
26
27
28
29
30
31
32
33
34
35
36
37
38
39
40
41
42
43
44
45
46
47
48
49
50
2208 27” Bumper (30” & 60” MCB)
2209 33” Bumper (36” & 72” MCB)
2210 45” Bumper (48” MCB)
3023
4023
6023
6024
7024
8025
3025
4025
6025
7025
2170
2160
2150
8071
3071
4071
Heat Shield – 36” & LH 72” MCB
Heat Shield – 48” MCB
Heat Shield – 30” & LH 60” MCB
Heat Shield – RH 60” MCB
Heat Shield – RH 72” MCB
Grease Tray – 30” MCB
Grease Tray – 36” MCB
Grease Tray – 48” MCB
Grease Tray – 60” MCB
Grease Tray – 72” MCB
Cooking Grate – 12” x 20 1/2”
Cooking Grate – 14” x 20 1/2”
Cooking Grate – 22” x 20 1/2”
Under Shelf – 30” MCB
Under Shelf – 36” MCB
Under Shelf – 48” MCB
6071
7071
2142
2213
2214
2211
2220
2216
2141
2215
2146
2148
2214
2200
Under Shelf – 60” MCB
Under Shelf – 72” MCB
Leg Bolt
Leg – Right Hand
Leg – Left Hand
Caster Mount
Caster Mount Stiffener
Caster – 5"
Spoke Wheel – 14” Plastic Spoke
Axle
Axle Washer
Axle Pin
Cylinder Bracket Assembly
Hose & Regulator Assembly – Propane
2180 1/2” Regulator – Natural Gas (36” & 48” MCB)
51 CAN.
CROWN VERITY INC., 37 ADAMS BLVD., BRANTFORD, ON.
N3S
7V8
2189 3/4”
Regulator
– Natural Gas (60” & 72” MCB)
FAX: (519) 751-18025110 1/2” Natural Gas Hose c/w Quick Disconnect (36” & 48” MCB)
TEL: (519) 751-1800
52 5120 3/4” Natural Gas Hose c/w Quick Disconnect (60” & 72” MCB)
www.crownverity.com
The drawing is the property of Crown
Due to a continuous program of product
* Note: Please specify model number,
53 2205 Roll Dome Pivot Assembly
Verity Inc. and it is not to be reproduced
improvement Crown Verity Inc. reserves
of gas and serial number when
Email: type
[email protected]
the right to make changes in design and
without expressed written consent of
ordering replacement parts. Example:
54 2206 Roll Dome Stop Assembly
in specifications without notice.
Crown Verity Inc.
MCB-48, propane, *****
55 2003 Bronze Name Plate Assembly
56 2004 Thermometer Assembly
57 2020 Roll Dome Pin / Ring Assembly