1
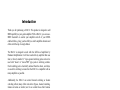
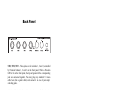
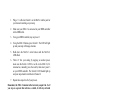
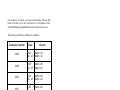
MAC-2
User’s Manual
RJM Music Technology, Inc.
MAC-2
User’s Manual
Version 1.0
August 6, 2007
Diamond Amplification
5261 Langfield Road
Houston, TX 77040
+1-713-934-0100
Email: [email protected]
Web: www.diamondamplification.com
RJM Music Technology, Inc.
2525 Pioneer Ave #2
Vista, CA 92081
+1-760-597-9450
E-mail: [email protected]
Web: www.rjmmusic.com
Copyright © 2007 RJM Music Technology, Inc. All Rights Reserved.
Table of Contents
INTRODUCTION
1
FRONT PANEL
2
BACK PANEL
3
PROGRAMMING
5
Continuous Controllers
SETUP MODE
6
8
Setting MIDI Channel
8
Setting Inverted Functions
9
Setting Momentary Functions
9
Grouping Functions
DATA BACKUP
10
11
MAC-2 to MAC-2 copy
11
MAC-2 to computer copy
11
SPECIFICATIONS
13
WARRANTY
14
Introduction
Thank you for purchasing a MAC-2. This product is designed to add
MIDI capability to your guitar amplifier. With a MAC-2, you can use a
MIDI footswitch to control your amplifier and all of your MIDIenabled effects, giving you the ability to switch amplifier channels and
effects with the tap of a single button.
The MAC-2 is designed to work with the full line of amplifiers by
Diamond Amplification. It will also work with any amplifier that uses
four (or fewer) standard ¼” tip-to-ground switching jacks and can be
used with “mono” or “stereo/TRS” type jacks or switching controls.
Each switching jack is electrically isolated from the others, and relays
are used for switching to insure that the MAC-2 is compatible with as
many amplifiers as possible.
Additionally, the MAC-2 can control channel switching or feature
switching effects (many effect units allow bypass, channel switching,
feature activation or similar) and it can control these effect features
along with your amp giving you maximum flexibility.
1
Front Panel
Function buttons 1 through 5 – These buttons control the five
switches found on the MAC-2. Once the MAC-2 is connected to an
amplifier, these buttons will control the amplifier just like the
amplifier’s footswitch does – switching channels, boosts, or any other
feature found on the footswitch. These may also be used to control
effect bypass, channel or function controls.
Each function button has a blue LED next to it. When a function switch
is on, its LED is lit.
Write – When held down for 3 seconds, this button saves the current
switch settings to memory. This function is not active until you connect
a MIDI footswitch to the MAC-2 and select a MIDI program number.
See the Programming section for more details.
Power – This green LED is lit when the MAC-2 is on.
2
Back Panel
SW1, SW2, SW3 – These jacks are for switches 1, 2 and 3, controlled
by Function buttons 1, 2 and 3 on the front panel. When a Function
LED is lit on the front panel, the tip and ground of the corresponding
jack are connected together. You may plug any standard ¼” mono
cable here (like a guitar cable) and connect it to one of your amp’s
switching jacks.
SW4/5 – This jack is for switches 4 and 5, controlled by Function
buttons 4 and 5 on the front panel. When the Function 4 LED is lit on
the front panel, the tip and ground of this jack are connected together.
When the Function 5 LED is lit on the front panel, the ring and ground
of this jack are connected together. If you plug a standard ¼” cable in
this jack, only switch 4 will work. If you plug a stereo (also called
TRS) ¼” cable in this jack, you’ll have access to both switch 4 (on the
tip conductor) and switch 5 (on the ring conductor).
MIDI Thru – All of the MIDI commands that are received at the MIDI
In jack are sent out through this jack. This jack also doubles as a MIDI
output for the purpose of dumping the MAC-2s settings over MIDI (see
the Data Backup section for more details). Bring your MIDI in through
the MIDI In jack, then send it to the next piece in line through the
MIDI Thru jack.
MIDI In – Jack for incoming MIDI commands. Connect your MIDI
foot controller here. The MAC-2 will provide phantom power to a
compatible MIDI controller if you use a 7-pin MIDI cable. The AC
adapter provided with the MAC-2 can phantom power most MIDI
controllers provided that they can run on a 9V DC supply. However, if
3
your MIDI controller needs more than 800mA, an adapter with a higher
current capacity is required.
Power – This unit requires power supply in the range of 9 to 18 volts,
AC or DC. The plug should be a 5.5mm/2.1mm barrel connector,
similar to those used in most effects pedals. The MAC-2 requires a
power supply able to deliver at least 200mA of current. This power is
also passed directly to the MIDI In jack to phantom power the
connected MIDI footswitch. If you are phantom powering, please make
sure that the power supply is sufficient to power both the MAC-2 and
your MIDI footswitch. If you use certain DC power supplies designed
to supply DC power to multiple devices, it may not supply sufficient
current. For example, when using the Voodoo Lab Pedal Power 2, it is
recommended that you use the LINE 6 outputs, which are capable of
providing more current than the other outputs.
4
Programming
Programming the MAC-2 lets it know which switches to turn on when
you select a program number on your MIDI footswitch. For each
program number on your footswitch, you can choose which channel
and which features are active on your amplifier. For example, you can
set up button 1 on your MIDI footswitch to select channel 2 on your
amp, and button 2 on your MIDI footswitch to select channel 1 and the
boost function.
The MAC-2 is designed to work with any standard MIDI footswitch.
You can store different switch settings for MIDI program numbers 1
through 128. When a Program Change message is received on the
correct channel, the MAC-2 will automatically recall the saved settings
for the given program number.
To program the MAC-2, simply connect your MIDI controller’s MIDI
output to your MAC-2’s MIDI In jack. The MAC-2 is set for MIDI
Channel 1 by default. Either make sure your MIDI controller is set up
to transmit on Channel 1, or use the MAC-2’s setup mode to change
which MIDI channel the MAC-2 responds to. See the Setup Mode
section for more details.
To save a program setting, perform the following steps:
1.
Using your MIDI controller, select a MIDI program number.
2.
Using the MAC-2 buttons, select the amplifier channel (and
other features) you’d like to assign to that MIDI program.
3.
Hold down the Write button on the MAC-2 until the LEDs
flash. This should take about 3 seconds.
That’s all it takes. You can repeat this for any or all of MIDI program
numbers 1 though 128.
So, for example, let’s assume your amp is a two channel amp with a ¼”
jack for channel switching. Follow the following steps to make your
amp switch to Channel 2 when you step on preset 3 of your MIDI
controller:
5
1.
Plug a ¼” cable into Switch 1 on the MAC-2 and the jack for
your channel switching on your amp.
2.
Make sure your MAC-2 is connected to your MIDI controller
with a MIDI cable.
3.
Using your MIDI controller, step on preset 3.
4.
Using the MAC-2 buttons, press Switch 1. The LED will light
up and your amp will change channels.
5.
Hold down the MAC-2’s write button until the MAC-2’s
LEDs flash.
6.
That’s it! Test your setting by stepping on another preset,
make sure the Switch 1 LED is not lit on the MAC-2 (if it
remained on, manually press the switch), then select preset 3
on your MIDI controller. The Switch 1 LED should light up
and your amp should switch back to Channel 2.
7.
Repeat these steps for all of your presets.
Remember, the MAC-2 remains in the last state you put it in. So if
you step on a preset that activates a switch, it will stay activated
until you tell it to do something else. So when programming your
MIDI controller, you should repeat these steps for every preset,
even if it seems duplicative.
If the LEDs don’t flash after a few seconds of holding down the Write
button, it means that your MAC-2 did not receive the MIDI Program
Change message. Check your MIDI cable connection, and make sure
that the MIDI controller and MAC-2 are set to the same MIDI channel.
Now that your settings have been saved, you can recall your settings by
pressing the appropriate button on your MIDI footswitch. The MAC-2
will call up your saved settings and set the switches whenever it
receives a MIDI Program Change message.
Continuous Controllers
In addition to supporting MIDI Program Change messages, the MAC-2
supports MIDI Continuous Controller messages. This allows you to
have direct access to each switch. If your MIDI footswitch supports
Continuous Controllers you can, for example, assign one button on
6
your footswitch to control your amp’s boost function. Pressing that
button will allow you to turn the boost on or off regardless of the
current MIDI program number that has most recently been selected.
The following Continuous Controllers are supported:
Continuous Controller
Value
Function
CC88
0..63
64…127
Switch 1 off
Switch 1 on
CC89
0..63
64…127
Switch 2 off
Switch 2 on
CC90
0..63
64…127
Switch 3 off
Switch 3 on
CC91
0..63
64…127
Switch 4 off
Switch 4 on
CC92
0..63
64…127
Switch 5 off
Switch 5 on
Please note that settings such as Momentary Mode and Grouping are in
effect when processing Continuous Controller messages. See the Setup
Mode section for more details on these settings.
7
Setup Mode
Setup mode allows you to change how the MAC-2’s MIDI and
switching functions work. In most circumstances, you won’t need these
functions at all. If you have a complex MIDI setup, or an amplifier with
special switching requirements, setup mode will help you integrate the
MAC-2 into your rig.
Setting MIDI Channel
The MAC-2 responds to MIDI channel 1 by default. If you’d like to
change it to respond to a different channel, you can follow these steps:
1.
2.
3.
Remove the power supply from the MAC-2
Hold down the Function 1 button and plug in the MAC-2’s
power supply
Keep holding the Function 1 button until the LEDs flash
You’re now able to select which MIDI channel the MAC-2 responds to.
Use the channel buttons to turn the channel LEDs on or off to get the
desired pattern shown below:
MIDI
Chan
1
2
3
4
5
6
7
8
9
10
11
12
13
14
15
16
Function 1
LED
OFF
ON
OFF
ON
OFF
ON
OFF
ON
OFF
ON
OFF
ON
OFF
ON
OFF
ON
Function 2
LED
OFF
OFF
ON
ON
OFF
OFF
ON
ON
OFF
OFF
ON
ON
OFF
OFF
ON
ON
8
Function 3
LED
OFF
OFF
OFF
OFF
ON
ON
ON
ON
OFF
OFF
OFF
OFF
ON
ON
ON
ON
Function 4
LED
OFF
OFF
OFF
OFF
OFF
OFF
OFF
OFF
ON
ON
ON
ON
ON
ON
ON
ON
Once you’ve chosen your MIDI channel, press the Write button. The
MAC-2 will flash its LEDs, then return to normal operating mode with
the new settings in effect.
Setting Inverted Functions
On certain amplifiers, a switching function is inverted. For example:
your amp has footswitchable reverb. But, when you control it from the
MAC-2, reverb is on when its function LED is not lit and reverb is off
when its function LED is lit. If you find that this is happening, follow
these steps:
1.
2.
3.
Remove the power supply from the MAC-2
Hold down the Function 2 button and plug in the MAC-2’s
power supply
Keep holding the Function 1 button until the LEDs flash
Now, press the buttons to select the function or functions that are
inverted. Make sure that only the inverted functions are lit up and all
others are not lit.
Once you’ve done this, press the Write button. The MAC-2 will flash
its LEDs, then return to normal operating mode. The inverted functions
should now work normally.
Setting Momentary Functions
A small number of amplifiers require momentary switching, where the
switch is turned on and then quickly turned off once again. The MAC-2
can accommodate this. Follow the steps to enable momentary
switching:
1.
2.
3.
Remove the power supply from the MAC-2
Hold down the Function 3 button and plug in the MAC-2’s
power supply
Keep holding the Function 1 button until the LEDs flash
9
Now, press the buttons to select the function or functions that require
momentary switching. Make sure that only the momentary functions
are lit up and all others are not lit.
Once you’ve done this, press the Write button. The MAC-2 will flash
its LEDs, then return to normal operating mode. The functions you
selected will now use momentary switching.
Grouping Functions
Using the Group setting, you can limit a group of switches to have only
one switch on at a time – if you turn on one switch in the group, all of
the other switches in the group turn off. This is especially useful for
amplifiers with three or more channels – only one channel may be on at
a time, so putting them in a group will insure that only one channel
switch is on at a time.
To set up a group:
1.
2.
3.
Remove the power supply from the MAC-2
Hold down the Function 4 button and plug in the MAC-2’s
power supply
Keep holding the Function 1 button until the LEDs flash
Now, press the buttons to select the functions that should be grouped
together. Any functions that are lit up will be in the group, and the ones
that are not lit will be excluded.
Once you’ve done this, press the Write button. The MAC-2 will flash
its LEDs, then return to normal operating mode. The selected functions
will now act as a group.
10
Data Backup
To make sure your settings are never lost, you can copy your settings
from one MAC-2 to another, or copy them from a MAC-2 to a
computer.
MAC-2 to MAC-2 copy
To copy settings from one MAC-2 to another:
1.
2.
3.
4.
5.
6.
Connect a MIDI cable to the MIDI Thru jack of the MAC-2
you wish to copy from.
Connect the other end of the MIDI cable to the MIDI In jack
of the MAC-2 you wish to copy to.
Make sure that no other MIDI cables are connected to the
MAC-2s.
Make sure that both MAC-2s are on.
On the MAC-2 you wish to copy from, disconnect the power
supply. Then, hold down the Function 5 button and reconnect
the power supply (while still holding the button down). The
LEDs on both units should flash briefly. This process is very
fast, so don’t be surprised if you miss it!
On the MAC-2 you copied the settings to, disconnect power,
wait a second, then reconnect power.
Once you’ve done this, both MAC-2s will have the same settings.
MAC-2 to computer copy
You can also copy your settings from your MAC-2 to a computer and
vice-versa. To do this, you need a computer with a MIDI interface and
a SysEx dump or SysEx librarian program.
To copy your settings to your computer, connect the MAC-2’s MIDI
Thru jack to the computer’s MIDI input. Don’t connect any other MIDI
cables. Set your SysEx program to receive data, then disconnect the
power on the MAC-2. Hold down the Function 5 button and reconnect
power to the MAC-2. The data will be transferred to your computer,
where you can keep it as a backup.
11
To copy your settings from the computer back to your MAC-2, connect
the MAC-2’s MIDI In jack to the computer’s MIDI output. Make sure
the MAC-2 is on. Using your SysEx program, load your settings and
send them to the MAC-2. The MAC-2’s LEDs will flash briefly. Once
this is done, disconnect power to the MAC-2, wait a second, then
reconnect power. The MAC-2 will now be using its new settings.
12
Specifications
Dimensions
Weight
Power
Half-rack size
8 (W) x 1.5 (H) x 5.7 (D) inches
20.3 (W) x 3.8 (H) x 14.5 (D) cm
2 lbs
0.9 kg
9-18 Volts, AC or DC @ 200mA
5.5mm OD, 2.5mm ID x 9.5mm barrel
connector
Included power supply is 9VDC, 1A
Phantom
Power
Power provided to the Power jack is passed
to pins 6 and 7 of the MIDI In jack
Maximum 800mA current when using
provided AC adaptor
Memory
128 programs
Memory is non-volatile and requires no
backup battery
13
Warranty
RJM Music Technology, Inc. warrants this product against any defects
that are due to faulty material or workmanship for a period of one year
from the date of original retail purchase. This warranty does not cover
damage to the product resulting from accident or misuse.
This warranty is transferable provided the current owner has the
original purchase receipt and can provide a copy of it when submitting
the warranty claim.
Should you experience any difficulty with this RJM Music product,
please contact us as described below. If it is determined that the product
has become defective within the warranty period and must be returned
to the factory, RJM Music Technology will issue a Returned
Merchandise Authorization (RMA) number and shipping and
packaging instructions.
RJM Music Technology will repair or replace the product free of
charge, provided it is returned freight prepaid to RJM Music
Technology with a valid receipt and RMA number. Return shipping
will be paid by RJM Music Technology within the U.S. only.
This warranty shall not apply to any goods that have been repaired or
altered by anyone other than the manufacturer. There are no warranties
which extend beyond the terms described herein.
RJM Music Technology, Inc.
2525 Pioneer Ave. #2
Vista, CA 92081
+1-760-597-9450
E-Mail: [email protected]
14