1
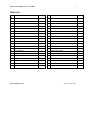
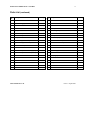
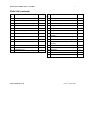
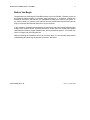
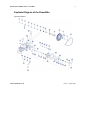
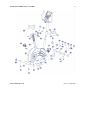
Reebok Fitness RB Bike Series – PowerBike Contents 1 Page Welcome to Reebok Fitness Equipment 2 Customer Services 3 Precautions 4 Parts List 5 Before You Begin 8 Exploded Diagram of the PowerBike 9 Component Checklist 11 Part Identification/Diagram 12 Assembly Instructions 14 The Computer 25 Functions and Buttons 26 Seat, Handlebar and Level Adjustment 29 Transport 32 EKG Hand Pulse Sensor Operation 33 Heart Rate Training 34 Training Guidelines 35 Hints To Help You Achieve Your Goals 36 Maintenance 38 How to Order Replacements Parts 39 Limited Warranty 40 www.reebokfitness.co.uk Issue 1 – August 2004 Reebok Fitness RB Bike Series – PowerBike 2 Welcome to Reebok Fitness Equipment All Reebok products are manufactured to the highest specifications and this instruction manual should enable you to assemble the PowerBike and commence your work out program. If, however, you have any additional comments please call our Customer Service Department on + 44 (0) 1908 512244 or our Technical Support Hotline on 0870 330 0024 (UK residents only). To help us assist you, please quote the product Model Number, Serial Number and Production date, these can be found on the product Data Plate located on the inside of the Rear Stabiliser. Not having this vital information will delay us in being able to solve your queries. www.reebokfitness.co.uk Issue 1 – August 2004 Reebok Fitness RB Bike Series – PowerBike 3 Customer Services As a manufacturer, we are committed to providing complete customer satisfaction. If you have any questions, or if parts are missing or damaged, we will guarantee complete satisfaction through direct assistance from our factory. To avoid unnecessary delays, please call our Technical Support Team direct on 0870 330 0024 The trained technicians on our Technical Support line will provide immediate assistance free of charge. UK Customer Services: 01908 512244 UK Technical Support: 0870 330 0024 UK Technical Support e-mail: UK Customer Services address: UK Customer Services e-mail Model No. [email protected] RFE International Ltd, DFDS House Maidstone Road, Kingston Milton Keynes MK10 OAJ [email protected] REM-11200 Serial Number: (Make a note of this here) Production Date: (Make a note of this here) [The above information can be found on the Data Sticker on the inner face of the Rear Stabiliser.] www.reebokfitness.co.uk Issue 1 – August 2004 Reebok Fitness RB Bike Series – PowerBike 4 Precautions Before beginning this or any exercise programme, please consult your GP. This is especially important for persons who have not exercised regularly before or persons with pre-existing health problems. Please read all instructions before using. Reebok® assumes no responsibility for personal injury or property damage sustained by or through the use of this product. Read all precautions and instructions in this manual before using this equipment. recommend that you keep this manual for future reference. We It is the responsibility of the owner to ensure that all users of the PowerBike are adequately informed of all precautions. Use the PowerBike only as described in this manual. Use the PowerBike indoors on a level surface with adequate free space around the bike to ensure safe operation and keep it away from moisture and dust. Place a mat under the stabilisers to protect the floor or carpet. Inspect and tighten all parts regularly. Replace any worn parts immediately. Keep children under the age of 12 and pets away from the PowerBike at all times. The PowerBike should not be used by persons weighing more than 110kg. Wear appropriate clothing when exercising; do not wear loose clothing that could become caught in the moving parts. Always wear athletic shoes and keep your back straight when using the PowerBike. Do not arch your back. If you feel pain or dizziness while exercising, stop immediately and cool down. The Heart Rate sensor is not a medical device. Various factors, including the user’s movement, may affect the accuracy of heart rate readings. The Heart Rate sensor is intended only as an exercise aid in determining heart rate trends in general. The PowerBike is a class “H” (Home) product and is intended for in-home use only. Do not use it in a commercial, rental, or institutional setting. The PowerBike is not designed for therapeutic use. www.reebokfitness.co.uk Issue 1 – August 2004 Reebok Fitness RB Bike Series – PowerBike 5 Parts List Part No. 1 Description Cap for Crank (R & L) 2 Part Description No. 21 3/8" Nut 2 M10 Nut 2 22 Spacer 1 3 Left Crank 1 23 Flywheel Axle 1 4 Right Crank 1 24 Bearing (6000) 2 5 Lock Nut 2 25 Flywheel 1 6 Magnet Bracket Spring 1 26 Clutch bearing 1 7 20 x 45 Washer 1 27 Small pulley 1 8 20 x 30 washer 3 28 Wire Lower Section – 7 Pins 1 9 Bearing (6004) 2 29 Not available on this model 0 10 M6 x 15 screw 4 30 Speed Sensor 1 11 Crank shaft 1 31 Base Frame 1 12 Large plastic pulley 1 32 Servo Motor 1 13 Drive Belt 1 33 M6 x 15 screw 1 14 10 x 22 Washer 2 34 Tension pulley bearing 2 15 Magnet spacer Spring 1 35 Tension pulley spring 1 16 Magnet Bracket Shaft 1 36 Tension pulley bracket 1 17 Magnet bracket 1 37 Cir-clip 1 18 M6 x 8 Screw 4 38 Computer Housing - Front 1 19 3/8" Nut 2 39 M6 x 12 Screw 4 20 Flywheel axle holder 2 40 Handlebar holder (1) 1 www.reebokfitness.co.uk Quantity Quantity 2 Issue 1 – August 2004 Reebok Fitness RB Bike Series – PowerBike 6 Parts List (continued) Part No. 41 Description Quantity M6 x 8 Screw 2 Part Description No. 61 Not available on this model 42 Nylon Bushing (2) 2 62 Not available on this model 0 43 #3 x 10 Screw 4 63 Saddle Post 1 44 M6 x 5 Bolt 1 64 Saddle post sleeve 1 45 Spring 1 65 Saddle height adjustment knob 1 46 Handlebar adjustment knob 1 66 Not available on this model 0 47 Handlebar adjustment bracket 1 67 Saddle post Insert 1 48 M6 Nylon Nut 1 68 Chain cover (Left) 1 49 Wire loom upper cable 7 pins 1 69 Stabiliser tube end cap 4 50 CyberRider upper cable 28 pins 1 70 Rear Stabiliser Level adjuster 2 51 Handlebar end cap 2 71 M8 x 15 Allen bolt 8 52 Handlebar 1 72 8 x 22 washer 4 53 Handlebar adjustment cover (upper) 1 73 Console Upright 1 54 Handlebar adjustment cover (lower) 1 74 Curve washer 4 55 #8 x 15 Screw 4 75 Pedal (Right) 1 56 #8 x 15 Drill screw 6 76 Rear stabiliser 1 57 Not available on this model 0 77 Front stabiliser 1 58 Not available on this model 0 78 Transportation wheel bracket 2 59 Not available on this model 0 79 Not available on this model 0 60 Saddle 1 80 Not available on this model 0 www.reebokfitness.co.uk Issue 1 – August 2004 Quantity 0 Reebok Fitness RB Bike Series – PowerBike 7 Parts List (continued) Part No. 81 Description Bearing (6003) 2 Part Description No. 94 Computer Insert 82 Aluminium Disk 1 95 Wireless HR receiver board 1 83 Spring washer 4 96 Computer Housing – Rear 1 84 M8 x 15 Allen bolt 4 97 Cir-clip 1 85 #3 x 12 Screw 2 98 M4 x 10 Computer housing screw 7 86 Chain Cover (Right) 1 99 Spring Washer 8 87 Chain Cover Insert 12 1 88 Pedal (Left) 1 100 Screws bag (not shown on exploded diagrams) 101 Allen Key (not shown on exploded diagrams) 89 M6 Nylon Nut 2 102 Spanner (not shown on exploded diagrams) 1 90 Transportation wheel 2 1 91 M6 x 30 Allen bolt 2 103 Screwdriver (not shown on exploded diagrams) 104 Computer Key Pad & Buttons 92 Not available on this model 0 105 Nylon Nut 3 93 CyberRider cover 1 106 Flat Washer 3 107 Stabilizer Cushion 2 108 M5 Screw 2 www.reebokfitness.co.uk Quantity Quantity 1 Issue 1 – August 2004 1 1 Reebok Fitness RB Bike Series – PowerBike 8 Before You Begin Congratulations on selecting the PowerBike exercise cycle from Reebok. Whether you are an accomplished athlete seeking to maintain peak performance or a beginner realising the benefits of exercise for the first time, the PowerBike will help you to achieve your goals. In the “Hints to Help You” section of this manual we have outlined some tips that we hope will help you maximise the effectiveness and fun of your workouts. In the meantime, remember that the benefits of exercise are many and varied including higher energy levels, reduced stress, improved self-esteem, clearer and more radiant skin, greater cardiovascular efficiency, higher metabolic rate, and improved body posture - all of which can result in a longer and more enjoyable life. Whilst purchasing the PowerBike will not do all of this alone, it is an important step towards understanding and achieving the benefits of exercise. Well done! www.reebokfitness.co.uk Issue 1 – August 2004 Reebok Fitness RB Bike Series – PowerBike 9 Exploded Diagram of the PowerBike Exploded diagram 1 www.reebokfitness.co.uk Issue 1 – August 2004 Reebok Fitness RB Bike Series – PowerBike 10 Exploded diagram 2 www.reebokfitness.co.uk Issue 1 – August 2004 Reebok Fitness RB Bike Series – PowerBike 11 Component Checklist In order to assist in assembly the majority of the screws etc have been placed in their correct location. All you will have to do is remove them when carrying out each step of the assembly procedure. Those parts that have not been pre-located have been placed in individual plastic bags with the part number on the bag to ease identification. These can be found in the carton that holds the PowerBike uprights, inside the main carton. If you do have problems identifying any part, please refer to the Parts List. We suggest that you leave all pre-assembled screws etc in their locations until you need to assemble that part. www.reebokfitness.co.uk Issue 1 – August 2004 Reebok Fitness RB Bike Series – PowerBike 12 Part Identification/Diagram Use this diagram to help identify the parts used in assembly. The numbers in the circles refer to the key number of the part. Place all parts of the product in a cleared area and remove the packaging. Please check that you have all of the parts before you begin assembly. If you are missing any parts please call our Technical Support Team on 0870 330 0024 and we will deliver the missing parts to you Note: Some parts may have been pre-attached for shipping purposes. If a part is not found in the hardware pack, check to see if it has been pre-attached. Do not dispose of the packaging materials until assembly is completed. Assembly tools and batteries (4 x 1.5V - size C) are included in the hardware pack. www.reebokfitness.co.uk Issue 1 – August 2004 Reebok Fitness RB Bike Series – PowerBike www.reebokfitness.co.uk 13 Issue 1 – August 2004 Reebok Fitness RB Bike Series – PowerBike 14 Assembly Instructions 1: Front Stabiliser Assembly: Fasten front stabiliser (77) to the Base Frame (31) using 2 x Bolt (71), 2 x washer (72) and 2 x Spring Washer (99). Tighten with Allen Key (101). The transport wheels and bracket (78) have been pre-assembled on Front Stabiliser (77). Note: To aid the assembly process, it may help to place a piece of the Styrofoam packaging under the Base Frame (31). www.reebokfitness.co.uk Issue 1 – August 2004 Reebok Fitness RB Bike Series – PowerBike 15 2: Rear Stabiliser Assembly: Fasten the Rear Stabiliser (76) to the Base Frame (31) using 2 x Bolt (71), 2 x Washer (72) and 2 x Spring Washer. Tighten with Allen Key (101). Note: To aid the assembly process, it may help to place a piece of the Styrofoam packaging under the Base Frame (31). The Rear Stabiliser (76) has the Level Adjusters (70) pre-assembled. If your PowerBike is not steady you will need to adjust these in order to stabilise the unit. To adjust tip the product to one side and screw the adjuster out. It may help to have someone hold the bike for you when carrying out this procedure. www.reebokfitness.co.uk Issue 1 – August 2004 Reebok Fitness RB Bike Series – PowerBike 16 3: Pedal Assembly: Thread the Right Pedal (75) (there is an “R” stamped on the pedal for identification) into the Right Crank (4). Finger tighten only and then fully tighten with the Spanner (102). Place the Right Pedal Strap onto the pedal (this is identified with an “R” on the upper surface of the strap). Attach the end of the strap with the two segments cut out first. Then attach the other side once the desired length has been selected. Repeat the process for the Left Pedal (88). www.reebokfitness.co.uk Issue 1 – August 2004 Reebok Fitness RB Bike Series – PowerBike 17 4: Saddle and Saddle Stem Assembly: Place the Saddle (60) on the floor and remove the pre-assembled nuts and washers, place the Saddle Post (63) over the captive bolts on the underside of the Saddle and replace the washers and nuts. Tighten with Spanner (102). Slide the Saddle post sleeve (64) over the Saddle post (63), if not already pre-assembled. Insert the assembled Saddle (60), Saddle Stem (63) and Saddle Post sleeve (64) into the Base Frame (31). When done insert the Saddle Height Adjustment Knob (65) into the Base Frame (31) and select the correct height you wish the saddle to be, then fully tighten the Adjustment Knob (65). Please note in order to adjust the height of the saddle you do not have to fully remove the Adjustment Knob, undo the knob a couple of turns and then pull, the knob is sprung loaded. www.reebokfitness.co.uk Issue 1 – August 2004 Reebok Fitness RB Bike Series – PowerBike 18 5: Handlebar Assembly When carrying out this section of the assembly place the Computer Upright on the floor and support it with some of the Styrofoam packaging. Place the Computer Upright (73) on the floor, then take the Handlebars (52) and place them in the adjustment bracket rear housing (40), this is found on the Computer Upright. You may have to open the Adjustment Bracket. To open the bracket simply undo the Adjustment Knob (46) www.reebokfitness.co.uk Issue 1 – August 2004 Reebok Fitness RB Bike Series – PowerBike 19 Place one Nylon Bushing (42) over the Handlebar (52) and secure with 2 x screws (43) using Screwdriver (103). Repeat this procedure for the second Nylon Bushing (42) and secure with 2 x screws (43) using Screwdriver (103). Place spring (45) over the thread of the Adjustment Knob (46) and then rotate the Adjustment Bracket front housing (47) over the rear housing (40). Insert Handlebar Adjustment Knob (46) into the hole at the top of the rear housing. Only screw the knob in a couple of turns - do not fully tighten as this will prevent you from assembling the handlebar adjustment. Thread the 2 EKG pulse wires through the hole in the left side of the Computer Upright (73) and out of the top of the computer upright. www.reebokfitness.co.uk Issue 1 – August 2004 Reebok Fitness RB Bike Series – PowerBike 20 6: Console Upright Assembly: Remove the pre-assembled Socket Head Screws and Curve Washers from the lower section of the upright (31). Attach Upper Wire Loom Cable 7-Pin connector (49) to Lower Wire Loom Cable 7-Pin connector (28). Please ensure these two cables are firmly connected. A click should be felt when pushing them together. www.reebokfitness.co.uk Issue 1 – August 2004 Reebok Fitness RB Bike Series – PowerBike 21 Remove the tie from the CyberRider loom (50) and insert the loom into the lower section of the upright (31). When both looms have been inserted into the upper and lower sections of the upright, place the upper section of the upright over the lower section of the upright; do not insert the screws at this point. Remove the CyberRider cover (93) from the front of the PowerBike and then carefully pull the CyberRider Loom out of the cut out section in the main frame, now replace the CyberRider Cover. Now re-attach the Socket Head Screws and Washers. Finger tighten first and then fully tighten with Allen Key (101). www.reebokfitness.co.uk Issue 1 – August 2004 Reebok Fitness RB Bike Series – PowerBike 22 7: Console Assembly: Connect Upper Loom cable 7-pin connector (49) to the 7-pin connector located on the wire coming from the back of the Computer, then attach the CyberRider Loom cable 28-pin Connector (50) to the 28-pin Connector located on the circuit board inside the console. Connect both EKG wires to the wires coming out of the rear of the computer. Push any excess wires back into the computer upright (73). Place console onto the metal plate on to the computer upright (73) and attach the computer to the metal plate with 4 x Screws (39) using screwdriver (103). www.reebokfitness.co.uk Issue 1 – August 2004 Reebok Fitness RB Bike Series – PowerBike 23 8: Handlebar Adjustment Cover Assembly Place the Handlebar Adjustment Cover – lower section (54) under the Handlebar. Please take extra care not to pinch the EKG wires. It is recommended that these wires are pushed out of the way of the captive thread to allow you to clip the lower section in place. www.reebokfitness.co.uk Issue 1 – August 2004 Reebok Fitness RB Bike Series – PowerBike 24 Place the Handlebar Adjustment Cover – upper section (53) over the Handlebar and on top of the lower section, secure both sections with 4 x Screws (55) using Screwdriver (103). Note: to do this the Handlebar Adjustment Knob must only be inserted a couple of turns. If it is fully tightened this will prevent you from assembling the Handlebar Covers. Now fully tighten Adjustment Knob (46). To alter the position of the Handlebars undo the Adjustment Knob (46), select the desired position and then tighten it again. www.reebokfitness.co.uk Issue 1 – August 2004 Reebok Fitness RB Bike Series – PowerBike 25 The Computer SPEED RPM profile RESISTANCE TIME PULSE CALORIES www.reebokfitness.co.uk DISTANCE Issue 1 – August 2004 Reebok Fitness RB Bike Series – PowerBike 26 Functions and Buttons SPEED: CALORIES: Displays current exercise speed. Count up: exercise. this measures total calories burned during Count down: if you have set the number of calories, the computer will count down from that preset number down to zero. This data is a guide and should not be used for medical assessment. RESISTANCE: Displays the current Resistance level from 1 to 8. DISTANCE: Count up: This measures the total distance from 0 to 99.9 KM/ML. Count down: if you have set the target distance, the computer will count down from that preset distance down to zero as soon as you start exercising. TIME: Count up: the computer measures total exercise time from 00:00 up to 99:59. Count down: if you have set the target time, the computer will count down from that preset time down to 0:00 PULSE: This displays your current pulse rate when the handgrip sensors are held. This data is a guide to be used as a comparison of different exercise sessions. It should not be used for medical assessment. Pulse is displayed in Beats Per Minute (BPM). BATTERY MARK: When the battery symbol appears on the display, this means the batteries are low. RESET: Press STOP to pause the functions during your exercise program. Then press RESET to reset the computer. STOP: START: www.reebokfitness.co.uk Press STOP to pause the functions during your exercise program. All the data on the display will freeze. Press START to resume the program and all the data displayed will continue until the program has finished. If you press STOP twice, then all data will return to 0. Press START to start your exercise. Issue 1 – August 2004 Reebok Fitness RB Bike Series – PowerBike ENTER: www.reebokfitness.co.uk 27 Press ENTER to confirm the setting of program. Issue 1 – August 2004 Reebok Fitness RB Bike Series – PowerBike 28 Manual Program When the console is in the POWER ON status, press the START button to activate the MANUAL program. Whilst exercising you can press the UP/DOWN button to increase or decrease the resistance. The TIME, DISTANCE and CALORIES will count up after you start exercising. Pre-Set Data The following can be pre-set as training targets: • TIME • DISTANCE • CALORIES Press the ENTER button. The TIME display will start to flash you can now set your target.. Press the UP/DOWN button to change your target, TIME, DISTANCE or CALORIES. A single press will increase the target by one unit. Hold the button to increase the target automatically. Press ENTER to confirm the value and switch to next target setting. Not every target value needs to be pre-set. Press START to commence your exercise session. The pre-set data will count down after starting training. Once a pre-set has been reached the computer will beep and end the training program. Auto Power Off The data will be shown for approximately 4 minutes after a training session. If you continue to train within these 4 minutes the data will start counting again, if not the computer will automatically turn off. If the data is frozen just press START to start again. www.reebokfitness.co.uk Issue 1 – August 2004 Reebok Fitness RB Bike Series – PowerBike 29 English to Metric conversion: The bike computer display can show both ENGLISH and METRIC information. If you want to change from ENGLISH to METRIC, please follow the procedure below: 1. When the bike is in the power on status, press and hold the ENTER and STOP buttons. The LED on the computer will light up KM or ML. 2. Press the UP or DOWN buttons to switch between ENGLISH/METRIC then press the ENTER button to confirm the selection and return to POWER ON status. CyberRider: Your PowerBike is compatible with the Reebok CyberRider Interactive Gaming system. For further details see www.reebokcyberrider.com. www.reebokfitness.co.uk Issue 1 – August 2004 Reebok Fitness RB Bike Series – PowerBike 30 Seat and Handlebar Adjustment 1: Seat Adjustment: The PowerBike has adjustable seat height. Unscrew the Saddle Height Adjustment knob (65) and pull. Please note you do not have to fully remove the knob in order to release the Saddle Post (63). Once you have done this you can alter the height of the Saddle. When you have selected the correct height, screw the knob back in. www.reebokfitness.co.uk Issue 1 – August 2004 Reebok Fitness RB Bike Series – PowerBike 31 2: Handlebar Adjustment The PowerBike has adjustable handlebars. To adjust the handlebars unscrew the Handlebar Adjustment Knob (46) this is located on the Console upright. Please note this knob does not need to be fully undone, just enough to allow the Handlebars to be moved. You can rotate the handlebars towards or away from you. Once you have done this fully tighten the knob. www.reebokfitness.co.uk Issue 1 – August 2004 Reebok Fitness RB Bike Series – PowerBike 32 3: Level Adjustment The Rear Stabiliser has two rubber feet that can be either screwed in or out in order to level your PowerBike. Sit on the PowerBike and if it moves, then you need to adjust these feet to level it. www.reebokfitness.co.uk Issue 1 – August 2004 Reebok Fitness RB Bike Series – PowerBike 33 Transport The PowerBike has a pair of wheels built into the front stabiliser. To move your PowerBike simply tilt the bike forwards onto the wheels and either pull or push the bike to its new location. www.reebokfitness.co.uk Issue 1 – August 2004 Reebok Fitness RB Bike Series – PowerBike 34 EKG Hand Pulse Sensor Operation The PowerBike comes with EKG hand pulse sensors which can be found on the handlebars. To operate place the palms of your hands over the sensors. It will take a few seconds for your pulse rate to be displayed on the console. To keep monitoring, keep gripping the sensors, if the readings are intermittent you may not have full contact with the sensors or not enough of your palm on the sensor. Remove your hand and place it over the sensor again. The pulse reading is not an accurate reading but a guide as to what your pulse is, if the reading is too high it might be that you are exercising too intensively, if this is the case you may want to either slow your pace or reduce the level of resistance in order to reduce the pulse rate. If you require a more accurate method of monitoring, Reebok has a range of Heart Rate monitors, details of which can be found on our website: www.reebokfitness.co.uk. www.reebokfitness.co.uk Issue 1 – August 2004 Reebok Fitness RB Bike Series – PowerBike 35 Heart Rate Training In the normal course of our everyday lives our bodies use oxygen to convert nutrients from our food intake into energy for muscle movement and body functions. The amount of energy used is measured in calories. Broadly speaking if we burn more calories than we consume then our body will require additional fuel and will use calories stored as fat. This will lead to a reduced ratio of fat to lean muscle tissue in our body composition and a leaner, fitter appearance. As we exercise, our heart rate has to increase in order to deliver sufficient oxygen to the working muscles. Regular cardiovascular exercise, such as cycling, results in a stronger heart and lungs that are more efficient at delivering oxygen to muscles which, in turn, are more efficient at converting calories into energy. It is however, imperative that you accurately determine the target heart rate within which to train in order that you may improve your fitness at a safe, comfortable and sustainable level. Start by determining your approximate Maximum Heart Rate (MHR). This is the fastest your heart can beat, measured in beats per minute. Whilst there are sophisticated ways to measure MHR, an acceptable approximation can be made using the following calculation: Male: Estimated Max MHR = 220 – Age Female: Estimated Max MHR = 226 – Age Finally, use the table on the next page as a rough guide to determine the level at which you should be exercising based upon your MHR. This level should be maintained using either the cycle’s heart rate grip sensors or a Reebok Heart Rate Monitor. www.reebokfitness.co.uk Issue 1 – August 2004 Reebok Fitness RB Bike Series – PowerBike 36 Training Guidelines Goal – to achieve: Training level Active Lifestyle Beginner Level 1 Work at 50-60% of your MHR • Improve functional capacity • Decrease risk of disease • Increase lifespan • Physical well being Healthy Heart • • Improve cardiovascular health Lose weight • Increase energy • Decrease blood pressure • Decrease cholesterol • Increase immune function • Decrease stress Cardio Challenge • Improve cardiovascular health • Increase aerobic capacity and endurance Extreme Training Challenge • Improve lactic acid tolerance • Performance gains • Increase anaerobic capacity www.reebokfitness.co.uk Level 2 Work at 61-70% of your MHR Level 3 Work at 71-85% of your MHR Level 4 Work at 86-90% of your MHR Issue 1 – August 2004 Reebok Fitness RB Bike Series – PowerBike 37 Hints To Help You Achieve Your Goals Always use your PowerBike in the correct manner, sitting in the correct bio-mechanical position as incorrect use may lead to injury. There are a vast number of benefits to exercising. They include improved sleeping patterns, increased metabolic rate due to the higher ratio of lean muscle tissue to fat (thereby burning calories even when not working out), improved posture reducing risk of back pain, denser bone mass reducing risk of osteoporosis, clearer skin and the improved self-esteem that go with all of these. Do not use weight loss as your only measure of success. Your mirror is a much better indicator than your scales. Don’t set unrealistic goals at the outset of your exercise programme. This could lead to muscle soreness and de-motivation. Instead use the cycle for no more than 20 minutes three times a week to allow your body to recover, and monitor your exertion level using the heart rate grips and the tables above. Remember, you’re changing your life, take time to do it properly. Don’t try to immediately change your entire lifestyle to get fitter. Incremental change is far easier and more sustainable. Don’t try to give up fatty foods, alcohol, late nights and start a gruelling exercise regime all on the same day. Take it one step at a time, ensure the changes you make genuinely become part of your lifestyle and don’t chastise yourself for backsliding occasionally. Understand the other elements of your daily life that can help or hinder you in achieving your goals. Nutrition is vitally important in affecting your general well-being with regard to the type of food you eat and when you eat it. Also, there are many opportunities during your normal day when your current habits could be substituted for healthier practices. Instead of taking the lift, take the stairs and instead of sitting over a long lunch, take a brisk walk and eat an apple. Even if you only do it one day of the week it all helps. www.reebokfitness.co.uk Issue 1 – August 2004 Reebok Fitness RB Bike Series – PowerBike 38 Reebok Heart Rate Monitors Reebok’s Heart Rate Monitors (HRM) provide the most accurate and effective way to measure your heart rate. Designed to guide you through any type of workout, every Reebok HRM comes with the unique Reebok University Training Guide, which provides you with advice on how to work out effectively and time-efficiently. The ECG-accurate HRMs are packed with features, including a multi-function chronograph and a ‘Key Press’ function which lets you measure your heart rate without a chest transmitter. For more information on Reebok Heart Rate Monitors please see our website www.reebokfitness.co.uk. www.reebokfitness.co.uk Issue 1 – August 2004 Reebok Fitness RB Bike Series – PowerBike 39 Maintenance Inspect and tighten all parts of the PowerBike regularly. Replace any worn parts immediately. For continued smooth operation of the PowerBike, the Front and Rear Stabilisers should be kept clean. Using a soft cloth and mild detergent, clean any dust and residue that may build up where the wheels move on the stabilisers. Other components of the PowerBike can also be cleaned in this manner. IMPORTANT: Never use abrasives or solvents to clean the PowerBike. To prevent damage to the computer, keep liquids away and keep it out of direct sunlight. Troubleshooting BATTERY REPLACEMENT Replace the batteries if: • the screen goes blank • the battery icon appears in lower screen • no resistance change is felt CHECK WIRE CONNECTIONS Check the connections if: • the screen goes blank • no resistance is felt • no resistance change is felt • the resistance is very high UK Contact Number If you have any other problems please call Technical Support on the following number (UK residents only): 0870 330 0024 www.reebokfitness.co.uk Issue 1 – August 2004 Reebok Fitness RB Bike Series – PowerBike 40 How To Order Replacement Parts If you encounter any problems with this product, or need to order replacement parts, please call the Technical Support Team on +44 (0) 870 330 0024. To help us assist you, please be prepared to give us the following information: The model number of the product (REM-11200) The name of the product (Reebok PowerBike exercise cycle) The serial number and production date of the product The key number and description of the part(s) www.reebokfitness.co.uk Issue 1 – August 2004 Reebok Fitness RB Bike Series – PowerBike 41 Limited Warranty RFE International Ltd (RFE), warrants this product to be free from defects in workmanship and material, under normal use and service conditions, for a period of Twelve (12) months from the date of purchase. This warranty extends only to the original purchaser. RFE’s obligation under this warranty is limited to replacing or repairing, at RFE’s option, the product through one of its authorised service centres. All repairs for which warranty claims are made must be pre-authorised by RFE. This warranty does not extend to any product or damage to the product caused by or attributable to freight damage, abuse, misuse, improper or abnormal usage or repairs not provided by an RFE authorised service centre, products used for commercial or rental purposes, or products used as store display models. No other warranty beyond that specifically set forth above is authorised by RFE. RFE is not responsible or liable for indirect, special or consequential damages arising out of or in connection with the use of performance of the product or damages with respect to any economic loss, loss of property, loss of revenues or profits, loss of enjoyment or use, costs of removal, installation or other consequential damages of whatsoever nature. Some states do not allow the exclusion or limitation of incidental or consequential damages. Accordingly, the above limitation may not apply to you. The warranty extended hereunder is in lieu of any and all other warranties and any implied warranties of merchantability or fitness for a particular purpose is limited in its scope and duration to the terms set forth herein. This warranty gives you specific legal rights. PLEASE RETAIN YOUR RECEIPT AS PROOF OF PURCHASE www.reebokfitness.co.uk Issue 1 – August 2004