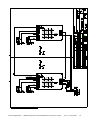
1
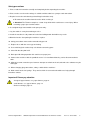
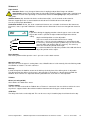
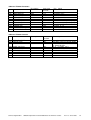
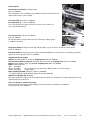
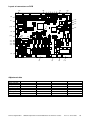
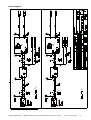
Foldnak 80/100
Trimmer 100
Operations manual/
Service instruction
ENGLISH
Foldnak 80/100
Trimmer 100
© Ernst Nagel GmbH
9965043 Operations manual Foldnak 80-100 Trimmer 100.doc
Rev.1.3 23.10.2006
2
Content
Safety precautions ............................................................................................................................................. 5
Important! Please pay attention ......................................................................................................................... 5
Intended Use ..................................................................................................................................................... 6
Foldnak 80/100 .............................................................................................................................................. 6
Trimmer 100................................................................................................................................................... 6
Description and technical details ....................................................................................................................... 6
Foldnak 80/100 .............................................................................................................................................. 6
Trimmer 100................................................................................................................................................... 6
Technical data Foldnak 80/100...................................................................................................................... 7
Technical data Trimmer 100 .......................................................................................................................... 8
Installation and operation of Foldnak 80/100 .................................................................................................... 9
Sequence of switching on .............................................................................................................................. 9
Settings of the function keys............................................................................................................................ 10
Maintenance and cleaning............................................................................................................................... 10
Menu table of Foldnak 80/100 ......................................................................................................................... 11
Submenu 1 ...................................................................................................................................................... 12
Paper format ................................................................................................................................................ 12
Adjust ........................................................................................................................................................... 12
Reset Counter .............................................................................................................................................. 12
Operation mode ........................................................................................................................................... 12
Delivery ........................................................................................................................................................ 12
Trimmer ........................................................................................................................................................ 12
Offset (of cutting width) ............................................................................................................................ 12
Trimmer modes ........................................................................................................................................ 12
STOP-Pos. ............................................................................................................................................... 12
Settings Foldnak 80/100 .............................................................................................................................. 13
Customized Formats (C-Formats)............................................................................................................ 13
Language.................................................................................................................................................. 13
Dimensions............................................................................................................................................... 13
Service...................................................................................................................................................... 13
Speed ....................................................................................................................................................... 13
Clearing .................................................................................................................................................... 13
Additional mechanical corrections at the Foldnak ....................................................................................... 13
Different stapling heads ................................................................................................................................... 14
Hohner.......................................................................................................................................................... 14
ISP Stitching & Bindery Products................................................................................................................. 15
Rapid ............................................................................................................................................................ 15
Nagel ............................................................................................................................................................ 15
Adjusting the stapling head .......................................................................................................................... 15
Clincher exchange (except at Rapid-SH)..................................................................................................... 15
Selection of staples and driver blade............................................................................................................... 16
Change from flat to loop staples ...................................................................................................................... 16
Block stapling................................................................................................................................................... 16
Error messages ............................................................................................................................................... 17
Functional Errors / SH Exchange .................................................................................................................... 18
The wire uncoils too fast .............................................................................................................................. 18
Paper jam at the Foldnak infeed .................................................................................................................. 18
Paper jam ..................................................................................................................................................... 18
Reset the over current fuse / also Trimmer.................................................................................................. 18
Reset to factory settings............................................................................................................................... 18
Exchange Nagel-stapling head / remove jammed staples........................................................................... 18
Nagel stapling head functional test .............................................................................................................. 18
Booklet shears at the stitching ..................................................................................................................... 18
Layout of Foldnak 80/100 ................................................................................................................................ 19
Sequence description of the Foldnak 80/100 .................................................................................................. 20
© Ernst Nagel GmbH
9965043 Operations manual Foldnak 80-100 Trimmer 100.doc
Rev.1.3 23.10.2006
3
Operation of Trimmer 100................................................................................................................................ 21
Adjustments of the Trimmer in the Foldnak menu ....................................................................................... 21
Setting up the cutting width ...................................................................................................................... 21
Trimmer modes ........................................................................................................................................ 21
Stop-Pos................................................................................................................................................... 21
Trimmer errors ................................................................................................................................................. 22
Waste drawer full ......................................................................................................................................... 22
Poor cutting quality....................................................................................................................................... 22
Booklets are not cut through ........................................................................................................................ 22
Knife doesn’t reach the TDC........................................................................................................................ 22
Knife doesn’t stop at the TDC (runs continuously) ...................................................................................... 22
Main motor doesn’t run ................................................................................................................................ 22
Further possible mechanical adjustments at the Trimmer 100........................................................................ 22
Layout of Trimmer 100..................................................................................................................................... 23
Sequence of Trimmer 100 ............................................................................................................................... 24
Service ............................................................................................................................................................. 25
Submenu Foldnak Actuators........................................................................................................................ 25
Submenu Foldnak Sensors.......................................................................................................................... 26
Submenu Trimmer Actuators ....................................................................................................................... 27
Submenu Trimmer Sensors ......................................................................................................................... 27
Accessories ..................................................................................................................................................... 28
Layout of connectors on PCB .......................................................................................................................... 29
Adjustment data............................................................................................................................................... 29
Circuit diagram................................................................................................................................................. 30
DECLARATION OF CONFORMITY................................................................................................................ 34
Glossary/ abbreviations ................................................................................................................................... 35
History.............................................................................................................................................................. 35
© Ernst Nagel GmbH
9965043 Operations manual Foldnak 80-100 Trimmer 100.doc
Rev.1.3 23.10.2006
4
Safety precautions
1. Please read this instruction carefully and completely before operating the machine.
2. Please make sure the mains voltage is suitable and the outlet has a proper earth connection.
3. Repairs have to be carried out by trained Nagel technicians only.
4. Disconnect the machine from the mains while servicing it.
5. Attention! The Trimmer comprises a razor sharp knife which could cause severe injury. When
removing a paper jam act with caution.
6. Use original Nagel consumables and spare parts only.
7. Lay the cables in a way that no dangers arise.
8. Install the machine in a dry room on leveled and solid ground. And within easy reach.
9. Block the breaks after putting the machines in place.
10. Safety precautions must not be removed or bypassed.
11. Replace fuses with the same type and rating.
12. Users with long hair need to keep safe distance to turning parts.
13. Close lids that they don’t fall.
14. Don’t open lid during operation this could cause paper jams.
15. Connect the machines with the provided screws. It is not allowed that they can be disconnected w/o
tools.
16. Allow at least 20 seconds to pass between attempts to switch on the unit, otherwise the software may be
damaged.
17. When changing plug connections, always switch off the machines!
18. Work careful at the leaf springs. They consist of thin sheet metal and could cause injury through
incautious contact.
Important! Please pay attention
- change of paper format: see „paper format“, page 12.
- small formats: see „paper format“, page 12.
- clincher exchange: page 15.
© Ernst Nagel GmbH
9965043 Operations manual Foldnak 80-100 Trimmer 100.doc
Rev.1.3 23.10.2006
5
Intended Use
Foldnak 80/100
Intended use is the stapling and folding of booklets within the in “Technical data” documented limits.
Trimmer 100
Intended use is the inline face trimming of booklets within the in “Technical details” documented limits.
Description and technical details
Foldnak 80/100
The Foldnak 80/100 is designed to make booklets.
The sheets to be used for it can be supplied as a collated set by hand or through a collator. Another option is
to feed the Foldnak with single sheets through a RoboFeeder.
If you use thicker paper please keep in mind the physical limits. You might have to reduce the size of the
stack. 2.5 mm equals 25 sheets of 80 gsm paper.
The Foldnak has four different processing methods:
- saddle stitching and fold
- block stitching
- block stitching and fold
- fold only, also asymmetric
Trimmer 100
The Trimmer can trim the inline face of booklets.
© Ernst Nagel GmbH
9965043 Operations manual Foldnak 80-100 Trimmer 100.doc
Rev.1.3 23.10.2006
6
Technical data Foldnak 80/100
Max. output (cuts) per
hour (depends on
format)
Paper format max.
Paper format min.
with 2 stapling heads
Max. height of stack
(booklet)
Max height of stack
(corner stitching)
Clincher
Possible stapling
head (=SH)
positions
Number of SH,
standard (max.)
Staple types
Loop staples
Capacity of staples
Delivery
Corner-/ block
stitching
Infeed belts
Collator online
Integrated
accumulating station
LCD Display
Trimmer online
Automatic jogger
Counter
Automatic triggering
Monitoring stock of
staples
Power supply
Sound power level
Operating conditions
HxWxD (cm) not
packed
Weight (kg)
© Ernst Nagel GmbH
Foldnak 100
Hohner
3,000
Foldnak 100 ISP
Foldnak 100 M2
Foldnak 80 Rapid
3,000
3,000
2,500
364 x 521 mm
14.33 x 20.50 inch
105 x 140 mm
4.14 x 5.5 inch
2,5 mm/ 0.10 inch
364 x 521 mm
14.33 x20.50 inch
105 x 140 mm
4.14 x 5.5 inch
2,5 mm/ 0.10 inch
364 x 521 mm
14.33 x20.50 inch
150 x 140 mm
5.90 x 5.5 inch
2,5 mm/ 0.10 inch
364 x 461 mm
14.33 x 18.15 inch
140 x 210 mm
5,5 x 8.27 inch
2,5 mm/ 0.10 inch
3,0 mm/ 0.12 inch
3,0 mm/ 0.12 inch
3,0 mm/ 0.12 inch
3,0 mm/ 0.12 inch
yes
any
yes
any
yes
any
2 (4)
yes
with 4 SH 88.563-88.5 ; or with
2 SH 124 [mm]
2 (4)
2 (4)
2 (4)
wire
wire
cartridge
yes (optional)
app. 65,000
yes
yes
no
app. 65,000
yes
yes
26/6, 26/8 S,
loop staple 26/6
yes
210
yes
yes
no
5,000
yes
yes
yes
yes
yes
yes
yes
yes
yes
yes
yes
yes
yes
yes
yes
yes
yes
yes
yes
yes
yes
yes
yes
yes
yes
yes
yes
yes
yes
yes
yes
yes
yes
yes
yes
yes
yes
yes
230 V 50 Hz
0.8 kW
or 115 V 60 Hz 0.8
kW
< 75 dB(A) ± 5%
with Trimmer
10 to 35 degree
Celsius
35 to 85 % RH,
non condensing
without/with
delivery
115x72x118/186
230 not packed
260 packed
230 V 50 Hz
0.8 kW
or 115 V 60 Hz
0.8 kW
< 75 dB(A) ± 5%
with Trimmer
10 to 35 degree
Celsius
35 to 85 % RH,
non condensing
without /with
delivery
115x72x118/186
230 not packed
260 packed
230 V 50 Hz
0.8 kW
or 115 V 60 Hz
0.8 kW
< 75 dB(A) ± 5%
with Trimmer
10 to 35 degree
Celsius
35 to 85 % RH,
non condensing
without /with
delivery
115x72x118/186
230 not packed
260 packed
230 V 50 Hz
0.8 kW
or 115 V 60 Hz
0.8 kW
< 75 dB(A) ± 5%
with Trimmer
10 to 35 degree
Celsius
35 to 85 % RH,
non condensing
without /with
delivery
115x72x118/186
205 not packed
235 packed
9965043 Operations manual Foldnak 80-100 Trimmer 100.doc
Rev.1.3 23.10.2006
7
Technical data Trimmer 100
Max. output (cuts) per hour:
Max. booklet length, folded:
Min. booklet length, folded:
Max. cutting width (standard):
Max. cutting width (longer knife):
Max. height of stack:
Max. trim margin:
Adjustment of paper format:
Delivery:
Waste monitoring:
Power supply:
Sound power level:
Operating conditions:
HxWxD not packed (cm):
Weight not packed:
Weight packed:
© Ernst Nagel GmbH
3000/h
260.5 mm
74 mm
320 mm
364 mm
60 sheets with 80 gsm
15 mm
fully automatic
yes
yes
115 Volt 60 Hz 650 Watt, or 230 Volt 50 Hz 650 Watt
< 75 dB(A) ± 5% with Foldnak
10 to 35 degree Celsius, 35 to 85 % RH, non condensing
106 x 72 x 51/112 without/with delivery
160 kg
180 kg
9965043 Operations manual Foldnak 80-100 Trimmer 100.doc
Rev.1.3 23.10.2006
8
Installation and operation of Foldnak 80/100
Preparation of the stapling heads: to avoid uncoiling or tangling up of the wire during transport, the wire was
pinched off. That means only few stitches can be made until the wire is threaded again.
Both Foldnak and Trimmer have an additional mains switch close to the power inlet. If the machine is not in
use for a longer period of time, please switch it off with this switch.
Welcome !!!
FK xxx
TR yyy
Shortly after switching the Foldnak on the display shows the loaded S/W version:
xxx shows the Foldnak and yyy the Trimmer software version. This might be a
helpful piece of information for your service technician.
After power up the display shows in the upper line the operation mode, the finishing mode and the counter.
The lower line shows the name and the size of the selected format in inch or cm, e.g. A3 and 420.0 x 297.0.
Man.
A3
Power switch
Status
LED
Saddle 0000
420.0x297.0
Display
Back
key
F1
Control
keys
up/down
Enter
key
F2
F3
Function keys
F1, F2, F3
The Foldnak 80/100 and a possibly connected Trimmer are controlled via the four control keys and the three
function keys.
Please hit the enter key to go into the main menu. Scroll up and down with the
Main menu
0
two direction keys. The upper line shows the higher menu level permanently.
Paper format
The line underneath changes its contents and displays the submenus with
every hit of a direction key. If you have reached the desired submenu, please
hit the enter key again to select it. It is then displayed in the upper line.
Paper format
0e
A3
420.0x297.0
The chapter “Menu table of Foldnak 80/100“ includes the complete structure, to make orientation within the
menu easier. With the back key you can arrive at a higher level. This equals one column to the left in the
menu table.
To ease repeated adjustments the Foldnak memorizes the last path in the menu. That means you can reach
the same submenu through repeated pressing of the enter key.
Terminating plug
Depending on the configuration, that means which machines are assembled, the fitting terminating plug must
be plugged in into the last element. For Foldnak and Trimmer plug with parts no. 2710198, for SP+ 2958571.
S8
Attention! S8 needs Software-Version 2.23 or higher to run at the Foldnak!
Sequence of switching on
First switch on the SP+ (if existing). Wait until the LED becomes green. Then the Trimmer can be switched
on, then the Foldnak. For the RoboFeeder it is unimportant when it is powered up.
© Ernst Nagel GmbH
9965043 Operations manual Foldnak 80-100 Trimmer 100.doc
Rev.1.3 23.10.2006
9
Settings of the function keys
The default settings of the function keys F1, F2, F3 are as follows:
F1 = Staple position
F2 = Fold position
F3 = Language
Each function key can be overwritten with a new function out of the menu table. In order to do this, go to the
desired submenu and hold the function key which is supposed to be overwritten for more than 3 seconds.
The LCD displays “function key stored”.
There is an option to replace the function key labels with customized ones. It should be done by trained
personnel.
Maintenance and cleaning
If the clinchers or stapling heads (=SH) are polluted visibly, they need to be cleaned. At least:
at every wire roller change the clinchers and SH are to be cleaned, see SH-manual.
When changing the wire roller all further jobs required by the maker need to be carried out, like greasing and
cleaning.
Remove regularly staple and paper remnants. They can cause troubles.
© Ernst Nagel GmbH
9965043 Operations manual Foldnak 80-100 Trimmer 100.doc
Rev.1.3 23.10.2006
10
Menu table of Foldnak 80/100
0
Main Menu
1
Paper Format
Adjust
Reset Counter
Mode
Delivery
Trimmer
Settings
2
?
(e.g. after a change from inch
to cm) metric/inch:
CD | CD
A5 | Statement (5.5x8.5 in)
A4 | Executive (7.25x10.5 in)
A3 | Letter (8.5x11 in)
A3+ | Legal (8.5x14 in)
SRA3 | Tabloid (11x17 in)
C1-mm | C1-inch
… (C2 to C4)
C5-mm | C5-inch
Width
+/-0.0 *
Length
+/-0.0 *
Staple
+/-0.0 *
Fold
+/-0.0 *
Sure?
S8
RoboFeeder
Manual-Start
Saddle
Block
Block+Fold
Fold only
Staple test
Delay
+/-00
Offset
00
Not connected
Bypass Mode
Trim Mode
SP+ in-line
Paper Stop
00
C-Formats
(=Customized Formats)
Language
Dimension
Service
Speed
Clearing
4
display in inch:
see table below
C1-mm to C5-mm
Length
Width
C1-inch to C5-inch Length
Width
English
German
French
Spanish
Dutch
Italian
metric
inch
Paper stop offset
T-Finger
Side guide
Staple Stop
Fold Stop
Staple Pos.
Fold Pos.
Total counter
0000000000
Staple head
Wire
Staples
Rapid
Actuators
FA1 to FA30
Sensors
FS1 to FS41
Actuat. Trimmer
TA1 to TA11
Sensors Trimmer
TS1 to TS7
000.0 *
000.0 *
00.00 **
00.00 **
+/-0.0 *
+/-0.0 *
+/-0.0 *
+/-0.0 *
+/-0.0 *
+/-0.0 *
Set:
0000
booklet
open side guides
drop out
* display in mm: 0.1 = 1/10 mm
display in inch: 01 = 1/256 inch
© Ernst Nagel GmbH
0000
3
** 1.50 = 1 1/2 inch
9965043 Operations manual Foldnak 80-100 Trimmer 100.doc
Rev.1.3 23.10.2006
11
Submenu 1
Paper format
Attention! Before every change of format check stapling head position. Danger of collision!
Small format: remove leaf springs from the side guides! Below a width of 152mm with a stapling head
distance of 75mm. After operating in small format reattach the leaf springs tight and parallel to the
side guides.
Smallest format (A6): install the kit for the smallest format (A6), see the manual enclosed the kit.
Remove support plate of S 8, mount attachment infeed funnel and infeed funnel left and right.
Use the special paper downholders.
Predefined formats like A5, A4, A3 or customized C-formats are selectable. Inch formats like Statement,
Executive, Letter, Legal and Tabloid are selectable after the dimensions have been changed from metric to
inch.
Adjust
Width
+
+
Adjust
If you notice during the jogging procedure that the paper seems to bee too
large or too small it is possible to adjust width and length of the format
setting.
Staple and fold position are also adjustable.
You have to enter the deviation from the basic setting.
Adjust the +/- first by using the up/down keys and confirm it with
Adjustment of fold position
the enter key. Search by using the up/down keys the correct value
(for each digit) and confirm it with the enter key. The enter key
moves the cursor one position to the right.
Adjustment of staple position
It is recommended first to adjust the position of the fold and then to
adjust the position of the staples.
1a
+/-0.0
Reset Counter
After having confirmed the question “sure?” you can reset the batch counter.
Operation mode
Here you can set if the paper is coming from a S8, a RoboFeeder or is fed manually. Also the finishing mode
of a booklet or a block is set in this submenu.
Delivery
In order to improve the booklet stream on the delivery the delay time of the delivery belts is adjustable.
The adjustment of the delivery in the menu is only possible, if the delivery is directly connected with the
Foldnak. At the Trimmer it is adjustable with the potentiometer, at the SP+ it is not adjustable.
Trimmer
Offset (of cutting width)
Offset defines the width of the waste.
Trimmer modes
You can set a tick mark to tell the Foldnak that a Trimmer is connected. You can tell the machine the same
way what is supposed to be done with the booklet. Not trimmed in the bypass mode or trimmed.
STOP-Pos.
The delay of the belts can be adjusted. This can be necessary if a booklet jumps back from the trim stop.
© Ernst Nagel GmbH
9965043 Operations manual Foldnak 80-100 Trimmer 100.doc
Rev.1.3 23.10.2006
12
Settings Foldnak 80/100
Attention! Adjusting the Foldnak-parameter during operation may cause disruptions!
Customized Formats (C-Formats)
Definition of customized formats. Minimal: 105 x 140/ 4.14 x 5.50, Maximal: 364 x 521/ 14.33 x 20.50 resp.
461/ 18.15 [mm/inch]. Choose a C-Format and press enter twice. Search by using the up/down keys the
correct value (for each digit) and confirm it with the enter key. If the length is choosen, it jumps to the menu
item width. Finish it with the back key. To select a customized format it needs to be choosen in the paper
format menu. See paragraph “paper format”. Check stapling head position!
Language
The selection of different languages is possible.
Dimensions
Here you can change from metric to imperial dimensions. The display will show a question mark after a
change. It means you need to choose a paper format. There is a differentiation between fine and rough
adjustment. In the menutable it is marked with one * and two ** asterics. In the fine adjustment means
0.1 = 1/256 inch, rough adjustment means 01 = 1 inch. See little table below the menu table.
Service
This part is password protected and meant for the use of service technicians only. Attempting to perform
repair and replacement procedures w/o proper training may cause machine damage or operator injury.
Speed
The speed of the Foldnak can be set for S8-operation (sets per hour):
S8:
with SP+:
slow:
medium:
fast:
continuous
1,000
compulsory (will be improved)
500-1,100 / 1,000 range / recommended initial value
1,200-1,800 / 1,600 range / recommended initial value
1,900-3,000 / 2,300 range FK100 / recommended initial value
2,000-2,500 / 2,300 range FK80/ recommended initial value
It is recommended to start e.g. in the medium speed with the initial value of 1,600 and than to increase it.
Speed of the Foldnak, RF-operation (sheets/hour):
slow and medium:
up to 6,000
fast:
above 6,000
The maximum of the FK depends on paper type and format and amout of pages of the booklets.
Clearing
There are three choices: a) booklet, that means stitch and fold, b) open the side guide and c) eject, that
means only folding.
If an error occurs, the Foldnak jumps automatically to this menu item.
Additional mechanical corrections at the Foldnak
The clearance between the fold rollers can be adjusted w/o tools. The
knurled screw needs to be loosened, see arrow in the picture. For
sensitive paper rather set a wider clearance, that means to turn the
screw in the direction of the infeed. It is important to set the lever on
both sides similar.
The pressure of the fold rollers can be reduced for sensitive paper. And
it can be set subtler by using a weaker spring. The pressure must not be
increased, because a thicker booklet may not pass the fold rollers.
© Ernst Nagel GmbH
9965043 Operations manual Foldnak 80-100 Trimmer 100.doc
Rev.1.3 23.10.2006
13
Different stapling heads
The stapling heads (except ISP) can be put in in any position. But they can cause problems in the area of the
folding knife finger. That is in the range between 94 to 110 mm and 244 to 260 mm.
Please read the manufacturers handbook carefully. You get hints on feeding the stitch wire into the head,
preventive maintenance and repair. In the case of a malfunction, please call your Nagel dealer.
For small formats: remove leaf springs! Below a width of 152 mm with a stapling head distance of 75 mm.
Hohner
Please use wire #25, order no. 6170110. Stapling head: order no. 2660223.
The clinchers (lower arrow) can be adjusted with the alignment tool (upper arrow) to the stapling heads. For
this purpose turn the leaf spring sideways (left photo), take out the former and insert the alignment tool. Now
you can move the clincher sideways, until the marking in the middle aligns with the nose.
The stapling head can be aligned through lowering. The machine must be switched off. Disconnect
manually the stapling head clutch. For this purpose open the little lid and push at the place which is marked
with arrow 1 in the picture below. Put an Allen key 4 mm as shown with arrow 2 into the motor shaft and turn
the hexagon socket screw clockwise (arrow 3). After the adjustment turn it further until the stapling head
clutch opens again. The stapling heads are now at the top dead center.
2
1
3
© Ernst Nagel GmbH
9965043 Operations manual Foldnak 80-100 Trimmer 100.doc
Rev.1.3 23.10.2006
14
ISP Stitching & Bindery Products
The stapling heads have fixed positions. The clincher can be easily
aligned to the stapling head by lowering them, see Hohner stapling
heads.
Please use wire #25, order no. 6170110.
Stapling head: order no. 2660225.
Rapid
For adjusting the distance unscrew the 4 hexagon socket screws
with SW 3 and move the stapling head to the required position.
Loosen the knurled screw of the clincher and align the clincher.
Please use only Nagel cartridges with the order no 2660800.
Stapling head: order no. 2660801.
Nagel
Alignment of the clinchers as described above with lowered
stapling heads.
For simple and precise adjustment of the 80 mm distance between
2 Nagel-SH’s it is recommended to use the alignment tool Nagel
SH. Also it can be used for aligning clincher to stapling head, for all
distances.
Alignment tool Nagel SH: 2660199.
Please use original Nagel staples with the order numbers:
26/6:
627 2060
26/8S: 627 2081
Ri 26/6: 627 4062
Stapling head (complete): order no. 2660100,
assembly stapling head without adapter FK 100: 2660106.
Adjusting the stapling head
For the adjustment of the SH also the wire rollers must be aligned with the stapling heads. It
can be enough to turn the wire guides.
Clincher exchange (except at Rapid-SH)
See SH-manual. Draw out the clincher pusher (4) downward, turn clincher (1) in clincher box
(3) up and draw out of the holding pin (2). Push new clincher in the holding pin and turn it to
the clincher box center. Reinsert clincher pusher.
Attention! When inserting the clincher pusher it must go into the slot of the clincher. If the
clincher pusher remains under the clincher it destroys the clincher during operation.
© Ernst Nagel GmbH
9965043 Operations manual Foldnak 80-100 Trimmer 100.doc
Rev.1.3 23.10.2006
15
Selection of staples and driver blade
For very hard sheets or thick paper blocks (above 15 sheets 80 gsm) it is recommended to use 26/8S
staples and the flat driver blade.
Change from flat to loop staples
To change from flat staples to loop staples the driver needs to be exchanged, if the flat driver blade is
installed. See SH-change (Hohner: page 14, Nagel: page 18).
For a change from loop staples to flat staples the driver doesn’t need to be exchanged, unless very hard
sheets or thick paper blocks are processed (above 15 sheets 80 gsm).
Block stapling
The paper block is jogged against the staple stop when block stapling. That means the unstapled side of the
block is the leading edge. Please consider this orientation, when loading the collator.
A sheet metal ramp which guides the block into the transport belt after the fold rollers needs to be installed.
The side guides are opened automatically in order to allow the block to be deflected into the transport belt.
To insert the ramp remove the upper belt (fig. 2 and 3), then insert the ramp with both narrow guide fingers in
the table. Push the ends down (fig.4). After finishing, put the belt back in its place.
1
3
© Ernst Nagel GmbH
9965043 Operations manual Foldnak 80-100 Trimmer 100.doc
2
4
Rev.1.3 23.10.2006
16
Error messages
In case of an error you have four options, described in the menu item ”clearing” in the chapter “Settings”
(p.13). Each error message has to be confirmed by pressing the Backspace key.
DOOR OPEN
Close the door.
CHECK --- >
See feeder e.g. S8 or RoboFeeder.
ERROR home position
Check if paper remainder is in the machine. Remove it. Check slotted optical sensor home position of
stitching and fold stops FS27 and FS8. Check if spindles of staple stop and fold stop run smoothly.
Check encoder FS32, FS33 and slotted optical sensor of the side guide.
ERROR pos. T.-Finger (=position transport finger)
Check Encoder FS30 and FS31 and slotted optical sensor FS25.
COLLISION S.H. change papersize! (collision stapling head - change paper format)
Decrease stapling head distance.
ERROR pos. staple stop
Check FS27, check if spindle runs smoothly.
ERROR pos. fold stop
Check FS28, check if spindle runs smoothly.
ERROR ref. T.-Finger (reference transport finger)
Check FS25, encoder FS30 and FS31. Check if delivery belt runs smoothly.
ERROR ref. side guide
Check FS26, encoder FS32 and FS33. Check if side guides run smoothly.
ERROR ref. staple stop
Check FS27. Check if spindle runs smoothly.
ERROR ref. fold stop
Check FS28. Check if spindle runs smoothly.
PAPER JAM infeed
Check speed of belt of S8 and RoboFeeder. The desired value amounts 60m/min.
Check the slotted optical sensor FS1.
PAPER JAM not at foldstop
The sheets didn’t leave sensor FS4. Check T-Finger.
ERROR Trimmer/ SP+
Paper jam at the Trimmer, or waste drawer is full.
STAPLES empty !!!
Refill it.
TRIMMER not connected!
Check connection.
ERROR folding
Sheets didn’t leave sensor FS4. Check clutch FA4.
ERROR feed slower!
Reduce the speed of S8/ RoboFeeder. Maybe in the Trimmer menu “SP+ in line” is choosen wrongly.
Paper too long for Block-mode
Not possible with this size.
© Ernst Nagel GmbH
9965043 Operations manual Foldnak 80-100 Trimmer 100.doc
Rev.1.3 23.10.2006
17
Functional Errors / SH Exchange
1
The wire uncoils too fast
Tighten the spring with the adjusting ring (fig.1).
Paper jam at the Foldnak infeed
Possible reasons: The speed of the belt of the RF/S8 is too fast. The
desired value of the belt amounts 60 m/min.
The alignment of the machines is too inexact.
The lateral format rods in the RF/S8 are too wide open.
Paper jam
Attention! Don’t move the side guides by hand, they can be damaged.
In case of paper jam always empty via the menu (clearing).
2
Reset the over current fuse / also Trimmer
After a jam or a power outage it could be that the starting torque of the
main motor is insufficient to start against a closed wrap spring clutch. The
stapling heads and folding knife (Trimmer: knife bar) are not in their home
position.
The over current fuse could will interrupt the power in order to protect the
stalled motor.
First return the stapling heads and knife to their home positions (page 14,
fig. 2 & 3), use the provided long Allen key. Open the main cover. Then
reset the fuse (fig.2, arrow) through pushing it.
3
2
Reset to factory settings
Hold function key #3 for more than 3 seconds upon power up of the
machine. The memory of the Foldnak will be over written with the factory
settings.
Attention! You will lose your customized formats and settings. You have
to select language and type of stapling head again. Default language =
English. Default stapling head = Nagel.
Exchange Nagel-stapling head / remove jammed staples
Switch the machine off. Remove all staples. Disconnect the SH clutch
manually (page 14, fig.1). Put the long Allen key through the opening in the
front casing into the motor shaft (page 14, fig.2 & 3). Turn it clockwise until
the SH bar is approx. in the middle. Unfasten the SH from the back with
the long Allen key (fig.3). Remove jammed staples (fig.4).
Mounting of Stapling head (SH)
Attach the driver in the right direction: the number must be visible.
Assemble the SH from the back. Turn the SH bar to the top with the long
Allen key. Insert staples. Accomplish the stapling head functional test.
4
Nagel stapling head functional test
Push the spring of the SH down. Each time a staple must fall out.
Booklet shears at the stitching
If very thick booklets with glossy cover sheets shear at the staples, you can turn
the 2 knurled screws (a) anti-clockwise to reduce the pressure. If it doesn’t help
the 2 knurled screws (b) can be turned clockwise to lift the infeed belt.
The 2 knurled screws of each pair should be turned approximately the same.
© Ernst Nagel GmbH
9965043 Operations manual Foldnak 80-100 Trimmer 100.doc
a
b
Rev.1.3 23.10.2006
18
Layout of Foldnak 80/100
Side view
FS1
FS4
FA29
FA30
FA1
FA27
FA28
FS28
FS30
FS31
FS27
FA4
FA3
FA2
Top view
FA23
FA24
FS25
FS32, FS33
FS26
© Ernst Nagel GmbH
FA25, FA26
9965043 Operations manual Foldnak 80-100 Trimmer 100.doc
Rev.1.3 23.10.2006
19
Sequence description of the Foldnak 80/100
After power up, the Foldnak references its stops and guides. Staple stop, fold stop and side guides are
moved to their outermost position until they reach the slotted optical sensors. The stepper motors are
reversed until the desired format is reached. The accurate position is controlled by encoders.
The main motor will be started via the solid state relays FA2 after the Foldnak has received a start signal.
The infeed rollers, fold rollers are turning. At the same time the solenoid of the staple stop is activated. The
stop is in its upper position.
As soon as the infeed sensor FS1 detects the trailing edge of an incoming stack of paper, the transport
finger is started. This will drive the stack against the staple stop. The exact position of the finger is controlled
by encoder FS32/33. Depending on the selected speed the set is jogged once or several times through
opening and closing of side guides and T-Finger. During folding the side guides are moving to the set width
of the format. The stapling stroke is triggered by wrap spring clutch FA3. The side guides are opened.
The staple stop is deactivated. The transport finger transports the stack from the stapling to the fold position.
The accuracy is controlled by encoder FS32/3. The side guides are closed. Wrap spring clutch FA4 triggers
a fold stroke, after the slotted optical sensor FS4 has detected that the fold position is reached.
To the RoboFeeder operation
In the accumulation mode the transport finger is in front of the stack and drives the sheets against the back
stop. After the last sheet has been accumulated the direction of the finger is reversed and the stack moved
towards the staple stop.
© Ernst Nagel GmbH
9965043 Operations manual Foldnak 80-100 Trimmer 100.doc
Rev.1.3 23.10.2006
20
Operation of Trimmer 100
Power switch
Status
LED
Trimming
On-Off and
Reset
Cutting
width bigger
Cutting width
smaller
Delivery
potentiometer
The Trimmer is mainly controlled from the Foldnak. The cutting width can be
either changed from the Trimmer or the Foldnak. The set value can be read off
at the back of the Trimmer.
Adjustments of the Trimmer in the Foldnak menu
Setting up the cutting width
The width of cutting can be chosen.
Trimmer modes
Through ticking off in the menu the Foldnak receives the information, whether a Trimmer is present, whether
the booklet should only pass through or if it should be trimmed.
Stop-Pos.
The delay of the belts can be adjusted. This can become necessary if a booklet jumps back from the side
guide.
Please keep in mind: at a high speed a too big delay can cause paper jam.
For thin booklets with sensitive sheets the delay should be minimal.
© Ernst Nagel GmbH
9965043 Operations manual Foldnak 80-100 Trimmer 100.doc
Rev.1.3 23.10.2006
21
Trimmer errors
In case of a disruption the red LED gleams. After fixing the problem it must be confirmed by pressing the
bypass-key (=Trimming OFF).
Waste drawer full
Empty the drawer. Then confirm the error.
Poor cutting quality
If the knife is dull the lower sheets can be pulled into the cutting clearance. Similar symptoms arise if the
cutting clearance is too little.
Solution: sharpen the knife respectively increase the cutting clearance.
Booklets are not cut through
If the knife stops during cutting, proceed as described:
Toggle the service switch in the Trimmer. It is difficult to reach and therefore this must be done by a servicetechnician. Insert an Allen key 4 mm from the back into the motor shaft. Turn it clockwise, until the booklet is
cut through and the knife is again in the top dead center position. Remove the Allen key. Toggle the service
switch.
Knife doesn’t reach the TDC
The reason can be a dull knife, a power failure, or another disruption.
Let a technician bring the knife to the TDC, as described above.
Knife doesn’t stop at the TDC (runs continuously)
Check whether the service switch is still active (after a repair).
I
II
operation:
service:
Main motor doesn’t run
If the motor is blocked the motor overload switch activates. It is at the paper outlet side of the Trimmer. It can
be reset by pressing.
Further possible mechanical adjustments at the Trimmer 100
The pressure on the outfit belt can be raised by turning the two black
knurled screws (see arrow) clockwise. It can be necessary for thick
booklets or a glossy front sheet.
For sensitive sheets it is recommended to lower it.
© Ernst Nagel GmbH
9965043 Operations manual Foldnak 80-100 Trimmer 100.doc
Rev.1.3 23.10.2006
22
Layout of Trimmer 100
Side view
TS3
TS4
TS2
TA3
TS7
TA1
TA10/11
TS5
TS6
TA4
TA2
© Ernst Nagel GmbH
9965043 Operations manual Foldnak 80-100 Trimmer 100.doc
Rev.1.3 23.10.2006
23
Sequence of Trimmer 100
It is important to switch on the Trimmer first. This allows the Foldnak to recognize it. Double check in the
Foldnak menu, that the Trimmer is selected.
After being switched on the Trimmer is referencing the booklet stop. The stop is moved to its outermost
position until it reaches the slotted optical sensor TS6. The gear motor TA10/11 is reversed until the desired
format is reached. The accurate position is controlled by the encoder TS7.
The main motor will be started via the solid state relays TA2 after the Trimmer has received a start signal
from the Foldnak. The infeed belts are turning. At the same time the solenoid TA1 of the booklet stop is
activated. The stop is now in its upper position.
The clutch TA3 of the out feed belt is started as well.
As soon as both switches TS2 at the booklet stop are closed the out feed belt TA3 is stopped and a knife
stroke is triggered via wrap spring clutch TA4.
The knife has almost returned to its upper position (TDC) when it deactivates the paper stop solenoid TA1
and starts the out feed belt TA3 via the slotted optical sensor TS4.
The booklet is then transported onto the delivery TA5.
An optical sensor TS3 controls the exit of the Trimmer.
An additional optical sensor TS5 controls the height of the waste in the waste paper drawer.
© Ernst Nagel GmbH
9965043 Operations manual Foldnak 80-100 Trimmer 100.doc
Rev.1.3 23.10.2006
24
Service
It is possible to check every actuator and sensor from the service submenu.
Submenu Foldnak Actuators
Description
FA1
FA2
FA3
FA4
FA5
FA6
FA7
FA8
FA9
FA10
FA11
FA12
FA13
FA14
FA15
FA16
FA17
FA18
FA19
FA20
FA21
FA22
FA23
FA24
FA25
FA26
FA27
FA28
FA29
FA30
FA31
SOLENOID
MAIN MOTOR
STAPLE
FOLD
AUX1 ERR S8
AUX2
AUX3
AUX4
AUX5
AUX6
AUX7
DELIVERY
RELAY 1
RELAY 2
ERROR LED
GREEN LED
LED3
LED4
LED5
LED6
LED7
LED8
FINGER FORW.
FINGER BACKW.
SIDEGUIDE CLOSE
SIDEGUIDE OPEN
STAPLEPOS CLOSE
STAPLE POS OPEN
FOLD POS CLOSE
FOLD POS OPEN
ENDURANCE RUN
Pins Signal
Solenoid Staple stop
Main motor via SSR
Clutch CB6 Stapling
Clutch CB5 Folding
Error FK at S8
Input sensor at S8
Trimmer error at S8
----Delivery
Connector
on PCB
J18
J18
J18
J18
J19
J19
J19
J19
J19
J19
J19
J19
Error LED
Error LED
Error LED
Error LED
Error LED
Error LED
Error LED
Error LED
J20
J20
J20
J20
J20
J20
J20
J20
1: GND; 2: 3 V
3: GND; 4: 3 V
5: GND; 6: 3 V
7: GND; 8: 3 V
9: GND; 10: 3 V
11: GND; 12: 3 V
13: GND; 14: 3 V
15: GND; 16: 3 V
1, 11 coil 1; 2, 12 coil 2
1: GND;
2: GND;
3: GND;
4: GND;
1: GND;
2: GND;
3: GND;
5: 24 V
6: 24 V
7: 24 V
8: 24 V
9: 24 V
10: 24 V
11: 24 V
8: GND; 16: 24 V
3, 13 coil 1; 4, 14 coil 2
5, 15 coil 1; 6, 16 coil 2
7, 17 coil 1; 8, 18 coil 2
Continuous run
--
GND = Ground
SSR = Solid state relay
© Ernst Nagel GmbH
9965043 Operations manual Foldnak 80-100 Trimmer 100.doc
Rev.1.3 23.10.2006
25
Submenu Foldnak Sensors
Description
FS1
INPUT
Connector
on PCB
J29
FS2
FS3
FS4
FS5
FS6
FS7
FS8
FS9
FS10
FS11
FS12
FS13
FS14
FS15
FS16
FS17
FS18
FS19
FS20
FS21
FS22
FS23
FS24
FS25
OPTICAL SENSOR
STAPLE POS
FOLD POS
AUX1 S8 START
AUX2 S8 ERROR
AUX3
AUX4
AUX5 TP ERROR
DOOR 24V
AUX7
AUX8
BUTTON 1
BUTTON 2
BUTTON 3
BUTTON 4
BUTTON 5
BUTTON 6
BUTTON 7
BUTTON 8
STAPLE 1
STAPLE 2
STAPLE 3
STAPLE 4
REF. FINGER
J29
J29
J29
J22
J22
J22
J22
J22
J22
J22
J22
J21
J21
J21
J21
J21
J21
J21
J21
J26
J26
J26
J26
J27
FS26
FS27
FS28
FS29
FS30
FS31
FS32
FS33
FS34
FS35
FS36
FS37
FS38
FS39
FS40
FS41
REF. SIDEGUIDE
REF. STAPLE
REF. FOLD
DOOR CONTACT
ENC.T-FINGER A
ENC.T-FINGER B
ENC.SIDEGUIDE A
ENC.SIDEGUIDE B
ENCODER 3 A
ENCODER 3 B
ENCODER 4 A
ENCODER 4 B
ENCODER 5 A
ENCODER 5 B
ENCODER 6 A
ENCODER 6 B
Trimmer/SP+
Staples empty
Staples empty
Staples empty
Staples empty
J27
J27
J27
J28
J1
J1
J2
J2
---------
Pins Signal
1: Collector IR-Transistor;
4: Anode IR-LED; 2,3: GND
--16: VCC; 18: V0; 20: GND
1: high; 2: low (24 V)
3: high; 4: low (24 V)
10: 24 V
12: 24 V
1: Make-contact to pin 2 (GND)
3: Make-contact to pin 4 (GND)
5: Make-contact to pin 6 (GND)
7: Make-contact to pin 8 (GND)
9: Make-contact to pin 10 (GND)
11: Make-contact to pin 12 (GND)
13: Make-contact to pin 14 (GND)
15: Make-contact to pin 16 (GND)
1: Make-contact to pin 5 (GND)
2: Make-contact to pin 6 (GND)
3: Make-contact to pin 7 (GND)
4: Make-contact to pin 8 (GND)
1: Collector IR-Trans.; 2,3: GND;
4 Anode IR-LED
6: VCC; 8:GND; 10: V0
12: VCC; 14:GND; 16: V0
18: VCC; 20:GND; 22: V0
3: Make-contact to pin 4 (GND)
1: VCC; 2: V01
3: V02; 4: GND
1: VCC; 3: V01
2: V02; 4: GND
---------
IR = Infrared
Trans. = Transistor
© Ernst Nagel GmbH
9965043 Operations manual Foldnak 80-100 Trimmer 100.doc
Rev.1.3 23.10.2006
26
Submenu Trimmer Actuators
Description
TA1
TA2
TA3
TA4
TA5
TA6
TA7
TA8
TA9
TA10
TA11
PAPER STOP
MAIN MOTOR
OUTPUT BELT
TRIM STOKE
DELIVERY
ERROR RELAY 1
ERROR RELAY 2
ERROR LED
GREEN LED
PAPERSTOP large
PAPERSTOP small
Solenoid
SSR
Gear motor
Gear motor
Connector
on PCB
J18
J18
J18
J18
J19
J9
J9
J20
J20
J9
J9
Pins Signal
1: GND; 5: 24 V
2: GND; 6: 24 V
3: GND; 7: 24 V
4: GND; 8: 24 V
8: GND; 16: 24 V
1: Make-contact to pin 5 (GND)
2: Make-contact to pin 6 (GND)
1: GND; 2: 3 V
3: GND; 4: 3 V
3: +24 V; 7: -24 V
3: -24 V; 7: +24 V
Submenu Trimmer Sensors
Description
TS1
TS2
TS3
OFFLINE-START
PAPER STOP
OUTPUT IR-LED
Connector
on PCB
J22
J27
J27
TS4
TS5
TS6
TS7
KNIFE TOP POS.
WASTE FULL
REF. FORMAT
ENCODER
J27
J29
J27
J1
© Ernst Nagel GmbH
Pins Signal
7: 24 V; 8: GND
22: Make-contact to pin 20 (GND)
1: Collector IR-Trans.; 2,3: GND;
4: Anode IR-LED
6: VCC; 8: GND; 10: V0
17, 19: 24 V; 18: V0; 20: GND
12: VCC; 14: GND; 16: V0
1: VCC; 2: V01; 3: V02; 4: GND
9965043 Operations manual Foldnak 80-100 Trimmer 100.doc
Rev.1.3 23.10.2006
27
Accessories
Downholder attachment, FK 80 and 100:
parts no. 2660389.
The attachment serves to hold the paper down, if the pile fans out too much
and therefore doesn’t enter straight.
Leaf spring FK 100: parts no. 2660392.
Leaf spring FK 80: parts no. 2660393.
The leaf springs prevent paper jam in the cut-outs. The cut-outs are
necessary for little formats.
Leaf spring RoboFeeder at the Foldnak:
parts no. 2760832.
For RF-operation at a high number of sheets with high feeding speed.
(> 5.000 sheets/hour).
Loop driver blade for Nagel-SH: for loop and flat staples. Up to 15 sheets or until the staples bend.
Parts no. 2958418.
Flat driver blade for Nagel-SH: for flat staples. Recommendable for very hard sheets and thick paper blocks
(above 15 sheets 80 gsm). Parts no. 2660256.
Stapling heads and staples
Hohner: wire #25. Order no. 6170110. Stapling head: order no. 2660223.
ISP Stitching & Bindery Products: wire #25. Order no. 6170110. Stapling head: order no. 2660225.
Rapid: Nagel-cartridge. Order no. 2660800. Stapling head: order no. 2660801.
Nagel-staples order no’s:
26/6:
627 2060
26/8S: 627 2081
for very hard sheets or thick paper blocks (above 15 sheets 80 gsm)
Ri 26/6: 627 4062
(=loop staples).
Nagel stapling head M2 (complete): order no. 2660100,
assembly stapling head M2 without adapter for FK 100: 2660106.
Alignment tool Nagel SH: 2660199.
For simple and precise adjustment of the 80 mm distance between 2 Nagel-SH’s. And for aligning clincher to
stapling head, for all distances.
Parts for change to smallest format A6
Infeed funnel for small formats right: 2660750, infeed funnel for small formats left: 2660751,
fastener infeed funnel: 2660752.
© Ernst Nagel GmbH
9965043 Operations manual Foldnak 80-100 Trimmer 100.doc
Rev.1.3 23.10.2006
28
Layout of connectors on PCB
J29
J26
J21
J20
J25
J28
J11
J32
J23
(J12)
J7
J24
J10
(J17)
JP6
JP7
JP1
JP2
JP3
JP4
JP5
J13
J14
J15
J16
J30
J8
J9
J18
J19
Adjustment data
Format
Staple position
Fold position
Transport finger
Side guide
Staple stop
Fold stop
© Ernst Nagel GmbH
9965043 Operations manual Foldnak 80-100 Trimmer 100.doc
Rev.1.3 23.10.2006
29
Circuit diagram
© Ernst Nagel GmbH
9965043 Operations manual Foldnak 80-100 Trimmer 100.doc
Rev.1.3 23.10.2006
30
© Ernst Nagel GmbH
9965043 Operations manual Foldnak 80-100 Trimmer 100.doc
Rev.1.3 23.10.2006
31
© Ernst Nagel GmbH
9965043 Operations manual Foldnak 80-100 Trimmer 100.doc
Rev.1.3 23.10.2006
32
© Ernst Nagel GmbH
9965043 Operations manual Foldnak 80-100 Trimmer 100.doc
Rev.1.3 23.10.2006
33
KONFORMITÄTSERKLÄRUNG
DECLARATION OF CONFORMITY
DÉCLARATION DE CONFORMITÉ
Ernst Nagel GmbH
Breitwiesenstr. 21
70565 Stuttgart
Germany
Wir/ We/ Nous:
erklären in alleiniger Verantwortung, dass das Produkt/
declare under our sole responsibility that the product/
déclarons sous notre seule responsabilité que le produit
Foldnak 80/100 – Trimmer 100
auf das sich diese Erklärung bezieht, in Übereinstimmung ist mit den Bestimmungen
der EU Richtlinien/
to which this declaration relates is in conformity with the essential requirements of
EEC directives/
auquel se réfère cette déclaration est en conformité avec les exigences essentielles
des directives de la communauté européenne
89/336/EEC
89/392/EEC
73/23/EEC
und Änderungen/ and amendments/ et amendements
und Änderungen/ and amendments/ et amendements
und Änderungen/ and amendments/ et amendements
unter Anwendung der folgenden harmonisierten Normen/
by applying the following harmonized standards/
en appliquant les normes harmonisées suivantes
EN 60204-1
prEN 1010
EN 60950
EN 55022
EN 55024
EN 61000-3-2
EN 61000-3-3
06.93
10.99
08.92, + A1 + A2 + A3 + A4 + A11
09.98 Klasse B/ class B/ classe B
09.98
04.95 + A1 + A2 + A14
01.95
Jahr der Anbringung der CE-Kennzeichnung/
Year of affixing the CE marking/
L' an de l' application de la marque CE:
2006
Stuttgart, 15. März 2006
Ort und Datum/
Place and date/
Lieu et date
© Ernst Nagel GmbH
Geschäftsführer/
Managing Director/
Gérant
9965043 Operations manual Foldnak 80-100 Trimmer 100.doc
Rev.1.3 23.10.2006
34
Glossary/ abbreviations
FK = Foldnak
FA = Foldnak actuator
FS = Foldnak sensor
GND = Ground
HxWxD = height x width x depth
IR = infrared
RF = RoboFeeder
RH = relative humidity
SH = stapling head
SSR = Solid state relay
TDC = top dead center
TA = Trimmer actuator
TS = Trimmer sensor
T-Finger = transport finger
History
Rev. 0.1
Rev. 0.2
Rev. 0.3
Rev. 0.4
Rev.1
Rev.1.1
Rev.1.2
Rev.1.3
15.03.2006
13.04.2006: Picture, Trimmer actuators
13.06.2006: Page 11 FS32/33 in FS30/31
02.08.2006: Trimmer new, many changes and additions, adjusted to layout of German Operations manual;
software version FK 4.43
05.09.2006: pages 25-27 tables completed; p.7+13 paper format min.
software version FK 5.xx, p.10 Maintenance and cleaning
11.09.06: p.18 booklet shears; p.15+28 alignment tool SH, Clincher-exchange,
p.9 Sequence of switching on, p.5 Safety precautions 8, 16,17, 18
28.09.06: p.12 reattach the leaf springs; p.28 loop driver blade: + flat staples; flat driver blade: ring and flat
staples; p.30 product …-Trimmer 100; clinch->clincher
23.10.06: p.30-32 inserted: circuit diagram page 1-3 (2660450); p.33 inserted blank page;
p.28 Smallest format kit -> Parts for change to smallest format A6, + listing of parts
© Ernst Nagel GmbH
9965043 Operations manual Foldnak 80-100 Trimmer 100.doc
Rev.1.3 23.10.2006
35
Ernst Nagel GmbH
D - 70565 Stuttgart, Germany
Inland
0711 78078 11
Export +49 711 78078 21
Telefax +49 711 78078 10
www.ernstnagel.com