1
Operation Manual
© ZOOM Corporation
Reproduction of this manual, in whole or in part, by
any means, is prohibited.
USAGE AND SAFETY PRECAUTIONS
• Excessive dust or sand
• Excessive vibration or shock
SAFETY PRECAUTIONS
• Handling
In this manual, symbols are used to highlight warnings and cautions
for you to read so that accidents can be prevented. The meanings of
these symbols are as follows:
Warning
Caution
This symbol indicates explanations about
extremely dangerous matters. If users ignore this
symbol and handle the device the wrong way,
serious injury or death could result.
This symbol indicates explanations about
dangerous matters. If users ignore this symbol
and handle the device the wrong way, bodily
injury and damage to the equipment could result.
Please observe the following safety tips and precautions to ensure
hazard-free use of the RT-223.
• Never place objects filled with liquids, such as vases, on the
RT-223 since this can cause electric shock.
Warning • Do not place naked flame sources, such as lighted candles,
on the RT-223 since this can cause fire.
The RT-223 is a precision instrument. Do not exert undue
pressure on the keys and other controls. Also take care not to
Caution drop the unit, and do not subject it to shock or excessive
pressure.
• Connecting cables and input and output jacks
You should always turn off the power to the RT-223 and all
other equipment before connecting or disconnecting any
Warning cables. Also make sure to disconnect all connection cables and
the power cord before moving the RT-223.
• Alterations
Warning
• Power requirements
Since power consumption of this unit is fairly high, we
recommend the use of an AC adapter whenever possible. When
Warning powering the unit from batteries, use only alkaline types.
[AC adapter operation]
• Be sure to use only an AC adapter which supplies 9 V DC,
300 mA and is equipped with a "center minus" plug (Zoom
AD-0006). The use of an adapter other than the specified
type may damage the unit and pose a safety hazard.
• Connect the AC adapter only to an AC outlet that supplies
the rated voltage required by the adapter.
• When disconnecting the AC adapter from the AC outlet,
always grasp the adapter itself and do not pull at the cable.
• During lightning or when not using the unit for an extended
period, disconnect the AC adapter from the AC outlet.
[Battery operation]
• Use four conventional IEC R6 (size AA) batteries
(alkaline).
• The RT-223 cannot be used for recharging.
• Pay close attention to the labelling of the battery to make
sure you choose the correct type.
• When not using the unit for an extended period, remove the
batteries from the unit.
• If battery leakage has occurred, wipe the battery
compartment and the battery terminals carefully to remove
all remnants of battery fluid.
• While using the unit, the battery compartment cover should
be closed.
• Environment
Warning
To prevent the risk of fire, electric shock or malfunction, avoid
using your RT-223 in environments where it will be exposed to:
• Extreme temperatures
• Heat sources such as radiators or stoves
• High humidity or moisture
2
Never open the case of the RT-223 or attempt to modify the
product in any way since this can result in damage to the unit.
• Volume
Do not use the RT-223 at a loud volume for a long time since
this can cause hearing impairment.
Caution
Usage Precautions
• Electrical interference
For safety considerations, the RT-223 has been designed to provide
maximum protection against the emission of electromagnetic radiation
from inside the device, and protection from external interference.
However, equipment that is very susceptible to interference or that
emits powerful electromagnetic waves should not be placed near the
RT-223, as the possibility of interference cannot be ruled out entirely.
With any type of digital control device, the RT-223 included,
electromagnetic interference can cause malfunctioning and can
corrupt or destroy data. Care should be taken to minimize the risk of
damage.
• Cleaning
Use a soft, dry cloth to clean the RT-223. If necessary, slightly moisten
the cloth. Do not use abrasive cleanser, wax, or solvents (such as paint
thinner or cleaning alcohol), since these may dull the finish or damage
the surface.
Please keep this manual in a convenient place for future reference.
* MIDI is a registered trademark of Association of Musical
Electronics Industry(AMEI).
* SD Logo is a trademark.
* All trademarks and registered trademarks mentioned in this
manual are for identification purposes only and are not
intended to infringe on the copyrighted properties of their
respective owners.
ZOOM RT-223
Contents
USAGE AND SAFETY PRECAUTIONS . . 2
SAFETY PRECAUTIONS . . . . . . . . . . . . . . . . . 2
Usage Precautions . . . . . . . . . . . . . . . . . . . . . 2
Introduction . . . . . . . . . . . . . . . . . . . . . . . 4
Names of Parts . . . . . . . . . . . . . . . . . . . . 5
Top panel . . . . . . . . . . . . . . . . . . . . . . . . . . . . 5
Rear panel . . . . . . . . . . . . . . . . . . . . . . . . . . . . 5
Getting Connected . . . . . . . . . . . . . . . . .
Using the Unit on Batteries . . . . . . . . . .
Preparations . . . . . . . . . . . . . . . . . . . . . .
Quick Guide . . . . . . . . . . . . . . . . . . . . . . .
6
7
7
8
Quick Guide 1 Listening to the Demo Song . . 8
Quick Guide 2 Playing the Pads . . . . . . . . . . 10
Quick Guide 3 Playing a Pattern. . . . . . . . . . 12
Quick Guide 4 Assembling a Song by Hitting
the Pads . . . . . . . . . . . . . . . . . . . . . . . . . . . 14
Quick Guide 5 Using Groove Play . . . . . . . . 16
Playing the Pads (Manual Play) . . . . . . 18
Playing by tapping the pads . . . . . . . . . . . . . 18
Selecting a kit/program . . . . . . . . . . . . . . . . 19
Playing the Patterns (Pattern Mode) . . 20
Playing a pattern . . . . . . . . . . . . . . . . . . . . . . 20
Changing the tempo of pattern playback . . . 21
Entering Patterns in Real Time . . . . . . 22
Real-time recording of a drum track . . . . . . . 22
Real-time recording of a bass track . . . . . . . 25
Entering Patterns Using Step Input . . 27
What is step recording? . . . . . . . . . . . . . . . . 27
Step recording of drum track . . . . . . . . . . . . 28
Step recording of bass track . . . . . . . . . . . . 29
Editing a Pattern . . . . . . . . . . . . . . . . . . 32
Copying a pattern/Returning a pattern to the
factory default condition . . . . . . . . . . . . . . 32
Erasing a pattern . . . . . . . . . . . . . . . . . . . . . 33
Assigning a name to a pattern . . . . . . . . . . . 33
Creating Songs (Song Mode) . . . . . . . . 34
What is a song? . . . . . . . . . . . . . . . . . . . . . .
Creating a song using step input . . . . . . . . .
Creating a song using real-time input . . . . .
Creating a song using FAST input . . . . . . . .
Entering event information . . . . . . . . . . . . . .
Playing a song . . . . . . . . . . . . . . . . . . . . . . .
34
34
36
39
42
44
Editing a Song . . . . . . . . . . . . . . . . . . . . 45
Copying a range of measures . . . . . . . . . . . .
Copying a song . . . . . . . . . . . . . . . . . . . . . . .
Erasing a song . . . . . . . . . . . . . . . . . . . . . . .
Assigning a name to a song . . . . . . . . . . . . .
ZOOM RT-223
45
46
47
47
Using Pads to Play Patterns
(Groove Play Mode) . . . . . . . . . . . . . . . 48
Various Drum Kit Functions
(Kit Mode) . . . . . . . . . . . . . . . . . . . . . . . 50
Creating an original drum kit . . . . . . . . . . . . . 50
Copying a drum kit/Returning a drum kit to
the factory default condition . . . . . . . . . . . . 52
Assigning a name to a drum kit . . . . . . . . . . . 53
Using Effects (Effect Mode) . . . . . . . . . 54
About the effects . . . . . . . . . . . . . . . . . . . . . . 54
About patches . . . . . . . . . . . . . . . . . . . . . . . . 54
Using the COMP EQ effect . . . . . . . . . . . . . . 55
Using the REVERB effect . . . . . . . . . . . . . . . 55
Editing effect patches . . . . . . . . . . . . . . . . . . 57
Storing, swapping, or initializing effect
patches . . . . . . . . . . . . . . . . . . . . . . . . . . . . 58
Assigning a name to an effect patch . . . . . . . 59
Using the Metronome
(Metronome Mode) . . . . . . . . . . . . . . . 60
Changing Various Settings of the
RT-223 . . . . . . . . . . . . . . . . . . . . . . . . . . 63
Basic function setting procedure . . . . . . . . . 63
Function setting items . . . . . . . . . . . . . . . . . . 64
Other Functions . . . . . . . . . . . . . . . . . . . 68
Using the jam function . . . . . . . . . . . . . . . . . 68
Synchronizing the RT-223 to external MIDI
equipment . . . . . . . . . . . . . . . . . . . . . . . . . . 69
Using MIDI equipment to play the RT-223 . . 70
Checking the remaining memory
capacity . . . . . . . . . . . . . . . . . . . . . . . . . . . 71
Turning the backlight off . . . . . . . . . . . . . . . . 71
Returning the RT-223 to the factory default
condition (initialization) . . . . . . . . . . . . . . . . 71
Troubleshooting . . . . . . . . . . . . . . . . . . 72
RT-223 Appendix . . . . . . . . . . . . . . . . . 73
RT-223 Product Specifications . . . . . . . . . . . 73
Reverb Module . . . . . . . . . . . . . . . . . . . . . . . 74
COMP EQ Module . . . . . . . . . . . . . . . . . . . . . 75
PATCH LIST . . . . . . . . . . . . . . . . . . . . . . . . . 76
DRUM KIT LIST . . . . . . . . . . . . . . . . . . . . . . 77
BASS PROGRAM LIST . . . . . . . . . . . . . . . . . 78
DRUM PAD NOTE# LIST . . . . . . . . . . . . . . . . 78
MIDI NOTE # LIST . . . . . . . . . . . . . . . . . . . . . 78
INSTRUMENT LIST . . . . . . . . . . . . . . . . . . . . 79
PRESET PATTERN LIST . . . . . . . . . . . . . . . . 80
PRESET SONG PAD PARAMETER . . . . . . . . 85
MIDI Implementation . . . . . . . . . . . . . . . . . . 86
MIDI Implementation Chart . . . . . . . . . . . . . 87
3
Introduction
Thank you for selecting the ZOOM RhythmTrak RT-223 (hereafter simply called the “RT-223”).
The RT-223 is a sophisticated product with the following features.
• Highly compact drum/bass machine
The RT-223 is small enough to fit in the pocket of
a guitar case. But it has enough muscle to play a
full rhythm accompaniment with super realistic
drum and bass sounds. You can use it as a
personal metronome during practice, or as your
rhythm section during a live performance and
when making a demo tape.
• Perfectly simple operation
Even if you have never used a drum machine or
sequencer before, you will feel comfortable with
the RT-223 right away.
• Great selection of preset patterns
The RT-223 can store 511 different patterns
(including patterns that you have created
yourself). Out of the box, it comes with a wide
choice of representative patterns that will you get
started in no time.
• Program the accompaniment to an
entire song
You can line up multiple patterns in the intended
order to create the rhythm accompaniment for a
full song. Besides step input, where you specify
elements such as pattern number, volume, and
tempo one by one, the RT-223 also supports the
innovative FAST input method developed by
ZOOM.
• Groove play mode lets you play patterns
like a DJ
Assigning patterns to the pads on the top panel
lets you change patterns simply by tapping the
pads. Great for live performances and for DJ use.
• Create your original kits
The RT-223 comes with built-in drum kits and
bass programs for a variety of musical genres.
What’s more, you can create your own drum kits
by combining drum sounds at will.
• Two types of effects
The drum kit/bass program sound can be
processed by two kinds of effects (COMP EQ and
REVERB). The REVERB effect allows adjusting
4
the effect depth for each drum sound individually.
• Jam function for selecting patterns with
a foot switch
Connect a foot switch to have even more control
over play start/stop and switching patterns. While
playing your instrument, you can set fill-ins or
breaks or return to the main theme after
improvising for any length. This is great for those
lively jam sessions.
• Built-in metronome function
The metronome is convenient for scale practice or
rhythm practice. In addition to the standard beat,
you can also use mixed beat settings such as
5-beat and 7-beat.
• Input jack for connecting an external
sound source
Connect an instrument processed with a multieffect such as the ZOOM GFX-1 and mix it with
the RT-223 signal to produce impressive
sounding output.
• Control various functions with a foot
switch
A connected foot switch can be used to start/stop
a pattern or change the tempo while keeping your
hands free. Alternatively, push the foot switch
down to kick a virtual bass drum, or switch
between hi-hat open/close.
• Compatible with MIDI synchronization
The MIDI IN connector allows an external MIDI
keyboard or other device to play the sounds of the
RT-223. It is also possible to synchronize the
RT-223 to the MIDI clock from a MIDI
sequencer.
Please take the time to read this manual carefully
so as to get the most out of your RT-223 and to
ensure optimum performance and reliability.
Retain this manual, the warranty card and all
other documentation for future reference.
ZOOM RT-223
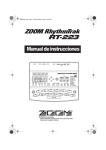
Names of Parts
Top panel
[INSERT/COPY] key
[DELETE/ERASE] key
[BASS MUTE] key
Display
VALUE [+]/[-] keys
Cursor keys
[SONG] key
[TEMPO] key
[PATTERN] key
[COMP EQ] key
[REVERB] key
[EXIT] key
[METRONOME] key
[EDIT] key
REC [O] key
PLAY [R] key
STOP [P] key
[BANK] key
[REPEAT/STEP] key
[KIT/PROG] key
[DRUM] key
[BASS] key
Pads
[FUNCTION] key
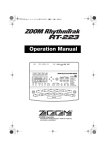
Rear panel
[VOLUME] control
[PHONES] jack
[R OUT] jack
[DC IN]
connector
[LINE IN] jack
[MIDI IN] connector
[FOOT SW] jack
[POWER] switch
[L/MONO OUT] jack
ZOOM RT-223
5
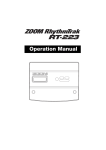
Getting Connected
For mono playback, connect only
the [L/MONO OUT] jack.
Connecting the optional foot switch
FS01 allows such functions as
playing the bass drum sound with
your foot or switching between open
and closed hi-hat.
FS01
Mixer, audio system,
or other playback system
Headphones
AC adapter
MIDI OUT
GFX-1 or other effect device
When a guitar or other
instrument is connected to the
[LINE IN] jack, the sound from
the instrument is mixed with
the sound of the RT-223 and
output from the [L/MONO
OUT] and [R OUT] jacks.
6
Guitar, bass etc.
MIDI sequencer/computer
MIDI interface
To synchronize the RT-223 with
an external sequencer or to control
operation of the RT-223 from an
external MIDI component, link the
MIDI OUT connector of the
equipment with the [MIDI IN]
connector on the RT-223.
ZOOM RT-223
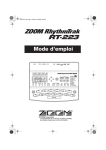
Using the Unit on Batteries
The RT-223 can be powered from four IEC R6 (size AA) batteries. Follow the steps below to insert the
batteries.
1. Turn the unit over and open the
NOTE
battery compartment cover.
If the “BATT” symbol appears while the
u n i t i s p o w e re d f ro m b a t t e r i e s , t h e
batteries are exhausted. Replace the
batteries as soon as possible.
2. Insert four fresh IEC R6 (size AA)
alkaline batteries.
3. Close the battery compartment
cover.
Tab
OPEN
BATTERY:R6(SUM-3)or"AA"SIZEx4
Battery
compartment
cover
Bottom view of RT-223
Battery compartment
IEC R6 (size AA) battery x 4
Batteries must all face in the same direction.
Preparations
After connections are established, check the sound by performing the following steps.
1. With the playback system turned off
and the volume fully turned down,
double-check whether all connections
have been made correctly.
3. Set the [POWER] switch of the
RT-223 to ON, and then turn power
to the playback system on.
2. To power the unit from the AC
adapter(optional),connect the AC
adapter to the [DC IN] connector and
turn the [VOLUME] control fully down.
4. While tapping a pad to produce
sound, adjust the [VOLUME] control
of the RT-223 and the volume
control on the playback system to a
suitable position.
ZOOM RT-223
7
Quick Guide
This Quick Guide demonstrates how to operate your RT-223, using a few representative examples. Some
of the terms and concepts used in this manual are also explained here.
Quick Guide 1
Listening to the Demo Song
The RT-223 comes with a demo song already
built in. Hear for yourself what RT-223 can do.
Connect the RT-223 to the
playback system and turn
the power on.
Press the [FUNCTION] key.
Verify that the [FUNCTION] key
flashes.
Press the [SONG] key.
The demo song starts.
Sounds just like the backup of a live
band, doesn't it? Note how effectively
various drum, percussion, and bass
sounds are combined. The RT-223 can
produce such a great variety of sounds
with ease.
To stop the demo
Press the [PATTERN] key
or [SONG] key.
8
ZOOM RT-223
Quick Guide
Drum kits and
bass programs
The backup sound provided by the RT-223
consists of a drum kit and a bass program. A drum
kit is a collection of drum sounds including bass
drum, snares, and tomtom, percussion sounds
such as congas and bongos, and various other
effect sounds. These are combined to create
backing tracks for a wide range of music genres.
The RT-223 comes with 127 drum kits of which
70 are preprogrammed. You can also create your
own original drum kits.
A bass program is a bass sound such as electric
bass, acoustic bass, or synthesizer bass. 12 types
of bass programs are available, of which one can
be selected for playback.
Bass
program
Drum kit
When [PATTERN] key is pressed
RT-223 switches to pattern mode
(for playing and recording patterns).
ZOOM RT-223
When [SONG] key is pressed
RT-223 switches to song mode (for creating
backing songs which are sequences of patterns).
9
Quick Guide
Quick Guide 2 Playing the Pads
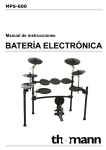
The top panel of the RT-223 has 13 pads which serve to play drum kits and bass programs.
Turn the power on.
Press the [PATTERN] key.
The [PATTERN] key lights up and the
RT-223 is in pattern mode.
Press the [DRUM] key.
The [DRUM] key lights up. Now you can
use the pads to play the drum kit.
Tap the pads.
You will notice that the pads produce
various drum sounds. The 13 pads are
assigned different sounds, depending on the
drum kit or bass program that has been
selected. The illustration below shows an
example for the drum sounds of the 13 pads
with a drum kit.
Mid Tom
Hi Tom
Ride Cymbal
Low Tom Crash Cymbal
Extra Cymbal
SNARE
KICK
Kick
Snare
Cowbell
Closed Hat
Open Hat
Rim Shot
Tambourine
Thump Slap Thump Thump Slap
Try tapping pad 0 (KICK) and pad 2 (SNARE) as
shown in the illustration above, to play a rhythm
line of bass drum and snare drum.
10
ZOOM RT-223
Quick Guide
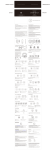
To play a bass program with the pads
Press the [BASS] key.
The [BASS] key lights up and the current bass program can be played with the
pads.
You will notice that different pads produce bass sound
of a different pitch. You can use the 13 pads like the
keys of a keyboard.
The illustration below shows an example for the notes
produced by the pads when a bass program is selected.
To change the drum kit/bass
program
Press the [DRUM] or [BASS] key
and then the [KIT/PROG] key.
When you press the [KIT/PROG] key, the display
shows the name of the currently selected drum kit
or bass program.
Press one of the
VALUE [+]/[-] keys.
BASIC
0
VALUE [+] key
Selects the next higher
kit/program number.
VALUE [-] key
Selects the next lower
kit/program number.
ZOOM RT-223
Press the [EXIT] key.
To play the changed drum kit/bass
program with the pads, press the
[EXIT] key to return to the pattern
mode.
11
Quick Guide
Quick Guide 3 Playing a Pattern
The RT-223 already contains many preprogrammed patterns (backing sequence of several
bars), using the drum kits and bass programs. Here's how you can play such a pattern.
Turn the power on.
Press the [PATTERN] key.
The [PATTERN] key lights up and the
RT-223 is in pattern mode. The display
shows the currently selected pattern name
and pattern number.
POPS1VA 025
Pattern name Pattern number
Press the PLAY [R] key.
Playback of the currently selected pattern
starts.
The patterns of the RT-223 can be thought
of as "recordings" of a drum kit and bass
program. These are recorded on so-called
tracks that are combined to form the
pattern.
A pattern of the RT-223
therefore consists of the
drum track and the bass
track. The drum track
contains a drum kit
recording and the bass
track a bass program
recording.
12
Pattern
Drum
track
Bass
track
To change
the pattern
Press one of the
VALUE [+]/[-] keys.
ZOOM RT-223
Quick Guide
To change the tempo
TEMPO
Hold the [TEMPO] key...
While the [TEMPO] key is held down, the display
shows the currently active tempo.
120
Tempo value (BPM)
Press one of the VALUE [+]/[-] keys.
VALUE [+] key
Increases the
TEMPO
tempo value.
VALUE [-] key
Decreases the tempo value.
HINT
125
You can tap the [TEMPO] key twice in
succession to specify the tempo (→ p. 21).
To mute the bass sound
Press the [BASS MUTE] key once.
Press the key once more to turn the bass on again.
To stop pattern play
Press the STOP [P] key.
VALUE [+] key
Selects next higher pattern number.
POPS1VA 026
VALUE [-] key
Selects next lower pattern number.
ZOOM RT-223
Pattern name Pattern number
13
Quick Guide
Quick Guide 4 Assembling a Song by Hitting the Pads
In song mode, you can preassign patterns to pads, making it easy to switch patterns by hitting
the pads. This function lets you assemble patterns for a song in real time, complete with fillins and breaks.
Turn power on.
Press the [SONG] key.
The [SONG] key lights up and the RT-223
goes into song mode. The display shows the
name and number of the currently selected
song.
RCKTMP
00
Song name Song number
Use the VALUE [+]/[-] keys to
select a song.
In this example, select a song from numbers
0 -9.
VALUE [+] key
Select next higher song number.
Press pad 0
VALUE [-] key
Select next lower song number.
For these preprogrammed songs numbers,
patterns are already assigned to the pads.
14
When you hit pad 0 (INTRO), the
intro pattern plays, and then the
RT-223 automatically switches to
pad 2 (VERSE A).
ZOOM RT-223
Quick Guide
Press pads 1 - 9, [+], [x].
The respective patterns assigned to the pads will play.
When pad 4 (FILL A), pad 8 (FILL B), or pad [+] (BREAK) is pressed, the fill-in or
break pattern plays, and then the RT-223 switches automatically to the pattern of
another pad. When you press one of these pads, a new pattern will start playing at the
beat, even if the previous pattern is not finished. (For other pads, the pattern is switched
only after the current pattern has finished.)
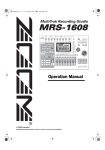
Measure number
1
2
4/4
VERSE A
3
VERSE A FILL A
4
VERSE B
For most of the songs 0 - 9, patterns are assigned to the
pads as follows.
VERSE B variations
VERSE A variations
INTRO
VERSE A FILL A VERSE B FILL B
Press pad [()].
ZOOM RT-223
BREAK
ENDING
In this way, you can assemble the
accompaniment for an entire song in real time.
HINT
When you hit pad [()] (ENDING), the
ending pattern plays, and then the
RT-223 automatically stops playing.
BRIDGE
You can also record your pad
playing in the song (→ p. 36).
The assignment of patterns to
pads and the transition settings
can be changed ( → p. 37).
15
Quick Guide
Quick Guide 5 Using Groove Play
Groove play is a special feature of the RT-223 which lets you switch among various patterns
simply by tapping the pads. This makes it easy to play with patterns like a DJ spinning records.
Turn the power on.
Press the [SONG] key and
[PATTERN] key together.
The [SONG] key and [PATTERN] key
light up, and the RT-223 is in groove play
mode.
Push a pad.
While the pad is held down, the pattern
assigned to that pad is played. Give it a try
and check out which patterns are assigned
to the various pads.
The pattern assigned to a pad can be changed (→ p. 48).
HINT
Release
Pad
Pad
Hold down
Pattern
assigned
to pad
16
ZOOM RT-223
Quick Guide
To play multiple patterns simultaneously
Push several pads together.
In groove play mode, up to 4 patterns can be played simultaneously. While playing
a basic drum pattern, you can do things such as hitting another pad to overlay a bass
pattern and then adding a snare fill-in.
By using the right timing when pushing the pads, you can create complex rhythms.
To stop groove play
Press the [SONG] key or
[PATTERN] key.
RT-223 switches to pattern mode.
RT-223 switches to song mode.
To keep playing the pattern
without pressing the pad
Hold down the [REPEAT/STEP] key
while pushing the pad.
The pattern will continue to play when the pad is
released. This is useful to keep on playing a basic drum
pattern.
Pad
Pad
To stop the pattern,
push the same pad once
more.
Pad
Pattern
assigned
to pad
ZOOM RT-223
17
Playing the Pads (Manual Play)
The RT-223 lets you not only play back existing patterns and songs, it also allows you to manually play the
unit by tapping the pads. This section describes how to manually play the unit.
Playing by tapping the
pads
The RT-223 assigns various sounds or pitches to
the pads, depending on the currently selected
drum kit/bass program. Play the pads to discover
the realistic sounds offered by the RT-223.
HINT
When the [BASS] key is pressed in step 2,
a bass program can be played, but there is
a difference in how the pads operate. With
a drum kit, the sound plays through even if
the pad is released immediately. With a
bass program, the sound continues only as
long as the pad is pressed.
4. Press the [BANK] key.
1. Press the [PATTERN] key.
This activates the pattern mode. The [PATTERN]
key lights up.
2. Press the [DRUM] key.
Each time you press the [BANK] key, the set of
sounds assigned to the pads (pad bank) changes.
The RT-223 gives you a choice of three pad
banks.
HINT
When a bass program is selected, pressing
the [BANK] key changes the pitch range of
the bass sound.
5. To play the sound of a pad
The [DRUM] key lights up, and you can play the
drum kit using the pads.
During manual play, you use the [DRUM] key
and [BASS] key to select the drum kit or bass
program. (The selected key lights up.)
repeatedly, hold down the [REPEAT/
STEP] key while pushing the pad.
Pad
3. Tap one of the pads.
Pad
The LED of the pad lights up briefly and the
sound assigned in the drum kit to that pad is
heard. The volume changes according to how
strongly you tap the pad.
18
The sound will be repeated while the pad is being
held down. The repeat rate depends on the tempo
setting.
HINT
The repeat play interval can be adjusted
with the quantize setting (→ p. 65).
ZOOM RT-223
Playing the Pads (Manual Play)
Selecting a kit/program
The RT-223 lets you select among 127 drum kits
(70 preprogrammed) and 12 bass programs. Try
changing the setting as follows.
1. Press the [PATTERN] key.
3. Use the VALUE [+]/[-] keys to select
the drum kit/bass program.
The [PATTERN] key lights up and the RT-223
goes into pattern mode.
2. Press the [DRUM] key/[BASS] key
and then the [KIT/PROG] key.
The kit/program number shown on the display
increases or decreases by one, and the kit/program
is switched accordingly.
REZROCK
The name and number of the currently selected
drum kit (or bass program) appears on the display.
BASIC
1
HINT
0
HINT
Available drum kit types are printed on the
panel.
• Keeping a VALUE [+]/[-] key depressed
changes numbers continuously.
• To change numbers quickly, hold down
one of the VALUE [+]/[-] keys and press
the other key. The numbers will change
rapidly.
4. Press the [PATTERN] key to return
to pattern mode.
You can now play the sound of the new drum kit/
bass program with the pads.
ZOOM RT-223
19
Playing the Patterns (Pattern Mode)
This section describes how to play patterns of the RT-223.
Playing a pattern
The [TEMPO] key flashes according to the tempo
of the pattern.
The display shows the current position in the
pattern (measure/beat).
The RT-223 incorporates 511 accompaniment
patterns. In the factory default condition, the
patterns 0 - 439 are preprogrammed.
001-04
1. Press the [PATTERN] key.
The [PATTERN] key lights up and the RT-223
goes into pattern mode. The name and number of
the currently selected pattern appears on the
display.
Measure Beat
025
Pattern
number
HINT
• You can use the pads for manual play
while a pattern is playing.
• You can switch the pattern number while
a pattern is playing.
4. To mute only the bass track, press
POPS1VA 025
Pattern name
the [BASS MUTE] key.
Pattern number
2. Use the VALUE [+]/[-] keys to select
the pattern to play.
The key lights up and the bass track is muted
(only the drum track is heard). To turn the bass
track back on, press the [BASS MUTE] key once
more.
HINT
The bass track can be muted while the
pattern is stopped.
3. Press the PLAY [R] key.
5. Press the STOP [P] key to stop the
pattern.
The PLAY [R] key lights up and the pattern is
played repeatedly.
20
Pressing the PLAY [R] key instead of the STOP
ZOOM RT-223
Playing the Patterns (Pattern Mode)
[P] key sets the unit to pause mode. The PLAY
[ R ] key flashes. Pressing the PLAY [ R ] key
again in this condition resumes playback from the
point where it was paused.
3. To set the tempo directly by manual
input, tap the [TEMPO] key twice
while the indication "TEMPO" is
shown on the display (tap tempo
input function).
Changing the tempo of
pattern playback
Tap twice
When playing a pattern in pattern mode, the
playback tempo for the pattern can be varied over
the range of 40 - 250 BPM (BPM = beats per
minute, using quarter notes).
1. Press the [TEMPO] key.
The display shows the current tempo for about 2
seconds.
TEMPO
While the pattern is stopped or playing, pressing
the [TEMPO] key once to bring up the "TEMPO"
indication, and then pressing the [TEMPO] key
twice in succession will set the tempo by taking
the key press interval as a quarter note. Simply
tap the [TEMPO] key in sync with the song
rhythm.
NOTE
120
The tempo set in pattern mode applies to
all patterns.
Tempo
2. Use the VALUE [+]/[-] keys to set the
tempo.
TEMPO
125
Tempo value
To return to the condition before the [TEMPO]
key was pressed, press the [EXIT] key or simply
wait a while.
ZOOM RT-223
21
Entering Patterns in Real Time
The RT-223 lets you enter your own accompaniment patterns. Creating and recording a pattern is possible
in two ways: by actually playing the pattern on the pads (real-time recording), or by entering each sound
individually (step recording). The procedure for real-time recording of a drum track and bass track is
described below.
Real-time recording of a
drum track
To record a drum track in real time using the pads,
proceed as follows.
The [DRUM] key and [BASS] key serve to select
the drum track or bass track.
4. Press the [KIT/PROG] key.
The name and number of the currently selected
drum kit appears on the display.
PUNCH
1. Press the [PATTERN] key.
Drum kit name
9
Drum kit number
5. Use the VALUE [+]/[-] keys to select
a drum kit.
The [PATTERN] key lights up and the RT-223
goes into pattern mode. The name and number of
the currently selected pattern appear on the
display.
2. Use the VALUE [+]/[-] keys to select
an empty pattern.
When you select an empty pattern, the indication
“EMPTY” appears on the display.
EMPT
500
HINT
If there is no empty pattern, you should
delete an unwanted pattern (→p.33 ).
3. Press the [DRUM] key.
HINT
• Keeping a VALUE [+]/[-] key depressed
changes numbers continuously.
• To change numbers quickly, hold down
one of the VALUE [+]/[-] keys and press
the other key. The numbers will change
rapidly.
• The drum kit/bass program used for a
pattern can be changed later, after the
pattern has been recorded.
• When you change the drum kit/bass
program of a pattern, the new drum kit/
bass program is automatically stored for
that pattern.
6. Press the [EXIT] key to return to
pattern mode.
The sound of the newly selected drum kit can now
be played in pattern mode.
22
ZOOM RT-223
Entering Patterns in Real Time
7. Press the [FUNCTION] key and then
pad 5 (QUANTIZE).
bass drum and snare drum using quarter
notes, you can record a hi-hat sequence
with sixteenth notes.
The current quantize value appears on the display.
10.While holding down the REC [O]
key, press the PLAY [R] key.
QNTIZE
001-04
16
Measure Beat
Quantize value
“Quantization” refers to the degree of detail with
which notes are recorded. By setting the quantize
value to the shortest note to use for the pattern,
recording can be carried out while automatically
maintaining precise timing. If you select the finest
quantize setting, you can retain the human touch
that is characterized by slightly irregular timing.
HINT
The [FUNCTION] key is used to make
various settings for the RT-223. For details,
please refer to page 63.
8. Use the VALUE [+]/[-] keys to set the
The REC [O] key and PLAY [R] key light up,
and the [TEMPO] key flashes according to the
currently selected tempo. The metronome sound
starts.
HINT
When you call up an empty pattern, it will
be set to the same beat and number of
measures as the previous pattern. These
settings can be changed, as described on
pages 64, 65.
11.Tap the pads in accordance with the
metronome sound.
quantize value (shortest note to be
recorded).
4 ........Quarter note
8 ........Eighth note
12 ......Eighth triplet note
16 ......Sixteenth note
24.....Sixteenth triplet note
32.....Thirty-second note
48.....Thirty-second triplet note
Hi .....1 tick (1/96 of quarter
note)
9. Press the [FUNCTION] key once
more.
The new quantize value is set and the unit returns
to the pattern mode.
HINT
After recording is completed, it is possible
to change the quantize value and record
again on the same track. After recording
ZOOM RT-223
500
Pad
The sound of the respective pad is heard, and it is
recorded for the duration set with the quantize
value. When the end of the pattern is reached, the
recording loops back to the beginning and
continues, allowing you to add to the recording as
often as desired. You can check the current
position in the pattern on the display (measure/
beat).
HINT
• By using the [BANK] key during input of a
pattern, you can switch the set of drum
sounds assigned to the pads.
• When the REC [O] key is pressed during
23
Entering Patterns in Real Time
real-time recording, the REC [ O ] key
starts to flash and pattern recording is
suspended. In this condition, tapping the
pads will produce sound, but it is not
recorded. This is useful to check
phrasing and sound before actually
recording. To resume recording, press the
REC [O] key once more.
13.To repeat a sound, tap the pad while
holding down the [REPEAT/STEP]
key.
By holding down the [REPEAT/STEP] key while
hitting a pad, a percussion sound can be recorded.
Pad
12.To erase the sound from a specific
pad, push the pad while holding
down the [DELETE/ERASE] key.
While the key is held down, the sound from that
pad is erased from the pattern, as shown in Figure
1 below.
To erase the entire track, push the [DRUM] key
while holding down the [DELETE/ERASE] key.
While both keys are held down, all sounds in that
track are erased, as shown in Figure 2 below.
14.When real-time input of the drum
track is completed, press the STOP
[P] key.
Pattern recording stops.
Figure 1
Deleting the sound of a
specific pad
Drum track
Snare drum
Bass drum
Snare drum
Bass drum
Figure 2
Deleting the sound of the
entire drum track
Drum track
Snare drum
Bass drum
Snare drum
Bass drum
24
ZOOM RT-223
Entering Patterns in Real Time
4. Press the [FUNCTION] key and then
NOTE
• If a MIDI clock signal is being received,
real-time recording is not possible. For
details, please refer to page 67.
pad 0 (BASS KEY).
Real-time recording of a
bass track
Next, let’s add a bass track to the drum track
pattern recorded in the previous section.
1. Press the [BASS] key.
BASSKE
E
When the bass track is selected, the pads play a
series of pitches that are a semitone apart, such as
C, C#, D, D#, ...B, C. You can change the bass
key that is assigned to the lowest pad (pad 0), as
shown in the illustration below.
HINT
2. Press the [KIT/PROG] key, and then
The last selected key will be saved as the
root for that pattern. By specifying root
information in song mode, the bass track
can be shifted up or down, using this key
as reference.
use the VALUE [+]/[-] keys to select
the bass program.
5. Use the VALUE [+]/[-] keys to select
The bass track is selected for recording.
the key to be assigned to pad 0.
HINT
The BASS KEY setting is stored
individually for each pattern.
3. Press the [EXIT] key to return to
pattern mode.
6. When the setting is complete, press
the [FUNCTION] key once more.
The sound of the newly selected bass program can
now be played in pattern mode.
The [FUNCTION] key goes out and the unit
returns to the pattern mode.
Example for BASS KEY setting of "E"
ZOOM RT-223
25
Entering Patterns in Real Time
7. While holding down the REC [O]
key, press the PLAY [R] key.
The REC [O] key and PLAY [R] key light up,
and the [TEMPO] key flashes according to the
currently selected tempo. The metronome sound
starts.
To erase the entire bass track, push the [BASS]
key while holding the [DELETE/ERASE] key
down. While both keys are held down, the bass
track is erased.
Erasing the sound of a specific pad
B2 pad
8. Tap the pads along with the
metronome sound. Select the pad
with the pitch to enter into the
phrase.
Unlike in drum track recording, the bass track
also records the duration for which you press a
pad. For example, to record the following
sequence, hold the pad to which A2 has been
assigned and the pad to which E2 has been
assigned down for the length of a quarter note
each.
A2 pad
E2 pad
Hold down
Hold down
HINT
• By using the [BANK] key during pattern
recording, you can switch the pitch range
of bass notes assigned to the pads.
• When the REC [O] key is pressed during
real-time recording, the REC [ O ] key
starts to flash and pattern recording is
suspended. In this condition, tapping the
pads will produce sound, but it is not
recorded. This is useful to check
phrasing before actually recording. To
resume recording, press the REC [O] key
once more.
Erasing the sound of the entire bass track
10.When real-time input of the bass
track is completed, press the STOP
[P] key.
HINT
If necessary, specify a root for the pattern
that suits the entered bass phrase. The
BASS KEY setting (p. 64) is used to set the
root information for the patter n. For
patterns that are not to be used in a song
or for patterns where the bass track is
empty, making the setting is not required.
9. To erase the sound from a specific
pad, push the pad while holding
down the [DELETE/ERASE] key.
While the key is held down, the sound from that
pad is erased from the pattern.
26
ZOOM RT-223
Entering Patterns Using Step Input
This section describes step recording, which is another recording type that is possible with the RT-223.
When the end of a pattern is reached, it loops
automatically back to the beginning, allowing you
to add for example snare and hi-hat separately, to
complete the pattern. By pushing two pads at the
same time, you can enter two sounds in the same
position.
What is step recording?
Step recording allows you to enter and record each
sound separately, step by step, while the RT-223 is
in the stop condition. Even without mastering how
to play the pads in real time, you can easily create
complex drum and bass patterns.
For step recording of a bass track, the procedure is
slightly different, because unlike for the drum
track, the pitch and duration of the sound must be
specified. For the drum track, every pad produces
the sound of a different instrument, but for the
bass track, the pitch is determined by which pad
you push.
For step recording of a drum track, you first select
the shortest note that is to be used as a unit (length
of one step). Then you specify the drum
instrument by pressing a pad and the [REPEAT/
STEP] key. The note is entered, and input
proceeds to the next step. If you press the
[REPEAT/STEP] key without pressing a pad, a
rest is entered.
The fact that tapping a pad gives the shortest-unit
note and pushing the [REPEAT/STEP] key gives
the shortest-unit rest is the same, but the fact that
a parameter called “duration” is added when
entering a note is different. Even when the step
length is the same, the actual duration of each
note can be varied individually. To enter the bass
phrase shown in Figure 2, select an eighth note as
smallest unit and make the entry as shown, while
varying the duration.
For example, to enter the following bass drum
pattern by step input, select an eighth note as
smallest unit, and then make the input in the
following order, as shown in Figure 1.
[KICK] → [STEP] → [STEP] → [STEP] →
[KICK] → [STEP] → [STEP] → [STEP] →
[STEP] → [KICK]→ [STEP]
Figure 1
Bass drum
[STEP]
[KICK] [STEP]
Figure 2
[STEP]
[STEP]
[STEP]
[KICK] [STEP]
1 step
Duration Eighth note
Sixteenth note
[STEP]
[A2]
ZOOM RT-223
[STEP]
[KICK] [STEP]
[STEP]
[STEP]
Quarter note
[STEP]
[E2]
[STEP]
[STEP]
[E2]
[STEP]
[STEP]
27
Entering Patterns Using Step Input
Step recording of drum
track
This section describes how to record the drum
track using step recording.
1. In pattern mode, select an empty
user pattern, and select a drum kit,
as necessary.
The selection method for pattern and drum kit is
the same as in real-time recording (→ p. 22).
When you select an empty pattern, the indication
“EMPTY” appears on the display.
4...... Quarter note
24....... Sixteenth triplet note
8...... Eighth note
32....... Thirty-second note
12.... Eighth triplet note 48....... Thirty-second triplet
note
16.... Sixteenth note
Hi ....... 1 tick (1/96 of quarter
note)
4. Press the [FUNCTION] key once
more.
The quantize value is set, and the unit returns to
pattern mode.
5. Press the REC [O] key.
The REC [O] key lights up and pattern step input
becomes possible.
HINT
If there is no empty pattern, delete an
unneeded pattern first (→ p. 33).
2. Press the [FUNCTION] key and then
pad 5 (QUANTIZE).
The current quantize setting appears on the
display. The minimum unit (shortest note) for step
recording is determined by this setting.
6. To enter a note, press the pad
corresponding to the sound, and
then press the [REPEAT/STEP] key.
Pad
The note is entered, and the input position
advances by one step.
QNTIZE
16
Quantize value
3. Use the VALUE [+]/[-] keys to select
the quantize value (step length) from
the following values.
HINT
You can check the current position in the
pattern on the display (measure/beat/tick).
7. To enter a rest, press the [REPEAT/
STEP] key only.
If you press the [REPEAT/STEP] key without
pressing a pad, no note is entered, and the input
28
ZOOM RT-223
Entering Patterns Using Step Input
position advances by one step.
When the end of the pattern is reached, the
recording loops back to the beginning and
continues, allowing you to add to the recording.
8. To erase the sound of a specific pad,
use the [REPEAT/STEP] key to move
to its position. Then press the
corresponding pad while holding
down the [DELETE/ERASE] key.
Pad
When you move the position with the [REPEAT/
STEP] key, the pad for the sound input at the
current point lights up. When you delete the
sound by pressing the pad while holding down the
[DELETE/ERASE] key, the pad goes out.
The REC [ O ] key goes out, and step input
terminates.
Step recording of bass
track
Now let’s add a bass track to the drum track
recorded as described in the previous section.
Because pitch and duration must be specified for
the bass track, the procedure is slightly different
from step recording of the drum track.
1. In pattern mode, press the [BASS]
key.
Drum track
Snare
drum
Bass
drum
The bass track is selected. The bass program
selection method is the same as for real-time
recording (→ p. 25).
2. Press the [FUNCTION] key and then
Snare
drum
pad 5 (QUANTIZE).
Bass
drum
NOTE
During step input, it is not possible to
erase the entire track in one go.
9. When step input of the drum track is
finished, press the STOP [P] key.
ZOOM RT-223
QNTIZE
16
Quantize value
You can now set the quantize value.
29
Entering Patterns Using Step Input
3. Use the VALUE [+]/[-] keys to select
the quantize value (step length).
For information on quantize values, see page 23.
4. Press the [FUNCTION] key once
After a while, the screen of step 5 appears again.
8. To enter a note, press the pad for
the pitch, and then press the
[REPEAT/STEP] key.
more.
The quantize value is set, and the unit returns to
pattern mode.
5. Press the REC [O] key.
The display changes as follows, and step input
becomes possible.
001-01
00
6. Press the left or right cursor key.
The display changes as follows. Here you can set
the duration value.
Pad
The note is entered, and the input position
advances by one step. The sound duration will be
as specified earlier. You can check the current
position in the pattern on the display (measure/
beat/tick).
NOTE
If the entered duration exceeds the pattern
length, the note will continue until the end
of the pattern.
9. To advance to the next step, press
the [REPEAT/STEP] key.
D=1/2
The following settings for note duration are
available.
1 - 8 .............. Quarter note x 1 - 8
3/2 ................ Dotted quarter note
3/4 ................ Dotted eighth note
1/2 ................ Eighth note
1/3 ................ Eighth triplet note
1/4 ................ Sixteenth note
1/6 ................ Sixteenth triplet note
1/8 ................ Thirty-second note
If you press the [REPEAT/STEP] key without
pressing a pad, the position advances by one step
without note entry.
7. Use the cursor keys to select the
duration value.
30
ZOOM RT-223
Entering Patterns Using Step Input
10.To erase a note, use the [REPEAT/
STEP] key to move to its position.
Then press the corresponding pad
while holding down the [DELETE/
ERASE] key.
As you move the position with the [REPEAT/
STEP] key, the pad that has been input for the
current position lights up. Pressing the pad while
holding the [DELETE/ERASE] key down causes
the pad to go out and the note will be erased.
HINT
If necessary, specify a root for the pattern
that suits the entered bass phrase. The
BASS KEY setting (p. 64) is used to set the
root information for the patter n. For
patterns that are not to be used in a song
or for patterns where the bass track is
empty, making the setting is not required.
Bass track
11.Repeat steps 8 - 10 while changing
the quantize value and duration
setting, to proceed until the end of
the pattern.
When the end of the pattern is reached, the unit
automatically loops back to the first measure.
12.When step input of the bass track is
completed, press the STOP [P] key.
The REC [ O ] key goes out, and step input is
completed.
ZOOM RT-223
31
Editing a Pattern
This section explains how to edit patterns.
Copying a pattern/
Returning a pattern to the
factory default condition
You can copy the currently selected pattern to
another position. This is useful to change only a
part of a pattern, such as changing the bass track
phrasing while keeping the drum track.
Patterns that were preprogrammed at the factory
(patterns 0 - 439) can be returned to their original
condition by the copy process described below.
NOTE
When the copy is executed, the existing
contents of the pattern selected as copy target
will be erased. Use this function with care.
1. Press the [PATTERN] key.
The RT-223 goes into pattern mode, and the
pattern selection screen appears.
2. Use the VALUE [+]/[-] keys to select
the pattern to use as copy source.
3. Press the [INSERT/COPY] key.
The [INSERT/COPY] key flashes and the current
pattern is selected as the copy source.
4. Use the VALUE [+]/[-] keys to select
the pattern to be used as copy
target.
TO 500E
Copy target pattern number
HINT
When you select an empty pattern, the
indication “E” appears to the right of the
pattern number.
To return one of the factory preprogrammed
patterns (0 - 439) to the original condition, select
the same number as copy source and copy target
(the indication “COPY” appears on the display).
Then proceed to step 5.
5. To execute the copy, press the
[INSERT/COPY] key.
• When you have selected an empty
pattern as copy target
The copy is carried out when you press the
[INSERT/COPY] key.
• When you have selected an existing
pattern as copy target
The indication “REPLACE” appears on the
display when you press the [INSERT/COPY]
key. To execute the copy, press the [INSERT/
COPY] key once more.
• When you have selected the same
pattern as copy source and copy target
The indications “FACTORY” and “REVERT”
appear alternately on the display when you
press the [INSERT/COPY] key. To execute the
32
ZOOM RT-223
Editing a Pattern
factory restore process, press the [INSERT/
COPY] key once more.
When the copy or factory restore process is
completed, the indication “DONE” appears on the
display, and the unit returns to the pattern mode.
By pressing the [EXIT] key instead of the
[INSERT/COPY] key, you can cancel the process
and return to pattern mode.
Assigning a name to a pattern
When you have selected an empty pattern and
created a new pattern, the name “PAT xxx” (where
xxx is the pattern number) will automatically be
assigned to it. You can change this name later.
1. In pattern mode, select the pattern
Erasing a pattern
A user pattern can be erased when it is no longer
needed. This can be useful to free up memory
space.
NOTE
When a patter n has been erased, its
contents can no longer be restored. Use
this function with care.
whose name you want to change.
POPS1VA 025
Pattern name
Pattern number
2. Press the [EDIT] key.
The currently selected character of the pattern
name flashes.
1. In pattern mode, select the pattern
POPS1VA 025
to be erased.
2. Press the [DELETE/ERASE] key.
3. Use the cursor left/right keys to move
the cursor position, and use the VALUE
[+]/[-] keys to select the character.
The following characters are available.
The [DELETE/ERASE] key flashes, and the
current pattern name and number alternate with
the indication “DELETE” on the display.
3. To execute the erasing process,
press the [DELETE/ERASE] key
once more.
To cancel the process, press the [EXIT] key
instead of the [DELETE/ERASE] key.
Numbers: 0 - 9
Letters: A - Z
Symbols: (space), ( )
*+–/
4. Repeat step 3 until the name is
complete.
5. When name input is completed,
press the [EXIT] key.
The name is accepted, and the RT-223 returns to
the pattern mode.
ZOOM RT-223
33
Creating Songs (Song Mode)
This section explains what a song in the RT-223 is and how to create songs.
What is a song?
A song in terms of the RT-223 is a sequence of
patterns (a number of measures of drum track and
bass track) lined up in play order, to provide the
backing for an entire musical piece (see
illustration below). The maximum number of
songs that can be stored in the RT-223 is 100.
A song can be input in three different ways.
• Step input
With this method, you start at the beginning of
the song and proceed in discrete steps,
specifying the pattern to play and the number
of measures for each step. This method is
suitable for detailed, manual work on a song.
• Real-time input
With this method, you first assign the patterns
to the pads and then play the patterns in real
time. This method is suitable for quick and
intuitive input of a song.
• FAST (Formula Assisted Song Translator)
This method uses simple formulas to specify
rhythm pattern playback from start to end. The
result is written out as a song in a single
operation. This method is suitable for songs
with repeated patterns and cases where the
configuration of the entire song has been
decided beforehand.
which input method was used. After creating a
song with FAST input or real-time input, you
can still fine-tune it with step input.
• Besides pattern information, a song also
contains so-called event data (tempo,
beat, volume and other information, see
page 42). Use step input to enter event
information.
Creating a song using
step input
This section explains how to create a song by
lining up patterns one by one.
1. Press the [SONG] key.
The [SONG] key lights up and the RT-223 goes
into song mode. The name and number of the
currently selected song are shown on the display.
RCK TMP
00
Song name Song number
2. Use the VALUE [+]/[-] keys to select
a song for which “EMPTY” is shown.
HINT
HINT
• The resulting song is the same, regardless of
Pattern A
Pattern B
Pattern C
Pattern D
Pattern E
Song
Pattern A
34
• If there is no empty song, you may have
to erase a song that is no longer needed
(→ p. 47).
Pattern B
Pattern C
Drum track
Drum track
Drum track
Bass track
Bass track
Bass track
ZOOM RT-223
Creating Songs (Song Mode)
• Keeping a VALUE [+]/[-] key depressed
changes numbers continuously.
• To change numbers quickly, hold down
one of the VALUE [+]/[-] keys and press
the other key. The numbers will change
rapidly.
pattern will be repeated. If a smaller number is
selected, the sound will switch to the next pattern
partway through.
7. When the setting is complete, press
the [INSERT/COPY] key.
3. Press the REC [O] key.
The REC [O] key lights up and the display changes
as follows. This screen is used for step input.
001-01
Measure Beat
END
End
4. Press the [INSERT/COPY] key.
The display changes as follows, and pattern input
becomes possible.
POPS1VA
END
(Measure number)
1
2
3
Entered pattern
4
Current position
5
End
During step input of a song, the input position can
be moved by the following actions.
Current position
1 (Measure number)
4
Number of measures
5. Use the VALUE [+]/[-] keys to select
the pattern to input.
The selected pattern name appears on the display.
6. Use the cursor left/right keys to set
the number of measures for the
pattern.
If the selected number is higher than the original
number of measures for the pattern, the same
ZOOM RT-223
005-01
Tick or End
The “End” indication means that the song is
currently at the end position. For an empty song
where no information has been input, the start and
“End” point are identical.
Empty song
The pattern with the specified number of
measures is inserted, and the display shows the
new end position of the song. This means that the
“End” indication has now moved to the last
measure.
• Jumping to event positions
Use the VALUE [+]/[-] keys. With each push
of a key, the input position moves to the next or
previous event point.
• Moving in measure units
Use the cursor left/right keys. With each push
of a key, the input position moves to the next or
previous measure.
• Moving in sixteenth note units
Use the [REPEAT/STEP] key. With each push
of the key, the input position moves in
sixteenth note units.
8. Repeat steps 4 - 7 to enter all
required pattern information.
To edit an entered pattern, you can perform one of
the following actions.
• To reselect a pattern
Use the cursor left/right keys to move to the point
where the respective pattern information is input,
and press the [EDIT] key. The event editing
screen appears. Now use the cursor left/right keys
35
Creating Songs (Song Mode)
to select “PTN”, and use the VALUE [+]/[-] keys
to select a new pattern number. To return to the
step input screen, press the [EXIT] key. For
details on event input/editing, see page 42.
When the pattern is switched within a measure,
the new pattern will normally start playing at
this point from the beginning. However, you
can also have the new pattern start playing
from a point other than the beginning. This lets
you do things such as inserting the fill-in
portion of the new pattern at the third beat of a
measure.
To do this, press the [REPEAT] key when the
new pattern number is displayed, so that a dot
(.) appears next to the pattern number.
ROCK1FA
changes to “¨←PTN”, which means that the
preceding pattern will continue to play. For
details on event input/editing, see page 42.
Erase
PATTERN A
PATTERN B
PATTERN A
PATTERN C
PATTERN C
• To delete a specific measure
Move to the start of the measure to delete, and
press the [DELETE/ERASE] key. The measure
is deleted and subsequent events are shifted by
one measure forward.
65
Delete one measure
Dot
Pressing the [REPEAT] key once more turns
the dot off. The pattern will be playing from the
start.
• To insert a new pattern in a song
Move to the point where the pattern is to be
inserted and carry out steps 4 - 7. This inserts a
pattern at the current position, and shifts all
later patterns back by the duration of the
inserted pattern.
PATTERN A
PATTERN B
PATTERN D PATTERN C
PATTERN A
PATTERN B
PATTERN C
9. To terminate song step input, press
the STOP [P] key.
Insert
PATTERN D
PATTERN A
PATTERN A
PATTERN B
PATTERN B
PATTERN C
PATTERN D PATTERN C
• To delete a pattern
Use the cursor left/right keys to move to the
pattern to delete, and press the [EDIT] key to
switch to the event editing screen. Now use the
cursor left/right keys to select “PTN”, and press
the [DELETE/ERASE] key. When pattern
information is deleted, the “PTN” indication
36
The REC [O] key goes out, and song step input is
terminated.
Creating a song using
real-time input
In song mode, you can assign different patterns to
the 13 pads and play the patterns with the pads.
This allows you to play the accompaniment to a
performance by hitting the pads to switch
patterns. It can also be used to line up patterns for
a song in real time, as described below.
ZOOM RT-223
Creating Songs (Song Mode)
HINT
The operation of pads in song mode
resembles that of groove play mode ( → p.
48). However, in song mode, it is not
possible to play several patterns
simultaneously. Switching patterns is only
available in measure or beat units.
■ Assigning patterns to pads
Pad
INTRO01 400
4. Use the VALUE [+]/[-] keys to select
a pattern to assign to the pad.
This section describes how to assign to the pads
the patterns to use in a song.
NOTE
The pattern assignment made in song
mode and that made in groove play mode
(→ p. 48) are separate. These settings do
not influence each other.
1. Press the [SONG] key to activate
song mode, and use the VALUE [+]/
[-] keys to select a song for which
“EMPTY” is shown.
HINT
5. Repeat steps 3 - 4 to assign
patterns to the other pads in the
same way.
6. When the setting is complete, press
the [BANK] key or the [EXIT] key.
The screen of step 1 appears again.
HINT
• In the factory default condition, song
numbers 0 - 9 already have patterns
assigned to the pads.
• In the factory default condition, song
numbers 10 - 99 (for which “EMPTY” is
shown) will automatically have the same
pattern assignment as used in the
previously selected song.
2. Press the [BANK] key.
A screen for making various pad settings appears.
PADFUNC
The pattern information is stored for each
song separately.
■ Changing the pattern play
method for each pad
You can make changes to the way a pattern plays
in song mode, such as transposing the bass track.
1. In song mode, select the song for
which to change the settings, and
press the [BANK] key.
The screen for making various pad settings
appears.
PADFUNC
3. Press the pad for which pattern
should be assigned.
The pad lights up, and a pattern can be selected.
2. Press the pad for which to change
the settings.
ZOOM RT-223
37
Creating Songs (Song Mode)
• StP
Playback stops at the end of the pattern.
Pad
4. Use the VALUE [+]/[-] keys to
The pad lights up, showing that it is selected for
operation.
3. Use the cursor left/right keys to
select a parameter.
change the setting value.
Repeat steps 2 - 4 to make settings for the other
pads in the same way.
5. When the setting is complete, press
the [BANK] key or the [EXIT] key.
The unit returns to song mode.
The parameters and their setting ranges that are
available for each pad are shown in the table
below.
Parameter
type
Description
PATTERN
Number and name
assigned to the pad
ROOT
NEXT
Setting range
000 – 511
Bass track root
E – D#
Operation when
switching a pattern
P00 – P12
F00 – F12
StP
If the root set for a pattern with BASS KEY (→ p.
64) and the root set for the song are different, the
bass phrase is transposed to match the root
entered for the song. For example, if the pattern
root is set to C for the phrase “G - A - B”, and the
song root is set to D, the resulting phrase will be
“A - B- C#”.
The NEXT parameter determines the operation
when a pad is pressed to switch a pattern and
when a pattern has finished playing.
• P00 - P12
When the pattern is finished, the pattern of the
specified pad (00 - 09: pads 0 - 9, 10: pad [+],
11: pad [x], 12: pad [()] ) will be called up.
• F00 - F12
The pattern changes at the change of the beat,
and when the pattern is finished, the pattern of
the specified pad plays.
38
■ Using the pads to enter a song in
real mode
This section describes how to enter a song in real
time by tapping pads to which patterns have been
assigned.
1. In song mode, select the song for
which to perform real-time input.
HINT
• Song numbers 0 - 9 already have patterns
assigned to the pads.
• You can assign patterns to pads yourself.
For details, see page 37.
2. Press the PLAY [R] key while
holding down the REC [O] key.
The REC [O] key and PLAY [R] key light up,
and the song is ready for real-time input.
3. Hit the pad to which the first pattern
is assigned.
As soon as you hit the pad, real-time recording
starts, and the pattern plays. The current measure
and beat and the current song number are shown
on the display.
ZOOM RT-223
Creating Songs (Song Mode)
5. Enter the remaining patterns in the
005-04
same way as described for step 4.
000
Song
number
Current measure Current beat
press the STOP [P] key.
4. To switch the pattern, hit the next
pad during the last measure before
the intended switch.
The pattern assigned to the pad goes into standby,
and the pattern is switched at the start of the next
measure. The pad that is in standby mode flashes.
(Measure number)
1
2
3
4
5
6
7
8
Patterns
recorded Pattern A Pattern A Pattern B Pattern B
in song
Pad
Hit pad with
assigned pattern A
6. To terminate song real-time input,
Pad
Hit pad with
assigned pattern B
NOTE
If you hit a pad whose NEXT parameter ( →
p. 38) is set to “F00 - F12”, the pattern will
be switched not at the measure boundary
but at the beat boundary.
The REC [O] key and PLAY [R] key go out, and
song real-time input is completed.
HINT
• To assign an ending pattern to a pad, set
the NEXT parameter to “StP”, so that
real-time input will automatically be
stopped.
• A song created with real-time input can
later be edited with step input.
Creating a song using
FAST input
The FAST (Formula Assisted Song Translator)
method developed by ZOOM uses simple
formulas to specify patterns for an entire song,
which is then written in a single operation.
The formula symbols are entered using the 13
pads. The function of each pad during FAST input
is shown in the illustration below.
Pad [x]
Enters "x"
(multiplication symbol)
for repeated play of
the same pattern.
Pad [()]
Pad [+]
Pads 0 - 9
Serve to specify pattern numbers
and repetition times, according to
the pad numbers 0 - 9.
ZOOM RT-223
Enters "+" (plus symbol)
for lining up multiple patterns.
Enters opening and closing
brackets used for linking several
patterns. One push of the pad
enters a "(" and the second push
enters a ")".
39
Creating Songs (Song Mode)
The basic rules for creating a rhythm pattern
sequence are as follows.
0_
• Line up patterns
Use the “+” symbol to line up rhythm patterns.
For example, entering 0 + 1 + 2 will result in
the following rhythm pattern play sequence.
0+_
0+(
PATTERN 0 PATTERN 1 PATTERN 2
• Repeat patterns
Use the “x” (multiplication) symbol to specify
pattern repetitions. As in normal arithmetic,
“x” takes precedence over “+”. For example,
entering 0 + 1 x 2 + 2 will result in the
following rhythm pattern play sequence.
0+(1_
0+(1+_
PATTERN 0 PATTERN 1 PATTERN 1 PATTERN 2
0+(1+2_
• Repeat multiple patterns
Use the “(“ and “)” symbols (opening and
closing brackets) to link a group of patterns for
repetition. Formulas enclosed in brackets take
precedence over other formulas. For example,
entering 0 + (1 + 2) x 2 + 3 will result in the
following rhythm pattern play sequence.
0+(1+2)
Twice
(1+2)X_
PATTERN 0 PATTERN 1 PATTERN 2
1+2)X3_
PATTERN 1 PATTERN 2 PATTERN 3
An example for creating the rhythm pattern
sequence 0 + (1 + 2) x 3 is shown below.
HINT
If the formula exceeds seven digits, earlier
character/symbol entries are scrolled off
the display. To see the scrolled part, use
the cursor left/right keys to move the
display position.
40
ZOOM RT-223
Creating Songs (Song Mode)
3. Use the pads to enter a formula.
NOTE
• The FAST method can only be used to
write a song in one go, from beginning to
end. Entering patterns partly into the
song is not possible.
• To edit a song that was written with this
method, edit the formula and then write
the entire song again, or use step input.
1. Press the [SONG] key to activate
song mode, and use the VALUE [+]/
[-] keys to select a song for which
“EMPTY” is shown.
NOTE
If you select an existing song and write it
out using FAST input, the entire previous
content of the song will be overwritten.
Use this function with care.
2. Press the [FUNCTION] key and then
the REC [O] key.
The input method is explained on page 40.
112+(2_
If you make a mistake during input, you can
correct it as follows.
• Deleting a number/symbol
Use the cursor left/right keys to move the
flashing segment to the number/symbol to
delete, and press the [DELETE/ERASE] key.
• Inserting a number/symbol
Use the cursor left/right keys to move the
flashing segment to the point where you want
to insert a number or symbol, and input the new
number/symbol.
4. When formula input is completed,
press the [FUNCTION] key.
The song is written and FAST input terminates.
NOTE
The indication “FAST” appears briefly on the
display. Then an underline cursor appears at the
first character position. FAST input is now
possible.
If the entered formula contains a syntax
error, the indication “SYTXERR” appears
on the display when you press the
[FUNCTION] key. After a while, the formula
input screen appears again. Correct the
wrong part, and perform the write
operation again.
FAST
_
Underline
ZOOM RT-223
41
Creating Songs (Song Mode)
including pattern information is input, the
“EVENT” indication is shown (see illustration
below).
Entering event
information
012-01
"EVENT"
indication
48
Besides pattern information, you can enter
various other information (called event data) for a
song, such as tempo, beat, and volume. You can
gradually fade out the volume or switch the sound
of the drum kit or bass program at any point in the
song. To add event data to a song for which
patterns have already been input, use the step
input method.
HINT
1. In song mode, select the song for
4. Press the [EDIT] key.
which you want to input an event.
By using the VALUE [+]/[-] keys during step
input of a song, you can move directly to
previous or later events.
You can now select the event type to enter/edit.
2. Press the REC [O] key.
The REC [O] key lights up, and step input for the
song becomes possible.
DR VOL
3. Move to the position where you
15
want to enter event information.
For information on moving the current position,
see page 35.
At a point where any kind of event information
"EVENT" indication
Pattern number
000
Beat
4/4
Bass track root
42
Currently selected
event name
"EVENT" indication
Event setting
"EVENT" indication
001
E
Tempo
120
Drum track volume
15
Bass track volume
15
Drum kit number
0
Bass program number
0
135
10
2
ZOOM RT-223
Creating Songs (Song Mode)
5. Use the cursor left/right keys to
select the type of event to enter.
TEMPO
---
Event name
Available event types are shown in the following
table.
Event type
Description
Setting range
Pattern number
000 – 511
Beat
1–8
(1/4 – 8/4)
Bass track root
E – D#
TEMPO
Tempo
40 – 250
DR VOL
Drum track volume
0 – 15
BS VOL
Bass track volume
0 – 15
DR KIT
Drum kit
0 – 126
BS PRG
Bass program
0 – 11
PTN
TIMSIG
ROOT
If you select an event for which information has
already been input at the current position, the
event name and setting value are shown on the
display. (By pressing the VALUE [+]/[-] keys in
this condition, you can change the setting.)
DR VOL
15
HINT
• If you enter tempo information at the
beginning of a song, the song will always
play at that tempo, regardless of current
tempo settings.
• If the root set for a pattern with BASS KEY
(→ p. 64) and the root set for the song are
different, the bass phrase is transposed to
match the root entered for the song. For
example, if the pattern root is set to C for
the phrase “G - A - B”, and the song root is
set to D, the resulting phrase will be “A B- C#”.
6. Use the VALUE [+]/[-] keys to enter
the setting value.
When you specify the setting value with the
VALUE [+]/[-] keys, the indication “←xxx”
(where xxx is the event name) changes to the
event name only. This indicates that new event
information has been input at the current position.
TEMPO
Event name
Event name
125
Entered value
Event setting value
If you select an event for which no information
has been input at the current position, the
indication “←xxx” (where xxx is the event name)
is shown. This means that the preceding
information for the same event type remains
valid. The following illustration shows an
example for the display when the TEMPO event
is selected.
7. When event information for the
current position has been input,
press the [EXIT] key to return to the
song step input screen.
If required, repeat steps 3 - 7 for other events.
ZOOM RT-223
43
Creating Songs (Song Mode)
To edit event information that has already been
input, proceed as follows.
• To delete an event
Call up the event to delete, and press the
[DELETE/ERASE] key.
• To change an event setting value
Call up the event to edit, and use the VALUE
[+]/[-] keys to change the value.
Playing a song
This section shows how you can select and play a
song that you have created.
1. Press the [SONG] key.
The [SONG] key lights up and the RT-223 goes
into song mode. The display shows the currently
selected song name and number.
8. To terminate event input, press the
STOP [P] key.
JGLEMAN 01
The REC [O] key goes out, and song step input is
completed.
Song name
Song number
2. Use the VALUE [+]/[-] keys to select
the song you want to play, and press
the PLAY [R] key.
The selected song is played back.
3. To stop song playback, press the
STOP [P] key.
HINT
While the song is stopped, you can use the
cursor left/right keys to move the current
position in measure units.
44
ZOOM RT-223
Editing a Song
This section describes how you can edit a song that you have created.
Copying a range of measures
3. Press the REC [O] key.
Part of a song specified as a range of measures
can be copied to another location. This is useful to
have a certain passage play repeatedly.
The key lights up and song step input becomes
possible.
Copy
1
2
3
4
5
6
7
8
4. Press the [EDIT] key while holding
PATTERN A PATTERN A PATTERN A PATTERN B
down the [INSERT/COPY] key.
1
2
3
4
5
6
7
8
9
10
PATTERN A PATTERN B PATTERN A PATTERN A PATTERN B
Copy
1
2
3
4
PATTERN A PATTERN B
1
2
3
4
5
6
7
8
The display changes as follows. On this screen,
you can specify the copy start point measure.
PATTERN A PATTERN B PATTERN A PATTERN B
1. Press the [SONG] key.
123-01
STR
First measure of range to copy
5. Use the VALUE [+]/[-] keys to select
The RT-223 goes into song mode, and the song
selection screen appears.
2. Use the VALUE [+]/[-] keys to select
the measure to be used as start
point of the range to copy. Then
press the [INSERT/COPY] key.
The display changes as follows. On this screen,
you can specify the copy end point measure.
the song to edit.
124-01
END
Last measure of range to copy
6. Use the VALUE [+]/[-] keys to select
ZOOM RT-223
45
Editing a Song
the measure to be used as end point
of the range to copy. Then press the
[INSERT/COPY] key.
The display changes as follows. On this screen, you
can specify the insert point for the copied range.
be overwritten. Use this function with care.
1. In song mode, select the song to
use as copy source.
2. Press the [INSERT/COPY] key.
125-01
TO
Insert point for range to copy
7. Use the VALUE [+]/[-] keys to select
the point where the copied range is
to be inserted.
8. To carry out the copy process, press
The [INSERT/COPY] key flashes, and the current
song is selected as copy source.
3. Use the VALUE [+]/[-] keys to select the
song number of the copy destination.
the [INSERT/COPY] key.
The indication “DONE” appears, and the “End”
point moves back by the number of copied
measures. By pressing the [EXIT] key instead of
the [INSERT/COPY] key, you can cancel the
process and return to the previous step.
9. To terminate editing, press the STOP
[P] key.
TO 50E
Copy destination song number
HINT
When you select an empty song, the
indication “E” appears to the right of the
song number.
NOTE
It is not possible to select the current song
as copy destination.
Song step input is terminated, and the RT-223
returns to song mode.
4. To carry out the copy, press the
[INSERT/COPY] key.
Copying a song
The currently selected song can be copied onto
another song number. This is useful to create song
variations.
NOTE
When you carry out the copy process, any
existing song at the copy destination will
46
• If an empty song has been selected as
copy destination
The copy process is carried out when you press
the [INSERT/COPY] key.
• If an existing song has been selected as
copy destination
The indication “REPLACE” appears when you
press the [INSERT/COPY] key. To carry out the
copy, press the [INSERT/COPY] key once more.
ZOOM RT-223
Editing a Song
When the copy process is completed, the
indication “DONE” appears, and the RT-223
returns to the song mode. If you press the [EXIT]
key instead of the [INSERT/COPY] key, the
process is canceled and the RT-223 returns to the
song mode.
Erasing a song
Assigning a name to a song
When you have selected an empty song and
created a new song, the name “SONGxxx” (where
xxx is the song number) will automatically be
assigned to it. You can change this name later.
1. In song mode, select the song
whose name you want to change.
You can erase the contents of the currently
selected song, returning it to the blank state.
JGLEMAN
1
NOTE
An erased song cannot be restored. Use
this function with care.
1. In song mode, select the song to
erase.
Song name
Song number
2. Press the [EDIT] key.
The currently selected character of the song name
flashes.
2. Press the [DELETE/ERASE] key.
JGLEMAN
1
3. Use the cursor left/right keys to
The [DELETE/ERASE] key flashes, and the song
name/number indication and the indication
“DELETE” are shown alternately on the display.
3. To carry out the erase process,
press the [DELETE/ERASE] key
once more.
When the erase process is completed, the
indication “DONE” appears, and the RT-223
returns to the song mode. If you press the [EXIT]
key instead of the [DELETE/ERASE] key, the
process is canceled and the RT-223 returns to the
song mode.
move the cursor position, and use
the VALUE [+]/[-] keys to select the
character.
For information on available characters, see page
33.
4. Repeat step 3 until the name is
complete.
5. When name input is completed,
press the [EXIT] key.
The name is accepted, and the RT-223 returns to
the song mode.
ZOOM RT-223
47
Using Pads to Play Patterns (Groove Play Mode)
This section describes the groove play mode. In this mode, the 13 pads are used to play patterns assigned to
them. This allows quick switching between patterns during a performance. Up to 4 patterns can be played
simultaneously, letting you play two patterns with a different beat, or the same pattern twice, shifted by 1
beat, to create a complex rhythm.
1. Press the [SONG] key and
[PATTERN] key simultaneously.
3. To change the pattern assigned to a
pad, hold the pad down and use the
VALUE [+]/[-] keys to select the new
pattern.
Pad
The RT-223 switches to groove play mode. The
[SONG] key and [PATTERN] key are both lit.
The display shows the name and number of the
currently selected song.
NOTE
In groove play mode, all patterns are
played with the tempo of the currently
selected song. If required, you can enter a
desired tempo at the beginning of the song
(→ p. 42).
If the VALUE [-] key is pressed while “0” is
displayed, or if the VALUE [+] key is pressed
while “510” is displayed, the display indication
changes to “PAD”. Instead of a pattern, a pad for
which “PAD” is selected will play the single
sound originally allocated to the pad (such as kick
drum or snare).
NOTE
2. Try out the sound by pressing any pad.
Pad
In the factory default condition, the RT-223 has
13 patterns specially designed for groove play
assigned to the pads. If a pad is held down, the
assigned pattern plays repeatedly. The intensity
with which the pad is hit controls the overall
pattern volume. While the pad is pressed, the
pattern name and number are shown on the
display.
POPS1VA 025
Pattern number
• The pattern assignments made in groove
play and those made in song mode (→ p.
37) are separate and independent of each
other.
• The patterns assigned to the pads are
retained also while the unit is turned off.
4. To repeat a pattern even when the
pad is released, hit the pad while
holding down the [REPEAT/STEP]
key.
Pad
The pattern will be looped even when you release
the pad. To stop the loop, hit the pad once more.
The unit returns to normal groove play.
Pattern assigned to pad
48
ZOOM RT-223
Using Pads to Play Patterns (Groove Play Mode)
5. To play several patterns
HINT
simultaneously, push several pads
together.
Pad
Pad
Up to 4 patterns can be played simultaneously,
using the same tempo. Slightly shifting the timing
when you hit the pads is also possible.
During groove playback, pad operation
(press/release) is detected using the
quantize value (shortest note) as the
detection interval.
This is aimed at matching the timing to
other grooves and songs played at the
same time. Playing with fast timing is
therefore facilitated by choosing a low
quantize value. To play with small timing
shifts, choose a higher quantize setting.
NOTE
NOTE
If 5 or more pads are pushed, only the
patterns of the last 4 pads will be played.
In groove play mode, song editing is not
possible.
7. To terminate the groove play mode,
6. To play a song while groove play
continues in the background, use
the VALUE [+]/[-] keys to select the
song number and press the PLAY
[R] key.
press the [SONG] key or [PATTERN]
key.
or
In groove play mode, the PLAY [ R ] key and
STOP [ P ] key can be used to start or stop the
currently selected song. Also while a song is
playing, up to four patterns assigned to pads can
be played.
Shortest note set
with quantize setting
Song playback
ZOOM RT-223
Push
Release
Pad
Pad
PLAY
STOP
49
Various Drum Kit Functions (Kit Mode)
The RT-223 incorporates 70 types of drum kits. This section describes how you can create your own drum
kit or edit an existing kit.
Creating an original drum
kit
A menu for making individual pad settings
appears.
STD-BD3 B0
To create your very own drum kit, you select
drum and percussion sounds and assign them to
the pads (13 pads x 3 banks), along with other
settings such as panning.
1. Press the [PATTERN] key.
Setting value
Selected item (in this example: sound name)
4. Use the [BANK] key and the 13 pads
to select a pad.
The selected pad lights up, and the setting can be
made.
5. Use the cursor left/right keys to
select one of the following items.
The [PATTERN] key lights up, and the RT-223
goes into pattern mode.
2. Press the [DRUM] key and then the
[KIT/PROG] key.
The screen for selecting a drum kit appears.
BASIC
Drum kit name
0
Drum kit number
3. Use the VALUE [+]/[-] keys to select
a drum kit, and then press the [EDIT]
key.
50
• Sound name
From the single drum and percussion sounds
stored in the RT-223, select the sound to assign
to the pad. Each sound is identified by a
number. For a list of available sounds, see the
appendix at the end of this manual.
• PITCH
This lets you fine-tune the pitch of the drum
sound assigned to each pad. The setting range
is -7.9 - 0 (reference pitch) - +7.9. The setting
can be made in increments of 0.1 (1/10
semitone).
• INSTLVL (Instrument level)
Sets the volume for each pad in the range from
0 to 15.
• PAN (Panning)
Sets the left/right position of each pad when
stereo playback is carried out. The setting range is
L63 (fully left) - 0 (center) - R63 (fully right).
ZOOM RT-223
Various Drum Kit Functions (Kit Mode)
• VGROUP (Voice group)
This setting determines the type of action when
the same pad is hit in succession (PL/MN), and
the group to which the pad belongs (0 - 7). The
setting range is PL0 - PL7 and MN0 - MN7.
which the kick drum sound is assigned
(pad 0 of pad bank 1/2) has no effect. To
turn the KICKDRY parameter on and off,
follow the steps described in the section
"Editing effect patches".
If you select PL for a pad, the previous sound
of the pad will keep playing in addition to the
new sound when you hit the pad in succession.
If you select MN for a pad, the previous sound
of the pad will stop, and only the new sound is
heard when you hit the pad in succession.
• KITNAME (Drum kit name)
Lets you change the name of the drum kit (→ p.
53).
GROUP=PL
6. Use the VALUE [+]/[-] keys to adjust
the value.
GROUP=MN
7. Repeat steps 4 - 6 for the other
The numeric settings 0 - 7 determine the group
of a pad (0: no group, 1 - 7: group 1 - 7). The
sounds of pads that are in the same group will
not be produced together. By assigning the
pads for open hi-hat and closed hi-hat to the
same group, the open hi-hat sound will be
suppressed when you activate the closed hi-hat
sound, resulting in a natural effect.
The group number 0 - 7 applies both to PL and
MN. Therefore pads PL1 and MN1 will not
produce sound together.
• SENDLVL (Send level)
Sets the signal level to be supplied to the
REVERB effect. The setting range is 0 - 100.
This setting is made separately for each pad
and is independent of the overall drum kit send
level setting (→ p. 56) made in effect mode.
To control effect intensity for each pad
individually, it may be best to set the effect
mode send level to 0 and adjust the SENDLVL
parameter for the pads.
pads.
8. When the setting is complete, press
the [EXIT] key.
The settings are automatically saved, and the
drum kit select screen appears again. To return to
pattern mode, press the [PATTERN] key.
NOTE
If the KICKDRY parameter in the patch
currently selected for the REVERB effect is
ON, changing the send level of a pad to
ZOOM RT-223
51
Various Drum Kit Functions (Kit Mode)
Copying a drum kit/
Returning a drum kit to the
factory default condition
You can copy the currently selected drum kit to
another position. This is useful to copy an existing
preprogrammed drum kit and then change only a
part of it to quickly create your original.
By specifying the same drum kit as copy source
and copy target, you can return the drum kit to its
factory default condition.
NOTE
When the copy is executed, the existing
contents of the drum kit selected as copy
target will be erased. Use this function with
care.
1. Press the [PATTERN] key.
The [PATTERN] key lights up and the RT-223
goes into pattern mode.
2. Press the [DRUM] key and then the
[KIT/PROG] key.
The screen for selecting a drum kit appears.
3. Use the VALUE [+]/[-] keys to select
the drum kit to be used as copy
source.
4. Press the [INSERT/COPY] key.
5. Use the VALUE [+]/[-] keys to select
the number of the copy destination
drum kit.
TO 50
Copy destination drum kit number
To return a drum kit to the factory default
condition, select the same number as copy source
and copy target (the indication “COPY” appears
on the display). Then proceed to step 6.
6. To execute the copy, press the
[INSERT/COPY] key.
• If a different drum kit number is
selected for the copy source and copy
target
The copy will be carried out when you press
the [INSERT/COPY] key.
• When you have selected the same drum
kit as copy source and copy target
The indications “FACTORY” and “REVERT”
appear alternately on the display when you
press the [INSERT/COPY] key. To execute the
factory restore process, press the [INSERT/
COPY] key once more.
When the copy process is completed, the
indication “DONE” appears, and the RT-223
returns to the drum kit select screen. If you press
the [EXIT] key instead of the [INSERT/COPY]
key, the process is canceled and the RT-223
returns to the drum kit select screen.
The [INSERT/COPY] key flashes, and the current
drum kit is selected as copy source.
52
ZOOM RT-223
Various Drum Kit Functions (Kit Mode)
Assigning a name to a
drum kit
To give a name to a drum kit or change an
existing name, proceed as follows.
move the cursor position, and use
the VALUE [+]/[-] keys to select the
character.
For information on available characters, see page
33.
6. Repeat step 5 until the name is
1. Press the [PATTERN] key.
The [PATTERN] key lights up and the RT-223
goes into pattern mode.
2. Press the [DRUM] key and then the
[KIT/PROG] key.
The screen for selecting a drum kit appears.
BASIC
5. Use the cursor left/right keys to
complete.
7. When name input is completed,
press the [EXIT] key.
The new name is accepted, and the drum kit select
screen appears again.
To return to pattern mode, press the [PATTERN]
key.
0
3. Use the VALUE [+]/[-] keys to select
the drum kit whose name you want
to edit.
A menu for making individual pad settings
appears.
4. Use the cursor left/right keys to
bring up the indication "KITNAME"
on the display.
After a while, the current drum kit name appears.
The currently selected character of the drum kit
name flashes.
BASIC
0
HINT
The “KITNAME” parameter applies to all
pads.
ZOOM RT-223
53
Using Effects (Effect Mode)
This section explains the effects that can be used with the drum kit/bass program.
About the effects
Send
Send level adjustment
The RT-223 incorporates two types of effects.
The COMP EQ effect allows you to directly
shape the overall sound of the drum kit/bass
program. The REVERB effect is mixed to the
original sound of the drum kit/bass program.
These two types of effect can be used
simultaneously and can be switched individually
on and off. The characteristics of each effect type
are described below.
The COMP EQ effect is inserted in the drum kit/
bass program signal output and comprises
functions such as compressor and low-fi sound
simulation.
[L/MONO OUT]/
[R OUT] jacks
Drum kit
COMP EQ
effect
■ REVERB effect
The REVERB effect of the RT-223 lets you
adjust effect intensity by controlling the level of
the signal sent from the drum kit and bass
program to the effect. The signal processed by the
REVERB effect is then added to the final stereo
signal. For the drum kit, you can also set the send
level individually for each instrument sound.
54
[L/MONO OUT]/
[R OUT] jacks
Drum
kit
Bass
program
Return
HINT
■ COMP EQ effect
Bass
program
REVERB
effect
In effect mode, you adjust the overall send
level of the drum kit/bass program. To
adjust the send level for individual
instruments of the drum kit, perform pad
send level adjustment in kit mode (→ p. 51).
About patches
The COMP EQ effect and REVERB effect
comprise different effect types that determine the
category of the effect and different effect
parameters that determine the intensity and other
aspects of the effect. By first selecting an effect
type and then adjusting its parameters, you can
achieve a wide variety of sound characteristics.
The sum of these edited effect settings is called a
patch. Storing and recalling patches makes it
possible to instantly switch among different effect
settings. The RT-223 allows you to use 40 patches
each for the COMP EQ effect and REVERB
effect.
ZOOM RT-223
Using Effects (Effect Mode)
Using the COMP EQ
effect
3. To temporarily bypass the COMP EQ
effect, press the [COMP EQ] key so
that the key goes out.
This section describes how to use the COMP EQ
effect.
The COMP EQ effect is turned off, and the
indication “BYPASS” is shown on the display. To
turn the COMP EQ effect back on, press the
[COMP EQ] key once more.
1. In pattern, song, or groove play
4. When the COMP EQ effect patch
mode, press the [COMP EQ] key
several times, so that the key lights
up.
has been selected, press the [EXIT]
key.
The RT-223 switches to effect mode, and the
COMP EQ effect becomes ON. The display
changes as follows.
The effect mode is terminated, and the RT-223
returns to the previous mode.
BOTTOM
COMP EQ effect
patch name
1
COMP EQ effect
patch number
2. Use the VALUE [+]/[-] keys to select
Using the REVERB effect
This section describes how to use the REVERB
effect. For this effect, you first select the patch
and then separately adjust the send level for the
drum kit and bass program.
the patch to use.
1. In pattern, song, or groove play
mode, press the [REVERB] key
several times, so that the key lights
up.
The new patch is called up immediately.
The RT-223 switches to effect mode, and the
REVERB effect becomes ON. The display
changes as follows.
HINT
• When you select an empty patch, the
indication “EMPTY” appears on the
display. In this case, the sound does not
change.
• If a playable pattern or song is selected in
pattern or song mode, pressing the PLAY
[R] key will start playback of the pattern
or song. This lets you check the sound.
ZOOM RT-223
STUDIO
0
REVERB effect
patch number
REVERB effect patch name
2. Use the VALUE [+]/[-] keys to select
55
Using Effects (Effect Mode)
the patch to use.
The new patch is called up immediately.
HINT
When you select an empty patch, the
indication "EMPTY" appears on the
display. In this case, the sound does not
change.
The [REVERB] key flashes and the patch edit
screen appears.
ON
4. Use the cursor left/right keys to
bring up the indication "DR SEND"
on the display.
This screen lets you adjust the overall send level
of the drum kit.
DR SEND
5
Drum kit send level
HINT
You can change the send level for each
drum/percussion sound separately. To do
this, adjust the send level for each pad in
kit mode (→ p. 51).
5. Use the VALUE [+]/[-] keys to adjust
the drum kit send level. The send
level can be adjusted in the range
from 0 - 100.
HINT
The REVERB effect comprises the
KICKDRY parameter that excludes the
s o u n d o f t h e k i c k d r u m f ro m e ff e c t
56
6. Use the VALUE [+]/[-] keys to bring
up the indication "BS SEND" on the
display.
3. Press the [EDIT] key.
EFFECT
processing. When this parameter is ON,
the sound of pad 0 in pad bank 1/2 will not
be changed by the REVERB effect. (The
same applies if the pad send level is raised
in kit mode.) For information on how to turn
the KICKDRY parameter on and off, see
the section "Editing effect patches".
This screen lets you adjust the send level of the
bass program.
7. Use the VALUE [+]/[-] keys to adjust
the bass program send level.
8. When the send level patch has been
adjusted, press the [EXIT] key.
The RT-223 returns to the condition of step 1.
9. Save the current patch.
For information on how to save an effect patch,
see page 58.
NOTE
The send level setting for the drum kit/bass
program is saved as part of the patch. If
you switch to another patch without
storing the edited patch first, the edit
contents will be lost.
10. To temporarily bypass the REVERB
effect, press the [REVERB] key so
that the key goes out.
The REVERB effect is turned off, and the
indication "BYPASS" is shown on the display. To
turn the REVERB effect back on, press the
[REVERB] key once more so that the key is lit.
11. To terminate the REVERB effect
setting, press the [EXIT] key.
The effect mode is terminated, and the RT-223
returns to the previous mode.
ZOOM RT-223
Using Effects (Effect Mode)
and the patch edit screen appears.
Editing effect patches
To edit an effect patch, you first select an effect
type and then adjust its parameters to fine tune the
resulting sound. Since the various effect types
have their own effect parameters, switching the
effect type will also change the parameters. An
example for effect parameters for effect types of
the COMP EQ effect is shown below.
LO-FI
XOVER L
CHARA
XOVER H
COLOR
SENS H
DIST
SENS M
TONE
ON
HINT
When “EFFECT” is shown on the display,
you can use the VALUE [+]/[-] keys to
switch the effect on and off.
4. Press the cursor right key once to
Effect type
MLT COMP
EFFECT
RESONNC
bring up the effect type indication
on the display.
DEPTH
FREQ
MLTCOMP
RATE
TYPE
Effect type name
Effect parameters
This section explains how to edit the effect
patches for the COMP EQ effect and REVERB
effect.
1. Press the [COMP EQ] key (to edit
the COMP EQ effect) or the
[REVERB] key (to edit the REVERB
effect) several times, so that the key
lights up.
5. Use the VALUE [+]/[-] keys to select
the effect type to use.
HINT
If a playable pattern or song is selected in
pattern or song mode, pressing the PLAY
[R] key will start playback of the pattern or
song. This lets you check the sound.
The RT-223 switches to effect mode, and the
patch select screen appears.
6. Use the cursor left/right keys to
2. Use the VALUE [+]/[-] keys to select
Which effect parameters are displayed will
depend on the effect type.
In the illustration below, MLTCOMP has been
selected as effect type of the COMP EQ effect,
and the “XOVER H” parameter is displayed.
select the effect parameter to edit.
the patch to edit.
HINT
To change the effect intensity of the
REVERB effect, use the cursor left/right
keys to bring up the indication “DR SEND”
on the display, and adjust the send level.
3. Press the [EDIT] key.
XOVER H 125
Effect parameter
name
Setting value
The [COMP EQ] key or [REVERB] key flashes,
ZOOM RT-223
57
Using Effects (Effect Mode)
7. Use the VALUE [+]/[-] keys to
change the setting value.
For information on effect types and effect
parameters, see the appendix at the end of this
manual.
8. Repeat steps 6 - 7 as necessary to
adjust other effect parameters.
HINT
• When editing the COMP EQ effect, you
can bring up “LEVEL” to adjust the
overall volume level of the patch.
• When editing the REVERB effect, you can
bring up “EFX LVL” to adjust the mixing
amount of the effect sound.
• When editing the REVERB effect, you can
bring up “KICKDRY” to individually
switch the effect off and on for pad 0 of
pad bank 1/2 (usually assigned to the
kick drum).
1. At the patch select screen for the
COMP EQ effect or REVERB effect,
select the patch to store or swap.
HINT
• You can also store or swap patches from
the patch editing screen. In this case, the
patch being edited will be the one that is
stored or swapped.
• To initialize a patch, select the patch that
you want to return to the factory default
condition.
2. Press the [INSERT/COPY] key.
The [INSERT/COPY] key flashes, and the patch
name/patch number and the indication "STORE >"
are shown alternately on the display.
STORE )
9. When you have finished editing the
patch, press the [EXIT] key.
The patch select screen appears again. Press the
[EXIT] key once more to terminate effect mode.
NOTE
If you switch to another patch without
storing the edited patch first, the edit
contents will be lost. For information on
how to store a patch, see the next section.
Storing, swapping, or
initializing effect patches
This section explains how to store a patch of the
COMP EQ effect or REVERB effect.
If you store an already stored patch in another
location, a copy of the patch is created. You can
also swap two patches in their respective
locations, or use this procedure to restore a patch
to the factory default condition.
58
3. Use the cursor left/right keys to
select the "STORE >", "SWAP >", or
"FACTORY" (initialize) action.
If you have selected "SWAP >", the patch name/
patch number and the indication "SWAP >" are
shown alternately on the display.
SWAP
)
If you have selected "FACTORY", the indications
"FACTORY" and "REVERT" are shown
alternately on the display. To continue with the
initialize procedure, go directly to step 5.
4. If you have selected "STORE >" or
"SWAP >", use the VALUE [+]/[-]
keys to select the store/swap target
patch number.
ZOOM RT-223
Using Effects (Effect Mode)
the effect type.
3. Use the cursor left/right keys to
bring up the indication "PATNAME"
on the display.
When store was selected, the current patch will be
stored in this patch number.
When swap was selected, the current patch will be
swapped with the patch in this patch number.
After a while, the name of the current patch
appears. The currently selected character of the
patch name flashes.
MIDHALL
5. To carry out the process, press the
[INSERT/COPY] key.
Store, swap, or factory initialize is carried out,
and the patch select screen appears again. If you
press the [EXIT] key instead of the [INSERT/
COPY] key, the respective process is canceled.
Assigning a name to an
effect patch
4. Use the cursor left/right keys to
move the cursor position, and use
the VALUE [+]/[-] keys to select the
character.
For information on available characters, see page
33.
5. Repeat step 4 until the name is
complete.
To give a name to a patch of the COMP EQ effect
or REVERB effect, proceed as follows.
1. From the COMP EQ effect or
REVERB effect patch select screen,
select the patch whose name you
want to change.
The patch name/patch number are shown.
MIDHALL
6. When name input is completed,
press the [EXIT] key.
The patch select screen appears again. Press the
[EXIT] key once more to terminate effect mode.
NOTE
If you switch to another patch without
storing the edited patch first, the edit
contents will be lost. For information on
how to store a patch, see the previous
section.
2. Press the [EDIT] key.
The patch edit screen appears. The display shows
ZOOM RT-223
59
Using the Metronome (Metronome Mode)
The RT-223 incorporates a metronome function that is ideal to provide a guide rhythm for practice. The
metronome also lets you use mixed beat patterns, such as 2 + 3 or 3 + 4 beat combinations.
■ Beat types
● C5
The metronome of the RT-223 supports beats
using quarter notes or eighth notes as
denominator (unit note). The following
numerators (number of beats) can be selected.
Denominator
Numerator (number of beats)
(unit note)
Quarter note
Eighth note
1, 2, 3, 4, 2+3, 3+2, 3+3, 6, 3+4,
4+3
6/8, 7/8, 12/8
Within the beats using the quarter note
denominator, there are five subtypes (C1, C2, C3,
C4, C5) that differ in dynamics and count detail.
For example, if a 4/4 beat is selected, the C1 - C5
variations are as follows.
NOTE
• Depending on the beat type, some dynamics
combinations are not available.
• For beats using the eighth note denominator
(6/8, 7/8, 12/8), the dynamics cannot be
changed.
■ Mixed beat patterns
When using the metronome at a 5/4 beat, you can
select 2 + 3 or 3 + 2 as a numerator.
● 2+3 C1
● C1
● 3+2 C1
● C2
● C3
In the same way, when using the metronome at a
7/4 beat, you can select 3 + 4, or 4 +3, resulting in
different ways of counting the measure.
● C4
60
ZOOM RT-223
Using the Metronome (Metronome Mode)
2. Use the VALUE [+]/[-] keys to select
● 3+4 C1
1/7
2/7
the metronome pattern.
3/7
4/7
5/7
6/7
7/7
3/7
4/7
5/7
6/7
7/7
● 4+3 C1
3. To change the sound of the
1/7
2/7
To use the metronome function, proceed as
follows.
1. In pattern, song, or groove play
mode, press the [METRONOME]
key.
The [METRONOME] key lights up, and the RT-223
goes into metronome mode. The display shows the
metronome pattern name and pattern number.
The pattern name consists of a numeral/symbol
combination that stands for the beat type, and a
numeral that stands for the stress dynamics
setting. For a list of available beats and dynamics
settings, see page 60.
metronome, press the [KIT/PROG]
key and use the cursor left/right
keys to select the sound.
Available sound choices for the metronome are as
follows.
Display
M-BELL
M-CLICK
STICK
COWBELL
HIGH-Q
indication and corresponding sound
Metronome sound
Metronome sound (click only)
Stick beating sound
Cowbell sound
Synthesizer click sound
COWBELL
4. To quit the sound selection screen,
press the [EXIT] key.
2+3/4C1
23
The display returns to the condition of step 1.
Pattern number
5. To set the tempo, press the
Pattern name (beat type + dynamics)
HINT
[TEMPO] key and then use the
VALUE [+]/[-] keys to adjust the
tempo.
• When the RT-223 is in metronome mode,
all effects are bypassed and no effect
processing is carried out.
ZOOM RT-223
61
Using the Metronome (Metronome Mode)
8. To terminate metronome mode,
HINT
If you tap the [TEMPO] key twice, the
interval is set as a quarter note (tap tempo
input function).
press the [PATTERN] key or the
[SONG] key.
6. To activate the metronome sound,
press the PLAY [R] key.
or
The RT-223 returns to pattern mode or song
mode. When metronome mode finishes, the effect
bypass condition is canceled and the foot switch
setting returns to the original condition.
The metronome begins to operate. The display
now shows the current beat in real time.
If you press the [EXIT] key in this step, the
RT-223 returns to the previous mode.
4/8 BPM 120
Current beat
Tempo value
NOTE
When a foot switch is connected to the
RT-223 and the foot switch function is not
s e t t o “ TA P ” , t h e f o o t s w i t c h w i l l
automatically be set to control start/stop
when the metronome is activated.
HINT
You can change the metronome sound and
t e m p o a l s o w h i l e t h e m e t ro n o m e i s
operating.
7. To stop the metronome, press the
STOP [P] key.
62
ZOOM RT-223
Changing Various Settings of the RT-223
The [FUNCTION] key is used to make various settings for the RT-223. The basic steps for using the
[FUNCTION] key and the setting items are described below.
Basic function setting
procedure
The [FUNCTION] key is used in the same way
for most setting items. The basic steps are as
follows.
1. Press the [FUNCTION] key.
The [FUNCTION] key flashes, indicating that
you can select a setting item.
NOTE
For some items, you must first select the
pattern before pressing the [FUNCTION]
key, or you must first stop playback. For
details, see the description of the
respective items.
2. Depending on the desired item,
press one of pads 1 - 13 or the
[PATTERN] key.
The 13 pads on the top panel and the [PATTERN]
key are used to select items. The item is identified
by the label below the pad or key, as given in
brackets in the following list.
• Pad 0 (BASS KEY)
Sets the reference pitch for the bass program as
well as the pattern root.
• Pad 1 (MIX)
Sets the drum track/bass track level.
• Pad 2 (BASS TUNE)
Allows tuning a bass program.
• Pad 3 (TIME SIG)
Sets the time signature of the pattern.
ZOOM RT-223
• Pad 4 (PRE COUNT)
Switches pre-count on or off and sets the
number of beats.
• Pad 5 (QUANTIZE)
Sets the quantize value.
• Pad 6 (CLICK VOL)
Sets the metronome volume.
• Pad 7 (BAR LENGTH)
Sets the number of measures for the pattern.
• Pad 8 (FOOT SW)
Sets the foot switch function.
• Pad 9 (SWING)
Sets the amount of swing for playback.
• Pad [+] (PAD SENS)
Adjusts the pad sensitivity.
• Pad [x] (SHIFT)
Shifts the playback timing backwards or
forwards.
• Pad [()] (MIDI)
Sets reception of MIDI synchronization
messages on and off and assigns the MIDI
channel for each track.
• [PATTERN] key
Serves to display remaining memory capacity.
NOTE
For some items, the sound or track that is
to be set must be selected after selecting
the item.
3. Use the VALUE [+]/[-] keys to
change the setting.
HINT
• Keeping a VALUE [+]/[-] key depressed
changes numbers continuously.
• To change numbers quickly, hold down
one of the VALUE [+]/[-] keys and press
the other key. The numbers will change
rapidly.
• When you change a function setting, the
63
Changing Various Settings of the RT-223
new setting becomes effective immediately.
To return to the previous setting, perform
the setting procedure again.
4. Press the [FUNCTION] key once
more, or press the [EXIT] key.
The function setting mode is terminated.
HINT
The [FUNCTION] key is also used for demo
song playback (→ p. 8), FAST input (→ p.
39), and other functions.
HINT
This setting is stored for each pattern
individually.
■ Tuning a bass program (BASS
TUNE)
Setting range: 435 - 445 (Default: 440)
Allows tuning the bass program in the range of A
= 435 Hz to A = 445 Hz.
■ Setting the time signature of a
pattern (TIME SIG)
Setting range: 1, 2, 3, 4, 5, 6, 7, 8
Function setting items
This section explains the various items that can be
set and gives information on the setting range.
■ Setting bass program reference
pitch (BASS KEY)
Set the time signature for the pattern to 1 - 8 (1/4 8/4 beat).
The time signature of an already recorded pattern
(indicated by “*” on the display) is not possible.
HINT
This setting is stored for each pattern
individually.
Setting range: C - B
This sets the pitch assigned to pad 0 in the range
from C to B. The note set here also expresses the
root of the pattern.
When you use the VALUE [+]/[-] keys to change
the pitch of pad 0, the pitch of pads 1 - 9, [+], [x],
and [()] also is shifted accordingly.
A sharp pitch (#) is expressed as “
” (where o
stands for #).
HINT
This setting is stored for each pattern
individually.
■ Setting the drum track/bass
track level (MIX)
■ Setting the pre-count (PRE COUNT)
Setting range: oFF, 1 - 8, SP (Default: 4)
The pre-count (number of metronome ticks before
the start of pattern real-time recording) can be
turned on and off, and the number of measures
etc. can be set. This setting applies to all patterns.
The settings have the following meaning.
• oFF
Pre-count is off.
• 1-8
Real-time recording starts after the respective
number of measures has been counted.
• SP
Real-time recording starts after the following
special pre-count was heard.
Setting range: 0 - 15
Sets the volume for each track in a pattern over a
range of 0 - 15.
After selecting this item, use the [DRUM] or
[BASS] key to select the track and then use the
VALUE [+]/[-] keys to make the setting.
64
ZOOM RT-223
Changing Various Settings of the RT-223
■ Setting the pattern resolution
(QUANTIZE)
■ Setting the number of measures
for a pattern (BAR LENGTH)
Setting range: 4, 8, 12, 16, 24, 32, 48, Hi
(Default: 16)
Setting range: 1 - 99
Sets the quantize value (shortest note) for the
pattern. The quantize setting affects the following
four functions:
• Shortest note for real-time recording
• Shortest note for step recording
• Sound interval when [REPEAT/STEP]
key is used together with pad for
continuous repetition
• Pad push/release detection timing
during groove play
The following 8 settings are available for the
quantize value.
4 .....Quarter note
24........Sixteenth triplet note
8 .....Eighth note
32 .......Thirty-second note
12 ....Eighth triplet note 48........ Thirty-second triplet
note
16 ....Sixteenth note
Hi ....... 1 tick (1/96 quarter
note)
Sets the length of the pattern in the range from 1 99 measures. After setting the pattern length,
press the [FUNCTION] key to confirm the
setting. The initial setting for an empty pattern is
then changed.
Changing the length of an already recorded
pattern is also possible. To do this, select the
pattern for which you want to make the change,
and then press the REC [ O] key instead of the
[FUNCTION] key in step 4 of “Basic function
setting procedure”. The action will change as
follows.
• Making the number of measures larger
Blank measures are added to the end of the
pattern.
• Making the number of measures smaller
The excess measures at the end of the pattern
are cut off.
HINT
This setting is stored for each pattern
individually.
NOTE
• Even if Quantize is set to Hi, the
continuous repetition interval for the
[REPEAT/STEP] key is a thirty-second
triplet note.
• If you press the REC [O] key instead of
the [FUNCTION] key in step 4 of “Basic
function setting procedure”, the note
recorded in the currently selected pattern
is aligned with the quantize value.
■ Setting the metronome volume
level (CLICK VOL)
Setting range: 0 - 15 (Default: 15)
The volume level of the metronome click sound
heard during real-time recording can be adjusted
with this setting.
The setting applies to all patterns.
ZOOM RT-223
■ Selecting the foot switch
function (FOOT SW)
Setting range: PAD00 - PAD38, TAP,
COUNT, START, MUTE, REPEAT, JAM
(Default: JAM)
This setting determines the function of a foot
switch (FS01) connected to the [FOOT SW] jack
on the rear panel.
The setting is made by pressing the [FUNCTION]
key followed by pad 8 (FOOT SW). The
indication “FOOT SW” appears on the display,
and then the currently selected foot switch
function is shown. In this condition, you can
change the setting.
Available settings and setup procedures are listed
below.
• Playing a drum sound of a pad with FS01
You can play one of the drum sounds assigned
to the pads of a pattern with the foot switch.
This is useful to play the bass drum with your
65
Changing Various Settings of the RT-223
•
•
•
•
foot. To make the setting, press the
[FUNCTION] key followed by pad 8 (FOOT
SW), and then press the desired pad from the
13 pads x 3 banks. (The strength with which
you hit the pad is also recorded.) Depending on
the selected pad, the indication PAD00 PAD38 is shown.
Switching pad drum sounds with FS01
You can switch between two drum sounds
assigned to the pads of a pattern with the foot
switch. To make the setting, press the
[FUNCTION] key followed by pad 8 (FOOT
SW). Then push the FS01 down and press the
first pad. Release the FS01 and press the
second pad. The sound of the first pad can now
be switched with the FS01.When the foot
switch is pushed down, the sound of the first
pad is heard. When it is released, the sound of
the second pad is heard. The left three digits of
the display show the number of the first pad,
and the right three digits the number of the
second pad.
To switch between open hi-hat and closed hihat with your foot, push the FS01 and press pad
4 (CLOSED HAT). Then release the FS01 and
press pad 6 (OPEN HAT).
Using the FS01 to set the tempo
You can adjust the tempo by tapping the foot
switch twice in succession (tap tempo
function). To make the setting, press the
[FUNCTION] key followed by pad 8 (FOOT
SW), and then press the [TEMPO] key. (The
indication “TAP” appears on the display.)
Using the FS01 to control start/pause
With this setting, the FS01 will function in the
same way as the PLAY [ R ] key, switching
between “Start play” → “Pause” → “Resume
play” with every push. To make the setting,
press the [FUNCTION] key followed by pad 8
(FOOT SW), and then press the PLAY [ R ]
key. (The indication “COUNT” appears on the
display.)
Using the FS01 to control start/stop
With this setting, the FS01 will function in the
same way as when the PLAY [ R ] key and
STOP [ P ] key are pressed alternately,
switching between “Start play” → “Stop” →
66
“Start play from beginning” with every push.
To make the setting, press the [FUNCTION]
key followed by pad 8 (FOOT SW), and then
press the STOP [ P ] key. (The indication
“START” appears on the display.)
• Using the FS01 to mute a desired track
With this setting, the currently selected track
(drum or bass) is muted when the foot switch is
pressed. To make the setting, press the
[FUNCTION] key followed by pad 8 (FOOT
SW), and then press the VALUE [-] key. (The
indication “MUTE” appears on the display.)
• Using the FS01 to control continuous
percussion sound
With this setting, you can play the sound of a
pad continuously by hitting the pad with the
foot switch pushed down. To make the setting,
press the [FUNCTION] key followed by pad 8
(FOOT SW), and then press the [REPEAT/
STEP] key. (The indication “REPEAT”
appears on the display.)
• Using the FS01 to control jam play
(song mode only)
When the RT-223 is in song mode, the FS01
can be used for the jam function that allows
switching between multiple patterns simply by
pressing the foot switch. To make the setting,
press the [FUNCTION] key followed by pad 8
(FOOT SW), and then press the [SONG] key.
(The indication “JAM” appears on the display.)
For details on the jam function, see page 68.
■ Setting the playback swing
amount (SWING)
Setting range: 8th, 16th/50 - 75 (Default:
8th/50)
This setting controls the swing amount (rhythm
flourish).
To make the setting, press the [FUNCTION] key
followed by pad 9 (SWING). The indication
“SWING” is shown on the display for a while.
When the display indication changes, use the
cursor left/right keys to select “8th” (swing in
eighth note units) or “16th” (swing in sixteenth
note units), and then use the VALUE [+]/[-] keys
change the setting value. With a setting of 50,
there is no change. Higher values result in more
ZOOM RT-223
Changing Various Settings of the RT-223
swing. (The values stand for percent.) This item
influences only the playback timing. It does not
affect the recorded data of the pattern.
■ Setting MIDI synchronization
message input on/off (MIDI)
■ Setting the pad sensitivity (PAD
SENS)
When this item is set to “Ext”, the RT-223 accepts
the following MIDI messages:
• MIDI clock
• Start/Stop/Continue
• Song Select
Setting range: SOFT, MEDIUM, LOUD,
LIGHT, NORMAL, HARD, EX HARD
(Default: NORMAL)
This setting controls the pad sensitivity. The
following seven settings are available.
• SOFT
Low volume regardless of pad hitting intensity
• MEDIUM
Medium volume regardless of pad hitting
intensity
• LOUD
High volume regardless of pad hitting intensity
• LIGHT
Highest sensitivity setting. Results in loud
volume even when pad is hit only lightly.
• NORMAL
Medium sensitivity setting
• HARD
Low sensitivity setting. Pads must be hit hard
to produce volume.
• EX HARD
Lowest sensitivity setting. Pads must be hit
extra hard to produce volume.
■ Setting the playback timing shift
(SHIFT)
Setting range: -192 to +192 (Default: 0)
Shifts the playback timing of a specific track in
the currently selected pattern back or forth in
1-tick units (1/96 of a quarter note). The
maximum shift is ± 2 beats.
NOTE
• Once the setting is made, it cannot be
undone. Use this function with care.
• When you shift the playback timing of a
track, the preceding or following notes
are deleted.
ZOOM RT-223
Setting range: int, Ext (Default: int)
NOTE
When this item is set to “Ext”, real-time
input is not possible.
■ Setting the MIDI receive channel
for each track (MIDI)
Setting range: oFF, 1 - 16, AUt (bass track
only) (Default: drum track = 10, bass track = 9)
This item sets the MIDI channel for each track.
Available settings for the drum track are oFF (not
received) and 1 - 16.Available settings for the
bass track are oFF (not received), 1 - 16, and AUt.
“AUt” is a special setting for playing GM
compatible standard MIDI files. When the RT223 receives a program change message for GM
bass sound, it automatically switches the bass
track to that MIDI channel.
When the [FUNCTION] key is pressed followed
by pad [()] (MIDI), the display for setting the
drum track/bass track MIDI receive channel to on
or off is shown. Hold down the [DRUM] key or
[BASS] key (current setting for the track is shown
on the display), and use the VALUE [+]/[-] keys
to change the setting.
■ Displaying the remaining amount
of memory (PATTERN)
Pressing the [FUNCTION] key followed by the
[PATTERN] key brings up a percentage display
of the remaining amount of memory. This display
is for information only, it cannot be changed.
67
Other Functions
This section describes examples for combining the RT-223 with optional equipment and external
components.
With each subsequent push of the foot switch,
patterns are switched between pad 4 and pad 8.If
you hold down the foot switch during play, the
pattern switches to pad [()] (see illustration 1
below).
Using the jam function
The jam function lets you use the foot switch to
play multiple patterns assigned to pads in song
mode. This is convenient when you want to use
your hands for playing an instrument, while still
being able to start patterns and switch them at any
desired point.
By specifying the NEXT parameter (→ p. 38) for
the above pads, you can use other pattern
combinations or stop play after a specific pattern.
For example, assume that INTRO is assigned to
pad 0 and VERSE A to pad 2.When you set the
NEXT parameter for pad 0 to “P02”, pressing the
foot switch will cause INTRO to play, followed
by VERSE A (see illustration 2 below). Similarly,
if FILL A is assigned to pad 4 and VERSE B to
pad 6, setting the NEXT parameter for pad 4 to
“F06” will cause FILL A to play from the next
beat after pressing the foot switch, and then play
can be switched to VERSE B (see illustration 3
below).
NOTE
The jam function is available only when the
RT-223 is in song mode.
The following four pads can be directly controlled
with the jam function: pad 0, pad 4, pad 8, and
pad [()].
When you press the foot switch while the RT-223
is stopped, the pattern of pad 0 begins playing.
Case 1
Push
Push
Push
Hold down
Foot switch
Pattern of
pad 0
Pattern of
pad 0
Pattern of
pad 4
Pattern of
pad 8
Pattern of
pad 4
Pattern of
pad 4
Pattern of
pad [()]
Case 2
Push
Foot switch
Pattern of pad 0
Pattern of pad 2
NEXT=P02
NEXT=P02
(INTRO)
(VERSE A)
(VERSE A)
Push
Case 3
Foot switch
Pattern of pad 2
68
Pattern of pad 2
NEXT=P02
NEXT=P02
Pattern of
pad 2
Pattern of
pad 4
Pattern of pad 6
NEXT=P02
NEXT=F06
NEXT=P06
(VERSE A)
(VERSE A)
(FILL A)
(VERSE B)
ZOOM RT-223
Other Functions
If the ENDING pattern is assigned to pad [()] and
the NEXT parameter is set to “StP”, pushing and
holding the foot switch will cause the ENDING
pattern to be played, and then play will stop.
HINT
F o r s o n g s w h i c h h a v e p re - a s s i g n e d
patterns (song numbers 0 - 9), the NEXT
parameter is set as follows for the
respective pads.
Pad
0
2
4
6
8
[()]
NEXT parameter
P02
P02
F06
P06
F02
STP
JAM
NOTE
When the jam function is assigned to the
foot switch, and the RT-223 is in a mode
other than song mode, the foot switch will
control playback/stop of the pattern/song.
5. Press the [FUNCTION] key.
The foot switch setting is completed. In this
condition, you can use the jam function.
6. If required, set the NEXT parameter
for each pad (→ p. 38).
1. Connect the FS01 to the [FOOT SW]
jack on the rear panel.
2. Press the [SONG] key to switch the
RT-223 to song mode.
3. Press the [FUNCTION] key and then
pad 8 (FOOT SW).
The indication “FOOT SW” appears briefly on
the display, followed by the currently selected
foot switch function.
In this condition, you can change the foot switch
function setting.
4. Press the [SONG] key.
The indication “JAM” appears on the display.
ZOOM RT-223
7. Push the foot switch.
Playback of the pattern assigned to pad [()] starts.
Each subsequent push of the foot switch then
switches patterns according to the NEXT
parameter setting. If you hold down the foot
switch during play, the pattern of pad [()] plays.
(If you have set the NEXT parameter of pad [()]
to “Stp”, pattern playback will stop after that.)
Synchronizing the RT-223
to external MIDI equipment
The RT-223 can receive MIDI clock signals for
synchronized operation with a multi-track
recorder, sequencer, rhythm machine, or similar
equipment. This allows playback of the patterns
or songs of the RT-223 with the tempo
determined by the external equipment.
1. Connect the MIDI OUT jack of the
MTR, rhythm machine, or other MIDI
component to the [MIDI IN]
connector of the RT-223, using a
MIDI cable.
69
Other Functions
sound sources of the RT-223.
NOTE
Verify that the external MIDI equipment is
capable of sending MIDI Clock and Start/
Stop/Continue messages.
2. Press the [FUNCTION] key followed
1. Connect the MIDI keyboard, MIDI
sequencer, or other MIDI component
to the [MIDI IN] connector of the RT223, using a MIDI cable.
by pad [()] (MIDI).
2. Press the [FUNCTION] key followed
by pad [()] (MIDI).
The display for enabling/disabling reception of
MIDI sync messages appears.
The display for enabling/disabling reception of
MIDI sync messages appears.
3. Press the [DRUM] key (or [BASS] key).
3. Use the VALUE [+]/[-] keys to bring
up the indication “Ext” on the
display.
The current setting value of the selected track
appears on the display.
MIDI
E T
4. Press the [FUNCTION] key.
In this condition, play operation of the RT-223 is
synchronized to the external MIDI equipment.
4. While continuing to hold down the key
pressed in step 3, use the VALUE [+]/[] keys to set the MIDI receive channel
for the track to the send channel of the
external MIDI equipment.
5. Select the pattern or song to play in
sync.
6. Start playback at the external MIDI
equipment.
The pattern or song of the RT-223 plays in
synchronization with the tempo of the external
MIDI equipment.
Using MIDI equipment to
play the RT-223
Using a MIDI keyboard, MIDI sequencer, or
similar MIDI device you can play the built-in
70
For information on MIDI channel setting, see
page 67.
5. Press the [FUNCTION] key.
The MIDI receive channel is set for the track. The
RT-223 produces sound according to the note
numbers received via the [MIDI IN] connector.
Program change messages can be used to switch
drum kits and bass programs of the RT-223. For
information on program change numbers and
corresponding drum kits and bass programs, refer
ZOOM RT-223
Other Functions
to the appendix at the end of this manual.
Checking the remaining
memory capacity
To display the remaining amount of free memory,
proceed as follows.
1. Press the [FUNCTION] key followed
by the [PATTERN] key.
Returning the RT-223 to
the factory default
condition (initialization)
You can return all data in the RT-223 to the
factory default condition.
NOTE
Use this function with care, because it will
erase all patterns and songs that have
been recorded by the user. These cannot
be restored.
1. Turn power to the RT-223 on while
holding down the REC [O] key.
The remaining amount of free memory is
displayed (in percent). This display is for
information only, it cannot be changed.
The indication “ALLINIT” flashes on the display.
HINT
To increase the amount of free memory,
delete patterns and songs that are no
longer required.
2. To return to the previous mode,
press the [FUNCTION] key or the
[EXIT] key.
ALLINIT
2. To go ahead with the initialization,
press the REC [O] key once more.
To cancel the procedure, press the
[EXIT] key.
Turning the backlight off
You can use the RT-223 with the display
backlight turned off.
Turn power to the RT-223 on while holding down
the VALUE [-] key. The backlight will be turned
off, and the unit consumes less power. This is
convenient when remaining battery capacity is
low.
ZOOM RT-223
When initialization is carried out, all settings and
data of the RT-223 are reset to the factory default
condition, and then the unit starts up.
If the process was canceled, the RT-223 starts up
normally.
HINT
If required, you can restore selected
patterns (→ p. 32) , drum kits (→ p. 52) or
effect patches ( → p. 58) to the factory
default condition.
71
Troubleshooting
Check the following items first if there seems to be a problem with the RT-223.
Symptom
No sound or very low volume
Hitting a pad produces no
sound or very low level sound
Sound is distorted or
intermittent
Cannot record song/pattern
Operating foot switch FS01 has
no effect
Check
Make sure that the correct AC adapter
or batteries are used.
Are [R OUT] jack and [L/
MONO OUT] jack
connected correctly to the
playback system?
Make connections as described in
"Getting Connected" (page 6).
Is there a problem with the
cable?
Try using another cable.
Is the connected playback
system operating
normally?
Check the system and make sure that
the volume level is adjusted properly.
Is volume of RT-223 set
correctly?
Set [VOLUME] control to a suitable
position.
Are pad settings correct?
Use [FUNCTION] key and pad [+]
(PAD SENS) to set pad sensitivity (→
p. 67).
Is output level of RT-223
set too high?
Set [VOLUME] control of RT-223 to a
suitable position.
Is COMP EQ effect output
signal too high?
Set LEVEL parameter of COMP EQ
effect to a suitable value.
Is memory capacity limit
reached?
Delete unneeded patterns and songs.
Is FS01 connected
correctly to [FOOT SW]
jack?
Make connections as described in
"Getting Connected" (page 6).
Are foot switch settings
adequate?
Simultaneous playback with
MIDI components is not
possible
72
Remedy
Is the specified AC adapter
connected properly?
Is MIDI receive function set
to ON?
Use [FUNCTION] key and pad 8
(FOOT SW) to set pad sensitivity (→
p. 65).
Use [FUNCTION] key and pad [()]
(MIDI) to change setting from "Int"
(MIDI clock receive disabled) to "Ext"
(MIDI clock receive enabled).
ZOOM RT-223
RT-223 Appendix
RT-223 Product Specifications
Sampling Frequency
D/A Conversion
Maximum Polyphony
Resolution
Tempo Range
Number of Recordable Note Events
Drum Sounds
Bass Sounds
Drum Kits
Rhythm Patterns
Songs
Number of Pads
44.1 kHz
24-bit 8-times oversampling
18 voices
96 clock pulses per quarter note
40 - 250 BPM
32,000
213
12
127
511
100
13 (with velocity sensor)
Display
Display Type
Custom LCD with 128 segments
External Connectors
External Control Connector
MIDI
FS01 input
IN
Inputs/Outputs
LINE IN
OUTPUT
Line Out (L/MONO)
Line Out (R)
Headphones
Standard stereo phone jack
(Input impedance 10 kilohms, rated input level -10 dBm)
Standard phone jack
Standard phone jack (Output impedance 1 kilohm or
less, rated output level -10 dBm)
Mini phone jack, 50 mW (into 32 ohm load)
Dimensions
217.9 (W) x 182.6 (D) x 35.5 (H) mm
Weight
680 grams
Power Requirements
9 V DC, 300 mA (from AC adapter AD-0006)
Batteries IEC R6 (size AA) x 4; continuous operation
8 hours or more
Supplied Accessories
Operation Manual
ZOOM RT-223
73
RT-223 Appendix
Reverb Module
Parameters
EFFECT
HALL
ON/OFF
EFFECT
ROOM
ON/OFF
EFFECT
SPRING
ON/OFF
EFFECT
PLATE
ON/OFF
EFFECT
DELAY
ON/OFF
EFFECT
CHORUS
ON/OFF
EFFECT
FLANGER
ON/OFF
PRE DLY
DECAY
EQ H
EQ L
DAMP
E/R MIX DR SEND BS SEND KICKDRY EFX LVL
Produces concert hall type reverberation.
PRE DLY
DECAY
EQ H
EQ L
DAMP
E/R MIX DR SEND BS SEND KICKDRY EFX LVL
EQ L
DAMP
KICKDRY BS SEND KICKDRY EFX LVL
EQ L
DAMP
KICKDRY BS SEND KICKDRY EFX LVL
Produces room type reverberation.
PRE DLY
DECAY
EQ H
Simulates a spring reverb.
PRE DLY
DECAY
EQ H
Simulates a plate reverb.
TIME
FB
DAMP
PAN
KICKDRY BS SEND KICKDRY EFX LVL
Delay with up to 700 ms delay time.
LFO TYP
DEPTH
RATE
PRE DLY KICKDRY BS SEND KICKDRY EFX LVL
Adds modulation and spread.
DEPTH
RATE
FB
LFO SFT KICKDRY BS SEND KICKDRY EFX LVL
Adds an undulating sound with strong character.
Parameter description
Parameter name
Setting range
EFFECT ON/OFF
LFO TYP
ON, OFF
HALL, ROOM , SPRING, PLATE, DELAY,
CHORUS, FLANGER
Mn, St
LFO SFT
0 - 180
TYPE
DEPTH
RATE
PRE DLY
TIME
FB
DAMP
PAN
0 - 10
CHORUS : 1 - 30
FLANGER : 1 - 30, t0 - t9, M1 - M4
CHORUS : 1 - 30
HALL, ROOM, SPRING, PLATE : 1 - 100
Selects from seven available types.
Sets LFO phase to Mn (Mono) or St (Stereo).
Sets the left/right phase difference.
Sets the effect depth.
Sets the effect rate. When set to "tx" or "Mx", rate is
synchronized to rhythm tempo (see next page Table 1).
Sets the predelay.
1 - 700, t0 - t7
Sets the delay time in 1-ms steps. When set to "tx", delay time
is synchronized to rhythm tempo (see next page Table 1).
DELAY : 0 - 10
FLANGER : -10 - 10
Sets the feedback amount.
0 - 10
L10 - L1, 0, r1 - r10
DECAY
1 - 30
EQ H
-12 - 6
EQ L
-12 - 6
E/R MIX
0 - 30
KICKDRY
ON, OFF
DR SEND
0 - 100
BS SEND
0 - 100
EFX LVL
0 - 30
74
Parameter description
Controls effect ON/OFF for each patch.
Sets the high-range attenuation of the reverb sound and delay
sound.
Sets the stereo position of the delay sound.
Sets the reverb time.
Controls the high-range level of the effect sound.
Controls the low-range level of the effect sound.
Sets the level of the initial reflection.
Switches KICK (bass drum) effect processing for pad 0 ON/
OFF.
Adjusts the drum effect sound send level.
Adjusts the bass effect sound send level.
Sets the effect sound mix amount.
ZOOM RT-223
RT-223 Appendix
COMP EQ Module
Parameters
EFFECT
MLT CMP
ON/OFF
EFFECT
ON/OFF
LO-FI
XOVER XOVER SENS
L
H
H
SENS
M
SENS
L
MIX
H
MIX
M
MIX
L
EQ
H
EQ
M
EQ
L
BASS
LEVEL
ON/OFF
Divides the signal into three frequency bands and separately sets compressor and mix for each.
Also includes 3-band equalizer.
CHARA COLOR
DIST
EFX
LVL
TONE
DRY
LVL
EQ H
EQ M
EQ L
BASS
LEVEL
ON/OFF
Simulates low-fi sound. Also includes 3-band equalizer.
DEPTH FREQ
EFFECT
RESONNC
ON/OFF
RATE
TYPE
RESO
EFX
LVL
DRY
LVL
EQ H
EQ M
EQ L
BASS
LEVEL
ON/OFF
Resonance filter with LFO. Also includes 3-band equalizer.
Parameter description
Parameter name
EFFECT ON/OFF
TYPE
Setting range
MLT CMP, LO-FI, RESONNC
XOVER L
50 - 16000
XOVER H
50 - 16000
SENS H
0 - 24
SENS M
0 - 24
SENS L
0 - 24
MIX H
0FF, -24 - 6
MIX M
0FF, -24 - 6
MIX L
0FF, -24 - 6
CHARA
0 - 10
COLOR
1 - 10
DIST
0 - 10
TONE
0 - 10
DEPTH
0 - 10
FREQ
1 - 30
RATE
1 - 30, t0 - t9, M1 - M4
TYPE
HPF, LPF, bPF
RESO
1 - 30
EFX LVL
0 - 30
DRY LVL
0 - 30
EQ H
-12 - 12
EQ M
-12 - 12
EQ L
-12 - 12
BASS ON/OFF
ON, OFF
LEVEL
Parameter description
ON, OFF
1 - 30
Controls effect ON/OFF for each patch.
Selects from three available types.
Sets the division point for low/mid frequency bands.
Sets the division point for mid/high frequency bands.
Sets the compressor sensitivity in the high range.
Sets the compressor sensitivity in the mid range.
Sets the compressor sensitivity in the low range.
Sets the high range mix amount.
Sets the mid range mix amount.
Sets the low range mix amount.
Sets the filter characteristic.
Adjusts the sound color.
Adjusts the distortion.
Adjusts the tonal quality.
Sets the effect depth.
Sets the LFO offset.
Sets the effect rate. When set to "tx" or "Mx", rate is synchronized to
rhythm tempo (see Table 2).
Selects the filter type.
Applies resonance to the effect.
Sets the effect sound mix amount.
Sets the original sound mix amount.
Applies boost/cut to the high range.
Applies boost/cut to the mid range.
Applies boost/cut to the low range.
Switches bass effect processing ON/OFF.
Sets the patch output level.
[Table 1 Synchronization setting for RATE and TIME parameter ]
Setting value
Frequency
Setting value
Frequency
Setting value
t0
t1
t2
t3
t4
Thirty-second note
Sixteenth note
Quarter note triplet
Dotted sixteenth note
Eighth note
t5
t6
t7
t8
t9
Half note triplet
Dotted eighth note
Quarter note
Dotted quarter note
Half note
M1
M2
M3
M4
ZOOM RT-223
Frequency
Full note
Full note x 2
Full note x 3
Full note x 4
75
RT-223 Appendix
PATCH LIST
COMP EQ
REVERB
NO. SECTION NAME
0
STANDRD
1
BOTTOM
2
FULLRG
3
CRUSH
4
POWER
5
EQBOOST
COMP
6
EQHIBST
7
EQHICUT
8
EQLIGHT
9
EQTIGHT
10
LO&HI
11
NATURAL
12
FATDRUM
13
LO-FI
14
RETRO
LO-FI
15
8-Bit
16
ANGRY
17
RAVEREZ
18
19
RESONNC
HiPASS
RAY-GUN
Comment
Standard compressor
sound
Strong compression of low
range
Strong compression of full
frequency range
Strong compression of mid
range
Enhance overall punch
Compressor sound for
enhancing mid range
Compressor sound for
enhancing high range
EQ for cutting high range
EQ for making light sound
EQ for making tight sound
Compressor sound for
enhancing high and low
range
Compressor sound with
wide range of use
Simulate sound of big
drum
Lo-fi sound
Make a 1930's sound
Simulate old low bit
rhythm machine
Add a rough feeling over
all
Special sweep effect using
sharp filter
High-pass filter with
resonance
FX sound of the laser gun
style
NO. SECTION NAME
0
1
ROOM
2
3
4
5
GATE
6
7
8
HALL
9
10
11
12
13
PLATE
14
15
16
17
18
19
DELAY
20
21
22
23
CHORUS
24
FLANGER
25
DEMO
26
76
Comment
Simulate reverberation of a
STUDIO
rehersal studio
Room reverb with a hard
BRIGHT
tonal quality
Room reverb with a mild
DARK
tonal quality
Simulate reverberation of a
TUNNEL
tunnel
Gate reverb sound
GATE 1
Deep gate reverb sound
GATE 2
Simulate reverberation of a
SM HALL
small-sized hall
Simulate reverberation of a
MIDHALL
middle-sized hall
Simulate reverberation of a
BIGHALL
large-sized hall
Simulate bright reverb of a
CLEAR
concert hall
Hall reverb with a mild
SOFT
tonal quarity
Simulate reverberation at
BUDOKAN Budokan in Tokyo
Plate reverb simulation
PLATE
SHARPPL Sharp reverb
SHORTPL Short reverb
short delay
SLAP
16th-note delay in sync with
SHORT
rhythm tempo
8th-note delay in sync with
REPEAT
rhythm tempo
Dotted 16th-note delay in
TRIPLET
sync with rhythm tempo
Dotted 8th-note delay in
JAMMING sync with rhythm tempo
Dotted 8th-note delay in
SYNCHRO sync with rhythm tempo
4th-triple-note delay in sync
ACCENT
with rhythm
Half-triple-note delay in
RHYTHM
sync with rhythm
Wide chorus sound
AIR-CHO
Standard flanger for drum
FLANGER sound
Deep reverb used for
BIGVERB
demonstration song
Shallow reverb used for
MINVERB demonstration song
ZOOM RT-223
RT-223 Appendix
DRUM KIT LIST
Category
Rock
R&B
Voice
Funk
ZOOM
Classic
HipHop
Dance
NAME
BASIC
REZROCK
LIVE
MODERN
ROCKET
SNAPPY
ROOM
ACUSTIK
STUDIO
PUNCH
AMBIENT
BEATBX1
BEATBX2
BEATBX3
BEATBX4
BEATBX5
SUPRFLY
FUNKY
DRYFUNK
FUNKSTR
FUNKIFY
BIGFUNK
CRACKER
LIVE ZM
EPIC ZM
REAL ZM
SNAP ZM
MOD ZM
FUNK ZM
HIPHOP
STREET
HOMIE
RAPPER
SYNTECH
POWER
ELECTRO
KICKER
REZNANZ
ZOOM RT-223
No.
0
1
2
3
4
5
6
7
8
9
10
11
12
13
14
15
16
17
18
19
20
21
22
23
24
25
26
27
28
29
30
31
32
33
34
35
36
37
Category
Jazz
Pop
Hard Rock
Fusion
World
NAME
BRUSH1
BRUSH2
BRUSH3
BRUSH4
BRUSH5
POPROCK
LITEPOP
DRY POP
HIT POP
AMBIPOP
SUPRPOP
HARDROK
RESOROK
BIGBEAT
HARD RM
HEAVY
B-FUSON
L-FUSON
X-FUSON
S-FUSON
T-FUSON
D-FUSON
LATIN 1
LATIN 2
METAL
REGGAE
AFRICAN
TURKISH
INIDAN
ASIAN
SFX 1
SFX 2
No.
38
39
40
41
42
43
44
45
46
47
48
49
50
51
52
53
54
55
56
57
58
59
60
61
62
63
64
65
66
67
68
69
77
RT-223 Appendix
BASS PROGRAM LIST
MIDI NOTE # LIST
No.
PC#
DISPLAY
0
0,12,24,34,41,53,65,77,89,101,113,
125
FINGER
1
1,13,25,35,42,54,66,78,90,102,114,
126
BRIGHT
2
2,14,26,37,43,55,67,79,91,103,115,
127
SLAP
3
3,15,27,33,44,56,68,80,92,104,116
ACUSTIK
4
4,16,28,38,45,57,69,83,93,105,117
MUTE
5
5,17,29,36,46,58,70,84,94,106,118
DARK
6
6,18,30,39,47,59,71,85,95,107,119
SYNTH1
7
7,19,31,40,48,60,72,86,96,108,120
8
8,20,32,49,61,73,87,97,109,121
9
9,21,50,62,74,88,98,110,122
DRUM KIT
SYNTH2
SQUARE
11
11,23,52,64,76,82,100,112,124
SAW
DRUM PAD NOTE# LIST
PAD1
PAD2
PAD3
PAD4
PAD5
PAD6
PAD7
PAD8
PAD9
PAD10
PAD11
PAD12
PAD13
78
KICK
TOM1
SNARE
TOM2
CLOSED
HAT
TOM3
OPEN HAT
CRASH
EXTRA 1
RIDE
EXTRA 2
EXTRA
CYMBAL
EXTRA 3
BASS
Programs
From note 0
349
290
358
359
275
318
321
329
HighQ
Slap
Scratch1
Scratch2
ShortStk
SquarClk
MetroClk
MtrBell
BASS range
39
PAD BANK 1
66
PAD BANK 3
LO-SINE
10,22,51,63,75,81,99,111,123
PAD
NAME
24
25
26
27
28
29
30
31
32
33
34
35
36
37
38
INST No INST NAME
HARMONX
10
PAD No
Note No
BANK1
BANK2
BANK3
36
50
38
47
35
48
40
45
61
64
60
62
42
44
68
43
46
49
37
51
39
41
54
57
70
59
52
63
67
66
71
65
72
53
55
69
56
58
73
67
68
69
70
71
72
73
74
75
76
77
78
79
80
81
82
83
84
85
86
87
88
74
75
76
77
78
79
80
81
82
83
84
85
86
87
GuiroL1
Claves1
WoodBlkH
WoodBlkL
CuicaHi
CuicaLo
MtTrangl
OpTrangl
Shaker1
JBell1
Belltre1
Castnet1
MtSurdo
OpSurdo
The highest note number that can be produced depends on the bass program.
The PAD BANK 1 - 3 INST No, INST NAME depend on the kit.
The range of note numbers that can be produced by the pads of the RT-323 is 12 - 63.
ZOOM RT-223
RT-223 Appendix
INSTRUMENT LIST
Category
Kick
Snare
AbsNo
TIGHT
ACO-BD1
ACO-BD2
CLASSC1
CLASSC2
STD-BD1
STD-BD2
STD-BD3
PUNCH
ATTK-BD
ANALOG1
ANALOG2
DIGALG1
DIGALG2
LIVE-BD
STDO-BD
RESO-BD
HUGE
STAGE
DEEP-BD
HARD-BD
BEND-BD
BD-DRY1
BD-DRY2
VO-BD1
VO-BD2
VO-BD3
LIVE-SD
HIGHSD1
TIGHT
ANALOGM
ANALOGS
DIGALGM
DIGALGS
POWER
ROOM
SNAP1
SNAP2
FUNK
STD-SD
REGAE
ATTK-SD
DRY-SD
DRY-SDH
RESO-SD
DEEP-SD
BASIC
BRSTAP
BRSSWIP
BRSSWEP
BRSSMT
BRSSSLP
SD-DRY1
SD-DRY2
No.
0
1
2
3
4
5
6
7
8
9
10
11
12
13
14
15
16
17
18
19
20
21
22
23
24
25
26
0
1
2
3
4
5
6
7
8
9
10
11
12
13
14
15
16
17
18
19
20
21
22
23
24
25
26
ZOOM RT-223
Category
Snare
Toms
HiHat
AbsNo
No.
ROLL1
27
ROLL2
28
VO-SD1
29
VO-SD2
30
VO-SD3
31
VO-SD4
32
VO-SD5
33
LIVETM1
0
LIVETM2
1
LIVETM3
2
DRY-TM1
3
DRY-TM2
4
DRY-TM3
5
808_1
6
808_2
7
808_3
8
ACO-TM1
9
ACO-TM2
10
ACO-TM3
11
SYNTH
12
POPHI1
13
POPHI2
14
POPMID
15
POPLO
16
STDOTM1
17
STDOTM2
18
STDOTM3
19
AMBI1
20
AMBI2
21
AMBI3
22
HARDTM1
23
HARDTM2
24
HARDTM3
25
BENDTM1
26
BENDTM2
27
BENDTM3
28
GATE1
29
GATE2
30
GATE3
31
ELECTO1
32
ELECTO2
33
ELECTO3
34
BRSHTMH
35
BRSHTMM 36
BRSHTML
37
CLS14'
0
CLS14'2
1
CLSLIVE
2
OPLIVE
3
CLCLEAR
4
OPCLEAR
5
CLSANLG
6
CLSDGAN
7
OPDGAN
8
Category
HiHat
Cymbal
Extra
Global
AbsNo
OPANLG1
OPANLG2
CLSSTDO
CLSBEND
OPBEND
PEDACO
CLSHMN
OPHMN
LIVECYM
CRSH'17
CRSH'20
CRSH3
SPLASH1
SPLASH2
RIDE1
RIDE2
CUP1
CUP2
CRSH-B
RIDE-B
CHINA
VO-CYM
EXRIM1
EXRIM2
EXRIM3
EXCWBL1
EXCWBL2
EXCLAP1
EXCLAP2
EXSN909
EXTMBRB
EXCLAPB
C'MON
SCRATCH
H RIM01
DJEMBE1
DJEMBE2
DJEMBE3
DUMBEK1
DUMBEK2
DUMBEK3
TABLA1
TABLA2
TABLA3
TABLA4
HIGH Q
SLAP
SCRCH1
SCRCH2
STICKS
SQRCLK
MTRCLK
MTRBELL
TAMBRIN
No.
9
10
11
12
13
14
15
16
0
1
2
3
4
5
6
7
8
9
10
11
12
13
0
1
2
3
4
5
6
7
8
9
10
11
12
13
14
15
16
17
18
19
20
21
22
0
1
2
3
4
5
6
7
8
Category
Global
SFX
AbsNo
No.
VIBSLAP
9
HIBONGO
10
LOBONGO 11
MTHICNG
12
HICNG1
13
HICNG2
14
LOCNG
15
HITIMBA
16
LOTIMBA
17
HIAGOGO
18
LOAGOGO 19
CABASA
20
MARACAS
21
WHISL1
22
WHISL2
23
GUIROS
24
GUIROL
25
CLAVES
26
WDBLKH
27
WDBLKL
28
MTCUICA
29
OPCUICA
30
MTTRAGL
31
OPTRAGL
32
SHAKER
33
JGBELL
34
BELLTR
35
CSTNET
36
MTSRDO
37
OPSRDO
38
FLITSWP
0
GAMELAN
1
BASSSLD
2
BELL
3
OODAIKO
4
CUDAIKO
5
OEDO
6
TEMPLE
7
MOKUGYO 8
CLOCK
9
UFO
10
D-CLOSE
11
D-OPEN
12
KISHIMI
13
SLIDING
14
ENGINE
15
SONAR
16
SPACE
17
SQENCE
18
MAJOR7
19
MINOR7
20
79
RT-223 Appendix
PRESET PATTERN LIST
No.
DemoPattern
80
BPM
No.
Name
0
ROCK
Name
DrKit BassPG
0
0
120
42
ROCK07
DrKit BassPG
19
1
BPM
117
1
HARDROK
23
1
120
43
ROCK08
5
1
117
2
RnB
26
5
138
44
ROCK09
50
1
120
3
POP
44
0
120
45
ROCK10
28
1
136
4
FUNK
19
2
112
46
ROCK11
28
1
112
5
HIP
32
7
98
47
ROCK12
28
1
140
6
BEATBOX
11
9
84
48
ROCK13
7
1
120
7
HOUSE
36
7
120
49
ROCK14
10
1
120
8
FUSION
48
4
124
50
ROCK15
1
1
120
9
DnB
33
1
150
51
ROCK16
2
1
120
10
BLUS
25
4
120
52
ROCK17
53
0
116
11
BRUSH
42
3
120
53
ROCK18
4
1
92
12
JAZZ
41
3
120
54
ROCK19
53
0
96
13
AFRO
64
5
123
55
ROCK20
53
0
96
14
MIDEAST
65
5
122
56
ROCK21
27
1
137
15
8BEAT01
0
1
--
57
ROCK22
27
1
112
16
8BEAT02
0
5
--
58
ROCK23
27
1
103
17
8BEAT03
0
1
--
59
ROCK24
27
1
120
18
8BEAT04
1
0
--
60
ROCK25
26
1
99
19
8BEAT05
1
0
--
61
ROCK26
26
1
96
20
8BEAT06
1
0
--
62
ROCK27
26
1
132
21
8BEAT07
1
0
--
63
ROCK28T
2
1
120
22
8BEAT08
2
1
--
64
ROCK1VA
0
0
120
23
8BEAT09
2
1
--
65
ROCK1FA
0
0
120
24
8BEAT10
2
1
--
66
ROCK1VB
0
0
120
25
8BEAT11
2
1
--
67
ROCK1FB
0
0
120
26
8BEAT12
57
0
--
68
ROCK2VA
49
1
110
27
16BEAT1
54
0
--
69
ROCK2FA
49
1
110
28
16BEAT2
54
0
--
70
ROCK2VB
49
1
110
29
16BEAT3
54
0
--
71
ROCK2FB
49
1
110
30
16BEAT4
54
0
--
72
ROCK3VA
25
4
124
31
16BEAT5
55
0
--
73
ROCK3FA
25
4
124
32
16BEAT6
55
1
--
74
ROCK3VB
25
4
124
33
16BEAT7
55
1
--
75
ROCK3FB
25
4
124
34
16BEAT8
57
0
--
76
ROCK4VA
0
0
130
35
16BEAT9
57
0
--
77
ROCK4FA
0
0
130
36
ROCK01
4
1
120
78
ROCK4VB
0
0
130
37
ROCK02
4
1
140
79
ROCK4FB
0
0
130
38
ROCK03
4
1
107
80
ROCK4BR
0
0
130
39
ROCK04
19
1
136
81
HRK 01
49
1
130
40
ROCK05
19
1
120
82
HRK 02
49
1
113
41
ROCK06
19
1
115
83
HRK 03
10
1
96
SONG
SONG
SONG
SONG
ZOOM RT-223
RT-223 Appendix
No.
SONG
SONG
SONG
SONG
SONG
Name
DrKit BassPG
BPM
No.
Name
130
POP 2FB
48
4
134
121
131
POP 3VA
44
1
120
1
136
132
POP 3FA
44
1
120
59
1
120
133
POP 3VB
44
1
120
HRK 1VA
49
1
120
134
POP 3FB
44
1
120
89
HRK 1FA
49
1
120
135
RnB 01
49
5
138
90
HRK 1VB
49
1
120
136
RnB 02
9
0
100
91
HRK 1FB
49
1
120
137
RnB 03
7
1
120
92
HRK 2VA
53
1
115
138
RnB 04
6
0
168
93
HRK 2FA
53
1
115
139
RnB 05
9
2
100
94
HRK 2VB
53
1
115
140
RnB 06
17
0
120
95
HRK 2FB
53
1
115
141
RnB 07
9
0
92
96
MTL 01
24
1
98
142
RnB 08
9
0
116
97
MTL 02
24
1
103
143
RnB 09
20
2
104
98
MTL 03
24
1
112
144
RnB 1VA
9
7
130
145
RnB 1FA
9
7
130
146
RnB 1VB
9
7
130
84
HRK 04
4
1
120
85
HRK 05
52
1
86
HRK 06
24
87
HRK 07
88
SONG
SONG
DrKit BassPG
BPM
99
MTL 04
59
1
150
100
MTL 1VA
23
5
128
101
MTL 1FA
23
5
128
147
RnB 1FB
9
7
130
102
MTL 1VB
23
5
128
148
FUNK01
16
2
112
103
MTL 1FB
23
5
128
149
FUNK02
19
2
120
104
THRS01
21
1
135
150
FUNK03
16
2
112
105
THRS02
21
1
186
151
FUNK04
18
4
98
106
PUNK01
7
1
160
152
FUNK05
20
0
94
107
PUNK02
7
0
128
153
FUNK06
16
0
92
108
TP 1VA
21
1
129
154
FUNK07
18
0
99
109
TP 1FA
21
1
129
155
FUNK08
19
5
112
110
TP 1VB
21
1
129
156
FUNK09
20
5
125
111
TP 1FB
21
1
129
157
FUNK10
16
0
92
112
POP 01
48
0
142
158
FUNK11
16
0
110
SONG
113
POP 02
0
0
108
159
FUNK1VA
16
2
120
114
POP 03
44
0
120
160
FUNK1FA
16
2
120
115
POP 04
48
0
112
161
FUNK1VB
16
2
120
116
POP 05T
35
5
80
162
FUNK1FB
16
2
120
117
POP 06
26
0
100
163
FUNK2VA
19
0
118
118
POP 07
43
4
117
164
FUNK2FA
19
0
118
119
POP 08
7
4
120
165
FUNK2VB
19
0
118
120
POP 09
18
0
120
166
FUNK2FB
19
0
118
121
POP 10
18
0
120
167
HIP 01
36
7
98
122
POP 11T
55
0
140
168
HIP 02
36
5
91
123
POP 1VA
44
1
126
169
HIP 03
35
3
88
124
POP 1FA
44
1
126
170
HIP 04
32
5
96
125
POP 1VB
44
1
126
171
HIP 05
36
9
112
SONG
SONG
126
POP 1FB
44
1
126
172
HIP 06
36
5
112
127
POP 2VA
48
4
134
173
HIP 07
31
7
103
128
POP 2FA
48
4
134
174
HIP 08
29
0
92
129
POP 2VB
48
4
134
175
HIP 09
34
5
99
ZOOM RT-223
81
RT-223 Appendix
No.
SONG
SONG
SONG
SONG
SONG
82
BPM
No.
Name
176
HIP 10
Name
DrKit BassPG
33
9
85
221
HOUSE1
35
9
126
177
HIP 11
36
7
96
222
HOUSE2
35
7
120
178
HIP 12
36
7
116
223
HOUSE3
35
5
120
179
HIP 13
31
5
148
224
HOUS1VA
35
7
120
180
HIP 14
36
5
107
225
HOUS1FA
35
7
120
181
HIP 15
32
3
120
226
HOUS1VB
35
7
120
182
HIP 16
31
7
98
227
HOUS1FB
35
7
120
183
HIP 17
31
7
102
228
TECH01
33
9
148
184
HIP 18
20
5
99
229
TECH02
33
10
125
185
HIP 19
34
7
91
230
TECH03
33
7
125
186
HIP 20
34
6
88
231
TECH04
33
4
160
187
HIP 21
30
7
88
232
TECH05
33
3
164
188
HIP 22
30
4
136
233
TECH06
35
6
118
189
HIP 1VA
33
7
96
234
TECH07
56
7
140
190
HIP 1FA
33
7
96
235
TECH08
31
7
136
191
HIP 1VB
33
7
96
236
TECH09
33
7
119
192
HIP 1FB
33
7
96
237
TECH10
29
6
127
193
HIP 1VC
33
7
96
238
TECH1VA
33
7
135
194
HIP 1VD
33
7
96
239
TECH1FA
33
7
135
195
HIP 2VA
29
4
110
240
TECH1VB
33
7
135
196
HIP 2VB
29
4
110
241
TECH1FB
33
7
135
197
HIP 2FB
29
4
110
242
FUS 01
58
2
120
198
HIP 2VC
29
4
110
243
FUS 02
47
0
113
199
HIP 2VD
29
4
110
244
FUS 03
59
1
105
200
HIP 3VA
29
5
112
245
FUS 04
55
1
120
201
HIP 3VB
29
5
112
246
FUS 05
58
5
120
202
BEATBX1
12
9
88
247
FUS 06
16
0
120
203
BEATBX2
13
9
99
248
FUS 07
58
0
94
204
BEATBX3
14
9
102
249
FUS 1VA
55
2
110
205
BEATBX4
15
9
112
250
FUS 1FA
55
2
110
206
DANCE1
35
5
-
251
FUS 1VB
55
2
110
207
DANCE2
34
0
111
252
FUS 1FB
55
2
110
208
DANCE3
29
7
102
253
FUS 2VA
54
0
124
209
DANCE4
34
5
120
254
FUS 2FA
54
0
124
210
DANCE5
29
6
180
255
FUS 2VB
54
0
124
211
DANCE6
35
7
103
256
FUS 2FB
54
0
124
212
DANCE7
34
7
120
257
FUS 3VA
57
4
118
213
DANC1VA
29
7
110
258
FUS 3FA
57
4
118
214
DANC1FA
29
7
110
259
FUS 3VB
57
4
118
215
DANC1VB
29
7
110
260
FUS 3FB
57
4
118
216
DANC1FB
29
7
120
261
INDT1VA
24
6
134
217
DANC2VA
35
7
120
262
INDT1FA
24
6
134
218
DANC2FA
35
7
120
263
INDT1VB
24
6
134
219
DANC2VB
35
7
120
264
INDT1FB
24
6
134
220
DANC2FB
35
7
120
265
DnB 01
38
0
150
SONG
SONG
SONG
SONG
SONG
SONG
DrKit BassPG
BPM
ZOOM RT-223
RT-223 Appendix
No.
SONG
SONG
SONG
SONG
BPM
No.
Name
266
DnB 02
Name
DrKit BassPG
56
9
150
312
CNTRY03
DrKit BassPG
56
0
BPM
267
DnB 03
29
9
144
313
CNTRY04
0
4
95
268
DnB 04
31
9
154
314
CNTRY05
51
0
115
120
269
DnB 05
36
9
154
315
CNTR1VA
51
0
118
270
DnB 1VA
56
7
150
316
CNTR1FA
51
0
118
271
DnB 1FA
56
7
150
317
CNTR1VB
51
0
118
272
DnB 1VB
56
7
150
318
CNTR1FB
51
0
118
273
DnB 1FB
56
7
150
319
BRUSH1
39
3
120
274
TRIP01
45
9
120
320
BRUSH2
39
3
120
275
TRIP02
45
5
75
321
BRUSH3
40
3
120
276
TRIP03
45
9
97
322
BRUSH4
41
3
120
277
TRIP04
48
7
101
323
JAZZ01
39
3
102
278
AMB 01
35
5
106
324
JAZZ02
7
3
72
279
AMB 02
33
5
98
325
JAZZ03
38
3
111
280
AMB 03
45
5
157
326
JAZZ04
39
3
92
281
AMB 04
9
3
89
327
JAZZ05
40
3
105
SONG
282
AMB 1VA
9
5
114
328
JAZZ06
0
0
136
283
AMB 1FA
9
5
114
329
JAZZ1VA
41
3
136
284
AMB 1VB
9
5
114
330
JAZZ1FA
41
3
136
285
AMB 1FB
9
5
114
331
JAZZ1VB
41
3
136
286
BALD01
57
5
76
332
JAZZ1FB
41
3
136
287
BALD02
58
5
75
333
SHFL01
7
4
125
288
BALD03
58
5
65
334
SHFL02
51
4
120
289
BALD04
25
5
65
335
SHFL03
51
1
122
290
BALD05
25
5
108
336
SHFL04
23
0
120
291
BALD06
25
5
99
337
SHFL05
54
1
120
292
BALD07
4
5
80
338
SHFL1VA
7
4
115
293
BALD08
25
0
75
339
SHFL1FA
7
4
115
294
BALD09
58
0
110
340
SHFL1VB
7
4
115
295
BALD10
25
5
105
341
SHFL1FB
7
4
115
296
BALD11T
26
0
112
342
SKA 01
44
4
160
297
BALD1VA
25
5
96
343
SKA 02
44
5
1441
298
BALD1FA
25
5
96
344
SKA 03
44
4
160
299
BALD1VB
25
5
96
345
SKA 04
44
4
144
300
BALD1FB
25
5
96
346
REGGAE1
63
5
132
301
BLUSE01
7
0
72
347
REGGAE2
63
2
161
302
BLUSE02
17
0
120
348
REGGAE3
63
5
129
303
BLUSE03
25
0
111
349
REGGAE4
63
5
150
304
BLUSE04
0
0
91
350
REGG1VA
63
5
132
305
BLUSE05
25
4
105
351
REGG1VB
63
5
132
306
BLUS1VA
7
5
136
352
REGG1FA
63
5
132
307
BLUS1FA
7
5
136
353
REGG1FB
63
5
132
308
BLUS1VB
7
5
136
354
AFRO01
18
0
123
309
BLUS1FB
7
5
136
355
AFRO02
60
4
98
310
CNTRY01
57
0
-
356
AFRO03
60
1
115
311
CNTRY02
48
0
120
357
AFRO04
18
0
11
ZOOM RT-223
SONG
SONG
SONG
83
RT-223 Appendix
SONG
SONG
SONG
SONG
84
No.
Name
BPM
No.
Name
358
AFRO05
DrKit BassPG
64
0
106
401
INTRO02
DrKit BassPG
1
0
359
AFRO06
64
0
92
402
INTRO03
49
1
--
360
AFRO07
64
0
116
403
INTRO04
2
0
--
361
AFRO1VA
60
0
107
404
INTRO05
3
0
--
362
AFRO1FA
60
0
107
405
INTRO06
0
0
--
363
AFRO1VB
60
0
107
406
INTRO07
0
0
--
364
AFRO1FB
60
0
107
407
INTRO08
7
4
--
365
LATIN01
60
0
116
408
INTRO09
16
2
--
366
LATIN02
61
0
130
409
INTRO10
1
0
--
367
LATIN03
62
5
118
410
INTRO11
9
7
--
368
LATIN04
61
0
88
411
INTRO12
41
3
--
369
LATIN05
60
4
109
412
INTRO13
39
0
--
370
LATIN06
7
0
150
413
INTRO14
7
5
--
371
LATIN07
61
7
141
414
INTRO15
61
5
--
372
LATIN08
61
3
104
415
INTRO16
53
7
--
373
LATIN09
60
0
100
416
ENDING1
0
0
--
374
LATIN10
60
0
78
417
ENDING2
16
2
--
375
LATIN11
7
5
109
418
ENDING3
10
2
--
376
LATN1VA
7
5
126
419
ENDING4
7
4
--
377
LATN1FA
7
5
126
420
ENDING5
33
7
--
378
LATN1VB
7
5
126
421
ENDING6
43
1
--
379
LATN1FB
7
5
126
422
ENDING7
61
5
--
380
LATN2VA
61
0
112
423
ENDING8
43
3
--
381
LATN2FA
61
0
112
424
ENDING9
7
5
--
382
LATN2VB
61
0
112
425
ENDNG10
9
7
383
LATN2FB
61
0
112
No.
Name
384
MIDEST1
65
5
122
426
GRVARP1
-
8
385
MIDEST2
65
5
122
427
GRVARP2
-
8
PAD4
386
MIDEST3
65
5
112
428
GRVBAS1
-
0
PAD13
387
MIDE1VA
65
5
118
429
GRVBAS2
-
1
PAD9
388
MIDE1FA
65
5
118
430
GRVBAS3
-
4
PAD12
389
MIDE1VB
65
5
118
431
GRVBAS4
-
2
PAD11
390
MIDE1FB
65
5
118
432
GRVPRC1
60
-
PAD6
391
TURKSH1
65
0
100
433
GRVPRC2
64
-
PAD10
392
TURKSH2
65
0
100
434
GRVDRM1
22
-
PAD1
393
AFRICA1
64
0
89
435
GRVDRM2
18
-
PAD5
394
AFRICA2
64
0
95
436
GRVDRM3
35
-
PAD7
395
AFRICA3
64
0
108
437
GRVDRM4
0
-
PAD8
396
AFRICA4
64
0
120
438
GRVSNFL
0
-
PAD3
397
INDIAN1
66
0
120
439
ALLMUTE
-
-
--
398
INDIAN2
66
0
100
399
COUNT
46
0
--
400
INTRO01
44
1
--
DrKit BassPG
BPM
--
-PAD#
PAD2
ZOOM RT-223
RT-223 Appendix
PRESET SONG PAD PARAMETER
No.0
Pattern
407
64
64
64
65
66
66
66
67
0
80
0
416
RCK TMP
ROOT Next
E
P02
A
P01
E
P02
B
P03
E
F06
A
P05
E
P06
B
P07
E
F02
E
P09
G
F02
F
P11
E
Stp
No.3
Pattern
403
88
88
88
89
90
90
90
91
70
418
70
418
HRK TMP
ROOT Next
A
P02
D
P01
A
P02
E
P03
A
F06
D
P05
A
P06
E
P07
A
F02
E
P09
G
P02
F
P11
A
stp
No.6
Pattern
411
329
329
329
330
331
331
331
332
322
322
322
423
JZZ TMP
ROOT Next
F#
P02
D#
P01
F#
P02
F
P03
F#
F06
D#
P05
F#
P06
F
P07
F#
F02
D#
P09
F#
P10
E
F11
F#
stp
No.1
Pattern
408
159
159
159
160
161
161
161
162
148
417
148
417
FNK TMP
ROOT Next
D
P02
G
P01
D
P02
A
P03
D
F06
G
P05
D
P06
A
P07
D
F02
D
P11
D
P02
G
P09
D
stp
No.4
Pattern
414
376
376
376
377
379
378
379
379
375
377
375
422
LTN TMP
ROOT Next
G
P02
A#
P01
G
P02
C
P03
G
F06
A#
P05
G
P06
C
P07
G
F02
F
P09
G
F12
G
P11
G
stp
No.7
Pattern
410
144
144
144
145
146
146
146
147
144
145
419
419
RnB TMP
ROOT Next
F#
P02
A
P01
F#
P02
B
P03
F#
F06
A
P05
F#
P06
B
P07
F#
F02
E
P09
B
F11
F#
P00
F#
stp
No.2
Pattern
415
189
189
189
190
191
191
191
192
193
190
194
420
HIP TMP
ROOT Next
E
P02
E
P01
E
P02
E
P03
E
F06
E
P05
E
P06
E
P07
E
F02
E
P09
E
F02
E
P11
E
stp
No.5
Pattern
405
338
338
338
339
340
340
340
341
333
333
333
419
SHL TMP
ROOT Next
C
P02
D
P01
C
P02
D#
P03
C
F06
D#
P05
C
P06
F
P07
D
F02
C
P09
F
P10
D#
P11
C
stp
No.8
Pattern
413
306
306
306
307
308
308
308
309
306
307
306
424
BLS TMP
ROOT Next
E
P02
A
P01
E
P02
B
P03
E
F06
A
P05
E
P06
B
P07
E
F02
D
P11
D
F02
G
P09
E
stp
ZOOM RT-223
No.9
Pattern
400
131
131
131
132
133
133
133
134
123
124
123
421
RLL TMP
ROOT Next
A
P02
D
P01
A
P02
E
P03
A
F06
D
P05
A
P06
E
P07
A
F02
D
P09
A
F02
E
P11
A
stp
85
RT-223 Appendix
MIDI Implementation
ZOOM Corporation
TOKYO, JAPAN
1. Recognized Messages
Status
1st
2nd
Description
----------------------------------------------------------------------------------8nH
kk
vv
Note Off kk: note number
vv: velocity will be ignored
9nH
kk
00H
Note Off
kk: note number
9nH
kk
vv
Note On
kk: note number
vv: velocity
BnH
BnH
BnH
BnH
0BH
11H
78H
7BH
vv
vv
xx
xx
Channel Volume
vv: volume value
Channel Expression vv: expression value
All Sounds Off
All Notes Off
CnH
pp
EnH
ll
F2H
F3H
sl
ss
Program Change
pp: program number
hh
Pitch Bend Change
hhll: pitch bend value
sh
Song Position Pointer shsl: song position (See Note 2)
Song Select ss: song number 0-99
F8H
FAH
FBH
FCH
(See Note 1)
Timing Clock
Start
Continue
Stop
NOTE: n = MIDI Channel Number ( 0000 - 1111 )
1. Relationship between Program Numbers and Kit Numbers are assigned as
"Kits and Program List" attached.
2. SongPositionPointer for a pattern , new location is wrapped around
the bar length of the pattern.
3. Note On messages can be recorded into a pattern.
2. Transmitted Messages
NONE.
3. System Exclusive Messages
No SysEx messages are recognized/transmitted.
86
ZOOM RT-223
RT-223 Appendix
MIDI Implementation Chart
[MultiTrack Rhythm Machine
Model RhythmTrak RT-223
]
MIDI Implementation Chart
Date :
30.Nov.,2004
Version :1.00
+---------------------+--------------------+--------------------+---------------------+
|
|
Transmitted
|
Recognized
|
Remarks
|
|
Function ...
|
|
|
|
+---------------------+--------------------+--------------------+---------------------+
|Basic
Default
|
| 1-16
| Memorized
|
|Channel Changed
|
| 1-16
|
|
+---------------------+--------------------+--------------------+---------------------+
|
Default
|
| 3
|
|
|Mode
Messages
|
|
|
|
|
Altered
| ****************** |
|
|
+---------------------+--------------------+--------------------+---------------------+
|Note
|
| 0-127
|
|
|Number | True voice | ****************** |
|
|
+---------------------+--------------------+--------------------+---------------------+
|Velocity Note ON
|
| o
|
|
|
Note OFF
|
| x
|
|
+---------------------+--------------------+--------------------+---------------------+
|After
Key's
|
| x
|
|
|Touch
Ch's
|
| x
|
|
+---------------------+--------------------+--------------------+---------------------+
|Pitch Bend
|
| o
|
|
+---------------------+--------------------+--------------------+---------------------+
|
|
| 7
| Volume
|
|
|
| 11
| Expression
|
|Control
|
|
|
|
|Change
|
|
|
|
|
|
|
|
|
|
|
|
|
|
|
|
|120
| All Sounds Off
|
|
|
|
|
|
+---------------------+--------------------+--------------------+---------------------+
|Prog
|
| o 0-127
|
|
|Change | True #
| ****************** |
|
|
+---------------------+--------------------+--------------------+---------------------+
|System Exclusive
|
| x
|
|
+---------------------+--------------------+--------------------+---------------------+
|System | Song Pos
|
| o
|
|
|
| Song Sel
|
| o
|
|
|Common | Tune
|
| x
|
|
+---------------------+--------------------+--------------------+---------------------+
|System
| Clock
|
| o
|
|
|Real Time | Commands |
| o
|
|
+---------------------+--------------------+--------------------+---------------------+
|Aux
| Local ON/OFF |
| x
|
|
|
| All Notes OFF|
| o
|
|
|Mes- | Active Sense |
| x
|
|
|sages | Reset
|
| x
|
|
+---------------------+--------------------+--------------------+---------------------+
|Notes
No messages will be transmitted.
|
|
|
|
|
|
|
+-------------------------------------------------------------------------------------+
Mode 1 : OMNI ON, POLY
Mode 2 : OMNI ON, MONO
o : Yes
Mode 3 : OMNI OFF, POLY
Mode 4 : OMNI OFF, MONO
x : No
ZOOM RT-223
87
The FCC regulation warning (for U.S.A.)
This equipment has been tested and found to comply with the limits for a Class B
digital device, pursuant to Part 15 of the FCC Rules. These limits are designed to
provide reasonable protection against harmful interference in a residential installation.
This equipment generates, uses, and can radiate radio frequency energy and, if not
installed and used in accordance with the instructions, may cause harmful interference
to radio communications. However, there is no guarantee that interference will not
occur in a particular installation. If this equipment does cause harmful interference to
radio or television reception, which can be determined by turning the equipment off
and on, the user is encouraged to try to correct the interference by one or more of the
following measures:
• Reorient or relocate the receiving antenna.
• Increase the separation between the equipment and receiver.
• Connect the equipment into an outlet on a circuit different from that to
which the receiver is connected.
• Consult the dealer or an experienced radio/TV technician for help.
ZOOM CORPORATION
ITOHPIA Iwamotocho 2chome Bldg. 2F, 2-11-2, Iwamoto-cho,
Chiyoda-ku, Tokyo 101-0032, Japan
Web Site: http://www.zoom.co.jp
RT-223 - 5000-3