1
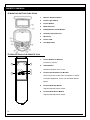
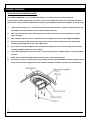
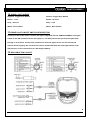
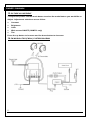
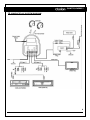
OHM733
OHM833
7” LCD COLOR MONITOR
8” LCD COLOR MONITOR
OWNER’S MANUAL
OWNER’S MANUAL
INTRODUCTION
The Clarion OHM733/OHM833 is a full-featured 7” / 8” LCD Color Monitor that can be used as for a
mobile multimedia system.
The OHM733/OHM833 has the following features:
. TFT Active Matrix Display
. Swivel Mechanism
. Adjustable Wide-Screen Format (16:9 / 4:3) (OHM733 only)
. 2 Audio / Composite video Inputs
. 1 Audio / Composite video Inputs
. Lightweight Plastic Housing
. Built-in Dome Light
. Built-in IR Transmitter for optional Wireless Headphones
. Front Panel Control: Power Indicator, Picture Adjust, Aux, FM-Modulator
. FM Modulator Output Connector (for FM201 Add-On’s)
. Includes Universal Mounting Bracket
. Includes IR Remote Control for main Monitor Functions
ABOUT THE MANUAL AND WARRANTY
The start enjoying your new Clarion monitor, please read the instructions listed in the manual.
Keep all instructions for future reference. Also, save your original sales receipt as proof of
purchase.
TABLE OF CONTENTS:
1. Precautions
2
2. Description
2
3. Package Contents
2
4. Monitor Button Functions
3
5. Description of IR Remote Control
3
6. Using Remote Control
4
7. Inserting the Batteries
4
8. Wiring Precautions
4
9. Installation Instructions
5
10.Dome Light Wiring
6
11.Dome Light ON/OFF Switch Description
6
12.Din Cable Pin Layout
6
13.Picture Adjustments
7
14.FM Modulator
7
(FM201) System Diagram
15.Complete A/V System Diagram
8
16.Care and Maintenance
9
17.Specification
9
1
OHM733,OHM833
1.PRECAUTIONS:
●
The set is for use in DC 12V, negative ground vehicles.
●
Do not operate the set in ways other than described in this guide. Doing so may damage it
and voids your warranty.
●
SAFETY FIRST! For rear seat use only. Do not install in dashboard or anywhere else that would
permit monitor to be viewed by the driver. Monitor must never be used in any manner
that will distract driver or interfere with the driver’s safe operation of the motor vehicle.
●
Be careful not to run down the car battery while using the set with the car stopped.
●
Do not disassemble or modify the set. Doing so may damage it and voids your warranty.
●
Keep drinks and drops from umbrellas away from the set. Water may damage the internal
circuitry.
●
Do not let the set become hot. If the temperature in the car is high or the set has been exposed
to direct sunlight and is hot, lower the temperature before using it. (The liquid crystal panel will
work properly within a temperature range of –10°C ~ +60°C (14°F ~ 140°F) .
●
In extremely cold temperatures, the movement of the picture may be slow and the picture may
be dark, but this is not a malfunction. The set will work normally once the temperature
increases.
●
Small black and shiny dots inside the liquid crystal panel are normal for liquid crystal product.
2.DESCRIPTION
The OHM733/833 is a TFT active matrix color LCD monitor that delivers a striking picture
and superior image resolution. The OHM733/833 can be used to enjoy video images
with the Clarion video sources.
3.PACKAGE CONTENTS
DESCRIPTION
Q’TY
LCD Monitor
1
Universal Trim Ring
1
IR Remote Control
1
A/V Din Cables
2
FM Modulator Din Cable
1
Power Connector
1
M3X8 Screws
5
Manual/Installation Guide
1
Rubber Gasket
1
2
OWNER’S MANUAL
4.MONITOR BUTTON FUNCTIONS
1.
Monitor Release Button
2.
Dome Light Switch
3.
Power Button
4.
Mode Selector
5.
FM Modulator On/Off Button
6.
Auxiliary Input Selector
7.
IR Sensor
8.
Power LED
9.
Not Applicable
5.DESCRIPTION OF IR REMOTE CONTROL
1.
POWER
1
AV1/AV2
Powers on monitor.
2
2.
PICTURE
SELECT
5
Video Button
Switches between A/V1, A/V2
3
4
Power Button for Monitor
3.
Picture Select Button for Monitor
Goes into picture mode menu for Monitor to select
Contrast, Brightness, Color, Tint and Wide Screen
Mode.
4.
Picture Mode Up Button
Adjusts selected picture mode.
5.
Picture Mode Down Button
Adjusts selected picture mode.
3
OHM733,OHM833
6.USING REMOTE CONTROL
Inside the vehicle, simply aim the IR Remote Control directly at the OHM733/OHM833,
or at a Clarion monitor, or video source with an IR eye input and press any desired
button for better results. Also note the following:
●
Aim the IR Remote Control from no further than 2 Meters away and no more than 0.9 Meters
on either side of the sensor.
●
Direct sunlight or very bright light will reduce sensitivity to the IR remote signal commands.
Be sure the monitor is not located in direct sunlight.
●
Objects between the monitor will interfere or block IR remote signal commands.
7.INSERTING THE BATTERIES
1.
Locate the battery compartment on the back of the IR Remote Control.
2.
Remove the battery holder and insert two AAA alkaline batteries matching polarity
as shown inside the battery holder.
3.
Snap the battery holder back into the remote unit until it locks with a click.
8.WIRING PRECAUTIONS
Read all wiring precautions. If you are not sure of the connections, contact your
Authorized Clarion dealer.
1.
Disconnect the negative (-) lead of the battery before making any power connections.
2.
When creating passage holes for the power wires, use grommets to eliminate any sharp
edges created during drilling. This will protect the wire from being nicked and causing a
short circuit.
3.
When connecting the ground lead, fasten the ground lead (black wire) securely to a clean
metal plate on the vehicle.
NOTE: The OHM733/OHM833 monitor displays video images only. It does not provide audio output.
Refer to the owner’s manual of the connected device for the information on audio output.
4
OWNER’S MANUAL
9.INSTALLATION INSTRUCTIONS
The OHM733/OHM833 is an overhead, flip-down 7”/8” monitor with an infrared (IR) eye.
It will accept a video signal from any video source with composite video out. The IR eye will work
with Clarion video source products with an IR eye input.(Please check first if Adapter is necessary!).
1.
Look over the vehicle for a location for the monitor. Each vehicle is different and locations will
vary. Make sure the monitor will not interfere with the driver.
2.
Run necessary wires to the mounting location. When necessary cut the headliner and pull
wires through.
3.
Use a 30cm x 30cm x 2cm or 1.2cm think piece of plywood to mount the OHM733/OHM833.
4.
Silicone the piece of plywood to the top of the roof or screw the plywood to the dome light
mounting assembly and or the roof support rail.
5.
If you don’t need full Heights of the universal Trim Ring you can cut these Ring and use than
including Rubber gasket to close cutting.
6.
Once the plywood has been mounted, connect the IR, power and DIN cables to the designated
sources.
7.
Make sure all wires and DIN cables are way from screws when drilling.
8.
Screw the monitor and universal pod assembly (factory pre-assembled) into the plywood using
4 wood screws (not supplied). Use the shortest screws possible to prevent roof penetration.
5
OHM733,OHM833
10.DOME LIGHT WIRING
Negative Trigger Door Switch
Positive Trigger Door Switch
Brown : +12V
Brown : Ground
Gray : Ground
Gray : +12V
White : Door Switch
White : Door Switch
11.DOME LIGHT ON/OFF SWITCH DESCRIPTION
A three-position slide switch controls the lights integrated into the OHM733/OHM833 sliding the
switch to the ON position will turn the lights on. The OFF position will prevent the lights from
turning on at all times and the auto position will allow the lights to turn on and off with the
vehicle interior lighting. Do not leave the vehicle unattended with the dome light switch in the
ON position, as this could result in a discharged battery.
12.DIN CABLE PIN LAYOUT
6
OWNER’S MANUAL
13.PICTURE ADJUSTMENT
To adjust the picture use the mode button to select the mode feature you would like to
Adjust. Adjustment selections are as follow:
●
Contrast
●
Brightness
●
Color
●
Wide screen ON/OFF (OHM733 only)
●
Tint
Press the up button to increase and the down button to decrease.
14.FM MODULATOR (FM201) SYSTEM DIAGRAM
7
OHM733,OHM833
15.COMPLETE A/V SYSTEM DIAGRAM
8
OWNER’S MANUAL
16.CARE AND MAINTENANCE
Cleaning the cabinet
●
Use a soft, dry cloth to gently wipe off any dirt.
●
Do not use benzene, thinner, car cleaner, etc., as these substances may damage
the cabinet or cause the paint to peel.
Cleaning the LCD panel
●
Use a soft, dry cloth to gently wipe off any dust.
●
The surface is easily scratched; do not rub it with hard objects.
17.SPECIFICATIONS
GENERAL SPECIFICATIONS:
Power Source:
Car Battery (DC 9-16V)
Power Consumption:
DC 12V 15W (without Dome lights)
Max Current Consumption:
Less than 1.5A (without Dome lights)
OHM733 Dimensions:
8-1/2” x 11-3/4” x 1-3/16” (W x H x D)
216 x 300 x 31.5 mm (W x H x D)
OHM833 Dimensions:
9-1/8” x 13-3/16” x 1-3/16” (W x H x D)
232 x 336 x 31.5 mm (W x H x D)
OHM733 Weight:
3 lb (1.4 kg)
OHM833 Weight:
3.5 lb (1.6 kg)
Operation Temperature
-10°C~+60°C (14°F ~ 140°F)
MONITOR SPECIFICATIONS:
Display Type:
Color TFT Active Matrix LCD
OHM733 Display Screen Size: 7.0”
OHM833 Display Screen Size: 8.0”
Format
1440 x 234
Screen Resolution:
336,960 dots
Video Signal
1Vp-p with 75-ohm load
Video System
Auto NTSC/PAL
9