1
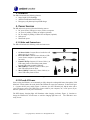
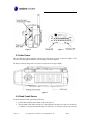
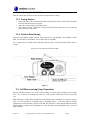
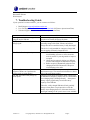
Ambient Weather WR-089 Emergency Solar Hand Crank
Radio, Flashlight with AM/FM/NOAA WeatherBand and
Smart Phone/PDA Charger User Manual
Table of Contents
Introduction ..................................................................................................................................... 2
Warnings and Cautions ................................................................................................................... 2
Features ........................................................................................................................................... 3
Power Sources ................................................................................................................................. 3
4.1
Cables and Connectors ........................................................................................................... 3
4.2
DC and AC Power .................................................................................................................. 3
4.3
Solar Power ............................................................................................................................ 4
4.4
Hand Crank Power ................................................................................................................. 4
5. Operation......................................................................................................................................... 5
5.1
Flashlight Operation ............................................................................................................... 5
5.2
Radio Operation ..................................................................................................................... 5
5.2.1 Turning the Radio On and Off............................................................................................ 5
5.2.2 Adjusting the Radio Volume .............................................................................................. 6
5.2.3 Tuning Stations .................................................................................................................. 6
5.2.4 Weather Band Tuning ......................................................................................................... 6
5.3
Cell Phone and mp3/mp4 Operation ...................................................................................... 6
6. Specifications .................................................................................................................................. 7
7. Troubleshooting Guide.................................................................................................................... 8
8. Accessories ..................................................................................................................................... 9
9. Liability Disclaimer ........................................................................................................................ 9
10.
Warranty Information ................................................................................................................. 9
11.
FCC Statement.......................................................................................................................... 10
1.
2.
3.
4.
Version 1.0
©Copyright 2012, Ambient LLC. All Rights Reserved.
Page 1
1. Introduction
Thank you for your purchase of the Ambient Weather WR-089 Emergency Solar Hand Crank Radio,
Flashlight with AM/FM/WeatherBand and Cell Phone/mp3/mp4/USB Charger. To download the latest
full size manual (for easy viewing) and additional troubleshooting tips, please visit:
http://ambientweather.wikispaces.com/wr089
2. Warnings and Cautions
When used in the directed manner, this unit has been designed and manufactured to ensure your
personal safety. However, improper use can result in potential electrical shock or fire hazards. Please
read all safety and operating instructions carefully before use, and keep these instructions handy for
future reference. Take special note of all warnings listed in these instructions.
Before using this product, please read the following warning and cautions:
1. Read these instructions – All the safety and operating instructions should be read before the
unit is operated.
2. Keep these instructions – The safety and operating instructions should be kept for future
reference.
3. Heed all warnings – All warnings on the device and in the operating instructions should be
adhered to.
4. Follow all instructions – All operation and use instructions should be followed
5. Do not use this item near water – The device should not be used near water; for example, near
a bath tub, washbowl, kitchen sink, laundry tub, in a wet basement, or near a swimming pool.
6. Clean only with dry cloth – The device should be cleaned only as recommended by the
manufacturer.
7. Do not install near any heat sources such as radiators, heat registers, stoves, or other device
(including amplifiers) that produce heat. The battery can explode.
8. Do not place near a fire. The battery can explode.
9. Only use attachments / accessories recommended by the manufacturer.
10. Refer all servicing to qualified service personnel. Servicing is required when the device has
been damaged in any way, such as liquid has been spilled or the device has been exposed to
rain or moisture, does not operate normally, or has been dropped.
11. This device shall not be exposed to dripping or splashing water and that no object filled with
liquids such as vases shall be placed on the device.
12. Unplug immediately if liquid has been spilled or any object has fallen into the unit.
13. Power Sources – The device should be connected to a power supply only of the type
described in the operating instructions or as marked on the device. Do not overload wall
outlet.
14. Danger of explosion if battery is incorrectly replaced. Replace only with the same or
equivalent type.
15. Do not attempt to dismantle, open or repair this product yourself. If a fault occurs, seek
advice from Ambient Weather support only. Only the rechargeable battery can be replaced or
serviced.
16. Only operate within specified temperature range (32 °F to 131 °F).
Version 1.0
©Copyright 2012, Ambient LLC. All Rights Reserved.
Page 2
3. Features
The WR-089 includes the following features:
• Super bright 3 LED flashlight
• AM/FM with Weather Band Feature
• Emergency cell phone/mp3/mp4/USB charger
4. Power Sources
The WR-089 can be powered from the following sources:
• DC power from a USB power source, such as a computer.
• AC power by adding a USB to AC adaptor (optional).
• DC car charger by adding a USB to DC car adaptor (optional).
• Solar power.
• Hand crank power.
4.1 Cables and Connectors
The WR-089 includes the following cables and connectors:
1. 2.5 Stereo Cable. Connects Power Out Jack to cell
phone tips (3), (4) and (5).
2. Power In Cable. Connects Power In Jack to USB
power (from a compute or optional AC or DC
converter).
3. Female USB Tip. Connects 2.5 Stereo Cable (1) to
USB smart phone or PDA. Most smart phones
include USB cables (example, IPhones).
4. Mini USB Tip. Connects 2.5 Stereo Cable (1) to
mini USB smart phone or PDA.
5. Micro USB Tip. Connects 2.5 Stereo Cable (1) to
micro USB smart phone or PDA.
Figure 1
4.2 DC and AC Power
Prior to using the WR-089, we recommend you fully charge the rechargeable battery through the USB
Mini Jack. Lift the rubber tab on the back of the WR-089 to expose the connectors, as shown in Figure
2. Connect the DC power cable (Figure 3, reference 2) to the USB mini jack, and the other end to
your USB power source. The USB power source could be your computer, AC, or DC power (if you
have the optional AC or DC power converters).
The RED battery charging light will illuminate when charging (reference Figure 3). Continue to
charge the WR-089 for several hours or until the charging light turns off. The WR-089 is now
ready for use.
Version 1.0
©Copyright 2012, Ambient LLC. All Rights Reserved.
Page 3
Figure 2
Figure 3
4.3 Solar Power
Place the WR-089 in direct sunlight with the solar panel facing upwards, as shown in Figure 4. The
red battery charging light illuminates when charging, as shown in Figure 3.
The battery will fully charge after 10-12 hours of exposure in average sunlight.
Figure 4
4.4 Hand Crank Power
To operate the hand crank, perform the following:
1. Lift the hand crank from the cradle, as shown in Figure 5.
2. Turn the hand crank either clockwise or counterclockwise at about two cranks per second for
3-5 minutes to activate the internal battery for initial use, or when the unit has not been used
Version 1.0
©Copyright 2012, Ambient LLC. All Rights Reserved.
Page 4
for more than 60 days. The red battery charging light illuminates when charging, as shown
in Figure 3.
3. For subsequent charges, turn the hand crank for one minute to produce 70 minutes of
continuous light for the LED flashlight, or 16-20 minutes of continuous radio usage (subject
to volume) or approximately 3-5 minutes of talk time on the cell phone (your results may vary
due to phone variation).
When the battery is fully charged, there is little resistance in the crank.
Figure 5
5. Operation
5.1 Flashlight Operation
Turn the light on and off with the light switch on the top of the unit (Figure 4).
5.2 Radio Operation
To view radio controls, reference Figure 6.
5.2.1 Turning the Radio On and Off
To turn the radio on, rotate the ON/OFF/VOLUME control clockwise. To turn the radio off, turn the
ON/OFF/VOLUME control to OFF.
Version 1.0
©Copyright 2012, Ambient LLC. All Rights Reserved.
Page 5
5.2.2 Adjusting the Radio Volume
Turn the volume dial clockwise to turn the radio on and control the volume.
5.2.3 Tuning Stations
1. Select AM, FM or WB (weather band) channel with the band selector switch. Fully extend the
telescopic antenna for better reception.
2. Adjust the volume with the VOLUME control.
3. Tune stations with the TUNE knob. The green TUNE indicator light will come on when the
station selected is fully tuned.
5.2.4 Weather Band Tuning
There are seven distinct weather channels. The frequencies are 162.400 MHz, 162.425 MHz, 162.450
MHz, 162.475 MHz, 162.500 MHz, 162.525 MHz and 162.550 MHz.
For a complete list of weather radio broadcasting stations, please visit the National Weather Service
website:
http://www.nws.noaa.gov/nwr/indexnw.htm
Figure 6
5.3 Cell Phone and mp3/mp4 Operation
Because cell phone batteries vary in their current ratings, we cannot specify charging rates or usage
time. 10 to 15 minutes of cranking may result in 1 or more minute of talk-time, but your results may
vary.
Note: Charging a mobile phone through the Phone Charger Jack is intended for emergency purpose
only. It is not intended for recharging fully a discharged battery. Cell phone battery capacity
significantly exceeds the battery capacity of the WR-089. Therefore, a fully charged WR-089 will only
partially charge a cell phone or mp3/mp4 device. After the battery stops charging the device, you must
begin cranking.
Version 1.0
©Copyright 2012, Ambient LLC. All Rights Reserved.
Page 6
To charge the cell phone or music player device:
1. Set POWER/VOLUME control to OFF position. The radio will turn off automatically when
an external device is connected to the WR-089.
2. Plug the cell phone charging cable (with the appropriate adaptor, mini and micro USB tips
included) into the circular Phone Charge connector, as shown in Figure 7.
3. Plug other end of your cable into the cell phone’s charging connector.
4. If the phone does not begin charging, begin cranking. When charging a cell phone via the cell
phone charger, it is important to turn the crank at least two revolutions per second, or until
you see red charging LED turn on. This is an indication that the phone is receiving enough
power from the radio. Continue to crank at this rate until you are satisfied that an appropriate
level of charge has been received by your cell phone. If you decide to stop cranking for
whatever reason, please wait at least 5 seconds before cranking the radio again.
Figure 7
6. Specifications
Battery Power:
3xAAA/350 mAh/3.6V Ni-MH
Working voltage: 2.7V to 4.2V
Maximum Power Consumption: 0.5W
Radio Bands:
AM: 525 KHz to 1710KHz
FM: 88MHz to 108 MHz
WeatherBand: 162.4 to 162.5 MHz
Flashlight:
3-LED Flashlight
LED lifespan: 100,000 hours
LED illumination: 5000lux @120mm
Size and Dimensions:
Dimensions: 5" x 2.4" x 1.6"
Weight: less than 0.5 lbs.
Includes:
Version 1.0
©Copyright 2012, Ambient LLC. All Rights Reserved.
Page 7
USB Charging Cable
Retractable Antenna
Wrist lanyard
7. Troubleshooting Guide
If your question is not answered here, you can contact us as follows:
1. Email Support: [email protected]
2. Live Chat Support: www.ambientweather.com/chat.html (M-F 8am to 4pm Arizona Time)
3. Technical Support: 480-283-1644 (M-F 8am to 4pm Arizona Time)
Problem
Phone generates an error message when
plugged into the WR-089.
My Ipod / IPhone does not display the
charge signal.
The Weather Band reception is poor.
My smart phone connector is not
supported. Where can I purchase the
proper tip for my smart phone?
The WR-089 will not fully charge my
smart phone.
Solution
A lower voltage output may result in error messages on
the phone but should still charge the phone.
The output voltage of the WR-089 is lower than the
operating voltage of the IPod / IPhone, and will not
charge these devices until the battery is fully discharged.
The device is only intended for emergency charges and
not for topping off already charged devices.
• Weather band reception can be poor inside a
metal building, structure or where electronic
noise is present. Try moving outside to improve
reception
• Check local reception by driving to a different
location and testing the weather band reception.
• Radio reception is dramatically reduced when
charging from USB. Disconnect USB power
when listening to the radio.
Contact Ambient Weather with your smart phone model
and connector type. The connectors included cover about
95% of the smart phone market.
Charging a smart phone through the Phone Charger Jack
is intended for emergency purpose only. It is not intended
for recharging fully a discharged battery. Smart phone
battery capacity significantly exceeds the battery
capacity of the WR-089.
Therefore, a fully charged WR-089 will only partially
charge a smart phone or mp3/mp4 device. After the
battery stops charging the device, disconnect the device
and begin cranking if a DC power source is not available.
Version 1.0
©Copyright 2012, Ambient LLC. All Rights Reserved.
Page 8
8. Accessories
The following software and
at www.AmbientWeather.com .
hardware
accessories
are
available
for
Accessory
Ambient Weather 90W1-29100 USB to
AC Adaptor Converter
Description
Converts USB cable to AC power.
Ambient Weather 30W1-29100 USB to
DC Car Charger Converter
Converts USB cable to DC car charger.
the
WR-089
9. Liability Disclaimer
•
•
•
•
•
•
Please help in the preservation of the environment and return used batteries to an authorized
depot.
The electrical and electronic wastes contain hazardous substances. Disposal of electronic
waste in wild country and/or in unauthorized grounds strongly damages the environment.
Reading the “User manual” is highly recommended.
The specifications of this product may change without prior notice.
This product is not a toy. Keep out of the reach of children.
No part of this manual may be reproduced without written authorization of the manufacturer.
Ambient, LLC WILL NOT ASSUME LIABILITY FOR INCIDENTAL,
CONSEQUENTIAL, PUNITIVE, OR OTHER SIMILAR DAMAGES ASSOCIATED WITH
THE OPERATION OR MALFUNCTION OF THIS PRODUCT.
10. Warranty Information
Ambient, LLC provides a 1-year limited warranty on this product against manufacturing defects in
materials and workmanship.
This limited warranty begins on the original date of purchase, is valid only on products purchased and
only to the original purchaser of this product. To receive warranty service, the purchaser must contact
Ambient, LLC for problem determination and service procedures.
Warranty service can only be performed by Ambient, LLC. The original dated bill of sale must be
presented upon request as proof of purchase to Ambient, LLC.
Your Ambient, LLC warranty covers all defects in material and workmanship with the following
specified exceptions: (1) damage caused by accident, unreasonable use or neglect (lack of reasonable
and necessary maintenance); (2) damage resulting from failure to follow instructions contained in your
owner’s manual; (3) damage resulting from the performance of repairs or alterations by someone other
than an authorized Ambient, LLC authorized service center; (4) applications and uses that this product
was not intended (5) the products inability to receive a radio signal due to any source of interference,
metal obstructions or other reception issues.
This warranty covers only actual defects within the product itself, and does not cover the cost of
installation or removal from a fixed installation, normal set-up or adjustments, claims based on
misrepresentation by the seller or performance variations resulting from installation-related
circumstances.
Version 1.0
©Copyright 2012, Ambient LLC. All Rights Reserved.
Page 9
11. FCC Statement
This device complies with Part 15 of the FCC Rules. Operation is subject to the following two
conditions:
(1) this device may not cause harmful interference, and
(2) this device must accept any interference received, including interference that may cause undesired
operation.
NOTE: This equipment has been tested and found to comply with the limits for a Class B digital
device, pursuant to Part 15 of the FCC Rules. These limits are designed to provide reasonable
protection against harmful interference in a residential installation. This equipment generates, uses and
can radiate radio frequency energy and, if not installed and used in accordance with the instructions,
may cause harmful interference to radio communications. However, there is no guarantee that
interference will not occur in a particular installation. If this equipment does cause harmful
interference to radio or television reception, which can be determined by turning the equipment off
and on, the user is encouraged to try to correct the interference by one or more of the following
measures:
• Reorient or relocate the receiving antenna.
• Increase the separation between the equipment and receiver.
• Connect the equipment into an outlet on a circuit different from that to which the receiver is
connected.
• Consult the dealer or an experienced radio/TV technician for help
Version 1.0
©Copyright 2012, Ambient LLC. All Rights Reserved.
Page 10