1
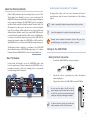
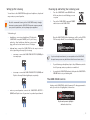
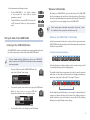
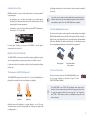
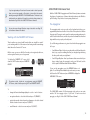
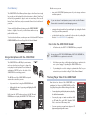
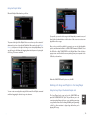
Workshop ®ÂØÒňΠ® JUNO-STAGE 128-Voice Expandable Synthesizer with Song Player Getting to Know the JUNO-STAGE © 2009 Roland Corporation U.S. All rights reserved. No part of this publication may be reproduced in any form without the written permission of Roland Corporation U.S. JSWS01 1 About the Workshop Booklets Understanding the Symbols in This Booklet Roland’s JUNO synthesizers have been making history since the 1980s. They’ve always been affordable, easy to use, and sounded great. The JUNO-STAGE is designed specifically for performing, putting everything you need on a gig at your fingertips. The JUNO-STAGE’s got 128-note polyphony and killer sounds derived from Roland’s acclaimed Fantom-X synths. Two SRX expansion slots allow you to add even more sounds from Roland’s huge SRX sound library. Split the keyboard or layer sounds quickly using dedicated buttons. Realtime controls let you shape JUNO-STAGE sounds as you play. Perform along with audio files or SMFs stored on a USB flash drive, or connect a personal music player. Plug a mic into the JUNO-STAGE for singing along. Instantly configure the JUNO-STAGE as a MIDI controller of external MIDI devices or a computer-based DAW with a single button-press. This Workshop booklet is intended as a companion to the JUNO-STAGE Owner’s Manual. It requires JUNO-STAGE Operating System v1.03 or higher. Download the latest JUNO-STAGE O.S. for free from www.RolandUS.com. Throughout this booklet, you’ll come across information that deserves special attention—that’s the reason it’s labeled with one of the following symbols. A note is something that adds information about the topic at hand. A tip offers suggestions for using the feature being discussed. Warnings contain important information that can help you avoid possible damage to your equipment, your data, or yourself. Setting Up the JUNO-STAGE Making the Power Connection About This Booklet 1 Assemble the JUNO-STAGE’s two-piece power adaptor. 2 Plug the AC end into a grounded power outlet—the adaptor’s indicator lights green. 3 Plug the other end into the JUNO-STAGE’s rear-panel DC IN jack. In this booklet, we’ll introduce you to the JUNO-STAGE, with a quick tour of its many features. It’ll give an idea why the JUNO-STAGE is such a performance powerhouse. And most everything it does is conveniently accessible onstage from its front panel. USB memory Song Player D Beam Synth tools Sound selection Input mixer Realtime controls Keyboard You can wrap the cable at the DC end of the power adaptor around the cord hook to the left of the DC IN jack to help avoid unintentionally yanking out the plug or damaging the adaptor. It’s best not to power up until you’ve made your audio connections, which we’ll discuss next. 2 Setting Up For Listening You can listen to the JUNO-STAGE through stereo headphones, a keyboard amp, a mixer, or powered speakers. We don’t recommend listening to the JUNO-STAGE directly through a home music system since the JUNO-STAGE’s dynamic range may exceed your system’s capabilities, and may damage your equipment. Powering Up and Setting Your Listening Level 1 Turn the JUNO-STAGE’s main VOLUME knob all the way down to avoid blasting your ears or system. 2 Press in the JUNO-STAGE’s rear-panel POWER switch to turn on the JUNO-STAGE. To listen through • headphones—connect your headphones’ 1/4” plug to the Once the JUNO-STAGE’s finished starting up, you’ll be on the PATCH PLAY screen by default. (You can change this setting if you like.) JUNO-STAGE’s rear-panel PHONES jack. If you’re using earbuds or other headphones that have a stereo mini plug, you’ll need a stereo-mini-to-stereo-1/4” adaptor. • keyboard amp—connect the JUNO-STAGE to the amp in mono or stereo, depending on the amp. If you’re using a • mono amp—connect the JUNO-STAGE’s OUTPUT L (MONO) jack to an amp input. • stereo amp—connect the JUNO-STAGE’s OUTPUT L (MONO) and R jacks to the amp’s left and right inputs, respectively. If you’ve already stored some of your own patches in the JUNO-STAGE, the patch name you see may be different that the one shown above. 3 If you’re listening on headphones, skip to Step 4. Otherwise, raise the level of your amp, mixer, or speakers to a normal level. 4 As you play the JUNO-STAGE keyboard, slowly raise the JUNO-STAGE’s VOLUME knob to set your listening level. The JUNO-STAGE Controls A setting on the JUNO-STAGE is called a “parameter.” To change a parameter’s value, you select it so it’s highlighted, as shown here. • mixer or powered speakers—connect the JUNO-STAGE’s OUTPUT L (MONO) and R jacks to two of your mixer’s or speakers’ input channels. The patch number parameter is highlighted— and therefore selected—here. 3 To select a parameter and change its value: 1 Use the JUNO-STAGE’s 3, 4, 5, and/or 6 buttons to move around the screen until the desired parameter is selected. 2 Turn the VALUE dial, or use the DEC (for “decrement”) or INC (“increment”) buttons to set the parameter’s value. The Synth Side of the JUNO-STAGE Listening to the JUNO-STAGE Demo The JUNO-STAGE’s sounds are probably the most important thing about it. Let’s take a few moments to listen to the main JUNO-STAGE demo. If you’ve already installed a USB memory stick in your JUNO-STAGE, remove it and turn the JUNO-STAGE off and back on before proceeding with demo playback. 1 Press the PLAY button in the SONG PLAYER area—the main demo “JS-Getup!” starts to play. 2 If you want to stop the demo before it ends, press the STOP button. When the demo ends—or you press STOP—the display shows the titles of the other built-in demos. 3 Welcome to Patch Mode By default, your JUNO-STAGE boots up into Patch mode. The JUNO-STAGE has a few operating modes, and this one’s the place where you’ll select, play, and edit or create individual sounds, which are called “patches.” Patch mode’s a good place for us to start getting to know the JUNO-STAGE. There’s another type of individual sound called a “rhythm set,” which has a different drum or percussion sound for every key. Operating the JUNO-STAGE in Patch Mode Let’s take a moment to introduce the controls you’ll use to get around on the JUNO-STAGE and its display, which provides information and constant visual feedback on your activities. The Buttons Beneath the Display Under the display are ten buttons that are used in a variety of ways, as we’ll see, including selecting sounds and playing beats. The middle six have the most important role to play, because they interact with what’s on the display, with their functions changing depending on what you’re doing. They’re called the “F1” through “F6” buttons. A button lights red and a label appears onscreen above it when the button’s acting as an F button. Gray bars at the bottom of the display, just above a button, help lead your eye to the button’s onscreen label. In the following illustration, pressing F4 displays reverb settings. To play another demo, select it and press the PLAY button. 4 Beneath the main display, the Patch/Perform Number readout shows the number of the currently selected patch in Patch mode. Its big, bright, red numbers make it easy to see onstage what you’ve got selected. There are two main ways to select patches. Over time, you’ll settle on the best method for you. In the next two sections, try selecting different patches, both to get comfortable and to have some fun. Whenever we need to tell you to press an F button, we’ll refer to the button by its F-button number, and put its job in parentheses. For example, the button in the example above would be called “F4 (Reverb).” Selecting Patches and Rhythm Sets You can also select patches using a footswitch—see Page 147 of the Owner’s Manual for details. Selecting Sounds Using the Category Buttons The JUNO-STAGE contains over 1,000 factory-programmed sounds: • 1,283 factory Preset patches • 41 factory Preset rhythm sets In addition, there’s space set aside in the JUNO-STAGE’s memory for patches and rhythm sets you create. It can hold • 256 User patches • One way to select a patch is by using the buttons beneath the display from the PATCH PLAY screen: 1 32 User rhythm sets Press the desired category’s button beneath the display. To select a • patch—press the PIANO, KBD/ORGAN, GUITAR, ORCH, WORLD, BRASS, VOCAL/PAD, SYNTH, or BASS button. To select an electric piano patch, hit the PIANO button again. You can add even more sounds to the JUNO-STAGE by installing one or two SRX sound expansion board from Roland’s huge SRX sound library. • rhythm set—press the RHYTHM button to display the available rhythm sets. The JUNO-STAGE makes sounds easy to find and select by presenting them to you in instrument-type categories. (Under the hood, they’re actually stored in memory “banks” that make them accessible from external MIDI devices.) You select patches from the PATCH PLAY screen. You can get to this screen by pressing the PATCH button in the MODE area of the JUNO-STAGE front panel. 2 Press ENTER•LIST to display the patches in the selected category, or rhythm sets if you pressed RHYTHM. 3 Turn the VALUE dial or use the DEC/INC button to select a sound. 5 You can check out the currently selected sound by playing the keyboard, or by pressing the PREVIEW button in the MODE area so the JUNO-STAGE plays the sound for you. 4 Press the ENTER•LIST button again to confirm your choice and return to the PATCH PLAY screen. About Selecting Favorite Patches You can also set up sounds as “Favorites” for quick selection. We’ll explain how to work with Favorites a little bit later. (You can jump to this section now if you like by clicking the Jump button to the right.) Piano Mode Selecting Sounds Using the PATCH PLAY Screen Parameters Using the 3, 4, 5, 6, DEC, and INC buttons and the VALUE dial to select and set the appropriate parameters, you can choose patches directly from the PATCH PLAY screen. The JUNO-STAGE’s Piano mode makes it especially easy to get to its best piano and electric piano sounds. To enter Piano mode, simply hit the PIANO MODE button. When you do, the PIANO MODE screen appears. Sound type Group Number Category 1 2 Set the sound type to Patch or Rhythm to select a patch or rhythm set, respectively. If you set the sound type to Patch, set the category parameter to the desired type of instrument. If you want to make sure you don’t inadvertently change categories, you can select the Category lock icon in the lower-left of the screen, and then turn the VALUE dial to activate it. 3 4 If you can get to the sound you want most easily by selecting the memory bank in which it resides, you can set the group parameter to that memory bank. Set the patch number parameter to select the patch or rhythm set you want. To exit Piano mode, press PIANO MODE again. Selecting Your Piano Sound The JUNO-STAGE offers up its best 88-note sampled grand by default. You can choose another acoustic piano if you like, or an electric piano, and the JUNO-STAGE will remember your choice until you next power down. Each time you hit the PIANO MODE button, the last-selected acoustic or electric piano is immediately placed at your fingertips. To choose • a different acoustic piano—press F5 (LIST), select the desired piano, and then press ENTER•LIST to confirm your choice. • an electric piano—press F2 (EL PIANO) to select the Stage Phazer electric piano. To choose another one, press F5 (LIST, select the one you want, and then press ENTER•LIST. 6 Customizing Your Piano PIANO mode makes it easy to make quick tweaks to your piano patch. If you’re playing an • acoustic piano—you can adjust the height or your virtual piano’s lid,using the Lid State parameter, and set the desired amount of body ring using the Resonance parameter. • electric piano—you can select an effect using the EFFECT parameter, or leave it set to THRU for no effect. For both types of piano, you can press F4 (TOUCH) to set the piano’s responsiveness to your touch. Try playing the patch you’ve selected and see how it responds sonically to your touch. If you find you have to play uncomfortably hard or unnaturally soft to make the sounds react, you can change the keyboard’s touch sensitivity, as described on Page 147 of the JUNO-STAGE Owner’s Manual. The Pitch Bend/Modulation Lever The next most basic way to control a patch’s sound in realtime is by using the Pitch Bend/Modulation lever to the left of the keyboard. Flip the lever left or right to lower or raise the pitch of notes, or push it forward to add modulation to the notes. Modulation—which means “change”—is often vibrato, but can be most anything depending on how the patch is programmed. Realtime Control of Sounds The JUNO-STAGE’s sounds respond musically to how you play them, and you can also change them as you play using a variety of “realtime” controls. For the next section, select a patch you like to play for exploring the things we’ll discuss. The Responsive JUNO-STAGE Keyboard The JUNO-STAGE’s keyboard detects the force, or “velocity,” with which you play, and the currently selected sound changes accordingly. Bend note pitches Push to add modulation, release to remove it The S1 and S2 Switches Press these buttons above the Pitch Bend/Modulation lever to do a range of things, as described on Page 55 of the JUNO-STAGE Owner’s Manual. The JUNO-STAGE’s new CATCH+LAST pitch-bend mode allows you to bend only the last note you played without affecting your other notes. It’s great for guitar-like leads. You can assign the S1 or S2 switch to turn CATCH + LAST mode on and off, as described on Page 55 in the Owner’s Manual. Low velocity High velocity Getting louder and/or brighter as you play harder is one of the most common velocity responses, though, really, lots of things can change with your playing force. 7 The SOUND MODIFY Knobs The D Beam The D Beam is an infrared sensor that tracks the position of your hand as it moves above the sensor. It can operate in any of three ways. Press the desired button beneath the D Beam so it lights to select : • SOLO SYNTH—to play notes by moving your hand over the D Beam. • ACTIVE EXPRESS—to adjust the parameter In the SOUND MODIFY area of the JUNO-STAGE front panel are knobs that let you quickly adjust some important parameters as you play. designated at the Roland factory as the best for adding expression to the current patch. • ASSIGNABLE—to control the value of a parameter in the current patch that’s been set to respond to D Beam control. • The ENVELOPE ATTACK and RELEASE knobs—The ATTACK knob adjusts the speed at which a note starts to play after you press its key. The RELEASE knob adjusts how long it takes a note to return to silence when you release its key. • The CUTOFF and RESONANCE knobs—Changing a patch’s filter Cutoff and Resonance values to produce the moving “yowl” that’s often part of dance and electronic synth music. The CUTOFF and RESONANCE knobs adjust those parameters in the current patch. Press the SYNTH button to select User:044 SuperSawSlow, and try turning the CUTOFF and RESONANCE knobs as you play the keyboard. • The MASTER EQ LOW and HIGH knobs—You can change the overall tone, or EQ, of the JUNO-STAGE using the LOW and HIGH knobs, which affect the bass and treble frequencies, respectively. As you move your hand down closer to the D Beam sensor, its effect increases. As you move up and away, it decreases. Press the currently lit button to turn off the D Beam. Transposing the Keyboard The JUNO-STAGE’s Transpose features allow you to easily shift the notes the keyboard plays to any key or octave so you can play in any key using the fingerings you find most comfortable. To Transpose the Keyboard by Octaves 1 • The REVERB knob—Use this knob to increase or decrease the output level of the JUNO-STAGE’s reverb processor. The SOUND MODIFY knobs affect the currently selected sound, except for the master EQ, whose settings remain when you change sounds, allowing you to customize the overall sound of the JUNO-STAGE for a particular performance venue or a band with which you’re playing. Viewed from the side, this is the area above the D Beam in which you can move your hand. Press the OCTAVE DOWN or UP button to lower or raise the keyboard’s pitch as desired. The JUNO-STAGE displays the amount of transposition. Transposing the Keyboard by Semitone Steps 1 Hold down the TRANSPOSE button and then use the - or + button to lower or raise the pitch in semitone steps as desired. The JUNO-STAGE displays the selected amount of transposition. 8 Performance Mode Selecting a Performance Andes Mood 7 8 9 Orch Pizz Pat is away 6 Searing COSM Trancy Synth 5 Cue Tip Trance 4 DCO Bell Pad Sweet House 3 String Ens LonesomeRoad 2 Strobot Nylon Gt 1 HipHop Kit 1 Juno-Grand Juno-106 Bass In Performance mode, you work with “performances,” collections of 16 sounds—patches or rhythm sets—that can be played at the same time from the keyboard or from an external sequencer. Performances are comprised of 16 “parts,” each of which plays its own sound. 10 11 12 13 14 15 16 Each part also has its own settings for using the JUNO-STAGE’s effects, as well as parameters that determine how its sound behaves. The JUNO-STAGE ships with 64 factory preset performances, and you can store up to 64 of your own. There are two ways to select a performance. They both begin on the PERF PLAY screen. To get there, press the PERFORM button in the MODE area of the JUNO-STAGE front panel. As with patches and rhythm sets, you can also set up performances as Favorites. We’ll discuss Favorites a bit later. Selecting a Performance from the Performance List 1 On the PERF PLAY screen, press ENTER•LIST to display the performance list. 2 Press 3 or 4 to select the User or Preset performance list. 3 Turn the VALUE dial or use DEC/INC to select a performance. As its name suggests, a performance is handy onstage, since it provides a way to • “layer” sounds—on top of each other so they’re heard together. • “split” the keyboard—by assigning different sounds to different areas of the keyboard. Layers and splits can be combined in performances that have layers that play from their own areas of the keyboard. You can also use a performance to configure the JUNO-STAGE as a 16-part multitimbral sound module for an external sequencer when you’re in MIDI Controller mode, which we’ll discuss later. You can try out each selected performance by playing it on the keyboard. 4 When you’ve made your choice, press ENTER•LIST to confirm your selection. The big, red Patch/Perform Number readout beneath the display shows the number of the performance you’ve selected. In the JUNO-STAGE, you can build up performances of tremendous complexity if you like, or use the handy SPLIT and DUAL buttons to quickly create simple splits and layers. We’ll talk about these buttons in a moment. 9 Selecting a Performance on the PERF PLAY Screen Changing a Split Sound and Adjusting Its Level 1 On the split setup screen, use the 3 or 4 button to select the LOWER or UPPER part. 2 Press ENTER•LIST to display the patch/rhythm set list. 3 Press the category buttons beneath the display to select the desired category, pressing PIANO twice to display electric piano patches. Set the Group parameter to USER or PRST (for “Preset”) to select the bank in which the preset you want is stored. 4 Select the sound you want. 5 Press ENTER•LIST to confirm your choice. Turn the VALUE dial or use DEC/INC to select the desired performance’s number. 6 To adjust the relative levels of the two sounds, adjust their level parameters, presented onscreen as knob icons. Group Number 1 2 Quickly Creating a Two-Sound Simple Keyboard Split Quickly Creating a Two-Sound Layer When you use the JUNO-STAGE’s Split feature, the keyboard is divided into Lower and Upper zones, each of which has its own part and parameters. The Dual feature layers two sounds on top of each other so they both play when you strike any key on the keyboard. One sound is called the “Lower” sound, and the other is called the “Upper” sound. As with splits, each has its own corresponding part and parameters. A split you create using the SPLIT button is a performance in which all of the parts except Parts 1 and 2 are turned off. 1 Press the SPLIT button—the screen for setting up splits appears. A layer you create using the DUAL button is a performance in which all of the parts except Parts 1 and 2 are turned off. To get to the Dual layering feature’s setup screen, press the DUAL button. The Lower and Upper parts each occupy half of this screen. Use the 3 and/or 4 buttons to select the part whose parameters you want to set. Changing a Layered Dual Sound and Adjusting Its Level Setting the Split Point 1 From the Dual feature’s setup screen, use the 5 or 6 buttons to select the part that plays the layered sound you want to change. Here’s how to define the Lower and Upper areas of the keyboard. 2 Press ENTER•LIST to display the patch/rhythm set list. 3 Press the category buttons beneath the display to select the desired category, pressing PIANO twice to display electric piano patches. 1 On the split setup screen, hold down the SPLIT button and press the lowest key with which you want to play the sound in the Upper zone of the keyboard—the SPLIT POINT window appears showing you the key you’ve selected. 10 4 Select the sound you want. 5 Press ENTER•LIST to confirm your choice. 6 To adjust the relative levels of the two sounds, adjust their level parameters, presented onscreen as knob icons. Creating More Complicated Splits and Layers You can create more complex performances by setting their part parameters as described starting on Page 132 in the JUNO-STAGE Owner’s Manual. Quick Access to Favorite Sounds and Performances The JUNO-STAGE’s Favorite feature allows you to set up frequently used patches, rhythm sets, and performances for quick recall by registering them as Favorites. Any Favorite can be grabbed at any time with the press of a button, regardless of whether you’re in Patch or Performance mode. You can have up to 100 Favorites, organized into Favorite Banks 0-9. Each bank holds 10 Favorites, called “Favorites 0-9.” Each Favorite in a bank is assigned, or “registered,” to the corresponding 0-9 button beneath the display. Navigating Favorites Banks To Figure Out the Favorites Bank That’s Selected 1 Press the FAVORITE BANK button so it lights—the button for the currently selected Favorites bank flashes. To Select a Favorites Bank 1 Press the FAVORITE BANK button so it lights. 2 Press the desired Favorite bank’s 0-9 button—the JUNO-STAGE displays a message telling you you’ve changed banks. 3 Press the BANK button again to un-light it. Registering a Sound or Performance as a Favorite 1 In Patch or Performance mode, select the patch, rhythm set, or performance you want to register as a Favorite. 2 If you’re not already there, navigate to the desired bank as described above. 3 Hold down the FAVORITE ON/OFF button and press a 0-9 button to register the current patch, rhythm set, or performance there. The JUNO-STAGE confirms what you’ve done with an onscreen message. To change the Favorite registered to a 0-9 button, just register the button’s new Favorite there. When you’re onstage, you’ll have a bank selected and ready to go so you can quickly recall the Favorites it holds. To make this happen, you’ll group your Favorites ahead of time in the way you expect to need them onstage. For example, if there are 10 patches, rhythm sets, or performances you know you’ll need in a set, register them all in the same Favorites bank so you can get to each one instantly as you play by pressing its 0-9 button. Selecting a Favorite Sound or Performance 1 If you’re not already there, navigate to the desired Favorites bank as described above. 2 Press the FAVORITE ON/OFF button so it’s lit if it’s not already lit. 3 Press a Favorite’s 0-9 button to select, or “recall,” the Favorite you want. The JUNO-STAGE remembers your Favorites even when you power down. Only a Factory Reset clears them. 11 If you’ve registered your Favorites in the exact order in which you need them, you can step upwards a Favorite at a time within the current bank by pressing the FAVORITE UP/ASSIGNABLE button. The button’s set to behave this way by default, though it can do other things instead, as described on Page 148 of the JUNO-STAGE Owner’s Manual. JUNO-STAGE Performance Tools Both the JUNO-STAGE’s Arpeggiator and Chord Memory features automate the playing of certain types of phrases that might otherwise be difficult to pull off onstage. They can also act as inspiring creative tools. The Arpeggiator You can also move through Favorites using a footswitch—see Page 147 of the Owner’s Manual for details. Working with the FAVORITE LIST Screen The arpeggiator takes notes you play on the keyboard and plays a preprogrammed phrase based on those notes. Each of these phrases is called an “arpeggio style.” Arpeggios can be great for creating repeating patterns such as those used in dance music, and can also produce automatic bass lines that begin with the note you play on the keyboard. There’s another way to work with Favorites that can actually be easier if you’re working with a lot of Favorites and are having trouble remembering what’s where: the Favorites LIST screen. Try out following performances to get an idea of what the arpeggiator can do for you: On this screen, you can see all of the Favorites you’ve registered, add more, and un-register Favorites you no longer want. basis (oops, sorry) for a walking bass line you can play along with using the vibes patch under your right hand. To display the FAVORITE LIST screen, hold down the SHIFT button and press FAVORITES ON/OFF. + • User 002 Jazz n’ Rhtm—Each note you play with your left hand forms the • User 027 HypnoRhythm—Here’s a performance that can work nicely in a dance setting. Again, the arpeggio’s under your left hand, but the effect’s quite a bit different than with Jazz n’ Rhthm. To turn on the arpeggiator, press the ARPEGGIO button so it lights. To scroll through the available styles and create your own, hold down the SHIFT button and press ARPEGGIO to display the ARPEGGIO STYLE screen. To register a patch, rhythm set, or performance using the FAVORITE LIST screen, select it before pressing SHIFT and FAVORITE ON/OFF. To • change the Favorite bank being displayed—use the 3 and 4 buttons. • un-register a Favorite—select it in the list and press F1 (REMOVE.) The JUNO-STAGE contains 128 Preset arpeggio styles, and you can create another 128 User arpeggio styles of your own. To learn more about arpeggios, see Page 60 of the JUNO-STAGE Owner’s Manual. • register the currently selected sound or performance—select the desired Favorite location onscreen and press F2 (REGIST). • recall a Favorite—select it onscreen and press F6 (SELECT). 12 Chord Memory The JUNO-STAGE’s Chord Memory feature plays a chord based on a single key you play on the keyboard. Each chord structure is called a “chord form,” and can be programmed to play its notes in several ways. There are 64 factory Preset chord forms, and you can make 64 more User chord forms of your own. To turn on the Chord Memory feature, press the CHORD MEMORY button so it lights. You can try out this feature with most any patch in Patch mode. On this screen, you can: • turn on the JUNO-STAGE’s phantom power—if you’re using a condenser mic that requires it. If your mic doesn’t need phantom power, make sure the Phantom Power switch is turned off to avoid damaging your mic. • customize the mic’s reverb level, type and length—by setting the Reverb Level, Type, and Time parameters. • set whether the mic is live or used only for the vocoder—by setting Mic To select other chord forms, or make your own—hold down SHIFT and press CHORD MEMORY, and then see Page 64 in the Owner’s Manual. Mode to ALL or VOCODER ONLY, respectively. How to Use the JUNO-STAGE Vocoder 1 Using a Microphone with the JUNO-STAGE The JUNO-STAGE has a MIC IN jack, a mini-mixer, and a vocoder that uses the mic to shape the notes played on the keyboard. There’s a balanced combination XLR/TRS jack on the back of the JUNO-STAGE for connecting your mic. The MIC IN area of the JUNO-STAGE front panel contains the controls for your mic: • Set your mic’s level—using the MIC VOLUME knob. • Add reverb to the mic—by pressing and lighting the MIC IN REVERB button. Hold down the SHIFT button and press the MIC IN area’s REVERB button to display the MIC INPUT SETTINGS screen. In Patch mode, select PRST 1027 VOCODER Ens as your patch. You can also use PRST 1025 VOCODER Robt or PRST 1026 VOCODER Chr, but VOCODER Ens is a good one to start with. 2 Hold down some keys on the keyboard and sing or speak into the mic—you’re “singing” or “speaking” the JUNO-STAGE’s notes. 3 Try tweaking the vocoder’s settings to optimize the effect for your mic and voice, as described on Page 87 of the Owner’s Manual. The Song Player Side of the JUNO-STAGE Now that we’ve discussed the JUNO-STAGE as a synthesizer, let’s discuss its SONG PLAYER tools. The Song Player brings three different things to the table: • You can play along with rhythm patterns played by the built-in drum machine. • You can play songs or tracks recorded as .WAV or AIFF audio files—and SMFs (Standard MIDI Files)—stored on a USB memory stick. • You can connect a personal music player or CD player and play along with its music. 13 Playing Rhythm Patterns on the JUNO-STAGE The JUNO-STAGE contains rhythm patterns—beats—that are perfect for playing along with onstage. It’s got 256 Preset rhythm patterns, and 256 User memory locations for storing your own User patterns. You can adjust the tempo of any pattern. The JUNO-STAGE Owner’s Manual describes creating and editing rhythm patterns, beginning on Page 75. Rhythm patterns are arranged in “rhythm groups,” which are sets of six rhythm patterns, along with a rhythm set that’s pre-programmed to play them. How To Play Rhythm Patterns • To start playing a rhythm pattern—press its pad. The pad lights and the pattern’s name flashes onscreen to show it’s the one that’s playing. • To switch to another rhythm pattern—press the desired rhythm pattern’s pad. The JUNO-STAGE immediately switches to the new rhythm pattern. • To stop a rhythm pattern—press its lit pad. Setting the Rhythm Pattern Tempo 1 Press the TAP TEMPO button to open the Tempo window. 2 Set the tempo as desired by To use the Rhythm Pattern feature, press the RHYTHM PATTERN button in the SONG PLAYER area of the JUNO-STAGE front panel and display the RHYTHM GROUP screen. • tapping it out—on the TAP TEMPO button. • setting the Tempo parameter—using the VALUE dial or DEC/INC buttons The JUNO-STAGE Rhythm Patterns While the RHYTHM GROUP screen is displayed, the F buttons act as rhythm pads and light to show that each corresponds to the rhythm pattern above it in the current rhythm group. The Rhythm Pattern Transport Buttons While the RHYTHM GROUP screen is displayed, the transport buttons in the SONG PLAYER area provide a quick and easy way to navigate rhythm patterns and rhythm groups. Here’s what they do: Press this button to move down through the rhythm groups. Press this button to select the next rhythm pattern to the left in the current rhythm group. Press this button to move up through the rhythm groups. Press this button to select the next rhythm pattern to the right in the current rhythm group. 14 Selecting Rhythm Sets Though each rhythm group contains a preferred rhythm set, you can use any rhythm set you like with any rhythm. To change rhythm sets, highlight the name of the current rhythm set on the RHYTHM GROUP screen, and then use the VALUE dial or DEC/INC button to select another set. You can learn how to create and edit rhythm sets—including picking a new preferred rhythm set—on Page 77 of the JUNO-STAGE Owner’s Manual. Playing Along with Songs on a USB Drive If you’ve got a personal computer, you can load songs onto a JUNO-STAGE-formatted USB memory stick, and the JUNO-STAGE can play them. This makes it easy to perform along with pre-recorded tracks. To learn how to initialize, or format, a USB stick for the JUNO-STAGE, see Page 155 in the Owner’s Manual. You can also use a USB stick for backing up your User data, as explained on Page 144 of the Owner’s Manual. We recommend using the Roland M-UF1G USB memory stick. Any standard USB memory stick should work, though Roland obviously can’t guarantee the quality of other manufacturers’ products. The JUNO-STAGE’s Song Player lets you play along with a variety of audio and MIDI file types. You can play • SMFs—that are Type 0 (all tracks combined into one track) or Type 1 (multiple separate tracks) SMFs. SMF songs play the JUNO-STAGE’s internal General MIDI sounds according to MIDI Bank-Select and Program-Change messages embedded in the file. An SMF can be no larger than roughly 240 kb in size, and if an SMF contains System Exclusive (“SysEx”) data, that data must have a packet size of 512 or less. To learn more about MIDI, SMFs, and SysEx data, see Roland’s An Introduction to MIDI InFocus booklet, which you can download here. Using the Playlist Editor on Your Computer The best way to work with audio/MP3 and SMF files is by using the included Playlist Editor software that runs on your Mac or Windows computer. It allows you to create playlists that put songs you want in the order you want. The JUNO-STAGE can then play—and you can edit—these playlists. Since the Playlist Editor comes with an extensive PDF manual, we’ll just take a quick look at it now. If you want to play individual songs without using a playlist, you can copy the song files to your USB stick on your computer without putting them into a folder. Before Launching the Playlist Editor You’ll need to install the Playlist Editor on your computer according to its installer’s instructions—the software’s on the CD that came with your JUNO-STAGE. The installer can also be downloaded from the JUNO-STAGE’s Downloads tab on the RolandUS.com website. • MP3 files—at a 44.1 kHz sample rate. The JUNO-STAGE stage plays MP3s with a range of bit rates, as listed on Page 69 of the Owner’s Manual. • audio files—in .WAV or AIFF format with a 44.1 kHz sample rate. The JUNO-STAGE can play 8-, 16-, and 24-bit audio files. 15 Using the Playlist Editor When the Playlist Editor launches, you’ll see: The pane at the right of the Playlist Editor screen shows you the contents of whatever it is you’ve selected in the Playlist list. Below, we’ve selected Playlist Library, so the pane on the right is showing us our entire playlist library. You can add songs to the library by dragging them into the pane or by using the Add Song... File menu command. If you prefer, you can select the songs in the library that you want to use, and then hit the checkmark button at the bottom of the screen to create a new playlist from those songs. Once you’ve created the playlist(s) you want, you can set their playback options, and then transfer them to a JUNO-STAGE-formatted USB stick. Select the USB stick—called “JUNO-STAGE” in the Playlist Editor’s Drive Selection popup menu—and then hit the arrow pointing from your computer to the USB stick, as shown here. When the JUNO-STAGE asks if you’re sure, click OK. Working with Songs and Playlists in the Song Player You can create a new playlist using the Edit menu’s New Playlist command and then dragging the desired songs onto its name. Using the Song Player’s Dedicated Output Jack The Song Player has its own jack on the JUNO-STAGE rear panel: the SONG/CLICK OUT jack. This jack allows you to do some interesting things with your songs, including removing songs from the main outs for mixing flexibility, and generating a click for other musicians to play along with when you’re playing SMF songs. 16 To view the SONG/CLICK OUT jack’s parameters, hold down SHIFT and press the TAP TEMPO button. On this screen you can Playing Songs and Playlists When you’ve got the playlists and songs on your USB stick, insert it into the JUNO-STAGE’s front-panel USB jack and wait a few moments for the data to load. When you play songs from a USB stick, you use the SONG PLAYER’s transport buttons to play and navigate songs and playlists. • direct your songs or a click to the SONG/CLICK OUT jack—by setting the Rewind Fast-Forward Song/Click Output Mode parameter. When it’s set to Press this to go to the top of the current song. Press it again to go to the top of the previous song. • CLICK—a metronome click is sent out the jack when you’re playing an SMF song. (When you’re playing an audio or MP3 song, no click is produced and songs remain in the main JUNO-STAGE outputs. Press this to go to the next song. • SONG—songs are directed to the SONG/CLICK OUT jack and removed from the JUNO-STAGE’s main outputs. • set the level of your click—using the Click Level parameter. • change the click sound—using the Click Sound parameter. Press F2 (PLAYER) to set the output level of your audio/MP3 and SMF songs, whether they’re going through the SONG/CLICK OUT jack or the main outputs. On both of these screens, press F6 (WRITE) to save your settings in the JUNO-STAGE’s memory. You can use the SONG PLAYER area’s LEVEL buttons to raise or lower the overall level of the both audio/MP3 and SMF songs together. To get started, press the SONG PLAYER button, and you’ll see something like this: To: • play a song at the root level of the USB stick—select USB Memory, and press F1 (SELECT) to display a list of individual songs on the SONG SELECT screen. Select the song you want and press the PLAY button. • see all of the songs in your playlist library—select Playlist Library and hit F1 (SELECT). To play a particular song, select it and press PLAY. • select and play one of your playlists—select it and press PLAY. (If you enabled Chain Play in the Playlist Editor, the playlist’s songs automatically play one after another.) • change a playlist’s settings—select it and press F2 (P.INFO) to view its settings. Press F6 (WRITE) to save your changes. 17 To select individual songs or edit a playlist from this screen, select the playlist and then press F1 (SELECT) to display the SONG SELECT screen. On this screen, you can: • play any songs in the playlist—by selecting them and pressing PLAY. • adjust a song’s volume—on the screen that’s displayed when you press F3 (SNG EDIT). Press F6 (WRITE) to save your changes. • change the location of a song in the playlist—on the screen that’s Removing a Lead Vocal or Instrument You may also be able to use the JUNO-STAGE’s Center Cancel feature to remove the lead vocal—or anything else in the center of player’s stereo image. The success of this feature depends on each song’s mix—press the C. CANCEL/MINUS ONE button so it lights to give it a try. The End We hope you’ve found this workshop helpful. Keep an eye out for new JUNO-STAGE updates and support documents you can download for free from www.RolandUS.com. displayed when you press F4 (CHANGE). Press F6 (WRITE) to save your changes. • remove a song from the playlist—by pressing F5 (DELETE), and then pressing F6 (EXEC). Music Minus One The JUNO-STAGE’s Music Minus One feature allows you to quickly silence one of the tracks in an SMF song by simply pressing the C. CANCEL/MINUS ONE button to light it. Typically the track you remove from the arrangement is the one you want to play yourself, live. See Page 154 of the Owner’s Manual to learn how to designate the track to be muted with Music Minus One. Playing Along with a Personal Music Player or CD You can also play along with music from a personal music player—the type that plays MP3 and AAC files—or a CD player. Using a 1/4” stereo mini cable, you can connect the player’s headphone or line out to the SONG PLAYER area’s EXT INPUT jack. The audio from the player is heard along with the JUNO-STAGE’s own sounds in the main outputs. 18