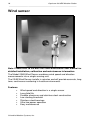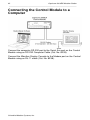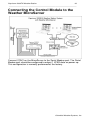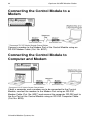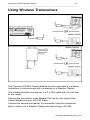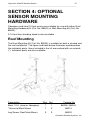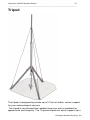
1
Capricorn 2000EX Weather Station 1 ___________________________________________________________________ Capricorn 2000EXTM Weather Station User Manual Version 1.08 Serial Number: ___________________ Date Purchased: _________________ All specifications subject to change without notice. Printed in U. S. A. Columbia Weather Systems, Inc. 2 Capricorn 2000EX Weather Station ___________________________________________________________________ © Copyright 1997, 2012 Columbia Weather Systems, Inc. All Rights Reserved. Proprietary Notice: Capricorn 2000, Capricorn 2000MP, Capricorn 2000EX, Weather Display Console, and Weather MicroServer are trademarks of Columbia Weather Systems, Inc. The information and drawings contained herein are the sole property of Columbia Weather Systems, Inc. Use of this publication is reserved exclusively for customers of Columbia Weather Systems, Inc. and their personnel. Reproduction of this material is forbidden without the express written consent of Columbia Weather Systems, Inc. Columbia Weather Systems, Inc. Capricorn 2000EX Weather Station 3 ___________________________________________________________________ Welcome! Congratulations on your purchase of the Capricorn 2000EX Weather Station. The Capricorn 2000EX is a precision instrument that requires proper installation and a certain amount of regular maintenance. Please read this manual completely prior to installation. Columbia Weather Systems, Inc. 4 Capricorn 2000EX Weather Station ___________________________________________________________________ Columbia Weather Systems, Inc. Capricorn 2000EX Weather Station 5 ___________________________________________________________________ Important Notice: Shipping Damage BEFORE YOU READ ANY FURTHER, please inspect all system components for obvious shipping damage. The Capricorn 2000EX is a high precision instrument and can be damaged by rough handling. Your unit was packaged to minimize the possibility of damage in transit. Therefore, we recommend that you save the shipping container for any future shipment of your Capricorn unit. In the event your order arrives in damaged condition, it is important that the following steps be taken immediately. The title transfers automatically to you, the customer, once the material is entrusted to the transport company. NOTE: DO NOT RETURN THE INSTRUMENT TO COLUMBIA WEATHER SYSTEMS until the following steps are completed. Failure to follow this request will jeopardize your claim. 1. Open the container and inspect the contents. Do not throw away the container or any damaged parts. Try to keep items in the same condition as originally received. 2. Notify the transport company immediately in writing, preferably by facsimile, about the shipping damage. 3. Wait for the transport company’s representative to inspect the shipment personally. 4. After inspection, request permission from Columbia Weather Systems for return of the damaged instrument by calling the Capricorn Service Department, (503) 629-0887. 5. Return approved items to us at the following address: Columbia Weather Systems, Inc. 2240 NE Griffin Oaks Street, Suite 100 Hillsboro, OR 97124 6. After return authorization is issued and we receive the instrument, an estimate of the cost of repair will be sent to you for submittal to the transport company as a claim. Columbia Weather Systems, Inc. 6 Capricorn 2000EX Weather Station ___________________________________________________________________ Columbia Weather Systems, Inc. Capricorn 2000EX Weather Station 7 ___________________________________________________________________ Table of Contents WELCOME! ..................................................................................3 IMPORTANT NOTICE: SHIPPING DAMAGE .......................5 SECTION 1: INTRODUCTION ................................................11 THE CAPRICORN 2000EX SYSTEM ................................................................. 11 SPECIFICATIONS.............................................................................................. 11 Temperature............................................................................................... 11 Barometric Pressure .................................................................................. 11 Wind Speed ................................................................................................ 11 Wind Direction (channel X2) ..................................................................... 12 Relative Humidity....................................................................................... 12 Rainfall....................................................................................................... 12 Leaf Wetness .............................................................................................. 12 Solar Radiation (Pyranometer) (Channel X1) ........................................... 13 Input Voltage.............................................................................................. 13 Control Module.......................................................................................... 13 SECTION 2: PHYSICAL DESCRIPTION...............................15 CONTROL MODULE ......................................................................................... 16 Back Panel ................................................................................................. 17 WIND SENSOR ................................................................................................. 18 Wind sensor components............................................................................ 19 TEMPERATURE SENSOR ................................................................................... 20 RELATIVE HUMIDITY SENSOR ......................................................................... 21 RAIN GAUGE (OPTIONAL)................................................................................ 22 LEAF WETNESS SENSOR (OPTIONAL) ............................................................... 23 SOLAR RADIATION SENSOR –PYRANOMETER (OPTIONAL) ............................ 24 WEATHERMASTER SOFTWARE.................................................................... 25 WEATHER VIEW 32 SOFTWARE ................................................................... 26 WEATHER DISPLAY CONSOLE (OPTIONAL) .................................................... 27 WEATHER MICROSERVER .............................................................................. 28 SECTION 3: INSTALLATION..................................................29 WIRING AND COLOR CODE ............................................................................. 29 INSTALLATION OVERVIEW.............................................................................. 30 TOOLS NEEDED .............................................................................................. 30 MATERIALS NEEDED ...................................................................................... 30 UNPACKING THE UNIT .................................................................................... 31 Installing the Control Module.................................................................... 31 INSTALLING THE BAROMETRIC PRESSURE SENSOR ......................................... 32 INSTALLING THE TEMPERATURE AND HUMIDITY SENSORS............................. 33 Columbia Weather Systems, Inc. 8 Capricorn 2000EX Weather Station ___________________________________________________________________ INSTALLING ADDITIONAL TEMPERATURE SENSORS ........................................ 34 TEMPERATURE SENSOR INITIALIZATION ......................................................... 34 INSTALLING THE WIND SENSOR...................................................................... 36 Assembling the Wind Speed Sensor............................................................ 36 Installing the Mast ..................................................................................... 38 Location ..................................................................................................... 38 Mounting Method....................................................................................... 38 Routing Cable ............................................................................................ 38 INSTALLING THE RAIN GAUGE SENSOR .......................................................... 40 INSTALLING THE LEAF WETNESS SENSOR ...................................................... 41 INSTALLING THE SOLAR RADIATION SENSOR ................................................. 41 CONNECTING THE CONTROL MODULE TO A COMPUTER ................................. 42 CONNECTING THE CONTROL MODULE TO THE WEATHER MICROSERVER ...... 43 CONNECTING THE CONTROL MODULE TO A MODEM ...................................... 44 CONNECTING THE CONTROL MODULE TO COMPUTER AND MODEM ............... 44 USING WIRELESS TRANSCEIVERS ................................................................... 45 SECTION 4: OPTIONAL SENSOR MOUNTING HARDWARE ...............................................................................47 ROOF MOUNTING ........................................................................................... 47 WALL MOUNTING........................................................................................... 49 TRIPOD ........................................................................................................... 51 Specifications ............................................................................................. 52 SECTION 5: OPERATION ........................................................55 RS-232 MODEM SERIAL PORT ......................................................................... 55 RS-232 AUX SERIAL PORT .............................................................................. 55 COMMUNICATION SETTINGS ........................................................................... 55 OPERATING SOFTWARE ................................................................................... 55 SETTING DATE AND TIME ................................................................................ 56 DISPLAYING DATE AND TIME .......................................................................... 56 DISPLAYING CURRENT SENSOR READINGS ...................................................... 56 The POLL command .................................................................................. 56 The SAMPLE command ............................................................................. 57 The Short commands.................................................................................. 58 DATALOG ....................................................................................................... 58 SETTING DATALOG INTERVALS ....................................................................... 59 SETTING HI/LO INTERVALS ............................................................................. 59 DISPLAYING THE DATALOG............................................................................. 59 RESETTING HI/LO ........................................................................................... 60 RESETTING THE DATALOG .............................................................................. 60 DISPLAYING CURRENT HI/LO ......................................................................... 60 SETTING BAROMETRIC PRESSURE ALTITUDE AND OFFSET ............................... 61 DISPLAY CURRENT SETTINGS .......................................................................... 61 CONTINUOUS DISPLAY OF DIRECTION ............................................................. 62 CONTINUOUS DISPLAY OF WEATHER INFORMATION ........................................ 62 Columbia Weather Systems, Inc. Capricorn 2000EX Weather Station 9 ___________________________________________________________________ SECTION 6: CALIBRATION....................................................65 CALIBRATING THE BAROMETRIC PRESSURE SENSOR ...................................... 65 Altitude Setting........................................................................................... 65 Optional Calibration Procedure ................................................................ 65 CALIBRATING THE WIND SENSOR ................................................................... 66 CALIBRATING THE TEMPERATURE SENSORS ................................................... 66 CALIBRATING THE HUMIDITY SENSOR ........................................................... 67 CALIBRATING THE RAIN GAUGE SENSOR ....................................................... 67 CALIBRATING THE LEAF WETNESS SENSOR ................................................... 67 CALIBRATING THE SOLAR RADIATION SENSOR .............................................. 67 SECTION 7: MAINTENANCE..................................................69 CONSOLE MAINTENANCE ............................................................................... 69 BAROMETRIC PRESSURE SENSOR MAINTENANCE ........................................... 69 TEMPERATURE SENSOR MAINTENANCE ......................................................... 69 WIND SENSOR MAINTENANCE ........................................................................ 69 RELATIVE HUMIDITY SENSOR MAINTENANCE................................................ 69 RAIN GAUGE MAINTENANCE .......................................................................... 69 LEAF WETNESS SENSOR MAINTENANCE ........................................................ 69 SOLAR RADIATION SENSOR MAINTENANCE ................................................... 70 SECTION 8: TROUBLESHOOTING.......................................71 WIND SENSOR TESTS ...................................................................................... 71 Wind Speed Test......................................................................................... 71 Wind Direction Test ................................................................................... 72 TEMPERATURE SENSOR TROUBLESHOOTING .................................................. 72 SECTION 9: USER SUPPORT INFORMATION ...................75 LIMITED WARRANTY ...................................................................................... 75 EXCLUSIONS ............................................................................................ 75 RETURN FOR REPAIR PROCEDURE .................................................................. 76 REFERENCE...............................................................................79 GLOSSARY ...................................................................................................... 79 Aspirating Radiation Shield ....................................................................... 79 Barometric Pressure .................................................................................. 79 Celsius Temperature Scale......................................................................... 79 Dew Point .................................................................................................. 79 Fahrenheit Temperature Scale................................................................... 79 Global Radiation........................................................................................ 79 Heat Index.................................................................................................. 79 Pyranometer............................................................................................... 80 Relative Humidity....................................................................................... 80 Sea Level Pressure..................................................................................... 80 Soil Moisture.............................................................................................. 80 Columbia Weather Systems, Inc. 10 Capricorn 2000EX Weather Station ___________________________________________________________________ Solar Radiation .......................................................................................... 80 Wind Chill .................................................................................................. 80 UNIT CONVERSION ......................................................................................... 81 Speed.......................................................................................................... 81 Temperature............................................................................................... 81 Distance ..................................................................................................... 81 Pressure ..................................................................................................... 81 Solar Radiation .......................................................................................... 81 TABLES AND FORMULAS................................................................................. 82 Wind Chill Chart........................................................................................ 82 Wind Chill Equation .................................................................................. 83 Heat Index.................................................................................................. 84 Dew Point .................................................................................................. 85 Columbia Weather Systems, Inc. Capricorn 2000EX Weather Station 11 ___________________________________________________________________ SECTION 1: INTRODUCTION The Capricorn 2000EX System The Capricorn 2000EX is a modular-design weather station providing commercial-level data capture, storage, and transfer. The system is designed around the Control Module which is housed in a compact utility-grade enclosure powered by a wall mount transformer. The module accepts signal inputs from a wide range of meteorological sensors. User interface is via RS-232 ports. The Capricorn 2000E has the capacity for handling additional sensors. Specifications Temperature The temperature port on the Capricorn 2000EX can accept up to four temperature probes. Type: digital semiconductor Range: -67° to 257°F Accuracy: ± 0.9°F from +14° to 185°F (±0.5°C from -10° to 85°C) ± 3.6°F from -67° to 257°F (±2.0°C from -55° to 125°C) Resolution: 0.01°F Units: Fahrenheit Cable Length: maximum 400 ft. combined length for all four sensors Barometric Pressure The barometric pressure sensor is located inside the Control Module and is part of the weather station circuit board. Type: silicon shear stress strain gauge; temperature compensated and calibrated Range: 27 to 33.96 in. Hg Accuracy: ±0.03 in. Hg over range (at sea level, with temperature between 32° and 182°F) Resolution: 0.01 in. Hg Units: in. Hg Wind Speed Columbia Weather Systems, Inc. 12 Capricorn 2000EX Weather Station ___________________________________________________________________ Type: Sealed reed switch Accuracy: ± 0.25 mph from 0 to 23 mph, ± 1% from 24 to 160 mph Range: 0 to 160 mph (139 knots) Resolution: 1 mph Starting Threshold: 0.9 mph Wind Direction (channel X2) Type: Precision Potentiometer Resolution: 2 degrees Mechanical Range: 0 to 360 degrees Electrical Range: 0 to 356 degrees Accuracy: ± 4 degrees Relative Humidity Type: Capacitance Range: 0 to 100% Accuracy: ±3% (or better) from 10 to 90% RH at 68° F Temperature Effect: <±1.5% RH from 14° F to 140° F Stability: ±2% RH over 2 years Resolution: 1% RH Rainfall Type: tipping bucket Accuracy: ±1% at 2 in/hr or less Resolution: 0.01 inch Leaf Wetness Type: capacitance grid (measures percentage of wetness where 0.50 volts corresponds to dry and 4.40 volts corresponds to dripping) Accuracy: ±5% Resolution: 0.01 volts Columbia Weather Systems, Inc. Capricorn 2000EX Weather Station 13 ___________________________________________________________________ Solar Radiation (Pyranometer) (Channel X1) Type: high performance silicon photodiode Cosine Response: 45° zenith angle ± 1%, 75° zenith angle ± 5% Absolute Accuracy: ± 5% Uniformity: ± 3% Repeatability: ± 1% Sensitivity: Custom calibrated to exactly 5.00 W m-2 per mV Operating Environment: -40 to 55°C, 0 to 100% relative humidity Input Voltage Powered by a wall mount transformer Input: 120 VAC, 60 HZ, 16 W Output: 12 VDC, 800 mA Control Module Dimensions: 10" L x 7.5" W x 2.8" H Weight: 3 lbs/1.3 kg. Columbia Weather Systems, Inc. 14 Capricorn 2000EX Weather Station ___________________________________________________________________ Columbia Weather Systems, Inc. Capricorn 2000EX Weather Station 15 ___________________________________________________________________ SECTION 2: PHYSICAL DESCRIPTION Columbia Weather Systems, Inc. 16 Capricorn 2000EX Weather Station ___________________________________________________________________ Control Module The Control Module consists of the System board housed in a utilitygrade enclosure with access to the sensor connections (terminal block), RS-232 ports and power connection through the back panel. The System board has an on-board barometric pressure sensor and a system fuse (including a spare fuse). The System board also has in-line rechargeable lithium batteries to preserve the datalog and system configuration when power is absent. The Control Module dimensions are: 10" L x 7.5" W x 2.8" H and weighs: 3 lbs/1.3 kg. The Control Module can also come in an optional weatherproof enclosure. Dimensions: 12.5” L x 10.5” W x 6.25” H Columbia Weather Systems, Inc. Capricorn 2000EX Weather Station 17 ___________________________________________________________________ Back Panel All connections are made at the back panel of the Control Module. Columbia Weather Systems, Inc. 18 Capricorn 2000EX Weather Station ___________________________________________________________________ Wind sensor Note: Please refer to the Met One 034B wind sensor user manual for detailed installation, calibration and maintenance information The Model 034B Wind Sensor combines wind speed and direction measurements into a single sensing unit. The 034B Wind Sensor installs in minutes and will provide accurate, long term, continuous monitoring in hostile environments. Features • • • • • • • Wind speed and direction in a single sensor Long field life Durable aluminum and stainless steel construction Low starting threshold Stainless steel bearings Ultra low power operation Easy maintenance Columbia Weather Systems, Inc. Capricorn 2000EX Weather Station 19 ___________________________________________________________________ Wind sensor components The wind sensor consists of four parts: 1. Sensor body 2. Vane 3. Alignment adapter 4. 50 feet of Cable with quick disconnect Columbia Weather Systems, Inc. 20 Capricorn 2000EX Weather Station ___________________________________________________________________ Temperature sensor The Capricorn 2000EX includes one temperature sensor with 50 feet of cable and a quick disconnect connector set. Up to four temperature sensors can be connected with a maximum of 400 feet combined cable length. These digital, semiconductor-type probes all connect to a single port, reducing susceptibility to noise interference, reducing cost, and increasing accuracy. The sensors are calibrated at the factory to a superior grade ASTM mercury thermometer. Columbia Weather Systems, Inc. Capricorn 2000EX Weather Station 21 ___________________________________________________________________ Relative Humidity sensor This optional capacitive relative humidity sensor is compact and easy to use. It can be easily installed in a self-aspirating radiation shield for protection from the sun and rain. This sensor offers long-term stability with minimal drift. Because the sensor is a capacitive device, it will not be affected by surface contamination in unclean environments. Since the sensor element is socketed and laser trimmed it can be easily replaced in the field without any additional calibration. The relative humidity sensor comes with a standard 50-foot cable and a quick disconnect connector. Columbia Weather Systems, Inc. 22 Capricorn 2000EX Weather Station ___________________________________________________________________ Rain gauge (optional) This optional tipping bucket rain gauge is composed of a complex spun collector funnel with a knife-edge that diverts the water to a tipping bucket mechanism. For each tip, a magnet causes an electronic pulse to be generated and is recorded by the Control Module. The rainfall sensor is completely automatic - spent water drains out of the bottom of the housing, hence, the instrument requires no servicing. The rain gauge comes with a standard 50-foot cable. Columbia Weather Systems, Inc. Capricorn 2000EX Weather Station 23 ___________________________________________________________________ Leaf wetness sensor (optional) Measured with a capacitance grid, this leaf wetness sensor is manufactured by Columbia Weather Systems to provide a precise, high resolution scale - not just wet or dry. It is useful to determine the wetness condition of surfaces such as foliage, for example, in preparation for spraying pesticides. The leaf wetness sensor measures the percentage of wetness where 0.5 volts corresponds to wet and 4.4 volts corresponds to dry. The leaf wetness sensor comes with a standard 50-foot cable. Columbia Weather Systems, Inc. 24 Capricorn 2000EX Weather Station ___________________________________________________________________ Solar Radiation Sensor –Pyranometer (Optional) This sensor is designed for routine measurement of global hemispherical solar radiation under all weather conditions. The sensor has a rugged uni-body design, which houses a high performance silicon photodiode detector mounted beneath a conical shaped (self-cleaning) diffuser. Due to the unique diffuser design, the sensitivity of this sensor is proportional to the cosine of incidence of the incoming solar irradiance, allowing for accurate and consistent measurement. An optional leveling plate is available for most accurate measurements. Columbia Weather Systems, Inc. Capricorn 2000EX Weather Station 25 ___________________________________________________________________ WeatherMaster Software WeatherMaster is a professional grade weather monitoring software. This software package is designed for specialized markets that require robust weather calculations, interoperability with computer models, and data interfaces to other industrial systems. WeatherMaster utilizes Microsoft Access database for easy data access and manipulation. Columbia Weather Systems, Inc. 26 Capricorn 2000EX Weather Station ___________________________________________________________________ Weather View 32 Software Operating in Windows graphic environment, Weather View 32 monitors, records, and stores local weather data for current or future analysis. Weather View 32 offers: • User-defined real time monitoring display • Internet and email interface • Calculated parameters including wind chill, dew point, heat index and degree days • Monthly calculations for degree days heating and cooling • Full-featured graphing and printing capabilities • Six separate alarms functions • A Climatological database that covers the U.S. and Canada • Modem access for remote weather stations Columbia Weather Systems, Inc. Capricorn 2000EX Weather Station 27 ___________________________________________________________________ Weather Display Console (Optional) Displays weather information • Designed to be viewed clearly from a distance • Industrial grade WVGA touchscreen Seven-inch, TFT color LCD panel with 800 x 480 pixel resolution. Performs computations for wind chill, heat index and other calculated parameters • 200MHz ARM9 CPU Serial or Ethernet connection: Connects directly to weather station with serial port or connect to a Weather MicroServer over a network utilizing an existing Ethernet infrastructure -- no extra wiring. The MicroServer configuration also allows for data from one weather station to be monitored from multiple display consoles at various locations Compatible with all CWS weather stations. Screens can be factory-customized to meet specialized market and industry requirements. The Weather Display is also available in a 19” rack-mount and panel mount chassis. Columbia Weather Systems, Inc. 28 Capricorn 2000EX Weather Station ___________________________________________________________________ Weather MicroServer No longer does weather station connectivity require a dedicated computer with its requisite maintenance, virus-protection and operating system upgrades. The Weather MicroServer is a self-contained, proprietary system utilizing the Linux operating system. The Weather MicroServer creates an “Internet-ready” weather monitoring system by automatically providing FTP output, XML web service, and Internet browser user interface. FTP output includes XML, CSV, and CSV append formats. SNMP and Modbus/OPC communication protocols are standard for Industrial Management applications. The Weather MicroServer has data logging capability. It connects to your network with an included Ethernet cable. Two serial ports offer interface to both the Weather Display Console and additional peripheral devices or sensors. The Weather MicroServer can provide real-time weather data to WeatherMaster Software over the network. This allows users to simultaneously monitor the weather using WeatherMaster on any computer connected to the network. Columbia Weather Systems, Inc. Capricorn 2000EX Weather Station 29 ___________________________________________________________________ SECTION 3: INSTALLATION Wiring and Color Code Terminal # Wire Color Description Temperature 1 RED +5V 2 BARE Ground 3 BLACK Temperature Signal Wind Speed 4 N/C No Connection 5 BLACK Ground 6 RED Wind Speed Signal 7 N/C No Connection 8 N/C No Connection 9 N/C No Connection 10 N/C No Connection 11 N/C No Connection 12 N/C No Connection Rainfall 13 N/C No Connection 14 RED Rain Signal 15 BLACK Ground Relative Humidity 16 RED +12V 17 BARE Ground 18 BLACK Humidity Signal Leaf Wetness 19 RED +5V 20 BARE Ground 21 BLACK Wetness Signal Solar Radiation (X1) 22 N/C No Connection 23 RED & BARE Ground 24 BLACK Solar Signal Wind Direction (same cable as wind speed) 25 WHITE Reference Voltage 26 GREEN Ground 27 BROWN Wind Direction Signal Columbia Weather Systems, Inc. 30 Capricorn 2000EX Weather Station ___________________________________________________________________ Installation Overview Unpacking the Unit Installing the Control Module Installing the Barometric Pressure Sensor Installing the Temperature Sensors Temperature Sensor Initialization Installing optional Self-Aspirating Radiation Shield Installing the Optional Humidity Sensor Installing Wind Sensor Installing the Optional Rain Gauge Sensor Installing the Optional Leaf Wetness Sensor Installing the Optional Solar Radiation Sensor Tools Needed 7/64 Allen wrench (provided with wind sensor) 7/32 Allen wrench (provided with wind sensor) #3 (med.) Phillips Screwdriver #2 (small) Phillips Screwdriver Small straight blade (1/8") Screwdriver Power Drill and 3/8" or 1/2" Bit (1/2" bit needed to thread temperature and wind sensor cables through same hole.) 3/8" or Adjustable Wrench Wire Cutter Compass Pencil Materials Needed (See also Section 4: Optional Sensor Mounting Hardware.) Black PVC Electrical Tape (2-4) Plastic Wall Bushings Columbia Weather Systems, Inc. Capricorn 2000EX Weather Station 31 ___________________________________________________________________ Mast: Height above structure: Minimum 5 ft., recommended 10 ft. For Roof Mount “Cold Patch” Roofing Tar 50' Guy Wire Roof Anchor Mount Guy Ring & Collar (3-4) Eye Bolt Screws For Wall Mount (2) 4" Wall Mount Bracket Assembly. (4) Bracket Mounting Screws Optional Items Surge Suppressor Unpacking the Unit Unpack the Capricorn 2000EX weather station and verify that all parts are included. Inspect all system components for obvious shipping damage (Refer to page 5 in case of damage). Save the shipping carton and packing material in case the unit needs to be returned to the factory. Note: If items are missing or if there is damage, see page 5. If the system does not operate or calibrate properly, see Section 7: Maintenance and Section 8: Troubleshooting, for further instructions. Installing the Control Module Place the Capricorn 2000EX Control Module in a clean, dry location, close to a grounded power outlet (and phone line, if a modem connection is required). Plug the power cord into a convenient grounded outlet. Connect the Chassis Ground terminal to a good earth ground. Note: It is strongly recommended that you protect your unit from power line spikes (caused by lightning or electrical discharge) by installing a good quality spike-surge suppression device between the Control Module and the power source. Columbia Weather Systems, Inc. 32 Capricorn 2000EX Weather Station ___________________________________________________________________ Installing the Barometric Pressure Sensor The barometric pressure sensor is located inside the Control Module; no user installation is required. The sensor does need to be calibrated for altitude, however. Please refer to Section 6: Calibration for the procedure of setting the altitude. Columbia Weather Systems, Inc. Capricorn 2000EX Weather Station 33 ___________________________________________________________________ Installing the Temperature and Humidity Sensors The temperature and relative humidity sensors should be mounted in a sheltered area, preferably on the north side of a building. Insert both humidity and temperature sensors in the radiation shield to the midway point and secure both cables to the plastic fastener on the mounting bracket using the provided tiewrap. Both sensors are supplied with a standard 50-foot cable. The cable provided is a 22 gauge, 2 conductor shielded cable with a ground drain lead. Once the sensors have been placed, route the cables back to the Control Module. Columbia Weather Systems, Inc. 34 Capricorn 2000EX Weather Station ___________________________________________________________________ Using a small straight screw driver, attach the temperature cable to the back of the Control Module as follows: Red Wire - Terminal #1 Bare Wire - Terminal #2 Black Wire - Terminal #3 Using a small straight screw driver, attach the humidity cable to the back of the Control Module as follows: Red Wire - Terminal #16 Bare Wire - Terminal #17 Black Wire - Terminal #18 Installing additional Temperature Sensors The Capricorn 2000EX can accept up to four temperature sensors. The standard model is supplied with only one temperature sensor. Additional sensors can be added at any time (Cat. No.82100). Temperature Sensor Initialization Power the Control Module initially without any temperature sensor installed. Using a small Straight Slot screwdriver, attach the wires from the end of the first temperature sensor cable to the Temperature terminal block screws as follows: Red Wire Terminal #1 Bare Wire Terminal #2 Black Wire Terminal #3 Apply power to the Control Module for 10 seconds to identify the probe and then remove power. This probe is now identified as T1 by the Control Module. If more than one Temperature Probe is to be installed, they must all be identified by the Control Module. Remove power from the Control Module, connect the next temperature sensor cable to the same temperature terminal block, and apply power for 10 seconds to identify the probe and then remove power. The second probe is now identified as T2. Repeat these steps for each additional temperature sensor, T3 and T4 (up to 4 total). Note: Do Not remove the first set of wires from the Terminals. Columbia Weather Systems, Inc. Capricorn 2000EX Weather Station 35 ___________________________________________________________________ Columbia Weather Systems, Inc. 36 Capricorn 2000EX Weather Station ___________________________________________________________________ Installing the Wind Sensor Assembling the Wind Speed Sensor Note: Please refer to the Met One 034B wind sensor user manual for detailed installation, calibration and maintenance information Columbia Weather Systems, Inc. Capricorn 2000EX Weather Station 37 ___________________________________________________________________ 1. Install Vane A. Fully insert vane arm into hub B. Align vane with center axis of sensor C. Using 7/64” Allen wrench, tighten set screw thru top of hub 2. Sensor Installation A. Install alignment adapter onto sensor base with socket head cap screw B. Place sensor with adapter on tip of mast C. Rotate entire sensor until vane tail points to “true North” D. Tighten both set screws clamping adapter to mast, using 7/32 Allen wrench E. Remove shoulder screw from hub and save Connect sensor cable Columbia Weather Systems, Inc. 38 Capricorn 2000EX Weather Station ___________________________________________________________________ Installing the Mast The Capricorn 2000EX will measure wind speeds of up to 160 mph (257 km/h). However, unless the Wind Sensor Assembly is properly mounted to withstand such high winds, this capability is useless. Please read these instructions carefully to insure a safe and reliable installation. There are three acceptable methods for mounting the mast to a roof or building structure: Sloped roof mounting, flat roof mounting or wall mounting. See Section 4: Optional Sensor Mounting Hardware for more information. Location Do not attach the Wind Sensor Assembly to a chimney or any other transmitting mast or tower. Select a mounting location that will allow the Wind Sensor Assembly cables to be routed away from any other data cables to avoid interference. Do not mount sensors close to power lines or in tall trees. Mounting Method Choose the appropriate mounting method for the installation and obtain the necessary mounting hardware. Refer to Section 4 for information on optional sensor mounting hardware and accessories which are available from the factory. If the mounting hardware is not obtained from the factory, be certain to use metal parts which are plated or galvanized to assure maximum longevity. In marine locations (or other areas) which experience severe corrosion problems, a watertight, rubberized spray coating is recommended. This can be sprayed on all metal parts from the cross arm support down (not the wind sensors) after the installation is completed. Secure the mast to the roof, using guy wires with sufficient tensile strength. The Wall Mounting Method should utilize a mast of no more than 5 ft. maximum height, unless it can be secured with guy wires. Routing Cable Use plastic tie wraps secure the cable to mast. Be sure that one is used at the mast base. Tighten the tie wraps securely and clip off any excess length with a wire cutter tool. Route the cable back to the Control Module. If mounting on a roof, route the sensors through a vent or other opening into an attic or crawl space. Columbia Weather Systems, Inc. Capricorn 2000EX Weather Station 39 ___________________________________________________________________ Avoid routing the cable near metal windows, metal door frames, metal gutters, or on a metal tower. Any mast or tower should always be properly earth grounded to minimize electrical storm damage. Use insulated standoffs (user supplied, see Section 4) when routing cable to help avoid electrical storm damage. CAUTION - There may be electric wires in the wall. We recommend that you shut off the electricity in the room(s) where you are drilling. For best results when routing the cable through the exterior wall adjacent to the console: a. drill a 3/8" hole though the wall (1/2" if combined with the temperature sensor cable); b. insert a pair of small plastic wall bushings (available as an option; see Section 4) on either side of the wall (or, insert a wall feed-through tube, also optionally available); and c. thread the cable through the bushings or tube. Make sure that the exposed portion of the sensor cable that is beyond the mast will not be blown about by the wind. Use insulated eye bolt standoffs or other fasteners if necessary. (See Section 4.) Once the Wind Sensor has been placed, route the cable back to the Control Module. Using a #1 Straight Slot screwdriver, attach the wires from the end of the Wind Sensor cable to the Wind Sensor terminal block screws at the back of the Control Module as follows: Black - Terminal #5 Red Wire - Terminal #6 White Wire - Terminal #25 Green Wire - Terminal #26 Brown Wire - Terminal #27 Connect the ground lug to the chassis ground terminal on the back panel of the Control Module. Columbia Weather Systems, Inc. 40 Capricorn 2000EX Weather Station ___________________________________________________________________ Installing the Rain Gauge Sensor Safety Note: The top rim of the rain gauge sensor is EXTREMELY sharp. Handle the rim with great care. Evaluate the proposed sensor location as compared to the cable length supplied. The rain gauge is supplied with a standard 50-foot cable. The cable provided is a 22 gauge, 2 conductor shielded cable with a ground drain lead. If additional cable is required, a good splice and waterproof insulation are essential; merely twisting the respective wires together is not adequate. To obtain an accurate reading, mount the Rain Gauge Sensor in a clear and open area. The Rain Gauge can be either surface mounted or mast mounted. Surface mounting is recommended where possible. The Rain Gauge must be mounted in a LEVEL position and in a location free from vibration. If using a mast mounting, make sure that the mast is properly guyed so that vibration in a high wind situation is kept to a minimum. When mounting with other sensors on a mast, position the Rain Gauge so that it is the lowest sensor in the vertical stack. This will prevent the Rain Gauge from draining water on the other sensors. Make sure any sensors above the Rain Gauge are rotated on the mast to provide an unobstructed rain path to the Rain Gauge. Once the Rain Gauge Sensor is securely mounted, grasp the top gold funnel portion of the Rain Gauge Sensor firmly and lift up. Do Not place any part of your hand on the rim of the Rain Gauge Sensor due to the sharpness of the Knife edge. Verify that the black tipping bucket is not in a center position and that one end of the bucket is down against the stop. Replace the top gold funnel portion of the Rain Gauge Sensor. Once the Rain Gauge Sensor has been placed, route the cable back to the Control Module Using a small straight screwdriver, attach the wires from the end of the cable to the Rain terminal posts screws as follows: Black Wire - Terminal #14 White Wire - Terminal #15 Columbia Weather Systems, Inc. Capricorn 2000EX Weather Station 41 ___________________________________________________________________ Installing the Leaf Wetness Sensor Evaluate the proposed sensor location as compared to the cable length supplied. In order to obtain an accurate reading, mount the Leaf Wetness Sensor in an exposed area. Once the Leaf Wetness Sensor has been mounted, route the cable back to the Control Module. The leaf wetness sensor is supplied with a standard 50-foot cable. The cable provided is a 22 gauge, 2 conductor shielded cable with a ground drain lead. If additional cable is required, a good splice and waterproof insulation are essential; merely twisting the respective wires together is not adequate. Once the Leaf Wetness Sensor has been placed, route the cable back to the Control Module. Using a small Straight Slot screwdriver, attach the wires from the end of the cable to the Leaf Wetness terminal posts screws as follows: Red Wire - Terminal #19 Bare Wire - Terminal #20 Black Wire - Terminal #21 Installing the Solar Radiation Sensor Evaluate the proposed sensor location as compared to the cable length supplied. The solar radiation sensor should be installed in an area that receives full sunlight away from any object that can create a shadow over the sensor. Please be aware that the sun position changes from season to season. The sensor should be mounted on a leveled surface for accurate readings. Once the solar radiation sensor is mounted, route the cable to the Control Module. It may be convenient to combine this step with routing of other sensors. Using a small straight screwdriver, attach the wires from the end of the cable to Channel X1 terminal block in the Multi-Purpose Channels area as follows: No Connection - Terminal #22 Bare and Red Wire - Terminal #23 Black Wire - Terminal #24 Columbia Weather Systems, Inc. 42 Capricorn 2000EX Weather Station ___________________________________________________________________ Connecting the Control Module to a Computer Connect the computer RS-232 port to the Serial Aux port on the Control Module using an RS-232 Computer Cable (Cat. No. 8239). Connect the Weather Display Console to the Modem port on the Control Module using an RJ-11 cable (Cat. No. 8238). Columbia Weather Systems, Inc. Capricorn 2000EX Weather Station 43 ___________________________________________________________________ Connecting the Control Module to the Weather MicroServer Connect COM1 on the MicroServer to the Serial Modem port. The Serial Modem port should be configured to output 1 XFER data on power up. This configuration is normally performed at the factory. Columbia Weather Systems, Inc. 44 Capricorn 2000EX Weather Station ___________________________________________________________________ Connecting the Control Module to a Modem Connect a modem to the Modem Port of the Control Module using an RS-232 Modem Cable (Cat. No. 8237). Connecting the Control Module to Computer and Modem If both a computer and a modem are to be connected to the Control Module, connect the modem to the Modem Port using an RS-232 Modem Cable (Cat. No. 8237) and connect the computer RS-232 port to the Aux Port on the Control Module using an RS-232 Computer Cable (Cat. No. 8239). Columbia Weather Systems, Inc. Capricorn 2000EX Weather Station 45 ___________________________________________________________________ Using Wireless Transceivers The Capricorn 2000EX Control Module can be connected to a wireless transceiver to communicate with a computer or a Weather Display. The standard wireless transceiver is a 2.4 GHz radio with a 2-mile lineof-site range. Connect the transceiver to the Modem Port (or the Aux. port) of the Control Module using an RS-232 Cable. Connect the second transceiver to a computer using the transceiver built-in cable or to a Weather Display console using an RS-232. Columbia Weather Systems, Inc. 46 Capricorn 2000EX Weather Station ___________________________________________________________________ Columbia Weather Systems, Inc. Capricorn 2000EX Weather Station 47 ___________________________________________________________________ SECTION 4: OPTIONAL SENSOR MOUNTING HARDWARE Fiberglass and steel 10-foot masts are available for use with either Roof Mounting Hardware Kit (Cat. No. 88002) or Wall Mounting Kit (Cat. No. 88003). A 10-foot free standing tripod is also available. Roof Mounting The Roof Mounting Kit (Cat. No. 88002) is suitable for both a slanted and flat roof installation. The figure and table below illustrates and describes the individual parts. Items included in the kit are marked with an asterisk (*). Individual parts are also available. Description Pkg. Ref Catalog No. Mast, 10 ft. (steel or fiberglass) 1 1 88005 / 88004 *Universal Mast Mount 1 2 88010 Lag Screw, Roof Mast Mount 3 3 88020 Columbia Weather Systems, Inc. 48 Capricorn 2000EX Weather Station ___________________________________________________________________ 1/4" x 4" (for shake roofs *Lag Screw, Roof Mast Mount 4 3 88030 *Guy Ring and Collar 1 4 88040 *Cable Standoffs, Wood Screw 4 5 88050 Cable Standoffs, Nail-In (for masonry application) 2 5 88060 Guy Wire Clamps, 1/8" 3 (not shown) 88070 *Steel Guy Wire, Galvanized 50 ft. 6 88080 *Eye Bolt Wood Screws, 1/4" x 3" 4 7 88090 Turnbuckles, 6" open x 4" closed 2 (not shown) 88100 *Cable Nail Clips 20 8 88110 Wall Feed Through Tube 1 10 88130 *Cable Feed Through Bushings 4 10 88140 Watertight Rubberized Coating 17oz (not shown) 1/4" x 2 1/4" (for comp. roofs) Columbia Weather Systems, Inc. 83500 Capricorn 2000EX Weather Station 49 ___________________________________________________________________ Wall Mounting The figure and table below illustrates and describes the individual parts in the Wall Mounting Kit (Cat. No.88003). Items included in the kit are marked with an asterisk (*). Individual parts are also available. Description Pkg. Ref Catalog No. Mast, 10 ft. (steel or fiberglass) 1 1 88005 / 88004 *4" Wall Mount 2 9 88120 Lag Screw, 1/4" x 2 1/4" 4 3 88030 *Cable Nail Clips 20 8 88110 Columbia Weather Systems, Inc. 50 Capricorn 2000EX Weather Station ___________________________________________________________________ Wall Feed Through Tube 1 10 88130 *Cable Feed Through Bushings 4 10 88140 Columbia Weather Systems, Inc. Capricorn 2000EX Weather Station 51 ___________________________________________________________________ Tripod The tripod is designed to provide up to 10 feet of stable, secure support for your meteorological sensors. The tripod is constructed from welded aluminum and is anodized for appearance and longevity. The 15-pound tripod can easily support up to Columbia Weather Systems, Inc. 52 Capricorn 2000EX Weather Station ___________________________________________________________________ 60 pounds of equipment. An optional tie-down kit allows for additional security in high-wind areas. Set up takes less than five minutes. Simply insert the legs into the main body and install the stainless steel retainer pins. Extend the mast to the desired height and insert another retainer pin. Install the guy wires and you’re ready to go! Specifications Capacity: Supports up to 60 lbs. Shipping Weight: 17lbs Shipping Box Dimensions: 70" x 8" x 8" Tripod and Tiedown Kit, Catalog Number: 88019 Columbia Weather Systems, Inc. Capricorn 2000EX Weather Station 53 ___________________________________________________________________ Tripod, 10 foot (Catalog No. 88019) Parts List: Item # Description Qty 1 Body/Mast Assembly 1 2 Legs 3 3 4 Retainer Pins 4 Guy Wire Ring with 1 3 Wires and Turnbuckles Tiedown Kit Parts List: Item # Description Qty 5 Anchor Screw with Chain 1 6 Clamp with Strap 1 7 Retainer Pin 1 Columbia Weather Systems, Inc. 54 Capricorn 2000EX Weather Station ___________________________________________________________________ Columbia Weather Systems, Inc. Capricorn 2000EX Weather Station 55 ___________________________________________________________________ Section 5: Operation The Capricorn 2000EX communicates with a computer via an RS-232 interface. The weather station has two ports available on the back panel (RJ-12 Jacks). All of the following commands are accessible through either port. The two ports are independent from one another and are controlled by a multitasking processor. RS-232 Modem serial port This is the main serial port in the system. It is usually used for communication via modem or directly to a computer if a modem is not used. RS-232 Aux serial port This is a secondary serial port. It is usually used for direct communication with a computer if the Modem serial port is used. Communication Settings The protocol for both serial ports is the following: Bits per Second (baud rate): 9600 Data bits: 8 Parity: None Stop bits: 1 Flow control: None Operating software Once an RS-232 connection is made between the computer and the weather station, commands can be issued to the weather station using a "Terminal" software such as Hyper Terminal (available with Windows operating system), or by using such as Weather View 32, WeatherMaster. The protocol is 8-bit, no parity, 1 stop bit and 9600 baud. All commands must be entered using upper case letters and followed by a carriage return. The weather station will return "ok" after the results of each command. If the command is incorrect, the weather station will return "?". Columbia Weather Systems, Inc. 56 Capricorn 2000EX Weather Station ___________________________________________________________________ Setting date and time SET-DATE: This command is used to set the internal calendar to the appropriate date. It uses space delimiters between the month field, the day field, the year field, and the command field. Example: 12 25 07 SET-DATE sets the date to 12/25/2007 SET-TIME: This command is used to set the internal clock to the appropriate military time (24 hours clock). It uses space delimiters between the hours field, minutes fields and the command field. Example: 13 46 SET-TIME sets the time to 1:46 PM Displaying date and time DATE-TIME: This command is used to display the system date and time. When used the weather station will return the date followed by the time, comma delimited. Example: 02/11/2007,13:20ok Displaying current sensor readings There are three ways to display current sensor readings: The POLL command POLL: This command is used to display the current sensor readings in a report format. When a POLL command is issued, the weather station will interrogate all the sensors and will display the information Columbia Weather Systems, Inc. Capricorn 2000EX Weather Station 57 ___________________________________________________________________ Example: 11:00 02/11/2007 50.14 Degrees F 70.89 Degrees F 68.33 Degrees F 64.46 Degrees F 29.88 Inches Hg 006 MPH SE 073 Percent 00.06 Inches 04.43 Volts 01.30 Volt 04.58 Volts ok Time Date Temperature 1 Temperature 2 Temperature 3 Temperature 4 Barometric Pressure Wind Speed Wind Direction Relative Humidity Rain (Today) Leaf Wetness X1 X2 The SAMPLE command SAMPLE: This command is used to display the current sensor readings in a one line record format (the same format as the datalog). The record starts with the letter S followed by the date and time of the sample, followed by the sensor values and ends with a check sum value. All of these fields are comma delimited. Example: S,02/11/98,11:09,36WD,003WS,00.06R,072RH,29.88P1,+050.59T1,+070.77T2,+068.23T3,+064.6 0T4,04.43LW,0.00X1,0.00X2,6007ok Where, WD is wind direction, WS is wind speed in MPH, R is rain fall in inches, RH is relative humidity percentage, P1 is barometric pressure in Inches-Hg, T1 through T4 are the four temperature sensors in degrees F, LW is leaf wetness in volts, X1 is typically solar radiation (5.00 volts equals 2000 Weather Master 2000-2) and X2 is used for additional sensors (X1 and X2 are available only in the Capricorn 2000MP). Temperature sensors that are not defined or connected will have a +255.00 reading. Wind direction is displayed in a 64 degree compass (1 = 5.625 degrees). For example: 0 4 8 12 16 20 24 N NNE NE ENE E ESE SE Degrees 0 22.5 45 67.5 90 112.5 135 Columbia Weather Systems, Inc. 58 Capricorn 2000EX Weather Station ___________________________________________________________________ 28 32 36 40 44 48 52 56 60 SSE S SSW SW WSW W WNW NW NNW 157.5 180 202.5 225 247.5 270 292.5 315 337.5 The Short commands WD: will display wind direction in 64 compass points (5.625 deg resolution). WS: will display wind speed in MPH R1: will display the rain fall for the day in inches RH: will display relative humidity percentage P1: will display the barometric pressure in inches-Hg T1: will display the temperature for the first temperature probe in degrees F T2: will display the temperature for the second temperature probe in degrees F T3: will display the temperature for the third temperature probe in degrees F T4: will display the temperature for the fourth temperature probe in degrees F LW: will display leaf wetness in volts. The range may vary per sensor. Typically, 0.5 volts indicates saturated condition and 4.5 volts indicates dry conditions. X1: will display solar radiation (typically). 5.00 volts equals 2000 Wm-2. X2: will display the value of the wind direction in 0 to 5 volts. Datalog The Capricorn 2000EX weather station has a built in circular datalogger. The datalog holds records of sensor readings (Samples) and High/Low information. Both types of records (Samples and High/Low) are recorded at user defined intervals. The datalog can hold up to 511 records. A Sample occupies on record and High/Low information occupies four records. Columbia Weather Systems, Inc. Capricorn 2000EX Weather Station 59 ___________________________________________________________________ Setting datalog intervals The interval for the Sample records in the datalog is user selectable. The interval duration is restricted to the following: 1, 2, 3, 4, 5, 6, 10, 15, 20, 30, and 60 minutes. n MEAS-INT: This command sets the Sample interval in the datalog. n is the interval duration in minutes. Example: 15 MEAS-INT will cause the weather station to save a Sample record every 15 minutes. Setting Hi/Lo intervals The interval for the High/Low records in the datalog is user selectable. The interval duration is restricted to the following: 1, 2, 3, 4, 6, 8, 12 and 24 hours. n HI/LO-INT: This command sets the High/Low interval in the datalog. n is the interval duration in hours. Example: 12 HI/LO-INT will cause the weather station to save High/Low records (total of four records) every 12 hours. Displaying the datalog ALL: This command will display the complete datalog (511 maximum records) Example: In this example the Sample interval is set at one minute and the High/Low interval is set at one hour and the datalog has 13 records (9 Sample records and 4 High/Low records). 13 records S,02/11/98,13:56,32WD,007WS,00.07R,074RH,29.85P1,+052.31T1,+071.62T2,+069.17T3,+065.5 7T4,01.88LW,0.00X1,0.00X2,6015 S,02/11/98,13:57,32WD,005WS,00.07R,074RH,29.86P1,+052.74T1,+071.83T2,+069.26T3,+065.6 9T4,01.70LW,0.00X1,0.00X2,6019 S,02/11/98,13:58,32WD,006WS,00.07R,072RH,29.85P1,+052.76T1,+071.64T2,+069.35T3,+065.7 5T4,01.74LW,0.00X1,0.00X2,6020 S,02/11/98,13:59,32WD,006WS,00.07R,071RH,29.85P1,+052.94T1,+071.86T2,+069.36T3,+065.8 1T4,01.74LW,0.00X1,0.00X2,6022 H,02/11/98,14:00,013,13:25WS,081,13:40RH,29.86,13:27P1,+053.23,14:00T1,+072.27,13:52T2,+ 069.59,13:31T3,+065.88, 14:00T4,01.70,13:57LW,0.00,14:00X1,0.00,14:00X2,8351 L,02/11/98,14:00,013,13:25WS,067,13:25RH,29.84,13:25P1,+050.17,13:39T1,+071.29,13:26T2,+ 068.33,13:42T3,+065.34, 13:25T4,04.41,13:27LW,0.00,00:00X1,0.00,00:00X2,8349 Columbia Weather Systems, Inc. 60 Capricorn 2000EX Weather Station ___________________________________________________________________ S,02/11/98,14:00,28WD,000WS,00.07R,071RH,29.85P1,+053.23T1,+072.02T2,+069.26T3,+065.8 8T4,01.76LW,0.00X1,0.00X2,5998 S,02/11/98,14:01,28WD,003WS,00.07R,071RH,29.85P1,+053.67T1,+072.52T2,+068.91T3,+065.8 8T4,01.78LW,0.00X1,0.00X2,6018 S,02/11/98,14:02,32WD,006WS,00.07R,069RH,29.85P1,+053.70T1,+072.86T2,+068.89T3,+065.8 6T4,01.84LW,0.00X1,0.00X2,6027 S,02/11/98,14:03,32WD,003WS,00.07R,068RH,29.85P1,+053.73T1,+073.13T2,+069.21T3,+065.8 6T4,01.88LW,0.00X1,0.00X2,6009 S,02/11/98,14:04,28WD,005WS,00.07R,067RH,29.85P1,+053.41T1,+072.48T2,+069.36T3,+065.8 6T4,01.94LW,0.00X1,0.00X2,6021ok Note that the Sample records start with the letter S and the High/Low records start with the letter H and L respectively. NOW: This command will display the last record in the datalog n GET: This command will display a user defined number of records in the datalog, where n is the number of records. Example: 10 GET will display the last ten records in the datalog. Resetting Hi/Lo RESET-HI/LO: This command will erase the high/low values from memory for the current high/low interval. Resetting the datalog RESET-DATA: This command will erase the datalog and will insert one current Sample record. Displaying current Hi/Lo HIGH: This command will display the current high record. The High record starts with the letter H followed by the date and time the record was requested followed by the high values and the time for wind speed, relative humidity, pressure, temperatures, leaf wetness and two undefined sensors (X1 and X2). The high value of wind speed is the wind gust. Example: H,02/11/98,14:00,013,13:25WS,081,13:40RH,29.86,13:27P1,+053.23,14:00T1,+072.27,13:52T2,+ 069.59,13:31T3,+065.88, 14:00T4,01.70,13:57LW,0.00,14:00X1,0.00,14:00X2,8351 LOW: This command will display the current low record. The Low record starts with the letter L followed by the date and time the record was requested followed by the low values and the time for wind speed, relative humidity, pressure, temperatures, leaf wetness and two Columbia Weather Systems, Inc. Capricorn 2000EX Weather Station 61 ___________________________________________________________________ undefined sensors (X1 and X2). The low value of wind speed is the high 4 second sustained wind average. Setting temperature offsets Temperature offsets are used to calibrate the temperature probes. n TCAL#: This command is used to enter an offset for a temperature probe. Where n is the offset in 1/100 of a degree F and # is the temperature probe number. Example: 231 TCAL2 adds 2.31 degree F to the temperature reading from temperature probe two and -231 TCAL2 subtracts 2.31 degrees F from the reading. Please refer to the Temperature Calibration section for more information. Setting barometric pressure altitude and offset n ALT: This command sets the altitude of the weather station, where n is the altitude in feet. Example: 225 ALT sets the altitude to 225 feet above sea level. n BAR-OFFSET: This command is used to enter an offset to the barometric pressure reading, where n is the offset in 1/100 of In.Hg. Example: 34 BAR-OFFSET adds 0.34 in.Hg to the barometric pressure reading and -34 BAR-OFFSET subtract 0.34 in.Hg from the reading. Please refer to Barometric Pressure Calibration for more information. Display current settings PARAMETERS: This command displays the current weather station settings and the number of records in the datalog. Example: Date & Time Measurement interval Hi/Lo interval Records in memory Pressure offset Altitude Temperature 1 offset Temperature 2 offset Temperature 3 offset Temperature 4 offset 02/11/2007,17:31 1 minute 1 hours 262 38 225 255 -25 55 155 ok Columbia Weather Systems, Inc. 62 Capricorn 2000EX Weather Station ___________________________________________________________________ Continuous display of direction NORTH: This command continuously displays the wind direction. This command is used for locating the north direction on the wind sensor. An <Esc> followed by a carriage return terminates this command. Continuous display of weather information 1 XFER: This command continuously displays a Sample record every 15 seconds and wind speed and direction every one second. The wind speed and direction record starts with the letter W followed by three digits for wind speed in MPH followed by two digits for wind direction. Example: W00124 S,02/11/07,17:44,24WD,001WS,00.08R,085RH,29.82P1,+048.56T1,+070.85T2,+067.24T3,+065.0 8T4,01.74LW,0.00X1,0.00X2,6014 W00224 W00224 W00124 W00124 W00124 W00120okok An <Esc> followed by a carriage return terminates this command. XSET: This command defines the frequency the Sample record is displayed in the XFER output. The default frequency of the Sample record in the XFER output is 15 seconds. This frequency can be changed using the XSET command. For example, 60 XSET will cause the Sample record to be issued every 60 seconds. XSET will change the frequency of the XFER output on both serial ports. CONT: This command will continuously output the Sample record at a specified interval. For example, 5 CONT will output a Sample record every 5 seconds. The time interval is limited to a range of 1 to 16 seconds. S,05/01/99,09:44,40WD,000WS,00.00R,022RH,29.10P1,+070.70T1,+255.00T2,04.80LW,5.00X1,0 .10X2,4923 S,05/01/99,09:44,40WD,000WS,00.00R,023RH,29.09P1,+070.70T1,+255.00T2,04.80LW,5.00X1,0 .10X2,4932 Columbia Weather Systems, Inc. Capricorn 2000EX Weather Station 63 ___________________________________________________________________ S,05/01/99,09:44,40WD,000WS,00.00R,023RH,29.09P1,+070.70T1,+255.00T2,04.80LW,5.00X1,0 .10X2,4932 S,05/01/99,09:44,40WD,000WS,00.00R,023RH,29.10P1,+070.70T1,+255.00T2,04.80LW,5.00X1,0 .10X2,4924 S,05/01/99,09:45,40WD,000WS,00.00R,023RH,29.10P1,+070.70T1,+255.00T2,04.80LW,5.00X1,0 .10X2,4925 S,05/01/99,09:45,40WD,000WS,00.00R,023RH,29.10P1,+070.70T1,+255.00T2,04.80LW,5.00X1,0 .10X2,4925 S,05/01/99,09:45,40WD,000WS,00.00R,023RH,29.10P1,+070.70T1,+255.00T2,04.80LW,5.00X1,0 .10X2,4925 S,05/01/99,09:45,40WD,000WS,00.00R,023RH,29.10P1,+070.70T1,+255.00T2,04.80LW,5.00X1,0 .10X2,4925 S,05/01/99,09:46,40WD,000WS,00.00R,023RH,29.10P1,+070.72T1,+255.00T2,04.80LW,5.00X1,0 .10X2,4928 S,05/01/99,09:46,40WD,000WS,00.00R,023RH,29.10P1,+070.72T1,+255.00T2,04.80LW,5.00X1,0 .10X2,4928okok An <Esc> followed by a carriage return terminates this command. The output will stop after one more Sample record is issued. For example, if CONT is set to repeat the Sample record every 15 seconds (15 CONT) and an <ESC><RETURN> was entered, one more Sample record will be issued before the double ok is displayed indicating that the command is terminated. Columbia Weather Systems, Inc. 64 Capricorn 2000EX Weather Station ___________________________________________________________________ Columbia Weather Systems, Inc. Capricorn 2000EX Weather Station 65 ___________________________________________________________________ SECTION 6: CALIBRATION Calibrating the Barometric Pressure Sensor The barometric pressure sensor is calibrated at the factory to a highly accurate digital pressure gauge (±0.02% of full range) and, therefore, requires no further calibration. Altitude Setting After calibration at the factory, the altitude is set to zero. To get an accurate barometric pressure reading, the local altitude needs to be set in the weather station. To set the altitude, use the ALT command and enter the altitude in feet. Please refer to Section 4: Operation for more information. The altitude can also be set using weather software or display console. Please refer to the product user manual. Note: The electronic transducer used to measure air pressure is sensitive to changes in elevation of as little as 10 ft. (3 m). Note: For systems with a MicroServer, the altitude setting should be entered in the MicroServer/Parameter Settings Optional Calibration Procedure Even though the barometric pressure sensor is calibrated at the factory, the sensor can be calibrated on-site. This might be required if the original barometric pressure offset has been erased from memory, or if weather station needs to match a local source. To calibrate the barometric pressure on-site: Using a terminal program set the barometric pressure offset to zero by entering: 0 BAR-OFFSET Wait approximately 5 seconds, then take a pressure reading using SAMPLE, POLL or P1 Record the barometric pressure from a local reliable source at the same elevation as the Capricorn 2000EX. Calculate the barometric pressure offset as follows: Barometric Pressure Offset = Source Reading - Capricorn 2000EX Reading. Columbia Weather Systems, Inc. 66 Capricorn 2000EX Weather Station ___________________________________________________________________ Enter the barometric pressure offset in 1/100 of in.Hg using the BAROFFSET command. Calibrating the Wind Sensor General Maintenance schedule: 6-12 month intervals: A. Inspect the sensor for proper operation per Section 3.0 of user manual B. Replacement of wind speed sensor bearing in extremely adverse environments 12-24 month intervals: A. Replacement of wind speed sensor bearings 24-36 month intervals: A. Recommended complete factory overhaul of sensor Note: Please refer to the Met One 034B wind sensor user manual for detailed installation, calibration and maintenance information Calibrating the Temperature Sensors All Temperature sensors are calibrated at the factory to a superior grade ASTM mercury thermometer. The calibration offset is recorded on the temperature sensor and on the end of the cable. After initializing all the temperature sensors, enter the temperature offsets using the TCAL command. Please refer to Section 5: Operation for more information. To calibrate the temperature sensors on-site, perform the following steps: Prepare an ice bath by mixing two cups of crushed ice in two cups of water. Use an insulated container for best results. Allow the temperature throughout the ice bath to stabilize by waiting for about twenty minutes. Stir the ice bath to mix the ice and water, wait for the ice to separate from the water, place the temperature sensor in the ice bath. Make sure that the sensor is not in direct contact with ice. Take a temperature reading from the Capricorn 2000EX using SAMPLE or POLL. Calculate the temperature offset as follows: Temperature offset = (32 - Capricorn 2000EX reading) * 100 Columbia Weather Systems, Inc. Capricorn 2000EX Weather Station 67 ___________________________________________________________________ Enter the temperature offset using the TCAL command. Please refer to Section 4: Operation for more information. Record the temperature offset on a label attached to the sensor. Repeat the process for any other temperature sensor. Calibrating the Humidity Sensor The humidity sensor is calibrated at the factory. No field calibration is required. The humidity sensor has a ±2% stability over 2 years. Therefore we recommend replacing the sensing element every 2 to 4 years. Calibrating the Rain Gauge Sensor The rain gauge is calibrated at the factory and does not require any initial field calibration. The tipping bucket mechanism is a simple and highly reliable device. The transmitter must be located in a clear area, away from trees, buildings, etc. It must also be mounted level. Accurate readings will not be obtained unless the transmitter is mounted in a level position. The mechanism must be clean. Any accumulation of foreign material, dust, etc. will alter the calibration of this unit. Absolutely accurate calibration can be obtained only with laboratory equipment, but an approximate field check can be easily made. For field calibration, a calibration kit is available from the factory. Calibrating the Leaf Wetness Sensor The leaf wetness sensor is calibrated at the factory. No field calibration is required. Calibrating the Solar Radiation Sensor The solar radiation sensor is calibrated at the factory. No field calibration is required. Columbia Weather Systems, Inc. 68 Capricorn 2000EX Weather Station ___________________________________________________________________ Columbia Weather Systems, Inc. Capricorn 2000EX Weather Station 69 ___________________________________________________________________ SECTION 7: MAINTENANCE In normal use, the Capricorn 2000EX should require very little maintenance. In the event of any problems, follow the procedures contained in Section 8: Troubleshooting, to determine whether the unit is defective. If it is defective and the unit needs to be returned to the factory for repair, refer to the Return For Repair Procedure in Section 9: User Support Information. Console Maintenance The Control Module contains sensitive electronics components and should not be serviced by the user. If the LED on the back (inside) of the unit is not on, check for proper installation of the wall mount power supply and then check to see if the fuse on the Control Module board needs to be replaced. If necessary, replace it with a 1.0 amp 250V fast acting fuse. Barometric Pressure Sensor Maintenance The barometric pressure sensor is located inside the cabinet and should not be serviced by the user. Temperature Sensor Maintenance Check the temperature sensor cables during installation and periodically thereafter to make sure they contain no cuts, kinks or other abnormalities, and that any splices are properly connected and insulated. Wind Sensor Maintenance Note: Please refer to the Met One 034B wind sensor user manual for detailed installation, calibration and maintenance information Relative Humidity Sensor Maintenance The Relative Humidity sensor does not require any field maintenance. Rain Gauge Maintenance Periodically clean the Rain Gauge of any debris that might be clogging the funnel or accumulating in the tipping bucket. Leaf Wetness Sensor Maintenance Columbia Weather Systems, Inc. 70 Capricorn 2000EX Weather Station ___________________________________________________________________ Periodically clean the Leaf Wetness sensor grid surface of any dirt or debris accumulation. Solar Radiation Sensor Maintenance Periodically clean the solar radiation sensor lens from any dirt or debris accumulation. Columbia Weather Systems, Inc. Capricorn 2000EX Weather Station 71 ___________________________________________________________________ Section 8: Troubleshooting Wind Sensor Tests In the event the wind speed is reporting zero constantly regardless of wind conditions, is inexplicably erratic and/or the wind direction is reporting North constantly regardless of wind conditions, or is reporting incorrect direction, either the Control Module or the sensors (or both) may be defective. The following tests are appropriate to help locate the source of the problem. Tools required: (1) Small Phillips screwdriver (1) 6" (15 cm) jumper wire, 22 gauge Multi meter or volt meter Wind Speed Test 1. Unplug the power supply cord from the Control Module. 2. Remove the seven wind sensor wires from their terminals at the back of the Control Module. 3. Power up the Control Module. 4. With one end of the jumper wire connected to terminal #6, tap the other end on terminal #5; the wind speed reading should change from zero. The faster you tap, the higher the wind speed value. 5. If the wind speed value does not change from zero, then the wind speed channel in the Control Module is defective and the Control Module should be returned to the factory for repair. 6. If the wind speed value changes from zero, the problem is in the wind sensor or cable. Check the cable for damage and inspect any cable splices. Make sure the cable connector is plugged in the wind sensor correctly. 7. If you cannot find any problems with the cable, disconnect the wind sensor and return it to the factory for repair. Note: Please follow the procedure on page 76 for returning any defective items to the factory. Columbia Weather Systems, Inc. 72 Capricorn 2000EX Weather Station ___________________________________________________________________ Wind Direction Test 1. Set the multi meter set to volts DC. 2. Measure the voltage between terminal #25 and #26. Place the black probe on terminal #26 and the red probe on terminal #25. The voltage should be 5.0 volts DC. If the voltage is different, the wind direction channel is defective and the Control Module should be returned to the factory for repair. 3. With the Control Module powered On and the wind sensor connected, place the back probe on terminal #26 and the red probe on terminal #27. 4. As the wind vane rotates, the voltage reading will vary from 0 to 5 volts DC. If the vane is pointing south, the voltage reading should be 2.5 volts. 5. If the voltage reading is not changing when the vane is rotating or if the value is out of the normal range (0 to 5.0 volts DC) the wind sensor is defective and should be returned to the factory for repair. Note: Please follow the procedure on page 76 for returning any defective items to the factory. Temperature Sensor Troubleshooting If the Temperature sensor is reading a few degrees off when compared to a standard, the Temperature sensor may require re-calibration. Please refer to calibration procedure in Section 6: Calibrating the Temperature Sensor. If the Temperature sensor is reading 255°F, the Temperature sensor may be disconnected from the Control Module, may not be initialized, or may be defective. Check the cable from the sensor to the Control Module for any cuts or kinks. Check any splices to ensure good connection. Check the cable connection to the Control Module. The initialization procedure should be performed when replacing or adding a sensor or when a sensor has lost its initialization to the Control Module and is reading 255°F. Columbia Weather Systems, Inc. Capricorn 2000EX Weather Station 73 ___________________________________________________________________ To initialize a temperature sensor to the Control Module, perform the following procedure: 1. Disconnect all temperature sensors from the Control Module. 2. Disconnect the power from the Control Module. Wait for 10 seconds and then connect the power to the Control Module. 3. Connect the temperature sensor to the Control Module 4. Disconnect the power from the Control Module. Wait for 10 seconds and then connect the power to the Control Module. 5. If installing more than one temperature sensor, repeat steps 3 and 4 for each sensor added. This procedure will initialize the temperature sensor(s) to the Control Module. The Control Module identifies each temperature sensor connected and initialized by an internal serial number. The Control Module will define the sensors by the numbers 1 through 4 based on the order in which they are initialized. Be sure to initialize the main outdoor sensor first, so that it will be defined as T1. Wind chill, heat index and dew point are all calculated based on the value of T1. Columbia Weather Systems, Inc. 74 Capricorn 2000EX Weather Station ___________________________________________________________________ Columbia Weather Systems, Inc. Capricorn 2000EX Weather Station 75 ___________________________________________________________________ SECTION 9: USER SUPPORT INFORMATION This section consists of the following items: 1. Two-Year Limited Warranty: Please read this document carefully. 2. Return for Repair Procedure: This procedure is for your convenience in the event you mut return your Capricorn 2000EX for repair or replacement. Follow the packing instructions carefully to protect your instrument in transit. Limited Warranty Columbia Weather Systems, Inc. (CWS) warrants the Capricorn 2000EX Weather Station to be free from defects in materials and/or workmanship when operated in accordance with the manufacturer’s operating instructions, for two (2) years from date of purchase, subject to the provisions contained herein. CWS warranty shall extend to the original purchaser only and shall be limited to factory repair or replacement of defective parts. EXCLUSIONS Certain parts are not manufactured by CWS (i.e., certain purchased options, etc.) and are therefore not covered by this warranty. These parts may be covered by warranties issued by their respective manufacturers and although CWS will not warrant these parts, CWS will act as agent for the administration of any such independent warranties during the term of this warranty. This warranty does not cover normal maintenance, damage resulting from improper use or repair, or abuse by the operator. Damage caused by lightning or other electrical discharge is specifically excluded. This warranty extends only to repair or replacement, and shall in no event extend to consequential damages. In the event of operator repair or replacement, this warranty shall cover neither the advisability of the repair undertaken, nor the sufficiency of the repair itself. THIS DOCUMENT REFLECTS THE ENTIRE AND EXCLUSIVE UNDERSTANDING OF THE PARTIES, AND EXCEPT AS OTHERWISE PROVIDED HEREIN, ALL OTHER WARRANTIES, EXPRESS OR IMPLIED, PARTICULARLY THE WARRANTIES OF MERCHANT Columbia Weather Systems, Inc. 76 Capricorn 2000EX Weather Station ___________________________________________________________________ ABILITY AND/OR FITNESS FOR A PARTICULAR PURPOSE ARE EXCLUDED. This warranty gives you specific legal rights, and you may also have other rights which vary from state to state. Return for Repair Procedure 1. In the event of defects or damage to your unit, first call the factory Capricorn Service Department Monday through Friday, 8:30 am to 4:00 pm PST, (503) 629-0887 to determine the advisability of factory repair. The Service Department will issue an RMA number (Return Merchandise Authorization) to help us identify the package when received. Please place that number on the outside of the box. 2. In the event factory service is required, return your Capricorn 2000EX as follows: A. Packing Wrap Control Module in plastic bag first. Pack in original shipping carton or a sturdy oversized carton. Use plenty of packing material. B. Include: A brief description of the problem with all known symptoms. Your phone number. Your return street shipping address (UPS will not deliver to a P.O. box). Write the RMA number on the outside of the box. C. Shipping Send freight prepaid (UPS recommended). Insurance is recommended. (The factory can provide the current replacement value of the item being shipped for insurance purposes.) Columbia Weather Systems, Inc. Capricorn 2000EX Weather Station 77 ___________________________________________________________________ D. Send to: Columbia Weather Systems, Inc. 2240 NE Griffin Oaks Street, Suite 100 Hillsboro, Oregon 97124 E. C.O.D. shipments will not be accepted. 3. If your unit is under warranty, after repair or replacement has been completed, it will be returned by a carrier and method chosen by Columbia Weather, Inc. to any destination within the continental U.S.A. If you desire some other specific form of conveyance or if you are located beyond these borders, then you must bear the additional cost of return shipment. 4. If your unit is not under warranty, we will call you with an estimate of the charges. If approved, your repaired unit will be returned after all charges, including parts, labor and return shipping and handling, have been paid. If not approved, your unit will be returned as is via UPS COD for the amount of the UPS COD freight charges. Columbia Weather Systems, Inc. 78 Capricorn 2000EX Weather Station ___________________________________________________________________ Columbia Weather Systems, Inc. Capricorn 2000EX Weather Station 79 ___________________________________________________________________ Reference Glossary Aspirating Radiation Shield A device used to shield a sensor such as a temperature probe from direct and indirect radiation and rain while providing access for ventilation. Barometric Pressure The pressure exerted by the atmosphere as a consequence of gravitational attraction exerted upon the “column” of air lying directly above the point in question. Celsius Temperature Scale A temperature scale with the ice point at 0 degrees and the boiling point of water at 100 degrees. Dew Point The temperature to which a given parcel of air must be cooled at constant pressure and constant water-vapor content in order for saturation to occur. When this temperature is below 0°C, it is sometimes called the frost point. Fahrenheit Temperature Scale A temperature scale with the ice point at 32 degrees and the boiling point of water at 212 degrees. Global Radiation The total of direct solar radiation and diffused sky radiation received by a unit horizontal surface. Global radiation is measured by a Pyranometer. Heat Index The heat index or apparent temperature is a measure of discomfort due to the combination of heat and high humidity. It was developed in 1979 and is based on studies of evaporative skin cooling for combinations of temperature and humidity. Columbia Weather Systems, Inc. 80 Capricorn 2000EX Weather Station ___________________________________________________________________ Pyranometer It measures the combined intensity of incoming direct solar radiation and diffused sky radiation. The Pyranometer consists of a radiation-sensing element, which is mounted so that it views the entire sky. Relative Humidity Popularly called humidity. The ratio of the actual vapor pressure of the air to the saturation vapor pressure. Sea Level Pressure The atmospheric pressure at mean sea level, either directly measured or, most commonly, empirically determined from the observed station pressure. In regions where the earth’s surface pressure is above sea level, it is standard observational practice to reduce the observed surface pressure to the value that would exist at a point at sea level directly below. Soil Moisture Moisture in the soil within the zone of aeration present in the soil pores. In some cases this refers strictly to moisture within the root zone of plants. Solar Radiation The total electromagnetic radiation emitted by the sun. 99% of the suns energy output falls within the wavelength interval from 0.15 microns to 4.0 microns, with peak intensity near 0.47 microns. About one-half of the total energy in the solar beam is contained within the visible spectrum from 0.4 to 0.7 microns, and most of the other half lies near infrared, a small additional portion lying in the ultraviolet. Wind Chill That part of the total cooling of a body caused by air motion. Columbia Weather Systems, Inc. Capricorn 2000EX Weather Station 81 ___________________________________________________________________ Unit Conversion Speed Kilometers per hour = 1.610 x miles per hour Knots = 0.869 x miles per hour Meters per second = 0.448 x miles per hour Feet per second = 1.467 x miles per hour Temperature Temperature in °C = 5/9 (temperature in °F - 32) Temperature in °F = (1.8 x temperature in °C) + 32 Distance Millimeters = 25.4 x inches Pressure Millibars = 33.86 x inches of mercury Kilopascals = 3.386 x inches of mercury Pounds per square inch = 0.49 x inches of mercury Standard atmospheres = 0.0334 x inches of mercury Solar Radiation BTU/foot2 minutes = 0.00529 x watts/meter2 Joules/centimeter2 minutes = 0.006 x watts/meter2 Mega joules/meter2 day = 11.574 x watts/meter2 Langleys/minutes = 0.00143 x watts/meter2 Columbia Weather Systems, Inc. 82 Capricorn 2000EX Weather Station ___________________________________________________________________ Tables and Formulas Wind Chill Chart In 2001, NWS implemented an updated Wind chill Temperature (WCT) index. The change improves upon the former WCT Index used by the NWS and the Meteorological Services of Canada, which was based on the 1945 Siple and Passel Index. In the fall of 2000, the Office of the Federal Coordinator for Meteorological Services and Supporting Research (OFCM) formed a group consisting of several Federal agencies, MSC, the academic community (Indiana University-Purdue University in Indianapolis (IUPUI), University of Delaware and University of Missouri), and the International Society of Biometeorology to evaluate and improve the windchill formula. The group, chaired by the NWS, is called the Joint Action Group for temperature Indices (JAG/TI). JAG/TI's goal is to upgrade and standardize the index for temperature extremes internationally (e.g. Wind chill Index). The current formula uses advances in science, technology, and computer modeling to provide a more accurate, understandable, and useful formula for calculating the dangers from winter winds and freezing temperatures. Columbia Weather Systems, Inc. Capricorn 2000EX Weather Station 83 ___________________________________________________________________ Wind Chill Equation WC = 35.74 + 0.6215 T -35.75(V0.16) + 0.4275 T(V0.16) Where: WC = wind chill temperature in °F V = wind velocity in mph T = air temperature in °F Note: Wind chill Temperature is only defined for temperatures at or below 50 degrees F and wind speeds above 3 mph. Columbia Weather Systems, Inc. 84 Capricorn 2000EX Weather Station ___________________________________________________________________ Heat Index Temperature in °F RH 70 75 80 85 90 95 100 105 110 115 120 125 130 135 0 64 66 73 78 83 87 91 95 99 5 64 69 74 79 84 88 93 97 102 107 111 116 122 126 10 65 70 75 80 85 90 95 100 105 111 116 123 131 15 65 71 76 81 86 91 97 102 108 115 123 131 20 66 72 77 82 87 93 99 105 112 120 130 141 25 66 72 77 83 88 94 101 109 117 127 139 30 67 73 78 84 90 96 104 113 123 135 148 35 67 73 79 85 91 98 107 118 130 143 40 68 74 79 86 93 101 110 123 137 151 45 68 74 80 87 95 104 115 129 143 50 69 75 81 88 96 107 120 135 150 55 69 75 81 89 98 110 126 142 60 70 76 82 90 100 114 132 149 65 70 76 83 91 102 119 138 70 70 77 84 93 106 124 144 75 70 77 85 95 109 130 150 80 71 78 86 97 113 136 85 71 78 87 99 117 140 90 71 79 88 102 122 150 95 71 79 89 105 126 100 72 80 90 108 131 Columbia Weather Systems, Inc. 103 107 111 117 120 Capricorn 2000EX Weather Station 85 ___________________________________________________________________ Dew Point B = (ln (RH/100) + ((17.2694*T) / (238.3+T))) / 17.2694 Dew Point in °C = (238.3 * B) / (1-B) Where: RH = Relative Humidity T = Temperature in °C Ln = Natural logarithm Columbia Weather Systems, Inc. 86 Capricorn 2000EX Weather Station ___________________________________________________________________ Columbia Weather Systems, Inc. 2240 NE Griffin Oaks Street, Suite 100 Hillsboro, OR 97124-6463 Telephone (503) 629-0887 Fax (503) 629-0898 Web Site http://www.columbiaweather.com Email [email protected] Catalog Number: 81644 Version 1.08 Printed in U.S.A. Columbia Weather Systems, Inc.