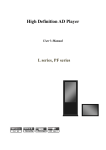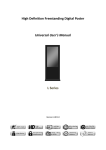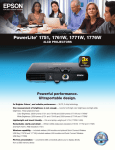
1
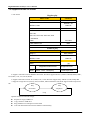
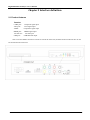
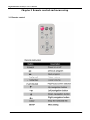
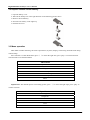
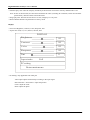
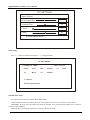
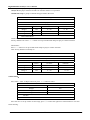
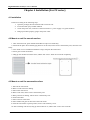
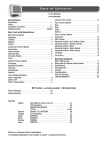
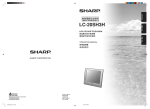
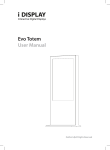
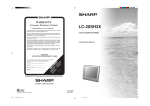
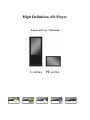
High Definition AD Player
Universal User’s Manual
L series
PF series
High Definition AD Player User’s Manual
Contents:
Chapter 1 Introduction .........................................................................................................................3
1.1 Introduction of the system ......................................................................................................3
1.2 System description ..................................................................................................................3
1.3 Attention about CF, SD, USB usage .......................................................................................3
1.4 Function description................................................................................................................4
1.5 Supported media file format ...................................................................................................5
Chapter 2 Interface definition ..............................................................................................................6
2.1 Product features.......................................................................................................................6
Chapter 3 Remote control and menu setup ..........................................................................................7
3.1 Remote control........................................................................................................................7
3.2 Replace remote control battery ...............................................................................................8
3.3 Menu operation .......................................................................................................................8
Chapter 4 Installation (For PF series) ................................................................................................14
4.1 Installation.............................................................................................................................14
4.2 Mount on wall for smooth surface ........................................................................................14
4.3 Mount on wall for unsmooth surface ....................................................................................14
2
High Definition AD Player User’s Manual
Congratulations on your purchase of our products. Please read carefully and follow all instructions in the manual
before first use.
1. The apparatus shall not be exposed to dripping or splashing and that no objects filled with liquids, such as
vases, shall be placed on the apparatus.
2. CAUTION: Danger of explosion if battery is incorrectly replaced. Replace only with the same or equivalent
type.
3. WARNING: To prevent injury, this apparatus must be securely attached to the floor/wall in accordance with
the installation instructions.
Chapter 1 Introduction
1.1 Introduction of the system
This player can play kinds of multi-media files. For convenience of customer, most of the operation can be
done through remote control.
To new users:
Before turning on the AD player, please make sure to plug-in the power cable and insert memory card
correctly.
After turning on the AD player, it will play automatically. If there is no program in memory card it will
display the main menu or startup picture.
Attention:
1.
2.
3.
4.
Do not change any default setting when it is unnecessary.
Copy all media files under the root directory in memory card, and delete the files that are not used to play.
Keep the product far away from water when installing and using.
Notes for CF card: before inserting CF card turn off the power, aligning the contact pins, do not insert with
over strength, otherwise it will bend the pins and may burn off the decoder board or driver board.
1.2 System description
Adopting signal-chip 1080P solution combine with decoder and driver, the system is stable and reliable with
long time work. It supports to read, decode and play AV files from flash disk and other memory card. It also
support AV signal input. This device has the function of multi ad player and monitor.
1.3 Attention about CF, SD, USB usage
1. SD and CF card can’t be used at the same time.
2. When there is CF card in the machine, the media files will be imported from flash disk to the CF card
automatically if plugging in flash disk.
3. Read the media file in flash disk if there is no CF or SD card.
4. CF card is the best choice if playing video file.
3
High Definition AD Player User’s Manual
5. The video file code rate should below 20M
6. High speed CF card is recommended for playing HD program
1.4 Function description
1. Auto copy function: import the media file from flash disk to memory card automatically.
2. Auto play system: users can set up time to switch input signal from different ports and internal storage.
3. Timer on/off function.
4. Seamless play: no black screen when program switching by follow below requirements:
1) All of the media files should be the same format, for example it can support suffix .TS/.MPG video file.
2) The resolution, codec, code rate, frame rate should be the same for all video files, and the audio coder,
sample rate should be the same for all audio files.
Note: If playing high definition (HD) combine with standard definition (SD) video file, it should follow
below:
1) Use video converter (like Ulead Video Studio) to convert the SD and HD video files to be one HD video
program.
2) Use video converter (like Ulead Video Studio) to convert the resolution, codec and frame rate of SD file to
be the same as the HD video file.
Video Function
LTI/CTI to improve the color performance
10 Bit ADC conversion and processing
Dynamic adaptive smoothing filter
Interlace convert to progressive interlace
Digital decoding and digital comb filter
Support PAL/SECAM/NTSC video formats
4
High Definition AD Player User’s Manual
1.5 Supported media file format
1. File format
Regular play
Video Codec
Mpeg1,2
Container
MPG, MPEG
MPEG2 –TS
MPEG2 ,H.264
H264-TS
MPEG2
MPEG2 –PS
MPEG4
Xvid 1.00,
Xvid 1.01, Xvid 1.02, Xvid 1.03, Xvid
1.10-beta1/2
AVI, MP4
H.264
H.264, MPEG1,2,4
MKV
Seamless play
Video Codec
Mpeg1,2
Container
MPG, MPEG
MPEG2 –TS
MPEG2, H.264
H264-TS
Photo
JPEG
.jpg
Supported coded format
Audio
Container
WMA、MP3、M4A(AAC)
Supported suffix
.wma\.mp3\.m4a
2. Support video files include: MPEG2,H.264 file. DO NOT support DIVX6.x, MSVC/CRAM, MP42, GMC,
IV32, RLE, cvid, VC1, RV20, WMV.
3. Support audio files include: AC3, MP3, AAC, Cook. DO NOT support Sony ATRAC3, DTS, Dobly HD
4. Support storage devices (memory card) in NTFS, FAT32 and FAT16. DO NOT support NTFS compressed
file
Play
Play
All Videos
All photos
Loop
Upload content into internal storage:
z Prepare an empty USB drive
z Copy content to USB drive
z Plug USB drive to USB port on main board
z Unit will download content form USB drive automatically
5
High Definition AD Player User’s Manual
Chapter 2 Interface definition 2.1 Product features
Function
CVBS port: Composite signal input
VGA port:
VGA signal input
YPbPr:
Component signal input
HDMI port: HDMI signal input
CF card slot: CF card input
USB port: USB flash disk input
Note: VGA and YPbPr connection can not be used in the same time, and their audio connection also can not
be connected in the same time.
6
High Definition AD Player User’s Manual
Chapter 3 Remote control and menu setup 3.1 Remote control
7
High Definition AD Player User’s Manual
3.2 Replace remote control battery
1. Open the battery cover
2. Take out the battery box in the right direction as the following picture shows
3. Remove the used battery
4. Insert the new battery in the right way
5. Put back the cover
3.3 Menu operation
Main Menu includes following sub-menu: Input Source, System, Display, Clock Setup, ON/OFF Time Setup,
Volume Setup.
Press “SETUP” to enter Main Menu, press ↑↓to select the right item, press “play” to confirm selection.
Choose EXIT to exit the Main Menu.
Main Menu Input Source System Display Clock Setup ON/OFF Time Setup Volume Setup EXIT Input Source: The default input is card reading system, press ↑↓to select the right input, press “play” to
confirm selection.
Input Source
Storage
Component
HDMI
AV
VGA
Return Main Menu
8
High Definition AD Player User’s Manual
System:
System
Language:
ENGLISH
Show time:
OFF
Clock mode:
--:--
Encrypt:
Auto play system:
Seamless play:
OFF
Photo time:
10s
Restore default:
Return
> Language:简体中文, ENGLISH
> Show time: On/off, the default mode is off
> Clock mode:--:--,--:--:-> Encrypt: when activate it can play the encrypted media file in memory card, the unencrypted file cannot be
played. This function will be ready in Q4 2010.
> Auto play system: Play Media, Function Mode, Time Mode
Play media: Play programs stored in CF card automatically
Auto play system
Auto Play Configuration
Play Media
Play
Port
Time Set
1
Storage
0:00
Start Time
Port
End Time
Off
0:00
Storage
0:0
Off
0:00
Storage
0:0
Off
0:00
Storage
0:0
Off
0:00
Storage
0:0
Return
Function Mode: programs can be played repeatedly according to pre-setup time. Press ←→ button to
select item and press ↑↓to set up parameter.
Auto play system
Auto Play Configuration
Function Mode
Play
Port
Time Set
1
Storage
0:00
Start Time
Port
End Time
Off
0:00
Storage
0:0
Off
0:00
Storage
0:0
Off
0:00
Storage
0:0
Off
0:00
Storage
0:0
Return
Time mode: It will play according to programmed schedule. There are 4 time period to set up.
9
High Definition AD Player User’s Manual
> Seamless play: The video file will play seamlessly if this function is turned on. Factory default mode is off
Note: If turn on this function, the file format should be the same (including AV resolution, frame rate and other
specification), otherwise there will be abnormal.
> Image play time: Set interval time from 5s to 60s, change by 5s every time
> Restore default: Restore all parameters to factory mode
Display:
> Set screen Brightness, Contrast, Color, Sharpness, Tint
> Aspect ratio: Full, 4:3, 16:9, Zoom1, Zoom2, Auto.
D I S P L AY
Br ightne s s
50
Contr a s t
50
Color
55
Sharpness
50
Tint
0
Aspect ratio
Full
PC setting
Return main menu
> PC Setting: only applicable with VGA port
Auto Adjust: adjust automatically according to the input signal
Horizontal Pos. / Vertical Pos.: adjust the position
Clock: adjust the clock
Phase: adjust the phase
10
High Definition AD Player User’s Manual
PC SETTING
Auto Adjust
Horizontal Pos.
50
Vertical Pos.
50
Clock
0
Phase
60
Return main menu
Clock Setup:
Press ←→ button to select item and press ↑↓setup parameter.
CLOCK SETUP
Jun/14 12:55
CURRENT TIME
2010
Year
Jun.
Month
12
Hour
55
Minute
14
Date
Confirm
Return main menu
ON/OFF Time Setup:
It can be set to two modes: Uniform Mode, Week Mode
Uniform Mode: Set it for the whole one week, for example, turn it on at 8 am, and turn it off at 10 pm
Week Mode: Set it for every day within one week, for example, set it on/off mode from Mon. to Fri., and set it
to always off in weekend.
There are three on/off mode: Normally On, Always Off, On/off setup
11
High Definition AD Player User’s Manual
Normally on: the player keeps turning on once power is connected.
Always off: the player will turn off after two minutes if there is no operation.
On/Off time setup: 3 groups of On/off setup provided in the menu.
On/Off Time Setup On/Off Mode
Uniform Mode
Everyday
On/Off Mode
Normally on
Active
On Time
Off Time
Range1
Off
0:00
0:00
Range 2
Off
0:00
0:00
Range 3
Off
0:00
0:00
Return Main Menu
Uniform mode:
Factory default is On. Press ←→ button to set up On/Off mode and press play to confirm selection.
Week mode:
Press ←→ button to set up On/Off mode and press play to confirm selection.
Note: factory default is Normally on.
On/Off Time Setup On/Off Mode
Week mode
Friday
On/Off Mode
On/off setup
Active
On Time
Off Time
Range1
Off
0:00
0:00
Range 2
Off
0:00
0:00
Range 3
Off
0:00
0:00
Return Main Menu
Volume Setup:
Press VOL+, VOL- to adjust volume or press ←→ button to select.
VOLUME SETUP
DEFAULT VOLUME
30
Range1
Off
Range 2
Off
Range 3
Off
Confirm
Return Main Menu
Press “PLAY” to set up volume of each range, press↑↓to select the right item. Choose Return to exit. See
below drawing.
12
High Definition AD Player User’s Manual
VOLUME SETUP DEFAULT VOLUME
active
Off
Range1
Start Hour
00
Range 2
Start min
00
Range 3
End Hour
00
End min
00
Volume
0
Confirm
Return Main Menu
13
High Definition AD Player User’s Manual
Chapter 4 Installation (For PF series) 4.1 Installation
Install it according to the following steps:
1. Open the package, take the machine and accessories out.
2. Put wall mount up by suitable method.
3. Check the power line, ensure the connection with A.C. power supply is in good condition
4. Hang up machine properly, plug in the power cable
4.2 Mount on wall for smooth surface
1. Take wall mount out, paste double faced adhesive tape on its back fully.
2. Mark out the place where the hanging board is on the wall, which can be confirmed by rule, clean the wall
firstly.
3. Tear off the cover of double faced adhesive tape, and paste the wall mount.
4. Fill in glass cement all around.
5. Hang up the machine four hours later, and the four screws’ holes must coincide completely.
4.3 Mount on wall for unsmooth surface
1. Take out the wall mount.
2. Mark on wall mount for drilling.
3. Drill on the wall mount
4. Mark on the wall, which can be confirmed by rule
5. Mark positions of drilling, which can be confirmed by rule
6. Drill on the Wall
7. Place setscrew in the holes
8. Place double-side glue on the back of the wall mount
9. Paste the wall mount as preset position, fix the wall mount by screw
10. After installing wall mount, hang up the machine on it, and the four screws must coincide
14
High Definition AD Player User’s Manual
15