1
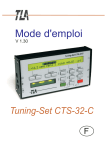
– QUICK START GUIDE – This Quick Start Guide will help you get started using your Ravish Sitar immediately. For detailed information on all of the Ravish Sitar's features and functions, please refer to the rest of this owner’s manual. Ravish Sitar Sitar Emulator Congratulations on your purchase of the Electro-Harmonix Ravish Sitar, a highly customizable sitar emulator. Electro-Harmonix is proud to bring you a product that accurately transforms your guitar into a sitar without making alterations to your instrument or needing any other accessories. The Ravish is practically an instrument unto itself. It is very deep and has many possibilities. We recommend you spend some time with this manual so you and the Ravish can be brought to a higher plane. Before proceeding further into the manual, it may be helpful to become familiar with some terms associated with the sitar: LEAD – The main strings played on the sitar. These strings can be plucked and bent at the player’s will just like a guitar’s. SYMPATHETIC STRINGS – There are 11 to 17 sympathetic strings within the body of a sitar that ring out at all times. They cannot be plucked. These strings are tuned to the key and scale determined by the player. Playing lower notes will encourage lower tones to resonate and playing higher notes will similarly encourage higher tones to resonate. – Special Features of the Ravish Sitar – Independent timbre controls for the lead and sympathetic string tones. Independent volume controls for dry, lead and sympathetic string voices. Play in all twelve chromatic keys in major, minor and exotic scales. Create your own custom sympathetic scales; up to 17 notes, including microtones. Freeze the sympathetic strings by holding down the PRESET footswitch. Fade and freeze sympathetic strings with optional expression pedal. Control the decay of the lead sitar notes. Modulate the sympathetic notes to create movement similar to that of a tanpura. Bend the pitch of the lead voice from one semitone up to one octave with an optional expression pedal. Separate outputs for main mix and sympathetic strings. Selectable Q control on lead voice allows variation from organic to synthetic. 10 fully programmable presets or leave it in What You See Is What You Get (WYSIWYG) mode. WARNING: Your Ravish Sitar comes equipped with an Electro-Harmonix 9.6DC® ® 200 power supply (same as used by Boss & Ibanez : 9.6 Volts DC 200mA / Center Negative). The Ravish Sitar requires 160mA at 9VDC with a center negative plug. The Ravish does not take batteries. Using the wrong adapter may damage your unit and void the warranty. 1 Setup 1. Using an unbalanced instrument cable, plug the output of your instrument into the INPUT jack on the right side of the Ravish. 2. Connect an unbalanced instrument cable from the MAIN OUT jack on the left side of the Ravish to the input jack of an amplifier. 3. Connect the included AC Adaptor to a wall outlet and plug its barrel connector into the 9V power jack at the top of the Ravish. 4. Turn on the amplifier and turn up your instrument’s volume. Press the BYPASS footswitch so that the STATUS LED is lit; the Ravish is now activated. A. Preset Settings Press and release the PRESET footswitch to cycle through the Ravish’s preset settings. Each factory preset has been carefully prepared to utilize the deep sonic capabilities of the Ravish. You may overwrite the factory presets with your own sound creations whenever you like. B. Manual Settings 1. To begin, turn the Ravish’s knobs to the following positions: DRY LEVEL: LEAD LEVEL: SYMPATHETIC LEVEL: LEAD TIMBRE: SYMPATHETIC TIMBRE: 3 o’clock 2 o’clock 12 o’clock 2 o’clock 10 o’clock 2. Ensure the green PRESET LED (under left segment display) is off. If it is on, turn the white MODE/PRESET knob clockwise until the PRESET LED shuts off. This action deactivates the currently loaded preset. 3. Press and release the MODE/PRESET knob to cycle into KEY mode. This is denoted by the KEY LED being lit as well as a dot in the bottom-right corner of the right segment display. Rotate the MODE/PRESET knob until E MAJOR (or any key you like) is selected. 4. Press the MODE/PRESET knob to cycle to the DECAY control. This is denoted by the DCY LED being lit. The right segment will display a number between 0 and 9. Select 3 for a short decay resembling that of an actual sitar. 5. Press the MODE/PRESET knob to cycle to the MODULATION control. Select a value between 1 and 3 for a nice, slow modulation or 0 for no modulation. 2 – SWITCH FUNCTIONS – MODE/PRESET Encoder – This white knob has three functions: 1. When in preset mode turn this knob to scroll through the presets, though it will not load the preset. To load the selected preset, press and release the PRESET footswitch.* 2. Press and hold the PRESET knob for 3 seconds to save a preset.* 3. Press and release the PRESET knob (without holding it down) to toggle through the PRESET, KEY, DECAY, MODULATION, PITCH BEND and Q modes.** *See the PRESETS section for more on presets. **See page 7 for more information. – KNOB FUNCTIONS – DRY LEVEL – Controls the volume of the dry signal (your original instrument’s signal) present at the MAIN OUTPUT. In the fully counter-clockwise position there is no dry signal on the output. At the fully clockwise position the dry level is at max, which is 2dB above unity gain. LEAD LEVEL – Controls the amount of lead sitar signal present at the MAIN OUTPUT. In the fully counter-clockwise position there is no lead signal on the output. At the fully clockwise position the lead level is at max, which is 2dB above unity gain. SYMPATHETIC LEVEL – Controls the amount of sympathetic signal on the MAIN OUTPUT and the SYMPATHETIC OUTPUT. When a plug is inserted into the SYMPATHETIC OUTPUT, there is no sympathetic signal on the MAIN OUTPUT and this knob only controls the signal level on the SYMPATHETIC OUTPUT. In the fully counter-clockwise position there is no sympathetic signal on the output. At the fully clockwise position the sympathetic level is at max, which is 6dB above unity gain. BYPASS Footswitch & LED – Pressing the BYPASS footswitch will toggle the Ravish between Effect mode and buffered Bypass mode. The associated red LED, near the BYPASS Footswitch, will light to indicate Effect mode. When this LED is off, the Ravish is in Bypass mode. PRESET Footswitch & LED – The PRESET footswitch serves three purposes: 1. Press and release the PRESET footswitch to load a selected preset. If a preset is already loaded, the Ravish will increment up to the next preset in a cyclical fashion. The PRESET LED will light up solid, indicating a preset is loaded.* 2. When in KEY MODE, press and hold the PRESET footswitch to engage the custom tuning feature of the Ravish.** 3. When in any mode other than KEY MODE, press and hold the PRESET footswitch to freeze the sympathetic strings.*** *See the PRESETS section for more on presets. **See the KEY MODE section for more on key mode. ***See the FREEZE MODE section for more on freezing the sympathetic strings. LEAD TIMBRE – Controls the “buzz” or “zing” of the lead tone. Turning this knob clockwise will make the lead tone sharper and more “buzzy” and turning it counterclockwise will make the sound duller and rounder. SYMPATHETIC TIMBRE – Controls the “buzz” or “zing” of the sympathetic strings tone. Turning this knob clockwise will make the sympathetic tone sharper and more “buzzy” and turning it counter-clockwise will make the sound duller and rounder. 3 4 – KEY MODE – The Ravish Sitar can be put into KEY MODE by pressing and releasing the MODE/PRESET encoder. When in KEY MODE, the KEY LED will light as well as the TUNE LED and one or more of the SHARP, MAJOR, MINOR and EXOTIC LEDs. A decimal point will be visible in the bottom-right corner of the right segment display and the selected key will be displayed. A “K” will briefly display on the left segment display. Rotating the MODE/PRESET knob will cycle through each chromatic key in the MAJOR, MINOR and EXOTIC modes. For example, starting in the key of E MAJOR, rotating the MODE/PRESET knob counter-clockwise will cycle through E MAJOR, E MINOR, E EXOTIC, D# MAJOR, D# MINOR, D# EXOTIC, etc. In the case of D# the letter D will display and the SHARP LED, below the digit, will be lit. – SCALES CHART – MAJOR MINOR (NATURAL) EXOTIC MAJOR MINOR (NATURAL) EXOTIC C C# / D♭ D The key and scale selected determines the notes of the sympathetic strings that will resonate. While it is not mandatory, it is often more sonically pleasing to play within the scale selected. The EXOTIC scale is unlike most traditional Western scales. It is known as the Bhairava scale in classical Hindustani music and can be described by the major scale with a flat second and flat sixth. A chart detailing the major, minor and exotic scales in each key can be found on the following page. CUSTOM SCALE TUNING – The Ravish Sitar also allows the user to custom tune the sympathetic strings. 1. While in KEY MODE, press and hold the PRESET footswitch for two seconds, after which the key display will go blank and the MAJOR, MINOR and EXOTIC LEDs will stay lit. KEEP HOLDING THE FOOTSWITCH DOWN WHILE INPUTTING NOTES. 2. Play the first note as the root note of the scale and the Ravish will recognize it by displaying the note on the right segment display. NOTE FOR BASS/LOW TUNING PLAYERS: The pitch estimator can be unreliable below 63 Hz so be sure to play the desired note loudly and clearly. 3. Silence the note and then play the second note of the desired scale. Once the note is recognized, silence it and continue the process until all of the notes of the custom scale are recognized. Up to 17 notes can be programmed. 4. Release the PRESET footswitch to retain the custom scale. This mode is indicated by the MAJOR, MINOR and EXOTIC LEDs staying lit. The MODE/PRESET encoder can be used to cycle through and edit other parameters, but rotating this knob while in KEY MODE will erase the custom scale. It is recommended that the user saves the custom scale in a preset to recall it at a later time. KEY TRANSPOSITION – The Ravish has the ability to transpose the entire sympathetic string set to another key without having to scroll to that key. This is helpful for users who need to change keys on the fly or use “quarter tuning” (i.e. tune their instruments halfway between semitones). To do this, follow the CUSTOM SCALE TUNING instructions above but only program one note (the root) and then release the PRESET footswitch. 5 D# / E♭ E F F# / G♭ G G# / A♭ A A# / B♭ B 6 – I/O CONNECTIONS – INPUT – Connect the output of your instrument or another effects pedal to this jack. – DECAY MODE – From KEY MODE, press and release the MODE/PRESET encoder once to put the Ravish into DECAY MODE, denoted by the DCY LED being lit as well as a “D” displaying briefly on the left segment display. In this mode the user can change the note decay of the lead sitar sound. This parameter ranges from 0 to 9 with 0 being the shortest decay and 9 being the longest. The default value is 3. – MODULATION MODE – From DECAY MODE, press and release the MODE/PRESET encoder once to put the Ravish into MOD MODE, denoted by the MOD LED being lit as well as an “M” displaying briefly on the left segment display. In this mode the user can add modulation to the sympathetic strings. The modulation is intended to emulate the sound of a tanpura (aka tambura), an instrument commonly used to accompany the sitar in live performance. As this parameter’s value increases, the modulation’s rate gets faster. The default setting is 0 (no modulation). – Q MODE – From MOD MODE, pressing the MODE/PRESET encoder once will put the Ravish in Q MODE, denoted by the DCY and MOD LEDs being lit as well as a “Q” displaying briefly on the left segment display. In this mode the user can adjust the Q setting of both the lead and sympathetic strings. This parameter ranges from 0 to 4 with 4 being the most “sharp” or “synthetic” setting. The default setting is 4. – PITCH MODE – ONLY AVAILABLE WHEN AN EXPRESSION PEDAL IS PLUGGED INTO THE PITCH EXP JACK. With an expression pedal plugged into the PITCH EXP jack, from Q MODE, pressing the MODE/PRESET encoder once will put the Ravish into PITCH MODE, denoted by the KEY, DCY and MOD LEDs being lit as well as a “P” displaying briefly on the left segment display. Here the user can change the maximum number of semitones the lead sitar sound will bend at the expression pedal’s toe down position. The default setting is 2 (one whole step) but this parameter ranges from 1 semitone to a full octave (signified by the letter O). The expression pedal only bends up in pitch. – FREEZE MODE – When in any mode other than KEY MODE, pressing and holding the PRESET footswitch freezes the sympathetic strings indefinitely. While frozen, all controls are still functional and can be tweaked to the user’s taste. MAIN OUT – This jack contains the dry, lead sitar and sympathetic string signals. When a cable is plugged into the SYMPATHETIC OUT, the MAIN OUT contains only the dry and lead sitar signals. SYMPATHETIC OUT – This output contains only the sympathetic strings signal and is intended for use with external effects and/or to go to a separate amplifier. When this output is in use, no sympathetic strings will be present on the MAIN OUT. DRONE EXP – An optional expression pedal* can be plugged into this jack for manual control of the Ravish’s sympathetic strings. With the expression pedal in the heel position, no sympathetic strings are present in the mix. As the pedal is rocked forward, the sympathetic strings will fade in and freeze. At the toe-down position, the volume of the sympathetic strings will be at the SYMPATHETIC LEVEL knob setting. PITCH EXP – An optional expression pedal* can be plugged into this jack and used to bend the pitch of the lead sitar up. Once the expression pedal is plugged in, a menu becomes available by pressing and releasing the white MODE/PRESET knob past the Q setting. All three of the MODE LEDs will light up and the right segment display will show how many semitones the pitch can be bent up. *The expression pedal must have a Tip-Ring-Sleeve connection. It is important that the expression pedal have the correct polarity. The tip of the plug must be connected to the wiper of the potentiometer inside the expression pedal. If you are not sure what type of expression pedal to use, try one with a polarity switch so that it will work with many different types of instruments. Some suggested Expression Pedals: M-Audio EX-P, Moog EP-2, Roland EV-5 or Boss FV-500L. You may also connect a control voltage to the jack with a TS plug. The Control Voltage range must be between 0 V to 5 V. – POWER – Use the supplied AC adaptor to power the Ravish. Plug the barrel connector of the adaptor into the 9V power jack located at the top of the unit. The Ravish requires 9 – 9.6VDC at 200mA with a center negative plug. The Ravish accepts Boss™ style AC adaptors. The actual current draw of the Ravish is 160mA. – TECHNICAL SPECIFICATIONS – Sample Rate: 36082 Hz A/D and D/A Conversion Bit Resolution: 24 bits Processed Audio Bit Resolution: 32 bits ADC Clipping Level: 4.9 Vp-p Output Clipping Level: 4.7 Vp-p Input Jack Impedance INPUT: 2.2 MΩ 7 Output Jack Impedance MAIN OUT: 680 Ω SYMPATHETIC: 680 Ω 8 – PRESETS – Press and release the PRESET footswitch once to enter PRESET MODE. The Ravish has ten fully programmable presets. Saving a preset will capture the setting of each of the five black knobs and all internal settings. Once a preset is saved, the Ravish will remember its settings after power has been disconnected. Preset ten is denoted by the Roman numeral “X”. The Ravish also has What You See Is What You Get (WYSIWYG) mode, denoted by a “W” on the preset display. Preset Save Procedure 1. 2. 3. 4. Once you have created a sound you want to save or if you want to save an edited preset, turn the MODE/PRESET knob to display the preset LED number where you want to save the setting to. Press down and hold the MODE/PRESET knob for 3 seconds. The preset digit will blink to indicate save completion. After the digit stops blinking, release the MODE/PRESET knob. The PRESET LED will light up solid. Your preset is now saved. Preset Load Procedure There are two options for loading presets: A. Press and release the PRESET footswitch repeatedly until the preset you want to load is selected. Make sure the PRESET LED is lit to indicate your preset is loaded. Please Note: The current knob positions are no longer valid. B. Use the MODE/PRESETS knob and the PRESET footswitch. 1. Turn the PRESETS knob so the preset number where the preset was saved is selected. 2. Press and release the PRESET footswitch. The PRESET LED will light up to indicate that the preset is loaded. Please Note: The current knob positions are no longer valid. After loading a preset, if you move a knob, the knob’s new location will supersede the preset’s stored value for that knob. At this point, the PRESET LED will blink rapidly to indicate that a knob has been moved, though a preset is still loaded. Preset Unload Procedure A preset can be unloaded to restore the current knob positions. Turn the MODE/PRESETS knob clockwise until a “W” appears on the preset display. Once the “W” appears, the preset is unloaded and the current knob positions take over. This will also revert the KEY, DECAY, MODULATION and PITCH BEND parameters to their prior, non-preset settings. If preset X is loaded, upon pressing the PRESET footswitch, the Ravish will cycle to WYSIWYG mode, where no preset is loaded. Press the PRESET footswitch again and preset 1 will load. Factory Preset Restore Procedure 1. 2. Press and hold down the MODE/PRESET knob and the PRESET footswitch while applying power. After applying power, continue to hold down both switches until you see all of the LEDs blink rapidly. At this point you can release the switches; the factory presets have been restored. 9 - WARRANTY INFORMATION Please complete and return the enclosed warranty card within 10 days of purchase. Electro-Harmonix will repair or replace, at its discretion, a product that fails to operate due to defects in materials or workmanship for a period of one year from date of purchase. This applies only to original purchasers who have bought their product from an authorized Electro-Harmonix retailer. Repaired or replaced units will then be warranted for the unexpired portion of the original warranty term. If you should need to return your unit for service within the warranty period, please include a brief description of the problem as well as you name, address, telephone number, copy of your receipt, and a check or money order. The costs for shipping and handling are listed below. Electro-Harmonix United States c/o New Sensor Corporation Canada 55-01 2nd St. Europe and other outside counties Long Island City, NY 11101 Please make checks/money orders payable to: Attn: Service Department New Sensor Corporation To hear demos on all EH pedals visit us on the web at www.ehx.com. Email us at [email protected] - FCC COMPLIANCE Note: This equipment has been tested and found to comply with the limits for a Class B digital device, pursuant to part 15 of the FCC Rules. These limits are designed to provide reasonable protection against harmful interference in a residential installation. This equipment generates, uses and can radiate radio frequency energy and, if not installed and used in accordance with the instructions, may cause harmful interference to radio communications. However, there is no guarantee that interference will not occur in a particular installation. If this equipment does cause harmful interference to radio or television reception, which can be determined by turning the equipment off and on, the user is encouraged to try to correct the interference by one or more of the following measures: Reorient or relocate the receiving antenna. Increase the separation between the equipment and receiver. Connect the equipment into an outlet on a circuit different from that to which the receiver is connected. Consult the dealer or an experienced radio/TV technician for help. Modifications not expressly approved by the manufacturer could void the user's authority to operate the equipment under FCC rules. 10