1
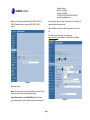
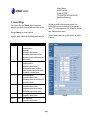
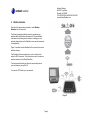
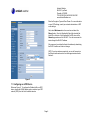
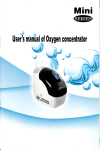
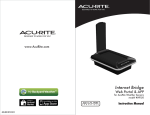
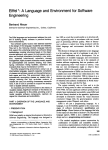
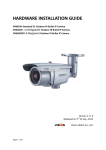
Ambient Weather 6845 W. Frye Road Chandler, AZ 85226 TEL 480-283-1644 FAX 480-346-3381 www.AmbientWeather.com WeatherHub3 Quick Start Guide Note: The WeatherHub3 Network Storage Link has been programmed by Ambient Weather before you receive it. For warranty replacement, please contact Ambient Weather directly. Ambient Weather warranties this product for 1 year. Table of Contents The unit has been tested thoroughly before shipping. 1 2 3 4 5 6 7 8 9 10 11 12 13 14 15 Introduction ............................................................................ 1 Packing List............................................................................ 1 Connections ........................................................................... 1 IP Addressing......................................................................... 2 Browser Access ..................................................................... 3 System Info ............................................................................ 3 Weather Station Settings ....................................................... 3 Sensor Settings...................................................................... 5 Weather Networks ................................................................. 6 Weather Underground Registration ................................... 7 Configuring as a WIFI Device ............................................ 8 Power Down Precautions .................................................. 9 More Information ................................................................ 9 Liability Disclaimer ........................................................... 10 Warranty Information ....................................................... 10 1 Introduction 2 Packing List The packing list is as follows: 1. 2. 3. 4. 5. 3 WeatherHub3 Linux Computer (IConnect) WeatherHub3 AC adaptor 4.0 GB Class 6 USB Flash Drive (programmed) Ethernet Cable WeatherHub3 CD Connections Note: Never plug or unplug the USB Stick when the WeatherHub3 is powered up. This can damage the USB Stick. Always make sure the device power is disconnected. Connect the WeatherHub3 Computer as follows (reference Figure 1): The following quick start programming guide provides basic instructions for connecting your WeatherHub3 to your weather station and router and the Internet. 1. Connect the pre-programmed USB stick (included) into one of the front USB ports. 2. Connect the weather station USB connection into the USB port on the back of the WeatherHub3. Note: If you have a weather station with a serial port, you will need a USB converter and serial cable available here: Note: Ambient Weather uses the terms WeatherHub3 and MeteoHub interchangeably. WeatherHub3 is the complete product, including the Linux computer (IConnect), 4 GB USB stick and operating system. The operating system is referred to as MeteoHub, developed by www.MeteoHub.de . http://www.ambientweather.com/cousbto9sead.html and http://www.ambientweather.com/secoca6.html Page 1 Ambient Weather 6845 W. Frye Road Chandler, AZ 85226 TEL 480-283-1644 FAX 480-346-3381 www.AmbientWeather.com 3. Connect the WeatherHub3 to your router or switch. Note: a cabled connection is required to configure the device. It can later be disconnected after the wireless LAN is configured. 4. Connect the AC power adaptor to the WeatherHub3. The unit will turn on and the blue status light on the front of the WeatherHub3 will turn solid on after approximately one minute. However, since it is dynamic, you will have to determine the address that was assigned to the unit. To determine this address, load and install the IPScan tool provided on the CD. You can also download it here: http://www.download25.com/install/free-ip-scanner.html For Mac and Linux users, visit: http://www.angryip.org/w/Download Select the Start Scanning button. After the scan is complete, locate the IP address associated with the Host Name METEOPLUG (or METEOHUB). In the example figure below, the IP address was assigned to 192.168.1.77. Figure 1 4 IP Addressing The WeatherHub3 is programmed from the factory for dynamic addressing (or DHCP). This allows to you to address the unit from any computer on your network without modifying the IP address. Figure 2 Page 2 Ambient Weather 6845 W. Frye Road Chandler, AZ 85226 TEL 480-283-1644 FAX 480-346-3381 www.AmbientWeather.com 5 Browser Access Enter this IP address into your web browser. In the example above, this would be http://192.168.1.77 When prompted for the Username and Password, enter: Username: meteohub Password: meteohub 6 System Info From the Menu Bar, select System Info. Record the Mac Address and System-ID for warranty purposes. From the Menu Bar, select Maintenance. Record the Activation Code for warranty purposes. Store this information in a safe place for warranty service! MAC: System-ID (case sensitive): Figure 3 Activation Code (case sensitive): 7 Weather Station Settings Reference Figure 4. From the side Menu bar, select Weather Station. Select your weather station type and then Save. Page 3 Ambient Weather 6845 W. Frye Road Chandler, AZ 85226 TEL 480-283-1644 FAX 480-346-3381 www.AmbientWeather.com Note: If you own an Ambient Weather WS-1080, WS-1090 or WS-2080 weather station, choose the WH-1080, W-8681,… option. communicating). Enter the Type of Connection (1) and Device (2) specified under available devices. Note: if there are two devices listed, choose the first one in the list. For other non-critical settings on this page, visit www.meteohub.de to download the full manual. Select Save when complete. Figure 4 Reference Figure 5. Name: Enter any name for your weather station (optional). This is helpful if you have more than one weather station. Type of Connection: Under Available Devices, you will see your weather station connection type (if properly connected and Figure 5 Page 4 Ambient Weather 6845 W. Frye Road Chandler, AZ 85226 TEL 480-283-1644 FAX 480-346-3381 www.AmbientWeather.com 8 Sensor Settings Note that you can define multiple channel numbers if your weather station has more than one of each sensor (example, channel 1,2,3 outdoor temperature, or th1, th2, and th3). In most cases, these sensors are optional. From the Menu Bar, select Sensors. Select the appropriate sensors for your system and add any additional sensors not listed. Entering a Name for your sensor is optional. For some weather stations, this may take a while for all sensors to report in. In general, weather stations have the following default sensor IDs: Type Indoor ID thb0 Outdoor th0 UV uv0 Solar sol0 rain rain0 wind wind0 Description t=temperature (indoor) h=humidity (indoor) b=barometer 0=no specific channel number Most weather stations have the indoor temperature, humidity and barometer built into the console. t=temperature (outdoor) h=humidity (outdoor) 0=no specific channel number All of the weather stations include an outdoor temperature and humidity sensor. The default is no channel number. uv=ultra-violet radiation 0=no specific channel number Most weather stations do not include a UV sensor and is optional. sol=solar radiation 0=no specific channel number Most weather stations do not include a Solar Radiation sensor and is optional. rain=rain gauge 0=no specific channel number wind= anemometer 0=no specific channel number Figure 6 Page 5 Ambient Weather 6845 W. Frye Road Chandler, AZ 85226 TEL 480-283-1644 FAX 480-346-3381 www.AmbientWeather.com 9 Weather Networks Once all of the sensors have reported in, select Weather Networks from the menu bar. The following example details the steps for registering your weather station with Weather Underground. For more detailed information on publishing to other servers, including your own website, please reference the MeteoHub user manual (referenced in the appendix). Figure 7 describes how the WeatherHub3 connects to the various weather networks. The WeatherHub3 communicates to a router or switch with a cabled or WIFI connection. This information is sent to the various weather networks via the World Wide Web. The device sends the data via http write commands (similar to your web browser), using Port 80. You can also FTP data to your own website. Figure 7 Page 6 Ambient Weather 6845 W. Frye Road Chandler, AZ 85226 TEL 480-283-1644 FAX 480-346-3381 www.AmbientWeather.com 10 Weather Underground Registration 1. To sign up your station with Weather Underground, visit: http://www.wunderground.com/wxstation/signup.html 2. Enter your Weather Underground Station ID and Password. 3. Select the Weather Underground checkbox. 4. Enable rapid fire to update up to the second data. 5. Select Save 6. Enter the appropriate sensors you entered on the Sensor page for reporting to the weather servers. If the sensor list is not displayed, make sure you select Save first. 7. Select Save to complete the registration. Figure 8 Page 7 Ambient Weather 6845 W. Frye Road Chandler, AZ 85226 TEL 480-283-1644 FAX 480-346-3381 www.AmbientWeather.com Enter the Encryption Type and Pass Phrase. For more information on your WIFI settings, consult your network administrator or WIFI router settings. Next, select Maintenance from the menu bar and select the Reboot button. Once the WeatherHub3 has fully rebooted (the blue LED on the front of the WeatherHub3 is ON), return to the Network page and record the WLAN IP. You can now access the device through the WLAN IP address. We recommend you statically allocate this address by deselecting the DHCP checkbox so it does not change. NOTE: If you lose wireless connectivity, you can still connect via the Ethernet cable and scan for the device again as described in Section 4. Figure 9 11 Configuring as a WIFI Device Reference Figure 9. To configure the WeatherHub3 as a WIFI device, choose the WLAN Adaptor option, and select your WIFI network (SSID) from the list of available networks. Page 8 Ambient Weather 6845 W. Frye Road Chandler, AZ 85226 TEL 480-283-1644 FAX 480-346-3381 www.AmbientWeather.com 12 Power Down Precautions Note: It is important to perform a graceful shutdown of the WeatherHub3. Failure to perform this procedure when power is removed from the device may corrupt the USB Stick. 1. Select the Maintenance panel from the menu. 2. Under System Control, MeteoHub System, select the Reboot button. Carefully watch the blue light on the front of the WeatherHub3. When the blue light turns red, unplug the WeatherHub3 from power. If you wait too long (you have several seconds to unplug), the system will reboot again. Figure 10 13 More Information MeteoHub is a Copyright of Boris Pasternak, all rights reserved. Please visit www.meteohub.de for firmware and manual updates. Note: Ambient Weather has licensed the WeatherHub3 for one weather station. For additional weather station licenses, visit www.meteohub.de For technical assistance, please email [email protected] Page 9 Ambient Weather 6845 W. Frye Road Chandler, AZ 85226 TEL 480-283-1644 FAX 480-346-3381 www.AmbientWeather.com Questions or comments about this manual? We are always striving to improve our documentation. Please send your comments to [email protected] . This limited warranty begins on the original date of purchase, is valid only on products purchased and only to the original purchaser of this product. To receive warranty service, the purchaser must contact Ambient, LLC for problem determination and service procedures. 14 Liability Disclaimer The electrical and electronic wastes contain hazardous substances. Disposal of electronic waste in wild country and/or in unauthorized grounds strongly damages the environment. Warranty service can only be performed by Ambient, LLC. The original dated bill of sale must be presented upon request as proof of purchase to Ambient, LLC. Reading the “User manual” is highly recommended. The manufacturer and supplier cannot accept any responsibility for any incorrect readings and any consequences that occur should an inaccurate reading take place. Your Ambient, LLC warranty covers all defects in material and workmanship with the following specified exceptions: (1) damage caused by accident, unreasonable use or neglect (lack of reasonable and necessary maintenance); (2) damage resulting from failure to follow instructions contained in your owner’s manual; (3) damage resulting from the performance of repairs or alterations by someone other than an authorized Ambient, LLC authorized service center; (4) units used for other than home use (5) applications and uses that this product was not intended. This product is designed for personal use as indication of weather conditions. This product is not to be used for medical purposes or for public information. The specifications of this product may change without prior notice. This warranty covers only actual defects within the product itself, and does not cover the cost of installation or removal from a fixed installation, normal set-up or adjustments, claims based on misrepresentation by the seller or performance variations resulting from installation-related circumstances. This product is not a toy. Keep out of the reach of children. No part of this manual may be reproduced without written authorization of the manufacturer. Ambient, LLC WILL NOT ASSUME LIABILITY FOR INCIDENTAL, CONSEQUENTIAL, PUNITIVE, OR OTHER SIMILAR DAMAGES ASSOCIATED WITH THE OPERATION OR MALFUNCTION OF THIS PRODUCT. 15 Warranty Information Ambient, LLC provides a 1-year limited warranty on this product against manufacturing defects in materials and workmanship. Page 10