1
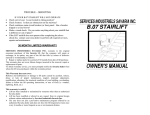
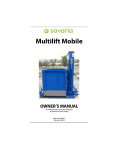
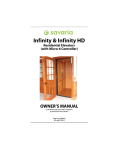
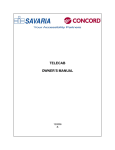
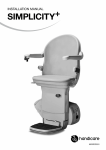
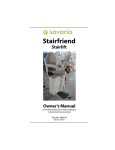
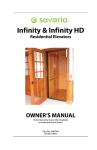
SL-1000 Stairlift OWNER’S MANUAL (To Be Retained by Owner After Installation by Authorized Savaria Dealer) Part No. 000729 03-m12-2013 2 IMPORTANT Ensure that only an authorized Savaria Dealer installs and services the Savaria SL-1000 Stairlift. Under no circumstances is anyone other than a dealer with Savaria training and authorization to install, adjust, or service any mechanical or electrical device on this equipment. Failure to follow this warning can result in safety system compromises or defeat; this can result in serious injury or death. Savaria accepts no liability for property damage, warranty claims or personal injury, including death, in this circumstance. Passenger safety is the result of countless details in the equipment’s design, manufacture, and installation. After installation, reliable operation and continual safe operation requires regular service and inspection at least twice per year, or more frequently where usage, environment, or local jurisdiction requires. As the Owner, you are responsible for ensuring that regular service and inspections occur in a timely manner. Refer to this manual for specifications, operating instructions and maintenance of the Savaria SL-1000 Stairlift. Upon completion of installation, the dealer must provide you with the information below and ensure it is recorded in this manual. In addition, either the dealer or you must keep any service and/or maintenance records in the Maintenance Record section of this manual. WARRANTY Ensure your Savaria Dealer provides you with a copy of the manufacturer’s limited parts warranty and documentation relating to any Dealer labour warranty. ------------------------------------------------------------------------------------------------- FOR OWNER’S RECORDS Customer Name: _________________________________________ Installing Dealer: _________________________________________ Dealer’s Telephone Number: _______________________________ Date Installed: ___________________________________________ Serial/Job Number: _______________________________________ SL-1000 Owner’s Manual Part No. 000729, 03-m12-2013 3 Table of Contents TO ENSURE SAFE OPERATION . . . . . . . . . . . . . . . . . . . . . . . . . . . . . . . . . . . . . . . . . . . . . . 4 1. DESCRIPTION . . . . . . . . . . . . . . . . . . . . . . . . . . . . . . . . . . . . . . . . . . . . . . . . . . . . . . . . . . . 5 2. SPECIFICATIONS . . . . . . . . . . . . . . . . . . . . . . . . . . . . . . . . . . . . . . . . . . . . . . . . . . . . . . . . 6 3. FEATURES . . . . . . . . . . . . . . . . . . . . . . . . . . . . . . . . . . . . . . . . . . . . . . . . . . . . . . . . . . . . . . 7 Seating Features . . . . . . . . . . . . . . . . . . . . . . . . . . . . . . . . . . . . . . . . . . . . . . . . . 7 Safety Features . . . . . . . . . . . . . . . . . . . . . . . . . . . . . . . . . . . . . . . . . . . . . . . . . . . 7 Footrest and Carriage Sensors . . . . . . . . . . . . . . . . . . . . . . . . . . . . . . . . . 7 Safety Switches . . . . . . . . . . . . . . . . . . . . . . . . . . . . . . . . . . . . . . . . . . . . . . . 7 Emergency Stop Button (Optional) . . . . . . . . . . . . . . . . . . . . . . . . . . . . 7 Overspeed Brake (Optional) . . . . . . . . . . . . . . . . . . . . . . . . . . . . . . . . . . . 7 Manual Operation . . . . . . . . . . . . . . . . . . . . . . . . . . . . . . . . . . . . . . . . . . . . 8 Key Switch and Power Switch . . . . . . . . . . . . . . . . . . . . . . . . . . . . . . . . . . . . . 9 Diagnostic Display . . . . . . . . . . . . . . . . . . . . . . . . . . . . . . . . . . . . . . . . . . . . . . . 9 4. OPERATION . . . . . . . . . . . . . . . . . . . . . . . . . . . . . . . . . . . . . . . . . . . . . . . . . . . . . . . . . . . .10 Before Operating the Stairlift . . . . . . . . . . . . . . . . . . . . . . . . . . . . . . . . . . . . .10 Operating the Stairlift . . . . . . . . . . . . . . . . . . . . . . . . . . . . . . . . . . . . . . . . . . . .10 5. TROUBLESHOOTING AND MAINTENANCE . . . . . . . . . . . . . . . . . . . . . . . . . . . . . .11 Operator Troubleshooting . . . . . . . . . . . . . . . . . . . . . . . . . . . . . . . . . . . . . . .11 Stairlift Will Not Operate . . . . . . . . . . . . . . . . . . . . . . . . . . . . . . . . . . . . .11 Stairlift Emits Beeping Sound . . . . . . . . . . . . . . . . . . . . . . . . . . . . . . . . .11 Diagnostics . . . . . . . . . . . . . . . . . . . . . . . . . . . . . . . . . . . . . . . . . . . . . . . . . . . . .12 Maintenance . . . . . . . . . . . . . . . . . . . . . . . . . . . . . . . . . . . . . . . . . . . . . . . . . . . .14 Maintenance Record . . . . . . . . . . . . . . . . . . . . . . . . . . . . . . . . . . . . . . . . . . . .15 Part No. 000729, 03-m12-2013 SL-1000 Owner’s Manual 4 TO ENSURE SAFE OPERATION To ensure safe operation of this equipment, pay careful attention to the important notes below. • Read this manual carefully before using the SL-1000 Stairlift. • To prevent accidents, adhere strictly to the instructions and keep clear of moving parts at all times. • Follow instructions on all equipment labels at all times. Replace any damaged labels immediately. • Ensure that only qualified personnel perform maintenance. SL-1000 Owner’s Manual Part No. 000729, 03-m12-2013 5 1. DESCRIPTION Figure 1 shows the exterior components of the SL-1000 Stairlift. Figure 1 Backrest Adjustable armrests Flip-up seat (swivel out, up/down adjustable) Emergency stop button (optional) UP/DOWN rocker switch Seat swivel handle Retractable seat belt Carriage Folding footrest Controls on side of carriage ON/OFF switch Diagnostic display Part No. 000729, 03-m12-2013 Remote control CALL/SEND unit Key switch Press to go DOWN Press to go UP SL-1000 Owner’s Manual 6 2. SPECIFICATIONS SL-1000 Specifications Applications Indoor, straight-run stairway Load capacity 350 lb (159 kg) Maximum travel 32 ft (9.75 m) Travel speed 20 ft/min (6 m/min) Range of incline 25° to 55° Drive system Rack and pinion Operator controls Constant-pressure type (rocker switch and remote control call/send units) Seat belt Retractable Motor 1/2 HP, 24 VDC Fold-up width 13 3/4” (35 cm) Fold-out width 24 1/4” (61.6 cm) Rail Aluminum extruded Charges on standard household power (110 VAC) Charging Constant-charge battery operation that charges anywhere on the rail Emergency operation Full up and down travel on power interruption (full battery backup) Warranty 36 months SL-1000 Owner’s Manual Part No. 000729, 03-m12-2013 7 3. FEATURES Seating Features The seat assembly can swivel in either direction. Lift up and hold the swivel handle to swivel the seat for transfer into or out of the seat. Let go of the handle and the seat will lock in position. For your safety, do not swivel the seat until the unit has stopped. The seat height can also be adjusted as required. The arms can be adjusted in or out, and the angle of the armrests can be adjusted to allow for a more comfortable seating position. Contact your authorized Savaria dealer to perform these adjustments. When the stairlift is not in use, the seat, arms, and footrest can be folded up to allow for more space on the stairway. Always use the retractable seat belt to ensure that you are safely secured in the chair during travel. Safety Features Footrest and Carriage Sensors There are edge sensors on the sides of the footrest and carriage, and an underpan sensor on the bottom of the footrest. These sensors will stop the unit if an obstruction is encountered on the stairway. If you encounter an obstruction, press the opposite side of the UP/DOWN rocker switch to run the stairlift in the opposite direction. Remove the obstacle from the pathway and proceed in the original direction of travel. Safety Switches There are upper and lower limit switches on the SL-1000 to stop the stairlift when it reaches the top or bottom of the stairway. There are mechanical stops at the top and bottom of the rail to stop the lift in an over-travel situation. There is also a safety switch for the swivel seat that will prevent the unit from running if the seat is not in the riding position. Emergency Stop Button (Optional) There is an optional emergency stop button located on the left arm. Pressing this button will stop the unit immediately. Overspeed Brake (Optional) There is an optional overspeed brake that will engage and stop the lift if the normal downward travel speed is exceeded. Part No. 000729, 03-m12-2013 SL-1000 Owner’s Manual 8 Manual Operation The manual device allows you to operate the lift manually. 1 Turn off power to the lift at the charger disconnect and battery disconnect. 2 For public units only: Before you can use the manual device on public units, you must release the motor brake. To release the brake, remove the rubber cover “R” on the side of the carriage and move the brake lever to the right. 3 Remove the rubber cover “M” on the side of the carriage and fit the manual operation tool onto the motor input shaft. 4 Rotate the tool clockwise for the unit to travel up the stairs and counter-clockwise for the unit to travel down the stairs. 5 When complete, remove the tool, reset the motor brake (for public units only) and replace the rubber plug(s). Note that the unit will not operate when the motor brake is disengaged (public units only). Figure 2 Manual device cover “M” Brake release cover “R” (public units only) Motor input shaft Brake release lever (public units only) Figure 3 Manual operation tool SL-1000 Owner’s Manual Part No. 000729, 03-m12-2013 9 Key Switch and Power Switch The stairlift is equipped with a key switch and cannot be operated unless the key is inserted and turned a quarter turn clockwise to the on position. Once the key switch is turned on, flip the ON/OFF power switch to the ON position. Figure 4 ON/OFF power switch Key switch Diagnostic Display The stairlift is equipped with a diagnostic display located on the side panel of the stairlift. The diagnostic display shows the status of the unit and displays codes to help diagnose any faults. Refer to the “Diagnostics” section on pages 14 and 15. Figure 5 Diagnostic display Part No. 000729, 03-m12-2013 SL-1000 Owner’s Manual 10 4. OPERATION Before Operating the Stairlift 1 Ensure the stairway is clear of any obstructions. 2 Insert the key and turn it a quarter turn clockwise. Flip the ON/OFF switch to the ON position. This diagnostic display will show the ‘stairlift okay’ code . 3 Check that the seat is locked in the riding position for up/down travel. Operating the Stairlift 1 If the stairlift is not at the required end of the stairway, use one of the remote control CALL/SEND units to call or send the stairlift to the appropriate end of the rail. Be sure to point the remote at the lift. 2 If necessary, fold down the seat, armrests, and footrest. 3 Position yourself in the seat and fasten the seat belt. 4 Lift up and hold the seat swivel handle, and then rotate the seat so that you are parallel to the rail (with your back against the stairway wall). 5 Release the seat swivel handle to secure the seat in the riding position. 6 Position both feet securely on the footrest and place your arms on the armrest cushions. 7 Press and hold one end of the UP/DOWN rocker switch (located on the front end of the right arm) to move the stairlift in the desired direction. 8 The stairlift will stop automatically at the upper or lower end of the rail, or if the rocker switch is released. 9 Once the stairlift has come to a complete stop, swivel the seat as required, unfasten the seat belt, and get out of the chair. 10 To allow for more room on the stairway, you can fold up the seat, armrests, and footrest when the stairlift is not in use. NOTE In addition to the on-board UP/DOWN rocker switch, there are two remote control CALL/SEND units that enable you to “call” or “send” the stairlift to or from either end of the rail. Point the remote at the lift and press the red button to go UP or the green button to go DOWN. SL-1000 Owner’s Manual Part No. 000729, 03-m12-2013 11 5. TROUBLESHOOTING AND MAINTENANCE Operator Troubleshooting Stairlift will not operate If your stairlift will not operate, check the basic items listed below first. 1 Check the swivel seat. Is the seat locked in the riding position? 2 Check around the footrest and carriage. Is there an object on the stairway? 3 Check the residence main circuit breaker (or fuse) panel. Has a breaker tripped or a fuse blown? 4 Make a visual check. Do you notice anything about your stairlift that is different or out of place? If the stairlift does not operate after checking the above items, check the code on the diagnostic display. Refer to the table on the next page to help diagnose the fault. If the stairlift still does not operate, contact your Authorized Savaria Dealer. Stairlift emits beeping sound If at any time while the stairlift is not in motion, the unit emits a beeping sound that lasts for approximately 20 seconds, this means that the stairlift is not charging. Check first that the unit is plugged in to the wall outlet. If the beeping continues, check the code on the diagnostic display. Refer to the table on the next page to help diagnose the fault. If the beeping still continues, contact your Authorized Savaria Dealer. Stairlift stops at either end of stairway and won’t restart If the stairlift runs to either end of the stairway and then stops and won’t restart, this means that the battery charge is low (diagnostic code 1 will be displayed). Leave the stairlift charging until the diagnostic display shows the normal operation code indicating that the stairlift is ready to use. If the problem continues, contact your Authorized Savaria Dealer. Part No. 000729, 03-m12-2013 SL-1000 Owner’s Manual 12 Diagnostics For codes displayed on the diagnostic display, refer to the following table to help diagnose and correct any faults. NOTE If the recommended corrective action provided in the table does not solve the problem, contact your authorized dealer for assistance. Diagnostic Codes Code _ Status/Fault Recommended Corrective Action No display. Press the UP/DOWN rocker switch and see if the display comes on. Check that the key switch and ON/OFF switch are turned on. On when the stairlift is okay; ready to use. Flashing when the stairlift is running. No action required. 0 Final limit switch is activated or swivel seat switch is activated. Check that the key switch is ON and the seat is fully swivelled to the riding position. 1 Batteries require charging. Check that the charger is plugged in and charging. 2 Batteries not charging. Check that the charger is plugged in and charging. 3 Upper limit safety switch is activated. You have reached the upper limit. Run the unit in the down direction. 4 Safety edge switch (bumper) in up Remove any obstacle that may have direction is activated. activated the switch. 5 Underpan switch is activated. SL-1000 Owner’s Manual Remove any obstacle from underneath the footrest. Part No. 000729, 03-m12-2013 13 Diagnostic Codes (continued) Code 6 Status/Fault Recommended Corrective Action Safety edge switch (bumper) in down direction is activated. Remove any obstacle that may have activated the switch. Lower limit safety switch is activated You have reached the lower limit. Run the unit in the up direction. 7 Batteries approaching critical level Check that the charger is plugged in and need charging. and charging. 9 Rocker switch is activated in UP/DOWN direction. No action required. A Hinge is open. Contact your authorized dealer. B A switch is active at power on (toggle up, toggle down, IR up, IR down, or learn. Contact your authorized dealer. C IR address (DIP switch) does not match. Contact your authorized dealer. d Main power relay is welded. Contact your authorized dealer. E Main power relay did not close. Contact your authorized dealer. g Brake not connected. Contact your authorized dealer. H Main power relay has closed early. Contact your authorized dealer. L Current limit exceeded. Contact your authorized dealer. n Stairlift is running at half speed. Contact your authorized dealer. o Main control board has a memory Contact your authorized dealer. problem. P Powered swivel did not respond. Contact your authorized dealer. r No charging current. Check that the charger is plugged in and charging. Part No. 000729, 03-m12-2013 SL-1000 Owner’s Manual 14 Maintenance NOTE The owner can perform the 3-month checks; 6-month checks must be performed by a Qualified Technician. Contact your Authorized Dealer. Units installed in adverse environments will require additional maintenance on a monthly basis. Lockout Pin (public units only) The lockout pin (on public units only) is for use only by the technician when performing maintenance or for inspection purposes. For normal use, the lockout pin must be inserted vertically into the storage hole. This photo shows the pin in the lockout position. Lockout pin in lockout position Insert lockout pin in storage hole for normal operation Maintenance Schedule Verification by owner Frequency Check that the swivel seat switch is working. Ensure the unit will not travel until the swivel seat is locked in the riding position. Check that the footrest and carriage sensors are working. Ensure the unit stops when it contacts an obstacle. Every 3 months Every 3 months Check that the emergency stop button is working. Ensure the unit stops immediately when the button is pressed. Every 3 months Verification by technician Frequency Check the operation of the limit switches. Ensure the unit stops at the required position at the top and bottom of the stairway. Every 6 months Check the operation of the overspeed brake. Every 6 months Lubricate the rollers using white lithium grease. As required Lubricate the seat swivel system using wheel bearing grease. As required SL-1000 Owner’s Manual Part No. 000729, 03-m12-2013 15 Maintenance Record Date Time Reason for Call Part No. 000729, 03-m12-2013 Comments Dealer SL-1000 Owner’s Manual Authorized Savaria Dealer Savaria™ SL-1000 Stairlift OWNER’S MANUAL Part No. 000729 Copyright 2013 Savaria Corporation Elevators and Lifts www.savaria.com Sales 2 Walker Drive Brampton, Ontario, L6T 5E1, Canada Tel: (905) 791-5555 Fax: (905) 791-2222 Toll Free: 1-800-661-5112