1
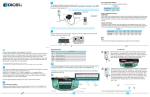
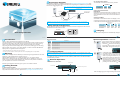
Connection Diagram.
For detailed installation instructions, please visit http://support.diceelectronics.com. Here,
you will find the latest information and instructions regarding the installation of your DICE
Electronics iPod Integration Kit.
Car Configuration Switch.
The features of this switch are currently inactive.
Dip Switch #
Position
1
2
OFF
OFF
Selected Mode
NOTE: - Verify proper alignment of plugs before inserting into the receptacles!
- External CD/DVD changer or SAT module MUST be disconnected!
iPod
Default
Car Radio/Trunk CD
Changer connector
DICE Module
Vehicle Specific
Interface Cable
8-pin
Din
Dock Cable
Optional DSP package
may be required for
some BMW vehicles
12-pin
molex
AUX
jack
SAT radio/
MP3 player/
DVD player
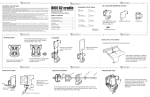
iPod Configuration Switch.
DICE Mode.
DICE Mode is best selected when controls from both the iPod and the radio are both
desired. On your iPod you will see a DICE logo or checkmark followed by a series of
iPod initialization screens for a few seconds before the familiar iPod user interface
returns.
Simple iPod Mode.
iPod Mode is best selected when text display is not supported by the radio. Track
numbers and times are not synchronized between the iPod and radio. Because there
is less data transferee between the iPod and the radio, this mode has the fastest
CAUTION: There may be more than one 3-pin plug if the vehicle is cellular phone ready; see supplement!
Dip Switch #
Position
The dip switches located on the DICE module are used to configure how the iPod will
interface and function with the radio.
DICE Module
iPod Integration Kit
2
"Car Config.
Switch"
ON 1
Switch in ON
position
* Sound quality depends on the quality of the music on the iPod.
** CD Text may not be available on all text capable radios. Check compatibility guide for complete details.
"iPod Config.
Switch"
Do not allow the Apple iPod to distract you from driving! Only operate the unit when
stationary or ask passengers to operate it for you.
Neither DICE Electronics, LLC., Apple Computer, Inc., its regional offices,
distributors or resellers accept any responsibility for any damage or injury as a
result of using the DICE iPod Integration Kit. The use of this product constitutes
your acceptance of our terms and conditions.
iPod
Controls
Initialization
DICE Mode
OFF
OFF
YES
YES
YES
YES
YES
iPod Mode
ON
ON
NO
NO
YES
YES
NO
1
2
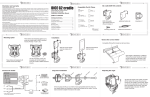
General Operation-continued.
Limitations
iPod
3G
Must have FW version 2.3 Does not support Albums and Chapters. FF/RW does not work from radio.
4G
Must have FW version 3.1.1
Photo
Must have FW version 1.2.1
Video
Must have FW version 1.1.1
nano
Must have FW version 1.1.1
mini
Must have FW version 1.4.1
1
a Connect the iPod to your DICE iPod Interface with the provided
docking cable or an optional DICE Video cradle. b Turn on your
radio and c select the CD Changer source. For a few seconds the
iPod may cycle through a set of screens while it initializes in the
DICE Mode. During this time your radio will display "INIT"!
a
INIT
b
Load Your Music.
For details on using your iPod and iTunes software, please refer to the documentation
provided with your iPod.
General Operation.
BMW Business CD Radio.
2
c
If playback does not automaticaly begin or "PAUSE" is displayed on
the radio's display, then select a playlist or song or press the next
track button on your radio. You can browse music by d using your
iPod or by using the buttons on your radio or steering wheel. Both
the iPod and radio's controls are always active in both DICE and
d simple iPod mode and do not require you to select different modes.
The following buttons on your radio have features (see pg.6)
assigned to them: next/previous e , fast forward/rewind e (after
pressing the manual button f ) and disc 1-6 g .
Radio's Display
Exercise good judgment and keep your eyes on the road at all times!
Getting Started.
Radio
Controls
ON/OFF Switch Positions
To take full advantage of our quick music browsing system, you must have your music
organized in playlists on your iPod before using your DICE iPod Integration Kit.
Warning!
Track Time
Info
The DICE iPod integration kit automatically charges your iPods battery.
Supported iPods.
Factory radio compatible iPod integration from DICE!
Connect the iPod to your vehicle's factory entertainment system and hear what an
iPod should sound like. CD quality sound* and controls from your radio, steering
wheel or the iPod. DICE keeps your iPod charged and ready to go. Radios
supporting CD-text will also display text from your iPod, allowing you to view song
title and artist name right on your radio's display.** Please note that FM-RDS text
display does not guarantee CD-text support!
Text
Display
2
Rev. B.01
Introduction.
2
Charging.
Switch in OFF
position
ON 1
1
Selected Mode
Dip Switch Configuration.
Power/Volume
song*artist*album
Is Your iPod Up To Date?
Before you start, please check your iPod firmware version. For a complete list of
supported iPod firmware versions, please visit http://support.diceelectronics.com.
Select CD/CD Changer Mode
DISC 1-6
Buttons
4
Manual
Button
f
e
g
Previous
Track
Random
3
Cruisin * DJ Le
Next
Track
See next page (pg.6) for song browsing instructions .
5
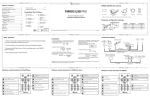
Song Browsing.
+ Auxiliary Input.
The DICE iPod integration kit gives you the following features while browsing from
your radio: The DISC 1-4 modes select how your next/previous and fast
forward/rewind buttons will function. If text display is enabled, the radio will display
the currently selected mode. See the matrix below:
Radio Buttons and Features
Next
Previous
Fast Forward
DISC 1
next track
prev. track
FF song
RW song
DISC 2
next playlist
prev. playlist
--
--
DISC 3
next album
prev. album
--
--
DISC 4
next chapter
prev. chapter
--
--
DISC 5
next source
prev. source
--
--
Selected Mode
DISC 6
Rewind
-Enable--text display. -See--instructions below.
--
ie. When you select DISC 1 the next button will select the next song. If you select DISC 2 then then the next button will select the next
playlist.
Text Display.
To enable text display on BMW radios, press DISC 6. Then, select a track number to
send text to the designated display:
Track #
Text Displayed On
For Vehicles
Characters
01
Radio
3-Series/Z3/Z4/X3
12
02
Navigation
All with nav.
15
03
Cluster/OBD
5-Series/7-Series/X5 w/o nav.
20
04
MID
alternate for 5-Series/7-Series/X5
11
99
No Text
All
----
Selecting the AUX Source.
Selecting DISC 5 and then pressing the next track or previous track buttons will toggle
between the iPod and an auxiliary audio device. Auxiliary device support does not include
controls from the radio or charging. While DISC 5 is selected track 1 indicates that the
iPod is selected and track 2 indicates that the AUX source is selected.
Gain. Should be adjusted if the input level from the auxiliary device is too low or to high.
If you hear distorted audio while playing the auxiliary device, you need to reduce (-) the
gain setting. If you notice the audio is too quiet while listening to an auxiliary device, the
gain setting should be increased (+). Default settings are "50" ("68" is default for gain) and
values may be adjusted between 01-99.
Bass, Mid and Treble. Should be adjusted to personal preference.
Left RCA
+
+
Selected Mode
OR
A Ground-Loop Isolator (not included) may be required when the auxiliary device is
charged/powered from the vehicle's 12V battery source. This additional part can be
found at Radio Shack (Cat.No. 270-054) and will eliminate unwanted noise caused
by ground loops.
R
Ground-Loop
Isolator
Previous
Next
DISC 1
gain +
gain -
DISC 2
bass +
bass -
DISC 3
mid +
mid -
DISC 4
treble +
treble -
ie. When you select DISC 1, pressing the
next/previous button will adjust +/- gain settings. If
you select DISC 2, the next/previous button will
adjust +/- bass settings.
To DICE Module
1/8" Male Stereo
Tip (Left audio)
Ring (Right audio)
Sleeve (Ground)
Important Disclaimer, please read!
Driving is dangerous and requires concentration. Do not allow the DICE iPod Integration Kit to
distract you from prevailing traffic conditions. If in doubt, only operate the unit when stationary
or ask a passenger to operate it for you.
Do not submerge or expose to water or other fluids. DICE components are NOT water resistant
and will be damaged by water. You must properly insulate its casing if your installation
environment may subject the unit to water, such as a convertible vehicle.
Sleek Design.
Unique Mount.
Video Out.
You cannot control the iPod from the radio:
1. Make sure the firmware on your iPod is supported. See pg.4 of this guide.
2. Disconnect and reset the iPod. Please refer to the documentation included with your iPod or
visit http://www.apple.com/support/ipod
iPod does not charge:
1. Check all connections.
2. See if the iPod will charge when connected to a computer or wall charger.
Music is distorted or the sound level is too low:
1. Check and make sure all EQ and BASS boost options are turned off on your iPod.
DICE Video Cradle.
An iPod docking cradle with a sleek design that compliments the car's interior! The DICE
Video Cradle can be mounted almost anywhere, thanks to its unique ball and cup mount
solution, allowing it to be angled, tilted and rotated. Featuring a universal iPod dock
connector and 1/8" video out jack for use with video compatible iPods.
The DICE Video Cradle can be added to any dock cable compatible iPod solution,
regardless of the manufacturer!
For more accessories, visit http://www.diceelectronics.com
9
Radio Shack (Cat.No. 270-054) or
equivalent recommended.
Disclaimer.
Optional Hardware.
The "OK to disconnect (checkmark)" screen will not go away.
1. Disconnect and reset iPod. Please refer to the documentation included with
your iPod or visit http://www.apple.com/support/ipod.
2. Turn radio off and then on again.
iPod does not turn on:
1. Verify that the iPod's battery is not depleted by attempting to turn it on without
connecting it to the car.
2. Turn off both your car stereo and the iPod before connecting to the interface. Power on your
radio and select the appropriate source.
To auxiliary device
8
You cannot switch your radio to CD changer/ SAT mode:
1. Check cables to make sure everything is tight. VW and Audi vehicles have a
separate ground cable that MUST be grounded to the chassis.
2. Remove the fuse of the radio, wait 30 seconds, then reinsert the fuse. This will reset your
radio and the interface. You may have to enter the radio security code so please keep it at
hand.
3. Consult with your installer or contact your support center
You cannot hear music playing:
1. Make sure that the correct mode (CDC/SAT/AUX) is selected on your radio. Check
your radio's owner's manual to find how this is done.
2. Make sure that the iPod can play music on its own and that it has playlists with music.
3. Nano iPods may need to be reset (select + menu buttons) to enable external audio out.
Some nano iPods do not have audio output through the dock connector.
1/8" Male Stereo
Tip (Left audio)
Ring (Right audio)
Sleeve (Ground)
7
Troubleshooting.
Right RCA
1/8" Male Stereo
Radio Buttons and Features
Making the Adjustments.
While listening to the auxiliary device, the
next/previous buttons will adjust gain, bass,
mid and treble. The DISC 1-4 modes select
what functionality your next/previous
buttons will have. See the matrix for the
complete list of what each mode does.
6
To auxiliary device
To DICE Module
AUX Source Settings.
The auxiliary input has settings for gain, bass and treble in order to optimize sound.
On some older BMW radios, buttons must be pressed 2x to execute the command if text display is
enabled.
?
AUX Source Connections.
These are examples of component cables that can be used to connect an AUX
device to the DICE module. These cables can be found at any stereo shop and are
not included in this kit.
10
Keep away from children !
DICE components may contain small parts, can be broken or disassembled and components
may become loose from vibration and heat. Small components and packaging materials may be
a choking hazard when handled by children.
Unauthorized reproduction or reverse engineering is strictly prohibited ! Intellectual property
included is distributed under specific license agreement with respective vendor(s). No warranty,
explicit or implied, is stated and neither DICE Electronics, LLC., nor any of its distributors,
dealers or vendors shall be liable for damages. IN NO EVENT SHALL DICE ELECTRONICS'
LIABILITY EXCEED THE PRICE PAID FOR THE PRODUCT FROM DIRECT, INDIRECT,
SPECIAL, INCIDENTAL, OR CONSEQUENTIAL DAMAGES RESULTING FROM THE USE OF
THE PRODUCT, ITS ACCOMPANYING SOFTWARE, OR ITS DOCUMENTATION.DICE
Electronics, LLC. is a trademark. All other products are registered and copyrighted by their
respective owners.
Warranty and Support.
DICE Electronics products carry a one year limited warranty that protects you from defects in
material and workmanship of products sold by DICE Electronics or its authorized agents,
distributors and dealers. We do not warrant any installation. If you experience any problems or
need help, please contact your DICE Electonics retailer.
Proof of purchase is required.
Warranty does not cover normal tear and wear, damages due to negligence, improper
installation or operation.
11