1
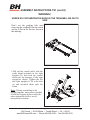
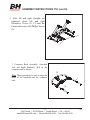
BH Fitness TS1 Treadmill
Owner’s Manual
BH FITNESS
20155 Ellipse, Foothill Ranch, CA 92610
Phone: 949-206-0330
Fax: 949-206-0013
Email: [email protected]
Web: www.BHFitnessUSA.com
TS1
BH Fitness • 20155 Ellipse • Foothill Ranch • CA • 92610
www.BHFitnessUSA.com • Phone 949-206-0330 • Fax 949-206-0013
V.20100429
BH 12/6/12
INTRODUCTION:
Congratulations for selecting BH FITNESS as your new fitness resource.
BH FITNESS treadmills offer many exercise programs that benefit users of all
levels and ages. Your new treadmill is designed to make your workouts more
effective and enjoyable.
Please read this entire manual carefully before using your treadmill. This
will allow you to get a full understanding of all the features your BH FITNESS
treadmill provides. If you have any questions or concerns, please contact BH
FITNESS or any authorized BH FITNESS distributors in your area.
BH FITNESS
20155 Ellipse, Foothill Ranch, CA 92610
Phone: 949-206-0330
Fax: 949-206-0013
Email: [email protected]
Web: www.BHFitnessUSA.com
BEFORE YOU BEGIN
It is very important to become familiar with the frequently used components of
your treadmill.
"#$
Computer
Hand Pulse
Power Cord
"+,Power
Switch
Safety
Key
2345
Frame
)*
Circuit Breaker
./01,-
Rear End Cap
%&'(
2
BH Fitness • 20155 Ellipse • Foothill Ranch • CA • 92610
www.BHFitnessUSA.com • Phone 949-206-0330 • Fax 949-206-0013
TS1
TABLE OF CONTENTS
SECTION
PAGE
1. IMPORTANT SAFET Y INSTRUCTIONS ...................................................... 4
2. ASSEMBLY IN STRUCTIONS....................................................................... 6
3. TREADMILL AND CONSOL E......................................................................11
4. WORKOUT PROGRAMS ............................................................................16
5. CALCULATING YOUR T ARGET HEART RATE ...........................................21
6. PREVENTIVE MAINTENANCE....................................................................22
7. TROUBLESHOOTING .................................................................................23
8. WARRANTY.................................................................................................24
3
BH Fitness • 20155 Ellipse • Foothill Ranch • CA • 92610
www.BHFitnessUSA.com • Phone 949-206-80330• Fax 949-206-0013
TS1
SECTION 1
IMPORTANT SAFETY INSTRUCTIONS
Read all instructions before using the treadmill.
User Safety:
Before using this or any other exercise equipment consult your family physician or health care
professional in order to develop a well-planned exercise program to fit your health needs. If you
encounter any pain or breathing discomfort while working out, STOP!, and consult a physician
before continuing.
1. Close supervision is necessary when this unit is used by or near children, invalids or disabled
persons. Children are curious and vulnerable to accidents. Do not use the unit as a toy.
2. Do not wear loose or dangling clothing while using the treadmill.
3. Maximum user weight is 325 lbs (~147kg) for the TS1 treadmill.
4. Only one person can use the unit at a time.
5. Keep hands away from moving parts.
6. The owner is responsible for explaining safety instructions to each user.
Treadmill Safety:
WARNING: To reduce the risk of fire, electric shock, injuries to persons or
inflicting the harm of a burn:
7. Turn all the controls to the off position prior to removing the electrical plug from the outlet. The
ON/OFF switch is located on the right, front of the unit.
8. Never leave the unit unattended when plugged in. Always unplug the unit from the outlet
before leaving the room, when unused and before servicing or adding / removing parts.
9. Unplug the treadmill prior to cleaning to reduce the risk of electric shock, serious burns, and the
risk of injuries.
10. Never operate this unit if it has a damaged electrical cord or plug. Do not operate this unit if it is
not working properly. Do not operate this unit if it has been dropped or damaged. Do not operate
this unit if it has been immersed in water. Return the unit to a service center for examination
and repair.
11. Do not pull or carry the unit by the electrical cord. Do not use the cord as a handle.
12. Keep the electrical cord away from heated surfaces.
13. Connect this Treadmill to a properly grounded 110-120V, 15 or 20 Amp dedicated outlet only.
14. Call your service center or BH Fitness with your concerns before taking your treadmill in for
repair.
15. Do not place sharp objects near the unit. Never drop or insert any object into any opening.
16. Do not use outdoors.
17. Do not operate where aerosol (spray) products are being used or where oxygen is being
administered.
18. Use the unit only as described in this manual. Only use attachments recommended by the
manufacturer.
19. For safety, keep a minimum clearance of 18” on the front and each side and 24” at the rear of
the treadmill. Place the unit on a flat stable surface.
Note–This treadmill has the foldable mechanism, please make sure the incline is adjusted to the
original position before folding the treadmill (to avoid interference between mechanisms).
4
BH Fitness • 20155 Ellipse • Foothill Ranch • CA • 92610
www.BHFitnessUSA.com • Phone 949-206-0330 • Fax 949-206-0013
TS 1
IMPORTANT SAFETY INSTRUCTIONS (cont’d)
GROUNDING INSTRUCTIONS
This unit must be grounded. If it malfunctions or breaks down, grounding reduces
the risk of electric shock by providing a path of least resistance for electric
currents. This unit is equipped with a cord that has an equipment-grounding
conductor and a grounding plug. Insert the plug into an appropriate 110-120 Volt
electrical outlet that is properly installed and grounded in accordance with all
local codes and ordinances. Do not use an adapter or extension cord with this
unit.
WARNING! – An improper connection of the grounding conductor can result in
a risk of an electrical shock. Check with a qualified electrician if you are uncertain
if the unit is grounded properly. Do not modify the plug provided to you. If it does
not fit the outlet, have a proper outlet installed by a qualified electrician.
GROUNDING METHODS
GROUNDED
GROUNDING PIN
WARNING!
NEVER PUT THE TREADMILL BE ON ITS SIDE
Please save these instructions
5
BH Fitness • 20155 Ellipse • Foothill Ranch • CA • 92610
www.BHFitnessUSA.com • Phone 949-206-0330 • Fax 949-206-0013
TS1
SECTION 2
ASSEMBLY INSTRUCTIONS TS1
Item
Description
Qty
Item
Description
Qty
A
B
C
D
E
F
G
H
I
J
K
L
M
N
Computer Console
Frame
Left Upright
Right Upright
Left Decoration Cover
Right Decoration Cover
Computer Shelf
Left Handrail
Right Handrail
Cup/Bottle Holder
Left Handrail Decoration Cover
Right Handrail Decoration Cover
Rear Cover
Bottle
1
1
1
1
1
1
1
1
1
1
1
1
1
1
a
b
c
d
e
f
g
h
i
j
k
l
m
n
o
Truss Hex Screw M8xP1.25x15
Truss Philips Screw M5xP0.8x10
Truss Hex Screw M8xP1.25x60
Truss Philips Self Tapping Screw ψ5x25
Truss Philips Self Tapping Screw ψ4x12
Truss Philips Screw M5xP0.8x15
Nylon Nut
Hex Wrench 6mm
Hex Wrench 5mm
SILICONE
Safety Key
Power Cord
Sleeve Screwdriver
Round Head Philips Screw M4xP0.7x8
Washer Ø6xØ16x1.0t
10
4
4
2
2
4
4
1
1
1
1
1
1
4
4
N
G
k
h
i
C
M
D
I
A
H
F
L
K
E
B
J
6
BH Fitness • 20155 Ellipse • Foothill Ranch • CA • 92610
www.BHFitnessUSA.com • Phone 949-206-0330 • Fax 949-206-0013
TS1
ASSEMBLY INSTRUCTIONS TS1 (cont’d)
WARNING!
UNDER NO CIRCUMSTANCES SHOULD THE TREADMILL BE ON ITS
SIDE
Don’t cut the packing belt until
removing the treadmill from the carton
and lay it flat on the floor as shown in
the drawing.
1. Pull out the control cable with the
guide thread attached in the right
upright (D), then feed the control
cable into the opening of the right
upright as shown. Tighten the left
and right uprights (C,D) with bolts
(a) and assemble them onto the
frame
Note:. During assembling of the
upright supports, one person is needed
to hold the support in place while the
other tightens the bolts to avoid
unexpected accidents
D
C
a
7
BH Fitness • 20155 Ellipse • Foothill Ranch • CA • 92610
www.BHFitnessUSA.com • Phone 949-206-0330 • Fax 949-206-0013
TS1
ASSEMBLY INSTRUCTIONS TS1 (cont’d)
2. After left and right Uprights are
tightened, place left and right
Decorative Covers (E, F) onto the
Frame and secure with Philips Screws
(b).
F
b
b
b
E
3. Computer Rack Assembly: Assemble
Left and Right handrails (H,I) to the
computer rack as shown
G
Note: During assembly, be sure to align the
holes of the handrails and the computer
rack
I
H
8
BH Fitness • 20155 Ellipse • Foothill Ranch • CA • 92610
www.BHFitnessUSA.com • Phone 949-206-0330 • Fax 949-206-0013
TS1
ASSEMBLY INSTRUCTIONS TS1 (cont’d)
4. Connect the main cable through the
Computer Rack Assembly (G) and pull
out the wire from the upper holes of the
Computer Rack Assembly. Place the
Computer Rack Assembly (G) on the
uprights. Fasten with hex bolts (c).
c
G
c
When fastening the bolts for the uprights
and handrails, make sure that the bolts do
not pinch the wires/cables in the process
Note: Always assemble the treadmill
with an assistant, do not assemble by
one’s self.
5. Attach the left and right
decorative handrail covers (K,L) onto
the computer rack as shown (right)
and tighten with Philips Self Tapping
Screw (d, f).
Place the bottle holder (J) on the
computer rack and tighten with 1
Philips Self Tapping Screw (e) on
each side.
J
L
f
e
K
d
f
d
Note: Be aware not to pinch or
damage the wires/cables during the
assembly
9
BH Fitness • 20155 Ellipse • Foothill Ranch • CA • 92610
www.bhnorthamerica.com
• Phone 949-206-0330 • Fax 949-206-0013
BHFitnessUSA
TS1
ASSEMBLY INSTRUCTIONS TS1 (cont’d)
6. Match and connect all the cables
from the bottle holder to the
computer console (A) on the
treadmill. Tidy up all cables and
tuck them inside the computer
console.
Place the computer
console on bottle holder and tighten
with nylon nut (g) and washer (o).
Tighten the rear cover (M) with 4
screws (n).
A
M
n
g
o
Note: While connecting the cables,
be sure to match their colors: red to
red, white to white, etc.
8.
10
BH Fitness • 20155 Ellipse • Foothill Ranch • CA • 92610
www.%+)LWQHVV86$.com • Phone 949-206-0330 • Fax 949-206-0013
TS1
SECTION 3
TREADMILL AND CONSOLE
WARNING!
NEVER PUT THE TREADMILL BE ON ITS SIDE
MOVING THE TREADMILL
Use the front wheels to move the Treadmill. Elevating the treadmill
(incline) may help make the wheeling of the unit easier. Always be
sure to use proper lifting form / technique. Grasp the end caps with
two hands and slowly lift deck up until you are in an upright position.
keep the treadmill at that angle an d wheel the unit as required.
SAFETY KEY & CLIP
Your BH Fitness treadmill is equipped with a safety key that will
disable the treadmill if it is not in place. You should attach the clip end
to your clothing. The magnet end goes into the recess in the center of
the console. If at any time you need to stop the treadmill, pull the
safety key quickly off the console. This will cut all power to the
treadmill and it will come to a complete stop. To restart the treadmill,
place the safety key back in place. You will then need to program
your workout again.
BEFORE STARTING
Straddle the running belt and stand on the side rails. Insert the safety
key and attach the clip to your clothing. Do not stand on the walking
belt while starting or stopping the treadmill.
11
BH Fitness • 20155 Ellipse • Foothill Ranch • CA • 92610
www.%+)LWQHVV86$.com • Phone 949-206-0330 • Fax 949-206-0013
TS1
TREADMILL FOLDING AND MOVING
FOLDING UP THE UNIT
The Treadmill can be folded for storage.
1. Stop the treadmill.
2. Lower the elevation to the minimum.
3. Turn off the power and unplug the electrical power cord
4. Lift the running deck up by the end caps until lever (O) clicks into place. The treadmill
Is locked in folding storage position
5. Do not touch lever (O) until you
are ready to unlock and use the
treadmill again
NOTE: The pneumatic cylinder is packed under high pressure. Hard hits, knocks
or impacts could cause damages to the cylinder. If damaged, the folding
mechanism may not work properly and the treadmill deck could land on
the floor abruptly
Do not hit the cylinder
12
BH Fitness • 20155 Ellipse • Foothill Ranch • CA • 92610
www.%+)LWQHVV86$.com • Phone 949-206-0330 • Fax 949-206-0013
TS1
FOLDING AND MOVING (cont’d)
MOVING THE UNIT
NOTE: Do not move across an uneven floor.
1. Verify the electrical connector is unplugged and the unit is folded.
2. Place your hands on the handrails and push the treadmill using the two wheels.
UNFOLDING THE UNIT
1. Verify the space under the treadmill is clear and children are not near.
2. Press lever (O) down as shown by the arrow.
3. The deck will slowly lower down to the floor.
POSITION THE TREADMILL
1. For safety, maintain a minimum clearance around the treadmill. Maintain 18 inches on the
front and on each side of the treadmill plus 24 inches at the rear of the treadmill.
2. Store the unit in a dry place away from direct sunlight and temperature changes.
13
BH Fitness • 20155 Ellipse • Foothill Ranch • CA • 92610
www.%+)LWQHVV86$.com • Phone 949-206-0330 • Fax 949-206-0013
T S1
TREADMILL AND CONSOLE (cont’d)
TS1
KEY FUNCTIONS
START – This key is used to begin any treadmill program.
PROGRAM – This key is used to enter into the programs.
STOP/RESET – This key is used to stop the treadmill at any time. Press
STOP/RESET once to stop the running belt. Press STOP a
second time and hold 5 seconds until it beeps to end the program
and set the incline to zero from an elevated position.
NOTE: Slow running belt, then step off running belt onto the side rails prior to
pressing the STOP button.
NOTE: For an immediate stop, pull the safety key out of the safety
key recess and the treadmill will stop abruptly.
ENTER – This key is used to confirm the value of the current selection.
These keys are used to adjust the elevation of the treadmill.
These keys are used to adjust the speed of the treadmill.
INSTANT SPEED – You can change the speed of the treadmill by pressing one
of the Instant Key buttons.
14
BH Fitness • 20155 Ellipse • Foothill Ranch • CA • 92610
www.%+)LWQHVV86$.com • Phone 949-206-0330 • Fax 949-206-0013
TS1
TREADMILL AND CONSOLE (cont’d)
CONSOLE FEEDBACK
TIME – This will read the number of minutes left in the program that you have
selected or the number of minutes since beginning the test.
CALORIES – This reading is the amount of body heat in calories burned during
your workout. As with all pieces of exercise equipment, this is an
estimated value.
PULSE – Pulse will display in Beats Per Minute (BPM).
SPEED – This is how fast the treadmill moves in Miles Per Hour (MPH).
DISTANCE – Total distance traveled during your workout in miles.
INCLINE – Incline will read as a percent of grade.
NOTE: If the Incline is elevated and the belt is not moving, press the STOP for 5
seconds until the unit beeps to lower the incline to zero.
USING HEART RATE
NOTE: See page 21 for Target Heart Rate Instructions.
PULSE GRIP – To periodically check your heart rate, grasp the sensors at the
base of the console. The PULSE LED will blink and after about 9 seconds your
pulse will be displayed in the pulse window.
15
BH Fitness • 20155 Ellipse • Foothill Ranch • CA • 92610
www.%+)LWQHVV86$.com • Phone 949-206-0330 • Fax 949-206-0013
TS1
SECTION 4
WORKOUT PROGRAMS
Your BH FITNESS treadmill will provide both manual controlled and factory
installed preset workout programs.
In MANUAL, you control the speed and/or elevation at your discretion.
In PRESET programs, the speed and/or elevation will change in accordance with
the program’s profile (as illustrated on the following pages).
In any program, pressing the STOP will pause the current program. To resume
the current program press the START key. To exit the current program and return
to the START/READY status, press and hold the STOP again for 3 to 5 seconds
until the console beeps.
16
BH Fitness • 20155 Ellipse • Foothill Ranch • CA • 92610
www.%+)LWQHVV86$.com • Phone 949-206-0330 • Fax 949-206-0013
TS1
WORKOUT PROGRAMS (cont’d)
1
GENERAL OPERATION
1.1
1.2
Turn on the treadmill.
Stand on the side rails. Place the safety key into the recess of the console.
The beeper will sound and the windows will display zeroes ”0”, which shows
the treadmill is in START/READY status. Under this status the user can hold
the grip pulse sensor to detect heart rate value directly.
1.3
Press
to start and the MANUAL LED illuminated . The treadmill belt will
roll at the speed of 0.6 miles/hr (1.0 km/hr). At this time, press “
” to
decrease/increase the speed (or press
2
2.1
2.2
to select the speed
you want) or press “
” to control the incline angle. Press
, the
treadmill will stop. (Press
once and it will display
. All the numbers
will stop changing. After the treadmill pauses for 60 seconds, it will default
to the Start/Ready status. If
is pressed once, then pressed and held for
3 seconds, the unit will Reset to the Start/Ready status.
PROGRAM Function Key
Under Start/Ready status, when the PROGRAM button is pressed, the
MANUAL LED (Light Emitting Diode) will blink. Now a new program can be
selected. To select a new program, press “
or
” to switch the
LED between MANUAL and P1 through P6.
MANUAL Function
2.2.1 When MANUAL light is blinking, press PROGRAM and the MANUAL light
will stop blinking. TIME LED will blink. Now you can adjust time by pressing
the speed
or incline
buttons.
2.2.2 Press
, the motor will start at the speed of 0.6 miles (1.0 km/hr). At this
or
” to control the speed and elevation.
time, press “
2.2.3 Press and hold STOP for 3 to 5 seconds to end the program before it is
finished.
17
BH Fitness • 20155 Ellipse • Foothill Ranch • CA • 92610
www.%+)LWQHVV86$.com • Phone 949-206-0330 • Fax 949-206-0013
TS1
WORKOUT PROGRAMS (cont’d)
2.3
Operating P1 through P6 Program Method 1 (each PROGRAM has 15
segments).
NOTE: The P1 9 HOLE program is 2.17 miles (3500m) in length and simulates
the length of a golf course. The difficulty depends on the degree of the
change between elevations. After reaching the 2.17 miles (3500m),
the treadmill will stop.
NOTE: In every PROGRAM, before L1 through L3 begin, there is a 1 minute
warm up. During this time, it begins with the initial speed of each level.
2.3.1 If the “M” LED light is not blinking, press the PROGRAM button until “M”
does blink.
2.3.2 When the “M”, MANUAL LED is blinking, press “
or
” until the
LED of the desired program P1 through P6 is blinking. Press
to
confirm. After a program is selected, the corresponding LED light will
continue to illuminate
2.3.3 The CALORIES window displays the exercise intensity level (L1 through
L3). The graphs on the following pages illustrate the three levels. Press
“
or
” to select the desired level, after you have selected the
level press
to confirm.
2.3.4 For P1 skip this step, go to next step. After the level is selected, the TIME
window blinks. Press “
or
” to change the time. After the
desired time is set, press
and the TIME window stops flashing.
2.3.5 Press
and the treadmill runs according to the pre-set value of the
program. The speed and incline of the program’s 15 segments will change
according to the pre-set values. The first segment will last 2 minutes, then
the following will each last for 1 minute. When the time is achieved, speed
and incline will change directly. (During exercise, you can press “
” to
directly change the speed and
to change the incline.)
2.4
Operating P1 through P6 Program Method 2
2.4.1 During programs P1 through P6, if
is pressed the belt will start to
roll at once. To change the pre-set values, press “
or
”. The
pre-set program value is restored the next time the program is used
18
BH Fitness • 20155 Ellipse • Foothill Ranch • CA • 92610
www.%+)LWQHVV86$.com • Phone 949-206-0330 • Fax 949-206-0013
TS1
WORKOUT PROGRAMS (cont’d)
Refer to the below chart for the pre-set inclines and speeds of the PROGRAM:
Miles/hr
8.7 – 10.0
7.5 – 8.7
6.2 – 7.4
5.0 – 6.2
3.7 – 4.9
2.5 – 3.7
1.3 – 2.4
0.6 – 1.2
Minutes
P1 9 HOLE
Elevation
19
BH Fitness • 20155 Ellipse • Foothill Ranch • CA • 92610
www.%+)LWQHVV86$.com • Phone 949-206-0330 • Fax 949-206-0013
TS1
WORKOUT PROGRAMS (continued)
20
BH Fitness • 20155 Ellipse • Foothill Ranch • CA • 92610
www.%+)LWQHVV86$.com • Phone 949-206-0330 • Fax 949-206-0013
TS1
SECTION 5
CALCULATE YOUR TARGET HEART RATE
Heart Rate (HR) training has become one of the most popular forms of
monitoring your workouts. Nothing tells you how your body is feeling like your
own heart. By using your heart rate to tell you how hard to train, you can
maximize your workout results.
STEP ONE
Determining your Maximum Heart Rate:
The standard calculation for determining your maximum heart rate, Beats Per
Minute (BPM), is to take your age and subtracting it from the number 220.
Example:
If you are 30 years of age, your maximum heart rate is:
220 – 30 = 190 BPM.
STEP TWO
Select your ideal workout HR Zone:
Once you have your maximum heart rate you can use it to determine your Target
HR Zone based on your fitness goal(s).
Recent studies have shown:
60-70% of your maximum HR will allow you to loose weight.
70-80% of your maximum HR will improve your aerobic fitness.
80-85% of your maximum HR will increase your athletic performance.
NOTE: DO NOT exceed 85% of your maximum heart rate.
STEP THREE
Calculate your ideal Target HR:
Using the above percentages, you can calculate your ideal Target Heart Rate for
your specific goal.
As an example, the average 30 year old can:
Maximize burn fat / weight loss, by maintaining ~123 BPM during a workout
190 * 0.65 =123 BPM.
Improve aerobic fitness, by maintaining ~142 BPM during a workout
190 * 0.75 =142 BPM.
Do not exceed 85% = 190 * 0.85 = 161 BPM.
Remember to consult your family physician or health care professional to
develop a well-planned exercise program to fit your health needs.
21
BH Fitness • 20155 Ellipse • Foothill Ranch • CA • 92610
www.%+)LWQHVV86$.com • Phone 949-206-0330 • Fax 949-206-0013
TS1
SECTION 6
PREVENTIVE MAINTENANCE
The running belt can shift to one side or simply ‘skid
over’ when running. Run the machine at 3 mph for a
few minutes to determine which side the belt is
drifting towards, left or right. Center the belt using
the Torque wrench.
If the belt is drifting left.
i) Turn the treadmill off and unplug from the machine.
ii) Tighten the left hexagonal head socket a ¼ turn
(clockwise).
iii) Loosen the right hexagonal head socket a ¼ turn
(counterclockwise).
iv) Run the belt at 3 mph again for a few minutes.
If the belt drifts to the left, repeat steps.
Rear Roller
Hexagonal
Head Socket
Use Torque wrench
to turn Hex Head
Socket
If the belt is drifting right.
i) Turn the treadmill off and unplug from the machine.
ii) Tighten the right hexagonal head socket a ¼ turn
(clockwise).
iii) Loosen the left hexagonal head socket a ¼ turn
(counterclockwise).
iv) Run the belt at 3 mph again for a few minutes.
If the belt drifts to the right, repeat steps.
Once the running belt has been adjusted, closer to
the center, the treadmill can be powered on again.
It is recommended that the deck be lubricated
regularly according to the frequency of usage.
Refer to the suggested schedule in the table below .
WARNING!
Do not use cleaner under the running belt.
i) Use Torque wrench to loosen the hexagonal head
socket in the end caps. Remove excessive
accumulations of dust, dirt, and other substances
from running deck. ONLY use a clean soft cloth.
ii) Gently pull up the side of the running belt.
Dispense a thin layer of the lubricant on deck, and
spread evenly. DO NOT over lubricate.
iii) Center the belt (using the instructions above), and
tighten the hexagonal head socket.
Check belt condition and if necessary adjust using
the instructions above.
For home use:
4 Miles or less / hr = lube every 1 year
4~8 Miles / hr = lube every 6 months
8 Miles or more / hr = lube every 3 months
22
BH Fitness • 20155 Ellipse • Foothill Ranch • CA • 92610
www.%+)LWQHVV86$.com • Phone 949-206-0330 • Fax 949-206-0013
TS1
SECTION 7
TROUBLESHOOTING
ERROR MESSSAGE
POSSIBLE CAUSES
SOLUTION
E1
Loss of Feedback
Speed Sensor disconnected
Check Speed Sensor
Connection
Speed Sensor Misaligned
Check Sensor position
Faulty Speed Sensor
Replace Speed Sensor
Loose Display Connection
Check Display Cable
Connection
Faulty MCB (D2 LED on)
Replace MCB
Faulty Drive Motor
Replace Drive Motor
E6
Safety Key Off
Faulty Safety key
Check Safety key or
switch
Elevation Motor
Elv. Motor not moving
Check Elv. Motor connections
Stalled Elev. Motor
Elv. Motor screw binding
Clean screw, lubricate or
Elv. Motor out of range
remove obstruction
Check motor zero position
Elv. Potentiometer
Calibrate Elev motor
E7
Elevation Motor
Elv. Motor out of range
Calibrate Elev motor
Display doesn’t light up
On/Off Switch
Check if unit is turned on
Fuse
Check fuses on MCB
Insufficient power source
Plug unit in a dedicated 120V,
20A outlet
23
BH Fitness • 20155 Ellipse • Foothill Ranch • CA • 92610
www.%+)LWQHVV86$.com • Phone 949-206-0330 • Fax 949-206-0013
TS1
SECTION 8
WARRANTY
USA / CANADA Warranty
Warranties may vary in other countries. See your local BH Fitness Dealer.
WARRANTY SUBMITTAL
Please have the following information available when contacting your dealer or BH for
warranty support.
• A copy of the dated purchase receipt or credit card statement.
• An explanation the problem/malfunction or parts that are missing or damaged.
• Owner’s name, address and phone number.
• Model (Treadmill TS 1) and Serial Number
Forward your information to BH North America by
FAX: (949) 206-0013
E-mail: [email protected]
Mail to: 20155 Ellipse, Foothill Ranch, California 92610, USA
For troubleshooting assistance or to confirm your claim please phone:
(949) 206-0330
BH FITNESS extends the following exclusive, limited warranty. Any other use of the unit
shall void this warranty.
FRAME – Lifetime Home Warranty for T S1
BH Fitness warrants the Frame against defects in workmanship and materials for
Lifetime from the date of original purchase, so long as it remains in the possession of the
original owner for home use.
DRIVE MOTOR – Lifetime Home Warranty for T S1
BH Fitness warrants the Drive Motor against defects in workmanship and materials for
Lifetime from the date of original purchase, so long as the unit remains in the possession
of the original owner for home use.
ELECTRONICS & PARTS – 5 Years Home Warranty
BH Fitness warrants the Electronic components and all original parts (other than the
Drive Motor) against defects in workmanship and materials for a period of five years
from the date of original purchase, so long as the unit remains in the possession of the
original owner for home use.
LABOR – 1 Year Home Warranty
BH Fitness shall cover the labor cost for the repair of the unit for the period described
above from the date of original purchase, so long as the unit remains in the possession
of the original owner for home use. Labor warranty does not include the travel time and
or expense that may result from the unit being outside of the seller or repair technician’s
normal service zone.
24
BH Fitness • 20155 Ellipse • Foothill Ranch • CA • 92610
www.%+)LWQHVV86$.com • Phone 949-206-0330 • Fax 949-206-0013
TS1
WARRANTY
LIMITED RESIDENTIAL WARRANTY
BH North America will repair or replace, free of charge, at its option, parts that are
defective as a result of material or workmanship. Lifetime replacement warranty coverage
on frame and five (5) years on other parts. Labor warranty coverage is one (1) year.
Warranty covers the original consumer purchaser only.
THIS WARRANTY DOES NOT COVER
• Pre-delivery set-up.
• Components that require replacement due to dirt or lack of regular maintenance.
• Expendable items which become worn during normal use.
• Repairs necessary because of operator abuse or negligence or the failure to operate
and maintain the equipment according to the instructions contained in the Owner’s
Manual.
For more detailed warranty information or to register your product warranty easily
online, visit our website at: www.BHFitnessUSA.com
FOR WARRANTY REPAIRS, PLEASE DO NOT TAKE YOUR MACHINE
BACK TO THE RETAIL STORE. CONTACT BH FITNESS FIRST.
BH North America Corporation
20155 Ellipse
Foothill Ranch, CA 92610
Phone: 949.206.0330; Toll Free: 866.325.2339; Fax: 949.206.0013
Web: www.BHFitnessUSA.com
Mon - Fri 8am - 5pm PST
PART LIST
No.
1
1-1
1-2
2
3
4
4-1
5
6
7
7-1
8
8-1
9
10
11
11-1
12
13
14
15
16
17
18
19
20
21
22
23
24
25
26
27
28
29
30
31
32
33
34
35
36
37
38
39
40
41
Description
Electronics
water bottle holder
Electronic shelf
Truss hex screw M8xP.1.25x60
Positioning Mechanical Spring
left upper handle cover
right upper handle cover
Qty.
1
1
1
4
1
1
1
computer decoration cover
left lower handle cover
right lower handle cover
left handlerail
right handlerail
Arc tube
PVC foam grip
left upright
right upright
guide thread
backboard
washer spring M8x2.0t
Orientation pedal
Conduplicate stator
Truss Philips Screw M4xP0.7x8
Incline Base
Wheel PBKP320
1
1
1
1
1
2
2
1
1
1
1
6
1
1
4
1
2
Hex Screw M6x45
Plastic cushion
Rear Fixing Plate
Round Head Philips Screw M5x40
CKS Hex Screw SEKK413
Bushing mandril
inside and outside tube
Base
4
1
1
1
1
1
1
1
Nylon nut M8xP1.25
Smooth Tube
Hex Screw M8x32
Incline joining Board
Nylon nut M6xP1.0
Truss hex screw SAEK432S
Stop Washer SCAK431
Safty Pin
Cylinder
Truss Philips Self Tapping Screw ?5x25
Truss Philips Screw M5xP0.8x15
6
1
2
4
8
4
10
1
1
2
12
No.
54
55
56
57
58
59
60
61
62
63
64
65
66
67
68
69
70
71
72
73
74
75
76
77
78
79
80
81
82
83
84
85
86
87
88
89
90
90-1
90-2
91
92
92-1
93
94
95
96
97
Description
Qty.
2
1
1
1
1
1
1
R Pin ψ10xψ2.0
controller pin
Frame
Power cord socket
Power Switch
Circuit Breaker
Sensor
Truss hex screw M10x52(12mm)(SAE105212)
Truss Philips Self Tapping Screw ψ4x12
2
2
Truss Philips Screw M4xP0.7x15
CKS Hex Screw M8xP1.25x30 12mm
Fixed cushion
Truss Philips Screw M4xP0.7x10
Fixed plastic pedal
Washer Drilling Philips Self Tapping Screw ψ4x12
CKS Hex Screw M8xP1.25x45
Washer ψ10xψ6x1.0t
CKS Hex Screw M8xP1.25x45
Hex nut M8xP1.25
Rear End Cap(Left)
Rear End Cap(Right)
Round Head Drilling Philips Screw Ø4x20
Motor Cover
Front Roller Sets
Running Belt
Peadl
Rear Roller sets
Counter Sink Hex Screw M6xP1.25x25
Foam Sticker 1200x20x1.5t
Running Board
Power Cord
Control Wire(Lower)
Wire Clip Knob UC-0
Counter Sink Hex Screw M6xP1.0x30
Extension
90
Wire (White) 14AWGx90mmx2T,180
Extension Wire (Black) 14AWGx90x2T
Extension
90
Wire (Black) 14AWGx90mmx2T,180
8
1
6
1
8
4
3
3
1
1
1
1
2
1
1
1
2
1
6
2
1
1
1
1
2
1
1
1
Extension Wire(yellow&green) 14AWGx150mmx1T1R 1
Round Head Philips Screw M5x35
Washer Ø6xØ13x1.5t
Wheel
26
BH Fitness • 20155 Ellipse • Foothill Ranch • CA • 92610
www.bhnorthamerica.com
• Phone 949-206-0330 • Fax 949-206-0013
BHFitnessUSA
1
4
2
TS1
PART LIST (CONT’D)
42
43
44
45
46
47
48
49
50
51
52
53
110
111
112
113
114
115
116
117
118
119
120
121
122
123
124
125
Truss Philips Screw M5xP0.8x10
Lower Motor Cover
Truss Philips Screw M6xP1.0x10
Motor
Drive Belt
CKS Hex Screw M8xP1.25x20
Washer
CKS Hex Screw M8xP1.25x15
Motor fixing plate
Incline Motor
CKS Hex Screw SAK101535A
Incline Base Flex
ㄇ
Hex nut M8xP1.25
6
1
13
1
1
4
4
2
1
1
1
2
1
Truss philips Self Tapping Screw ?4x12
2
Safty key top
Safty key bottom
Truss philips Self Tapping Screw ?4x16
1
1
6
Hex Wrench 5mm
Hex Wrench 6mm
Truss Hex ScrewM8xP1.25x15
1
1
10
Sleeve Wrench+Philips Screw
Nylon nut M10xP1.5
Nylon nut M10xP1.5,8t
Side fixed plastic
1
2
10
2
98
99
100
101
102
103
104
105
106
107
108
109
126
127
128
129
130
131
132
133
134
135
136
137
138
139
140
141
Washer Drilling Philips Screw ψ4x20
Truss Hex Screw SAEK430S
Foot Pad
Washer Drilling Philips Screw ψ4x20
Nylon nut M5
Sensor fixed Plate
Hex Screw M6x8
Round Head Philips Screw(copper) M5xP0.8x8
Left Decoration Cover
Right Decoration Cover
3
6
4
8
2
1
1
4
1
1
Hand Pulse Sets
Foam Sticker 40x25x1.0t
Foam Sticker Ø25xØ8x1.0t
Hex Screw M6x8
Truss Hex Screw M8xP1.25x38 (10mm)
2
2
6
1
2
Washer ?6x?16x1.0t
Nylon nut M6xP1.0
Plastic washer
Plastic Post Pad
4
4
2
4
Water Bottle
SILICON
Sound insulation pad
1
1
2
27
BH Fitness • 20155 Ellipse • Foothill Ranch • CA • 92610
www.bhnorthamerica.com
BHFitnessUSA
• Phone 949-206-0330 • Fax 949-206-0013
TS1
42
17
106
6
120
40
1- 1
35
125
4
42
124
120
40
1- 2
36
101
124
11
2
100
33
112
134
36
124
7
40
115
2
99
99
135
1
40
87
30
137
101
36
114
62
104
31
137
30
39
8
99
127
116
100
18
112
40
66
37
2
9
4-1
19
26
2
38
10
44
32
100
36
123
101
125
11-1
7- 1
40
40
33
40
30
137
124
22
9
32
101
28
44
16
42
123
99
36
35
120
36
39
124
43
12
8- 1
27
100
21
44
10
95
24
40
44
19
88
105
62
98
23
40
44
15
102
102
3
130
46
48
14
47
107
14
70
13
60
68
56
63
52
49
34
103
70
42
69
65
129
57
50
110
67
54
96
44
59
136
58
40
14
48
51
42
53
45
47
25
73
53
71
34
44
67
129
74
55
72
69
65
96
42
70
34
34
40
67
69
65
129
78
131
69
65
129
67
69
65
141
34
97
69
65
67
129
34
128
30
72
34
71
30
128
69
65
67
129
141
34
79
97
98
75
69
65
122
77
72
131
83
71
93
83
98
76
83
86
85
90
77
83
83
90-1
139
89
81
82
90-2
84
83
118
119
140
80
89
84
81