1
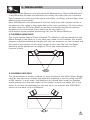
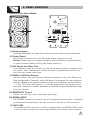
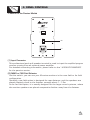
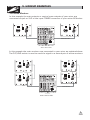
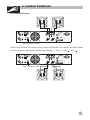
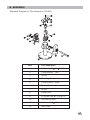
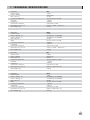
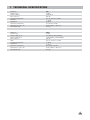
R
LTO
OWNER'S MANUAL
M SERIES MONITORS
PASSIVE & ACTIVE MODELS
www.altoproaudio.com
Version 1.4 SEPTEMBER 2007
English
IMPORTANT SAFETY INSTRUCTION
CAUTION
RISK OF ELECTRIC SHOCK
DO NOT OPEN
TO REDUCE THE RISK OF ELECTRIC SHOCK
PLEASE DO NOT REMOVE THE COVER OR
THE BACK PANEL OF THIS EQUIPMENT.
THERE ARE NO PARTS NEEDED BY USER
INSIDE THE EQUIPMENT. FOR SERVICE,
PLEASE CONTACT QUALIFIED SERVICE
CENTERS.
WARNING
To reduce the risk of electric shock
and fire, do not expose this equipment
to moisture or rain.
Dispose of this product should
not be placed in municipal waste
and should be separate collection.
11. Move this Equipment only with a cart,
stand, tripod, or bracket,
This symbol, wherever used, alerts you to the
specified by the
presence of un-insulated and dangerous voltages
manufacturer, or
within the product enclosure. These are voltages that
sold with the
may be sufficient to constitute the risk of electric
Equipment. When
shock or death.
a cart is used, use
This symbol, wherever used, alerts you to
caution when
important operating and maintenance instructions.
moving the cart /
Please read.
equipment
Protective Ground Terminal
combination to
AC mains (Alternating Current)
avoid possible
Hazardous Live Terminal
injury from tip-over.
ON: Denotes the product is turned on.
12. Permanent hearing loss may be caused by
OFF: Denotes the product is turned off.
exposure to \ extremely high noise levels.
CAUTION
The US. Government's Occupational Safety
Describes precautions that should be observed to
and Health Administration (OSHA) has
prevent damage to the product.
specified the permissible exposure to noise
1. Read this Manual carefully before operation.
level.
2. Keep this Manual in a safe place.
These are shown in the following chart:
3. Be aware of all warnings reported
with this symbol.
HOURS X DAY SPL EXAMPLE
4. Keep this Equipment away from water and
90 Small gig
8
moisture.
92 train
6
5. Clean it only with dry cloth. Do not use
95 Subway train
4
solvent or other chemicals.
97 High level desktop monitors
3
6. Do not damp or cover any cooling opening.
100 Classic music concert
2
Install the equipment only in accordance with
the Manufacturer's instructions.
102
1,5
105
1
7. Power Cords are designed for your safety. Do
110
0,5
not remove Ground connections! If the plug
does not fit your AC outlet, seek advice from
0,25 or less 115 Rock concert
a qualified electrician. Protect the power
According to OSHA, an exposure to high SPL in
cord and plug from any physical stress to
excess of these limits may result in the loss of
avoid risk of electric shock. Do not place
heat. To avoid the potential damage of heat, it is
heavy objects on the power cord. This could
cause electric shock or fire.
recommended that Personnel exposed to
equipment capable of generating high SPL use
8. Unplug this equipment when unused for long
hearing protection while such equipment is
periods of time or during a storm.
under operation.
9. Refer all service to qualified service personnel
The apparatus shall be connected to a mains
only. Do not perform any servicing other than
those instructions contained within the
socket outlet with a protective earthing
User's Manual.
connection.
10. To prevent fire and damage to the product,
use only the recommended fuse type as
indicated in this manual. Do not short-circuit
the fuse holder. Before replacing the fuse,
make sure that the product is OFF and
disconnected from the AC outlet.
The mains plug or an appliance coupler is used
as the disconnect device, the disconnect device
shall remain readily operable.
IN THIS MANUAL:
1. INTRODUCTION ............................................................................................. 1
2. PHILOSOPHY ................................................................................................ 2
3.. INSTALLATION .............................................................................................. 3
4. PANEL CONTROLS .........................................................................................5
5. HOOKUP EXAMPLES ......................................................................................7
6. WALL MOUNTING .......................................................................................... 9
7. APPENDIX ....................................................................................................10
8. TECHNICAL SPECIFICATION.............................................................................11
9. WARRANTY ..................................................................................................13
1. INTRODUCTION
Thank you for your purchasing of the ALTO M Series compact Studio Monitors.
The increasing number of home studios and small audio / video production has
created a large demand for compact monitors with excellent performance and
affordable price. With the M Series Monitors we have addressed these needs.
Available in different formats and configurations the M Series also come with a
2-channel amplifier built-in and electronic Xover. Made of durable high-tech Italian
designed injected polypropylene, they are almost indestructible and, in they
passive version they are also advised for outdoors use given the fact that also
the speakers are waterproof. We have also included in the design top, side and
bottom groove for easy hanging on the wall of the M Series Monitors through
optional bracket.
Enjoy your M series Monitor and make sure to read this Manual carefully before
operation!
1
SP
OT
L
IG
2. PHILOSOPHY
HT
WHY PLASTIC?
Because we can produce thousands and thousands of piece with the same
characteristics of material integrity. Our Plastic is water and moisture resistance
and it is finished with a "velvet-touch" paint that protects the unit from fingertips
and scratches.
WHY TWO WOOFERS?
Because two is better than one. Joke apart, it is always difficult to get a decent
amount of low frequencies out of a compact speaker cabinet. Low frequencies
are produced by moving air so the more air you move the more low frequencies
you get. Therefore the amount of low frequencies you get out from speaker cabinet
is directly related to moving surface of the woofer. One woofer=limited moving
surface. Two woofers=more moving surface. In fact you get more bass out from
your Alto M Series Monitor than any other cabinet of the same size. But two
woofers also mean two moving coils. Take our M3 as an example. Each woofer
includes a 25 mm (1") moving coil, so with our two woofers we have 50 mm (2")
of moving coil. Such moving coil is usually used in PA cabinet able to handle at
least 200 watt. Therefore, you can put a lot of power into your M Monitor
without producing heat in the moving coils of the woofers with consequent
power compression.
WHY THE TWEETER IN SUCH AN UNUSUAL POSITION?
Positioning the tweeter in the middle of the two woofers allows for a more
coherent sound image. Furthermore, the tweeter is almost out of the baffle and
can give much more breath and depth to the sound. IN conventional Monitors
tweeter are in the middle of a much larger baffle. Try to put your open hands
around your mouth and sing. You hear that "ducky, nasal" sound. Now remove
the hands and sign again. See the hands are the baffles. Compact Monitors
are usually positioned on the top of the mixer or in any case only a few feet from
the Listener. The amazing depth of the M Series with high frequencies is the
effect of the position of the tweeter.
WHY PASSIVE AND ACTIVE VERSION?
Small Studio Owners will prefer the active version. Although, some people will
privilege the set up with a passive Monitor and an external power amplifier. For
example, Alto just introduced a very high-end digital stereo amplifier: the A200.2.
It is a half / rack, 1U little animal that can produce up to 240 watts of power. And
it does not need a fan! Try this amp with one of the M Series Monitor. You will hear
a surprising level of high fidelity and dynamic that it is not possible to achieve in
self-powered models.Passive Monitors are then becoming popular for Dolby 5.1
and up to 8.1 set ups.
2
3. INSTALLATION
Compact Studio Monitors are also generally addressed as "Near-Field Monitors"
In big Recording Studios the Monitors are usually far away from the Listeners.
They interact the room since the sound will reflect on ceiling, wall and floor thus
affecting the sound quality.
Near-filed Monitors are positioned a few feet away from the Listener and as a
consequence the sound is less depended to the room conditions. For this reason
we have made our M Series Monitors as flat as possible and did not add any
frequency control because there would not be any need for it.
Let's explore some possible positionings for your M Series Monitors.
2 CHANNELS NEAR-FIELD
This is the typical Control Room situation. The Monitors will be poisoned on the
Meter Bridge of the Mixer or in any case very close to the Listener. You should
measure a simple equilateral triangle with the two monitors on two corners and
the head of the listener in the other corner. In this way, the Left and Right
Monitors will be placed with an angle of 60 at the same distance to the
Listener's head.
2 CHANNELS MID-FIELD
This configuration is similar to above. In some situations the Mixer Meter Bridge
could be too narrow to sustain the Monitors especially if you are using the M5
or M4 version. In such case, the Monitors are moved back usually on speaker
stand making sure that the height of the woofer is above the upper line of the
mixer. If you have no possibility for this set-up try to activate the "FAR-FIELD"
switch on the back of your M Monitor.
3
3. INSTALLATION
2 CHANNELS+SUBWOOFER
This is the best possible positioning for the Monitors and the subwoofer but
this set-up maybe not practical in your room. So, play some music with the
subwoofer in different positions. Usually, the only possible positioning is under
the table. Choose a sound material where there is a lot of low frequencies.
Some positions may create phase misalignment. If the subwoofer has a phase
switch, turn it on and listen to the difference. The bass response will increase
or decrease. Keep the switch in the position that gives you more bass. Once
you have taken care of phase problems adjust the sound level of the subwoofer
to get a good and smooth mix with the Monitors.
Subwoofer
5.1 CHANNEL SURROUND SET-UP
You can keep front monitors and subwoofer in the same position described in
the above example. The surround (back) monitors should be positioned slightly
behind the listener's head forming an angle of about 90 with the main monitor
on the same side.
Subwoofer
4
SP
OT
L
IG
4. PANEL CONTROLS
HT
-. Features of the Active Models
LTO
R
M5A
M SERIES MONITOR
HIGH FREQUENCY AMP-60 WATT (FULL RANGE)
LOW FREQUENCY AMP-130 WATT (FULL RANGE)
MODEL
(1)
SERIAL
ON
(2)
(4)
SENSITIVITY
-30
NEAR
POWER
SW
(5)
dB
+6
OFF
OUT/LINK
BALANCED
110-120VAC~4A 60Hz
1
TIDE
3
2
Use only with a 250V fuse
NEW
(3)
PUSH
FAR
SIG.INPUT
BAL/UNBAL
(7)
(6)
(1) Power Indicator
This blue LED lights up when the M series active monitor are powered on.
(2) Power Switch
This switch is used to turn the M series active monitor on or off.
Caution: Make sure your supply voltage is identical with the value marking
on your monitors before turning the power switch on.
(3) AC Socket with Main Fuse
This socket is used to connect your M series active monitor speaker with
the mains. Fuse replacement should be done by qualified personnel only,
and only with same value fuse.
(4) NEAR or FAR Field Selector
Via this switch, you can use your M series monitors in the near field or far
field configuration. Generally, near field option is designed for near distance,
and the speakers are placed relatively close to the listener, normally about
1~1.5m. As for far field option, it is usually designed for the larger sound
systems, where the monitor speakers are placed comparative farther away
from the listener.
(5) SENSITIVITY Control
Adjust this trim pot to get the proper input gain.
(6) SIGNAL INPUT
This COMBO connector is used to input the program sources either in balanced
or unbalanced configuration. You can use either 1/4 jack or XLR connector.
(7) OUT/LINK
This balanced XLR connector is linked in parallel with the SIGNAL INPUT, and
it can be used to output the input signal directly to another active monitor.
5
SP
OT
L
IG
4. PANEL CONTROLS
HT
-.Features of the Passive Models
R
LTO
M5
M SERIES MONITOR
Power Handling:
AES - 80 Watts
MODEL
SERIAL
NEAR
(2)
FAR
-
+
(1)
INPUT
INPUT
(1) Input Connector
This professional push-pull speaker terminal is used to input the amplified program
sources coming from an external power amplifier.
For detailed connecting information, please refer to the " HOOKUP EXAMPLES"
for the passive version.
(2) NEAR or FAR Field Selector
Via this switch, you can use your M series monitors in the near field or far field
configuration.
Generally, near field option is designed for near distance, and the speakers are
placed relatively close to the listener, normally about 1~1.5m.
As for far field option, it is usually designed for the larger sound systems, where
the monitor speakers are placed comparative farther away from the listener.
6
HOOK
5. HOOKUP EXAMPLES
UP
-. For Active Monitors
In this example the main outputs or control room outputs of your mixer are
connected via jack or XLR to the input COMBO connector of your active M Monitor.
ON
SENSITIVITY
-30
SENSITIVITY
-30
NEAR
POWER
SW
dB
dB
+6
+6
AM
2
1
2
3
1
2
3
1
2
1
3
2
3
1
OUT/LINK
BALANCED
-140 FX
USB
3
FAR
14-CHANNEL MIXING CONSOLE
PUSH
1
SIG.INPUT
BAL/UNBAL
3
TIDE
DIGITAL EFFECTS
Use only with a 250V fuse
2
Use only with a 250V fuse
NEW
PUSH
WITH
2
TIDE
1
3
FAR
3
2
OFF
R
NEW
OUT/LINK
BALANCED
LTO
1
NEAR
OFF
SIG.INPUT
BAL/UNBAL
2
ON
POWER
SW
1
3
110-120VAC~4A 60Hz
110-120VAC~4A 60Hz
CTRL RM OUT
AMX-140FX USB
In this example the main monitors are connected to your mixer as explained above.
The OUT/LINK socket is used to send the signal to a second pair of active monitors.
ON
ON
SENSITIVITY
-30
NEAR
POWER
SW
SENSITIVITY
-30
NEAR
POWER
SW
dB
dB
+6
+6
OFF
OFF
OUT/LINK
BALANCED
OUT/LINK
BALANCED
FAR
1
TIDE
3
PUSH
SIG.INPUT
BAL/UNBAL
2
Use only with a 250V fuse
NEW
1
TIDE
3
SIG.INPUT
BAL/UNBAL
2
Use only with a 250V fuse
NEW
PUSH
FAR
110-120VAC~4A 60Hz
110-120VAC~4A 60Hz
ON
ON
-30
AM
dB
2
1
3
+6
2
1
3
2
1
3
2
1
2
3
1
3
2
1
LTO
SENSITIVITY
-30
NEAR
POWER
SW
SENSITIVITY
NEAR
POWER
SW
dB
+6
R
-140 FX
USB
OFF
OUT/LINK
BALANCED
3
14-CHANNEL MIXING CONSOLE
WITH
OFF
DIGITAL EFFECTS
FAR
1
1
TIDE
3
Use only with a 250V fuse
SIG.INPUT
BAL/UNBAL
2
2
NEW
FAR
PUSH
OUT/LINK
BALANCED
1
TIDE
3
110-120VAC~4A 60Hz
SIG.INPUT
BAL/UNBAL
2
NEW
PUSH
3
Use only with a 250V fuse
110-120VAC~4A 60Hz
CTRL RM OUT
AMX-140FX USB
7
HOOK
5. HOOKUP EXAMPLES
UP
-. For Passive Monitors
-
-
+
INPUT
INPUT
INPUT
CH-B
CONNECTION
(+)
2
LINE
2
+
1
3
SRT
WARNING
T(+)
(GND)
BREAKER
R( )
( )
1
S(GND)
3
OFF
ON
LF 30HZ
BALANCED
TO REDUCE THE RISK OF FIRE
OR ELECTRIC SHOCK, DO NOT
EXPOSE THIS APPARATUS TO
RAIN OR MOISTURE.
SEE INSTRUCTION BEFORE
USING!
BRIDGED
FILTER
1.15V/20K
MONO
INPUT
BRIDGED
CHANNEL A
CHANNEL B
STEREO
LINE
2
PARALLEL
1
MODEL
(MONO)
3
OFF
ON
CLIP LIMIT
SERIAL
CH-A
BRIDGED INPUT
Set to stereo mode
Follow this scheme to connect your passive M Monitor to a power amplifier. Make
sure to respect the polarity always connecting "+" with "+" and " " with " ".
INPUT
CH-B
CONNECTION
(+)
2
LINE
2
1
3
SRT
WARNING
T(+)
(GND)
BREAKER
R( )
( )
1
S(GND)
3
OFF
ON
LF 30HZ
BALANCED
TO REDUCE THE RISK OF FIRE
OR ELECTRIC SHOCK, DO NOT
EXPOSE THIS APPARATUS TO
RAIN OR MOISTURE.
SEE INSTRUCTION BEFORE
USING!
BRIDGED
FILTER
1.15V/20K
MONO
INPUT
BRIDGED
CHANNEL A
CHANNEL B
STEREO
LINE
2
PARALLEL
1
MODEL
(MONO)
3
OFF
ON
CLIP LIMIT
SERIAL
CH-A
BRIDGED INPUT
1+ 1-
1+ 1-
Set to stereo mode
-
+
INPUT
-
+
INPUT
8
6. WALL MOUNTING
To install M Monitor on the wall or ceiling,
Alto has provided an optional custom-built
bracket: The YS 60
Installation steps:
1. Mount the base (4) on the wall.
2. Adjust the angle of the bracket according to your needs.
3. Push the Solid Slide (12) into the specific Slot of the monitor speakers.
The M monitors provide 3 slots for each unit, respectively on top, side and bottom.
4. Use two screws (11, M3 10) to stop the Solid Slide at the proper position in the
slot.
5. Insert the Connecting Lever (10) of the accessory into its Fixing Lever (8), then
use another screw (9, M6 1.0PH 10) to fasten them.
Caution: While mounting the monitor speaker on the wall, please ensure the wall
is strong enough to support it. Consult the installation specialist or the dealer
for further instruction.
9
6. APPENDIX
Exploded Diagram of The Accessory (YS-60)
Item
Part Description
1
Ni Screw, M6
55
1.0PH
2
Fixing Bracket - Left
3
Spring
4
Mounting Base
5
Fixing bracket - Right
6
Spring Washer
7
Ni Nut
8
Fixing Lever
9
Zn Screw, M6
10
Connecting Lever
11
Ni Screw, M3
12
Solid Slide
1.0PH
10
10
10
7. TECHNICAL SPECIFICATION
Model No.
System type
Power Handing
SPL (1W/1m)
Frequency Response
Max SPL
Impedance
Crossover Frequency
Dimension (H x W x D)
Net Weight (kg)
M3
2 Way
AES 30 W
87 dB
50 Hz-13 kHz (-10 dB)
102 dB
4 Ohms
2.3-3 kHz (1m/W)
216.5 x 143.5 x 152.5 mm
2.4 kg
Model No.
System type
Power Handing: HF
Power Handing: LF
SPL (1W/1m)
AMP
Frequency Response
Impedance
Crossover Frequency
Dimension (H x W x D)
Net Weight (kg)
M3A
2 Way
20 W(EIAJ), 15 W(RMS)
38 W(EIAJ), 30 W(RMS)
87 dB
50 Hz-13 kHz (-10 dB)
104 dB
4 Ohms
2.3-3 kHz (1m/W)
216.5 x 143.5 x 152.5 mm
3.6 kg
Model No.
System type
Power Handing
SPL (1W/1m)
Frequency Response
Max SPL
Impedance
Crossover Frequency
Dimension (H x W x D)
Net Weight (kg)
M4
2 Way
AES 70 W
92 dB
40 Hz-15 kHz (-10 dB)
110 dB
4 Ohms
2.3-3 kHz (1m/W)
287.5 x 169 x 201 mm
4.8 kg
Model No.
System type
Power Handing: HF
Power Handing: LF
SPL (1W/1m)
AMP
Frequency Response
Impedance
Crossover Frequency
Dimension (H x W x D)
Net Weight (kg)
M4A
2 Way
36 W(EIAJ), 30 W(RMS)
72 W(EIAJ), 60 W(RMS)
92 dB
40 Hz-15 kHz (-10 dB)
112 dB
4 Ohms
2.3-3 kHz (1m/W)
287.5 x 169 x 201 mm
6.5 kg
11
7. TECHNICAL SPECIFICATION
Model No.
System type
Power Handing
SPL (1W/1m)
Frequency Response
Max SPL
Impedance
Crossover Frequency
Dimension (H x W x D)
Net Weight (kg)
M5
2 Way
AES 80 W
95 dB
40 Hz-15 kHz (-10dB)
113 dB
4 Ohms
2.3-3 kHz (1m/W)
376 x 223.5 x 267 mm
6.6 kg
Model No.
System type
Power Handing: HF
Power Handing: LF
SPL (1W/1m)
AMP
Frequency Response
Impedance
Crossover Frequency
Dimension (H x W x D)
Net Weight (kg)
M5A
2 Way
70 W(EIAJ), 60 W(RMS)
142 W(EIAJ), 130 W(RMS)
95 dB
40 Hz-13 kHz (-10 dB)
118 dB
4 Ohms
2.3-3 kHz (1m/W)
376 x 223.5 x 267 mm
8.3 kg
12
8. WARRANTY
1. WARRANTY REGISTRATION CARD
To obtain Warranty Service, the buyer should first fill out and return the enclosed
Warranty Registration Card within 10 days of the Purchase Date.
All the information presented in this Warranty Registration Card gives the
manufacturer a better understanding of the sales status, so as to provide a
more effective and efficient after-sales warranty service. Please fill out all the
information carefully and genuinely, miswriting or absence of this card will void
your warranty service.
2. RETURN NOTICE
2.1 In case of return for any warranty service, please make sure that the
product is well packed in its original shipping carton, and it can protect your
unit from any other extra damage.
2.2 Please provide a copy of your sales receipt or other proof of purchase with
the returned machine, and give detail information about your return address
and contact telephone number.
2.3 A brief description of the defect will be appreciated.
2.4 Please prepay all the costs involved in the return shipping, handling and
insurance.
3. TERMS AND CONDITIONS
3.1 LTO warrants that this product will be free from any defects in materials
and/or workmanship for a period of 1 year from the purchase date if you
have completed the Warranty Registration Card in time.
3.2 The warranty service is only available to the original consumer, who purchased
this product directly from the retail dealer, and it can not be transferred.
3.3 During the warranty service, LTO may repair or replace this product at its
own option at no charge to you for parts or for labor in accordance with the
right side of this limited warranty.
3.4 This warranty does not apply to the damages to this product that occurred
as the following conditions:
Instead of operating in accordance with the user's manual thoroughly, any abuse
or misuse of this product.
Normal tear and wear.
The product has been altered or modified in any way.
Damage which may have been caused either directly or indirectly by another
product / force / etc.
Abnormal service or repairing by anyone other than the qualified personnel or
technician.
And in such cases, all the expenses will be charged to the buyer.
3.5 In no event shall LTO be liable for any incidental or consequential damages.
Some states do not allow the exclusion or limitation of incidental or
consequential damages, so the above exclusion or limitation may not apply to
you.
3.6 This warranty gives you the specific rights, and these rights are compatible
with the state laws, you may also have other statutory rights that may vary
from state to state.
13
SEIKAKU TECHNICAL GROUP LIMITED
NO. 1, Lane 17, Sec. 2, Han Shi West Road, Taichung 40151, Taiwan
http://www.altoproaudio.com Tel: 886-4-22313737
email: [email protected] Fax: 886-4-22346757
All rights reserved to ALTO. All features and content might be changed
without prior notice. Any photocopy, translation, or reproduction of part of this
manual without written permission is forbidden. Copyright c 2007 Seikaku Group
NF01519-1.4