1
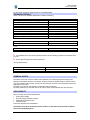
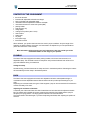
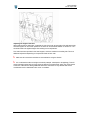
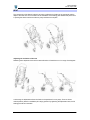
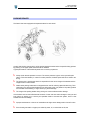
Manual
„GEMINI“
NV VERMEIREN BELGIUM
Vermeirenplein 1/15
Tel: 00 32 (0)3 620 20 20
•
•
2920 Kalmthout
Fax: 00 32 (0)3 666 48 94
Manual GEMINI
Version: Sept. 2006
Notice to the specialist dealer:
This Instruction Manual is part and parcel of the product and must accompany every wheelchair sold.
1. Edition 2005
All rights reserved, including translation.
No part of this manual may be reproduced in any form whatsoever (print, photocopy, microfilm or any other process) without
written permission of the publisher, or processed, duplicated, or distributed by using electronic systems.
2
Manual GEMINI
Version: Sept. 2006
© N.V. Vermeiren N.V., 2006
CONTENTS
SECTION
Contents ............................................................................................................................................... 03
Preface ................................................................................................................................................. 03
Technical Details .................................................................................................................................. 04
General Notes ...................................................................................................................................... 04
Applicability........................................................................................................................................... 04
Contents of the consignment................................................................................................................ 05
Push bar ............................................................................................................................................... 05
Back...................................................................................................................................................... 05
Seat ...................................................................................................................................................... 07
Foot support ......................................................................................................................................... 10
Tyres..................................................................................................................................................... 11
Replacing the tyres............................................................................................................................... 12
Parking brake ....................................................................................................................................... 13
Wedge (B22) ........................................................................................................................................ 14
Safety belt............................................................................................................................................. 14
Transport .............................................................................................................................................. 14
Using ramps ......................................................................................................................................... 15
Additional parts..................................................................................................................................... 15
• Clamps ............................................................................................................................................... 15
• Foot belts............................................................................................................................................ 15
• Collapsible cover ................................................................................................................................ 15
Safety principles ................................................................................................................................... 16
Inspection ............................................................................................................................................. 16
Care ...................................................................................................................................................... 17
• Covers ................................................................................................................................................ 17
• Plastic parts........................................................................................................................................ 17
• Outer coatings .................................................................................................................................... 17
Disinfection ........................................................................................................................................... 17
Guarantee............................................................................................................................................. 18
Addresses............................................................................................................................................. 19
PREFACE
First of all we want to thank you for putting your trust in us by selecting one of our products.
The products supplied by Vermeiren are the result of research and experience over many years.
During the development simplicity of operation and servicing was especially emphasized.
But the expected working life of your product depends essentially on your care and maintenance. This
instruction manual will help you to familiarize yourself with the operation of your product and advise
you about keeping your product in a good operating condition to ensure a long working life.
This instruction manual reflects the latest level of development of the product. However, our firm,
Vermeiren, reserves the right to introduce changes without any obligation to adapt or replace
previously delivered models.
Kindly keep in mind that your product will be in an excellent working condition and function perfectly
even after many years, if you follow our advice.
3
Manual GEMINI
Version: Sept. 2006
For any further questions, please consult your specialist dealer.
TECHNICAL DETAILS
Given in terms of the standard adjustments (condition of delivery)
Total length (footrest closed, back in seating position)
Total length (footrest open, back in laying position)
Height (including push bar)
Total width (depending on the model)
Seat width
Seat depth
Height (floor to seat)
Distance seat – footrest (adjustable)
Height back
Height armrest (seat-cushion)
Height armrest (floor-cushion)
77 cm
130 cm
118 cm
63 cm
32 cm
28 - 34 cm
50 cm
25 – 28 – 31 - 34 cm
51 - 64 cm
20 cm
70 cm
Measurement tolerance +/- 15 mm
Total weight (differs if additions have been installed)
Maximum load
+/- 13,5 kg
35 kg
Tyres
Front wheels - turnable / pressure
Rear wheels - fixed / pressure
200 x 50 / 2,5 bar
57-203 (12 1/2 x 2 1/4) / 2,0 bar
L
L Ensure the tires keep their maximum pressure.
Since different tires may be used, please notes the correct operating pressure of the specific tires
you use.
Driving specifications:
Turning radius
Max. inclination
Max. height of obstacles
- cm
10° (17%) when seated correctly
40 mm when seated correctly
GENERAL NOTES
The Gemini chairs are meant for children with a disability or movement dysfunction through brain
damage. The modular aluminium construction allows to choose the optimal design in specific need to
your child. Together with a variety of colours for the frame will this chair ensure a physical and mental
happiness for your child.
The Gemini can also be used outside in combination with a supervisor.
We kindly insist that you read this manual very well to make yourself familiar with all its functions.
APPLICABILITY
When providing for individual requirements
• body size and weight
• physical and psychological condition
• residential circumstances and
• the environment
should also be taken into consideration.
Guarantees can only be honoured when the product is used under the prescribed conditions
and for the intended purposes.
4
Manual GEMINI
Version: Sept. 2006
CONTENTS OF THE CONSIGNMENT
•
•
•
•
•
•
•
•
•
•
•
•
•
•
the frame structure
footrests with adjustable inclination and length
back (inclinable) with adjustable height
removable seat with adjustable inclination and depth
rear wheels mounted on a fast-lock system (B80)
parking brakes
side support (L03)
wedge (B22)
coating of the product (seat – back)
head cushion
safety belts
air pump
tools (Allen keys)
Instruction manual
When delivered, your product has been set to be used in proper conditions. Only the length of the
footrests, the ideal inclination of the back and seat need to be adjusted to your own specifications
(follow the instructions in this manual).
More information will be given by your local salesperson who can provide you all the
needed information on the usage of your product.
PUSHBAR
The Gemini has been equipped with rubber pushing handles, which have been mounted, on a
adjustable clamp. This will make it easier for the person who pushes the Gemini and remain a firm
grip under different driving circumstances.
Setting the clamp
Simultaneously, push both buttons at the clamp and lock in the desired position. Releasing the buttons
will automatically lock the clamp in the desired position.
BACK
The Gemini has been equipped with a back with adjustable inclination and adjustable height. In
combination with the adjustable seat and footrest will the Gemini provide optimal settings for your
child.
Depending on individual needs, two types of side supports (L03) can be mounted and will increase the
comfort and safety of its users.
Adjusting the inclination of the back
In the back part of the metal frame is a slider located that can be locked with the adjustment handle
M6. The release of this handle will ensure a seaming less transition from folded-position (easy for
transport) to a laying-position. The laying-position has been secured with limiters.
The frame needs to be locked again, by means of adjusting handle M6, after adjusting the position of
the back.
5
Manual GEMINI
Version: Sept. 2006
Adjusting the height of the back
After loosening the two bolts (M6 – located at the rear of the back at both sides of the adjustment bar),
the head support can be moved upwards or the back can be shortened between 51 and 64 cm. The
two bolts needs to be tightened again after making such an adjustment.
Two holes have been provided in the head support, which are needed for the safety belt. This is an
additional adjustment depending on the personal needs of each user.
L Make sure all connections and bolts are secured before using the Gemini!
L
It is not allowed to add more weight to the back (example: a backpack or shoppinbag). This will
cause overweight at the back and may cause the Gemini to trip backwards, which can cause injuries
to the user of the Gemini! Adding additional elements to the Gemini is only allowed after careful
consideration and in collaboration with one of our retailers.
6
Manual GEMINI
Version: Sept. 2006
SEAT
The construction of the Gemini makes it very easy to adjust the inclination of the seat angle and the
depth of the seat. Also a full conversion of the orientation of the seating parts towards the person who
is pushing the Gemini has been made very easy and fast to accomplish.
Adjusting the inclination of the seat
Releasing the 2 adjustment bars at the bottom allows the full module to turn in a range of 55 degrees.
A wide range in adjustments allows the Gemini to be positioned in many ways. From an almost
vertical position (ideal for revalidation) till a laying position. By tightening the adjustment bars, the full
seating part will be unmovable.
7
Manual GEMINI
Version: Sept. 2006
Adjusting the depth of the seat
The function to alter the depth of the seat can be used after loosening the bolts (M6) on the seating
plate (The needed tools are included in the package) and sliding the full segment into the desired
position. The range of the adjustment is about 6cm, which, in combination with the range of other
adjustments of the Gemini, allows a wide variety of adjustments.
8
Manual GEMINI
Version: Sept. 2006
Mounting the seat element
The Gemini stands for comfort when it comes to removing or switching positions of the seating
element. As such, you can push the Gemini with your child facing forward or facing towards you.
L Switching the direction of the seat is only allowed when the child is no longer present in
the Gemini!
The seat element will be disassembled as follows:
• Use the brakes to make the Gemini unmovable
• Unlock the two clamps in the rear part.
• Slide the full element backwards and pull vertically upwards while holding on to the side supports.
Assembling the seat element will happen in reverse order as described above.
9
Manual GEMINI
Version: Sept. 2006
L
L Make sure the locking clamps are locked before commencing to push your child in the Gemini.
L The person who operates the wheelchair must be aware of the responsibility of his actions
concerning the correct usage of the Gemini.
L Make sure no loose or hanging objects are stuck between the seat element and the supportive
part of the Gemini.
L Usage of the Gemini without seat element is strictly forbidden!
L All connections must be secured and checked before using the Gemini.
L We shall decline all liability for damage caused by improper use.
Always check if the clamps are mounted correctly on the frame during the placement of the seat
element.
The seat of the Gemini can only be extended with additional elements after approval of your retailer.
FOOTSUPPORT
The foot support of the Gemini consists out of:
1. A foldable footplate
2. Undercarriage with blocking pins
3. Hinged upperparts with regulating strips
The foot support segment is connected to the seat module through a plate, which acts as a depth
regulator for the seat. This design allows your child to put its legs in any desired position.
Positions of the footplate
By default the footplate is in a horizontal position.
With the emphasis on transport and rehabilitation and getting out of the Gemini, the footplate must be
turned into the direction of the undercarriage of the foot support.
The footplate has been equipped with limiters at the rear and the sides to prevent uncontrollable
sliding of the feet. As additional security, foot belts (B19) have been implemented.
10
Manual GEMINI
Version: Sept. 2006
Adjusting the length of the foot support
Due to the super design of the Gemini, the foot support can be set into 4 different lengths: 25 – 28 –
31- 34 cm.
Adjust them as follows:
• Retract both blocking pins
• Adjust the undercarriage of the foot support into the desired
• Block the undercarriage again with the blocking pins
Adjusting the inclination of the foot support
The adjustment of the inclination of the foot support to a range of 60°, in combination with other
adjustments, will increase the possible positions of the Gemini.
Adjust them as follows:
• Turn both adjustment knobs from the regulator strips loose
• Adjust to optimal inclination for the foot support
• Lock again by tightening both adjustment knobs
Attention:
L Before use, make sure that the leg supports are securely locked in place.
L The position of the adjustment knobs has to be checked every time to prevent that they would be
in a position that would endanger the user.
L Never grasp the wheelchair by the leg supports when picking it up for transportation, but only by
solid frame parts.
L Never stand on top of the foot support as they are only meant to give support.
L We shall decline all liability for damage caused by improper use.
For a correct adjustment of the foot support, turn to your local dealer who will support you with
professional advise and technical support.
In case the disorder of your child makes the correct adjustment of the foot support difficult, turn to your
local dealer who will find a suitable and proper solution.
TYRES
The Gemini is by default equipped with inflated rear wheels (½ x 2 ¼), which are mounted, to the
undercarriage by use of axles with rapid-connections (B80) and with revolving inflated front wheels (8
x 1 ¾ (200x50)).
Removing the rear wheel
The fast and safe removal of the wheels is very convenient for transport in smaller cars.
By usage of the special axles B80, a fast removal is possible. Use your thumb to press the button on
the wheels to the inside. After that, the wheel can be removed.
For mounting the wheels again, the same procedure needs to be followed. Push the button on the
axle and slide in the wheel to lock it into position.
L
A correct mounted wheels cannot be removed when the button of axle is clearly visible on the
outside.
11
Manual GEMINI
Version: Sept. 2006
L
L Improper assembly or use of tyres other then ours voids any warranty claim.
When inflating the tyres, always check that the pressure is correct. The correct pressure is given
on the tyre walls (also refer to "Technical details").
TYRE CHANGING
If you want to change the tyres or inner tubes, you should note the following:
Removing the tyre
Before you can remove a tyre, you must let all the air out of the tube, and insert a tyre lever between
the tyre and the rim. Then slowly and carefully push the lever downwards. This will pull the tyre over
the edge of the rim. If you then move the lever along the rim, the tyre will jump out. Now carefully
remove the tyre from the rim and then remove the tube.
L If handled improperly, the rim might be damaged. Rather let an expert perform these activities.
Check the rim bed and the inside wall of the tyre for foreign matter and clean these properly if
necessary. Check the condition of the rim bed, especially around the position of the air valve. Please
use only genuine original replacement parts. We do not accept any liability for damage caused by
non-genuine parts. Kindly contact your specialist dealer.
L Check that no objects or body parts are caught between the tyre and the edge of the rim,
since it could cause damage or injury.
L Improper assembly voids any warranty claim.
In case of problems, please turn to your local dealer.
Placing the tyres
Place the rim belt in position over the air valve before inserting it into the rim. Then the rim belt can be
pulled over easily. Check whether all spoke heads are covered (in the case of a plastic rim a rim belt
is not required).
Push the tyre over the edge of the rim, starting behind the air valve. Inflate the tube slightly until it is
round, and place it inside the tyre.
If the inner tube fits snugly inside the tyre without any folds (if there are folds, let some air out), then
you can push the upper side of the tyre gently onto the rim with both hands, beginning behind the air
valve.
L
L Improper assembly voids any warranty claim.
L When inflating the tyres, always check that the pressure is correct. The correct pressure is given
on the tyre walls (also refer to "Technical details").
L Use only inflating equipment which complies with regulations and indicates the pressure in bar, or
Check that no objects or body parts are caught between the tyre and the edge of the rim, since it
could cause damage or injury.
use the supplied air pump. We do not accept any liability for damage caused by using inflation
equipment not supplied by the manufacturer.
12
Manual GEMINI
Version: Sept. 2006
PARKING BRAKES
The Gemini has been equipped with separate brakes for each wheel.
A brake with blocking clamps which will be pushed against the wheel when the pedal is being pushed.
By pushing on the upper pedal, the brake will be released.
A good performance of the breaks depends on the correct tyre pressure.
L Always check that the pressure is correct. The correct pressure is given on the tyre walls (also
refer to "Technical details"). In case of incorrect pressure, the brake power will be too weak or too
strong.
L The person who is pushing the Gemini is responsible for the correct usage of the brakes and the
usage of them on both wheels.
L Note that the parking brakes are not supposed to be used for reducing speed while driving. Their
real function is to prevent the wheelchair from rolling away when it is parked. If the parking brakes
are activated while travelling, it might cause injury and/or damage.
L The usage of the parking brakes during driving can cause accidents and/or damage.
If the brakes have lost their effectiveness because of wear and tear and/or damage to the tyres and
inner tubes, we advise you to consult your specialist dealer to renovate the system, since he has
suitable tools and knowledge.
L Improper maintenance or the use of unsuitable tools might cause damage and/or loss of function.
L If the wheels (pneumatic or krypton) are soiled by water, oil, or other kinds of dirt, the
13
Manual GEMINI
Version: Sept. 2006
effectiveness of the parking brakes is impaired. Check the condition of the wheels every time
before using the wheelchair.
L If the brakes lose their effectiveness because of wear and tear and/or damage to the tyres/inner
tubes, kindly consult your specialist dealer, since special machines are required for changing the
krypton tyres. The end-user is not able to change the krypton tyres.
WEDGE (B22)
By default, a wedge, covered with textile, is mounted on the seating element. It will prevent your child
from sliding out of the Gemini. The wedge has been mounted by a screw (M6). It can easily be
adjusted by loosening/tightening the screw.
L The usage of the wedge depends on the physical and mental condition of your child.
L We do not accept any liability for damage and/or injuries caused by the wedge being fitted
by unauthorised persons.
SAFETY BELTS
Every Gemini has been equipped with adjustable belt to the purpose of a correct and safe seating
position. These belts have an adjustable length and are mounted to the seating frame. The ends are
connected to each other by means of a central lock.
After applying the safety belts to your child, you need to hear an auditable clicking sound to make sure
the belts are locked into place. Push the buttons on the locks to release them again. The belts can
only be adjusted after the locks are into place.
Adjusting the safety belts
Adjusting the length of each belt is done individually by shortening or extending the length of each belt
by means of the buckles.
The connection points of the belts on the plate of the back support can be located in different positions
depending on the size of your child. To do so, the shoulder belts need to go through the oval openings
in the back support and retightened again.
L The correct procedure of adjusting the length of the safety belts and the power by which they are
drawn will influence the safety and driving comfort of your child.
L Make sure all the safety belts are locked into place before driving the Gemini.
L In case of questions regarding the locking and safety systems, please refer to our dealers.
L We do not accept any liability for damage and/or injuries caused by the improper usage of
the safety belts.
TRANSPORT OF THE GEMINI
When folded, the Gemini becomes pretty easy to transport. A special designed system makes it easy
to fold and transport the Gemini.
1. Follow the instructions regarding the folding of the footplate and if needed remove or shorten the
undercarriage of the foot support.
2. Fold the frame of the back support into the direction of the seat (as far as possible) and shorten the
head support if needed.
3. At the same time, pull both sliders upwards. Due to the folding of the tube, the full frame of the
Gemini folds. Folded, the Gemini has following dimensions:
14
Manual GEMINI
Version: Sept. 2006
(length x height x width): 76 x 70 x 63 cm.
4. The removal of the rear wheels considerably changes the measures of the Gemini when folded:
84 x 56 x 60 cm.
Unfolding the Gemini will be done in the exact reverse order of the instructions described above.
L When relocating the folded Gemini, only hold on to the Gemini by the main frame.
L Be extra careful when (un)folding the Gemini.
L Always hold on to the main frame of the Gemini (never onto the wheels or foot support) when the
Gemini is being put in a car or been removed out of.
L We do not accept any liability for damage and/or injuries caused by the improper usage.
It is strictly forbidden to use the Gemini on stairs while the child is still inside the Gemini!
For transportation in public vehicles provided for disabled persons, we recommend that you should
ask the organisation concerned about the currently valid regulations and rules for the transportation of
wheelchairs. Then you can ensure proper transportation with suitable security systems.
For transportation in other vehicles (airplanes, buses, ships, trams, trains, etc.) you should ask the
service officials about travelling safely with your wheelchair to your intended destinations and about
the applicable requirements.
MOVING ON RAMPS
If you are considering ramps for overcoming obstacles, kindly note the following:
L Driving on or off ramps needs to be done at the slowest speed possible.
L Mind that the centre of the gravity will shift when driving upwards.
L Use a restraining belt to secure yourself in your wheelchair.
L We do not accept any liability for injury or damage caused by an improper choice of ramps.
ADDITIONAL PARTS
• CLAMPS
These clamps are made in a specific shape coated with foam making contact very gentle. The clamps
are connected to the frame of the side supports with special tube locks. By letting the tubes of the
clamps hinge, two possible positions become available (high or low position).
• FOOTBELTS
The feet of your child can easily be held into place by usage of the foot belts made out of Velcro strips.
• COLLAPSIBLE COVER
The accessory enhances the comfort of the Gemini. Special holes in the frame of the Gemini are
made to fix the cover. It suffices to lock the ends of the cover into the holes. Depending on the needs,
the cover can open or closed.
We offer a wide range of interesting and useful additional elements for the Gemini, which will increase
the comfort and usefulness of the Gemini. Please refer to your local dealer for more information on the
available options.
15
Manual GEMINI
Version: Sept. 2006
SAFETY
L
L Do not step on the footplates when getting into or out of the wheelchair. The footplates must be
folded up or the entire foot supports must be swung aside beforehand.
L Always make sure the parking brakes are locked when getting in or out the Gemini.
L Investigate the effects of shifting the centre of gravity on the behaviour of the wheelchair for
To prevent injury and/or damage to your wheelchair, make sure that no objects and/or body parts
are caught in the spokes of the driving wheels.
example on gradients, on ground sloping sideways, or when overcoming obstacles, only when a
helper is present to secure and support you.
L
L Only use a Gemini which has been adjusted to the weight and length of the child.
L Use your wheelchair only according to regulations. Avoid, for example, driving at full speed
against an obstacle (step or curb) without braking, or jumping down from a ledge or a landing.
L Check the profile depth and the inflation pressure of the tyres.
L When travelling outdoors, adapt your driving to weather and traffic conditions.
L To be better visible when driving in the dark, wear the brightest possible clothing or clothes with
The Gemini cannot be tipped too much backwards because the shift of the centre of gravity may
cause the Gemini to flip backwards.
reflectors, and check that the reflectors mounted on the sides and rear of the wheelchair are clearly
visible.
L Be careful with fire, especially burning cigarettes; the seat and back covers could ignite
L Make sure that the maximum load is not exceeded.
INSPECTION
Like many other products, your Gemini needs to be checked periodically to ensure correct and safe
usage.
•
BEFORE DRIVING OFF
L Check the tyres for visible damage and/or soiling. Clear the dirt, since it could impair the operation
of the parking brake. When a tyre is damaged, kindly go to an authorised workshop for repairs
(also refer to the chapter on "Tyre changing").
L Before driving off, check the effectiveness of the parking brakes. If they do not function properly,
consult your specialist dealer (see also the chapter on "Parking brakes").
L Check the pressure of the tyres and inflate them if necessary (refer also to the chapters "Tyre
changing" and "Technical details").
L Check the correct position of the safety belts en the function of the locks.
•
EVERY 6 MONTHS
Depending on the frequency of use, kindly check the following:
1. Cleanness
16
Manual GEMINI
Version: Sept. 2006
2. General condition
3. Functioning of the front wheels
If the rolling resistance is too great, the wheel bearings have to be cleaned. If this is insufficient,
kindly consult your specialist dealer.
Your specialist dealer should only undertake repairs or the fitting of replacement parts. Only genuine
parts may be used. We do not accept any liability for damage caused by the use of non-genuine parts
or accessories not supplied by the manufacturer.
CARE
Your Gemini requires regular care when you also want it to be visually attractive.
Take note of the following for this purpose:
• COVERS
L Do not use aggressive cleaning liquids like solvents; neither should hard brushes be used.
L We accept no liability for damage caused by using improper cleaning liquids or materials.
L Do not soak the covers.
L Steam cleaning is unsuitable for these covers, and its use would void your warranty claim.
• PLASTIC PARTS
Clean all plastic parts of your wheelchair with commercially available plastic cleaners. Take note of
any special product information.
• COATING
The high quality surface coating guarantees optimal corrosion protection.
The chrome parts only require wiping with a dry cloth. Dull places or stubborn dirt can best be
removed by using a suitable commercially available chrome polish.
To ensure that your wheelchair will always be in a good condition, we recommend that you should
have it inspected annually by your specialist dealer. These inspections can be confirmed in the
"Service plan" section.
L
The manufacturer is not liable for damage or injury caused by improper servicing and poor care.
DESINFECTION
Only a hygiene technician or someone appointed by him can disinfect your wheelchair and this should
be done every time before its use is resumed.
All parts of the wheelchair can be disinfected by scrubbing. In principle all surfaces of a system or a
product must be disinfected before handing it over to a new user, at least once a year (e.g. when the
wheelchair is inspected) or when the occurrence of infections of the user is ascertained. Then the
measures of the Federal Epidemic Law must be applied.
Only authorised technicians trained in the functioning and application of disinfectants should
apply disinfectants.
17
Manual GEMINI
Version: Sept. 2006
L Wear suitable protective clothing to prevent skin irritations which might be caused by the
disinfectant liquid. Also note the product information of the solutions used.
L You employ third parties at your own risk.
L The wheelchair manufacturer does not accept liability for damage and injury caused by improper
implementation of the disinfection.
GUARANTEE
Excerpt from the "General business conditions":
(…)
For processing defects or material faults discovered after delivery, we accept liability, computed from
the calculation date, for the warranty period of the relevant product group.
(…)
Lightweight wheelchair
12 months
(…)
The following are excluded from the guarantee:
Damage caused by structural alterations of our products
Worn parts
Damages caused by the product or its user
Damage caused by external influences
Damage caused by using non-genuine parts
(…)
We reserve the right either to repair a damaged part or to replace it with a new one. The warranty
period is not extended in such a case. The guarantee is accepted by the specialist trade.
(…)
18
Manual GEMINI
Version: Sept. 2006
ADDRESSES
Belgium
Germany
N.V. VERMEIREN & N.V.
Vermeirenplein 1 / 15
B-2920 Kalmthout
Fon: +32(0)3 620 20 20
Fax: +32(0)3 666 48 94
website: www.vermeiren.com
e-mail: [email protected]
Vermeiren Germany Co. Ltd.
Wahlerstr. 12 a
D-40472 Düsseldorf
Fon: +49(0)211 94 27 90
Fax: +49(0)211 65 36 00
website: vermeiren.com
e-mail: [email protected]
France
Austria
Vermeiren France S.A.
Zone Industrielle / Rue d´Ennevelin
F-59710 Avelin
Fon: +33(0)3 28 55 07 98
Fax: +33(0)3 20 90 28 89
website: www.vermeiren.fr
e-mail: [email protected]
L. Vermeiren Ges. mbH
Winetzhammerstr. 10
A-4030 Linz
Fon: +43(0)732 37 13 66
Fax: +43(0)732 37 13 69
website: www.vermeiren.com
e-mail: [email protected]
Italy
Switzerland
Reatime S.R.L.
Via Torino 5
I-20039 Varedo MI
Fon: +39(0)362 55 49 50
Fax: +39(0)362 55 49 46
website: www.reatime.it
e-mail: [email protected]
Vermeiren Suisse S.A.
Hühnerhubelstr. 64
CH-3123 Belp
Tel.: +41(0)31/8121700
Fax: +41(0)31/8121702
website: www.vermeiren.ch
e-mail: [email protected]
Poland
The Netherlands
Reha-Pol-A Sp. z o.o
ul. Łączna 1
PL-55-100 Trzebnica
Fon: +48(0)71 387 42 00
Fax: +48(0)71 387 05 74
website: www.rehapola.pl
e-mail: [email protected]
Vermeiren Nederland B.V.
Bijster 26
NL-4817 HX Breda
Fon: +31(0)3 165 37 85 47
Fax: +31(0)3 165 37 82 53
website: www.vermeiren.com
e-mail: [email protected]
19