1
DM7
DRUM MODULE
MODULE OVERVIEW
::: ENGLISH ( 3 – 7 ) :::
VISTA DEL MÓDULO
::: ESPAÑOL ( 8 – 9 ) :::
CARACTERISTIQUES DU MODULE
::: FRANÇAIS ( 10 – 11 ) :::
PANORAMICA DI MODULO
::: ITALIANO ( 12 – 13 ) :::
OBERSEITE DER MODUL
::: DEUTSCH ( 14 – 15 ) :::
GETTING STARTED
1.
2.
3.
4.
5.
6.
7.
8.
9.
10.
Assemble your drum kit as described in its assembly guide.
Insert the included module cable connector into the TRIGGER connector on the module's rear panel.
Insert the connector's cables to the jacks of their respective drum pads, cymbal pads, and hi-hat control pedal. (Each
cable is labeled with the name of its corresponding pad or pedal.)
Make sure all your devices' volumes are at "0" (DM7 module, external speakers or headphones, a device connected to
the LINE IN, etc.).
If you connected a device to the module's LINE IN, turn it on.
Do not strike any pad or press the hi-hat control pedal. Turn on the module.
If you are using external speakers, turn them on.
Strike the pads and adjust the volume levels of your devices as needed. If you are using headphones, adjust the
module's volume with the VOLUME knob on its rear panel. If you are using external speakers, adjust the module's
volume by pushing the DATA dial, rotating it to select the volume level, and waiting for five seconds until it returns to the
previous window.
To select a Kit to play, press one of the numbered buttons (1-9) or turn the DATA dial to access more Kits.
Play!
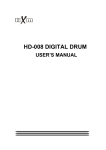
TOP PANEL FEATURES
1.
DISPLAY
–
Displays
module
information such as the Kit number and
name, Song name, pad selection, etc.
2.
SONG Button – Enters Song Mode
where you can play the Demo Song or
a User Song.
3.
KIT Button – Enters Kit Selection
Mode.
4.
CLICK Button – Activates/deactivates
the Metronome.
Press this twice
quickly to edit the Metronome settings
(and press EXIT to return to the normal
screen).
5.
TEMPO Button – Press this button
then rotate the DATA dial to adjust the
Metronome speed.
6.
PLAY/STOP Button – When in Song
Mode,
this
button
starts/stops
playback. When the module is recordarmed,
this
button
starts/stops
recording.
7.
RECORD Button – Press this button
to record-arm the module.
Press
PLAY/STOP to start/stop recording.
8.
COUNT Button – Enters Count Mode, which lets you count how quickly you can strike the pads.
9.
DATA Dial – Rotate this dial to adjust the currently selected setting shown in the DISPLAY. From the main screen
(when the current Kit is displayed), press the dial then rotate it to adjust the master volume (and wait for the display to
return to the previous screen).
10.
ENTER Button – Confirms the setting or data entry shown in the DISPLAY.
11.
EXIT Button – Cancels any data entry and returns to the previous screen of the DISPLAY.
12.
SETUP Button – Enters Setup Mode, which allows you to edit the module's overall settings.
13.
MODE Button – Changes how the Demo Song is played. You can select "Full" (all the song's parts will play), "Drum
Only" (only the song's drum part will be heard), or "Drum Mute" (only the song's accompaniment will be heard).
14.
EDIT Button – Enters Edit Mode, which allows you to edit various parameters for the Kits to customize your sound.
15.
PAD SELECT Buttons – These buttons serve two functions. In Edit Mode, these buttons select which pad's parameters
are being edited. When in Kit Selection Mode, pressing one of these buttons will select one of nine Preset Kits.
3
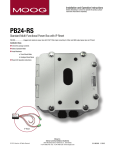
REAR PANEL FEATURES
1.
2.
3.
4.
5.
6.
7.
8.
POWER IN – Connect the included power
adapter to this input, then plug the
adapter into your power source.
POWER SWITCH – Turns the module
on/off.
Note: If you want to turn the module on
after turning it off, wait at least five
seconds in between so the electronic
circuits can properly reset.
USB Jack – You can use this USB jack to connect the drum module to an available USB port on your computer if your
operating system is Windows XP, Windows Vista, or Mac OS X. The drivers will be installed automatically, and the
module will appear as a USB audio device (e.g., "USB Audio CODEC"). When connected, the module can send MIDI
data to your computer via the USB connection.
HEADPHONE Jack – You can connect standard 1/4" stereo headphones to this output to hear your drum performance.
Adjust the volume with the HEADPHONE VOLUME knob.
HEADPHONE VOLUME Knob – Adjusts the volume of the HEADPHONE output.
LINE IN Jack – You can connect an audio device to this input using a standard stereo 1/4" cable. The sound from that
device will be mixed with the sound from the drum module, which can allow you to play along to a connected CD player,
MP3 player, iPod*, etc.
LINE OUT Jack – If you are not using headphones connected to the HEADPHONE output, connect a set of speakers or
other amplification system to this output using a standard stereo 1/4" cable. You can adjust this volume with the DATA
dial: from the main screen (when the current Kit is displayed), press the dial then rotate it to adjust the master volume
(and wait for the display to return to the previous screen).
TRIGGER Connector – Connect the included module cable connector to this input, then connect the cables to the jacks
of their respective drum pads, cymbal pads, and hi-hat control pedal. (Each cable is labeled with the name of its
corresponding pad or pedal.)
* iTunes and iPod are trademarks of Apple, Inc., registered in the U.S.A. and other countries.
KITS
There are 50 Preset Kits and 30 User Kits to choose from. Each Kit is unique combination of different instrument voices
assigned to your drum pads. See the back of this manual for a list of the available Kits.
To select a Kit:
1.
Press the KIT button to enter Kit Selection Mode. (This is also the default main screen of the module.)
2.
Rotate the DATA dial to select the Preset Kit you want to play. If you want to play a User Kit, press the KIT button again,
then rotate the DATA dial to select one. (Preset Kits are 01-50; User Kits are U01-U30.) You may also press any one of
the numbered PAD SELECT buttons on the module to select one of Kits 01-09.
3.
Play!
To create/edit a User Kit:
1.
Press the KIT button to enter Kit Selection Mode. (This is also the default main screen of the module.)
2.
Press the KIT button again, then rotate the DATA dial to select a User Kit to edit (U01-U30).
3.
Press the EDIT button to enter Edit Mode.
4.
Do one of the following to select the pad you want to edit:
a. Press the PAD SELECT button that corresponds to the drum pad. (If the pad has multiple zones – such as a
dual-zone snare drum pad or the hi-hat's "open" and "closed" sounds – press that PAD SELECT button multiple
times to toggle between the available zones.)
b. Strike the pad (or the zone of a multi-zone pad) you want to edit.
5.
Press ENTER to confirm your choice.
6.
Rotate the DATA dial to select one of the following parameters to edit, then press ENTER to confirm your choice:
a. Voice: The drum sound assigned to that pad.
b. Volume: The volume of that pad. This volume is independent of the module's master volume.
c. Pan: The stereo (left-right) panning of that pad's sound.
d. Pitch: The pitch or tuning of that pad.
e. Reverb: The amount of reverb effect applied to that pad.
7.
When the parameter value is flashing, rotate the DATA dial to change it. Press ENTER to confirm your choice. The next
parameter will start flashing.
8.
Optional: To edit another parameter, repeat Steps 6-7.
9.
When you are finished editing the Kit, press EXIT.
10.
You will be asked whether or not you want to save the Kit you just edited. To cancel saving, press EXIT. To save the
Kit:
a. Press the ENTER button
b. Rotate the DATA dial to choose the User Kit where you want to save this edited Kit, then press ENTER.
c. You will be asked, "Replace It?" Press ENTER to confirm or EXIT to cancel. The module will automatically return
to Kit Selection Mode.
11.
Play!
Note: The User Kits you edited will retain the settings you saved even if you turn the module off.
Tip: You may reset the changes you made to the User Kits by returning the module to its factory settings. See the SETUP
section for more information.
4
SONGS
There are two types of songs – 52 Demo Songs, to play back and or practice to, and 10 User Songs, which you can record
yourself.
To play Demo/User Songs:
1.
Press the SONG button to enter Song Mode – once to play Demo Songs, twice to play User Songs. (The button will
illuminate.) Depending on whether you selected Demo Songs or User Songs, the DISPLAY will show "All Demo" or "All
U-Song" indicating that the Songs will all play one after another.
2.
Press PLAY to start playback of all songs, or rotate the DATA dial to select a specific Song then press PLAY. If no
buttons are pressed within 3 seconds, playback will start automatically.
3.
During playback you can do any of the following:
a. Adjust the speed of the Song by pressing the TEMPO button and rotating the DATA dial until the song is at the
desired speed.
b. Change which parts of the Song you are hearing by pressing MODE to toggle through three different settings:
"Full" (all the song's parts will play), "Drum Only" (only the song's drum part will be heard), or "Drum Mute" (only
the song's accompaniment will be heard).
c. Turn the metronome on or off by pressing the CLICK button.
d. Adjust any settings in the Setup Menu by pressing the SETUP button. (See the SETUP section for more
information.)
4.
Press STOP to stop playback.
5.
Optional: To play another Song, repeat Steps 2-4.
6.
Press EXIT to exit Song Mode.
To record User Songs:
1.
Make sure the module's settings are set to your preference – tempo, time signature, drum and accompaniment volumes,
etc. (See the SETUP section for more information on these customizable settings.)
2.
Press the RECORD button to start recording. The recording indicator will flash and the current tempo, time signature will
be shown in the DISPLAY. You will hear a one-measure count-in before recording starts.
3.
Play! The current measure of the Song you are recording will be shown in the left of the DISPLAY.
4.
When you are done recording, press the RECORD button again.
5.
Rotate the DATA dial to select where to save the Song. You can choose from User Songs 01-10. If you want, you can
play the Song before saving it by pressing PLAY (and pressing STOP to stop playback).
6.
Press ENTER to save the Song to the selected User Song number.
7.
You will be asked if you want to replace the current User Song with your new recording. To save the Song, press
ENTER. To cancel, press EXIT (and return to Step #5 or press EXIT to cancel saving entirely).
To delete User Songs:
1.
When in Kit Selection Mode, press the SONG button twice to view User Songs in Song Mode.
2.
Rotate the DATA dial to select the User Song you want to delete.
3.
Press ENTER.
4.
You will be asked if you want to erase the selected User Song. To erase it, press ENTER. To cancel, press EXIT. You
will return to the list of User Songs.
METRONOME
The metronome helps you play at a steady speed. To activate/deactivate the Metronome, press the CLICK button. When
activated, you will hear a counting sound at the current tempo.
You can adjust the following settings by pressing the CLICK button twice. (If you do not want to change the setting, simply
press the ENTER button without adjusting the value to skip it.)
Time Signature ("Time-Sig") – The current time signature will flash in the second row of the DISPLAY (under "Click").
Rotate the DATA dial to change the time signature. Press the ENTER button to save the setting and move to the next
metronome setting or press EXIT to cancel any changes.
Metronome Volume ("Metro Vol") – The current metronome volume will flash in the left of the DISPLAY. Rotate the
DATA knob to adjust the volume. Press the ENTER button to save the setting and move to the next metronome setting
or press EXIT to cancel any changes.
Metronome Sound ("MetroSound") – The current metronome sound will flash in the left of the DISPLAY. Rotate the
DATA knob to select the sound: "Eng" (for a voice counting in English), "Chn" (for a voice counting in Chinese), or "Prc"
(for a standard "click" sound). Press the ENTER button to save the setting and return to Kit Selection Mode or press
EXIT to cancel any changes.
TEMPO
To adjust the speed of the Song and Metronome, press the TEMPO button. The button will flash, and the current tempo will
flash in the second row of the DISPLAY. Rotate the DATA dial to select a new tempo (40 – 240 BPM).
Press the ENTER button to confirm you setting or press EXIT to cancel. (If no changes are made for 10 seconds, it will exit
automatically.)
5
COUNT
This feature allows you to test how fast you can strike the pads.
1.
Press the COUNT button, and turn the DATA dial to set the length of time for 1, 2, or 3 minutes.
2.
Press the ENTER button to select it. "Ready" will flash on the DISPLAY.
3.
Strike any pad to begin and counting will start automatically. Play the pads as fast as you can. The remaining time (in
seconds) will be displayed in the right side and the current count will be displayed in the left side of the screen.
4.
When your time is up, you will hear a brief alert and the counting will stop. Then you can check the results.
5.
Press the ENTER button to start again or press the EXIT button to exit.
Note: You can adjust the pad sensitivity for this feature. See the SETUP section for more information.
SETUP
In the Kit Selection Mode or Song Mode, you can press the SETUP button to enter Setup Mode. You can then rotate the DATA
dial to select one of the 7 settings listed below and press the ENTER to select it (or press EXIT to return to the previous
screen). To skip to the next setting without adjusting the current one, simply press ENTER until it appears.
Accompaniment Volume for Demo ("Accomp Vol")
This setting determines the volume of the accompaniment you hear when playing Demo Songs. Rotate the DATA dial to adjust
the volume, and press ENTER to confirm your setting and turn to the next parameter for editing.
Percussion Volume for Demo ("D.Drum Vol")
This setting determines the volume of the drums you hear when playing Demo Songs. Rotate the DATA dial to adjust the
volume, and press ENTER to confirm your setting and turn to the next parameter for editing.
Master Tune ("MasterTune")
This setting determines the pitch globally. Rotate the DATA dial to adjust the pitch (in either direction), and press ENTER to
confirm your setting and turn to the next parameter for editing.
Count Sensitivity ("Count Sens")
The parameter for the sensitivity of the Count feature. Rotate the DATA dial to adjust the pitch (in either direction), and press
ENTER to confirm your setting and turn to the next parameter for editing. We recommend setting a lower sensitivity than your
normal performance.
Equalizer
You can use the Equalizer to adjust the global tone of the drums. There are 8 types of equalizer presets:
001 – Normal 1
002 – Normal 2
003 – Bass Boost
004 – Bass Mid
005 – Moderate
006 – Bright Mid
007 – Bright
008 – Bright High
Advanced
This option allows you to adjust more advanced settings for the individual drum pads, cymbal pads, or pedal. Rotate the DATA
dial to select which setting you want to edit.
Notes:
1. You cannot edit the settings of additional zones (rim, edge, etc.) of multi-zone pads in this menu. You can only edit zone
settings in Edit Mode.
2. Once you press the EXIT button from the main Advanced menu screen, the changes you made will be saved
automatically and you will return to the Kit Selection Mode.
Sensitivity ("Sensitive")
Rotate the DATA dial to set the pad sensitivity (001 – 127). A higher value indicates a higher sensitivity. (Note that if the
sensitivity is too high, it may cause unintended sounds and "retriggering.") Press ENTER to confirm and move to the
next parameter, or press EXIT to cancel and return to the Advanced setting menu.
Dynamic Range ("Dynamic")
Rotate the DATA dial to set the maximum volume of sound that can be produced by that pad. To find the optimal setting
for your performance style, strike the pad with the most force you would while playing. The dynamic value will be
displayed on the screen (127 is the maximum value). Press ENTER to confirm and move to the next parameter, or
press EXIT to cancel and return to the Advanced setting menu.
Trigger Curve ("Trigger")
This feature allows you select a curve from 6 presets to control the relation between the force with which you strike the
pad and the volume of the sound it produces. Change the curve until the response feels as natural as possible. Rotate
the DATA dial to choose a curve. Press ENTER to confirm and move to the next parameter, or press EXIT to cancel
and return to the Advanced setting menu.
6
Crosstalk ("Cross Talk")
Crosstalk occurs when you strike one pad and the sound of another pad is heard. This "crosstalk" is a result of pads
detecting the vibrations in the rack as you hit other pads. The module's crosstalk feature allows you to reduce how much
the selected pad receives crosstalk from other pads.
1.
Select a pad which is affected by crosstalk by pressing its PAD SELECT button or striking the pad then press
ENTER.
2.
Rotate the DATA dial to change the crosstalk value (0 – 100). The smaller the value, the less the pad will be
affected by crosstalk. However, if the value is too low, it will be harder to get the pad to generate its sound
when you hit it.
3.
Press ENTER to confirm your setting or press EXIT to cancel.
4.
To edit another pad's crosstalk setting, repeat Steps #1-3. Otherwise, press EXIT return to the Advanced
setting menu.
Hi-Hat Pedal Setting
The hi-hat pedal has three different zones, so its settings are different from the other pads. When the pedal is in the "up"
position (as determined by the "open threshold") striking the hi-hat cymbal pad will produce an "open" hi-hat sound.
Depending on how heavily the pedal is pressed down (and depending on the "closed threshold"), striking the hi-hat cymbal
pad will produce a "closed" hi-hat sound.
The "open" and "closed" thresholds mentioned above can be adjusted in the Sensitivity settings for the hi-hat pedal ("H.
PEDAL"). Use the DATA dial and ENTER or EXIT buttons as you would in other Setup Mode menus. "0" represents the
lowest position of the pedal (completely pressed) and "127" represents the highest position (completely raised).
The hi-hat pedal Sensitivity parameters are:
• Open THR (open threshold): The lowest point the pedal can be pressed in order to produce the "open" hi-hat
sound when striking the hi-hat cymbal pad (the lower the number, the lower the pedal position). This value must be
higher than the closed threshold.
• Close THR (closed threshold): The highest point the pedal can be raised in order to produce the "closed" hi-hat
sound when striking the hi-hat cymbal pad (the higher the number, the higher the pedal position). This value must
be lower than the open threshold.
• Pedal THR (pedal threshold): The lowest position of the pedal. This value must be lower than the closed
threshold.
Once you press the EXIT button from the main Advanced menu screen, the changes you made will be saved automatically and
you will return to the Kit Selection Mode.
Reset
This feature allows you to recover the module's factory settings. When "Reset" is flashing, press ENTER to select it, then
rotate the DATA dial to select one of the four types of reset operations.
Reset Kit – This will reset the sound parameters in all User Kits. When "Reset Kit" is flashing, press the ENTER button.
"AreYouSure" will be displayed. Press ENTER to confirm or press EXIT to cancel.
Reset Setup – This will reset changes made in Setup Mode. When "ResetSetup" is flashing, press the ENTER button.
"AreYouSure" will be displayed. Press ENTER to confirm or press EXIT to cancel.
Reset Song – This will delete all User Songs you have recorded. When "Reset Song" is flashing, press the ENTER
button. "AreYouSure" will be displayed. Press ENTER to confirm or press EXIT to cancel.
Reset All – This will reset all the items listed above as well as the parameter changes in Kits that have been edited in
the Advanced menus. When "Reset All" is flashing, press the ENTER button. "AreYouSure" will be displayed. Press
ENTER to confirm or press EXIT to cancel.
Notes:
1. Do not strike any pads or press any pedals after pressing the ENTER button to confirm a reset. Wait a couple seconds
after it returns to Setup Mode or Kit Selection Mode.
2. When entering Setup Mode from Song Mode, the reset feature will not be available.
7
PARA COMENZAR
1.
2.
3.
4.
5.
6.
7.
8.
9.
10.
Arme su kit de batería como se explica en su guía de armado.
Inserte el conector del cable del módulo incluido en el conector TRIGGER del panel trasero del módulo.
Inserte los cables del conector en los jacks de sus respectivos pads de tambor y de platillos y el pedal de control de hihat. (Cada cable está rotulado con el nombre de su correspondiente pad o pedal.)
Asegúrese de que los volúmenes de todos sus dispositivos estén en "0" (módulo DM7, altavoces o auriculares externos,
un dispositivo conectado a la ENTRADA DE LÍNEA, etc.).
Si conectó un dispositivo a la entrada de línea (LINE) del módulo, enciéndalo.
No golpee ningún pad ni presione el pedal de control de hi-hat. Encienda el módulo.
Si usa altavoces externos, enciéndalos.
Golpee los pads y ajuste los niveles de volumen de sus dispositivos según sea necesario. Si utiliza auriculares, ajuste
el volumen del módulo con la perilla de VOLUMEN del panel trasero. Si usa altavoces externos, ajuste el volumen del
módulo presionando el cuadrante de DATOS, girándolo para seleccionar el nivel de volumen y esperando cinco
segundos hasta que regrese a la ventana anterior.
Para seleccionar un kit para tocar, pulse uno de los botones numerados (1-9) o gire el cuadrante de DATOS para
acceder a más kits.
¡Toque!
CARACTERÍSTICAS DEL PANEL SUPERIOR
1.
PANTALLA – Muestra información
del módulo tal como número y nombre
del kit, nombre del tema, selección de
pad, etc.
2.
Botón de TEMA – Activa el modo de
tema con el que puede reproducir el
tema demo o un tema del usuario.
3.
Botón de KIT – Activa el modo de
selección de kit.
4.
Botón de CLIC – Activa y desactiva
el metrónomo. Púlselo rápidamente
dos veces para editar los parámetros
del metrónomo (y pulse SALIR para
volver a la pantalla normal).
5.
Botón de TEMPO – Pulse este botón
y luego gire el cuadrante de DATOS
para ajustar la velocidad del
metrónomo.
6.
Botón REPRODUCIR/PARAR – En
modo de tema, este botón inicia y
detiene la reproducción. Cuando el
módulo está preparado para grabar,
este botón inicia y detiene la
reproducción
7.
Botón de GRABAR – Pulse este botón para preparar el módulo para grabar. Pulse REPRODUCIR/PARAR para
comenzar a grabar.
8.
Botón de CUENTA – Activa el modo de cuenta, que le permite contar cuán rápidamente puede golpear los pads.
9.
Cuadrante de DATOS – Gire este cuadrante para ajustar el valor seleccionado actualmente que aparece en la
PANTALLA. Desde la pantalla principal (cuando se muestra el kit actual), presione el cuadrante y gírelo para ajustar el
volumen maestro (y espere que la pantalla vuelva a la pantalla anterior).
10.
Botón ENTER – Confirma la entrada de valores o datos que aparece en la PANTALLA.
11.
Botón SALIR – Cancela la entrada de datos y vuelve a la PANTALLA anterior.
12.
Botón de CONFIGURACIÓN – Active el modo de configuración, que le permite editar los parámetros generales del
módulo.
13.
Botón de MODO – Cambia la manera en que se reproduce el tema demo. Puede seleccionar "Full" (se reproducen
todas las partes del tema), "Sólo batería" (sólo se oye la parte de batería del tema) o "Drum Mute" (Silenciar batería)
(sólo se oye el acompañamiento del tema).
14.
Botón EDITAR – Activa el modo de edición, que le permite editar diversos parámetros de los kits para personalizar su
sonido.
15.
Botones de SELECCIÓN DE PAD – Estos botones cumplen dos funciones. En modo de edición, seleccionan los
parámetros del pad a editar. En modo de selección de kit, al pulsar uno de estos botones se selecciona uno de nueve
kits predeterminados
8
CARACTERÍSTICAS DEL PANEL TRASERO
1.
2.
3.
4.
5.
6.
7.
8.
ENTRADA DE ALIMENTACIÓN –
Conecte a esta entrada el adaptador de
alimentación incluido y luego enchufe el
adaptador al suministro eléctrico.
INTERRUPTOR DE ENCENDIDO –
Enciende y apaga el módulo.
Nota: Si desea encender el módulo
después de apagarlo, espere como
mínimo cinco segundos, para que los circuitos electrónicos se restablezcan correctamente.
Jack USB – Este jack USB se puede usar para conectar el módulo de batería a un puerto USB disponible de su
computadora si el sistema operativo es Windows XP, Windows Vista o Mac OS X. Los drivers se instalan
automáticamente y el módulo aparece como dispositivo de audio USB (por ejemplo, "USB Audio CODEC"). Cuando
está conectado, el módulo puede enviar datos MIDI a la computadora por la conexión USB.
Jack para AURICULARES – Puede conectar a esta salida auriculares estéreo estándar de 1/4" para oír su
interpretación de batería. Ajuste el volumen con la perilla de VOLUMEN DE AURICULARES.
Perilla de VOLUMEN DE AURICULARES - Ajusta el nivel de volumen de la salida para auriculares.
Jack de ENTRADA DE LÍNEA – Puede conectar a esta entrada un dispositivo de audio con un cable estéreo estándar
de 1/4". El sonido proveniente de ese dispositivo se mezcla con el proveniente del módulo de batería, lo que puede
permitirle tocar con el acompañamiento de un reproductor de CD, reproductor de MP3, iPod*, etc.
Jack de SALIDA DE LÍNEA – Si no está usando auriculares conectados a la salida para AURICULARES, conecte a
esta salida un juego de altavoces u otro sistema de amplificación con un cable estéreo estándar de 1/4". Puede ajustar
este volumen con el cuadrante de DATOS: Desde la pantalla principal (cuando se muestra el kit actual), presione el
cuadrante y gírelo para ajustar el volumen maestro (y espere que la pantalla vuelva a la pantalla anterior).
Conector de DISPARO – Conecte a esta entrada el conector del cable del módulo incluido y luego conecte los cables a
los jacks de sus respectivos pads de tambor, pads de platillos y pedal de control de hi-hat. (Cada cable está rotulado
con el nombre de su correspondiente pad o pedal.)
*iTunes e iPod son marcas registradas de Apple, Inc., registradas en EE.UU. y otros países.
9
GUIDE DE DÉMARRAGE
1.
2.
3.
4.
5.
6.
7.
8.
9.
10.
Assemblez l’ensemble de batterie tel qu’il est indiqué dans le guide d’assemblage.
Insérez le connecteur du câble de raccordement du module dans l’entrée TRIGGER sur le panneau arrière du module.
Branchez les câbles aux pads de batterie, pads de cymbale respectifs et à la pédale charleston. Chaque câble est
étiquetté avec le nom du pad ou pédale correspondant.
Veuillez vous assurer que le volume de tous les appareils est à « 0 » (module DM7, haut-parleurs externes ou casque
d’écoute, appareil à niveau ligne, etc.).
Si vous avez branché un appareil à l’entrée LINE IN du module, mettez-le sous tension.
Ne frappez pas les pads ou n’appuyez pas sur la pédale charleston. Mettez le DM7 sous tension.
Si vous utilisez des haut-parleurs externes, mettez-les sous tension.
Frappez les pads et réglez le volume de tous les appareils, au besoin. Si vous utilisez un casque d’écoute, réglez le
volume du module à l’aide de la commande VOLUME du panneau arrière. Si vous utilisez des haut-parleurs externes,
réglez le volume du module en appuyant sur la molette DATA et en la tournant afin de sélectionner le niveau de volume,
puis attendez cinq secondes que la fenêtre précédente s’affiche.
Pour sélectionner un ensemble de sonorités, appuyez sur les touches numérotées (1 à 9) ou utilisez la molette DATA
afin d’accéder à un plus grand choix d’ensembles.
Allez-y, jouez!
CARACTÉRISTIQUES DU PANNEAU SUPÉRIEUR
1.
ÉCRAN – Il permet d’afficher les
informations concernant le module,
telles que le numéro d’ensemble de
sonorités, le nom de la chanson, la
sélection de pads, etc.
2.
Touche SONG – Cette touche permet
d’entrer en mode Song (chanson) à
partir duquel vous pouvez faire jouer
le démo (Demo) ou une chanson
enregistrée (User Song).
3.
Touche KIT – Cette touche permet
d’entrer en mode de sélection
d’ensemble de sonorités.
4.
Touche CLICK –
Cette touche
permet
d’activer/désactiver
le
métronome. Appuyez rapidement
deux fois pour modifier les paramètres
du métronome, puis appuyez sur la
touche EXIT pour revenir à l’affichage
normal.
5.
Touche TEMPO – Appuyez d’abord
sur cette touche, puis tournez la
molette DATA afin de modifier la
vitesse du métronome.
6.
Touche de lecture/pause – En mode Song, cette touche permet de lancer et d’arrêter la lecture. Lorsque le module est
en mode d'enregistrement, cette touche permet de lancer et d’arrêter l’enregistrement.
7.
Touche RECORD – Cette touche permet de passer au mode d’enregistrement. Appuyez sur la touche de
lecture/pause pour lancer et arrêter l’enregistrement.
8.
Touche COUNT – Cette touche permet d'entrer en mode Count qui vous permet de savoir la vitesse à laquelle vous
frappez les pads.
9.
Molette DATA – En tournant la molette, vous pouvez régler le paramètre sélectionné à l’écran. À partir de l’écran
principal (lorsque l’ensemble des sonorités en cours est affiché), appuyez sur la molette, puis tournez-la afin de régler le
volume principal (attendez que la fenêtre précédente s’affiche).
10.
Touche ENTER – Cette touche permet de confirmer le paramètre ou le champ sélectionné à l’écran.
11.
Touche EXIT – Cette touche permet d'annuler l’opération en cours et de retourner à la fenêtre précédente.
12.
Touche SETUP – Cette touche permet d’entrer en mode Setup, qui vous permet de modifier les paramètres globaux du
module.
13.
Touche MODE – Cette touche permet de modifier la façon dont le démo sera joué. Vous pouvez sélectionner entre les
options « Full » (toutes les parties de la chanson jouent), « Drum Only » (uniquement la partie batterie joue) ou « Drum
Mute » (uniquement la partie accompagnement joue).
14.
Touche EDIT – Cette touche permet d’entrer en mode Edit, qui vous permet de modifier les différents paramètres des
ensembles de sonorités afin de personnaliser votre son.
15.
PAD SELECT – Ces touches ont deux fonctions : En mode Edit, ces touches permettent de sélectionner les paramètres
des pads à modifier. En mode de sélection d'ensemble de sonorités, appuyer sur une de ces touches permet de
sélectionner un des neuf ensembles de sonorité programmés.
10
CARACTÉRISTIQUES DU PANNEAU ARRIÈRE
1.
2.
3.
4.
5.
6.
7.
8.
POWER
–
Branchez
le
câble
d’alimentation inclus à cette entrée, puis
l'autre extrémité à la prise électrique.
ON/OFF – Cet interrupteur permet de
mettre l’appareil sous et hors tension.
Remarque : Si vous désirez mettre le
module à nouveau sous tension après
l’avoir éteint, veuillez attendre au moins cinq secondes afin de les circuits électroniques se réinitialisent correctement.
Port USB – Vous pouvez utiliser ce port USB afin de brancher le module à un port USB de votre ordinateur à condition
que le système d’exploitation de votre ordinateur est Windows XP, Windows Vista ou Mac OS X. Les pilotes seront
installés automatiquement, et le module s’affichera comme un périphérique USB audio (p. ex., USB Audio CODEC).
Lorsque branché, le module peut acheminer des données MIDI à l’ordinateur via la connexion USB.
PHONE – Vous pouvez brancher un casque d'écoute peut être branché à cette sortie stéréo de ¼ po afin d’écouter
votre performance. Vous pouvez ajuster le volume de la sortie du casque d'écoute à l’aide du bouton VOLUME.
VOLUME – Ce bouton permet de régler les niveaux de la sortie du casque d'écoute.
LINE IN – Cette entrée permet de brancher un appareil audio à l’aide d’un câble stéréo ¼ po standard. Le son de
l’appareil sera mixé au son du module, vous permettant ainsi de vous accompagner d’un lecteur de disques compacts,
lecture MP3, iPod*, etc.
LINE OUT – Si vous n’utilisez pas de casque d’écoute, branchez des haut-parleurs ou autre système de sonorisation à
cette sortie à l’aide d’un câble stéréo ¼ po standard. Vous pouvez régler le volume avec la molette DATA : à partir de
l’écran principal (lorsque l’ensemble des sonorités encours est affiché), appuyez sur la molette, puis tournez-la afin de
régler le volume principal (attendez que la fenêtre précédente s’affiche).
Connecteur TRIGGER – Insérez le connecteur du câble de raccordement du module dans cette entrée, puis branchez
les câbles aux pads de batterie, pads de cymbale respectifs et à la pédale charleston. Chaque câble est étiquetté avec
le nom du pad ou de pédale correspondant.
* iTunes et iPod sont des marques de commerce enregistrées de Apple, Inc., enregistrées aux États-Unis et dans d'autres pays.
11
PRIMI PASSI
1.
2.
3.
4.
5.
6.
7.
8.
9.
10.
Montare il kit per batteria come descritto nel presente manuale.
Inserire il cavo di connessione del modulo in dotazione nel connettore TRIGGER a livello del pannello posteriore del
modulo.
Inserire i cavi di collegamento ai jack dei rispettivi pad batteria, pad dei piatti e al pedale di controllo dell'hi-hat. (Ciascun
cavo è etichettato con il nome del pad o del pedale corrispondente.)
Assicurarsi che il volume di tutti i dispositivi sia su "0" (modulo DM7, altoparlanti esterni o cuffie, dispositivi collegati
all'ingresso di linea LINE IN, ecc.).
Se è stato collegato un dispositivo all'ingresso di linea LINE IN del modulo, accenderlo.
Non battere alcun pad, né premere il pedale di controllo dell'hi-hat. Accendere il modulo.
Se si utilizzano altoparlanti esterni, accenderli.
Battere i pad e regolare il volume dei dispositivi come desiderato. Se si utilizzano le cuffie, regolare il volume del
modulo servendosi della manopola VOLUME posta sul pannello posteriore. Se si utilizzano altoparlanti esterni, regolare
il volume del modulo premendo la manopola DATA, ruotandola per selezionare il livello del volume e attendendo 5
secondi che ritorni alla finestra precedente.
Per selezionare un Kit da suonare, premere uno dei pulsanti numerati (1-9) o girare la manopola DATA per accedere a
più Kit.
Suona!
CARATTERISTICHE PANNELLO SUPERIORE
1.
DISPLAY – Mostra a display
informazioni sul modulo quali numero
e nome del Kit, nome della canzone,
pad prescelto, ecc.
2.
Tasto SONG (canzone) – Entra in
modalità canzone, in cui è possibile
suonare una canzone Demo o una
Canzone utente.
3.
Tasto KIT – Entra in modalità di
scelta kit.
4.
Tasto CLICK – Attiva / disattiva il
metronomo. Premerlo due volte
rapidamente
per
modificare
le
impostazioni del metronomo (e
premere EXIT per tornare alla
schermata normale).
5.
Tasto TEMPO – Premere questo
tasto, quindi ruotare la manopola
DATA per regolare la velocità del
Metronomo.
6.
Tasto PLAY/STOP – Quando ci si
trova in modalità canzone, questo
tasto avvia/interrompe la riproduzione.
Quando il modulo è armato per la
registrazione, questo tasto avvia/interrompe la registrazione.
7.
Tasto RECORD (registra) – Premere questo tasto per armare il modulo per la registrazione. Premere PLAY/STOP per
avviare/interrompere la registrazione.
8.
Tasto COUNT (conteggio) – Entra in modalità conteggio, che ti consente di misurare la rapidità con la quale batti i pad.
9.
DATA Dial – Ruotare questa manopola per regolare la configurazione selezionata illustrata a DISPLAY. Dalla
schermata principale (quella nella quale viene illustrato il kit corrente), premere la manopola, quindi farla ruotare per
regolare il volume master (e attendere che il display torni alla schermata precedente).
10.
Tasto ENTER – Conferma la configurazione o i dati illustrati a DISPLAY.
11.
Tasto EXIT – Cancella qualsiasi dato inserito e torna alla schermata precedente del DISPLAY.
12.
Tasto SETUP – Entra in modalità di configurazione, che permette di modificare le configurazioni generali del modulo.
13.
Tasto MODE (modalità) – Modifica il modo in cui viene suonata la canzone Demo. È possibile selezionare "Full" (tutte
le parti della canzone suoneranno), "Drum Only" (si sentiranno unicamente le parti di batteria), o "Drum Mute" (si sentirà
solo l'accompagnamento della canzone).
Tasto EDIT – Entra in modalità Edit (modifica), che consente di modificare numerosi parametri dei kit per personalizzare
il suono.
14.
15.
Tasti PAD SELECT – Questi tasti hanno due funzioni. In modalità Edit (modifica), questi tasti selezionano quali
parametri dei pad verranno modificati. Quando in modalità Kit Selection (scelta kit), premendo uno di questi tasti si
selezionerà uno di nove kit predefiniti (Preset).
12
CARATTERISTICHE PANNELLO POSTERIORE
1.
2.
3.
4.
5.
6.
7.
8.
INGRESSO DI ALIMENTAZIONE –
Collegare l’adattatore di alimentazione in
dotazione a questo ingresso, quindi
collegare l’adattatore ad una sorgente di
alimentazione.
INTERRUTTORE DI ALIMENTAZIONE
(POWER) – Accende e spegne il modulo.
Nota bene: se si desidera accendere il
modulo dopo averlo spento, attendere almeno cinque secondi in modo che i circuiti elettronici si azzerino
adeguatamente.
Jack USB – Si può utilizzare questo jack USB per collegare il modulo di batteria ad una porta USB disponibile del
computer se il sistema operativo è Windows XP, Windows Vista, o Mac OS X. I driver verranno installati
automaticamente ed il modulo apparirà come un dispositivo audio USB ( ad es. "USB Audio CODEC"). Quando
collegato, il modulo può inviare dati MIDI al computer tramite il collegamento USB.
Jack CUFFIE – Si possono collegare cuffie stereo standard da 1/4" a questa uscita per ascoltare l'esibizione alla
batteria. Regolare il volume servendosi della manopola VOLUME CUFFIE.
Manopola VOLUME CUFFIE – Regola il livello del volume dell’uscita CUFFIE.
Jack LINE IN (ingresso di linea) – È possibile collegare un dispositivo audio a questo ingresso servendosi di un cavo
stereo standard da 1/4". Il suono di tale dispositivo sarà mixato con il suono del modulo batteria, che consente di
suonare collegati ad un lettore CD, MP3, iPod*, ecc.
Jack LINE OUT (uscita di linea) – Se non si utilizzano cuffie collegate all'uscita CUFFIE, collegare un set di altoparlanti
o un altro impianto di amplificazione a questa uscita servendosi di un cavo stereo standard da 1/4". È possibile regolare
questo volume servendosi della manopola DATA: dalla schermata principale (quella nella quale viene illustrato il kit
corrente), premere la manopola, quindi farla ruotare per regolare il volume master (e attendere che il display torni alla
schermata precedente).
Connettore TRIGGER – Collegare il cavo di collegamento del modulo a questo ingresso, quindi collegare i cavi ai jack
dei rispettivi pad di batteria, pad dei piatti e al pedale di controllo dell'hi-hat. (Ciascun cavo è etichettato con il nome del
pad o del pedale corrispondente.)
*iTunes e iPod sono marchi di fabbrica di Apple, Inc., registrati negli Stati Uniti e in altri Paesi.
13
ERSTE SCHRITTE
1.
2.
3.
4.
5.
6.
7.
8.
9.
10.
Montieren Sie Ihr Drum-Kit wie in der Montage-Anleitung beschrieben.
Stecken Sie das mitgelieferte Modul-Anschlusskabel in die TRIGGER-Buchse auf der Rückseite des Moduls.
Stecken Sie die Steckerkabel in die jeweiligen Buchsen der Drum-Pads, Becken-Pads und des Hi-Hat Pedals. (Jedes
Kabel ist mit dem Namen des zugehörigen Pads oder Pedals beschriftet.)
Achten Sie darauf, dass die Lautstärke all Ihrer Geräte auf "0" steht (DM7 Modul, externe Lautsprecher oder Kopfhörer
oder ein Gerät, das an LINE IN etc. angeschlossen ist).
Wenn Sie ein Gerät an den LINE IN Anschluss des Moduls angeschlossen haben, schalten Sie es ein.
Schlagen Sie auf kein Pad und betätigen Sie das Hi-Hat Pedal nicht. Schalten Sie das Modul ein.
Wenn Sie externe Lautsprecher verwenden, schalten Sie diese ein.
Schlagen Sie auf die Pads und adjustieren Sie bei Bedarf die Lautstärke Ihrer Geräte. Wenn Sie Kopfhörer verwenden,
stellen Sie die Modullautstärke mit dem VOLUME-Regler an der Geräterückseite ein. Wenn Sie externe Lautsprecher
verwenden, stellen Sie die Modullautstärke durch Drücken des DATA-Rads ein, indem Sie es drehen, die Lautstärke
anpassen und fünf Sekunden warten, bis es zum vorherigen Fenster zurückspringt.
Um ein Kit auszuwählen, das Sie für Ihr Spiel verwenden möchten, drücken Sie eine der Zifferntasten (1-9) oder drehen
das DATA-Rad, um Zugang zu weiteren Kits zu erlangen.
Spielen Sie!
ELEMENTE DER OBERSEITE
1.
DISPLAY - Zeigt Modul-Informationen
wie Kennzahl und Name des Kits
sowie den Song-Namen und die PadAuswahl etc. an.
2.
SONG Taste – Bringt Sie in den
Song-Modus, in dem Sie den DemoSong oder einen User-Song spielen
können.
3.
KIT Taste – Bringt Sie in den KitAuswahl-Modus.
4.
CLICK Taste - Aktiviert/Deaktiviert
das Metronom. Drücken Sie diese
Taste zweimal schnell hintereinander,
um die Metronom-Einstellungen zu
bearbeiten (und drücken Sie EXIT, um
zum
normalen
Bildschirm
zurückzukehren).
5.
TEMPO Taste - Drücken Sie diese
Taste und drehen Sie anschließend
das
DATA-Rad,
um
die
Geschwindigkeit
des
Metronoms
einzustellen.
6.
PLAY/STOP Taste – Wenn Sie sich
im
Song-Modus
befinden,
startet/stoppt diese Taste die Wiedergabe. Wenn das Modul im Aufnahme-Modus ist, startet/stoppt diese Taste die
Aufnahme.
7.
RECORD Taste – Drücken Sie diese Taste, um das Modul für die Aufnahme scharf zu stellen.
PLAY/STOP, um die Aufnahme zu starten/stoppen.
8.
COUNT Taste – Bringt Sie in den Zähl-Modus, in dem Sie zählen können wie schnell Sie die Pads schlagen.
9.
DATA-Rad – Drehen Sie dieses Rad, um die aktuell gewählte Einstellung zu adjustieren, die am DISPLAY angezeigt
wird. Drücken Sie im Hauptbildschirm (wenn das aktuelle Kit angezeigt wird) auf das Rad und drehen es anschließend,
um die Master-Lautstärke einzustellen (und warten Sie dann bis das Display zum vorherigen Bildschirm zurückkehrt).
Drücken Sie
10.
ENTER Taste - Bestätigt die Einstellung oder Dateneingabe, die am DISPLAY angezeigt wird.
11.
EXIT Taste - Bricht alle Dateneingaben ab und kehrt zum vorherigen Bildschirm des DISPLAYS zurück.
12.
SETUP Taste – Bringt Sie in den Konfigurations-Modus, in dem Sie die allgemeinen Einstellungen des Moduls editieren
können.
13.
MODE Taste – Ändert die Art und Weise, in der der Demo-Song gespielt wird. Sie können "Full" auswählen, (alle Teile
des Songs werden gespielt), "Drum Only" (nur die Schlagzeugspuren des Lieds sind zu hören), oder "Drum Mute" (nur
die Begleitung des Lieds ist zu hören).
14.
EDIT Taste – Bringt Sie in den Bearbeitungs-Modus, in dem Sie verschiedene Parameter der Kits editieren können, um
Ihren Sound anzupassen.
15.
PAD SELECT Tasten - Diese Tasten haben zwei Funktionen. Im Bearbeitungs-Modus wählen diese Tasten aus, welche
Pad-Parameter bearbeitet werden. Wenn Sie sich im Kit-Auswahl-Modus befinden, können Sie mit diesen Tasten eines
der neun Preset-Kits auswählen.
14
ELEMENTE DER RÜCKSEITE
1.
2.
3.
4.
5.
6.
7.
8.
POWER IN - Verbinden Sie das
mitgelieferte Netzteil mit diesem Eingang
und anschließend mit Ihrer Stromquelle.
POWER SWITCH – Schaltet das Modul
ein/aus.
Hinweis:
Wenn
Sie
das
Modul
einschalten möchten, nachdem Sie es
ausgeschaltet
haben,
warten
Sie
mindestens fünf Sekunden bis Sie dies tun, damit die elektronischen Schaltungen ordnungsgemäß zurückgesetzt
werden können.
USB Buchse - Sie können diese USB-Buchse dazu verwenden, das Drum-Modul mit einem freien USB-Anschluss Ihres
Computers zu verbinden, falls Sie die Betriebssysteme Windows XP, Windows Vista oder Mac OS X verwenden. Die
Treiber werden automatisch installiert, und das Modul scheint als USB-Audiogerät (z. B. "USB Audio CODEC") auf.
Wenn das Modul verbunden wird, kann es MIDI-Daten über den USB-Anschluss an Ihren Computer senden.
HEADPHONE Buchse - Sie können standardisierte 1/4" Stereo-Kopfhörer an diesen Ausgang anschließen, um Ihr Spiel
zu hören. Stellen Sie die Lautstärke mit dem HEADPHONE VOLUME Regler ein.
HEADPHONE VOLUME Regler - Regelt die Lautstärke des HEADPHONE-Ausgangs.
LINE IN Buchse - Sie können ein Audio-Gerät mit einem standardisierten 1/4"-Stereokabel an diesen Eingang
anschließen. Das Signal dieses Geräts wird mit dem Signal des Drum-Moduls vermischt, was Ihnen ermöglicht, zur
Musik eines angeschlossenen CD-Players, MP3-Players oder iPods * etc. zu spielen.
LINE OUT Buchse - Falls Sie keine Kopfhörer am HEADPHONE-Ausgang angeschlossen haben, schließen Sie mit
einem standardisierten 1/4"-Stereokabel ein Lautsprecherpaar oder eine andere Verstärkeranlage an diesen Ausgang
an. Sie können diese Lautstärke mit dem DATA-Rad adjustieren: Drücken Sie im Hauptbildschirm (wenn das aktuelle
Kit angezeigt wird) auf das Rad und drehen es anschließend, um die Master-Lautstärke einzustellen (und warten Sie
dann bis das Display zum vorherigen Bildschirm zurückkehrt).
TRIGGER Buchse – Verbinden Sie das mitgelieferte Modul-Anschlusskabel mit diesem Eingang, und verbinden Sie
dann die Kabel mit den Buchsen der jeweiligen Drum-Pads, Becken-Pads und mit dem Hi-Hat Pedal. (Jedes Kabel ist
mit dem Namen des zugehörigen Pads oder Pedals beschriftet.)
* iTunes und iPod sind Marken der Apple Inc. und in den USA und anderen Ländern eingetragen.
15
SPECIFICATIONS
Voices:
418 voices
Drum Kits:
80 Kits (50 Preset Kits + 30 User Kits)
Songs:
62 Songs (52 Demo Songs + 10 User Songs)
Sound Effects:
Reverb effect with professional DSP processor
Equalizer:
8 preset types
Display:
Backlit LCD
Power Supply:
12 V DC, 2 A, center-positive (included)
THIS DEVICE COMPLIES WITH PART 15 OF THE FCC RULES. OPERATION IS SUBJECT TO THE
FOLLOWING TWO CONDITIONS: (1) THIS DEVICE MAY NOT CAUSE HARMFUL INTERFERENCE, AND
(2) THIS DEVICE MUST ACCEPT ANY INTERFERENCE RECEIVED, INCLUDING INTERFERENCE THAT
MAY CAUSE UNDESIRED OPERATION.
www.alesis.com
7-51-0320-A