1
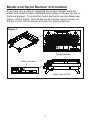
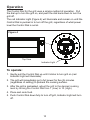
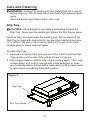
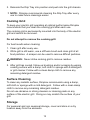
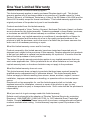
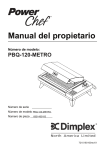
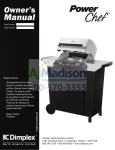
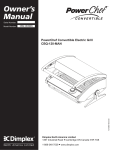
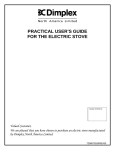
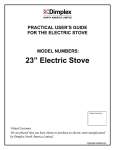
Owner’s Manual
Model Number:
PBQ-120-METRO
Serial Number
Model Number
PBQ-120-METRO
Part Number
6901480100
7210180100rev01
PowerChef ® Table Top Features
Welcome and Thank You
for purchasing a Dimplex
PowerChef ® Table Top Electric
Grill.
The following introduction
highlights the many features
of your electric grill. Detailed
operating instructions are
contained later on in this manual.
Top grill, with no open flame or
combustion, heats up quickly,
and never needs refueling! No
gas or other fuel fumes will impart
unwanted tastes or odor to your
food.
Easy to Clean
With its stainless steel upper grill,
the EvenSear ® Cooking System
is easy to keep clean.
EvenSear ® Cooking System
At the heart of your PowerChef ®
Table Top grill is the EvenSear ®
Cooking System. The dual layer
grill system functions in two ways.
The top grill sears your food, with
direct contact, and at the same
time your food is cooked gently
and evenly by additional radiant
heat from the lower element.
The EvenSear ® system ensures
that all energy supplied to the
grill is directly used on cooking
your food to perfection. The
EvenSear ® Cooking System
applies energy evenly and
consistently throughout the entire
grill area, eliminating “cool spots”.
100% Usable Grill Surface
Because there are no variations
in temperature or performance,
the EvenSear ® Cooking System
provides 100% use of its grill
area. The full 216 square inch
grill maintains a consistent even
temperature, even in the corners!
Lid Down Cooking
To conserve energy and reduce
cooking time, we recommend
that the PowerChef ® Table Top
be used with the lid down during
cooking. A thermometer, featured
in many other grills, which reads
only the air temperature inside
the cabinet, is unnecessary on
the PowerChef ® Table Top. The
EvenSear ® Cooking System
relies and utilizes direct cooking
rather than air temperature to
cook your food.
No Combustion or Tanks
PowerChef ® Table Top grill
utilizes your standard household
electric current and provides a
safe source of heat to cook your
food. The PowerChef ® Table
2
PowerChef ® Table Top Features
Versatile
With no open flame, no
combustion and no need to refuel
the PowerChef ® Table Top grill
can be used safely in many areas
that other grills cannot.
Electrical Requirements
A Ground Fault Interrupt (GFI)
outdoor outlet or a circuit
protected by a ground fault
breaker with a rating of 15
Amps, 120 Volts is strongly
recommended. A dedicated
circuit is preferred but not
essential in all cases. A
dedicated circuit will be required
if, after installation, the circuit
breaker trips or the fuse blows on
a regular basis when the electric
grill is operating. Additional
appliances on the same circuit
may exceed the current rating of
the circuit breaker.
Accessories
For the complete line of electric
BBQ accessories contact you
authorized Dimplex dealer or visit
us on the web at
www.dimplexoutdoors.com.
3
CONTENTS
Important Instructions................................ Page 5
Model and Serial Number Information....... Page 7
Assembly................................................... Page 8
Site Selection and Preparation.................. Page 9
Operation................................................... Page 10
Care and Cleaning.................................... Page 11
Warranty.................................................... Page 13
Replacement Parts.................................... Page 15
4
IMPORTANT INSTRUCTIONS
Please Retain This User’s Guide For Future Reference
WARNING: Read all instructions and warning labels prior to use.
Failure to follow these safeguards may result in serious personal
injury or property loss. This appliance is intended for outdoor
household, non-commercial use only.
1. Warning: Do not use charcoal, or any other combustible material in an
electric grill.
2. Never touch hot surfaces, use handles or knobs. The temperature of
accessible metal surfaces may be high when the appliance is operating.
Use cooking tongs, gloves, or cooking mitts at all times since the grill will
become very hot. Open hood carefully when cooking to avoid burns from
the hot air and steam trapped inside.
3. Wear clothing that does not have hanging shirt tails, frills, or apron strings.
4. Use long-handle barbeque utensils to avoid personal injury caused by
burns and splatters.
5. To protect against electric shock, never immerse cord, plugs or electric
heating element in water or any other liquid.
6. Never leave the electric grill on when you are not cooking.
7. Never operate any appliance with damaged electrical components or
after the appliance has malfunctioned. Regularly inspect supply cord and
connections. If cord, element or control is damaged or worn, it must be
replaced by an authorized service facility as special tools are required.
Do not attempt to repair the appliance yourself. Contact your authorized
service agent for installation of electrical replacement kit.
8. The use of non Dimplex accessory attachments is not recommended and
may cause damage to the unit or injury.
9. Never let cord touch hot surfaces.
10.To avoid personal injury, close hood before moving.
11.Never move a hot grill or leave it unattended.
12.Never move an electric grill unless it is unplugged.
13.Never use an electric grill in the rain, sleet or snow.
14.Never use an electric grill near combustible or flammable materials.
15.Turn the power off on the electric grill before unplugging.
16.The use of longer detachable power supply cords or extension cords is not
recommended. Extension cords may overheat and cause a risk of fire. If
5
you must use an extension cord, it must be intended for outdoor use and
have a rating of no less than 1875 Watts. Outdoor extension cords are
marked with the suffix letters “W-A” and have a tag stating “Suitable for Use
with Outdoor Appliances”.
17.Store the electric grill out of reach of children.
18.Never allow other persons to be near the electric grill while in use.
19.Do not use the electric grill or its accessories for anything other than the
intended use.
20.Always check that food is fully cooked before consumption.
21.Do not attempt to remove the cooking grid from the unit.
22.This appliance is not intended for use by persons (including children) with
reduced physical, sensory or mental capabilities or lack of experience and
knowledge, unless they have been given supervision concerning use of
the appliance by a person responsible for their safety. Children should be
supervised to ensure that they do not play with the appliance.
23.This appliance is not to be operated by means of an external timer or
separated remote control device.
24.Turn off the grill and wait until it is cool to the touch (approximately 30
minutes) before moving, covering or storing. Unplug the electric grill from
outlet when not in use or before cleaning. Allow grill to cool before cleaning
or adding or removing parts. Do not clean this product with high pressure
hoses.
25.Store products indoors when not in use - out of the reach of children.
26.Do not clean this product with a water spray or the like.
SAVE THESE INSTRUCTIONS
! NOTE: Procedures and techniques that are considered important enough to emphasize.
CAUTION: Procedures and techniques which, if not carefully
followed, will result in damage to the equipment.
WARNING: Procedures and techniques which, if not carefully
followed, will expose the user to the risk of fire, serious injury,
illness or death.
6
Model and Serial Number Information
If you have any questions regarding this product please have the
model and serial numbers available upon calling customer service or
technical support. To locate the model and serial number labels see
Figure 1 and 2 below. Record the model number, serial number, on
the front cover of this manual and save for future reference.
Figure 1
Model Number
Serial Number
Rear View of Grill
7
Assembly
CAUTION: Bottom surface is hot when in use. Do not operate
without legs installed, may cause personal injury or fire.
Position leg as shown in Figure 2 and attach with the supplied
hardware, using a Phillips screwdriver.
Figure 2
Positioning Pegs (2)
8
Site Selection and Preparation
! NOTE: A Ground Fault Interrupt (GFI) outdoor outlet or a circuit
protected by a ground fault breaker with a rating of 15 Amps, 120
Volts is strongly recommended. A dedicated circuit is preferred but
not essential in all cases. A dedicated circuit will be required if, after
installation, the circuit breaker trips or the fuse blows on a regular
basis when the electric grill is operating. Additional appliances on
the same circuit may exceed the current rating of the circuit breaker.
Construction and electrical outlet wiring must comply with local
building codes and other applicable regulations to reduce the risk
of fire, electric shock and injury to persons. Do not attempt to
wire your own new outlets or circuits, and always use a licensed
electrician.
CAUTION: To avoid personal injury and damage to unit, never
move or transport with the lid open.
1. Select a suitable location away from puddles, pools, ponds, and hot
tubs.
CAUTION: Do not place grill on surfaces covered by paper, plastic
or vinyl table cloths and the like. Wood, concrete, steel, or
outdoor plastic furniture surfaces are recommended.
2. Ensure the sides of the electric grill are positioned more than six (6)
inches (150 mm) away from any combustible material or surfaces
before cooking.
3. Ensure that there are no flammable or other volatile materials in the
direct area before grilling.
4. For ease of electrical hook up you may wish to locate the electric
grill near an existing outlet (refer to NOTE above).
WARNING: Ensure the power cord is not pinched or against a
sharp edge. Ensure that the power cord is stored or secured to
avoid tripping or snagging to reduce the risk of fire, electric shock or
injury to persons.
Never route power cord underneath the electric grill. Always route
power cord directly out the side or front.
9
Operation
The Control Dial for the grill uses a simple method of operation. Pull
the dial up to turn the grill on, and push the dial back down to turn the
grill off.
The red Indicator Light (Figure 4) will illuminate and remain on until the
Control Dial is pushed in to turn off the grill, regardless of what power
level the Control Dial is set at.
Figure 4
Top View
Indicator Light
To operate:
1. Gently pull the Control Dial up until it clicks to turn grill on (red
Indicator Light will illuminate).
2. The grill will immediately go to full power for five (5) minutes
(regardless of setting) to preheat the cooking surface.
3. After the grill is preheated, adjust the grill to the desired cooking
level by turning the Control Dial from 1 (Low) to 10 (High).
4. Place and cook food.
5. Push Control Dial down fully to turn off grill, Indicator Light will turn
off.
10
Care and Cleaning
WARNING: Unplug the electric grill from outlet when not in use or
before cleaning. Do not clean this product with high pressure water
spray.
Store the electric grill indoors when not in use.
Drip Tray
CAUTION: Allow the grill to cool before attempting to clean the
Drip Tray. Never use the electric grill without the Drip Tray in place.
The Drip Tray is located under the cooking grid. We recommend the
Drip Tray be lined with aluminum foil, an aluminum baking sheet (size
12 ¼ inches (320 mm) x 19 ¼ inches (490 mm), or use a non-stick
cooking spray to make clean-up easier.
To clean Drip Tray:
1.Keeping one hand on the grill, use your other hand to pull the Drip
Tray up then out the side of the grill as shown in Figure 5.
2. Use a paper towel or cloth to soak up any excess liquid. Then, use
a clean damp, soft cloth or sponge with a mild detergent to clean
any remaining debris. Follow with a clean damp cloth or paper towel
to removed any remaining detergent residue.
Figure 5
Drip Tray
Drip Tray Handle
11
3. Relocate the Drip Tray into position and push into the grill chassis.
! NOTE: Dimplex recommends cleaning the Drip Tray after every
use to make future cleanings easier.
Cooking Grid
To keep your electric grill operating at optimal performance Dimplex
recommends that you clean the cooking grid after each use.
The cooking grid is permanently mounted into the body of the electric
grill and cannot be removed.
Do not attempt to remove the cooking grill.
For best results when cleaning:
1. Clean grill after every use.
2. While grill is still warm, use a stiff wire brush and clear grill of all
food particles. A scraper can be used to remove difficult particles.
WARNING: Never strike cooking grid to remove residue.
3. After grill has cooled, follow up brushing and/or scraping by wiping
cooking surface with a damp, soft cloth or sponge with a detergent
or grill cleaner. Follow with a clean damp cloth to remove any
remaining detergent residue.
Surface Cleaning
To clean any metallic surface, Dimplex recommends using a damp,
soft cloth or sponge with a mild detergent. Follow with a clean damp
cloth to remove any remaining detergent residue.
Do not use abrasive or strong cleaners or cleaning pads on any
surface of the electric grill. Doing so may scratch the surface of your
grill.
Storage
For seasonal and non seasonal storage, cover and store in a dry
location away from the elements.
12
One Year Limited Warranty
Products to which this limited warranty applies
This limited warranty applies to newly purchased Dimplex electric grill. This limited
warranty applies only to purchases made in any province of Canada except for Yukon
Territory, Nunavut, or Northwest Territories or in any of the 50 States of the USA (and the
District of Columbia) except for Hawaii and Alaska. This limited warranty applies to the
original purchaser of the product only and is not transferable.
Products excluded from this limited warranty
Products purchased in Yukon Territory, Nunavut, Northwest Territories, Hawaii, or Alaska
are not covered by this limited warranty. Products purchased in these States, provinces,
or territories are sold AS IS without warranty or condition of any kind (including,
without limitation, any implied warranties or conditions of merchantability or fitness for
a particular purpose) and the entire risk of as to the quality and performance of the
products is with the purchaser, and in the event of a defect the purchaser assumes the
entire cost of all necessary servicing or repair.
What this limited warranty covers and for how long
Products covered by this limited warranty have been tested and inspected prior to
shipment and, subject to the provisions of this warranty, Dimplex warrants such products
to be free from defects in material and workmanship for a period of 12 months from the
date of the first purchase of such product.
The limited 12 month warranty period also applies to any implied warranties that may
exist under applicable law. Some jurisdictions do not allow limitations on how long an
implied warranty lasts, so the above limitation may not apply to the purchaser.
What this limited warranty does not cover
This limited warranty does not apply to products that have been repaired (except by
qualified service representatives) or otherwise altered. This limited warranty does
further not apply to defects resulting from misuse, abuse, accident, neglect, incorrect
installation, improper maintenance or handling, or operation with an incorrect power
source.
Dimplex will not be responsible for, and the limited warranty shall not include, any
expense incurred for installation, removal or repair of the product or part (or any
replacement product or part) or transportation costs. Such costs shall be the purchaser’s
responsibility.
What you must do to get coverage under this limited warranty
Defects must be brought to the attention of Dimplex Technical Service by contacting
Dimplex at 1-888-DIMPLEX (1-888-346-7539), or 1367 Industrial Road, Cambridge
Ontario, Canada N1R 7G8. Please have proof of purchase, catalogue/model and serial
numbers available when calling. Limited warranty requires a proof of purchase of the
product.
13
What Dimplex will do in the event of a defect
In the event a product or part covered by this limited warranty is proven to be defective
in material or workmanship during the 12 month limited warranty period you have the
following rights:
• Dimplex will, at it’s sole discretion, choose to replace such defective product or part,
without charge. If Dimplex is unable to replace such product or part, or if Dimplex at
it’s sole discretion deems the replacement not be commercially practical or cannot be
completed on a timely basis, Dimplex may, in lieu of replacement, choose to refund
the purchase price for such product or part.
• The purchaser is responsible for removal, installation, repair and transportation of
such product or part (and any replacement product or part)
What Dimplex and its dealers and service agents are also not responsible for:
IN NO EVENT WILL DIMPLEX, or ITS DIRECTORS, OFFICERS, OR AGENTS, BE
LIABLE TO the PURCHASER OR ANY THIRD PARTY, WHETHER IN CONTRACT,
IN TORT, OR ON ANY OTHER BASIS, FOR ANY INDIRECT, SPECIAL, PUNITIVE,
EXEMPLARY, CONSEQUENTIAL, OR INCIDENTAL LOSS, COST, OR DAMAGE
ARISING OUT OF OR IN CONNECTION WITH THE SALE, MAINTENANCE, USE,
OR INABILITY TO USE THE PRODUCT, EVEN IF DIMPLEX OR ITS directors,
officers, or AGENTS HAVE BEEN ADVISED OF THE POSSIBILITY OF SUCH
LOSSES, COSTS OR DAMAGES, OR IF SUCH LOSSES, COSTS, OR DAMAGES ARE
FORESEEABLE. IN NO EVENT WILL DIMPLEX, or ITS OFFICERS, DIRECTORS,
OR AGENTS BE LIABLE FOR any DIRECT LOSSES, COSTS, OR DAMAGES THAT
EXCEED THE PURCHASE PRICE OF THE PRODUCT.
SOME JURISDICTIONS DO NOT ALLOW THE EXCLUSION OR LIMITATION OF
INCIDENTAL OR CONSEQUENTIAL DAMAGES, SO THE ABOVE LIMITATION OR
EXCLUSION MAY NOT APPLY TO THE PURCHASER.
How State and Provincial law apply
This limited warranty gives you specific legal rights, and you may also have other
rights which vary from jurisdiction to jurisdiction. The provisions of the United Nations
Convention on Contracts for the Sale of Goods shall not apply to this limited warranty or
the sale of products covered by this limited warranty.
14
Replacement Parts List
Leg. . . . . . . . . . . . . . . . . . . . . . . . . . . . .PBQ-LEG KIT-RP
Handle . . . . . . . . . . . . . . . . . . . . . . . . . .PBQ-HANDLE KIT-RP
Hood . . . . . . . . . . . . . . . . . . . . . . . . . . . PBQ-HOOD KIT-RP
Control Knob . . . . . . . . . . . . . . . . . . . . .PBQ-CONTROL KNOB KIT-RP
Thermostat . . . . . . . . . . . . . . . . . . . . . . PBQ-THERMOSTAT KIT-RP
Drip Tray . . . . . . . . . . . . . . . . . . . . . . . . 1022650191RP
Bumpers (2). . . . . . . . . . . . . . . . . . . . . .8501400100RP
Dimplex North America Limited
1367 Industrial Road Cambridge ON
Canada N1R 7G8
1-888-346-7539
© 2010 Dimplex North America Limited
www.dimplex.com
Approved for use in the United States and Canada
Printed in China
15