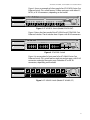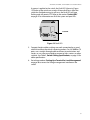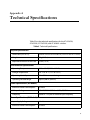
1
Fast Ethernet Switches ® AT-8216FXL/MT AT-8216FXL/VF AT-8216FXL/SC AT-8224XL AT-D8224XL AT-8288XL/MT AT-8288XL/SC ! Installation Guide PN 613-10811-00 Rev C Copyright 2000 Allied Telesyn International, Corp. 960 Stewart Drive Suite B, Sunnyvale, CA 94085 USA All rights reserved. No part of this publication may be reproduced without prior written permission from Allied Telesyn International, Corp. CentreCom is a registered trademark of Allied Telesyn International, Corp. All other product names, company names, logos or other designations mentioned herein are trademarks or registered trademarks of their respective owners. Allied Telesyn International, Corp. reserves the right to make changes in specifications and other information contained in this document without prior written notice. The information provided herein is subject to change without notice. In no event shall Allied Telesyn International, Corp. be liable for any incidental, special, indirect, or consequential damages whatsoever, including but not limited to lost profits, arising out of or related to this manual or the information contained herein, even if Allied Telesyn International, Corp. has been advised of, known, or should have known, the possibility of such damages. Electrical Safety and Emission Statement Standards: This product meets the following standards. U.S. Federal Communications Commission RADIATED ENERGY Note: This equipment has been tested and found to comply with the limits for a Class A digital device pursuant to Part 15 of the FCC Rules. These limits are designed to provide reasonable protection against harmful interference when the equipment is operated in a commercial environment. This equipment generates, uses, and can radiate radio frequency energy and, if not installed and used in accordance with this instruction manual, may cause harmful interference to radio communications. Operation of this equipment in a residential area is likely to cause harmful interference in which case the user will be required to correct the interference at his own expense. Note: Modifications or changes not expressly approved by the manufacturer or the FCC can void your right to operate this equipment. Canadian Department of Communications This Class A digital apparatus meets all requirements of the Canadian Interference-Causing Equipment Regulations. Cet appareil numérique de la classe A respecte toutes les exigences du Règlement sur le matériel brouilleur du Canada. RFI Emission EN55022 Class A " 1 Warning: In a domestic environment this product may cause radio interference in which case the user may be required to take adequate measures. " 2 Immunity EN50082-1 1997 " 3 Electrical Safety EN60950, UL 1950, CSA 950 " 4 Laser EN60825 " 5 Important: Appendix A contains translated safety statements for installing this equipment. When you see the ", go to Appendix A for the translated safety statement in your language. Wichtig: Anhang A enthält übersetzte Sicherheitshinweise für die Installation dieses Geräts. Wenn Sie " sehen, schlagen Sie in Anhang A den übersetzten Sicherheitshinweis in Ihrer Sprache nach. Vigtigt: Tillæg A indeholder oversatte sikkerhedsadvarsler, der vedrører installation af dette udstyr. Når De ser symbolet ", skal De slå op i tillæg A og finde de oversatte sikkerhedsadvarsler i Deres eget sprog. Belangrijk: Appendix A bevat vertaalde veiligheidsopmerkingen voor het installeren van deze apparatuur. Wanneer u de " ziet, raadpleeg Appendix A voor vertaalde veiligheidsinstructies in uw taal. Important : L'annexe A contient les instructions de sécurité relatives à l'installation de cet équipement. Lorsque vous voyez le symbole ", reportez-vous à l'annexe A pour consulter la traduction de ces instructions dans votre langue. Tärkeää: Liite A sisältää tämän laitteen asentamiseen liittyvät käännetyt turvaohjeet. Kun näet "-symbolin, katso käännettyä turvaohjetta liitteestä A. Importante: l’Appendice A contiene avvisi di sicurezza tradotti per l’installazione di questa apparecchiatura. Il simbolo ", indica di consultare l’Appendice A per l’avviso di sicurezza nella propria lingua. Viktig: Tillegg A inneholder oversatt sikkerhetsinformasjon for installering av dette utstyret. Når du ser ", åpner du til Tillegg A for å finne den oversatte sikkerhetsinformasjonen på ønsket språk. Importante: O Anexo A contém advertências de segurança traduzidas para instalar este equipamento. Quando vir o símbolo ", leia a advertência de segurança traduzida no seu idioma no Anexo A. Importante: El Apéndice A contiene mensajes de seguridad traducidos para la instalación de este equipo. Cuando vea el símbolo ", vaya al Apéndice A para ver el mensaje de seguridad traducido a su idioma. Obs! Bilaga A innehåller översatta säkerhetsmeddelanden avseende installationen av denna utrustning. När du ser ", skall du gå till Bilaga A för att läsa det översatta säkerhetsmeddelandet på ditt språk. 3 Table of Contents Preface ......................................................................................................................................................................................................................7 Purpose of This Guide ...........................................................................................................................................................................................7 How This Guide is Organized .............................................................................................................................................................................7 Document Conventions ......................................................................................................................................................................................8 Where to Find Related Guides ...........................................................................................................................................................................9 Contacting Allied Telesyn Technical Support ............................................................................................................................................10 Online Support ............................................................................................................................................................................................. 10 Telephone and Fax Support .................................................................................................................................................................... 10 E-mail Support.............................................................................................................................................................................................. 10 Returning Products .............................................................................................................................................................................................11 FTP Server ...............................................................................................................................................................................................................12 For Sales or Corporate Information ...............................................................................................................................................................13 Tell Us What You Think ......................................................................................................................................................................................14 Chapter 1 Hardware Description .....................................................................................................................................................................................15 Switch Models .......................................................................................................................................................................................................16 Hardware Features ..............................................................................................................................................................................................18 Network Management Features .....................................................................................................................................................................19 Physical Description ............................................................................................................................................................................................20 Port LEDs ........................................................................................................................................................................................................ 22 RS232 Connector ......................................................................................................................................................................................... 23 Reset Button.................................................................................................................................................................................................. 23 System LEDs .................................................................................................................................................................................................. 23 AC Power Connector.................................................................................................................................................................................. 23 Expansion Module Slots ....................................................................................................................................................................................24 Network Topologies ............................................................................................................................................................................................25 Standalone Configuration........................................................................................................................................................................ 25 Workgroup Configurations...................................................................................................................................................................... 26 Where to Go Next .................................................................................................................................................................................................27 5 Table of Contents Chapter 2 Installation ...........................................................................................................................................................................................................29 Verifying the Package Contents ..................................................................................................................................................................... 30 Reviewing Safety Precautions .........................................................................................................................................................................31 Selecting a Site for the Switch ........................................................................................................................................................................ 32 Planning the Installation ...................................................................................................................................................................................33 Installing the Switch on a Desktop ............................................................................................................................................................... 34 Installing the Switch in a Rack ........................................................................................................................................................................ 36 Installing an Expansion Module ..................................................................................................................................................................... 38 Setting Up a Terminal for Local Management .......................................................................................................................................... 40 Switch LEDs ...........................................................................................................................................................................................................41 Warranty Registration ........................................................................................................................................................................................42 Where to Go Next ................................................................................................................................................................................................43 Chapter 3 Troubleshooting ................................................................................................................................................................................................45 At the First Sign of a Problem .........................................................................................................................................................................46 Network Cabling Problems ..............................................................................................................................................................................47 Calling Technical Support ................................................................................................................................................................................ 48 How the Switch Reports Problems ................................................................................................................................................................ 49 Common Problems .............................................................................................................................................................................................50 Link /Activity LED on Any Port is OFF .................................................................................................................................................. 50 Power LED is OFF ........................................................................................................................................................................................ 50 Fault LED is ON ............................................................................................................................................................................................ 51 Appendix A Technical Specifications ................................................................................................................................................................................ 53 Appendix B Switch Default Settings ..................................................................................................................................................................................55 Appendix C DC Terminal Block Wiring Instructions .................................................................................................................................................. 57 Reviewing Safety Precautions .........................................................................................................................................................................57 Connecting the LAN Equipment to a DC Power Supply .......................................................................................................................58 Appendix D Translated Electrical Safety and Emission Information .................................................................................................................61 Index ........................................................................................................................................................................................................................79 6 Preface Purpose of This Guide This guide is intended for network administrators who are responsible for installing and maintaining AT-8216FXL, AT-8224XL, AT-D8224XL, and AT-8288XL Series Fast Ethernet Switches. How This Guide is Organized This guide consists of the following chapters and appendices: Chapter 1, Hardware Description, describes the features and functions of the switches and the expansion modules. The chapter also describes several network topologies that use the fast Ethernet switches. Chapter 2, Installation, describes the procedures for installing the switch and the expansion modules, connecting a terminal for local management, and connecting devices to the switch. Chapter 3, Troubleshooting, describes how to troubleshoot the switch in case of a problem. Appendix A, Technical Specifications, presents in tabular form switch and expansion module specifications. Appendix B, Switch Default Settings, lists the switch’s factory default software settings. Appendix C, DC Terminal Block Wiring Instructions, contains instructions on how to connect the AT-D8224XL switch to a DC power source. Appendix D, Translated Electrical Safety Emission Information, contains translations of the safety warnings documented throughout this guide. Index, at the end of this guide, is organized according to subject matter. 7 Preface Document Conventions This guide uses several conventions that you should become familiar with first before you begin to install the product: Note A note provides additional information. Warning A warning indicates that performing or omitting a specific action may result in bodily injury. Caution A caution indicates that performing or omitting a specific action may result in equipment damage or loss of data. 8 AT-8216FXL, AT-8224XL, and AT-8288XL Series Installation Guide Where to Find Related Guides The Allied Telesyn web site at www.alliedtelesyn.com/support/ prd_libs.htm provides you with an easy way to obtain the most up-todate documentation for all of our products. All web-based documents relating to this product and other Allied Telesyn products can be downloaded from the web site in PDF format. There are several manuals that you will need in order to manage your Fast Ethernet switch. Some guides are shipped with their respective products, while other manuals, such as this one, are only available from the Allied Telesyn web site. After you have performed the procedures in this guide and installed the switch on your network, you should go to the web site and download the following guide: AT-S24 Management Software User’s Guide PN 613-10809-00 This manual explains how to use the AT-S24 software and the Omega management interface to configure and manage the switch. 9 Preface Contacting Allied Telesyn Technical Support There are several ways that you can contact Allied Telesyn technical support: online, telephone, fax, and e-mail. Online Support Telephone and Fax Support E-mail Support You can request technical support online by filling out the Online Technical Support Form at www.alliedtelesyn.com/forms/support.htm. Americas United States, Canada, Mexico, Central America, South America Tel: 1 (800) 428-4835, option 4 Fax: 1 (503) 639-3176 Germany Germany, Switzerland, Austria, Eastern Europe Tel: (+49) 0130/83-56-66 Fax: (+49) 30-435-900-115 Asia Singapore, Taiwan, Thailand, Malaysia, Indonesia, Korea, Philippines, China, India, Hong Kong Tel: (+65) 381-5612 Fax: (+65) 383-3830 Italy Italy, Spain, Portugal, Greece, Turkey, Israel Tel: (+39) 02-416047 Fax: (+39) 02-419282 Australia Tel: 1 (800) 000-880 Fax: (+61) 2-9438-4966 Japan Tel: (+81) 3-3443-5640 Fax: (+81) 3-3443-2443 France France, Belgium, Luxembourg, The Netherlands, Middle East, Africa Tel: (+33) 01-60-92-15-25 Fax: (+33) 01-69-28-37-49 United Kingdom United Kingdom, Denmark, Norway, Sweden, Finland, Iceland Tel: (+0044) 1235-442500 Fax: (+44) 1-235-442680 United States and Canada [email protected] Latin America, Mexico, Puerto Rico, Caribbean, and Virgin Islands [email protected] United Kingdom, Sweden, Norway, Denmark, and Finland [email protected] 10 AT-8216FXL, AT-8224XL, and AT-8288XL Series Installation Guide Returning Products Products for return or repair must first be assigned a Return Materials Authorization (RMA) number. A product sent to Allied Telesyn without a RMA number will be returned to the sender at the sender’s expense. To obtain an RMA number, contact Allied Telesyn’s Technical Support at one of the following locations: North America 2205 Ringwood Ave. San Jose, CA 95131 Tel: 1-800-428-4835, option 4 Fax: 1-503-639-3716 European Customer Support Centre 10/11 Bridgemead Close Westmead Industrial Estate Swindon, Wiltshire SN5 7YT England Tel: +44-1793-501401 Fax: +44-1793-431099 Mexico and Puerto Rico Latin America, the Caribbean, Virgin Islands Tel: 1-800-424-5012, ext 3852 or 1-800-424-4284, ext 3852 Tel: international code + 425-481-3852 Fax: international code + 425-483-9458 Mexico only: 95-800-424-5012, ext 3852 Fax: international code + 425-489-9191 11 Preface FTP Server If you need a driver for an Allied Telesyn device and you know the name of the driver, you can download the software by connecting directly to our FTP server at ftp://gateway.centre.com. At login, enter “anonymous”. Enter your e-mail address for the password as requested by the server at login. 12 AT-8216FXL, AT-8224XL, and AT-8288XL Series Installation Guide For Sales or Corporate Information Allied Telesyn International, Corp. 19800 North Creek Parkway, Suite 200 Bothell, WA 98011 Tel: 1 (425) 487-8880 Fax: 1 (425) 489-9191 Allied Telesyn International, Corp. 960 Stewart Drive, Suite B Sunnyvale, CA 94085 Tel: 1 (800) 424-4284 (USA and Canada) Fax: 1 (408) 736-0100 13 Preface Tell Us What You Think If you have any comments or suggestions on how we might improve this or other Allied Telesyn documents, please fill out the Send us Feedback Form at www.alliedtelesyn.com/forms/feedback.htm. 14 Chapter 1 Hardware Description The AT-8216FXL, AT-8224XL, and AT-8288XL Series Fast Ethernet Switches offer the following features: # Ethernet, Fast Ethernet, and Gigabit Ethernet connectivity # A small 1.5U high, 19-inch rackmountable enclosure # Built-in management functions for extremely flexible operation in a standalone configuration # Many port configurations of different Ethernet speeds and media (including fiber) The switches are intended for the following: # Workgroup applications for aggregating traffic that must be trunked to a Gigabit backbone switch # Desktop connections that support IEEE 802.1p/Q standards of priority and VLAN-tagging with Gigabit Ethernet connections to backbone or local servers The following sections describe the hardware features of the AT-8216FXL, AT-8224XL, and AT-8288XL Series Fast Ethernet Switches. 15 Hardware Description Switch Models Table 1 lists the switch models. Table 1 Switch Models Model1 Number of Ports Type of Port Type of Connector Maximum Distance AT-8216FXL/MT 16 100Base-FX MT-RJ 2 kilometers2 (1.25 miles) AT-8216FXL/VF 16 100Base-FX VF-45 2 kilometers2 (1.25 miles) AT-8216FXL/SC 16 100Base-FX SC 2 kilometers2 (1.25 miles) AT-8224XL 24 10/100Base-TX RJ-45 100 meters (328 feet) AT-D8224XL3 24 10/100Base-TX RJ-45 100 meters (328 feet) AT-8288XL/MT 8 10/100Base-TX RJ-45 100 meters (328 feet) 8 100Base-FX MT-RJ 2 kilometers2 (1.25 miles) 8 10/100Base-TX RJ-45 100 meters (328 feet) 8 100Base-FX SC 2 kilometers2 (1.25 miles) AT-8288XL/SC 1. All models include two expansion slots. 2. Assumes 50/125 micron or 62.5/125 micron multimode fiber optic cabling and full-duplex operation. 3. DC power model. 16 AT-8216FXL, AT-8224XL, and AT-8288XL Series Installation Guide Figure 1 shows an example of a front panel of an AT-8216FXL Series Fast Ethernet Switch. This switch features 16 fiber optic ports with either SC, MT-RJ, or VF-45 connectors, depending on the model. 100BASE-FX FAST ETHERNET SWITCH A 100BASE-FX L /A L /A D/C L /A D/C L /A D/C L /A D/C D/C L /A L /A D/C L /A D/C PORT ACTIVITY L /A D/C D/C L /A L /A D/C L /A D/C L /A D/C L /A D/C L /A D/C L /A D/C D/C L /A 100M LINK D/C FULL DUP RS-232 TERMINAL PORT STATUS ACTIVITY HALF DUP/ COL FAULT RPS B PWR 1 2 3 4 5 6 7 8 9 10 11 12 13 14 15 16 RESET Figure 1 AT-8216FXL Switch (Model 8216FXL/MT) Figure 2 shows the front panel of the AT-8224XL and AT-D8224XL Fast Ethernet Switches. These switches have 24 ports with RJ-45 connectors. 10BASE-T / 100BASE-TX FAST ETHERNET SWITCH A 10BASE-T / 100BASE-TX 1X 3X 5X 7X 9X 11X 13X PORT ACTIVITY 17X 15X 19X 21X 23X L /A 100M LINK / D/C FULL DUP ACTIVITY RS-232 TERMINAL PORT 10M LINK / ACTIVITY HALF DUP/ COL 1 3 5 7 9 11 13 15 17 19 21 23 2 4 6 8 10 12 14 16 18 20 22 24 STATUS FAULT L /A D/C B RPS L /A PWR D/C 2X 4X 6X 8X 10X 12X 14X 18X 16X 20X 22X 24X RESET Figure 2 AT-8224XL Switch Figure 3 is an example of a front panel of an AT-8288XL Series Fast Ethernet Switch. This switch features eight twisted pair ports with RJ-45 connectors and eight fiber optic ports with either SC or MT-RJ connectors, depending on the model. 8 PORT 10BASE-T / 100BASE-TX and 8 PORT 100BASE-FX FAST ETHERNET SWITCH L /A PORT ACTIVITY L /A L /A L /A L /A L /A L /A L /A D/C D/C D/C D/C 1X 2X 3X 4X 9 10 11 12 D/C D/C D/C RS-232 TERMINAL PORT STATUS L /A A D/C 5X 6X 7X 8X D/C 13 14 15 16 L /A 100M LINK ACTIVITY 10M LINK ACTIVITY FULL DUP HALF DUP COL LINK ACTIVITY FULL DUP HALF DUP RPS COL PWR 10BASE-T / 100BASE-TX L /A L /A 100BASE-FX L /A L /A L /A L /A L /A L /A B D/C TX RX D/C TX RX D/C TX RX D/C TX RX D/C TX RX D/C TX RX D/C TX RX D/C TX RX FAULT D/C RESET Figure 3 AT-8288XL Switch (Model AT-8288XL/SC) 17 Hardware Description Hardware Features The switches have the following common hardware features: # Half- or full-duplex operation on all switched ports delivering up to 200 Mbps of bandwidth to servers, routers, or other switches # Auto-negotiation on all 10Base-T/100Base-TX ports for speed and duplex in compliance with IEEE 802.3u specifications (AT-8224XL and AT-8288XL switches only) # Non-blocking, clear-channel architecture delivers wire-speed switching and up to 8.8 Gbps bandwidth # Store-and-forward switching mode # 8 K MAC addresses per switch with automatic aging # 4 MB SDRAM per eight 10/100Base-TX ports (AT-8288XL or AT-8224XL switch) # 4 MB SDRAM per eight 100Base-FX ports (AT-8216FXL or AT-8288XL switch) # 1 MB Flash memory for software upgrades # In-band Telnet capability for remote switch management # Pre-installed management software, Omega (model AT-S24) # Out-of-band capability with RS232 connector for local switch management # IEEE 802.1Q compliant Virtual LAN (VLAN) tagging support # Two priority queues/levels per-port based on tagging information (IEEE 802.1P) # BootP and DHCP support # Port trunking 18 AT-8216FXL, AT-8224XL, and AT-8288XL Series Installation Guide Network Management Features The following lists the switches’ network management features. # Comprehensive in-band management supported by Telnet and SNMP Management Information Base (MIB): — — — — — MIB II Bridge MIB (RFC 1493) Ethernet MIB (RFC 1643) Interface MIB (RFC 1573) Allied Telesyn International (ATI) Enterprise MIB # Detailed out-of-band management provided by Local Omega, a menu-based management console # Management through a web browser # IEEE 802.1d Spanning Tree Protocol support For detailed information concerning software and management features, refer to the AT-S24 Management Software User’s Guide located on Allied Telesyn’s web site at www.alliedtelesyn.com/support/ prd_libs.htm. 19 Hardware Description Physical Description The switches have the following front panel components: # Ethernet 100Base-FX ports (16 ports on an AT-8216FXL switch and eight ports on an AT-8288XL switch) # Ethernet 10Base-T/100Base-TX ports (24 ports on an AT-8224XL switch and eight ports on an AT-8288XL switch) # RS232 (DB9-F) connector for out-of-band management # Reset button # System and port status LEDs # Two expansion slots for optional 10/100Base-TX, 100Base-FX, 1000Base-SX, 1000Base-LX, and 1000Base-T connectivity Refer to Figure 4, Figure 5, and Figure 6 for the locations of the front panel components. Expansion Module Slots Reset Button Port LEDs LED Color Function Key Fault LED 100BASE-FX FAST ETHERNET SWITCH A 100BASE-FX L /A D/C L /A D/C L /A D/C L /A D/C L /A D/C L /A D/C L /A D/C L /A D/C PORT ACTIVITY L /A D/C L /A D/C L /A D/C L /A D/C L /A D/C L /A D/C L /A D/C L /A D/C L /A 100M LINK D/C FULL DUP RS-232 TERMINAL PORT STATUS ACTIVITY HALF DUP/ COL FAULT RPS B PWR 1 2 3 4 5 6 7 8 9 10 100Base-FX Ports 11 12 13 14 15 16 Power LED RS232 Connector Figure 4 Front Panel Components for an AT-8216FXL Switch 20 RESET AT-8216FXL, AT-8224XL, and AT-8288XL Series Installation Guide Fault LED Expansion Module Slots Reset Button LED Color Function Key 10BASE-T / 100BASE-TX FAST ETHERNET SWITCH A 10BASE-T / 100BASE-TX 1X 3X 5X 7X 9X 11X PORT ACTIVITY 13X 17X 15X 19X 21X 23X L /A 100M LINK / D/C FULL DUP 1 3 5 ACTIVITY 7 9 11 13 RS-232 TERMINAL PORT 10M LINK / ACTIVITY HALF DUP/ COL 15 17 19 21 STATUS 23 FAULT L /A D/C B RPS L /A PWR D/C 2 2X 4X 6X 8X 10X 12X 14X 18X 16X 20X 22X 4 6 8 10 12 14 16 18 20 22 24 24X RESET Power LED Port LEDs Auto-negotiating 10Base-T/100Base-TX Ports RS232 Connector Figure 5 Front Panel Components for an AT-8224XL or AT-D8224XL Switch LED Color Function Key Expansion Module Slots Reset Button Auto-negotiating 10Base-T/100Base-TX Ports and LEDs Fault LED 8 PORT 10BASE-T / 100BASE-TX and 8 PORT 100BASE-FX FAST ETHERNET SWITCH L /A PORT ACTIVITY L /A L /A L /A L /A L /A L /A L /A D/C D/C 1X D/C 2X D/C 3X D/C 4X D/C D/C RS-232 TERMINAL PORT STATUS L /A A D/C 5X 6X 7X 8X D/C 13 14 15 16 L /A 100M LINK ACTIVITY 10M LINK ACTIVITY FULL DUP HALF DUP COL LINK ACTIVITY FULL DUP HALF DUP RPS COL PWR 10BASE-T / 100BASE-TX 9 10 11 100BASE-FX 12 L /A L /A L /A L /A L /A L /A L /A L /A D/C D/C D/C D/C D/C D/C D/C D/C B D/C TX RX TX RX TX RX TX RX TX RX TX RX TX RX TX RX FAULT RESET Power LED 100Base-FX Ports and LEDs RS232 Connector Figure 6 Front Panel Components for an AT-8288XL Switch 21 Hardware Description Figure 7 shows the switch’s back panel with the AC connector. Figure 7 Back Panel Note The AT-D8224XL switch has a DC power terminal block on the back panel. Port LEDs Each switch port has two LEDs that indicate the following: # L/A LED - indicates a valid physical link with a device with packets being received/transmitted and speed of transmission # D/C LED - indicates half- or full-duplex and collisions Figure 8 shows the LEDs on the AT-8224XL switch. (Port LEDs for an AT-8216FXL switch are located above each port. Port LEDs for an AT-8288XL switch are located next to each port.) 10BASE-T / 100BASE-TX 7X 9X 11X 13X PORT ACTIVITY 15X 17X 19X 21X 23X 100M LINK / L /A ACTIVITY 1 3 5 7 9 11 13 15 17 STATUS ACTIVITY HALF DUP/ FULL DUP D/C RS-232 TERMINAL PORT 10M LINK / COL 19 21 23 FAULT L /A D/C RPS L /A PWR D/C 2 8X 10X 12X 14X 16X 18X 20X 22X 4 6 8 10 12 14 16 18 20 22 24 24X RESET Station Port LEDs Figure 8 Port LEDs For more details about the LEDs, refer to Table 3, Switch System LED Status, on page 41. 22 AT-8216FXL, AT-8224XL, and AT-8288XL Series Installation Guide RS232 Connector Reset Button System LEDs The RS232, DB-9 female connector on the front panel of the switch is used to establish an out-of-band local management session with the switch and the AT-S24 management session. Establishing a local session requires a terminal or a personal computer with a terminal emulator program. The terminal is connected to the RS-232 port with a straightthrough cable. This button resets the switch. It is primarily used for diagnostics or resetting the switch statistics stored by the management software, Omega. You can also reset the switch using the Omega management software, as explained in the AT-S24 Management Software User’s Guide. The switch’s system LEDs are Power, and Fault. They indicate the over-all operating status of the switch. More details about the LEDs, refer to Table 3, Switch System LED Status, on page 41. AC Power Connector The switch has a single AC power supply socket on the back panel, which has autoswitch AC inputs. The input voltage range is from 100-120/200-240 VAC, 4/2A, 50/60 Hz. The power cord acts as an ON/ OFF switch. Note The AT-D8224XL switch has a DC power terminal block on the back panel. 23 Hardware Description Expansion Module Slots The two expansion slots on the front panel of the switch can accommodate a wide range of optional 10/100Base-TX, 100Base-FX, 1000Base-SX, 1000Base-LX, and 1000Base-T expansion modules. You can use the modules to interconnect distant network devices, build a high-speed backbone network, or attach additional nodes to the switch. Note For a list of the expansion modules supported by the switch and the AT-S24 management software, contact your Allied Telesyn sales representative or download a copy of the AT-S24 release notes from the Allied Telesyn web site. 24 AT-8216FXL, AT-8224XL, and AT-8288XL Series Installation Guide Network Topologies The following sections contain two examples of network configurations that use the switch models described in this guide. Standalone Configuration Figure 9 shows the AT-8224XL used as a standalone switch for a group of heavy traffic users. Switching on the desktop is either through a single end-station per switch port or through a multi-port hub. A 100 Mbps server is connected to a port, providing end stations high-speed access to its applications. AT-8224XL 10BASE-T / 100BASE-TX FAST ETHERNET SWITCH A 10BASE-T / 100BASE-TX PORT ACTIVITY 1X 3X 5X 7X 9X 11X 13X 15X 17X 19X 21X 23X 2X 4X 6X 8X 10X 12X 14X 16X 18X 20X 22X 24X 100M LINK / L /A ACTIVITY RS-232 TERMINAL PORT 10M LINK / HALF DUP/ FULL DUP D/C STATUS ACTIVITY COL 1 3 5 7 9 11 13 15 17 19 21 23 2 4 6 8 10 12 14 16 18 20 22 24 FAULT L /A D/C B RPS L /A PWR D/C RESET Hub 10BASE-T/100BASE-TX NETWORK PORTS 9X 8X 7X 6X 5X 4X 3X 2X 1 POWER Legend Shared 10/100 Mbps link Dedicated 10 Mbps link Dedicated 100 Mbps link 10/100 Mpbs link Figure 9 AT-8224XL Switch in a Standalone Configuration 25 Hardware Description Workgroup Configurations Figure 10 shows how the different switches can be incorporated into a large corporate network to form a Fast Ethernet infrastructure. A switch is located on each floor and servers are centralized in one room. AT-8224XL with AT-A15/LX fiber uplink PORT ACTIVITY Hub 10BASE-T/100BASE-TX NETWORK PORTS 9X 8X 7X 6X 5X 4X 3X 2X 1 POWER RS-232 TERMINAL PORT STATUS 10BASE-T / 100BASE-TX 10BASE-T / 100BASE-TX SWITCH FAST ETHERNET Hub 10BASE-T/100BASE-TX NETWORK PORTS 9X 8X 7X 6X 5X 4X 3X 2X 1 POWER AT-8118 with AT-A11 fiber uplink PORT ACTIVITY RS-232 TERMINAL PORT STATUS 10BASE-T / 100BASE-TX 10BASE-T / 100BASE-TX SWITCH FAST ETHERNET Workstations Backbone AT-8118 with AT-A11 fiber uplink PORT ACTIVITY RS-232 TERMINAL PORT STATUS 10BASE-T / 100BASE-TX 10BASE-T / 100BASE-TX SWITCH FAST ETHERNET PORT ACTIVITY 10BASE-T / 100BASE-TX 10BASE-T / 100BASE-TX SWITCH FAST ETHERNET RS-232 TERMINAL PORT STATUS AT-8216FXL/SC with AT-A17 and AT-A15/LX fiber uplinks Legend Shared 10/100 Mbps link Dedicated 10 Mbps link Dedicated 100 Mbps link Dedicated 1000 Mbps link Servers Figure 10 Switches in Workgroup Configurations 26 AT-8216FXL, AT-8224XL, and AT-8288XL Series Installation Guide Where to Go Next Proceed to Chapter 2 for details on how to install the switch. 27 Chapter 2 Installation This chapter contains the following installation procedures: # Verifying the Package Contents # Reviewing Safety Precautions # Selecting a Site for the Switch # Planning the Installation # Installing the Switch on a Desktop # Installing the Switch in a Rack # Installing an Expansion Module The chapter also contains information on the system and expansion module LEDs. 29 Installation Verifying the Package Contents Make sure the following hardware components are included in your switch package. If an item is missing or damaged, contact your Allied Telesyn sales representative. # One AT-8216FXL, AT-8224XL, AT-D8224XL, or AT-8288XL Series Fast Ethernet Switch # Two mounting brackets # Six flathead Phillips screws # Power cord (Americas, EC, Australia, and UK only) # One AT-8216FXL, AT-8224XL, and AT-8288XL Quick Install Guide # Warranty card 30 AT-8216FXL, AT-8224XL, and AT-8288XL Series Installation Guide Reviewing Safety Precautions Please review the following safety precautions before you begin to install the switch in your network. Refer to Appendix D for translated safety statements in your language. Laser Class 1 laser product. " 6 Laser Do not stare into the laser beam. " 7 Warning Electric Shock Hazard: To prevent electric shock, do not remove the cover. There are no user-serviceable parts inside. The unit contains hazardous voltages and should only be opened by a trained and qualified technician. " 8 Warning Lightening Danger: Do not work on this equipment or cables during periods of lightening activity. " 9 Warning Power cord is used as a disconnection device: To de-energize equipment, disconnect the power cord. " 10 Warning Electrical-Type Class 1 Equipment: This equipment must be earthed. The power plug must be connected to a properly wired earth ground socket outlet. An improperly wired socket outlet could place hazardous voltages on accessible metal parts. " 11 Caution Pluggable Equipment: The socket outlet should be installed near the equipment and should be easily accessible. " 12 Caution Air vents: The air vents must not be blocked on the unit and must have free access to the room ambient air for cooling " 13 Caution Operating Temperature: This product is designed for a maximum ambient temperature of 40°C. " 14 Caution All Countries: Install this product in accordance with local and National Electric Codes. " 15 31 Installation Selecting a Site for the Switch Be sure to observe the following requirements when choosing a site for your switch: # Make sure that the switch’s power is accessible and cables can be easily connected. # Cabling must be away from sources of electrical noise such as radios, transmitters, broadband amplifiers, power lines, electric motors, and fluorescent fixtures. # Air flow around the switch and through its vents on the side and rear must not be restricted. # If you are installing the switch on a desk, make sure it is placed on a level, secure desktop. # Do not place objects on top of the switch. # Do not expose the switch to moisture or water. # Make sure it is in a dust-free environment. # Use dedicated power circuits or power conditioners to supply reliable electrical power to the network devices. 32 AT-8216FXL, AT-8224XL, and AT-8288XL Series Installation Guide Planning the Installation Table 2 contains the cabling specifications for the switches. Table 2 Switch Cabling Specifications Model Type of Cabling Maximum Distance AT-8216FXL AT-8288XL (100Base-FX ports) 50/125 micron multimode or 62.5/125 micron multimode Full-duplex: 2 kilometers (1.25 miles) Half-duplex: 412 meters (1,351 feet) AT-8224XL AT-D8224XL AT-8288XL (10/100Base-TX ports) 10Base-T operation: Category 3 or better 100 meters (328 feet) 100Base-TX operation: Category 5 or better Note To connect a workstation or server to a 10/100Base-TX port on an AT-8224XL, AT-D8224XL, or AT-8288XL switch, use a straight-through cable. To connect a hub, router, or other switch to a 10/100Base-TX port on the switch, use a crossover cable. 33 Installation Installing the Switch on a Desktop The Ethernet switch can be installed in a standard 19-inch rack or on a table or desktop. To install the switch in a rack, go to the section ‘Installing the Switch in a Rack’ on page 36. To install the switch as a table or desktop, perform the following steps: 1. Remove all components from the shipping package and store the packaging material in a safe location. 2. Locate a level, secure surface for the switch. 3. If you purchased an expansion module for the switch, install the module by following the instructions in the section ‘Installing an Expansion Module’ on page 38. 4. Apply AC power to the switch by plugging the power cord into the AC power connector on the back panel of the unit (shown in Figure 11) and plugging the other end into a wall outlet. AC Power Connector Figure 11 Switch Rear Panel Warning The power cord is used as a disconnection device. To de-energize equipment, disconnect the power cord. "10 Note If you purchased an AT-D8224XL switch, refer to Appendix C for instructions on connecting the switch to a DC power source. 34 AT-8216FXL, AT-8224XL, and AT-8288XL Series Installation Guide As power is applied to the switch, the Fault LED (shown in Figure 12) flashes as the switch runs a series of internal self tests. After the switch has finished running its self tests, the Fault LED will stop flashing and will remain OFF. Refer to the section ‘Switch LEDs’ on page 41 for information on all of the system and port LEDs. RS-232 TERMINAL PORT STATUS OL Fault LED FAULT RPS PWR RESET Figure 12 Fault LED 5. Connect the data cables, making sure each connection has a good valid link and that the switch is receiving packets. For 10/100Base-TX ports, use a straight-through cable to connect to workstations and servers, or use a crossover cable to connect to hubs, routers, or other switches. See Table 2, Switch Cabling Specifications, on page 33 for cable specifications. 6. Go to the procedure ‘Setting Up a Terminal for Local Management’ on page 40 to access the Omega management interface on the switch. 35 Installation Installing the Switch in a Rack To install the Ethernet switch in a standard 19-inch rack, perform the following steps: 1. Remove all components from the shipping package and store the packaging material in a safe location. 2. To prepare the switch, place it on a level, secure surface. 3. If you purchased an expansion module for the switch, install the module by following the instructions in the section ‘Installing an Expansion Module’ on page 38. 4. Remove the snap-on plastic feet from the bottom of the switch, as shown in Figure 13. Figure 13 Removing the Feet 5. Attach the rackmounting brackets to each side of the switch, using the six flathead screws that came in the switch package as shown in Figure 14. RP ORT TER RS-23 MIN 2 AL P O RT STAT US FAU LT POW ER RES ET Figure 14 Attaching Rackmounting Brackets 36 AT-8216FXL, AT-8224XL, and AT-8288XL Series Installation Guide Caution Air vents must not be blocked and must have free access to the room ambient air for cooling. " 13 6. Mount the switch in the rack using standard screws (not provided). 7. Apply AC power to the switch by plugging the power cord into the AC power connector on the back panel of the unit (shown in Figure 11) and plugging the other end into a power outlet. Warning The power cord is used as a disconnection device. To de-energize equipment, disconnect the power cord. "10 Note If you purchased an AT-D8224XL switch, refer to Appendix C for instructions on connecting the switch to a DC power source. As power is applied to the switch, the Fault LED (shown in Figure 12) flashes as the switch runs a series of internal self tests. After the switch has finished running its self tests, the Fault LED will stop flashing and will remain OFF. Refer to the section ‘Switch LEDs’ on page 41 for information on all of the system and port LEDs. 8. Connect the data cables, making sure each connection has a good valid link and that the switch is receiving packets. For 10/100Base-TX ports, use a straight-through cable to connect to workstations and servers, or use a crossover cable to connect to hubs, routers, or other switches. See Table 2, Switch Cabling Specifications, on page 33 for cable specifications. 9. Go to the procedure ‘Setting Up a Terminal for Local Management’ on page 40 to access the Omega management interface on the switch. 37 Installation Installing an Expansion Module This section contains instructions for installing an optional expansion module in the switch. An optional expansion module package should include the following items: # One expansion module # One quick install guide # Warranty card Note For information on cabling specifications for the expansion module, refer to the quick install guide shipped with the module. To install an expansion module, perform the following steps: 1. Disconnect the switch’s power cord, if attached. Caution Be sure to disconnect the power cord before installing an expansion module. Installing an expansion module with the switch powered ON can damage the module. Warning The power cord is used as a disconnection device. To de-energize equipment, disconnect the power cord. " 10 2. Remove a blank faceplate from one of the expansion slots by unscrewing the faceplates two captive screws. Refer to Figure 15. Do not remove the blank faceplate if you are not installing an expansion module in the slot. A B Figure 15 Removing the Blank Panel 38 AT-8216FXL, AT-8224XL, and AT-8288XL Series Installation Guide If you are installing only one expansion module in the switch, you should install the module in slot A (upper slot). While the module will work in slot B (bottom slot) with slot A empty, the port numbering assignments will change if you later install a module in slot A. This could affect the VLAN memberships on the switch and this could require you to adjust your VLAN configurations. For example, if you install an AT-A17 expansion module in slot B of an AT-8224XL switch while leaving slot A empty, the switch will assign the port numbers 25 and 26 to the ports on the module. If you later install another AT-A17 module in slot A, the switch will automatically reallocate port numbers 25 and 26 to the new modules in slot A and assign the port numbers 27 and 28 to the module in slot B. If the module in slot B had been a member of a VLAN, you would be required to reconfigure the VLAN to reflect the change to its port numbers. 3. Remove the expansion module from the packing material. Be sure you observe ESD precautions. 4. Slide the expansion module into the empty slot making sure the board is aligned properly with the card guides. Refer to Figure 16. Card Guide A ACTIVITY TX 1 RX AT-A17 TX LINK 2 ACTIVITY RX B FULL DUP HALF DUP LINK COL 100BASE -FX/SC FULL DUP COL HALF DUP Board Figure 16 Installing an Expansion Module 5. Secure the expansion module to the switch by tightening the captive screws. 6. Apply power to the switch by re-attaching the power cord to the switch. Verify that the Power LED is green. 7. Connect the data cable(s) to the port(s) on the module. 8. Verify the LEDs on the expansion module’s front panel by referring to the quick install guide included with the module. 9. Go to the procedure ‘Setting Up a Terminal for Local Management’ on page 40 for instructions on how to access the Omega management software interface on the switch. 39 Installation Setting Up a Terminal for Local Management If you are installing the switch in a TCP/IP environment or if you intend to manage the switch from a remote site, you must first assign an IP address to the switch using the Omega management interface, which comes pre-installed on the switch along with the AT-S24 switch software. To start an Omega management session, perform the following steps: 1. Connect a terminal or a PC with a terminal emulator program to the RS232 connector on the front panel of the switch. Use an RS232, DB-9 straight-through cable. 2. Configure the terminal or the terminal emulation program to the following settings: # Baud rate: 9600 # Data bits: 8 # Parity: None # Stop bits: 1 # Flow control: None 3. Press Return. The switch displays the Omega main menu. You are now ready to use the Omega management software interface to configure the switch. For instructions, refer to the AT-S24 Management Software User’s Guide, which is available from the Allied Telesyn web site. 40 AT-8216FXL, AT-8224XL, and AT-8288XL Series Installation Guide Switch LEDs Table 3 describes the system LEDs on the Ethernet switch. Table 3 Switch System LED Status LED State Description Fault Solid Red The switch or management software is malfunctioning. Flashing Red The switch is booting, running diagnostic tests, writing messages to FLASH, or transferring files using XMODEM. OFF Normal operation. PWR (Power) Solid Green The switch is receiving power, the voltage is within the acceptable range, and the main power supply or the optional redundant power supply is working. RPS (Redundant Power Supply) Solid Green An optional redundant power supply is connected to the switch. (This LED will remain lit even when the optional redundant power supply is powered OFF.) Table 4 describes the port LEDs on the Ethernet switch. Table 4 Port LED Status LED State Description L/A (Link/Activity) Solid Green This indicates a 100 Mbps link. Flashing Green This indicates 100 Mbps activity. Solid Amber This indicates a 10 Mbps link (10/100 ports only). Flashing Amber This indicates 10 Mbps activity (10/100 ports only). Solid Green The port is operating at full-duplex. Solid Amber The port is operating at half-duplex. Flashing Amber Collisions are occurring on the line. D/C (Duplex/Collision) 41 Installation Warranty Registration When you have finished installing the switch, you should register your product by completing the enclosed warranty card and sending it in, or by visiting our web site at www.alliedtelesyn.com/forms/warranty.htm and completing the on-line registration. 42 AT-8216FXL, AT-8224XL, and AT-8288XL Series Installation Guide Where to Go Next Now that the switch is operational, you are ready to configure and monitor it as explained in the AT-S24 Management Software User’s Guide, which is available from Allied Telesyn’s web site at www.alliedtelesyn.com/support/prd_libs.htm. 43 Chapter 3 Troubleshooting This chapter provides information on how to detect and resolve problems with your switch. This section includes the following sections: # At the First Sign of a Problem # Network Cabling Problems # Calling Technical Support # How the Switch Reports Problems # Common Problems 45 Troubleshooting At the First Sign of a Problem Perform the following tasks when you first become aware of a problem with the switch: # Make sure the power cord is securely connected and the power voltage is not fluctuating. # Check the data cables for secure connections and make sure the device at the other end of a connection is operational. # Use Omega to read statistics and run diagnostics. For instructions, refer to the AT-S24 Management Software User’s Guide. # If the management software has failed, check the port LEDs to see if the switch is continuing to forward packets. If the switch is forwarding packets, wait for a convenient time and then reboot the switch by pressing RESET; or power ON and OFF the switch by disconnecting and reconnecting the power cord. Note Resetting the switch will clear all performance and error statistics # If the switch is no longer forwarding packets, press the RESET button so the switch can run self-diagnostics. # If the problem persists, call Allied Telesyn’s Technical Support or visit Allied Telesyn’s web site at www.alliedtelesyn.com. 46 AT-8216FXL, AT-8224XL, and AT-8288XL Installation Guide Network Cabling Problems If you have 10/100Base-TX (Fast Ethernet), some network problems may be related to exceeding cabling distances. Refer to the standard IEEE 802.3u, Clause 29.3.1.2 on Worst Case Path Delay Value. This document specifies that the collision domain diameter must be within the following limits: # Under 100 meters (328 feet) for TX cabling # Under 412 meters (1,331.56 feet) for half-duplex FX cabling 47 Troubleshooting Calling Technical Support When contacting Allied Telesyn for support on any of its products, you will need to provide Technical Support with the following information: # Model and serial number # Software version number # Description of the problem Refer to Allied Telesyn’s web site at www.alliedtelesyn.com for a list of worldwide locations. 48 AT-8216FXL, AT-8224XL, and AT-8288XL Installation Guide How the Switch Reports Problems The switch detects and processes errors as follows: # The LEDs indicate problems with the ports and power. For information on the LEDs, refer to ‘Switch LEDs’ on page 41. # In a TCP/IP environment, if you have configured the software correctly, the management software triggers an SNMP trap message. As a result, the software then sends traps to alert the network manager when a trigger occurs. This type of software configuration allows the network administrator to proactively monitor the network. 49 Troubleshooting Common Problems This section lists common possible sources of errors and the actions required to correct them. Link /Activity LED on Any Port is OFF This can indicate: # A loose data cable. # The device at the other end of the connection is powered OFF. # The 10/100Base-TX data cable is not wired correctly (straight/ crossed) for the device. # The port’s selected transmission mode does not match that of the attached device. Perform the following steps in sequence; you need not proceed to the next step if the problem is resolved: 1. Make sure the data cables are secure. 2. Make sure the device at the end of the connection is powered ON. 3. Make sure the 10/100Base-TX data cable is wired correctly (straight/crossed) for the device. 4. Logon to Omega if you can and check the port status (Port status and configuration><port number> menu). If the port is Enabled, make sure the transmission speed matches that of the connected device (auto-negotiating, fullor half-duplex). 5. Contact Allied Telesyn’s Technical Support for assistance. Power LED is OFF If there is no power to the switch, it cannot function. A Power LED that is OFF can indicate: # A loose power cord. # Power supply failure, malfunction, or loss of power to the power supply. # A power supply voltage below acceptable levels. # A high switch temperature due to fan failure or extreme ambient temperature. 50 AT-8216FXL, AT-8224XL, and AT-8288XL Installation Guide Perform the following steps in sequence; you need not proceed to the next step if the problem is resolved: 1. Secure the power cord to the power source and check the Power LED to see if it is ON. 2. Ensure that the voltage is within the required levels in your region. 3. If possible, logon to Omega and run Diagnostics if you can (Administration>Diagnostics ) and record any failures. 4. Contact Allied Telesyn’s Technical Support for assistance. Fault LED is ON This might indicate problems with the network management software, such as: # An unsuccessful software download # A failure of the power-on diagnostics Perform the following steps in sequence; you need not proceed to the next step if the problem is resolved: 1. Reset the switch either by: — Pressing the RESET button on the front panel, or — Selecting Administration>Reset and restart the system from Omega, if you can. 2. Make sure the RS232 connection from the local terminal or PC to the switch is secure; change the cable if necessary. If you cannot access Omega locally because of a faulty RS232 connection, try accessing Omega from a web browser or by using Telnet or an SNMP management program. 3. Unplug the switch from the power source, then plug it back in again. 4. Try to log on to Omega and run diagnostics (Administration>Diagnostics ). 5. Download a new version of the AT-S24 software onto the switch using the Administration menu. Refer to the AT-S24 Management Software User’s Guide for instructions. 6. Contact Allied Telesyn’s Technical Support for help. 51 Appendix A Technical Specifications Table 5 lists the technical specifications for the AT-8216FXL, AT-8224XL, AT-D8224XL, and AT-8288XL switches. Table 5 Technical Specifications Physical Specifications Dimensions (H x W x D) 6.48 cm x 42.93 cm x 35.60 cm (2.55 in x 16.9 in x 14.0 in) Weight 5 kg (11 lbs) Required Ventilation on All Sides 19 cm (7.5 in) Environmental Specifications Operating Temperature 0° C to 40° C (32° F to 104° F) Storage Temperature -20° C to 70° C (-4° F to 158° F) Operating Humidity 5% to 95% non-condensing Operating Altitude Range Up to 3,000 m (9,843 ft) Power Specifications (AC Models) Maximum Power Consumption 95 watts AC Input Voltage 100-120/200-240VAC~ +64/2A, 50/60Hz. Frequency 50/60 Hz ± 3 cycles of nominal input frequency Power Specifications (DC Models) Input Supply Voltage 48 volts Maximum Power Consumption 95 watts 53 Technical Specifications Table 5 Technical Specifications (Continued) Safety and Electromagnetic Emissions Certifications Safety: UL 1950 CSA 22.2 No. 950 EN 60950 (TUV) EMI: FCC Class A EN55022 Class A VCCI Class A Immunity: EN50082-1 Quality and Reliability: MTBF > 50,000 hrs MTTR < 1/2 hr DOA < 1% Table 6 shows the pin assignments for the switch’s RJ-45 connectors. Table 6 RJ-45 Port Pin Assignments 54 Pin Number Function 1 RD+ 2 RD- 3 TD+ 4 Unused 5 Unused 6 TD- 7 Unused 8 Unused Appendix B Switch Default Settings This appendix lists the switch’s factory default software settings. Settings Default IP Address Subnet Mask 0.0.0.0 0.0.0.0 Gateway Address Get Community String Set Community String Trap Community String Spanning Tree Protocol Bridge Priority Bridge Max Age Time Bridge Hello Time Bridge Forwarding Delay Telnet Access System Name Omega Password Omega Time Out Value Download Password Duplex Mode 10/100Base-TX Ports Duplex Mode 100Base-FX Ports Active Aging Time (MAC Address Table) High Port Speed Domain Name VLAN Name PVID/VID 0.0.0.0 public private public Disabled 32768 20 2 15 Enabled None No password assigned 5 minutes ATS24 Auto-negotiating Full-duplex 300 seconds Auto-negotiating None Default VLAN (all ports) 1 55 Appendix C DC Terminal Block Wiring Instructions This appendix contains instructions on how to connect the AT-D8224XL switch to a DC power source. The instructions describe how to connect the DC terminal block on the rear panel of the LAN equipment to a 36 - 60 V DC power source. Reviewing Safety Precautions Please review the following safety precautions before you begin to connect the LAN equipment to a DC power source. Warning For centralized DC power connection, install only in a restricted access area. " 16 Note A tray cable is required to connect the power source if the unit is powered by centralized DC power. The tray cable must be UL listed Type TC tray cable and rated at 600 V and 90 degree C, with three conductors, minimum 14 AWG. " 17 Warning Only trained and qualified personnel are allowed to install or replace this equipment. " 18 57 DC Terminal Block Wiring Instructions Connecting the LAN Equipment to a DC Power Supply To connect the equipment to a DC power source, perform the following instructions: Warning As a safety precaution, a 10 Amp circuit breaker should be installed at the supply end of the cable to be used with this LAN equipment. ALWAYS connect the wiring to the LAN equipment first before connecting the wiring to the breaker. To avoid the danger of physical injury from electrical shock, do not work with HOT feeds. Always be sure that the breaker is in the OFF position before connecting the wiring to the breaker. " 19 1. On the rear side of the LAN equipment is a terminal block. Starting from the left side of the terminal block, identify the positive, frame ground and negative terminals using either the diagram adjacent to the terminal block or the illustration here: 2. With a 14-gauge wire-stripping tool, strip the three wires in the tray cable coming from the DC input power source to 8mm ± 1mm (0.31 in., ± 0.039 in.). Warning Do not strip more than the recommended amount of wire. Stripping more than the recommended amount can create a safety hazard by leaving exposed wire on the terminal block after installation. " 20 8mm ±1mm (0.31in. ±0.039 in.) 58 AT-8216FXL, AT-8224XL, and AT-8288XL Series Installation Guide 3. Connect the frame ground wire to the terminal marked with the ground symbol by inserting the wire into the terminal and tightening the connection with a flathead screwdriver. Warning When installing this equipment, always ensure that the frame ground connection is installed first and disconnected last. " 6 4. Connect the positive feed to the terminal block marked + (plus). 5. Connect the negative feed to the terminal block marked - (minus). Warning "Safety Hazard"- Check to see if there are any exposed copper strands coming from the installed wires. When this installation is done correctly, there should be no exposed copper wire strands extending from the terminal block. Any exposed wiring can conduct harmful levels of electricity to persons touching the wires. " 22 6. Secure the tray supply cable near the rack framework using multiple cable ties to minimize the chance of the connections being disturbed by casual contact with the wiring. Use at least four cable ties separated four inches apart with the first one located within six inches of the terminal block. Note This system will work with a positive grounded or negative grounded DC system. " 23 This completes the procedure for connecting the LAN equipment to a DC power source. 59 Appendix D Translated Electrical Safety and Emission Information Important: This appendix contains multiple-language translations for the safety statements in this guide. Wichtig: Dieser Anhang enthält Übersetzungen der in diesem Handbuch enthaltenen Sicherheitshinweise in mehreren Sprachen. Vigtigt: Dette tillæg indeholder oversættelser i flere sprog af sikkerhedsadvarslerne i denne håndbog. Belangrijk: Deze appendix bevat vertalingen in meerdere talen van de veiligheidsopmerkingen in deze gids. Important: Cette annexe contient la traduction en plusieurs langues des instructions de sécurité figurant dans ce guide. Tärkeää: Tämä liite sisältää tässä oppaassa esiintyvät turvaohjeet usealla kielellä. Importante: questa appendice contiene traduzioni in più lingue degli avvisi di sicurezza di questa guida. Viktig: Dette tillegget inneholder oversettelser til flere språk av sikkerhetsinformasjonen i denne veiledningen. Importante: Este anexo contém traduções em vários idiomas das advertências de segurança neste guia. Importante: Este apéndice contiene traducciones en múltiples idiomas de los mensajes de seguridad incluidos en esta guía. Obs! Denna bilaga innehåller flerspråkiga översättningar av säkerhetsmeddelandena i denna handledning. 61 Translated Electrical Safety and Emission Information Standards: This product meets the following safety standards. U.S. Federal Communications Commission RADIATED ENERGY Note: This equipment has been tested and found to comply with the limits for a Class A digital device pursuant to Part 15 of the FCC Rules. These limits are designed to provide reasonable protection against harmful interference when the equipment is operated in a commercial environment. This equipment generates, uses, and can radiate radio frequency energy and, if not installed and used in accordance with this instruction manual, may cause harmful interference to radio communications. Operation of this equipment in a residential area is likely to cause harmful interference in which case the user will be required to correct the interference at his own expense. Note: Modifications or changes not expressly approved by the manufacturer or the FCC can void your right to operate this equipment. Canadian Department of Communications This Class A digital apparatus meets all requirements of the Canadian Interference-Causing Equipment Regulations. Cet appareil numérique de la classe A respecte toutes les exigences du Règlement sur le matériel brouilleur du Canada. "1 RFI Emission "2 WARNING: In a domestic environment this product may cause radio interference in which case the user may be required to take adequate measures. "3 Immunity EN50082-1 1997 "4 Electrical Safety EN60950, UL 1950, CSA 950 "5 Laser EN60825 EN55022 Class A SAFETY 62 "6 WARNING: Class 1 Laser product. "7 WARNING: Do not stare into the laser beam. "8 ELECTRICAL NOTICES WARNING: ELECTRIC SHOCK HAZARD To prevent ELECTRIC shock , do not remove the cover. No user-serviceable parts inside. This unit contains HAZARDOUS VOLTAGES and should only be opened by a trained and qualified technician. To avoid the possibility of ELECTRIC SHOCK, disconnect electric power to the product before connecting or disconnecting the LAN cables. "9 LIGHTNING DANGER DANGER: DO NOT WORK on equipment or CABLES during periods of LIGHTNING ACTIVITY. " 10 CAUTION: POWER CORD IS USED AS A DISCONNECTION DEVICE. TO DE-ENERGIZE EQUIPMENT, disconnect the power cord. " 11 ELECTRICAL - TYPE CLASS 1 EQUIPMENT THIS EQUIPMENT MUST BE EARTHED. Power plug must be connected to a properly wired earth ground socket outlet. An improperly wired socket outlet could place hazardous voltages on accessible metal parts. AT-8216FXL, AT-8224XL, and AT-8288XL Series Installation Guide " 12 PLUGGABLE EQUIPMENT, the socket outlet shall be installed near the equipment and shall be easily accessible. " 13 CAUTION: Air vents must not be blocked and must have free access to the room ambient air for cooling. " 14 OPERATING TEMPERATURE: This product is designed for a maximum ambient temperature of 40° degrees C. " 15 ALL COUNTRIES: Install product in accordance with local and National Electrical Codes. " 16 WARNING: For centralized dc power connection, install only in a restricted access area. " 17 A tray cable is required to connect the power source if the unit is powered by centralized DC power. The tray cable must be UL listed Type TC tray cable and rated at 600 V and 90 degree C, with three conductors, minimum 14 AWG. " 18 WARNING: Only trained and qualified personnel are allowed to install or replace this equipment. " 19 WARNING: As a safety precaution, a 10 Amp circuit breaker should be installed at the supply end of the cable to be used with this LAN equipment. ALWAYS connect the wiring to the LAN equipment first before connecting the wiring to the breaker. To avoid the danger of physical injury from electrical shock, do not work with HOT feeds. Always be sure that the breaker is in the OFF position before connecting the wiring to the breaker. " 20 WARNING: Do not strip more than the recommended amount of wire. Stripping more than the recommended amount can create a safety hazard by leaving exposed wire on the terminal block after installation. " 21 WARNING: When installing this equipment, always ensure that the frame ground connection is installed first and disconnected last. " 22 WARNING: "Safety Hazard"- Check to see if there are any exposed copper strands coming from the installed wires. When this installation is done correctly there should be no exposed copper wire strands extending from the terminal block. Any exposed wiring can conduct harmful levels of electricity to persons touching the wires. " 23 This system will work with a positive grounded or negative grounded DC system. Normen: Dieses Produkt erfüllt die Anforderungen der nachfolgenden Normen. "1 Hochfrequenzstörung "2 WARNUNG: Bei Verwendung zu Hause kann dieses Produkt Funkstörungen hervorrufen. In diesem Fall müßte der Anwender angemessene Gegenmaßnahmen ergreifen. "3 Störsicherheit EN50082-1 1997 "4 Elektrische Sicherheit EN60950, UL 1950, CSA 950 "5 Laser EN60825 EN55022 Klasse A SICHERHEIT "6 WARNUNG Laserprodukt der Klasse 1. "7 WARNUNG Nicht direkt in den Strahl blicken. 63 Translated Electrical Safety and Emission Information "8 ACHTUNG: GEFÄHRLICHE SPANNUNG Das Gehäuse nicht öffnen. Das Gerät enthält keine vom Benutzer wartbaren Teile. Das Gerät steht unter Hochspannung und darf nur von qualifiziertem technischem Personal geöffnet werden. Vor Anschluß der LAN-Kabel, Gerät vom Netz trennen. "9 GEFAHR DURCH BLITZSCHLAG GEFAHR: Keine Arbeiten am Gerät oder an den Kabeln während eines Gewitters ausführen. " 10 VORSICHT: DAS NETZKABEL DIENT ZUM TRENNEN DER STROMVERSORGUNG. ZUR TRENNUNG VOM NETZ, KABEL AUS DER STECKDOSE ZIEHEN. " 11 GERÄTE DER KLASSE 1 DIESE GERÄTE MÜSSEN GEERDET SEIN. Der Netzstecker darf nur mit einer vorschriftsmäßig geerdeten Steckdose verbunden werden. Ein unvorschriftsmäßiger Anschluß kann die Metallteile des Gehauses unter gefährliche elektrische Spannungen setzen. " 12 STECKBARES GERÄT: Die Anschlußbuchse sollte in der Nähe der Einrichtung angebracht werden und leicht zugänglich sein." " 13 VORSICHT Die Entlüftungsöffnungen dürfen nicht versperrt sein und müssen zum Kühlen freien Zugang zur Raumluft haben. " 14 BETRIEBSTEMPERATUR: Dieses Produkt wurde für den Betrieb in einer Umgebungstemperatur von nicht mehr als 40° C entworfen. " 15 ALLE LÄNDER: Installation muß örtlichen und nationalen elektrischen Vorschriften entsprechen. " 16 Warnung: Bei zentralisierten gleichstromverbindungen sollte die installation nur an einem standort mit beschränktem zugang erfolgen. " 17 Hinweis: Für den Anschluß der Stromquelle ist ein für den Einsatz in Kabelrinnen geeignetes Installationskabel (Tray Cable) erforderlich, falls die Einheit durch zentralisierten Gleichstrom angetrieben wird. Das Installationskabel muß ein dem UL-Standard entsprechendes Kabel des Typs TC mit einer Nennspannung von 600 V und einer Nenntemperatur von 90 Grad Celsius sein, das drei Leiter hat. Stärke mind. 14 AWG (American Wire Gage – amerikanische Einheit für Drahtdurchmesser). " 18 Warnung: INSTALLATION UND WARTUNG DIESER EINRICHTUNG NUR DURCH AUSGEBILDETES FACHPERSONAL. " 19 Warnung: Aus Sicherheitsgründen sollte am Netzteilende des mit dieser LANEinrichtung verwendeten Kabels ein 10-Ampere-Leistungsschalter installiert werden. Nehmen Sie STETS zuerst die Verkabelung der LAN-Einrichtung vor, bevor Sie die Kabel an den Leistungsschalter anschließen. Arbeiten Sie nie mit SPANNUNGSFÜHRENDEN Kabeln, um Körperverletzungen durch Stromschlag zu vermeiden. Achten Sie stets darauf, daß sich der Leistungsschalter in der Position OFF (Aus) befindet, bevor Sie Kabel an den Leistungsschalter anschließen. 64 " 20 Warnung: Ziehen Sie nicht mehr als die empfohlene Drahtlänge ab. Wird mehr als die empfohlene Länge abisoliert, stellt dies ein Sicherheitsrisiko dar, da auf dem Anschlußklemmblock nach der Installation möglicherweise freiliegende Drähte verbleiben. " 21 Warnung: Bei der Installation dieser Einrichtung ist stets sicherzustellen, daß der Masseanschluß jeweils zuerst installiert und zuletzt getrennt wird. AT-8216FXL, AT-8224XL, and AT-8288XL Series Installation Guide " 22 Warnung: “Sicherheitsrisiko” Prüfen Sie, daß aus dem installierten Draht keine freiliegenden Kupferlitzen herausragen. Bei korrekter Installation sollten aus dem Anschlußklemmblock keine freiliegenden Kupferlitzen vorstehen. Freiliegende Kabel führen genug Spannung, um Personen zu gefährden, die diese Drähte berühren. " 23 Hinweis: Dieses System kann mit positiv geerdeten oder negativ geerdeten Gleichstromsystemen betrieben werden. Standarder: Dette produkt tilfredsstiller de følgende standarder. "1 Radiofrekvens forstyrrelsesemission "2 ADVARSEL: I et hjemligt miljø kunne dette produkt forårsage radio forstyrrelse. Bliver det tilfældet, påkræves brugeren muligvis at tage tilstrækkelige foranstaltninger. "3 Immunitet EN50082-1 1997 "4 Elektrisk sikkerhed EN60950, UL 1950, CSA 950 "5 Laser EN60825 EN55022 Klasse A SIKKERHED "6 ADVARSEL Laserprodukt av klasse 1. "7 ADVARSEL Stirr ikke på strålen. "8 ELEKTRISKE FORHOLDSREGLER ADVARSEL: RISIKO FOR ELEKTRISK STØD For at forebygge ELEKTRISK stød, undlad at åbne apparatet. Der er ingen indre dele, der kan repareres af brugeren. Denne enhed indeholder LIVSFARLIGE STRØMSPÆNDINGER og bør kun åbnes af en uddannet og kvalificeret tekniker. For at undgå risiko for ELEKTRISK STØD, afbrydes den elektriske strøm til produktet, før LAN-kablerne monteres eller afmonteres. "9 FARE UNDER UVEJR FARE: UNDLAD at arbejde på udstyr eller KABLER i perioder med LYNAKTIVITET. " 10 ADVARSEL: DEN STRØMFØRENDE LEDNING BRUGES TIL AT AFBRYDE STRØMMEN. SKAL STRØMMEN TIL APPARATET AFBRYDES, tages ledningen ud af stikket. " 11 ELEKTRISK - KLASSE 1-UDSTYR DETTE UDSTYR KRÆVER JORDFORBINDELSE. Stikket skal være forbundet med en korrekt installeret jordforbunden stikkontakt. En ukorrekt installeret stikkontakt kan sætte livsfarlig spænding til tilgængelige metaldele. " 12 UDSTYR TIL STIKKONTAKT, stikkontakten bør installeres nær ved udstyret og skal være lettilgængelig. " 13 ADVARSEL: Ventilationsåbninger må ikke blokeres og skal have fri adgang til den omgivende luft i rummet for afkøling. " 14 BETJENINGSTEMPERATUR: Dette apparat er konstrueret til en omgivende temperatur på maksimum 40 grader C. " 15 ALLE LANDE: Installation af produktet skal ske i overensstemmelse med lokal og national lovgivning for elektriske installationer. " 16 Advarsel: ETABLERES FORBINDELSEN TIL ET JÆVNSTRØMSNET, BØR INSTALLERING FORETAGES I ET OMRÅDE HVOR UVEDKOMMENDE IKKE HAR ADGANG. 65 Translated Electrical Safety and Emission Information " 17 Bemærk: Hvis switchen forbindes til jævnstrømsnet skal den føres med skinnekabel, der skal være UL mærket type TC normeret til 600 V, 908C, med tre ledere af mindst tykkelse 14 AWG (amerikansk ledningsmål). " 18 Advarsel: INSTALLERING OG UDSKIFTNING AF DETTE UDSTYR BØR KUN UDFØRES AF AUT. EL-INSTALLATØR. " 19 Advarsel: Der bør indskydes en 10 A automatsikring på forsyningsenden af kablet til dette LAN-udstyr. Man skal ALTID først forbinde ledningerne med LAN-udstyret inden de forbindes med automatsikringen. Ved ledningsarbejde skal strømmen altid være AFBRUDT til forebyggelse af fare for elektrisk stød. Man skal altid SLUKKE automatsikringen inden man forbinder ledninger med den. " 20 Advarsel: Man bør ikke afisolere mere af ledningerne end anvist, for så kan sådanne blanke ledninger udgøre et faremoment efter montering på klemmerækken. " 21 Advarsel: Ved installering af dette udstyr skal steljord altid forbindes først og aftages sidst. " 22 Advarsel: "Fare" Se omhyggeligt efter om der stikker blanke kobbertråde ud fra klemmeforbindelserne. Ved korrekt montering er det ikke tilfældet. Enhver afisoleret leder kan lede farlig strømstyrke til personer, som kommer til at røre ved dem. " 23 Bemærk: Dette udstyr kan køre både på jævnstrøm med positiv og med negativ jord. Eisen: Dit product voldoet aan de volgende eisen. "1 RFI Emissie "2 WAARSCHUWING: Binnenshuis kan dit product radiostoring veroorzaken, in welk geval de gebruiker verplicht kan worden om gepaste maatregelen te nemen. "3 Immuniteit EN50082-1 1997 "4 Electrische Veiligheid EN60950, UL 1950, CSA 950 "5 Laser EN60825 EN55022 Klasse A VEILIGHEID 66 "6 WAARSHUWING Klasse-1 laser produkt. "7 WAARCHUWING Neit in de straal staren. "8 WAARSCHUWINGEN MET BETREKKING TOT ELEKTRICITEIT WAARSCHUWING: GEVAAR VOOR ELEKTRISCHE SCHOKKEN Verwijder het deksel niet, teneinde ELEKTRISCHE schokken te voorkomen. Binnenin bevinden zich geen onderdelen die door de gebruiker onderhouden kunnen worden. Dit toestel staat onder GEVAARLIJKE SPANNING en mag alleen worden geopend door een daartoe opgeleide en bevoegde technicus. Om het gevaar op ELEKTRISCHE SCHOKKEN te vermijden, moet u het toestel van de stroombron ontkoppelen alvorens de LAN-kabels te koppelen of ontkoppelen. "9 GEVAAR VOOR BLIKSEMINSLAG GEVAAR: NIET aan toestellen of KABELS WERKEN bij BLIKSEM. " 10 WAARSCHUWING: HET TOESTEL WORDT UITGESCHAKELD DOOR DE STROOMKABEL TE ONTKOPPELEN.OM HET TOESTEL STROOMLOOS TE MAKEN: de stroomkabel ontkoppelen. AT-8216FXL, AT-8224XL, and AT-8288XL Series Installation Guide " 11 ELEKTRISCHE TOESTELLEN VAN KLASSE 1 DIT TOESTEL MOET GEAARD WORDEN. De stekker moet aangesloten zijn op een juist geaarde contactdoos. Een onjuist geaarde contactdoos kan de metalen onderdelen waarmee de gebruiker eventueel in aanraking komt onder gevaarlijke spanning stellen. " 12 AAN TE SLUITEN APPARATUUR, de contactdoos wordt in de nabijheid van de apparatuur geïnstalleerd en is gemakkelijk te bereiken." " 13 OPGELET: De ventilatiegaten mogen niet worden gesperd en moeten de omgevingslucht ongehinderd toelaten voor afkoeling. " 14 BEDRIJFSTEMPERATUUR: De omgevingstemperatuur voor dit produkt mag niet meer bedragen dan 40 graden Celsius. " 15 ALLE LANDEN: het toestel installeren overeenkomstig de lokale en nationale elektrische voorschriften. " 16 Waarschuwing: BIJ GECENTRALISEERDE DC-AANSLUITING: INSTALLATIE UITSLUITEND UITVOEREN IN EEN GEBIED MET BEPERKTE TOEGANG. " 17 Opmerking: U hebt een PVC/nylon-kabel nodig voor aansluiting op de voedingsbron als de eenheid van stroom wordt voorzien door een gecentraliseerde DC-voeding. De PVC/nylon-kabel moet een TC-kabel zijn (met een vermelding op de UL-lijst), die geschikt is voor 600 V en 90 °C, met drie geleiders en een minimumdikte van 14 AWG. " 18 Waarschuwing: ALLEEN GESCHOOLD EN GEKWALIFICEERD PERSONEEL MAG DEZE APPARATUUR INSTALLEREN OF VERVANGEN. " 19 Waarschuwing: Op de kabel die op de LAN-apparatuur wordt aangesloten dient een zekering van 10 amp te worden gemonteerd aan de zijde van de aansluiting op de voeding. Sluit bedrading ALTIJD eerst op de LAN-apparatuur aan en pas daarna op de zekering. Voorkom het risico op een elektrische schok en schakel eerst de voeding uit. Controleer voordat u de bedrading op de zekering aansluit altijd of de zekering zich in de stand UIT bevindt. " 20 Waarschuwing: Verwijder niet meer dan de aanbevolen hoeveelheid isolatiemateriaal. Als u meer dan de aanbevolen hoeveelheid verwijdert, kan dit een veiligheidsrisico veroorzaken doordat draden bloot blijven liggen na aansluiting op het blok. " 21 Waarschuwing: Zorg er tijdens installatie van de apparatuur altijd voor dat de aardeaansluiting van het frame als eerste wordt geplaatst en als laatste wordt losgemaakt. " 22 Waarschuwing: "Veiligheidsrisico" Controleer of er bij de aangesloten bedrading geen koper blootligt. Als de installatie juist is uitgevoerd, is er bij het aansluitblok geen koperdraad zichtbaar. Blootliggende bedrading kan schadelijke elektriciteitsniveaus geleiden naar personen die met de draden in aanraking komen. " 23 Opmerking: Dit systeem werkt met positief geaarde of negatief geaarde DCsystemen. 67 Translated Electrical Safety and Emission Information Normes: ce produit est conforme aux normes de suivantes: "1 Emission d’interférences radioélectriques "2 MISE EN GARDE : dans un environnement domestique, ce produit peut provoquer des interférences radioélectriques. Auquel cas, l’utilisateur devra prendre les mesures adéquates. "3 Immunité EN50082 - 1 1997 "4 Sécurité électrique EN60950, UL 1950, CSA 950 "5 Laser EN60825 EN55022 Classe A SÉCURITÉ 68 "6 ATTENTION Producit laser di classe 1. "7 ATTENTION Ne pas fixer le faisceau des yeux. "8 INFORMATION SUR LES RISQUES ÉLECTRIQUES AVERTISSEMENT: DANGER D’ÉLECTROCUTION Pour éviter toute ÉLECTROCUTION, ne pas ôter le revêtement protecteur du matériel. Ce matériel ne contient aucun élément réparable par l’utilisateur. Il comprend des TENSIONS DANGEREUSES et ne doit être ouvert que par un technicien dûment qualifié. Pour éviter tout risque d’ÉLECTROCUTION, débrancher le matériel avant de connecter ou de déconnecter les câbles LAN. "9 DANGER DE FOUDRE DANGER: NE PAS MANIER le matériel ou les CÂBLES lors d’activité orageuse. " 10 ATTENTION: LE CORDON D’ALIMENTATION SERT DE MISE HORS CIRCUIT. POUR COUPER L’ALIMENTATION DU MATÉRIEL, débrancher le cordon. " 11 ÉQUIPEMENT DE CLASSE 1 ÉLECTRIQUE CE MATÉRIEL DOIT ÊTRE MIS A LA TERRE. La prise de courant doit être branchée dans une prise femelle correctement mise à la terre car des tensions dangereuses risqueraient d’atteindre les pièces métalliques accessibles à l’utilisateur. " 12 EQUIPEMENT POUR BRANCHEMENT ELECTRIQUE, la prise de sortie doit être placée près de l’équipement et facilement accessible". " 13 ATTENTION: Ne pas bloquer les fentes d’aération, ceci empêcherait l’air ambiant de circuler librement pour le refroidissement. " 14 TEMPÉRATURE DE FONCTIONNEMENT: Ce matériel est capable de tolérer une température ambiante maximum de ou 40 degrés Celsius. " 15 POUR TOUS PAYS: Installer le matériel conformément aux normes électriques nationales et locales. " 16 Avertissement: POUR UNE CONNEXION A UNE SOURCE D’ALIMENTATION C.C. CENTRALISEE, L’INSTALLATION DOIT ETRE UNIQUEMENT EFFECTUEE DANS UNE ZONE D’ACCES LIMITE. " 17 Remarque: Un câble de chariot est requis pour connecter la source de courant si l’unité est alimentée par une source de C.C. centralisée. Il doit s’agir d’un câble agréé UL de type TC, d’une puissance de 600 V et de 90 degrés C, avec trois fils conducteurs et un calibre minimum de 14 AWG (norme américaine exprimant la section des fils). " 18 Avertissement: SEUL UN PERSONNEL QUALIFIE ET ENTRAINE EST AUTORISE A INSTALLER OU REMPLACER CET EQUIPEMENT. AT-8216FXL, AT-8224XL, and AT-8288XL Series Installation Guide " 19 Avertissement: Par mesure de sécurité, un disjoncteur de 10 A doit être installé au point d’alimentation électrique du câble devant être utilisé avec cet équipement de réseau local (LAN). Connectez TOUJOURS le câblage à l’équipement LAN avant de le connecter au disjoncteur. Pour éviter tout risque de blessure corporelle par électrocution, ne travaillez pas lorsque le matériel est sous tension. Assurez-vous toujours que le disjoncteur est bien en position d’ARRET avant de le connecter au câblage. " 20 Avertissement: Ne coupez pas une quantité de câble supérieure à celle qui est recommandée. Cela pourrait constituer un risque de sécurité en laissant du câblage à nu sur le bornier après l’installation. " 21 Avertissement: Lors de l’installation de cet équipement, vérifiez toujours que la connexion de terre du châssis est installée en premier et débranchée en dernier. " 22 Avertissement: "Risque de sécurité" Vérifiez qu’aucun fil de cuivre dénudé ne sort du câble installé. Lorsque cette installation est effectuée correctement, aucun fil de cuivre ne devrait dépasser du bornier. Tout câblage dénudé peut être conducteur de tensions dangereuses pour les personnes touchant les câbles. " 23 Remarque: Ce système peut fonctionner avec des systèmes C.C. dotés d’une mise à la terre positive ou négative. Standardit: Tämä tuote on seuraavien standardien mukainen. "1 Radioaaltojen häirintä "2 VAROITUS: Kotiolosuhteissa tämä laite voi aiheuttaa radioaaltojen häiröitä, missä tapauksessa laitteen käyttäjän on mahdollisesti ryhdyttävä tarpeellisiin toimenpiteisiin. "3 Kestävyys EN50082-1 1997 "4 Sähköturvallisuus EN60950, UL 1950, CSA 950 "5 Laser EN60825 EN55022 Luokka A TURVALLISUUS "6 VAROITUS Luokan 1 Lasertuote. "7 VARIOTUS Älä katso säteeseen. "8 SÄHKÖÖN LIITTYVIÄ HUOMAUTUKSIA VAROITUS: SÄHKÖISKUVAARA Estääksesi SÄHKÖISKUN älä poista kantta. Sisällä ei ole käyttäjän huollettavissa olevia osia. Tämä laite sisältää VAARALLISIA JÄNNITTEITÄ ja sen voi avata vain koulutettu ja pätevä teknikko. Välttääksesi SÄHKÖISKUN mahdollisuuden katkaise sähkövirta tuotteeseen ennen kuin liität tai irrotat paikallisverkon (LAN) kaapelit. "9 SALAMANISKUVAARA HENGENVAARA: ÄLÄ TYÖSKENTELE laitteiden tai KAAPELEIDEN KANSSA SALAMOINNIN AIKANA. " 10 HUOMAUTUS: VIRTAJOHTOA KÄYTETÄÄN VIRRANKATKAISULAITTEENA. VIRTA KATKAISTAAN irrottamalla virtajohto. " 11 SÄHKÖ - TYYPPILUOKAN 1 LAITTEET TÄMÄ LAITE TÄYTYY MAADOITTAA. Pistoke täytyy liittää kunnollisesti maadoitettuun pistorasiaan. Virheellisesti johdotettu pistorasia voi altistaa metalliosat vaarallisille jännitteille. 69 Translated Electrical Safety and Emission Information " 12 PISTORASIAAN KYTKETTÄVÄ LAITE; pistorasia on asennettava laitteen lähelle ja siihen on oltava esteetön pääsy." " 13 HUOMAUTUS: Ilmavaihtoreikiä ei pidä tukkia ja niillä täytyy olla vapaa yhteys ympäröivään huoneilmaan, jotta ilmanvaihto tapahtuisi. " 14 KÄYTTÖLÄMPÖTILA: Tämä tuote on suunniteltu ympäröivän ilman maksimilämpötilalle 40°C. " 15 KAIKKI MAAT: Asenna tuote paikallisten ja kansallisten sähköturvallisuusmääräysten mukaisesti. " 16 Varoitus: KESKITETTY TASAVIRTAKYTKENTÄ ASENNETTAVA AINOASTAAN TILAAN, JOHON ON RAJOITETTU PÄÄSY. " 17 Huomaa: Virtalähteen kytkemiseen tarvitaan levykaapeli, jos yksikkö saa tehonsa keskitetystä tasavirtalähteestä. Levykaapelin on oltava UL-luetteloitu tyypin TC levykaapeli ja nimellisarvoiltaan 600 V ja 90 (C, kolmijohtiminen, minimi 14 AWG (American Wire Gauge -lankamitta). " 18 Varoitus: TÄMÄN LAITTEEN SAA ASENTAA TAI VAIHTAA AINOASTAAN KOULUTETTU JA AMMATTITAITOINEN HENKILÖKUNTA. " 19 Varoitus: Tämän LAN-laitteen kanssa käytettävän kaapelin syöttöpäähän tulee turvallisuussyistä asentaa 10 A virrankatkaisin. Yhdistä johdot AINA ensin LAN-laitteeseen ennen virrankatkaisimeen kytkemistä. Sähköiskusta johtuvien vammojen välttämiseksi älä käsittele JÄNNITTEELLISIÄ johtoja. Varmista aina, että virrankatkaisin on pois päältä (OFF) ennen kuin yhdistät johdot katkaisimeen. " 20 Varoitus: Älä poista johtimesta päällystettä enempää kuin on suositeltu. Päällysteen poistaminen suositusta pidemmältä matkalta voi aiheuttaa turvallisuusriskin, sillä riviliittimeen jää asennuksen jälkeen paljaita johtimia. " 21 Varoitus: Kun asennat tätä laitetta, varmista aina, että runkomaadoitettu liitin kytketään ensin ja irrotetaan viimeiseksi. " 22 Varoitus: Turvallisuusriski Tarkista, ettei asennetusta johtimesta näy paljaita kuparisäikeitä. Kun asennus suoritetaan oikein, riviliittimestä ei pitäisi näkyä paljaita kuparijohdinsäikeitä. Paljaat johtimet voivat aiheuttaa sähköiskuvaaran, jos niihin kosketaan. " 23 Huomaa: Tämä järjestelmä toimii positiivisesti tai negatiivisesti maadoitettujen tasavirtajärjestelmien kanssa. Standard: Questo prodotto è conforme ai seguenti standard. "1 Emissione RFI (interferenza di radiofrequenza) "2 AVVERTENZA: in ambiente domestico questo prodotto potrebbe causare radio interferenza. In questo caso potrebbe richiedersi all’utente di prendere gli adeguati provvedimenti. "3 Immunità EN50082-1 1997 "4 Sicurezza elettrica EN60950, UL 1950, CSA 950 "5 Laser EN60825 NORME DI SICUREZZA 70 EN55022 Classe A AT-8216FXL, AT-8224XL, and AT-8288XL Series Installation Guide "6 AVVERTENZA Prodotto laser di Classe 1. "7 AVERTENZA Non fissare il raggio con gli occhi. "8 AVVERTENZE ELETTRICHE ATTENZIONE: PERICOLO DI SCOSSE ELETTRICHE Per evitare SCOSSE ELETTRICHE non asportare il coperchio. Le componenti interne non sono riparabili dall’utente. Questa unità ha TENSIONI PERICOLOSE e va aperta solamente da un tecnico specializzato e qualificato. Per evitare ogni possibilità di SCOSSE ELETTRICHE, interrompere l’alimentazione del dispositivo prima di collegare o staccare i cavi LAN. "9 PERICOLO DI FULMINI PERICOLO: NON LAVORARE sul dispositivo o sui CAVI durante PRECIPITAZIONI TEMPORALESCHE. " 10 ATTENZIONE: IL CAVO DI ALIMENTAZIONE È USATO COME DISPOSITIVO DI DISATTIVAZIONE. PER TOGLIERE LA CORRENTE AL DISPOSITIVO staccare il cavo di alimentazione. " 11 ELETTRICITÀ - DISPOSITIVI DI CLASSE 1 QUESTO DISPOSITIVO DEVE AVERE LA MESSA A TERRA. La spina deve essere inserita in una presa di corrente specificamente dotata di messa a terra. Una presa non cablata in maniera corretta rischia di scaricare una tensione pericolosa su parti metalliche accessibili. " 12 APPARECCHIATURA COLLEGABILE, la presa va installata vicino all’apparecchio per risultare facilmente accessibile". " 13 ATTENZIONE: le prese d’aria non vanno ostruite e devono consentire il libero ricircolo dell’aria ambiente per il raffreddamento. " 14 TEMPERATURA DI FUNZIONAMENTO: Questo prodotto è concepito per una temperatura ambientale massima di 40 gradi centigradi. " 15 TUTTI I PAESI: installare il prodotto in conformità delle vigenti normative elettriche nazionali. " 16 Avvertenza: AI FINI DEL COLLEGAMENTO CENTRALIZZATO DI ALIMENTAZIONE A CC, INSTALLARE SOLO IN UN’AREA AD ACCESSO LIMITATO. " 17 Nota: Se l’unità è alimentata a corrente continua centralizzata, per collegare l’alimentatore è necessario un cavo a piatto di tipo TC, listato UL, avente caratteristiche nominali di tensione e temperatura di 600 V e 90°C, tre conduttori ed un diametro minimo di 14 AWG. " 18 Avvertenza: L’INSTALLAZIONE E LA SOSTITUZIONE DI QUESTA APPARECCHIATURA DEVONO ESSERE EFFETTUATE SOLAMENTE DA PERSONALE SPECIALIZZATO E QUALIFICATO. " 19 Avvertenza: A titolo di cautelativo, installare un interruttore di sicurezza da 10 ampere sull’estremità in entrata del cavo di alimentazione di questa apparecchiatura LAN. Collegare SEMPRE il cablaggio prima all’apparecchiatura LAN e poi all’interruttore. Per evitare i infortuni causati da folgorazione, non lavorare su cavi SOTTO TENSIONE. Prima di collegare il cavo all’interruttore di sicurezza, accertarsi sempre che quest’ultimo sia disinserito. " 20 Avvertenza: Per evitare i possibili pericoli associati all’esposizione dei fili sulla morsettiera dopo l’installazione, non rimuovere l’isolamento oltre le misure specificate. 71 Translated Electrical Safety and Emission Information " 21 Avvertenza: Quando si installa questo apparecchio, accertarsi sempre che il collegamento a massa del telaio sia sempre il primo ad essere effettuato e l’ultimo ad essere scollegato. " 22 Avvertenza: "Pericolo!" Controllare che il filo installato non abbia trefoli in rame esposti. Se l’installazione è stata effettuata in modo corretto, non vi deve protrudere dalla morsettiere alcun trefolo in rame esposto. In caso di contatto, un filo esposto può condurre livelli di elettricità pericolosi a quanti lo tocchino. " 23 Nota: Questo sistema funziona con sistemi a CC con massa positiva o negativa. Sikkerhetsnormer: Dette produktet tilfredsstiller følgende sikkerhetsnormer. "1 RFI stråling "2 ADVARSEL: Hvis dette produktet benyttes til privat bruk, kan produktet forårsake radioforstyrrelse. Hvis dette skjer, må brukeren ta de nødvendige forholdsregler. "3 Immunitet EN50082-1 1997 "4 Elektrisk sikkerhet EN60950, UL 1950, CSA 950 "5 Laser EN60825 EN55022 Klasse A SIKKERHET 72 "6 ADVARSEL Laserprodukt av klasse 1. "7 ADVARSAL Stirr ikke på strålen. "8 ELEKTRISITET ADVARSEL: FARE FOR ELEKTRISK SJOKK For å unngå ELEKTRISK sjokk, må dekslet ikke tas av. Det finnes ingen deler som brukeren kan reparere på innsiden. Denne enheten inneholder FARLIGE SPENNINGER, og må kun åpnes av en faglig kvalifisert tekniker. For å unngå ELEKTRISK SJOKK må den elektriske strømmen til produktet være avslått før LANkablene til- eller frakobles. "9 FARE FOR LYNNEDSLAG FARE: ARBEID IKKE på utstyr eller KABLER i TORDENVÆR. " 10 FORSIKTIG: STRØMLEDNINGEN BRUKES TIL Å FRAKOBLE UTSTYRET. FOR Å DEAKTIVISERE UTSTYRET, må strømforsyningen kobles fra. " 11 ELEKTRISK - TYPE 1- KLASSE UTSTYR DETTE UTSTYRET MÅ JORDES. Strømkontakten må være tilkoplet en korrekt jordet kontakt. En kontakt som ikke er korrekt jordet kan føre til farlig spenninger i lett t ilgjengelige metalldeler. " 12 UTSTYR FOR STIKKONTAKT. Stikkontakten skal monteres i nærheten av utstyret og skal være lett tilgjengelig." " 13 FORSIKTIG: Lufteventilene må ikke blokkeres, og må ha fri tilgang til luft med romtemperatur for avkjøling. " 14 DRIFTSTEMPERATUR: Dette produktet er konstruert for bruk i maksimum romtemperatur på 40 grader celsius. " 15 ALLE LAND: Produktet må installeres i samsvar med de lokale og nasjonale elektriske koder. " 16 Advarsel: VED TILKOPLING TIL ET LIKESTRØMSNETT, SKAL DU BARE MONTERE UTSTYRET PÅ ET STED HVOR UVEDKOMNE IKKE HAR ADGANG. AT-8216FXL, AT-8224XL, and AT-8288XL Series Installation Guide " 17 Merknad: En kanalkabel er nødvendig for å kople til strømkilden hvis enheten drives av strøm fra et likestrømsnett. Kanalkabelen må være utstyrt med UL-merke med type TC, normert for 600 V og 90 ºC med tre ledere som har en tykkelse på minst 14 AWG (amerikansk ledningsmål). " 18 Advarsel: DETTE UTSTYRET SKAL BARE MONTERES ELLER SKIFTES UT AV KVALIFISERT PERSONELL SOM HAR GJENNOMGÅTT OPPLÆRING. " 19 Advarsel: Av sikkerhetshensyn bør en automatsikring på 10 A monteres i forsyningsenden av kabelen som skal brukes sammen med dette LAN-utstyret. Du skal ALLTID først kople ledningene til LAN-utstyret før du kopler ledningene til automatsikringen. Arbeid aldri med ledninger uten at strømmen er slått av, ettersom det ellers kan være fare for personskader som følge av elektrisk støt. Pass alltid på at automatsikringer er slått AV før du kopler ledningene til automatsikringen. " 20 Advarsel: Du skal ikke avisolere mer av ledningen enn det som er anbefalt. Dersom du avisolerer mer enn det som er anbefalt, kan dette forårsake en sikkerhetsfare, ettersom det vil finnes uisolert ledning på rekkeklemmen etter montering. " 21 Advarsel: Når du monterer dette utstyret, skal du alltid passe på at forbindelsen til rammejordingen monteres først og koples fra sist. " 22 Advarsel: "Sikkerhetsfare" Kontroller om uisolerte koppertråder stikker ut av den monterte ledningen. Hvis monteringen er riktig utført, skal det ikke finnes uisolerte kobbertråder som stikker ut fra rekkeklemmen. Uisolerte ledninger kan lede skadelige mengder strøm til personer som berører ledningene. " 23 Merknad: Systemet fungerer med positivt og negativt jordede likestrømssystemer. Padrões: Este produto atende aos seguintes padrões. "1 Emissão de interferência de radiofrequência EN55022 Classe A "2 AVISO: Num ambiente doméstico este produto pode causar interferência na radiorrecepção e, neste caso, pode ser necessário que o utente tome as medidas adequadas. "3 Imunidade EN50082-1 1997 "4 Segurança Eléctrica EN60950, UL 1950, CSA 950 "5 Laser EN60825 SEGURANÇA "6 AVISO Produto laser de classe 1 "7 AVISO Não olhe fixamente para o raio. "8 AVISOS SOBRE CARACTERÍSTICAS ELÉTRICAS ATENÇÃO: PERIGO DE CHOQUE ELÉTRICO Para evitar CHOQUE ELÉTRICO, não retire a tampa. Não contém peças que possam ser consertadas pelo usuário. Este aparelho contém VOLTAGENS PERIGOSAS e só deve ser aberto por um técnico qualificado e treinado. Para evitar a possibilidade de CHOQUE ELÉTRICO, desconecte o aparelho da fonte de energia elétrica antes de conectar e desconectar os cabos da LAN. "9 PERIGO DE CHOQUE CAUSADO POR RAIO PERIGO: NÃO TRABALHE no equipamento ou nos CABOS durante períodos suscetíveis a QUEDAS DE RAIO. 73 Translated Electrical Safety and Emission Information " 10 CUIDADO: O CABO DE ALIMENTAÇÃO É UTILIZADO COMO UM DISPOSITIVO DE DESCONEXÃO. PARA DESELETRIFICAR O EQUIPAMENTO, desconecte o cabo de ALIMENTAÇÃO. " 11 ELÉTRICO - EQUIPAMENTOS DO TIPO CLASSE 1 DEVE SER FEITA LIGAÇÃO DE FIO TERRA PARA ESTE EQUIPAMENTO. O plugue de alimentação deve ser conectado a uma tomada com adequada ligação de fio terra. Tomadas sem adequada ligação de fio terra podem transmitir voltagens perigosas a peças metálicas expostas. " 12 EQUIPAMENTO DE LIGAÇÃO, a tomada eléctrica deve estar instalada perto do equipamento e ser de fácil acesso." " 13 CUIDADO: As aberturas de ventilação não devem ser bloqueadas e devem ter acesso livre ao ar ambiente para arrefecimento adequado do aparelho. " 14 TEMPERATURA DE FUNCIONAMENTO: Este produto foi projetado para uma temperatura ambiente máxima de 40 graus centígrados. " 15 TODOS OS PAÍSES: Instale o produto de acordo com as normas nacionais e locais para instalações elétricas. " 16 Aviso: PARA UMA LIGAÇÃO CC CENTRALIZADA, INSTALE APENAS NUMA ZONA DE ACESSO RESTRITO. " 17 Nota: É necessário um cabo de bandeja para ligar a fonte de energia se a unidade for alimentada por um fonte CC centralizada. O cabo de bandeja deve fazer parte da lista UL do Tipo TC cabo de bandeja para 600 V e 90 graus C, com três condutores, com um mínimo de 14 AWG. " 18 Aviso: SÓ PESSOAL TREINADO E QUALIFICADO PODE INSTALAR OU SUBSTITUIR ESTE EQUIPAMENTO. " 19 Aviso: Como medida de precaução, deve instalar-se um disjuntor de 10 Amp na extremidade de alimentação do cabo a ser usado com este equipamento LAN. Ligue SEMPRE os cabos ao equipamento LAN primeiro antes de os ligar ao disjuntor. Para evitar o perigo de ferimentos por choque eléctrico, não trabalhe com alimentadores LIGADOS. Verifique sempre se o disjuntor está na posição OFF (desligado) antes de ligar os cabos ao mesmo. 74 " 20 Aviso: Não corte mais fio do que recomendado. Cortar mais do que o recomendado pode ser perigoso, por deixar fio exposto no terminal depois da instalação. " 21 Aviso: Ao ligar este equipamento, instale sempre primeiro a ligação à terra e desligue-a sempre em último. " 22 Aviso: "Perigo" Verifique se há algum fio de cobre exposto a sair do fio instalado. Quando esta instalação é feita correctamente não deve haver qualquer fio de cobre exposto a sair do terminal. Qualquer fio exposto pode conduzir níveis perigosos de electricidade para a pessoa que toque nos fios. " 23 Nota: Este sistema funciona com sistemas CC com ligações à terra Positivas ou Negativas. AT-8216FXL, AT-8224XL, and AT-8288XL Series Installation Guide Estándares: Este producto cumple con los siguientes estándares. "1 Emisión RFI "2 ADVERTENCIA: en un entorno doméstico, este producto puede causar radiointerferencias, en cuyo caso, puede requerirse del usuario que tome las medidas que sean convenientes al respecto. "3 Inmunidad EN50082-1 1997 "4 Seguridad eléctrica EN60950, UL 1950, CSA 950 "5 Laser EN60825 EN55022 Clase A SEGURIDAD "6 ¡ADVERTENCIA! Producto láser Clase 1. "7 ¡ADVERTENCIA! No mirat fijamente el haz. "8 AVISOS ELECTRICOS ADVERTENCIA: PELIGRO DE ELECTROCHOQUE Para evitar un ELECTROCHOQUE, no quite la tapa. No hay ningún componente en el interior al cual puede prestar servicio el usuario. Esta unidad contiene VOLTAJES PELIGROSOS y sólo deberá abrirla un técnico entrenado y calificado. Para evitar la posibilidad de ELECTROCHOQUE desconecte la corriente eléctrica que llega al producto antes de conectar o desconectar los cables LAN. "9 PELIGRO DE RAYOS PELIGRO: NO REALICE NINGUN TIPO DE TRABAJO O CONEXION en los equipos o en LOS CABLES durante TORMENTAS ELECTRICAS. " 10 ATENCION: EL CABLE DE ALIMENTACION SE USA COMO UN DISPOSITIVO DE DESCONEXION. PARA DESACTIVAR EL EQUIPO, desconecte el cable de alimentación. " 11 ELECTRICO - EQUIPO DEL TIPO CLASE 1 ESTE EQUIPO TIENE QUE TENER CONEXION A TIERRA. El cable tiene que conectarse a un enchufe a tierra debidamente instalado. Un enchufe que no está correctamente instalado podría ocasionar tensiones peligrosas en las partes metálicas que están expuestas. " 12 EQUIPO CONECTABLE, el tomacorriente se debe instalar cerca del equipo, en un lugar con acceso fácil". " 13 ATENCION: Las aberturas para ventilación no deberán bloquearse y deberán tener acceso libre al aire ambiental de la sala para su enfriamiento. " 14 TEMPERATURA REQUERIDA PARA LA OPERACIÓN: Este producto está diseñado para una temperatura ambiental máxima de 40 grados C. " 15 PARA TODOS LOS PAÍSES: Monte el producto de acuerdo con los Códigos Eléctricos locales y nacionales. " 16 Advertencia: PARA HACER CONEXIONES DE CC CENTRALIZADAS, INSTALE EL CONMUTADOR ÚNICAMENTE EN LUGARES CON ACCESO RESTRINGIDO. " 17 Nota: Para conectar la fuente de alimentación, se necesita un cable de bastidor si el aparato es activado por una fuente de alimentación de CC. El cable de bastidor debe figurar en la lista de UL, ser de tipo TC, tener una clasificación de 600 V y 90 grados C, y disponer de tres conductores con un mínimo de 14 según el Patrón de Medidas Estadounidense (AWG - American Wire Gage). 75 Translated Electrical Safety and Emission Information " 18 Advertencia: ÚNICAMENTE EMPLEADOS CAPACITADOS Y COMPETENTES TIENEN LA AUTORIZACIÓN DE INSTALAR O REPONER DICHO EQUIPO. " 19 Advertencia: Por razones de precaución, se debe instalar un cortacircuitos de 10 amperios en el extremo de alimentación del cable que se utilizará con este equipo LAN. SIEMPRE conecte los cables al equipo LAN primero, antes de conectarlos al cortacircuitos. Para evitar el peligro de sufrir daños corporales a causa de sacudidas eléctricas, no trabaje con conductores CON CORRIENTE. Asegúrese siempre de que el cortacircuitos esté en la posición de APAGADO (OFF) antes de conectar los cables al cortacircuitos. " 20 Advertencia: No pele el cable más de la cantidad recomendada, ya que si después de instalar el bloque terminal quedan cables pelados, habrá riesgos de seguridad. " 21 Advertencia: Cuando instale dicho equipo, asegúrese siempre de que el bastidor se conecte a tierra primero y se desconecte por último. " 22 Advertencia: "Riesgo de seguridad" Cerciórese de que no haya hilos de cobre pelados que salgan del alambre instalado. Cuando dicha instalación se realiza correctamente, los hilos de cobre pelados no deben salir del bloque terminal. Todo alambre pelado puede conducir niveles de electricidad nocivos a la persona que lo toca. " 23 Nota: Este sistema funcionará con sistemas de CC con conexión positiva o negativa a tierra. Standarder: Denna produkt uppfyller följande standarder. "1 Radiostörning "2 VARNING: Denna produkt kan ge upphov till radiostörningar i hemmet, vilket kan tvinga användaren till att vidtaga erforderliga åtgärder. "3 Immunitet EN50082-1 1997 "4 Elsäkerhet EN60950, UL 1950, CSA 950 "5 Laser EN60825 EN55022 Klass A SÄKERHET 76 "6 VARNING! Laserprodukt av klass 1. "7 VARNING! Laserstrålning när enheten är öppen. "8 TILLKÄNNAGIVANDEN BETRÄFFANDE ELEKTRICITETSRISK: RISK FÖR ELEKTRISK STÖTFör att undvika ELEKTRISK stöt, ta ej av locket. Det finns inga delar inuti som behöver underhållas. Denna apparat är under HÖGSPÄNNING och får endast öppnas av en utbildad kvalificerad tekniker. För att undvika ELEKTRISK STÖT, koppla ifrån produktens strömanslutning innan LAN-kablarna ansluts eller kopplas ur. "9 FARA FÖR BLIXTNEDSLAG FARA: ARBETA EJ på utrustningen eller kablarna vid ÅSKVÄDER. " 10 VARNING: NÄTKABELN ANVÄNDS SOM STRÖMBRYTARE FÖR ATT KOPPLA FRÅN STRÖMMEN, dra ur nätkabeln. AT-8216FXL, AT-8224XL, and AT-8288XL Series Installation Guide " 11 ELEKTRISKT - TYP KLASS 1 UTRUSTNING DENNA UTRUSTNING MÅSTE VARA JORDAD. Nätkabeln måste vara ansluten till ett ordentligt jordat uttag. Ett felaktigt uttag kan göra att närliggande metalldelar utsätts för högspänning. Apparaten skall anslutas till jordat uttag, när den ansluts till ett nätverk. " 12 UTRUSTNING MED PLUGG. Uttaget skall installeras i utrustningens närhet och vara lättåtkomligt". " 13 VARNING: Luftventilerna får ej blockeras och måste ha fri tillgång till omgivande rumsluft för avsvalning. " 14 DRIFTSTEMPERATUR: Denna produkt är konstruerad för rumstemperatur ej överstigande 40 grader Celsius. " 15 ALLA LÄNDER: Installera produkten i enlighet med lokala och statliga bestämmelser för elektrisk utrustning. " 16 Varning: ANSLUTNING TILL LIKSTRÖMSNÄT FÅR ENDAST SKE I LOKAL DÄR OBEHÖRIGA EJ ÄGER TILLTRÄDE. " 17 Anmärkning: Kanalkabel krävs för att ansluta strömkällan om enheten ansluts till likströmsnät. Kanalkabeln måste vara UL-märkt och av TC-typ. Kabeln måste ha en märkspänning på 600 V och en märktemperatur på 90 grader Celsius samt ha tre ledare med en tjocklek på minst 14 AWG (amerikanskt ledningsmått). " 18 Varning: INSTALLATION OCH UTBYTE AV DENNA UTRUSTNING FÅR ENDAST UTFÖRAS AV AUKTORISERAD ELINSTALLATÖR. " 19 Varning: Av säkerhetsskäl skall en 10 A automatsäkring anslutas till försörjningsänden på kabeln som används till denna LAN-utrustning. Ledningar skall ALLTID anslutas till LAN-utrustningen innan ledningarna ansluts till automatsäkringen. För att förebygga uppkomsten av personskador orsakade av elektrisk stöt skall man inte vidröra strömförande uttag. Kontrollera alltid att automatsäkringen är i läget OFF (AV) innan anslutning av ledningar till automatsäkringen sker. " 20 Varning: Skala inte av mer isolering än vad som anges ovan. Skalas för mycket isolering av kan fara uppstå om oskyddad tråd vidröras på anslutningsplinten efter anslutningen. " 21 Varning: Vid anslutning av denna utrustning skall man alltid se till att jordtråden ansluts först och lossas sist. " 22 Varning: OBS! FARA! Kontrollera om små koppartrådar sticker ut ifrån den anslutna tråden. Om anslutningen utförts riktigt sticker inga trådar ut från anslutningsplinten. Oisolerade trådar kan överföra skadlig elektricitet till person som vidrör trådarna. " 23 Anmärkning: Detta system fungerar både med positivt och negativt jordade likströmskällor. 77 Index A AC connector, 23 ACTIVITY/LINK LED, 41 architecture clear-channel, 18 auto-negotiation, 18 B BootP, 18 C cabling requirements, 33, 47 clear-channel architecture, 18 configuration, 25 conventions, document, 8 D DC terminal block, 22, 57 desktop installation, switch, 34 DHCP support, 18 diagnostics, running, 51 distances, cabling, 33, 47 duplex mode full-, 18 half-, 18 DUPLEX/COLLISION LED, 41 E expansion modules, 20, 38 F Fault LED, 41, 51 flash memory, 18 full-duplex, 18 I IEEE 802.1Q compliant, 18 installation expansion module, 38 safety precautions, 31 switch, 19-inch rack, 36 switch, desktop, 34 L LED descriptions, 41 DUPLEX/COLLISION, 41 Fault, 41 LINK/ACTIVITY, 41 port, 22 PWR, 41, 50 RPS, 41 system, 23 LINK/ACTIVITY LED, 41 local managment, Omega, 40 M management local, Omega, 40 network features, 19 out-of-bandwith, 23 management information base (MIB), 19 N network management features, 19 O Omega, 19, 40, 46 out-of-band management, 23 H half-duplex, 18 hardware features, 16 79 Index P physical description, 20 port LEDs, 22 power failure, 50 problems, troubleshooting, 46 Protocol, Spanning Tree, 19 publications, list of, 9 PWR LED, 41, 50 R rack installation, 36 remote connection, Telnet, 51 RESET button, 23, 46, 51 resetting through software, 51 RJ-45 pin assignments, 54 RPS LED, 41 RS232 connector, 23 S safety precautions, 31 SNMP Management Information Base, 19 SNMP traps from switch, TCP/IP, 49 software resetting the switch, 51 Spanning Tree Protocol, 19 specifications, technical, 53 standalone switch, 25 switch 19-inch rack installation, 36 desktop installation, 34 system LEDs, 23, 41 T TCP/IP, 49 Technical Support, 10, 48 Telnet, remote connection via, 51 troubleshooting, 45 U uplink slots, 20 W workgroup switch, 26 Worst Case Path Delay Value, 47 80