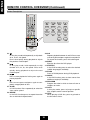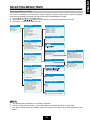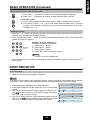
1
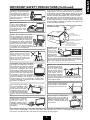
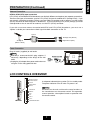
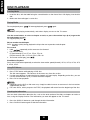
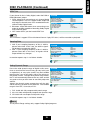
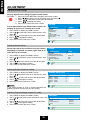
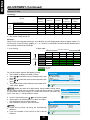
ML-3251HLT
LCD TV
OWNER' S MANUAL
IMPORTANT:
The serial number of this product may be found on the back of the
unit. You should record the number and other vital information here
and retain this manual as a permanent record to aid identification in
case of theft. Serial numbers are not kept on file.
Model No: ML-3251HLT
Serial No:
IMPORTANT INFORMATION
WARNING: TO REDUCE THE RISK OF FIRE OR ELECTRIC SHOCK,DO
NOT EXPOSE THIS PRODUCT TO RAIN OR MOISTURE.
RISK OF ELECTRIC SHOCK
DO NOT OPEN
CAUTION: TO REDUCE THE RISK OF ELECTRIC SHOCK,
DO NOT REMOVE COVER
NO USER-SERVICEABLE PARTS INSIDE.
REFER SERVICING TO QUALIFIED SERVICE PERSONNEL
The lightning flash with arrowhead symbol, within triangle, is intended
to alert the user to the presence of uninsulated "dangerous voltage
within the product's enclosure that may be of sufficient magnitude to
constitute a risk of electric shock to persons
The exclamation point within a triangle is intended to alert the user the
presence of important operating and maintenance (servicing) instruction accompanying the product.
1
ENGLISH
ML-3251HLT
ENGLISH
IMPORTANT INFORMATION
WARNING: FCC Regulations state that any unauthorized changes or modifications to this equipment not approved by the manufacturer could void the user's authority to operate this
equipment.
CAUTION : TO PREVENT ELECTRIC SHOCK, MATCH WIDE BLADE OF PLUG TO WIDE SLOT,
FULLY INSERT.
SERVICE INSTRUCTIONS:
No user-serviceable parts inside, refer servicing to qualified service personnel.
"Note to CATV SYSTEM installer. This reminder is provided to call CATV system installer's attention to
Article 820-40 of the National Electrical Code that provides guidelines for proper grounding and, in
particular, specifies that the cable ground has to be connected to the grounding system of the
building, as close to the point of cable entry as practical."
This product utilizes tin-lead solder, and fluorescent lamp containing a small amount of mercury.
Disposal of these materials may be regulated due to environmental considerations. For disposal or
recycling information, please contact your local authorities .
IMPORTANT SAFETY PRECAUTIONS
Servicing - Do not attempt to service the product yourself.
Removing covers can expose you to high voltage and other
dangerous conditions. Request a qualified service person to
perform servicing.
Electricity is used to perform many useful functions, but it can
also cause personal injuries and property damage if improperly
handled . This product has been engineered and manufactured
with safety being the highest as a priority. However, improper
use can result in personal injury and / or property damage.
Repair - If any of the following conditions occurs, unplug the
power cord from the AC outlet, and request a qualified service
person to perform repairs.
Read instructions - All operating instructions must be read and
understood before the product is operated.
a. When the power cord or plug is damaged.
b. When a liquid was spilled on the product or when objects have
fallen into the product.
c. When the product has been exposed to rain or water.
d. When the product does not operate properly as described in
the operating instructions.
Keep this manual in a safe place - These safety and operating
instructions must be kept in a safe place for future reference.
Observe warnings - All warnings on the product and in the instructions must be observed closely.
Follow instructions - All operating instructions must be followed.
Do not touch the controls other than those described in the
operating instructions. Improper adjustment of controls not described in the instructions can cause damage, which often requires extensive adjustment work by a qualified technician.
Attachments - Do not use attachments not recommended by the
manufacturer. Use of inadequate attachments can result in
accidents.
Power source - This product must be operated on a power source
specified on the specification label. If you are not sure of the
type of power supply used in your home, consult your dealer or
local power company. For units designed to operate on batteries
or another power source, refer to the operating instructions.
e. When the product has been dropped or damaged.
f . When the product displays an abnormal picture.
g. Any noticeable abnormality in the product.
Replacement parts - In case the product needs replacement
parts, make sure that the service person uses replacement
parts specified by the manufacturer.
Power cord protection - The power cords must be routed properly
to prevent people from stepping on them or objects from resting
on them.
Safety check - Upon completion of service or repair work, request the service technician to perform safety check to ensure
that the product is in proper operating condition.
If the AC adapter is misplaced or needs to be replaced, obtain the
same type of adapter from our service center or your dealer.
Wall or ceiling mounting - When mounting the product on a wall or
ceiling, be sure to install the product according to the method
recommended by the manufacturer.
Overloading - Do not overload AC outlets or extension cords.
Polarization - This AC adapter may be equipped with a polarized
alternating current line plug (a plug having one blade wider than
the other). This plug will fit into the power outlet only one way .
This is a safety feature. If you are unable to insert the plug fully
into the outlet, try reversing the plug. If the plug still doesn't fit,
contact your electrician to replace your obsolete Outlet.
Do not alter the safety purpose of the polarized plug.
Overloading can cause fire or electric shock.
Entering of external objects and liquids - Never insert an object
into the product through vents or openings. High voltage flows in
the product. Inserting objects can cause electric shock and/or
short circuit internal parts. Also, do not spill water, or any other
liquid on the product.
2
Cleaning - Unplug the power
cord from the AC outlet before cleaning the product. Use
a damp cloth to clean the
product. Do not use liquid or
aerosol Cleaners.
Water and moisture - Do
not use the product near
water, such as bathtub,
washbasin, kitchen sink
and laundry tub, swimming pool and in a wet
basement.
If an outside antenna is connected to the television
equipment, be sure the antenna system is grounded so
as to provide some protection against voltage surges and
built-up static charges. Section 810 of the Nation Electrical Code provides information with respect to proper
grounding of the mast and supporting structure, grounding of the lead-in wire to an antenna discharge unit, size
of grounding conductors, location of antenna-discharge
unit, connection to grounding electrode, and requirement
for the grounding electrode.
EXAMPLE OF ANTENNA GROUNDING AS PER NATIONAL
ELECTRICALCODE
ANTENNA
LEAD IN
WIRE
GROUND
CLAMP
ANTENNA
DISCHARGE UNIT
(NEC SECTION 810-20)
Stand - Do not place the product
on an unstable cart, stand, tripod
or table. Placing the product on an
unstable base can cause the product to fall, resulting in serious personal injuries as well as damage to
the product. Use only a cart, stand,
tripod, bracket or table recommended by the manufacturer's
instruction. Use only the mounting hardware recommended by the manufacturer.
ELECTRIC
SERVICE
EQUIPMENT
GROUNDING CONDUCTORS
(NEC SECTION 810-21)
GROUND CLAMPS
POWER SERVICE GROUNDING
ELECTRODE SYSTEM
(NEC ART 250,PART H)
Lightning - For
added protection for this
television
equipment
during a lightning storm, or
when it is left unattended and unused for long period
of time, unplug it from the wall outlet and disconnect
the antenna. This will prevent damage to the equipment due to lightning and power-line surge.
When relocating the product,
place it on a cart. It must be
moved with utmost care.
Sudden stops, excessive
force and uneven floor surface can cause the product
to fall from the cart.
Ventilation - The vents and other
openings in the cabinet are designed
for ventilation. Do not cover or block
these vents and openings since insufficient ventilation can cause
overheatings and/or shorten the life
of the product. Do not place the product on a bed, sofa, rug or other similar surface, since they can block
ventilation openings. This product is not designed for
built-in installations; do not place the product in an
enclosed place such as a bookcase or rack, unless
proper ventilation is provided or the manufacturer's
instruction is followed.
Power Lines - An outside antenna system should not
be located in the vicinity of overhead power
lines or other electric
light or power circuits,
or where it can fall into
such power lines or
circuits. When installing
an outside antenna
system, extreme care should be taken to keep from
touching such power lines or circuits as contact with
them might be fatal.
To prevent fire, never place any
type of candle or naked flames
on the top or near the TV set.
The Liquid Crystal panel
used in this product is made
of glass, Therefore, it can
break when the product is
dropped or when pressure
is applied. Be careful not to
injure yourself from broken
glass in case the Liquid Crystal Panel breaks.
To prevent fire or shock hazard,
do not expose this product to
dripping or splashing liquids. No
objects filled with liquids, such
as vases, should be placed on
the product.
Heat sources - Keep the
product away from heat
sources such as
radiators, heaters, stoves,
and other heat-generating
products (including
amplifiers).
The Liquid Crystal panel is a very high tech product which includes 921,600 thin film transistors, giving you fine
picture details. Occasionally, a few non-native pixels may appear on the screen as a fixed point of blue, green or
red. Please note that this does not affect the performance of your product.
3
ENGLISH
IMPORTANT SAFETY PRECAUTIONS (Continued)
ENGLISH
IMPORTANT SAFETY INSTRUCTIONS
1)
2)
3)
4)
5)
6)
7)
8)
9)
10)
11)
12)
13)
14)
15)
16)
17)
Read these instructions thoroughly.
Keep these instructions for future reference.
Heed all warnings.
Follow all instructions.
Do not use this apparatus near water.
Clean only with dry cloth.
Do not block any ventilation openings. Install in accordance with the manufacturer’s instructions.
Do not install near any heat sources such as radiators, heat registers, stoves, or other apparatus
(including amplifiers) that produce heart.
Do not alter the plug. A polarized plug has two blades with one wider than the other. A grounding type
plug has two blades and a third grounding prong. The wide blade or the third prong are provided for
your safety. IF the provided plug does not fit you’re your outlet, consult an electrician for replacement
of the obsolete outlet.
Protect the power cord from being walked on or pinched particularly at plugs, convenience
receptacles, and the point where they exit from the apparatus.
Only use attachments/accessories specified by the manufacturer.
Use only with the cart, stand, tripod, bracket, or table specified by the manufacturer,
or sold with the apparatus. When a cart is used, use caution when moving the cart/
apparatus combination to avoid injury from tip-over.
Unplug this apparatus during lightning storms or when unused for long periods of
time.
Refer all servicing to qualified service personnel. Servicing is required when the
apparatus has been damaged in any way, such as when power-supply cord or plug is damaged,
liquid has been spilled or objects have fallen into the apparatus, the apparatus has been exposed
to rain or moisture, does not operate normally, or has been dropped.
WARNING: TO reduce the risk of fire or electric shock, do not expose this apparatus to rain or
misture.
Apparatus shall not be exposed to dripping or splashing liquids and no objects filled with liquids,
such as vases, shall be placed on the apparatus.
CAUTION - Danger of explosion if battery is improperly replaced. Replace only with the same or
equivalent type.
Use of controls or the performance of procedures other than those specified
may result in hazardous radiation exposure.
This appliance is classified as a CLASS 1 LASER product. The CLASS 1
LASER PRODUCT marking is located on the rear panel.
To prevent direct exposure to laser beam, do not try to open the enclosure.
Visible and invisible laser radiation when open and interlocks defeated.
Do not stare into beam
This product contains a low power laser device. To ensure continued safety, do not remove any cover
or attempt to gain access to the inside of the product.
This symbol is known as the “Crossed-out Wheelie Bin Symbol”, when this symbol is
marked on a product, it means that the product should not be disposed of with your
general household waste. Only discard electrical/electronic items in separate collection
schemes which cater for the recovery and recycling of the materials contained within.
Your co-operations is vital to ensure the success of these schemes and for the protection
of the environment.
4
IMPORTANT INFORMATION ................................................................................................................. 1-2
IMPORTANT SAFETY PRECAUTIONS .................................................................................................. 2-3
IMPORTANT SAFETY INSTRUCTIONS ................................................................................................. 4-4
CONTENTS .......................................................................................................................................... 5-5
INTRODUCTION ................................................................................................................................... 5-5
SUPPLIED ACCESSORIES .................................................................................................................. 6-6
PREPARATION ...................................................................................................................................... 6-7
LCD CONTROL OVERVIEW ................................................................................................................. 7-7
CONNECTORS OVERVIEW ................................................................................................................. 8-8
REMOTE CONTROL OVERVIEW ....................................................................................................... 9-10
CONNECTING EXTERNAL DEVICES .............................................................................................. 11-12
SELECTING MENU ITEMS ............................................................................................................... 13-14
BASIC OPERATION ........................................................................................................................... 14-15
FIRST-TIME SETUP .......................................................................................................................... 15-15
DISC PLAYBACK ............................................................................................................................... 16-19
ADJUSTMENTS ................................................................................................................................ 20-24
TROUBLESHOOTING ...................................................................................................................... 25-26
SPECIFICATIONS ............................................................................................................................. 26-28
INTRODUCTION
Congratulations on purchasing the Maxent ML-3251HLT 32" LCD-TV with built-in DVD player. The ML3251HLT is an advanced home entertainment product that provides convenient viewing of DVDs and
other media. It can also be used with VCRs, games consoles and can even function as a PC monitor.
Features
Integrated LCD display and DVD player
Large 32-inch LCD screen; Stereo speakers
Supports diverse media and formats: (80mm disc not avaiable)
DVD (+R, -R, +RW, -RW; NTSC)
Video CD (VCD 2.0, SVCD), Audio CD (CD-DA), CD-R, CD-RW
DVD navigation functions
Supports component video (S-Video) and composite video
OSD menu display
Full function remote control
NOTE
You cannot play CD-G, CD-EXTRA, computer CD-ROM, or DVD-ROM discs.
You cannot play illegally produced discs.
You cannot play badly scratched discs.
You cannot play discs that are dusty, soiled or marked with fingerprints.
This unit does not support DTS audio encoded DVD discs. If playing back a DTS encoded sound track
,please use Dolby Digital track for audio.
5
ENGLISH
CONTENTS
ENGLISH
SUPPLIED ACCESSORIES
Make sure the following accessories are included in the product packaging.
1. Remote Control x 1
2. “AAA” Size Battery x 2
3. Instruction Manual x 1
4. Quick Start Guide x 1
5. Warranty Card x 1
Quick Start Guide
WARRANTY
User @Manua l
AAA Size Battery
Remote Control
Instruction
Manual
Quick Start Guide
Warranty
Carde
PREPARATION
Using the Remote Control
Use the remote control by pointing it towards the remote control sensor window on the main unit. Objects
between the remote control and sensor window may prevent proper operation.
Cautions regarding use of the remote control
Do not expose the remote control to shock.
In addition, do not expose the remote control to liquid, and do not place in an area with high humidity.
Do not install or place the remote control under direct sunlight. The heat may cause deformation of
the unit.
The remote control may not work properly if the remote control sensor window of the main unit is
under direct sunlight or strong lighting. In such case, change the angle of the lighting or LCD TV set,
or operate the remote control closer to the remote control sensor window.
Installing the Batteries
Before using the LCD TV set for the first time, insert 2 "AAA" size batteries into the remote control
(supplied). When the batteries become depleted and the remote control fails to operate, replace the
batteries with new (AAA size) batteries.
1 Press cover edge & pull it to
open the battery cober
2 Insert both batteries noting
the polarity markings.
3 Press the battery cover
down.
Caution !
Cautions regarding batteries
Improper use of batteries can result in chemical leakage and/or explosion. Be sure to follow the instruction below:
Insert batteries with their terminals corresponding to the (+) and (-) as indicated in the compartment.
Different types of batteries have different characteristics. Do not mix batteries of different types.
Do not mix old and new batteries. Mixing old and new batteries can shorten the life of new batteries and
/or cause the old battery to leak.
Remove batteries when they become weak. Chemicals the leak from batteries can cause a rash. If
chemical leakage is found, wipe clean with a cloth.
The batteries supplied with the product may have shorter life expectancy due to storage conditions.
If the remote control will not be used for an extended period of time, remove the batteries from the
remote control.
6
ENGLISH
PREPARATION (Continued)
Antenna Connection
NTSC & ATSC (DTV) input connection
DTV (ATSC) and traditional NTSC broadcasts are distinctly different and requires two separate connections.
There are two types of connectors: one for DTV (ATSC) and one for traditional TV (Analog NTSC). If you
are currently subscribing to regular TV from your local cable TV provider or via an antenna, use the Analog
(NTSC) connector to receive regular TV broadcasts. If you are receiving DTV (ATSC) through your local
cable provider or via an over-the-air antenna, use the DTV (ATSC) connector.
If you wish to use one antenna to receive both NTSC and DTV (ATSC) broadcasts, you must use a
“Splitter” to divide your connection to feed signal into both connectors on the TV.
Splitter
Analog Tuner (NTSC)
Digital Tuner (DTV)
Air Signal
(NTSC + ATSC)
Power Connection
Plug AC cords (supplied) to wall outlet.
NOTE
Use only a recommended AC plug adapter, if
necessary, depending on the design of the wall
outlet.
Unplug the AC adapter from power outlet when not
using the TV for a long period of time.
LCD CONTROLS OVERVIEW
OPEN/CLOSE
PLAY/PAUSE
STOP
PREVIOUS
NEXT
SOURCE
MENU
SOURCE
ME NU
CH
CH
CH
_
V OL
_
CH _
V OL
VOL
SOURCE
MENU
CH +
CH VOL+
A red power indicator lights up when TV is in standby mode.
The power indicator turns off when TV power is on.
NOTE
All buttons on the main unit have the same functions as
the same buttons on the remote control. This operation
manual provides a description based on operation with
the remote control.
VOL _
VOLPOWER ON/OFF
7
ENGLISH
CONNECTORS OVERVIEW
1. ANALOG TUNER ANTENNA
Connect to antenna plug with UHF/VHF antenna or cable system.
2. DIGITAL TUNER ANTENNA
Connect to antenna plug with ATSC system.
3. PC IN
Connect to the video output jack on your PC. Connect to audio out of your PC.
4. COMPONENT IN
Connect the component video input terminal to the component output terminal of the video out device.
Connect the audio input terminal to the audio output terminal of the video output device.
5. AV IN
Connect to a source with composite or S-VIDEO out jack of your video equipment that has composite
or S-VIDEO.
Connect the audio input terminal to the audio output terminal of the video output device.
6. AUDIO OUT
Connect to the left and right audio input jacks of your audio amplifier. You can use these outputs to
listen to your TV's audio through your stereo system.
7. SPDIF OUT
Connect to the coaxial audio input of a digital audio equipment that is PCM/DOLBY digital compatible.
(Coaxial out is only available for digital channels)
8. SUBW
Connect to a source with amplifier dealing with subwoofer input.
9. HDMI
HDMI (High-Definition Multimedia Interface) provides an uncompressed, all-Digital/Video interface
between this TV set and any HDMI-equipped AUDIO/VIDEO equipment.Such as a DVD player, A/V
receiver and a set-top box.
ML-3251HLT incorporates HDMITM technology
HDMI, the HDMI logo and High-Definition Multimedia Interface are trademarks or registered trademarks of HDMI Licensing LLC.
8
Button Descriptions
1
8. MENU
Press to display the menu screen.
9. SLEEP
Press repeatedly to call up the Sleep Timer
menu for setting the sleep timer.
10. / / / / OK / FAV
Press to move the cursor on screen to select
an item and press the "OK/FAV " button to
execute.
In TV mode, press OK/FAV repeatedly to select
the favorite program, If you have set the favorite program.
11. EPG/PBC
In ATSC, press to display EPG (Electronic Program Guide) menu.
In VCD disc playback, press to select PBC menu
on or off (PBC function only works for VCD disc
with title menu).
12. EXIT
Press EXIT to exit from the menu screen.
In DVD disc and VCD PBC on mode, press to
return to the menu (if available).
13. DISPLAY
Display channel information in TV mode; Display disc information in DVD mode.
14. SWAP
Press to switch the content of main screen and
PIP window. Details see page 24.
15. CC
Select the closed caption function.
16. TV
Press once to return back TV mode.
17. DVD
Press to return to DVD mode.
18. SOURCE
Select input source for TV, DTV, AV, DVD,
COMPONENT, PC, HDMI etc.
19. PICTURE
Press to call up Picture menu.
20. ASPECT
Switches TV screen sizes to 16:9, 14:9, 4:3,
ZOOM or PANORAMA.
21. PIP (picture in picture)
Switch PIP mode on/off. Details see page 24.
22. SOUND
Press repeatedly to cycle through the Multi-channel TV sound options: MONO, STEREO, SAP (if
sound is available).
During DVD playback, press to change the audio language (if DVD and VCD disc is
available).
2
4
3
6
8
5
7
9
10
11
13
16
19
20
12
15
14
18
17
22
21
1. POWER
Press to turn on or return from standby mode.
2. MUTE
Press to mute the sound. Press again to restore the sound.
3. 0-9
Press 0-9 to select a channel; the channel
changes after 3 seconds.
4. VOL UP/DOWN
Press to adjust the volume.
5. CH UP/DOWN
Press to scan through channels. Press and
hold down this button to scan quickly through
channels.
6. RECALL
Press to jump back and forth between two
channels. The TV alternates between the current and the last channel that was selected.
7.
Press to switch antenna or cable TV.
Press to show " - " (for ATSC channel input).
9
ENGLISH
REMOTE CONTROL OVERVIEW
ENGLISH
REMOTE CONTROL OVERVIEW (Continued)
Button Descriptions
23
24
25
26
27
28
29
30
31
32
33
34
35
36
29. A-B
Repeats playback between A and B. Press once
to insert A point and press again to insert point B.
To cancel the function, press this button again
30. EJECT
Eject the disc from the DVD player.
31. SUBTITLE
In the DVD function,press to select the desired
subtitle language(if available).
32. ZOOM
Press to ZOOM picture during DVD playback.
33. ANGLE
In the DVD function, press to view scenes from
additional angles(if available).
34. PROGRAM
Program the order in which to view or listen to
chapters or tracks.
35. GOTO
In disc play mode, press to jump to a specific
title, chapter,track or counter position.
36. TITLE
When playing a DVD disc, press to go back to
the title menu of disc.
23.
In disc play mode,hold repeatedly to skip back
at 2x, 4x, 8x, 20x speed.
Press once quickly during playback to skip to
the previous track/chapter.
24.
In disc play mode, hold repeatedly to skip
forward at 2x, 4x, 8x, 20x speed. Press once
quickly during playback to skip to the next
track/chapter.
25.
Press to start playback of a disc,press again to
pause playback.
26.
Press once to pause and press again to completely stop playback of disc.
27. SLOW
In DVD function, Press repeatedly to select the
slow motion speed.
28. REPEAT
In the DVD function,press to repeat the entire
disc or individual chapter/tracks.
10
ENGLISH
CONNECTING EXTERNAL DEVICES
Connecting a DVD or Digital Set-Top Box
Connecting a VCR
For best result , use this connection if your DVD
player or digital set-top box has component video
(Y, Pb/Cb, Pr/Cr ) jacks.
You can use the S-Video terminal when connecting a VCR and other audio visual equipment (if
there is an S-VIDEO output on the VCR. If there
isn't, use the VIDEO (AV) terminals).
VIDEO
AUDIO
AUDIO
L
SUBW
R
SPDIF OUT
HDMI
VGA
VGA/DVI
AUDIO
Y
Pb/Cb
Pr/Cr
R
L
S-VIDEO
R
L
COMPONENT IN
Y Pb/Cb Pr/Cr
L
VIDEO
AUDIO
R
If use the S-Video terminal to connect other
equipment, please follow below instruction:
1. Press MENU to display the MENU screen.
2. Press / to move the cursor to "Features", then
press
.
3. Press /
to move the cursor to "AV connections" item, then press .
4. Press / to select S-Video.
5. Press EXIT to exit.
VIDEO
AUDIO
AUDIO
L
SUBW
R
SPDIF OUT
HDMI
VGA
VGA/DVI
AUDIO
Y
Pb/Cb
Pr/Cr
R
L
S-VIDEO
R
L
(Cables Not Included)
AV IN
L
R
AV OUT
DVD PLAYER OR SET TOP BOX
(Cables Not Included)
To watch a DVD or a broadcast from a set-top box
using, the connection configuration shown above,
press the SOURCE button on the remote control
repeatedly to select COMPONENT as the input
source.
AV OUT
VCR
To watch a VCR image, select "AV" using SOURCE
button on the remote control or front panel.
NOTE
If both AV and S-Video cables are connected,
S-Video has high priority in AV mode.
11
ENGLISH
CONNECTING EXTERNAL DEVICES (Continued)
Connecting a Personal Computer
<Method 2>
1. Use a HDMI-DVI cable to connect the jack to
the DVI jack on your PC.
2. Connect computer sound card to 3.5mm phone
jack.
3. Select "HDMI" using SOURCE button on the
remote control or front panel.
<Method 1>
1. Use a VGA cable to connect the jack to the VGA
jack on your PC.
2. Connect computer sound card to 3.5mm phone
jack.
3. Select "PC" using SOURCE button on the remote control or front panel.
VIDEO
AUDIO
VIDEO
AUDIO
L
SUBW
R
SPDIF OUT
AUDIO
AUDIO
L
SUBW
R
SPDIF OUT
HDMI
HDMI
VGA
VGA/DVI
AUDIO
Y
Pb/Cb
Pr/Cr
R
L
S-VIDEO
R
L
VGA
VGA/DVI
AUDIO
Y
(Cables Not Included)
Pb/Cb
Pr/Cr
R
L
S-VIDEO
R
L
(Cables Not Included)
Personal
Computer
Personal
Computer
NOTE
After you connect the PC, please enter “PICTURE”
menu to set “AUTO ADJUSTMENT” to auto-sync
the TV to the computer’s output.
Connecting an Audio System
For improve sound quality , you may want to play the
TV's audio through your stereo system.
VIDEO
AUDIO
AUDIO
L
SUBW
R
SPDIF OUT
Connecting a DVD with HDMI
Use a HDMI cable to connect the jack to the HDMI
jack on your DVD Player.
HDMI
VGA
VGA/DVI
AUDIO
Y
Pb/Cb
Pr/Cr
R
L
S-VIDEO
R
L
L
VIDEO
AUDIO
AUDIO
L
SUBW
R
SPDIF OUT
HDMI
VGA
R
VGA/DVI
AUDIO
Y
Pb/Cb
Pr/Cr
R
L
S-VIDEO
R
L
Audio cable
to line input
(Not Included)
SUBW
SUBW
(Cable Not Included)
R
L
Amplifier
NOTE If you connect the SUBW, please enter
“Sound” menu to set subwoofer “on”.
DVD Player
12
ENGLISH
SELECTING MENU ITEMS
When Input Source is TV, AV
This LCD TV set allows you to adjust the various settings using the menu screen. Select the desired
menu item by following the steps and then refer to the indicated page for details.
1 Press MENU to display the MENU screen .
2 Press either the / / / buttons on the remote control panel to select the sub-menu.
3 Press EXIT on the remote control to exit .
TV MENU
PICTURE
GRAPHIC EQUALIZER
PICTURE
SOUND
FEATURES
SYSTEM
PICTURE MODE
CONTRAST
COLOR
BRIGHTNESS
SHARPNESS
TINT
COLOR TEMP
NOISE REDUCTION
BACKLIGHT
PRESET SELECTION
BAND 1 - 120HZ
BAND 2 - 500HZ
BAND 3 - 1.5KHZ
BAND 4 - 5KHZ
BAND 5 - 10KHZ
AV C O N N E C T I O N S
AV I N P U T
SOUND
LISTENING MODE
VOLUME
BALANCE
GRAPHIC EQUALIZER
PREFERRED LANGUAGE
SUBWOOFER
VIRTUALAROUND
DATA S E R V I C E S
FEATURES
ASPECT FORMAT
AV C O N N E C T I O N S
TIMER
DATA S E R V I C E S
VCHIP
DATA S E R V I C E S
ANALOG CC
DIGITAL CC
Only DVD mode
CAPTION MODE
SIZE
FONT STYLE
FOREGROUND COLOR
BACKGROUND COLOR
FOREGROUND OPACITY
BACKGROUND OPACITY
V CHIP
ENTER PIN
V- C H I P
TV RATING
MOVIE RATING
BLOCK OPTIONS
CHANGE PIN
SYSTEM
ATSC SETUP
CHANNELSEARCH
CHANNEL EDIT
FINE TUNE
MENU LANGUAGE
FACTORY RESET
OSD TIMEOUT
DIGITAL CC
TUNER MODE SELECTION
ATV TUNER
DTV TUNER
SYSTEM
SCREEN SAVER
AUDIO LANGUAGE
SUBTITLE LANGUAGE
MENU LANGUAGE
SPDIF OUT
SAMPLING RATE
DYNAMIC RANGE
FACTORY RESET
OSD TIMEOUT
CHANNEL EDIT
A2
A3
A4
A5
A6
FACTORY RESET
ALL TUNING DATA WILL BE ERASED
NOTE
The displayed items depend on the setting conditions.
To return to the previous screen , press either MENU on remote control or on front panel.
The options shown above are different when you connect a PC device. (For detail, please see next
page)
13
ENGLISH
SELECTING MENU ITEMS (Continued)
When Input Source is PC
This LCD TV set allows you to adjust the various settings using the menu screen. Select the desired
menu item by following the steps and then refer to the indicated page for details.
1 Press MENU to display the MENU screen .
2 Press either the / / / buttons on the remote control to select the sub-menu.
3 Press EXIT on the remote control to exit .
PC Menu
PICTURE
Picture
Sound
System
CONTRAST
BRIGHTNESS
HORIZONTAL POSITION
VERTICAL POSITION
PHASE
AUTO ADJUSTMENT
SOUND
GRAPHIC EQUALIZER
LISTENING MODE
PRESET SELECTION
BAND 1 - 120HZ
BAND 2 - 500HZ
BAND 3 - 1.5KHZ
BAND 4 - 5KHZ
BAND 5 - 10KHZ
VOLUME
BALANCE
GRAPHIC EQUALIZER
SUBWOOFER
VIRTUAL AROUND
SYSTEM
MENU LANGUAGE
FACTORY RESET
OSD TIMEOUT
All tuning data will be ereased
BASIC OPERATION
Turning the LCD TV on
1
Press power button located on the right side of the TV (or on
the remote control) once.
2. The red power indicator turns off and main unit turns ON.
3. Press again to turn off the LCD TV.
A2
POWER
ON/OFF
SD
MONO
NOTE
The on screen display disappears after a few second as right.
Switching Between Input Sources [ AV/DVD/COMPONENT/PC/HDMI/TV]
SOURCE
1
2
Turn on the power of the connected video equipment.
Press SOURCE button on remote control or on front panel to select the applicable input
source AV, DVD, COMPONENT, PC, HDMI and TV/DTV in sequence.
The TV screen will show text indicating the selected input source each time the SOURCE
button is pressed.
NOTE
The AV input mode indication will remain on the screen for 3 seconds.
14
ENGLISH
BASIC OPERATION (Continued)
Changing the Volume on the remote control
1
2
Press VOL ( + ) to increase the volume. The bar indicator shifts to the right.
Press VOL ( - ) to decrease to volume. The bar indicator shifts to the left.
To mute the sound
1 Press MUTE to temporarily turn off the sound. “ Mute” is displayed on the screen.
2 Press MUTE or VOL ( + )/( - ) to turn the sound back to previous level. The mute
function is automatically turned off when any of the following buttons are pressed:
POWER, VOL ( + )/( - ).
Changing Channels
1
Press CH ( + )/( - ) button to search the channels, the channel number will increase or decrease by 1
for each press excluding the skipped channels.
2. Press number buttons and " - " button to select the corresponding channel content. The time interval
should not exceed 2 seconds.
CHANNEL
SELECT
Example: to select Channel 113;
Complete the following procedure.
1 Please press 1 button.
2 Please press 1 button.
3 Please press 3 button.
4 Please press OK/FAV button to execute.
NOTE
" - " button is for ATSC channel input.
3. Press RECALL button to switch between present channel and previous channel. (Only for DTV or TV
input source.)
FIRST-TIME SETUP
First-Time Setup
1. Make sure that the antenna/cable is connected.
NOTE
If you plug in the unit before you connect the antenna, channel search will not be able to preset channel
into memory. If this occurs, check the cable/antenna connection and plug in the LCD TV again.
2. Connect the unit’s power plug to an electrical outlet.
3. Press power button on the right side of the TV or on the remote
control.
4. The “Auto Install” will automatically appear on the LCD TV.
Use
buttons to select your desired language. Then press
EXIT to escape the menu screen.
5. The “Tuner mode selection” will automatically appear on the
LCD TV. Use
buttons to select Cable or Air for the ATV and
DTV tuner. Then press EXIT to escape the menu screen.
Auto Install
Menu language
Back
Start
E Exit
Tuner mode selection
ATV Tuner
DTV Tuner
Back
E Exit
15
English
Cable
Air
Start
ENGLISH
DISC PLAYBACK
Inserting Media
1. Insert the disc, with the label facing the same direction as the front of the LCD display, into the disc
slot.
2. Make sure the media type is set to disc.
Playing Media
To start playback press
.. To interrupt playback, press
again.
NOTE
Some discs start playing automatically, and others display a menu on the TV screen.
Use the arrow buttons to select a chapter or track, or press the number keys (0~9) to go to the
desired chapter or track.
To stop playback press .
Skip to another track/chapter
Press
quickly during playback to skip to the next or previous track/chapter.
Fast search
1. Hold
repeatedly to fast reverse or fast forward.
For DVD/CD discs
FF (fast forward): FF x 2, FF x 4, FF x 8, FF x 20.
FR (fast reverse): FR x 2, FR x 4, FR x 8, FR x 20.
2. To resume normal play, press
.
Slow Motion Playback
Press the SLOW button repeatedly to select the slow motion speed (forward): SF1/2, SF1/3, SF1/4, SF1/
5, SF1/6, SF1/7.
Using DVD Menus
1. Press TITLE button while playing a DVD disc.
The title menu appears. The contents of the menu vary from disc to disc.
2. Use the arrow buttons to select the title (or chapter) you want to play. Depending on the disc, you can
use the number buttons (0~9) to select the title or chapter.
3. Press OK to start playback.
NOTE
Depending on the DVD, a title menu may simply be called a menu or root menu in the instructions
supplied with the disc.
For some DVDs, when you press the TITLE, the playback will restart from the beginning of the disc.
Checking the Information
You can check information about the disc, such as the total number of the titles or chapters or tracks or
time, using the Display function. The information you want will appear on the TV screen.
1. Press the DISPLAY button to cycle through the disc information.
2. Press DISPLAY button again to hide the information.
16
ENGLISH
DISC PLAYBACK (Continued)
Program Play
You can play the contents of the disc in the order you want by programming the order of the tracks to be played.
1. While playback is stopped, press PROGRAM to enter program
mode.
2. Use the number buttons (0~9) to input the track number in the
order you want.
3. Repeat step 2 to store other tracks.
4. To start the program play, press
.
5. To stop playback, press once.
6. To cancel the program, press again.
Repeating Titles, Chapters, and Tracks
DVD disc
Press REPEAT repeatedly to cycle through the following: REPEAT OFF > REPEAT TITLE > REPEAT
CHAPTER.
REP:
[TITLE]
REP:
[OFF]
CD discs
Press REPEAT repeatedly to cycle through the following: REPEAT OFF > REPEAT ONE > REPEAT ALL.
REP:
[OFF]
REP:
[
1
]
MP3
Press REPEAT repeatedly to cycle through the following: REPEAT OFF > REPEAT ONE > REPEAT DIR >
REPEAT ALL.
REP:
[OFF]
REP:
[
1
]
Search Function
Press GOTO button during playback or in the stop mode, the search screen appears on the TV screen,
and you can press the number keys and
buttons to enter the title, chapter, track or time (depending
on your disc type), and then press OK/FAV to select.
A-B Repeating
This function allows you to mark a section of a chapter or track to repeat play.
1. Press A-B at the start point.
2. Press A-B again at the end point. The specific section repeats continuously.
3. Press A-B again to return to normal playback.
NOTE
The A and B points can be set only within the same chapter/track.
After performing repeat play, be sure to press the STOP button or the disc will play continuously.
17
ENGLISH
DISC PLAYBACK (Continued)
Angle Selection
Some DVD discs contain scenes which have been shot simultaneously from a number of different
angles. For these discs, the same scenes can viewed from each of the different angles.
To Change Angles
Press the ANGLE button to change the scenes from one angle to other angles.
Picture Zooming
This function allows you to enlarge the picture on the TV screen and enlarge the image.
1. Press ZOOM repeatedly to select a zoom factor: ZOOM 2 >ZOOM 3 >ZOOM 4 >ZOOM 1/2 >ZOOM 1/3
>ZOOM 1/4 >ZOOM OFF.
2. Use the arrow buttons to move the zoomed picture left, right, up or down.
Select Subtitle Language
This function can only be used for DVD disc encoded in SYSTEM
multi-subtitle languages.
SCREEN SAVER
You can change the subtitle language or hide the sub- AUDIO LANGUAGE
SUBTITLE LANGUAGE
title during playback.
MENU LANGUAGE
Press SUBTITLE repeatedly to cycle through all avail- SPDIF OUT
RATE
able languages, or adjust subtitle using the menu screen. SAMPLING
DYNAMIC RANGE
FACTORY
RESET
Select the desired language by following the steps:
OSD TIMEOUT
1. Press MENU to display the MENU screen .
2. Press the
buttons to select the System, then
BACK
press .
E EXIT
3. Press the
buttons to select the Subtitle Language item, and then press
you desired.
4. Press EXIT to escape the menu screen.
OFF
ENGLISH
ENGLISH
ENGLISH
OFF
48KHZ
FULL
SELECT
5 SECONDS
to select language
MENU
NOTE
Pressing SUBTITLE button on remote control, the first pressing shows the
current selection. Subsequent pressing toggles to the next subtitle setting.
During some scenes, the subtitles may not appear immediately after turn them on.
EXIT
Select Audio Language
On some DVD discs, you may be able to change the
audio format (including audio coding type, number of
channels recorded and audio language).
During playback, you can change the audio language
(audio output).
1. Press MENU to display the MENU screen .
2. Press the
buttons to select the System, then
press .
3. Press the
buttons to select the Audio Language
item, and then press
to select language you
desired.
4. Press EXIT to escape the menu screen.
18
SYSTEM
SCREEN SAVER
AUDIO LANGUAGE
SUBTITLE LANGUAGE
MENU LANGUAGE
SPDIF OUT
SAMPLING RATE
DYNAMIC RANGE
FACTORY RESET
OSD TIMEOUT
E
BACK
EXIT
OFF
ENGLISH
ENGLISH
ENGLISH
OFF
48KHZ
FULL
SELECT
5 SECONDS
ENGLISH
DISC PLAYBACK (Continued)
SPDIF Out
If your format of disc is Dolby Digital, select the PCM or
RAW (Bitstream) output.
1. PCM: Select when connecting to a 2-channel digital
stereo amplifier. The unit’s digital audio output will
only output 2-channels even if it is encoded with multichannel Dolby Digital tracks.
2. Bitstream: Select Bitstream when connecting to an
external amplifier capable of decoding Dolby Digital
multi-channel audio.
3. OFF: Select OFF if you don’t need SPDIF Out.
SYSTEM
SCREEN SAVER
AUDIO LANGUAGE
SUBTITLE LANGUAGE
MENU LANGUAGE
SPDIF OUT
SAMPLING RATE
DYNAMIC RANGE
FACTORY RESET
OSD TIMEOUT
E
OFF
ENGLISH
ENGLISH
ENGLISH
OFF
48KHZ
FULL
SELECT
5 SECONDS
BACK
EXIT
NOTE
This unit doesn’t support DTS multi-channel format. If play DTS disc, it will be no audio on playback.
Sampling Rate
1. 48K: If your sampling frequency of disc is 48KHz,
please select 48K. In this case, the 96KHz signals
will be down converted to 48KHZ.
2. 96K: If your sampling frequency of disc is 96KHz,
please select 96K. In this case, all signals will be
output without any changes.
Instruction repeats step 1~4 of Select Subtitle.
SYSTEM
SCREEN SAVER
AUDIO LANGUAGE
SUBTITLE LANGUAGE
MENU LANGUAGE
SPDIF OUT
SAMPLING RATE
DYNAMIC RANGE
FACTORY RESET
OSD TIMEOUT
E
OFF
ENGLISH
ENGLISH
ENGLISH
OFF
48KHZ
FULL
SELECT
5 SECONDS
BACK
EXIT
Setting Dynamic Range
Due to the wide dynamic range of digital audio, sometimes a sound track of a movie may get very loud (such
as explosions) or very quiet sounds may be inaudible
requiring the user to constantly adjust the volume as
they watch a movie. Through this dynamic range control,
the TV will automatically balance the very loud and the
very quiet so that you don’t have to constantly adjust the
volume.
Selects the dynamic range compression to fit the individual listening situation of the audience. The variable
range is from OFF, 2/8 to 6/8,or FULL.
SYSTEM
SCREEN SAVER
AUDIO LANGUAGE
SUBTITLE LANGUAGE
MENU LANGUAGE
SPDIF OUT
SAMPLING RATE
DYNAMIC RANGE
FACTORY RESET
OSD TIMEOUT
E
BACK
EXIT
Full : Audio with fully compressed dynamic range.
6/8~2/8: Audio with partially compressed dynamic range.
Off: Audio with uncompressed dynamic range.
Instruction repeats step 1~4 of Select Subtitle.
NOTE
The Dynamic Range settings only support Dolby Digital programs.
19
OFF
ENGLISH
ENGLISH
ENGLISH
OFF
48KHZ
OFF
SELECT
5 SECONDS
ENGLISH
ADJUSTMENT
Adjusting Picture settings
Directly adjust Picture setting using the remote control
PICTURE 1 Press the PICTURE button to display the Picture screen.
2 Press / to move the cursor to Picture menu, then press
3 Press
/
to move the cursor to the desired item.
4 Press / to change the setting.
5 Press EXIT to close the menu screen.
.
PICTURE
Picture adjustments have different menu options depending on if you are in TV mode or PC mode.
1 Press MENU to display the MENU screen.
2 Press / to move the cursor to Picture menu, then
press .
3 Press
/
to move the cursor to the desired item.
4 Press / to change the setting.
5 Press EXIT to close the menu screen.
PICTURE MODE
CONTRAST
COLOR
BRIGHTNESS
SHARPNESS
TINT
COLOR TEMP
NOISE REDUCTION
BACKLIGHT
E
NORMAL
50
32
30
4
-8
NORMAL
AUTO
HIGH
BACK
EXIT
Adjusting Sound setting
Sound adjustments have different selection options
depending on TV mode, AV mode (signal from an external device) or PC mode.
1
2
3
4
5
Press MENU to display the MENU screen.
Press / to move the cursor to Sound menu, then
press .
Press
/
to move the cursor to the desired item.
Press / to change the setting.
Press EXIT to close the menu screen.
SOUND
LISTENING MODE
VOLUME
BALANCE
GRAPHIC EQUALIZER
PREFERRED LANGUAGE
SUBWOOFER
VIRTUAL AROUND
E
MONO
8
0
SELECT
ENGLISH
OFF
ON
BACK
EXIT
Adjusting Graphic Equalizer setting
1
2
3
4
5
Press MENU to display the MENU screen.
Press / to move the cursor to Sound menu, then
press .
Press
/
to move the cursor to the desired item.
Press / to change the setting.
Press EXIT to close the menu screen.
NOTE
If you select the item of “User” in Preset Selection, the
graphic equaliser will retrun to your last setting.
GRAPHIC EQUALIZER
PRESET SELECTION
BAND 1 - 120HZ
BAND 2 - 500HZ
BAND 3 - 1.5KHZ
BAND 4 - 5KHZ
BAND 5 - 10KHZ
E
NORMAL
0
0
0
0
0
BACK
EXIT
Adjusting Feature settings (except PC mode)
1
2
3
4
5
Press MENU to display the MENU screen.
Press / to move the cursor to Features menu, then
press .
Press
/
to move the cursor to the desired item.
Press / to change the setting.
Press EXIT to close the menu screen.
FEATURES
ASPECT FORMAT
AV CONNECTIONS
TIMER
DATA SERVICES
VCHIP
E
20
BACK
EXIT
16:9
SELECT
SELECT
SELECT
SELECT
ENGLISH
ADJUSTMENT (Continued)
Sleep Timer Function
You can set the Sleep Timer to automatically turn off the TV.
Directly setting the Sleep Timer using the remote control
1 Press the SLEEP button to display the Timer TIMER
screen.
SLEEP
2 Press / button to set the sleep timer (in SLEEP TIMER
OFF
EASTERN
TIMER ZONE
3
minutes), the timer can be set from 15 minutes up to 120 minutes (Off > 15 >30 >60 >.
90 >120 ).
Press EXIT to close the menu screen.
E
BACK
EXIT
FEATURES
Setting the Sleep Timer using the MENU screen
ASPECT FORMAT
16:9
Press MENU to display the
AV CONNECTIONS
SELECT
TIMER
SELECT
MENU screen.
DATA SERVICES
SELECT
MENU 2 Press
/
to move the
VCHIP
SELECT
cursor to Feature menu,
then press .
BACK
3 Press
/
to move the
E EXIT
cursor to the Timer item, then press
.
4
Press
/
to
set
the
sleep
timer
(in
minutes).
The time can be set 15
EXIT
minutes up to 120 minutes.
The Sleep timer is turned off when Off is displayed.
5 Press EXIT to close the menu screen.
NOTE In PC mode, the SLEEP button is invalidity.
1
Setting of V-Chip
V-Chip Function (Parental Control)
This function prevents children from viewing materials that may be inappropriate for minors due to violent
and/or sexual content.
Restriction of programs includes two ratings that contain information about the program: the Movie
Ratings (MPAA) and the TV Ratings (TV Parental Guidelines). The Movie Ratings is restricted by age. TV
Ratings are restricted by age and content.
Since a TV program may use either the TV Ratings or the Move Ratings ,both should be adjusted for
complete control.
RATING
G
PG
Age
PG-13
based
R
NC-17
X
GENERAL AUDIENCES. All ages admitted.
PARENTAL GUIDANCE SUGGESTED. Some material may not be suitable for children
PARENTAL STRONGLY CAUTIONED. Some material may be inappropriate for children under 13.
RESTRICTED.Under 17 requires accompanying parents or adult guardian.
NO ONE 17 AND UNDER ADMITTED.
X is an older rating that is unified w ith NC-17 but may be encoded in the data of older movies.
Movie Ratings
Example 1:
PG-13 in the age-based rating system is blocked,
this will also automatically block the higher rating
R, NC-17 and X.
Example 2:
R in the age-based rating is blocked, this will
also automatically block the higher ratings
NC-17 and X
G
----
G
G
----
PG
----
PG
PG
----
PG-13
BLOCK
PG-13
PG-13
----
R
BLOCK
R
R
BLOCK
NC-17
BLOCK
NC-17
NC-17
BLOCK
X
BLOCK
X
BLOCK
1.User setting
Age
based
X
2.Block table
21
G
PG
Age
based
PG-13
R
NC-17
X
ENGLISH
ADJUSTMENT (Continued)
Setting of V-Chip
TV Ratings
Content based
FV
(Fantasy
Violence)
RATING
S (Sexual
Situation)
L
(Adult
Language)
D(Sexually
Suggestive
Dialog)
*
*
*
*
*
*
*
*
*
*
*
*
*
TV-Y (All children)
TV-Y7 (Direct to Older Children)
Age
based
V
(Violence)
x
TV-G (General Audience)
TV-PG (Parental Guidance Suggested)
x
x
x
x
x
x
TV-MA (Mature Audience Only)
x
x
x
* : The content rating can be set, but this rating is not normally broadcasted by TV stations.
x : The content rating can be set.
TV-14 (Parents Strongly Cautioned)
x
x
Example :
When TV-Y7 in the age-based rating is set to BLOCK, this will automatically block the higher ratings: TVG,TV-PG,TV-14 and TV-MA.In addition, D, L, S, V and FV in CONTENT are automatically blocked unless
you manually set BLOCK CONTENT.
1. User setting
2. Block table
TV-Y
---
TV-Y7
BLOCK
TV-Y
TV-G
BLOCK
TV-Y7
TV-PG
BLOCK
TV-14
BLOCK
TV-MA
BLOCK
Content based
FV
Age
based
V
S
L
D
TV-G
TV-PG
TV-14
TV-MA
select block
auto-block
To use this feature, perform the following setup.
1 Press MENU to display the MENU screen.
2 Press / to move the cursor to Feature menu, then
press .
3 Press / to move the cursor to the V-Chip item, then
press .
4 The first password is 0000. After key in password the VChip screen appear.
FEATURES
ASPECT FORMAT
AV CONNECTIONS
TIMER
DATA SERVICES
VCHIP
E
BACK
EXIT
NOTE While you enter the 4-digit number, these numbers will be shown
on the screen to help the user confirm his/her password settings. However,
the password will not be display on screen the next time you enter this
menu. Star signs "*" will be shown instead.
5
6
7
In the V-chip setting, press / to the desired option.
Please press the arrow buttons to select and adjust
the rating level that you’d like to block.
V-CHIP
Press MENU to return to the main screen.
NOTE
If you set G to block, all rating are automatically
blocked.
If you set X to block, G, PG, PG-13, R, NC-17 are not
blocked.
22
TV RATING
MOVIE RATING
BLOCK OPTIONS
CHANGE PIN
E
16:9
SELECT
SELECT
SELECT
SELECT
BACK
EXIT
V CHIP
ENTER PIN
E
BACK
EXIT
SELECT
SELECT
SELECT
SELECT
- - - -
ENGLISH
ADJUSTMENT (Continued)
Adjusting CLOSED CAPTION Settings
SETTING CLOSED CAPTION
"Closed Caption" is a system which allows conversations, narration, and sound effects in TV programs
and home videos to be viewed as captions on the TV screen.
Not all programs and videos will offer closed captioning. Please look for the "CC" symbol to ensure that
captions are available.
Closed Caption broadcasts can be viewed in two modes: CAPTION and TEXT. For each mode, four
selections are available. The CAPTION mode shows subscripts of dialogs and commentaries of TV
dramas and news programs while allowing a clear view of the picture.
The TEXT mode display various information over the picture (such as TV program schedules and weather
forecasts, etc.) that is independent of the TV programs.
Setting the CLOSED CAPTION option from the MENU screen
1 Press MENU to display the MENU screen.
DATA SERVICES
2 Press
/
to move the cursor to Features menu,
DATA SERVICES
then press .
ANALOG CC
3 Press / to move the cursor to the Data services DIGITAL CC
option, then press , the Data services screen will
appear (or press CC button directly to call up the
BACK
E EXIT
screen).
4 Use the arrow button to move the cursor to the Closed Caption.
5 Please press the arrow buttons to select and adjust the Closed Caption function.
6 Press EXIT to close the menu screen.
CAPTION
CC1
SELECT
NOTE
Closed Caption may not work properly (white blocks ,strange characters ,etc.) if signal conditions are poor or
if there are problems at the broadcast source. This does not indicate a problem with your set.
If any button is pressed to call up the menu screen while viewing a Closed Caption broadcast, the
closed captions will disappear momentarily.
Adjusting System settings
System adjustments have different menu options depending on TV, DVD or PC mode.
1 Press MENU to display the MENU screen.
2 Press / to move the cursor to System menu, then
press .
3 Press
/
to move the cursor to the desired item.
4 Press / to change the setting.
5 Press EXIT to close the menu screen.
SYSTEM
ATSC SETUP
CHANNEL SEARCH
CHANNEL EDIT
FINE TUNE
MENU LANGUAGE
FACTORY RESET
OSD TIMEOUT
E
SELECT
SELECT
SELECT
0
ENGLISH
SELECT
5 SECONDS
BACK
EXIT
Channel Edit (Only TV mode)
This feature allows you to erase channels that were
added when you used the “Channel search” feature.
It also allows you to set favorite channels.
CHANNEL EDIT
A2
A3
A4
A5
A6
1. Press MENU to display the MENU screen .
2. Press the
buttons to select the System, then
press .
E EXIT
FAVORITE
3. Press the
buttons to select the Channel Edit
item, and then press .
4. Press the
buttons to select a channel you want to edit. Press red button
to erase or press green button to set to favorite channel.
5. Press EXIT to close the Channel Edit screen.
If you have set favorite channels, press OK/FAV on remote control to select
the favorite channels.
23
PAGE DOWN
MENU
OK/FAV
EXIT
ENGLISH
ADJUSTMENT (Continued)
Returning Settings Back to Factory Defaults
To let you set TV system back to the factory default
settings
1. Press MENU to display the MENU screen .
2. Press the
buttons to select the System, then
press .
3. Press the
buttons to select the Factory Reset
item, and then press .
4. “All tuning data will be erased” appear, please press
ASPECT (Green) button to start.
5. “All tuning data will be erased. Are you sure” appear,
please press ASPECT (Green) button again to execute.
FACTORY RESET
ALL TUNING DATA WILL BE ERASED
BACK
START
E EXIT
FACTORY RESET
A L L T U N I N G DATA W I L L B E E R A S E D
ARE YOU SURE?
BACK
START
E EXIT
PIP Function
Allows you to display two picture (Master and Slave) on the screen at one time.
1. Press PIP button to call up the PIP (picture in picture) function.
2. Press ASPECT button repeatedly to cycle through all available PIP modes: Large PIP > Normal >
Small PIP...
3. Press / button to adjust PIP screen position: Top left > Top right
> Bottom right > Bottom left > Top left...
4. Press SWAP button to switch the content of main screen and PIP
window.
Master
5. Press PIP button again to turn off PIP screen.
NOTE
Slave
In PC mode, the SWAP is invalidity.
Master Size = 16:9; Slave Size = 4:3
PIP function will only work under specific combination of inputs. Not all input combinations will work.
Please refer to this table:
TV
Master
Slave
TV
AV
COMPONENT
DVD
PC
HDMI
ATV
DTV
COMPOSITE
S-Video
Y Pb/Cb Pr/Cr
DVD
VGA
HDMI
ATV
X
○
X
X
○
X
○
○
DTV
○
X
○
○
X
○
X
X
COMPOSITE
X
○
X
X
○
X
○
○
S-Video
X
○
X
X
○
X
○
○
COMPONENT
Y Pb/Cb Pr/Cr
○
X
○
○
X
○
X
X
DVD
DVD
X
○
X
X
○
X
○
○
PC
VGA
X
X
X
X
X
X
X
X
HDMI
○
X
○
○
X
○
X
X
AV
HDMI
○
X
PIP supported
PIP not supported
Please follow below instruction to select PIP source:
1. Press PIP button to enter the PIP (picture in picture) mode.
2. Press / button to call up PIP Source setup menu.
3. Press / to select the PIP source you desired.
NOTE
PIP SOURCE SETUP
PIP INPUT
PIP TYPE
CONFIRM
If PIP input souce is AV, please select PIP type is Composite
or S-Video.
24
E EXIT
COMPONENT
YPBPR
ENGLISH
TROUBLESHOOTING
Remote Control
Problem
Remote control does not operate
Possible Remedies
z The batteries could be weak. Replace the batteries.
z Check the orientation of the batteries.
z Make sure this unit’s power cord is connected securely
to the wall outlet.
z Locate the unit at least 3-4 feet away from fluorescent
lights.
z Be sure the main source has been selected to “TV".
z If you are using another device to change channels, be
sure to select correct source for that device. For
example, if you are using your cable box or set top box
or DVD player, please use the corresponding remote
controller that was supplied with the device.
Cannot change channels with the
remote control
Video
Problem
Possible Remedies
No picture(screen not lit),No sound
z
z
z
z
Make sure the power cord is plugged in.
Press" POWER" on the right side of the TV unit.
Press “SOURCE” to check the correct video source has
been selected.
Try another channel; it could be a problem with the
station.
z
Dark, poor or no picture (screen lit),
good sound
z
Only snow and noise appear on the
screen
z
z
z
z
Lines or Stripes appear on the screen
z
z
Double images or ghosts
z
Black box on screen
z
Black bars appear at the top and
bottom of the screen
z
Make sure the source signal is connected to the TV unit.
Adjust the" VIDEO” settings in the “VIDEO".
Adjust the" BRIGHTNESS" in the “VIDEO ".Check the
antenna/cable connections.
Check the antenna/cable connections.
Try another channel; it could be a station problem.
Press "Source button repeatedly until the TV source is
selected or press the TV button on the remote ".
Adjust the antenna.
Move the TV away from noise sources, such as cars,
neon signs, or hair-dryers, microwave ovens, speakers.
Using a highly sensitive and directional outdoor antenna
or cable may solve the problem.
You have selected a text option in the setup MENU and
no text is available. To turn off this feature, set the
"CLOSED CAPTION" to OFF.
Some wide-screen programs are filmed in aspect rations
that are greater than 16:9(this is especially common with
theatrical releases).Your TV will show these programs
with black bars at the top and bottom of the screen. For
more details, check the documentation that came with
your DVD (or contact your program provider).
25
ENGLISH
TROUBLESHOOTING (Continued)
Audio
Problem
Possible Remedies
Good picture, no sound
z
Audio noise
z
Cannot gain enough volume when
using a cable box
Sound volume seems weak or
insufficient
z
z
Turn up the volume by pressing the VOL + button on the
remote or on the side of the TV set
Move away the infrared transceiver from the TV until the
noise is eliminated.
Increase the volume of the cable box using the cable
boxes remote control.
The TVs audio might be set to" SAP" or " MONO", when it
might be better set to " STEREO". If already set to
"STEREO", switch to" MONO" (which may reduce
background noise during weak stereo broadcasts) by
pressing the MTS button on the remote control.
Channels
Problem
Possible Remedies
Cannot receive any channels when
using cable
z
z
Use "TV" in the "MENU" to choose.
“SYSTEM" Æ “CHANNEL SEARCH " to scan receivable
channels.
Make sure cable is connected to TV properly and choose
TV as the main source.
SPECIFICATIONS
DVD Section
ITEM
DESCRIPTION
Laser type
Semiconductor laser, Wavelength 650 nm
Signal system
NTSC525/60
Video output level
1 Vp-p (75ohm)
Video Y output level
1 Vp-p (75ohm)
Video C output level
286 mVp-p (75ohm)
Horizontal resolution
480 lines
Video S/N ratio
60dB
Audio frequency
DVD (PCM) 100Hz – 16kHz (+/-3 dB)
response
CD 100Hz - 16 kHz (+/-3 dB)
Audio S/N ratio
60dB
Dynamic range
DVD (PCM): 85 dB; CD: 85 dB
Audio L/R
1V 1KHz 0 dB
Distortion
0.5%
26
REMARK
ENGLISH
SPECIFICATIONS (Continued)
LCD TV Section
ITEM
DESCRIPTION
Screen size
32” diagonal
Aspect Ration
16:9
Contrast Ratio
1200:1
Brightness
500nits
High Color Saturation
NTSC 75%
Resolution
1366 x R.G.B x 768
Pixel Pitch
0.173 (H) X 0.519 (V) mm
Display Colors
16.7M
Response Time gray to gray
average time
6.5 ms
Viewing Angle
176 Horizontal/176 Vertical
Built in Speaker
5W x 2 Stereo
TV System
NTSC, ATSC
Special Features
SAP/MTS
REMARK
Sleep Timer
PIP
3D comb filter
3:2 and 2:2 pull down
Closed Caption
V-chip
Full function remote control
Input Terminals:
Antenna
ATSCx1, NTSCx1
AV
Composite + S-Video + Stereo L/R
Component
Component x 1 + Stereo L/R
VGA (PC)
D-Sub + Stereo phone jack in
HDMI
480P; 576P; 720P
Output Terminals:
Line-Out
Stereo L/R
Subwoofer
Preout
Digital Audio Out
Coaxial
General:
Standby LED
Red
Safety & EMI
UL/CUL, FCC Class B, CDRH (FDA)
Dimension
About 816 mm (W) x 606mm (H) x 165 mm (D) / 32.13" (W) x
23.86" (H) x 6.50" (D)
Weight
About 14Kg (30.9 lbs)
Power Consumption
<195W (MAX)
Power Supply
AC: 100V - 240V ~ 50/60Hz
Operation Temperature
0oC ~ 35oC (32oF ~ 95oF)
Storage Temperature
From -5oC to 55oC (23oF ~ 131oF)
27
ENGLISH
SPECIFICATIONS (Continues)
PC Compatiblity Chart
Supported Resolutions for RGB Mode
This monitor supports the following resolutions
Dot x Line
Horizontal Freq.(KHZ)
Vertical Freq.(HZ)
640 × 480 @ 60Hz
31.47
59.94
800 × 600 @ 60Hz
37.88
60.32
1024 × 768 @ 60Hz
48.36
60.00
1366 × 768 @ 60Hz
48.00
60.00
720 × 400 @ 70Hz
31.47
70.09
Supported Resolutions for HDMI Mode
Dot x Line
Horizontal Freq.(KHZ)
Vertical Freq.(HZ)
720 × 480i @ 60Hz
15.73
59.94
720× 480p @ 60Hz
31.47
59.94
1280 × 720p @ 60Hz
45.00
60.00
1920 × 1080i @ 60Hz
33.75
60.00
28