1
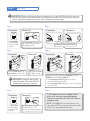
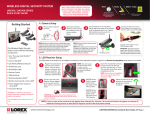
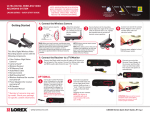
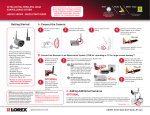
Step C
!
Connect Equipment
IMPORTANT: To avoid physical injury or damage to your equipment, we recommend you disconnect the units
from the DC power adaptors and all components from their power sources until you complete the connections.
Connecting the Receivers
You may use up to two Airfonix R Series wireless receivers with each T Series transmitter. This is useful when the
speakers are spaced far apart. To view examples diagrams for the six installation scenarios look in the User Manual.
Make sure to set the correct zone codes for your installation.
AFX-19AR050: Designed for use with semi-pro or home audio equipment. Use speaker cables to connect either
two passive speakers at 25W per channel or one passive speaker at 50W per channel with banana plug connectors.
AFX-19PR001: Designed for use with professional active speakers. Connect using XLR audio cables or RCA stereo
audio jacks.
!
IMPORTANT:
• When using model AFX-19AR050 and connecting one receiver to one speaker the output
will be 50W per channel. When connecting both speakers it will be 25W per channel.
• When using model AFX-19PR001, to prevent signals mixing together, do not connect
source to both the AUX L and R RCA jacks and the BALANCE IN sockets simultaneously.
• The system will accommodate 4 to 8 ohms output. Any system with 70V will not work
with these products.
Connecting the Transmitter
Airfonix T Series wireless transmitters may be connected to any audio product with a speaker output connection
such as stereo receivers, digital TVs, DVD players, CD players, professional mixing consoles, gaming products,
computers, iPods or MP3 players.
AFX-19PT002: Designed for use with professional audio equipment. Connect using XLR audio cables into Balance
In, optical cable into digital SPDIF input jack or RCA stereo cable into RCA jacks.
AFX-19PT102: Designed for use with semi-pro or home audio equipment. Connect using speaker cables into HiLevel IN push terminals, RCA stereo cable into RCA jacks or optical cable into digital SPDIF input jack.
!
!
IMPORTANT:
• When using model AFX-19PT002, to prevent signals mixing together, do not connect
source to both the AUX L and R RCA jacks and the BALANCE IN sockets simultaneously.
• When using model AFX-19PT102, to prevent signals mixing together, do not connect
source to both the AUX L and R RCA jacks and the HI-LEVEL IN sockets simultaneously.
• When connecting an audio source using the SPDIF input, it must use either 44.1KHz or
48KHz sampling rates. Check the owner’s manual for your audio source if you are unsure.
• Use supplied optical cable to connect HDTV to SPDIF input jack.
IMPORTANT: Your system will not work properly unless the dip switches on each unit are set to the
correct positions for your installation.
• If the LINK LEDs light green, double check the Zone Codes.
• If the LINK LEDs are not lit, go through the steps to Pair Units again.
• Look in the User Manual for Troubleshooting Guide, or contact Customer Service at (888) 778-2446 or
www.airfonix.com if you are having problems.
Technical Support and additional information
Please visit www.airfonix.com for:
• Information and help with troubleshooting and support issues.
• To contact customer service.
• United States customers may contact customer service at (888) 778-2446. For other countries, visit www.
airfonix.com to find the correct telephone number for your country.
• For the latest product documentation, as well as the Airfonix License Agreement and Limited Warranty.
Copyright © 2008, Airfonix. All rights reserved.
Quick Start Guide
Go to www.airfonix.com to view the User Manual.
Airfonix R Series
Wireless Receiver Models:
AFX-19AR050
AFX-19PR001
Airfonix T Series
Wireless Transmitter Models:
AFX-19PT002
AFX-19PT102
Step A
Pair Units
Step B
Set Zone Codes
Step C
Connect Equipment
Step A
!
Pair Units
IMPORTANT: Before you begin, follow the sequence of six steps to PAIR each of the receivers
with the transmitter in your installation. You may pair one transmitter with up to two receivers.
You will need the remote control and a small screwdriver for these steps.
Step 1
Step 2
Receiver(s)
Transmitter
Setting
OFF
Transmitter
Setting
OFF
Receiver(s)
DC IN
DC IN
Setting 9V
OFF
ON
Setting 9V
OFF
ON
ON
ON
For transmitter:
All dip switches
must be in OFF
position.
For all receivers: Push the third
dip switch to ON position to
enter pairing mode.
Step 3
Connect the power for all units.
Step 4
Receiver(s)
Receiver(s)
R
PW
lights orange.
Transmitter
R
PW
K
LIN
Press PAIRING
LIN
lights green
PWR LED
R
Press PWR twice
PWR LED
PW
Transmitter
K
K
LIN
K
Pow
Vol
-
Sou
rce
er
Vol
+
Pai
ring
Mu
te
LIN
Receivers are in
pairing mode. PWR
LED lights orange.
Press the PWR button on
transmitter to power ON.
!
IMPORTANT: Complete steps 3 and 4
within 10 seconds. Watch the LINK LEDs
to make sure the pairing is successful.
Step 5
With the remote pointing at the transmitter, press the
PAIRING button. Watch the LINK LEDs.
• The transmitter LINK LED flashes for three
seconds and then turns OFF.
• The receiver(s) LINK LED light for one second and
then turn OFF.
Step 6
Transmitter
Receiver(s)
Setting
OFF
Setting
OFF
ON
ON
For transmitter:
All dip switches
must be in OFF
position.
For all receivers: Push the
third dip switch to OFF
position to exit pairing mode.
The ID code has now been copied to each
of the units and they are paired together.
Follow the instructions for Set Zone Codes to
complete setup.
NOTE: The LINK LEDs on all paired units will
light green AFTER you have set the zone codes
and all units are powered ON again.
Step B
Set Zone Codes
The Airfonix R and T Series are highly versatile. You may use one use one transmitter with up to two receivers in six
scenarios. For examples, visit www.airfonix.com to view the user manual.
First go through the bulleted list to determine if you are using:
•
•
One or Two Receivers.
Active or Passive Speakers. NOTE: Follow the black heading for passive and the blue heading for active
speakers on the chart below.
One or Two Zones.
Power of Each Connected Speaker. NOTE: Scenarios 1 through 3 use different codes for setup with 4 ohm
or 8 ohm speakers.
LEFT or RIGHT Mono, or Stereo Channels.
•
•
•
Use the charts below to determine the correct settings for each unit:
1 Transmitter/1 Receiver 1 ZONE
1 Transmitter/2 Receivers 1 ZONE
Scenario 1 (4 ohm)
Transmitter
Receiver
Stereo
Scenario 2 (4 ohm)
Transmitter
4 ohm, 25W/ch
Receiver
Receiver
Mono LEFT Mono RIGHT
4 ohm, 50W 4 ohm, 50W
1 Transmitter/2 Receivers 2 ZONES
Scenario 3 (4 ohm)
Transmitter
Receiver
Receiver
Stereo
Stereo
4 ohm, 25W/ch 4 ohm, 25W/ch
Setting
OFF
Setting
OFF
Setting
OFF
Setting
OFF
Setting
OFF
Setting
OFF
Setting
OFF
Setting
OFF
ON
ON
ON
ON
ON
ON
ON
ON
1 Transmitter/1 Receiver 1 ZONE
1 Transmitter/2 Receivers 1 ZONE
Scenario 1 (8 ohm)
Transmitter
Receiver
Stereo
8 ohm, 25W/ch
Scenario 2 (8 ohm)
Transmitter
Receiver
Receiver
mono LEFT mono RIGHT
8 ohm, 36W 8 ohm, 36W
1 Transmitter/2 Receivers 2 ZONES
Scenario 3 (8 ohm)
Transmitter
Receiver
Receiver
Stereo
Stereo
8 ohm, 25W/ch 8 ohm, 25W/ch
Setting
OFF
Setting
OFF
Setting
OFF
Setting
OFF
Setting
OFF
Setting
OFF
Setting
OFF
Setting
OFF
ON
ON
ON
ON
ON
ON
ON
ON
1 Transmitter/1 Receiver 1 ZONE
1 Transmitter/2 Receivers 1 ZONE
Scenario 4
Transmitter
Scenario 5
Receiver
Stereo
Active Speakers
Transmitter
Receiver
Receiver
Mono LEFT Mono RIGHT
Active Speakers Active Speakers
Setting
OFF
Setting
OFF
Setting
OFF
Setting
OFF
ON
ON
ON
ON
1 Transmitter/2 Receivers 2 ZONES
Scenario 6
Transmitter
Receiver
Stereo
Active Speakers
Receiver
Stereo
Active Speakers
Setting
OFF
Setting
OFF
Setting
OFF
Setting
OFF
ON
ON
ON
ON
Use a small screwdriver to set the correct codes for each unit:
Disconnect the power from all units. Locate the three dip switches on the bottom
of each unit. Use a small flat screwdriver to push the first and second dip switches to
ON or leave in OFF position to match the code for your installation.
Setting
OFF
ON
Setting
OFF
ON
!
!
IMPORTANT: Do not adjust the third dip switch. Leave it in the OFF
position after pairing. The factory default position is OFF for all switches.
IMPORTANT: Pay close attention when making these connections. The receiver set with the left channel codes
connects to your speaker using the left output connectors and the receiver set with the right channel codes connects
to your speaker using the right output connectors. The system will not work unless these connections are correct.