1
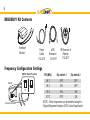
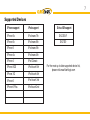
RDSUSBV1
Owner’s Manual/Installation Guide
2
Copyrights and Trademarks
Copyright 2014 Audiovox Electronics Corporation
The Audiovox and FlashLogic logos are trademarks of Audiovox Electronics
Corporation
iPod and iPhone are trademarks of Apple, Inc.
Sirius and Sirius XM are trademarks of Sirius XM Radio Inc.
All Trademarks and Logos are the property of their respective owners.
All rights reserved.
3
Table of Contents
Warning And Safety ..........................................................4
Wireless Remote Function for iPod/iPhone App ............18
Product Registration .........................................................5
Wireless Remote Function for USB Flash Drive ...........19
Kit Contents ......................................................................6
Notes on USB Memory Source .....................................20
Frequency Configuration Settings.....................................6
Basic Operation - Satellite Radio ..................................21
Compatible Devices .........................................................7
OEI Control App - Satellite Radio ..................................22
Note To Installers ..............................................................8
Wireless Remote Function for SIRIUS XM...................23
Connection Diagram .........................................................9
Sirius XM Operation (Using Wireless Remote)..............24
Installation ......................................................................10
Internet Radio App ........................................................25
User’s Manual ................................................................11
iPod/iPhone Charging ....................................................27
RDS / Text Display Example ..........................................13
Troubleshooting .......................................................28-30
Basic Operation I. ...........................................................14
Firmware Update...........................................................31
Basic Operation II. ..........................................................15
Installer Notes ...............................................................32
OEI Control Application - Settings ................................16
Warranty ........................................................................34
OEI Control Application - Music Remote Control ...........17
4
Warnings and Safety Instructions
Please read these instructions carefully before proceeding. Failure to follow instructions may result in
improper operation or injury. Neither Audiovox Electronics Corporation nor Apple Inc., it’s regional offices,
distributors or resellers take any responsibility for any damage or injury as a result of using the integration kit.
- Do not open, disassemble or alter the interface in any way.
- Do not insert anything into the casing.
- Do not cut or try to alter cables in any way and always use the correct connections.
- Only operate unit when the vehicle is stationary or ask passengers to operate it for you.
- Do not allow the Apple iPod/iPhone to distract you from driving.
- Exercise good judgement and keep your eyes on the road at all times.
- Do not expose unit to extreme temperatures, humidity or shock.
- Keep the unit and iPod/iPhone away from fluids.
- Keep away from children! - Interface components may contain small parts, that may be broken or
disassembled and components may become loose from vibration and heat. Small components and
packaging materials may be a choking hazard when handled by children.
5
Congratulations on your purchase!
Thank you for purchasing this integration kit. Please review this booklet before operating the unit. This
interface was designed and manufactured to seamlessly integrate with your vehicle’s factory audio system.
Product Registration
We recommend registering your Audiovox product so you can receive news about important firmware updates
and have unlimited access to our online support system.
To register your FlashLogic product, please complete the following steps:
1. Visit http://www.audiovoxoei.com
2. Look up and save the serial number of the product.
3. Complete the product registration form.
4. Submit the form.
5. Save the registration sheet in a safe place for future reference.
If you are unable to complete the registration via internet, please call Audiovox at 1-800-645-4994.
Prior to installation make sure the module’s firmware is up to date to ensure compatibility
with the latest features and enhancements. Please refer to page 31 to update firmware.
6
RDSUSBV1 Kit Contents
Interface
Module
Power
Cable
112-4213
USB
Extension
112-4191
IR Receiver &
Remote
112-4217
Frequency Configuration Settings
ON/OFF Switch Positions
OFF
Module
ON
12
Frequency Selector
FM (MHz)
Dip switch 1
Dip switch 2
88.7
OFF
OFF
93.3
ON
OFF
ON
ON
97.5
OFF
ON
107.7
NOTE - Other frequencies can be selected using the
Original Equipment Industry (OEI) Control Application!
7
Supported Devices
iPhone support
iPod support
iPhone 5s
iPod nano 7th
SXV200V1
iPhone 5c
iPod nano 6th
SXV300
iPhone 5
iPod nano 5th
iPhone 4s
iPod nano 4th
iPhone 4
iPod Classic
iPhone 3GS
iPod touch 5th
iPhone 3G
iPod touch 4th
iPhone 6
iPod touch 3rd
iPhone 6 Plus
iPod touch 2nd
Sirius XM support
For the most up to date supported device list,
please visit www.flashlogic.com
8
Attention installer! Please read the following!
Audiovox strongly recommends that the unit be installed in an easily accessible place!
DO NOT PLACE IT BEHIND THE RADIO AND DO NOT HIDE UNDER CARPET!
Whether the unit is professionally or self installed, put the module where you can get to it easily in the future.
(Have the installer show you where the box is located.)
Installing the RDSUSBV1 module behind the radio will make it difficult to:
-Add possible future upgrades, changing software, adding new features, improving operation.
-Access the AUX input on the module to attach any audio device.
-Access the DIP switches located on the module.
-Remove the unit in case of failure.
MAKE SURE THAT THE MODULE IS INSTALLED IN AN ACCESSIBLE PLACE!
9
Connection Diagram
USB
FLash
Drives
Antenna
Out
Wireless Remote
Antenna
In
3
T
2
1
4
SOURCE
IST
PLAYL
ARTIS
5
ALBUM
6
iPhone
MENU
Module (Front)
or
IR Receiver
USB/Dock Cable
Sirius XM Satellite
Radio Tuner
Module (Back)
USB
Upgrade Port
+12
Ground Ignition
(Yellow) (Black) (Red)
Power Cable
10
Installation
1. Verify compatibility. Certain radios require
antenna adapter(s), not included in the kit.
2. Disconnect battery.
3. Remove radio from car.
5. Test for 12V constant, 12V switched, and ground sources.
Splice into with leads from power cable.
6. Route kit to glove box or other accessible location.
7. Connect battery and test*
8. Complete installation by re-installing the radio
4. Install Universal RDS USB cable. Plug the
factory radio antenna to the receptacle on
the module.
9. Save the frequency to a preferred preset on the radio if
desired.
*CAUTION: Do NOT connect any mini-din and iPod cable used on other Audiovox
products to the mini-din port. Failure to follow this will cause permanent damage
to the unit/iPod!
11
Owner’s Manual
12
Thank you for purchasing this product!
Please make sure to register the product to receive updates and technical support.
The following pages will guide you through the operation of the product.
Some features may vary depending on the factory car radio, the iPod or iPhone and the Satellite Radio
tuner type as well as firmware updates applied to the interface module.
13
Radio Data System (RDS) Text Display On Typical Car Radios
AM
FM 88.7 * Song * Artist
+
1
Radio
Source
2
3
Radio tuned
to frequency
as selected on
page 6.
4
5
6
RDS
--
FM
TEXT
m
RDS text display
available on RDS
capable radios.
Image is for illustration purposes only. Please review your vehicle radio’s documentation
for specific details on how to operate it and for details on RDS technology.
Some radios
feature a text/
info button
for additional
station information.
14
Basic Operation I.
AM
FM 88.7
+
1
2
3
RDS
4
5
6
--
FM
TEXT
m
1. Turn on the vehicle ignition to (ACC/ON) and turn the radio ON.
2. Select the FM source to tune to the preset station set by the configuration switches (see page 6).
3. Tune the radio to the channel that is set by the frequency selector.
15
Basic Operation II.
4. Connect the iPhone or iPod using an Apple authorized USB cable to the RDSUSBV1 module.
5. Use wireless remote to control devices, or control desired music on your iPod/iPhone.
6. Launch the music player or any music application and press play to start music playback.
7. To resume listening to local radio stations either pause or disconnect your iPod/iPhone, or press
the Source button on the optional wireless remote controller.
16
OEI Control Application - Settings
1. Download the Audiovox Original Equipment Industry OEI Control App
from the Apple iTunes store.
2. Launch the application and connect the iPhone to the RDSUSBV1
module using an Apple authorized USB cable. This application only
works when the iPhone is connected through the USB port.
3. Explore the features and settings of the application.
4. Customize the RDSUSBV1 settings with the help of the OEI control
app.
A firmware update might be required to the RDSUSBV1 module.
For more information, please visit www.audiovoxoei.com
17
OEI Control App - Music Remote Control
The control app features a “car friendly” remote control User Interface (UI)
for the iPod playback.
OBEY ALL TRAFFIC LAWS AND NEVER OPERATE A MOBILE PHONE
WHILE DRIVING YOUR VEHICLE.
NOTE: User Interface functions are subject to change.
18
Wireless Remote Function For iPod / iPhone
Toggle the audio sources between iPod/
USB, SIRIUS/AUX and FM
iPod: Shuffle SONG (within a PLAYLIST/
FOLDER) / Shuffle ALBUM / Shuffle off
Play / Pause
iPod: Repeat one / Repeat all / Repeat
off
iPod: Next Track
App: Next station/song (App dependent)
3
iPod: Previous Track
App: Prev station/song (App dependent)
6
1
iPod: Skip to the next PLAYLIST
4
iPod: Skip to the previous PLAYLIST
iPod: Skip to the next ALBUM
iPod: Skip to the previous ALBUM
*Next / Previous ARTIST function is currently not supported.
19
Wireless Remote Function For USB Flash DriveS
MENU
Toggle the audio sources between iPod/
USB, SIRIUS/AUX and FM
SOURCE
Shuffle SONG (within the flash drive) /
Shuffle FOLDER /Shuffle off
Play / Pause
Repeat one / Repeat all / Repeat
FOLDER
Next Track
Previous Track
Skip ahead 10 Tracks every 1 second
Skip back 10 Tracks every 1 second
PLAYLIST
ARTIST
ALBUM
3
2
1
6
5
4
Skip to the next folder on the USB drive
Skip to the previous folder on the USB
drive
20
Notes on USB Memory Structure
• This unit will recognize the first 8 levels of folders, with up to 50 accessible folders within each folder. Only the first 650
files will be read in each folder, the rest will be ignored.
• Songs play in the order they were added to the flash drive.
• The USB device must be in FAT16/32 format and contain supported MP3, WMA or AAC content.
• USB hard drives and USB hubs are not supported
FAT16/32
MP3 - WMA - AAC
21
Basic Operation - Satellite Radio
AM
TEXT
FM 88.7 * CH001 * HITS
+
1
2
Preset
Frequency
3
4
5
6
FM
RDS
--
m
RDS Text Showing
Sirius Channel Number
And Station Name
• The RDSUSBV1 is designed to interface a compatible Sirius XM satellite radio tuner to a vehicle radio.
• Audio will play through the preset FM frequency. Channels of the Sirius XM radio can be selected either using the wireless
remote control or through the Audiovox OEI control application.
22
OEI Control App - Sirius XM Remote Control
The control app features a “car friendly” remote control UI for Sirius XM.
Large fonts are used to display the station information.
Easy channel and category navigation with 4 way control.
6 presets are provided.
OBEY ALL TRAFFIC LAWS AND NEVER OPERATE THE MOBILE
PHONE WHILE DRIVING THE VEHICLE.
23
Wireless remote function for Sirius XM
Next Category
Toggle the audio sources between
iPod/USB, SIRIUS/AUX and FM.
Previous Category
Next Channel
Recall preset SIRIUS channel
Previous Channel
Note: To display SIRIUS ID, go to channel 000.
Save the current SIRIUS channel in
the corresponding preset.
24
Sirius XM operation (using wireless remote)
• Stations can be saved to PRESET 1-6 by holding the desired PRESET button, while listening to the station.
• If a Sirius Connect compatible tuner is not detected, then either a “No Tuner” vehicle message is displayed,
or the SIRIUS option will not be selectable.
• Go to Channel 000 to view the Satellite radio ID (SID) for activation. The 8 digit SID display format is in two
halves as SID “123456-” followed by “-78”.
25
Internet Radio Application Support (iPhone/iPod touch)
This kit includes support for internet radio streaming apps available on the iTunes® Store. Thousands of
stations can be streamed through data connections. Many popular streaming apps are supported including
Livio Radio, Pandora, iHeart Radio and more. Supported features such as text display on screen, and next/
previous track functions will vary by app.
To learn more about each app specifically, please visit the website for the app you need information about.
Data connection requirements (3G/4G/LTE/WiFi)
Users must have an active wireless data connection in order to stream music from an app while in the car. Data
connections including “3G” or “4G” through wireless carriers, or a third party wireless Internet access point
connected to your mobile device through WiFi will work. Because this app requires a data connection, it will only
work on connected devices such as the iPhone and iPod touch.
26
This Page Left Intentionally Blank
27
Charging the iPod or iPhone
The interface automatically charges the battery of the iPhone or
iPod when connected and your vehicle ignition key is in the ACC/
ON position.
Charging may be shown by an
icon that appears on the upper
right corner of the iPod screen.
The icon may vary by model.
28
Troubleshooting
Problem
Solution
Interference, loss of refreshing RDS
text, or signal fading.
This problem generally can occur on radios with two FM antenna inputs.
Radios with a diversity antenna design are able to switch from one antenna
input to the other to find the strongest FM signals. Disconnecting the
secondary antenna from the radio or using a diversity antenna adapter
typically resolves this problem.
Text is not displaying on the screen of
the radio.
Text from the iPod will only display if the radio is RDS capable. Look for RDS
capability: RDS capable radios will show text in addition to the frequency
such as song information while listening to certain FM stations.
Music is distorted or sound level is too
low with iPod connected.
Make sure all EQ and BASS boost options are turned off on your iPod.
The remote control is not controlling
the iPod.
Please make sure that the iPod dock connection is not loose. Make sure that
an iPod case is not preventing the dock connector from being fully seated.
Disconnect and reconnect the device. If iPod is not responding, please try
resetting it. Check the wireless remote’s battery and IR receiver connection.
29
Problem
Solution
The radio display contains “EMPTY/
STOP” and no music plays.
The iPod does not have playable audio files or end of a playlist is reached.
Please select a new playlist on the iPod or remote.
Cannot hear audio from iPod.
Check the DIP switch settings and make sure that radio is tuned to the
selected frequency. With the ignition OFF, disconnect the power harness
from module for a few seconds and reconnect. Reset the iPod.
Category reads “PRESELCTD”.
Playback of content selected on the iPod before connected it was to the
interface continues until new content is selected.
iPod does not charge.
Check all connections. See if iPod charges while connected to computer or
wall charger. You may need to reset the iPod.
30
Problem
Solution
Text from iPod/iPhone music App
doesn’t display.
Audio streams from internet radio is routed through the Flashlogic RDS kit,
but text information may not be available unless the applications shares the
“now playing” information with the kit.
I can’t control the iPod/iPhone/USB
drive from the radio.
Content control must be done directly on the iPod/iPhone, or via the remote
control.
Cannot hear AM/FM radio stations.
When an iPod/iPhone/USB drive is connected to the Flashlogic RDS USB
kit, the interface cuts out the factory antenna feed to prevent interference
form strong local stations. Disconnecting the iPod/iPhone/USB drive restores
the antenna connection.
If you have the optional remote control, you can press the SOURCE button to
switch between iPod/iPhone/USB drive and factory antenna feed.
31
Updating Firmware (Mac OS illustrated)
Connect module via mini USB
Product Registration Notification
Device Specifications And Update Selection
Firmware Update Progress
NOTE: The above screen shots are for illustration purposes only.
License Agreement (click Agree to proceed)
Module Updated Successfully!
32
Installation Notes:
33
This Page Left Intentionally Blank
34
12 MONTH LIMITED WARRANTY
VOXX ELECTRONICS CORP. (the Company) warrants to the original retail purchaser of this product that should this product or any part
thereof, under normal use and conditions, be proven defective in material or workmanship within 12 months from the date of original purchase,
such defect(s) will be repaired or replaced with reconditioned product (at the Company’s option) without charge for parts and repair labor. A
game controller, if supplied, is similarly warranted for ninety (90) days.
To obtain repair or replacement within the terms of this Warranty, the product is to be delivered with proof of warranty coverage (e.g. dated
.
This Warranty does not extend to the elimination of externally generated static or noise, to correction of antenna problems, to costs incurred
for installation, removal or reinstallation of the product, or to damage to digital memory/media devices, gaming devices, discs, speakers, accessories, or vehicle electrical systems.
This Warranty does not apply to any product or part thereof which, in the opinion of the Company, has suffered or been
damaged through alteration, improper installation, mishandling, misuse, neglect, accident, or by removal or defacement
of the factory serial number/bar code label(s). THE EXTENT OF THE COMPANY’S LIABILITY UNDER THIS WARRANTY
IS LIMITED TO THE REPAIR OR REPLACEMENT PROVIDED ABOVE AND, IN NO EVENT, SHALL THE COMPANY’S LIABILITY EXCEED THE PURCHASE PRICE PAID BY PURCHASER FOR THE PRODUCT.
This Warranty is in lieu of all other express warranties or liabilities. ANY IMPLIED WARRANTIES, INCLUDING ANY IM PLIED WARRANTY OF MERCHANTABILITY, SHALL BE LIMITED TO THE DURATION OF THIS WRITTEN WARRANTY.
ANY ACTION FOR BREACH OF ANY WARRANTY HEREUNDER INCLUDING ANY IMPLIED WARRANTY OF MERCHANT ABILITY MUST BE BROUGHT WITHIN A PERIOD OF 24 MONTHS FROM DATE OF ORIGINAL PURCHASE. IN NO CASE
SHALL THE COMPANY BE LIABLE FOR ANY CONSEQUENTIAL OR INCIDENTAL DAMAGES FOR BREACH OF THIS
OR ANY OTHER WARRANTY. No person or representative is authorized to assume for the Company any liability other than expressed
herein in connection with the sale of this product.
Some states do not allow limitations on how long an implied warranty lasts or the exclusion or limitation of incidental or cons equential damrights which vary from state to state.
VOXX Electronics Corporation, 150 Marcus Blvd., Hauppauge, New York 11788
1-800-645-4994
128-9032a
35
This Page Left Intentionally Blank
Document Number
www.flashlogic.com
128-9371
4