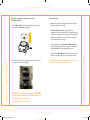
1
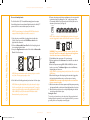
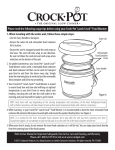
Owner’s Manual*
connectable entertaining system
For more hints, tips and recipes from the Crock-Pot® brand,
visit www.crockpot.com.
*For use with 2x1-Qt Double, 2-Qt Round and 3.5-Qt Oval units
as part of the Hook Up™ Connectable Entertaining System.
Crock-Pot hook up IB_13EM3.indd 1
5/23/13 9:06 AM
This appliance is for HOUSEHOLD USE ONLY.
There are no user-serviceable parts inside. Do not attempt to service this
product. A retractable power-supply cord is provided to reduce the hazards
resulting from entanglement or tripping over a longer cord.
2
Crock-Pot hook up IB_13EM3.indd 2-3
www.CrockPot.com
POLARIZED PLUG
This appliance has a polarized plug (one blade
is wider than the other). To reduce the risk of
electric shock, this plug is intended to fit into a
polarized outlet only one way. If the plug does
not fit fully into the outlet, reverse the plug.
If it still does not fit, contact a qualified
electrician. Do not attempt to modify the
plug in any way. If the plug fits loosely into the AC outlet
or if the AC outlet feels warm do not use that outlet.
M
R
WA
LOW
IMPORTANT NOTE: This appliance has a unique Patent Pending plug
design that will only allow it to work when used as a single unit and plugged
into a wall outlet or when using with other units in the Crock-Pot® Hook
Up™ Connectable Entertaining System. For your safety, do not attempt to
alter the product or plug in any other electrical products not sold with
this system.
IMPORTANT NOTE: Some countertop and table surfaces are not
designed to withstand the prolonged heat generated by certain appliances.
Do not set the heated unit on a finished wood table. We recommend
placing a hot pad or trivet under your unit to prevent possible damage to
the surface.
NOTE: During initial use of this appliance, some slight smoke and/or odor
may be detected. This is normal with many heating appliances and will not
recur after a few uses.
NOTE: Please use caution when placing your stoneware on a ceramic or
smooth glass cook top stove, countertop, table, or other surface. Due to
the nature of the stoneware, the rough bottom surface may scratch some
surfaces if caution is not used. Always place protective padding under
stoneware before setting on table or countertop.
(800) 323-9519
Save These Instructions
1. READ ALL INSTRUCTIONS BEFORE USING.
2. Do not touch hot surfaces. Use handles or knobs.
3. To protect against electrical shock, do not immerse cord, plug, or
heating base in water or other liquid.
4. Close supervision is necessary when any appliance is used by or
near children.
5. Unplug from outlet when not in use and before cleaning. Use oven
mitts or allow to cool before putting on or taking off parts.
6. Do not operate any appliance with a damaged cord or plug or after
the appliance malfunctions or has been damaged in any manner. Return
appliance to the manufacturer (see warranty) for examination, repair,
or adjustment.
7. Do not use outdoors.
8. Do not let cord hang over edge of table or counter or touch
heated surfaces.
9. Do not place on or near a hot gas or electric burner or in a
heated oven.
10. Extreme caution must be used when moving an appliance containing
hot oil or other hot liquids. Always use oven mitts when moving your
heated unit.
11. Do not use appliance for other than intended use.
12. Avoid sudden temperature changes, such as adding refrigerated foods
or cold liquids into a heated pot.
13. To disconnect, turn OFF then remove plug from wall outlet or
connecting units.
14. The use of accessory attachments not recommended by the
manufacturer may cause injuries.
15. Keep 6 inches clear from the wall and 6 inches clear on all sides.
16. CAUTION: To prevent damage or shock hazard, do not cook directly in
the heating base. Cook only in the stoneware provided.
AN EXTENSION CORD MAY BE USED WITH CARE; HOWEVER, THE
MARKED ELECTRICAL RATING SHOULD BE AT LEAST AS GREAT AS
THE ELECTRICAL RATING OF THE UNIT. The extension cord should not
be allowed to drape over the counter or tabletop where it can be pulled on by
children or tripped over unintentionally.
H
HIG
Important Safeguards
When using electrical appliances, basic safety precautions should
always be followed, including the following:
Owner’s Manual
OFF
Crock-Pot ® | Hook Up™ Connectable Entertaining System
3
5/23/13 9:06 AM
Crock-Pot ® | Hook Up™ Connectable Entertaining System
Owner’s Manual
4
Crock-Pot hook up IB_13EM3.indd 4-5
connection than socializing
with friends and family. With
the Crock-Pot® Hook Up™
Connectable Entertaining System,
hosting everything from intimate
gatherings to large dinner parties
(and everything in-between)
is easier than ever. You and
your guests will be connected
in no time!
connectable entertaining system
Important Safeguards | Page 2
Contents | Page 5
Product Diagrams | Page 6
Using Your Hook Up™
Entertaining system | Page 9
Caring For Your Hook Up™
Entertaining system | Page 19
Up to six units can hook up using a single
outlet, and you’re ready to prepare – and
elegantly serve – dips, side dishes, main dishes
and desserts for any occasion.
FAQs | Page 22
Troubleshooting | Page 24
Warranty | Page 26
Welcome to the future of “entertaining
crocking” – it’s a whole new way to connect™.
www.CrockPot.com
(800) 323-9519
Contents
A Whole New Way to Connect™
Nothing creates a stronger
5
5/23/13 9:06 AM
Crock-Pot ® | Hook Up™ Connectable Entertaining System
Owner’s Manual
NOTE: The instructions in this manual apply to all three models included in the
Crock-Pot® Hook UpTM Connectable Entertaining System, models SCCPMD1, SCCPMD2
and SCCPMD3. Please refer to below diagrams for individual unit components.
Resettable Circuit Breaker (View A)
Unit Components
A
A
B
B
RESET
C
C
Bottom View
K
K
D
D
Plug Connection (View B)
E
E
M
LOW
F
OFF
GH
HI
WAR
F
J
I H
B
C
K
D
M
LOW
GH
F
OFF
WAR
HI
Product Diagram
SCCPMD1 / 2-1 Qt Ovals
A
J
G
I
I H
Front
SCCPMD2 / 2 Qt Round
E
A. Lid Handle
B. Removable Glass Lids
C. Removable Stoneware
D. Heating Base
E. Manual Retractable Cord
F. Cord Release Latch (See View C)
G. Integrated Handle
H. Indicator Light
I. Temperature Control Knob
J. Resettable Circuit Breaker (See
View A)
K. Plug Connection Outlet (See
View B)
Left Side
Cord Release Latch (View C)
Up to 6 units can be
plugged into one power outlet.
Up to 6 units can be
plugged into one power outlet.
Front
H
Right Side
SCCPMD3 / 3.5 Qt Oval
Push the Cord-Release Latch
down to remove cord/plug.
Product Diagram
J
G
G
Refer to the icon to the left of the power cord (example shown in View C) to see
how many units each unit in your system represents.
6
Crock-Pot hook up IB_13EM3.indd 6-7
www.CrockPot.com
(800) 323-9519
7
5/23/13 9:06 AM
Owner’s Manual
connectable entertaining system
8
Crock-Pot hook up IB_13EM3.indd 8-9
www.CrockPot.com
(800) 323-9519
Using Your Connectable Entertaining System
Crock-Pot ® | Hook Up™ Connectable Entertaining System
9
5/23/13 9:06 AM
Preparing your Crock-Pot ® Hook Up™ Connectable Entertaining
System for use:
1. Before you use your units, remove all packaging components and wash
the lid and stoneware with warm, soapy water and dry thoroughly.
2. Check that the Temperature Control Knob is in the OFF position.
3. Place the unit(s) in the desired serving area prior to turning the units
on. There are integrated handles located on the bottom of both sides of
each unit for easy handling.
WARNING: Do not attempt to lift multiple units at one
time when they are connected together or stacked.
Assembly:
1. Place Stoneware into the Heating Base.
2. Lower the Glass Lid(s) horizontally down onto the Stoneware.
Getting Started
How to use:
1. Place the Removable Stoneware into the Heating Base, add your
ingredients, and cover with the Glass Lid(s).
2. Plug in your unit and select the temperature setting from the three
setting options. Refer to your specific recipe for more precise
cook times.
NOTE: Your unit is equipped with a WARM setting. WARM is only for
keeping already-cooked food warm. Do not cook on the WARM setting.
NOTE: We do not recommend using the WARM setting for more than
four (4) hours.
3. When heating or cooking is done, unplug your unit and allow it to cool
before cleaning.
4. Once the unit has cooled, store the cord by slowly feeding the cord
back into the base until it clicks into place.
10
Crock-Pot hook up IB_13EM3.indd 10-11
www.CrockPot.com
Owner’s Manual
Storing the Cord
To store the cord, start close to the cord pocket. Using your thumb and
forefinger, follow the pattern of the cord to guide it back in. If you seem to
get stuck, pull the cord completely out and try again.
Usage notes:
• If you suspect that the power has gone out during the day, the food may
be unsafe to eat. If you are unaware of how long the power was out, we
suggest you discard the food inside.
• To avoid over or under-cooking, always fill the Stoneware ½ to
¾ full to conform to recommended cook times (with the exception
of certain cakes and custards, and as guided otherwise in our slow
cooker recipes).
• Do not overfill Stoneware. To prevent spillover, do not fill
Stoneware higher than ¾ full.
• Always cook, with the Glass Lid(s) on, for the recommended time.
Do not remove the lid during the first two hours of cooking.
• Always wear oven mitts when handling the Glass Lid(s) or Stoneware.
• Unplug when cooking is done and before cleaning.
• Removable Stoneware is ovenproof and microwave-safe. Glass lid/
lids are not safe to use in the oven or broiler. Do not use removable
stoneware or glass lid/lids on gas or electric burner or under the
broiler. (Refer to chart on page 20.)
For use as a single unit:
1. Press down on the red Cord-Release Latch on the right-hand side
of the unit.
2. Pull out the Retractable Power Cord and plug the cord into a
standard electrical outlet.
3. Add your ingredients to the Stoneware and cover with Glass Lid(s).
4. Select the temperature setting (HIGH, LOW or WARM) based on
your recipe. The Indicator Light will illuminate, indicating that
your unit is on.
5. When finished, turn your unit OFF, then unplug the Power Cord and
allow unit to cool down prior to cleaning.
NOTE: WARM is only for keeping already- cooked foods warm. Do not Cook
on the Warm setting.
(800) 323-9519
How to Use (cont.)
Crock-Pot ® | Hook Up™ Connectable Entertaining System
11
5/23/13 9:06 AM
Crock-Pot ® | Hook Up™ Connectable Entertaining System
For use with multiple units:
The Crock-Pot ® Hook Up™ Connectable Entertaining System has a unique
Patent Pending electrical connector that will only allow units in the Hook Up™
system to be able to connect and draw power from each other.
Owner’s Manual
5.Connect other units as needed in any combination up to the recommended
total number of six (6) by adding up the “Unit ” count (see page 6, View
C for example). Refer to the icon located to the left of the power cord to
determine your unit count. (See Figure A).
Counts as
1
Unit
Unit B
electrical
outlet
Unit A
NOTE: Recommended maximum number of units to plug into one outlet is
six (6) units. This may vary depending on circuit.
4.Push Unit A and Unit B together until you hear them ‘click’ into place.
NOTE: When using with multiple units side by side, make sure the plug in
Unit A is securely in place prior to connecting units together. To ensure the
units are connected properly, you can turn the temperature dial to HIGH,
LOW or WARM for each of the units and the LED indicators should
illuminate when they are firmly connected.
12
Crock-Pot hook up IB_13EM3.indd 12-13
5
4
3
2
1
www.CrockPot.com
NOTE: Units do not have to be clicked tightly together to function. As long as the
male end is plugged into the female end, the units will be powered on. (See Figure B)
Figure B
WARNING: Your system was designed to connect only with other
Hook Up™ units. Do not attempt to plug in any other appliances
other than those that are sold within this system.
6.To add additional units, repeat steps 3-5 on previous page.
7.Add your ingredients to the Stoneware of each unit and cover with the
Glass Lid(s).
8.Select the temperature setting (HIGH, LOW or WARM) for each unit
based on your recipe. The Indicator Light on each unit will illuminate,
indicating that your units are on.
NOTE: WARM is only for keeping already-cooked food warm. Do not cook on the
WARM setting.
9.When finished using, turn off and unplug the first unit that is plugged into
the electrical outlet and allow units to cool down prior to cleaning.
WARNING: Do not attempt to lift multiple units at one time when
they are connected together.
10. Once the units have cooled down, separate and pull the system apart using
the integrated handles on the bottom left and right-hand sides of each unit.
11. Once the unit has cooled, store the cord by slowly feeding the cord back
into the base until it clicks into place.
Storing the Cord
To store the cord, start close to the cord pocket. Using your thumb and
forefinger, follow the pattern of the cord to guide it back in. If you seem to
get stuck, pull the cord completely out and try again.
(800) 323-9519
Connecting Multiple Units
1.Select the unit you would like to be plugged into the wall outlet
(Unit A). Press down on the red Cord-Release Latch on the
right-hand side of that unit.
2.Pull out the Retractable Power Cord for Unit A and plug the cord
into a standard electrical outlet.
3.Line up the Plug Connection outlet of Unit A with the Retractable
Cord of Unit B, as shown:
Retractable
Cord
6
Figure A
Wall
Connecting Multiple Units
NOTE: To prevent damage or shock hazards, DO NOT alter the units in
anyway to allow other appliances to be able to connect to it.
13
5/23/13 9:06 AM
Crock-Pot ® | Hook Up™ Connectable Entertaining System
Owner’s Manual
The Crock-Pot® Hook Up™ Connectable
Entertaining System can grow or adapt
as your needs change.
* Other units are required.
For all the ways you connect,
hook up your system, your way.
Large events
Small gatherings
Medium get-togethers
Spread the fun...
...to multiple locations!
14
Crock-Pot hook up IB_13EM3.indd 14-15
www.CrockPot.com
(800) 323-9519
15
5/23/13 9:06 AM
Crock-Pot ® | Hook Up™ Connectable Entertaining System
Owner’s Manual
NOTE: Recommended maximum number of units to plug in to one outlet is
six (6). This may vary depending on circuit.
Mix & match!
Fuse/Overload Protection:
Your system is designed to prevent connecting more than the
recommended number of units (six) to each other. When using multiple
units together, and when necessary, any unit that overloaded the system
will turn itself off.
• If this happens, simply reset the built in Resettable Circuit
Breaker on the unit that is plugged directly into the wall. To reset
the unit, push the resettable button with your index finger as shown:
Additionally, you may have to reset all the subsequent units that are
connected after the tripped unit that overloaded the system.
• You will notice which units have turned themselves off, as the
Indicator Light will no longer be illuminated on these units.
16
Crock-Pot hook up IB_13EM3.indd 16-17
www.CrockPot.com
(800) 323-9519
If Your Unit Stops Working
• Depending on the circuit, you may need to remove one or
more units from your system so the circuit does not trip again
from overload.
17
5/23/13 9:06 AM
Owner’s Manual
FFO
Crock-Pot ® | Hook Up™ Connectable Entertaining System
HG
IH
WAR
M
LOW
Your system is designed to stack for easier storage.
To stack your system:
Care and cleaning:
1. Turn the Glass Lid(s) of each unit in your system upside down and
nest it inside the Stoneware (See Figure A).
• Always turn your unit(s) off, unplug from the electrical outlet, and
allow to cool down prior to cleaning.
• The Glass Lid(s) and Stoneware can be washed in the
dishwasher, or with hot, soapy water. Do not use abrasive cleaning
compounds or scouring pads. A cloth, sponge or rubber spatula will
usually remove residue. To remove water spots and other stains,
use a non-abrasive cleaner or vinegar.
LOW
OFF
GH
HI
• The outside of the Heating Base may be cleaned with a soft cloth
and warm, soapy water. Wipe dry. Do not use abrasive cleaners.
Storing Your Product
Figure A
2. Stack each unit on top of one another by placing the base of Unit A on
top of the base of Unit B (See Figure B).
CAUTION: Never immerse the Heating Base in water or other
liquids. No other servicing should be performed.
Figure B
NOTE: If the 2 x 1 Qt model/models (model SCCPMD1)
are a part of your system, they will always need to be at
the bottom or base of the stack
(See Figure B for reference to size).
18
Crock-Pot hook up IB_13EM3.indd 18-19
www.CrockPot.com
(800) 323-9519
Caring for Your Product
M
WAR
• As with any fine ceramic, the Stoneware and Glass Lid(s) will
not withstand any sudden temperature changes. Do not wash the
Stoneware and Lid(s) with cold water when they are hot.
19
5/23/13 9:06 AM
Crock-Pot ® | Hook Up™ Connectable Entertaining System
Owner’s Manual
Safety Chart: Uses
Dishwasher
Safe
Oven
Safe
Microwave
Safe
Stovetop
Safe
connectable entertaining system
Glass Lid
yes
yes
Stoneware
20
Crock-Pot hook up IB_13EM3.indd 20-21
no
no
no
yes,
yes
no
but not with
the broiler.
www.CrockPot.com
(800) 323-9519
FAQ’s and Troubleshooting
connectable entertaining system
21
5/23/13 9:06 AM
Crock-Pot ® | Hook Up™ Connectable Entertaining System
Can I plug other electrical products into the Hook Up™
system?
No. For your satisfaction and safety, only units sold in the Hook Up™
system can be connected together. The plug has a special, Patent
Pending design that will not allow other electrical products to be
plugged in.
FFO
Up to 6 units can be
plugged into one power outlet.
HG
WAR
M
LOW
How do I stack my system?
Up to 6 units can be
plugged into one power outlet.
Front
IH
1. Turn the Glass Lid(s) of each unit in your system upside down and
nest it inside the Stoneware (See Figure A).
2. Stack each unit on top of one another by placing the base of
Unit A on top of the base of Unit B (See Figure B).
Right Side
How many units can I hook up together using only one outlet?
The recommended maximum number of units to plug in to one
outlet is six (6) units. This may vary depending on the circuit and
other appliances drawing current off the circuit.
M
LOW
OFF
WAR
GH
HI
Frequently Asked Questions (FAQ)
Press down on the red Cord-Release Latch on the right-hand side
of the unit, as shown:
Figure A
6
5
4
3
2
1
NOTE: Please make note of the icon on the side of your unit so as to avoid
overloading your circuit. Ensure that the total number the icons add up to
does not exceed six (6).
22
Crock-Pot hook up IB_13EM3.indd 22-23
Figure B
NOTE: If the 2 x 1 Qt model/models (model SCCPMD1) are a part of
your system, they will always need to be at the bottom or base of the
stack (See Figure B for reference to size).
www.CrockPot.com
Storing the Cord
To store the cord, start close to the cord pocket. Using your thumb and
forefinger, follow the pattern of the cord to guide it back in. If you seem to
get stuck, pull the cord completely out and try again.
(800) 323-9519
Frequently Asked Questions (FAQ)
How do I release the cord from the unit?
Owner’s Manual
23
5/23/13 9:06 AM
Crock-Pot ® | Hook Up™ Connectable Entertaining System
2. When connecting multiple units, the entire system shut Off and
stopped working.
1. Unit isn’t turning on.
• Make sure unit is plugged into power outlet.
• Make sure Control Knob is turned to any position other than Off.
• If both items above are met, press the Reset button and turn the unit on.
CHECK 1
Owner’s Manual
CHECK 2
LOW
HI
M
GH
R
WA
• There are too many units connected together in one outlet. Make sure
you haven’t exceeded the recommended maximum number of connected
units to use in one outlet (6). Remove one or more units from the system
as necessary. Once the unit(s) have been removed, reset the first unit that
is plugged directly into the wall by pushing the Resettable Circuit Breaker
button shown below. You may also need to reset each unit that is
connected to the first unit if the indicator light does not illuminate.
Troubleshooting
7
RESET
24
Crock-Pot hook up IB_13EM3.indd 24-25
RESET
www.CrockPot.com
(800) 323-9519
6
5
4
3
2
1
Troubleshooting
Unit isn’t turning on.
25
5/23/13 9:06 AM
Crock-Pot ® | Hook Up™ Connectable Entertaining System
Owner’s Manual
Sunbeam Products, Inc. doing business as Jarden Consumer Solutions or if in Canada, Sunbeam Corporation
(Canada) Limited doing business as Jarden Consumer Solutions (collectively “JCS”) warrants that for a period
of one year from the date of purchase, this product will be free from defects in material and workmanship.
JCS, at its option, will repair or replace this product or any component of the product found to be defective
during the warranty period. Replacement will be made with a new or remanufactured product or component.
If the product is no longer available, replacement may be made with a similar product of equal or greater
value. This is your exclusive warranty. Do NOT attempt to repair or adjust any electrical or mechanical
functions on this product. Doing so will void this warranty.
This warranty is valid for the original retail purchaser from the date of initial retail purchase and is not
transferable. Keep the original sales receipt. Proof of purchase is required to obtain warranty performance.
JCS dealers, service centers, or retail stores selling JCS products do not have the right to alter, modify or any
way change the terms and conditions of this warranty.
This warranty does not cover normal wear of parts or damage resulting from any of the following: negligent
use or misuse of the product, use on improper voltage or current, use contrary to the operating instructions,
disassembly, repair or alteration by anyone other than JCS or an authorized JCS service center. Further, the
warranty does not cover: Acts of God, such as fire, flood, hurricanes and tornadoes.
What are the limits on JCS’s Liability?
How to Obtain Warranty Service
In the U.S.A.
If you have any questions regarding this warranty or would like to obtain warranty service, please call
1-800-323-9519 and a convenient service center address will be provided to you.
In Canada
If you have any questions regarding this warranty or would like to obtain warranty service, please call
1-800-323-9519 and a convenient service center address will be provided to you.
In the U.S.A., this warranty is offered by Sunbeam Products, Inc. doing business as Jarden Consumer Solutions
located in Boca Raton, Florida 33431. In Canada, this warranty is offered by Sunbeam Corporation (Canada)
Limited doing business as Jarden Consumer Solutions, located at 20 B Hereford Street, Brampton, Ontario
L6Y 0M1. If you have any other problem or claim in connection with this product, please write our Consumer
Service Department.
PLEASE DO NOT RETURN THIS PRODUCT TO ANY OF THESE ADDRESSES OR TO THE
PLACE OF PURCHASE.
Notes
Limited Warranty
JCS shall not be liable for any incidental or consequential damages caused by the breach of any express,
implied or statutory warranty or condition. Except to the extent prohibited by applicable law, any implied
warranty or condition of merchantability or fitness for a particular purpose is limited in duration to the
duration of the above warranty. JCS disclaims all other warranties, conditions or representations, express,
implied, statutory or otherwise. JCS shall not be liable for any damages of any kind resulting from the
purchase, use or misuse of, or inability to use the product including incidental, special, consequential or similar
damages or loss of profits, or for any breach of contract, fundamental or otherwise, or for any claim brought
against purchaser by any other party. Some provinces, states or jurisdictions do not allow the exclusion or
limitation of incidental or consequential damages or limitations on how long an implied warranty lasts, so the
above limitations or exclusion may not apply to you. This warranty gives you specific legal rights, and you may
also have other rights that vary from province to province, state to state or jurisdiction to jurisdiction.
To register your product, please visit us online at www.crockpot.com.
© 2013 Sunbeam Products, Inc. doing business as Jarden Consumer Solutions. All rights reserved. Distributed
by Sunbeam Products, Inc. doing business as Jarden Consumer Solutions, Boca Raton, Florida 33431.
Website: www.crockpot.com.
Printed in China
GCDS-CRP29852-JC
26
Crock-Pot hook up IB_13EM3.indd 26-27
P.N. 164830 Rev B
SCCPMD1-CH_13EM3/9100050004026
www.CrockPot.com
(800) 323-9519
27
5/23/13 9:06 AM
www.Crock-Pot.com
facebook.com/crockpot
© 2013 Sunbeam Products, Inc. doing business as Jarden Consumer Solutions. All rights reserved. Distributed by
Sunbeam Products, Inc. doing business as Jarden Consumer Solutions, Boca Raton, Florida 33431.
Crock-Pot hook up IB_13EM3.indd 28
5/23/13 9:06 AM