1
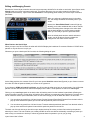
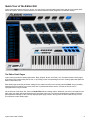
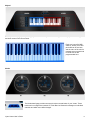
USER’S GUIDE
Welcome to the Vyzex Vortex User’s Guide. Please remember to check back at the Alesis website (www.alesis.com) for
updates to the program and to this document.
USER’S GUIDE ....................................................................................................................................................................... 1
What are the minimum requirements for the program? ...................................................................................................... 1
PC..................................................................................................................................................................................... 1
MAC ................................................................................................................................................................................. 1
How do I install and configure the program? ....................................................................................................................... 1
Auto-sensing, auto-sensing, 1, 2, 3… .............................................................................................................................. 1
Back up your Patches .......................................................................................................................................................... 2
What if Vyzex couldn’t find my Vortex? ............................................................................................................................... 2
Where’s the Help for this Software? .................................................................................................................................... 2
Editing and Managing Presets............................................................................................................................................. 3
When Patches Are Out-Of-Sync ...................................................................................................................................... 3
Quick Tour of the Editor GUI ................................................................................................................................................... 4
The Editor Detail Pages ....................................................................................................................................................... 4
Neck ................................................................................................................................................................................. 5
Body ................................................................................................................................................................................. 5
Keybed ............................................................................................................................................................................. 6
Knobs ............................................................................................................................................................................... 6
Pads ................................................................................................................................................................................. 7
The Bank Editor ............................................................................................................................................................... 8
The Collection View ............................................................................................................................................................. 9
Patch File Open/Save ........................................................................................................................................................ 10
MIDI Ports and Autosense................................................................................................................................................. 10
What are the minimum requirements for the program?
PC
Windows XP and up. P4 equivalent Processor and up, 32-bit color graphics and 1024x768 or larger display.
MAC
OSX 10.4.x and up, all Intel Processors. 1024x768 or larger display.
How do I install and configure the program?
First you should connect your Vortex to your computer with the supplied USB cable and then run the editor installer. Now
you should quit any MIDI port using music software you have running before you launch the program for the first time –
This will avoid any possible conflicts between Vyzex and your other MIDI software on the program’s maiden voyage.
Auto-sensing, auto-sensing, 1, 2, 3…
By default, Vyzex Vortex will open every MIDI In and MIDI Out port on your computer and will run a thorough search for
your Vortex on these MIDI ports: When your Vortex has been found, Vyzex selects the Vortex MIDI IN and MIDI OUT
ports that were detected and proceeds to...
Vyzex Vortex User’s Guide
1
Back up your Patches
Vyzex Vortex will automatically GET your Vortex patch bank. To back this data up to your hard disk, choose ‘FILE->Save
Set’ from the application’s menu. You’re now backed up, provided you don’t save any later edits to this file accidentally.
If you’re worried about future edits damaging your backup SET file, choose the ‘FILE->Save Set As…’ option to change
the file name you are working with. This will ensure your backup SET is no longer open in the editor and therefore safe
from any file saving you do while exploring the Vyzex Vortex editor.
What if Vyzex couldn’t find my Vortex?
If the AutoSense routine on program launch fails to find your Vortex, the editor will launch the QuickStart Help Guide
PDF which explains many of the common reasons why Vortex might not be detected by the editor: Procedures to resolve
these problems are included in this document.
The QuickStart Help GUIDE PDF and the rest of the Vyzex Vortex manuals are available from the application’s Manuals
menu. If in doubt, read them first and should you be unable to work things out, the application’s Online menu has a direct
link to the Vyzor Technical Support Board where help for editor related issues can be browsed, searched and
requested.
If you have hardware or firmware problems with your Alesis Vortex, please contact:
http://community.alesis.com/alesis
Where’s the Help for this Software?
Vyzex Vortex includes PDF manuals to help you along.
For detailed documentation of the editor’s many features, please keep reading.
If you want specific information regarding the program preferences, check out the Preference Guide PDF and the other
documents available from the application’s Manuals menu.
You can also check out the official Vyzor Editors YouTube channel at:
http://www.youtube.com/user/VyzorEditors to see if there are helpful videos
related to your Vyzex Vortex operational question.
Video demonstrations of our Vyzex and Vyzor editors are posted here, along with
all the tech support videos referenced by the Vyzor Technical Support board
(http://support.vyzor.com).
Vyzex Vortex User’s Guide
2
Editing and Managing Presets
Because the Vortex Keytar controller does not have a temporary edit buffer for the editor to work with, Vyzex Vortex works
directly inside your Vortex’s onboard patch bank. This means that every time you select a patch in the editor GUI
(Graphical User Interface), Vyzex Vortex will overwrite the corresponding patch aboard your Vortex keytar controller’s
patch bank.
When you adjust any individual control in the editor
GUI, the change will not be immediately sent to your
Vortex.
Instead, the ‘Store Edited Patch’ button will light up,
allowing you to make additional edits to other controls
before committing these changes to the editor bank
and the bank aboard your Vortex keytar controller:
When you are ready to proceed, press the button.
Once the edited patch has been stored and sent to
Vortex, you will be able to directly evaluate the
changes from the actual Vortex controls.
When Patches Are Out-Of-Sync
When you open a set file from disk, the editor will ALWAYS display the loaded set file contents: Whether it SYNCS all its
patches or only the first one is up to you.
Whenever you open a backup set file from disk, the following dialog will open:
As the dialog explains, the contents of the file you have opened should be transmitted (Synced) to your Vortex to ensure
the editor GUI and the patches aboard your Vortex are in agreement.
If you choose to SYNC only patch 1 to Vortex, you will see that the editor goes into an unusual mode: You will find that
patches 2-22 are different on Vortex than those displayed in the editor. These patches are said to be out-of-sync.
Clicking on any out-of-sync patch in the bank editor will load the patch from the hardware’s patch bank (affecting the
Vortex front panel controls), but the editor will load the (likely different) corresponding patch data from the currently open
set file. While this seems quite undesirable, there are two useful things you can do when the editor is in this mode.
1. You can select any patch from 2-22 and choose 'Get the Selected Patch Bank Elements' from the bank editor's
pop-up menu and that will update your set file with this particular patch from Vortex.
2. You can select any patch from 2-22 and choose 'Transmit selected patch bank elements' from the bank editor's
pop-up menu and that will update Vortex with this particular patch from the set file.
The basic rule of thumb is that you should not open another backup file unless you have first backed up the patches
aboard your Vortex. This rule will allow you to always SYNC the entire set without accidentally overwriting a preset you
want to keep, so remember to backup or collect any presets that are important to you as you go along.
Vyzex Vortex User’s Guide
3
Quick Tour of the Editor GUI
Vyzex Vortex has a simple ‘all-in-one’ layout. You can see the currently loaded patch name and the current patch bank
entries at a glance, and can choose between five different detailed control categories for parameter editing.
The Editor Detail Pages
Vyzex Vortex provides five detail pages (Neck, Body, Keybed, Knobs, and Pads). You can switch between these pages
by clicking on the buttons along the top row, or by clicking on the corresponding area in the Vortex graphic that spans the
bottom of the editor GUI.
Each detail page shows the parameter settings for the related controls in the currently selected Patch. As you probably
already know from exploring your Vortex, there are 24 patches aboard the device, of which the first 22 can be
reprogrammed to suit your needs.
On the left side of the editor GUI, there is a Bank Editor which is always visible. Whenever you select a new patch in the
bank editor, this patch will be transmitted to the connected Vortex unit. The GUI will simultaneously update to show the
patch parameter settings for the currently displayed patch page controls. We’ll get into the bank editor shortly, but first
let’s explore the editor detail pages…
Vyzex Vortex User’s Guide
4
Neck
The Neck detail page provides access to the controls located on the
Vortex keytar neck: The Ribbon, Pitch wheel and Slider can be
configured here.
Body
The Body detail page provides access to the controls left over from the
other pages: The Accelerometer, Start/Stop button and default Program
Change that is transmitted on the load of the current Vortex patch can
be configured here.
Vyzex Vortex User’s Guide
5
Keybed
The Keybed detail page provides a drag-keyboard control that you can click or drag to set the split point between upper
and lower zones in the current Patch.
Each zone’s specific MIDI
channel, velocity curve and
pitch shift can be set here,
and the value of the volume
message sent on patch load
for each zone is also
programmable here.
Knobs
The Knobs detail page provides access to the three central knobs of your Vortex. These
knobs can be configured to transmit CC, Pitch Bend or Aftertouch messages on individual
channels and within user-defined ranges.
Vyzex Vortex User’s Guide
6
Pads
The Pads detail page provides editing control over all eight of the Vortex pads.
These pads can be configured to transmit Notes, CC messages, or Program
Change commands on individual channels and within user-defined ranges.
That’s it for the Vortex Patch editor GUI. Now let’s look at the Bank Editor.
Vyzex Vortex User’s Guide
7
The Bank Editor
The Bank Editor serves several purposes:
• You can select new patches for editing by clicking on them.
•
You can reorganize the patches within the editor’s bank area with drag and drop
operations.
•
You can rename patches in the bank by double-clicking on them: No STORE
required afterwards.
•
If you have opened a backup set file and opted not to transmit the entire contents to
Vortex, you can SYNC individual patches to your Vortex by just clicking on them
where they will replace the corresponding locations in its onboard patch bank
•
You can GET selected patches from your Vortex’s onboard patch bank.
By default, drag and drop will swap the source patch with the destination. CTRL-C will copy
the current selection to the clipboard and CTRL-V will paste it back over any new selections
you make.
SHIFT-Drag will insert the source after the destination, and it will also move back the bank
entries in between the two in order to fill the hole left behind by the source.
Any changes you make the ordering of the bank will be automatically transmitted to Vortex
without any store operations required on your part. Vortex may require a few seconds to
update itself when this happens so don’t be alarmed if Vortex’s controls go nonresponsive
during this short moment of housecleaning.
NOTE: The Sonivox and Alesis patches cannot be edited or overwritten.
IMPORTANT
Vyzex Vortex is a Direct Bank Editor: This means that any data displayed in the editor is
also automatically transmitted to the Vortex where it will replace any data stored in the
corresponding bank locations.
While this direct operation makes for a very efficient and intuitive workflow, it also means you
need to ensure you have backed up any patches from your Vortex before you begin
exploring the editor with any set data opened from disk. The first patch from the opened set
file will end up replacing the first patch on your Vortex, and so will the rest of the opened
set’s patches if you are not very careful about which patches you click on in the bank editor.
As mentioned on Page 2 of this document, backing up your current presets as a SET file is
easily done whenever the editor program is first launched – By default, Vyzex Vortex will
request your current patches from Vortex on launch, so all you need to do is save this data
as a uniquely named SET file and it will be available for recall when you need it.
Vyzex Vortex always loads patch 01 for editing when you get the patch bank data from the
instrument or open a Set file from disk.
This means that any un-stored patch edits will not persist between sessions: If you want to keep any
edited data, you will need to STORE it or COLLECT it before saving and loading another file.
For even more advanced bank management, activate the Collection view (Options->Collection View in the program
menu): Then you can drag and drop patches between the bank and collection view.
You can think of the collection view as an unlimited bank of patches. It is saved to disk every time you add or delete an
entry, so it remains constant between runs of the editor program.
Vyzex Vortex User’s Guide
8
The Collection View
The collection view is an optional ‘side-car’ view that can be opened alongside the editor GUI. This view is activated from
the application’s Options Menu: Simply check the Set File View item and you’ll see this ‘side-car’ view open to the right
of the editor GUI.
The collection acts as a global listing of your favorite patches that remains available no matter which set file you have
currently opened. This property makes the Collection View as equally useful as both a transfer clipboard and a master
library of individual patches.
To transfer any bank entry to the Collection, drag it from the Bank window into the Collection and the patches there will be
sorted alphabetically by name.
When you click on any entry in the Collection, Vyzex will automatically load it into Vortex’s current patch editor: You will
still need to press the “Store Edited Patch” button to commit the changes to the current bank slot on your Vortex.
To transfer a collected patch directly to the bank editor, just drag it from the collection to a slot in the bank editor and
release the mouse. The collected patch will replace that bank entry in the current set and be automatically sent to the
patch bank on your Vortex without any Store operation required. If you drop a dragged collection patch elsewhere within
the editor GUI, the collected patch will replace the currently edited patch, just as if you had only mouse-clicked within the
collection.
When you first install Vyzex Vortex, the Collection will be empty. Then as you add items to it from the Editor, the
Collection will stores them sequentially, which means the newer entries will always be located closer to the bottom of the
collection’s listing: This allows you to archive multiple versions of the same item and not worry about which one is the
most recent.
The entire collection is stored as a single file on your hard drive called Default.SQC: If you ever
want to archive the collection, this is the file to back up.
The Default.SQC file is located in the \Psicraft\Vyzex Vortex\Alesis Vortex subfolder of your user
documents folder (on both Windows and Mac).
Vyzex Vortex User’s Guide
9
Patch File Open/Save
While the Set file format (*.SQS) is ideal for saving and restoring entire banks of Vortex patches, there will probably be
times when you want to save, share or load a single patch at a time.
You can save the currently loaded patch to a Patch (*.PCH) file any time you like
– You don’t even have to STORE it first.
Right-click anywhere there is no editable control in the editor GUI (such as the
Alesis logo) and select ‘Save Patch As...’ to launch the patch save dialog.
To open a patch file, simply repeat the steps above, only select ‘Open Patch...’ from the menu. The contents of this file will
replace the currently loaded patch, but you will need to STORE this patch to the bank to make it a permanent part of your
Vortex onboard bank and to check out the settings in real-time from your Vortex front panel. Selecting another patch in the
bank or collection prior to pressing the ‘Store Edited Patch’ button will replace the opened patch file data with the new
selection.
MIDI Ports and Autosense
When you first install Vyzex Vortex, the program is configured for AutoSense and to open Use All MIDI ports.
These program options instruct the editor to open All the MIDI ports on your computer and scan to see which MIDI port is
the dedicated Vortex Editor Control MIDI port. Once the editor knows the correct port to use, it configures itself to use the
detected MIDI In and Out port for communications with your Vortex.
This particular setup is the fastest and most reliable choice because the Vortex MIDI port ordering in your computer’s USB
MIDI Port list can change between runs of the program (depending on what USB MIDI devices you have currently plugged
in) and the editor will catch these changes and reconfigure itself each time.
The AutoSense and Use All MIDI Ports options have the consequence that the Vyzex editor opens all the MIDI ports
available to your computer and keeps them open while the editor is running. On a Window computer, this could cause
conflicts with other music software that wants access to your Vortex and any other MIDI devices connected to your
computer.
On Windows computers there is a USB MIDI driver limitation that only one software application can
use any given hardware MIDI port at a time.
This issue is called the Windows Single-Client USB MIDI Driver Problem, and it applies to any
MIDI device that uses the USB MIDI driver included with Windows XP, Vista, or 7 ...such as Vortex.
Mac users, feel free to gloat, but remember your latté is getting cold so try to keep it short.
Regardless of whether you are a Mac or PC user, you may not want the Vyzex editor to be listening to all the MIDI ports
on your computer and engaging all of its MIDI output ports whenever the program is running.
Vyzex Vortex User’s Guide
10
If you prefer that the program operate manually with regards to MIDI port selection, open the MIDI > MIDI In Ports...
dialog from the application’s main menu and uncheck the ‘Use All Available MIDI Ports’ option:
Ensure that the Vortex MIDI port is selected before you click the ‘OK’ button.
Now repeat this process with the the MIDI > MIDI Out Ports... dialog. At this point, Vyzex Vortex has been reconfigured to
manually use only the ports you have selected. Should you add or remove USB MIDI Devices to your system in the future
you may have to manually update these settings afterwards.
To disable the AutoSense functionality of the editor, please consult the Vyzex Vortex Preferences Guide PDF for details.
This concludes the Vyzex Vortex User’s Guide. As mentioned earlier on, it’s a good idea for you to also read the
companion PDF manuals like the Vyzex Vortex Preferences Guide for a more complete view of how the editor operates.
Just as with this document, these companion PDFs are also accessible from the program’s Manuals pull down menu.
Vyzex Vortex User’s Guide
11