1
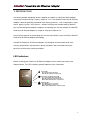
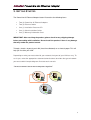
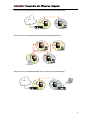
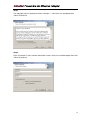
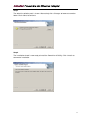
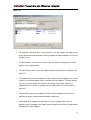
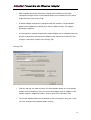
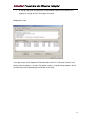
PowerLine 85 Ethernet Adapter
Model: PL85/230-ETH
User's Manual
Copyright © 2006 AdvaTel, a division of Telematic Communications Pty Ltd. All rights reserved. AdvaTel reserves the
right to modify product specifications without advance notice. No part of this publication may be produced in any format
without the express written permission of AdvaTel.
AdvaTel, the AdvaTel logo are registered trademarks or trademarks of AdvaTel. All other brands and product names are
or maybe trademarks of their respective owners.
0606-1
TABLE OF CONTENTS
1. INTRODUCTION ................................................................................................. 3
LED Indicators...................................................................................................................3
2. IMPORTANT SAFETY INFORMATION ..................................................................... 4
3. GETTING STARTED ........................................................................................... 5
“I want to connect two or more computers together” ..........................................................5
“I want to use my broadband Internet connection from another room” ..............................6
“I want to share a network printer between multiple computers”........................................6
“I want to site my broadband Wi-Fi access point at a better location”................................6
4. INSTALLING POWERLINE 85 ETHERNET ADAPTER............................................... 7
Step 1 – Connect to Mains ...............................................................................................7
Step 2 – Check Communication ......................................................................................7
Step 3 – Connect to Ethernet...........................................................................................7
Privacy................................................................................................................................7
Technical Support .............................................................................................................8
5. POWERLINE 85 UTILITY .................................................................................... 9
System Requirements.........................................................................................................9
Installing PowerLine 85 Utility .........................................................................................9
Using PowerLine 85 Utility.............................................................................................12
Main Tab ............................................................................................................................13
Privacy Tab........................................................................................................................14
Diagnostics Tab .................................................................................................................15
6. SETTING UP YOUR ENCRYPTION PASSWORD .................................................... 16
Setting the Private Network Name for a directly connected adapter................................16
Setting the Private Network Name for a remote adapter..................................................16
7. SPECIFICATIONS ............................................................................................. 17
8. TROUBLE SHOOTING ...................................................................................... 18
2
1. INTRODUCTION
Connecting multiple computing devices together to establish a LAN (Local Area Network)
using mains electrical wiring is now as simple as 1-2-3. The AdvaTel PowerLine 85 Ethernet
Adapter is ideal for providing information and sharing resources – such as documents, mp3s,
videos, games, printers, and scanners – without installing new network cabling. Whether
you are connecting two computers together or extending your existing network, the AdvaTel
PowerLine 85 Ethernet Adapter is simple to setup and simple to use.
Please take a moment to read through this manual and familiarise yourself with the AdvaTel
PowerLine 85 Ethernet Adapter technology.
All AdvaTel PowerLine 85 Ethernet Adapters are designed and manufactured to meet
industry specifications and world-class quality standards. We are confident that your
purchase will meet your exacting standards.
LED Indicators
Before installing your PowerLine 85 Ethernet Adapter, take a moment to examine the
diagram below. The LED indicators provide important status information.
Power LED
On = Connected to AC mains
Off = No AC mains power detected
Power Line Communication LED
On = Joined PowerLine 85 network
Off = No power line network detected
Blink = Data transmission on power line
Ethernet LED
On = Ethernet port connected
Off = No Ethernet connection
Blink = Data transmission on Ethernet port
3
2. IMPORTANT SAFETY INFORMATION
This product is intended for connection to mains electrical wiring. The following precautions
should be taken when using this product:
Read all instructions before installing and operating this product.
Follow all warnings and instructions.
Do not operate this product near water.
This product relies on a building’s electrical installation for short-circuit (over current)
protection. Ensure that a fuse or circuit breaker not exceeding 15A is used on the
phase conductors (all current-carrying conductors).
Do not allow anything to rest on the product. Allow space for ventilation.
Do not locate or operate this product where connections to it are subject to physical
stress.
PowerLine 85 Ethernet Adapters should be plugged directly into a wall mounted
mains power point.
This product does not contain user serviceable parts. Do not open the unit. Opening
the unit or removing its cover will result in exposure to dangerous voltages. Return
to AdvaTel for servicing. Opening the unit voids product warranty.
Turn off mains power before unplugging the PowerLine 85 Ethernet Adapter from
the wall outlet in the following conditions. Contact AdvaTel for product servicing:
o
If liquid has been spilled onto the product.
o
If the product has been exposed to rain or water.
o
If the product does not operate normally when the operating instructions
have been followed.
o
If the product exhibits a distinct change in performance.
4
3. GETTING STARTED
The PowerLine 85 Ethernet Adapter Starter Kit contains the following items:
Two (2) PowerLine 85 Ethernet Adapters
Two (2) Ethernet Cables
One (1) Installation Resource CD
One (1) Quick Installation Guide
One (1) Warranty Information Card
IMPORTANT: After receiving the product, please check for any shipping damage
before proceeding with installation. Do not install the product if there is any damage
that may render the product unsafe.
To begin, sketch a layout of your LAN (Local Area Network) on a sheet of paper. This will
help you visualize your LAN.
Depending on what you want to do with your network, the layout of your LAN can vary. To
assist you, select the appropriate statement below that best describes the type of network
you want to build. Sample diagrams illustrate each scenario:
“I want to connect two or more computers together”
ww w.adv atel.co m.au
ww w.adv atel.co m.au
ww w.adv atel.co m.au
5
“I want to use my broadband Internet connection from another room”
ww w.advatel.co m.au
ww w.adv atel.co m .au
“I want to share a network printer between multiple computers”
ww w.adv atel.co m.au
ww w.adv atel.co m.au
ww w.adv atel.co m.au
ww w.advatel.co m.au
“I want to site my broadband Wi-Fi access point at a better location”
ww w.advatel.co m.au
ww w.advatel.co m .au
6
4. INSTALLING POWERLINE 85 ETHERNET ADAPTER
AdvaTel PowerLine 85 Ethernet Adapters plug into wall mounted mains power points for
connecting Ethernet enabled devices over internal electrical wiring. It is suitable for use
between computers, routers, switches, hubs, access points, and gaming consoles.
IMPORTANT:
The adapter is for indoor use only
Data rates may vary depending on the premises mains electricity wiring
For best performance plug the adapter directly into a wall mounted mains
power point. Avoid plugging the adapter into power boards, surge protectors,
and extension cords.
Step 1 – Connect to Mains
Plug each adapter into a wall mounted power point located near the equipment to be
connected. Check that the Power LED (top) on the adapter is lit to indicate a connection to
mains power.
Step 2 – Check Communication
When plugging in the second (or an additional) adapter. check that the Power Line
Communication LED (middle) lights to indicate connection between adapters. It takes a few
seconds to stabilise after the adapter is first plugged in. If the PCL remains off after a minute
or two then the unit has failed to find other adapters in the same network. This may be due
to an incorrect Private Network Name being set (see Privacy section below) or because of
unsuitable mains wiring.
Step 3 – Connect to Ethernet
Next, connect the Ethernet cable between the adapter and your Ethernet device at each
location. The Ethernet indicator (bottom) lights to show successful cable connection.
Privacy
The PowerLine 85 Ethernet Adapter uses its Network Name as the password key to encrypt
data. A public Network Name (HomePlug) is set as default during manufacture. This
7
enables all PowerLine 85 Ethernet Adapters to connect to each other immediately after
purchase. For privacy, a Private Network Name can be set using the PowerLine 85 Utility
(found on the Installation Resource CD).
Technical Support
Support resources are available on the web at http://www.advatel.com.au/support.
8
5. POWERLINE 85 UTILITY
System Requirements
Computer with an Ethernet Network Interface Card (NIC)
32 MB of free RAM
10 MB of available hard disk space
CD-ROM Drive
Windows® 98SE, ME, 2000, XP Operating System
Installing PowerLine 85 Utility
Step 1
Insert the Installation Resource CD; it should start automatically. If the installation program
does not start automatically, start the application by clicking on the <Start> menu, select
<Run> and choose <Browse>, look at the CD-ROM drive, click on ‘setup.exe’, and select
<OK>.
Step 2
Click <Next> to start installation.
9
Step 3
The copyright notice is displayed. Select <I Accept…> if the terms are acceptable then
<Next> to continue.
Step 4
Enter your details in the customer information screen, select an installation option then click
<Next> to continue.
10
Step 5
The default installation path is shown. Alternatively click <Change> to browse to another
folder. Click <Next> to continue.
Step 6
The installation wizard is now ready to install the PowerLine 85 Utility. Click <Install> to
commence installation.
11
Step 7
When the installation wizard completes click <Finish> to end.
Using PowerLine 85 Utility
The PowerLine 85 Utility allows the user to set up a private secure power line network and
provides useful diagnostic tools.
IMPORTANT – Secure your PowerLine 85 network after first installation by setting a
Private Network Name. This prevents others from joining your network.
Connect the PowerLine 85 Utility PC to a PowerLine 85 Ethernet Adapter. Start the
PowerLine 85 Utility from the <Start> menu by selecting <Programs — AdvaTel —
PowerLine 85 Utility> or by clicking on its shortcut installed onto the desktop.
12
Main Tab
The PowerLine 85 Utility takes a few seconds to scan the network and report on the
quality of communications between the local adapter and other adapters in the same
network (if any).
The MAC address for each unit is shown. You can identify an adapter by its MAC
address on the product label.
The Local Device panel shows the adapter directly connected to the PowerLine 85
Utility PC.
The Powerline Devices Detected panel shows details for other adapters in the same
network. The example above shows a network of three adapters. The individual bit
rates are useful for diagnosing slow transfer speeds. Connection speeds are
updated when this screen is selected and then again when the <Scan> button is
pressed. T
From the Main Tab you can optionally select a remote adapter and rename it as
required (eg Study) to provide better location information.
A password for an adapter can be found on the unit’s product label. You can
optionally enter an adapter’s password into the PowerLine 85 Utility to allow remote
management for that adapter.
13
Where adapter passwords have been entered into the PowerLine 85 Utility,
subsequent changes to the Private Network Name can be made to all units with a
single command (see Privacy Tab).
A remote adapter not previously configured with the network’s Private Network
Name can be added to the network by using the <Add> function. The adapter
password is required.
If a password has not been entered for a remote adapter then its Network Name can
only be set by directly connecting the adapter to the PowerLine 85 Utility PC and
using the <Set Local> function in the Privacy Tab.
Privacy Tab
From this tab you can choose to enter a Private Network Name or use the default
network name (HomePlug), then set it to the local adapter or to all adapters in the
network (requires adapter password – refer to discussion under Main Tab).
The Private Network Name can be between 4 and 24 characters long, and is case
sensitive. A longer name provides better security.
14
A step-by-step guide to setting the Private Network Name can be found in the
Chapter 6, “Setting Up Your Encryption Password”.
Diagnostics Tab
In the top section of the Diagnostic Tab information for the PC’s Ethernet interfaces and
locally attached adapters is shown. The bottom section is a log of remote adapters which
have been previously detected by the PowerLine 85 Utility.
15
6. SETTING UP YOUR ENCRYPTION PASSWORD
IMPORTANT – The Network Name set in the Privacy Tab is used as the encryption
password. A Private Network Name can be between 4 and 24 characters long and is
case sensitive. A longer name provides better security.
IMPORTANT – All adapters in the same network must have the same Network Name.
Setting the Private Network Name for a directly connected adapter
Plug the adapter into a mains power point
Connect the adapter to the PowerLine 85 Utility PC
Start the PowerLine 85 Utility
Select the Privacy Tab
Type your Private Network Name in the “Private Network Name” text box
Click the <Set Local> button
Setting the Private Network Name for a remote adapter
Make a note of the password for the remote adapter from its product label
Plug the adapter into a mains power point
Start the PowerLine 85 Utility
Select the Main Tab
Select <Add>
Enter a descriptive name for the adapter then its password
Click <OK> to add the adapter to the network
Select <Scan> to confirm addition as required.
16
7. SPECIFICATIONS
Standards Compliance
HomePlug® 1
IEEE 802.3
Network Protocol
Layer 2 (including TCP/IP)
Network Interface:
10/100BaseT, auto detect, auto MDI/MDI-X
Network Socket:
RJ-45 (CAT5)
Bandwidth
Power Line Communications 85 Mbps
Security
56 bit DES Encryption
Mains Voltage
100—240V 50/60Hz
Safety and Regulatory
Energy Safe Victoria
C-Tick
Utility Software Operating Systems
Windows® 98SE, ME, 2000, XP
Operating Range
Temperature: 0—55º C
Humidity: 10—85% non-condensating
Storage Range
Temperature: -20—70º C
Humidity: 5—90% non-condensating
17
8. TROUBLE SHOOTING
No Indicators are on
Check mains power.
Power LED (top) is off but other LED indicators are on
Possible adapter fault.
Power Line Communications LED (middle) is off
This is normal for the first adapter installed. Its LED should come on when a
subsequent adapter is added to the network.
Check that the Network Name has been correctly set. Adapters with different
Network Names will not communicate with each other. Check for a common
Network Name by plugging the adapters in adjacent or near adjacent power points.
If PLC LED indicator lights then a common Network Name has been set.
If after confirming the Network Name the adapters are moved back into position but
the PLC LED remains off, then ensure that the adapters have been plugged directly
into a wall mounted power point. Failing resolution, it is possible that the mains
wiring at the required locations may be unsuitable, please try again using different
power points.
Ethernet LED (bottom) is off
Check the Ethernet connection.
All LEDS are on or blinking but the attached devices are not communication.
When all three LEDS being are on or blinking the PowerLine 85 network has been
established and operational. At this stage you will need to check the configuration of
the attached Ethernet devices to ensure that they are correctly configured.
Generally, if two pieces of Ethernet equipment can communication with each other
over standard Ethernet cabling then they are correctly configured for use in a
PowerLine 85 network.
18