1
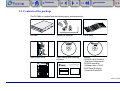
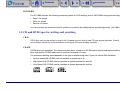
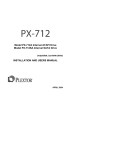
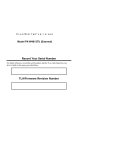
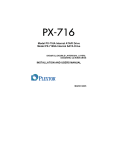
1
Contents
Contents
The PX-708A
1
Introduction
2
1.1
1.2
1.3
1.4
3
4
4
Contents of the package . . . . . . . . . . . .
System requirements . . . . . . . . . . . . . . .
About DVD technology . . . . . . . . . . . .
CD and DVD reading, writing and
rewriting speeds . . . . . . . . . . . . . . . . . .
5
MASTER setting . . . . . . . . . . . . . . . . . . . . . . 13
SLAVE setting . . . . . . . . . . . . . . . . . . . . . . . . 14
CSEL (Cable Select) setting . . . . . . . . . . . . . 14
2.3 Mounting and connecting the device. . 15
2.4 Installing the software . . . . . . . . . . . . . 20
3
CD . . . . . . . . . . . . . . . . . . . . . . . . . . . . . . . . . . 5
DVD+R/RW . . . . . . . . . . . . . . . . . . . . . . . . . . 5
DVD-R/RW . . . . . . . . . . . . . . . . . . . . . . . . . . . 6
Loading a disc . . . . . . . . . . . . . . . . . . . . . . . . 22
Removing a disc . . . . . . . . . . . . . . . . . . . . . . 23
Opening the device manually to remove a disc 24
6
6
7
7
8
3.3 Maintenance. . . . . . . . . . . . . . . . . . . . . 26
Device maintenance . . . . . . . . . . . . . . . . . . . . 26
Disc maintenance . . . . . . . . . . . . . . . . . . . . . . 26
4
Troubleshooting
27
1.6 Buffer Underrun Proof Technology . . . 9
4.1 Resolving problems yourself . . . . . . . . 27
Buffer Underrun Errors . . . . . . . . . . . . . . . . . . 9
Buffer Underrun Proof Technology . . . . . . . . . 9
Problems during installation . . . . . . . . . . . . . 27
Problems when reading a disc . . . . . . . . . . . . 27
Problems when writing a disc . . . . . . . . . . . . 28
1.7 PoweRec . . . . . . . . . . . . . . . . . . . . . . . . 9
1.8 VariRec . . . . . . . . . . . . . . . . . . . . . . . . 10
1.9 Precautionary measures. . . . . . . . . . . . 10
2
21
3.1 The control panel . . . . . . . . . . . . . . . . . 21
3.2 Using the disc tray . . . . . . . . . . . . . . . . 22
1.5 CD and DVD types for writing and
rewriting . . . . . . . . . . . . . . . . . . . . . . . . 6
CD-R . . . . . . . . . . . . . . . . . . . . . . . . . . . . . . . .
CD-RW . . . . . . . . . . . . . . . . . . . . . . . . . . . . . .
DVD+R and DVD-R . . . . . . . . . . . . . . . . . . . .
DVD+RW and DVD-RW . . . . . . . . . . . . . . . .
Compatibility with various CD and DVD
application technologies . . . . . . . . . . . . . . . . . .
Operation and maintenance
Installation
11
2.1 Before installing your device . . . . . . . .11
2.2 MASTER/SLAVE setting . . . . . . . . . . .11
4.2 Technical support. . . . . . . . . . . . . . . . . 29
5
Warranty
30
5.1 Warranty conditions. . . . . . . . . . . . . . . 30
6
Spec sheet
31
Contents
Introduction
2
1. Introduction
The PX-708A is a device, which you can use to read, write and rewrite CDs and DVDs. The device is an internal
type ATAPI model, which means it cannot be connected externally, but should be fitted inside your PC and
connected to your motherboard via an E-IDE cable.
Most PCs use the E-IDE (Enhanced Integrated Device Electronics) interface to communicate with the hard disk.
ATAPI (AT Attachment Packet Interface) is part of this interface and consists of a set of instructions, which enables
the PC to communicate with more recent devices such as CD-R/RW drives and DVD readers.
Contents
Introduction
3
1.1 Contents of the package
The PX-708A is supplied with the following parts and accessories:
48/2
4/4 PX 70
8A 8A
PX-708A
Screws (4) Eject pin
E-IDE cable
Video Editing and Authoring
software*
- Manual
- CD/DVD Utility Software
(PlexTools Professional)
- CD/DVD recording
Software: Nero + InCD*
- DVD Player Software:
CyberLink PowerDVD*
PX-708A
48/24/48A
Quick Install Guide
WARRANTY REGISTRATION CARD
Please fill in and send by post to Plextor - Prier de remplir et renvoyer à Plextor - Bitte ausfüllen und zurückschicken zu Plextor
CD-RW Drive - Lecteur CD-RW - CD-RW Laufwerk
Model:
Serial N :
Owner - Propriétaire - Besitzer
Name:
Company:
Address:
Vendor - Fournisseur - Großhändler
Name/Location:
❏
Purchase Date:
❏
RMA form
City/ZIP-code/Country:
Tel.:
❏
Fax:
❏
Warranty card
* Only in retail box
Contents
Introduction
4
1.2 System requirements
To install the PX-708A and to guarantee stable operation, your system must meet the following minimum
requirements:
•
IBM/AT-compatible PC with a 700 MHz processor or faster
•
•
•
•
•
128 MB of RAM
Windows 98SE, Windows Me, Windows 2000, Windows XP installed
A free 5.25 inch bay for fitting the PX-708A
A free E-IDE (ATAPI) connector
800 MB - 1 GB of free hard disk space
1.3 About DVD technology
DVD (Digital Versatile Disc, Digital Video Disc) is an optical storage technology that is expected to replace the CD
over the next few years.
Today, DVDs are most widely used as a digital video storage medium. One DVD (single-sided, single-layered) can
hold over 2 hours of high-quality digital video, 8 digital audio tracks (e.g. for multiple languages) and up to 32
subtitle tracks.
When it comes to storing computer data, up to 15.9 GB can be stored on a single DVD (dual-sided, dual-layered).
The most common DVD format (single-sided, single-layered) holds about 4.37 GB.
Contents
Introduction
5
1.4 CD and DVD reading, writing and rewriting speeds
CD
The maximum data transfer rate for the first CD readers was at 1x speed (single speed), which corresponds to
150 KB per second.
The PX-708A features the following maximum speeds for CD reading, writing and rewriting:
•
Read: 40x speed
•
Write: 40x speed
•
Rewrite: 24x speed
You can calculate the maximum transfer speed of your device by multiplying the specified figures by 150 KB/s.
DVD+R/RW
For DVD devices, single speed corresponds to 1.321 MB/s, which means that a single speed DVD reader is
roughly 9 times as fast as a single speed CD reader.
The PX-708A features the following maximum speeds for DVD reading, and for DVD+R/RW writing and rewriting:
•
Read: 12x speed
•
Write: 8x speed
•
Rewrite: 4x speed
You can calculate the maximum transfer speed of your device by multiplying the specified figures by 1.321 MB/s.
Contents
Introduction
6
DVD-R/RW
The PX-708A features the following maximum speeds for DVD reading, and for DVD-R/RW writing and rewriting:
•
Read: 12x speed
•
Write: 4x speed
•
Rewrite: 2x speed
You can calculate the maximum transfer speed of your device by multiplying the specified figures by 1.321 MB/s.
1.5 CD and DVD types for writing and rewriting
CD-R
CD-R discs can only be written to once in full. However you can write to one CD over several sessions. Consult
your software manual for more information on writing to CDs over multiple sessions.
CD-RW
CD-RW discs are rewritable. This means that data that is stored on a CD-RW can be erased and replaced with new
data. High quality CD-RW media can be rewritten thousands of times.
The maximum rewriting speed depends on the type of media being used. There are several RW standards:
•
Normal Speed (NS-CD-RW) can be rewritten at speeds up to 4x
•
High Speed (HS-CD-RW) can be rewritten at speeds between 4x and 10x
•
Ultra Speed (US-CD-RW) can be rewritten at speeds between 8x and 24x
Contents
Introduction
7
DVD+R and DVD-R
At this point, there are two different formats writing DVDs, called DVD-R and DVD+R. The PX-708A can read and
write DVDs in both formats, but notice that the maximum writing speed is two times higher in DVD+R than in
DVD-R.
DVD+RW and DVD-RW
Also for rewriting DVDs, two different formats (DVD-RW and DVD+RW) are in use. Again, the PX-708A can read
and rewrite DVDs in both formats, but notice that the maximum rewriting speed is two times higher in DVD+RW
than in DVD-RW.
Contents
8
Introduction
Compatibility with various CD and DVD application technologies
The PX-708A is compatible with the technologies listed here. Remember also that, depending on the
manufacturing quality and the software used, some CDs and DVDs cannot be written to.
CD
Type
CD-DA (Audio CD)
CD-ROM (Mode 1)
CD-ROM + CD-DA(Mixed Mode)
CD-ROM XA (Mode 2, Form 1/Form 2)
CD-I
Photo-CD
Video-CD
CD Extra (CD Plus)
CD Text
Multisession
DVD-ROM
DVD-Video
DVD+VR
DVD-VR
DVD
Write
ReWrite
Read
Play
Write
ReWrite
Read
Play
!
!
!
!
"
"
"
"
!
!
!
"
"
"
"
"
!
!
!
!
"
"
"
"
!
!
!
"
"
"
"
"
!
!
!
"
"
"
"
"
!
!
!
"
"
"
"
"
!
!
!
"
"
"
"
"
!
!
!
!
"
"
"
"
!
!
!
"
"
"
"
"
!
!
!
"
!
"
"
"
"
"
"
"
!
!
!
"
"
"
"
"
!
!
!
!
"
"
"
"
!
!
!
!
"
"
"
"
"
"
!
!
!
"
Yes
No
Contents
Introduction
9
1.6 Buffer Underrun Proof Technology
Storage media, like CD-Rs, sometimes get damaged during the recording process, due to a phenomenon called a
buffer underrun. To solve this problem, Plextor has fitted the PX-708A with a Buffer Underrun Proof Technology.
Buffer Underrun Errors
During CD/DVD recording, a constant flow of data should be sent from the computer to the recording device and
the transfer rate should match the recording speed of the CD/DVD. However, as most operating systems are not
designed for real-time processing of large amounts of data, the data flow speed is often unstable.
To overcome this problem, the recording device temporarily stores the transferred data in a buffer and sends them
to the CD/DVD at a constant speed.
However, this solution only works as long as the buffer does not run out of data. If this happens, the recording
process is halted at a random point, resulting in errors on the CD/DVD that will probably render it unusable. This
type of error is called a buffer underrun error.
Buffer Underrun Proof Technology
The PX-708A is equipped with a Buffer Underrun Proof Technology protecting storage media against this type of
error.
The PX-708A continuously checks the status of the data buffer. As soon as a risk of a buffer underrun is detected,
the recording process is suspended at a suitable point. The drive continues prompting the computer for data, in
order to refill the data buffer. As soon as the buffer’s situation returns to normal, the drive restarts the recording
process. The new data is correctly appended to the data already present on the CD/DVD.
1.7 PoweRec
Low quality media (CDs and DVDs) are very often the source of disc errors during high-speed recording. The
PoweRec technology checks the quality of the media and automatically selects the optimum (maximum) writing
speed, giving the highest quality result.
To obtain maximum writing speed, you can disable the PoweRec option using the software that is supplied with the
PX-708A.
Contents
Introduction
10
1.8 VariRec
With the VariRec technology, the user can select some settings, to obtain a more personalised sound tone. This
VariRec technology only works at 4x and 8x CD-DA Recording on CD-R discs.
1.9 Precautionary measures
To gain maximum, long-term benefit of the PX-708A you should take the following precautionary measures:
•
Keep the packaging for the device. If you ever have to return your device to Plextor, you can reuse the original
protective packaging.
•
Install and use the device as specified in this manual.
•
Do not use the device in places with a high level of humidity, excessive dust or poor ventilation.
•
Do not place the device in direct sunlight or close to heating appliances.
•
Do not place the device close to appliances, which consume a lot of electricity (microwave ovens, hair dryers,
toasters, ...).
•
Do not place the device close to radio or TV sets; it may interfere with their reception.
•
Do not place heavy objects on the device or on discs.
•
Do not open the enclosure for your device.
•
Never switch off the power while your device is working.
•
Never place damaged CDs or DVDs in the device.
•
Make sure that no fluids or foreign objects get into the device.
•
Maintain your device and your discs as specified in “Maintenance” on page 26.
Contents
Installation
11
2. Installation
Follow the steps set out below to simply and safely install your device.
2.1 Before installing your device
•
Switch off your PC and any peripheral equipment and remove the plugs from the wall socket.
•
Discharge any static electricity from your PC by touching the enclosure. Do this to the peripheral equipment too.
•
Undo the cables, which are still connected to the PC. Make sure that when you come to reconnect you still know
which cables belong where.
2.2 MASTER/SLAVE setting
A PC is usually fitted with two E-IDE connectors, which are designated as a primary and secondary connector.
These connectors consist of 40 pins (divided into two rows) and are located on your motherboard or on a separate
card, which is located on your motherboard.
Contents
Installation
12
A maximum of two devices can be connected to each of the two connectors using a 40 pin flat ribbon cable. You
can therefore connect a total of four E-IDE devices to your PC.
Master
Master
Master
Master
Slave
Slave
Slave
Primary
Primary
connector
leslsess
ththaan
n 445 c
5 mcm
m
llees
15sss tth
15 ,2 haan
.2 cm n
c
Slave
Motherboard
Motherboard
Secondary
Secondary
connector
Generally speaking, a hard disk is connected to the primary connector and a CD-ROM device to the secondary
connector. The devices, which are connected to the E-IDE connectors, should be correctly set up so that the
computer is able to distinguish between them. This setting is called the MASTER/SLAVE setting and it is usually
modified using a jumper switch on the back of the device.
Contents
Installation
13
A jumper switch consists of two metal pins across which a metal cover can be placed. By placing the cover across
the two pins, the pins are interconnected and the current bridge circuit is closed.
The hard disk is usually installed as the MASTER to the primary connector. If you now wish to connect a second
device to the same connector (and therefore to the same cable), this device must be set up as the SLAVE. It is
strongly recommended that you set up your CD-R/RW device as the MASTER and connect it to the secondary
connector. If necessary you can connect a second device to this cable as a SLAVE, but we advise against this as it
can affect the performance of your CD-R/RW.
Use a pair of long nose pliers to adjust the jumper switch at the back of your device. By default, the jumper switch is
set as the MASTER.
MASTER setting
Place the cover over the two right-hand pins.
Contents
Installation
14
SLAVE setting
Place the cover over the two second right-hand pins.
CSEL (Cable Select) setting
If you use this setting, the MASTER/SLAVE setting is made automatically. If another device is connected to the
same connector, this also has to be set up to Cable Select. Moreover, you must ensure that you use an E-IDE
cable, which supports Cable Select. Place the cover over the two second left-hand pins to select this option.
Contents
Installation
15
2.3 Mounting and connecting the device
Step 1:
Remove the cover from your computer.
In most instances the system case is secured with screws at the rear. Sometimes screws are also located on the
side or the bottom. Use a crosshead screwdriver to loosen the screws. Make sure that when doing this you only
undo the screws securing the cover. Then slide or lift the cover off your PC.
Some covers should be opened using push buttons on the side.
Contents
Step 2:
Installation
16
Remove the front plate from a free 5.25 inch bay.
The front plates are usually secured by means of a click system. For further details consult your PC manual.
Step 3:
Place the device into the free 5.25 inch bay.
Slide the device into the front of the bay.
If you notice that there isn’t much space left at the rear to work in, then first of all connect the cables as specified in
the next steps and then slide the device fully into the bay.
48/24/
PX48A
708
A
Contents
Step 4:
Installation
17
Connect the 40-pin E-IDE cable to the rear of the CD-R/RW device.
Two E-IDE connectors are located on the cable. Although you are not obliged to do so, we advise you to connect
the device to the end of the cable. The ribbon cable also has a red line on it. Make sure that the red line is located
at pin 1 (on the right-hand side).
Step 5:
Connect the audio cables.
If your PC is fitted with a sound card, you can relay the sound that your CD-R/RW device produces to your sound
card via the supplied 4-pin analog audio cable. Connect one end of the cable to your sound card. Connect the other
end to your CD-R/RW device. For further details consult the manual for your sound card.
Contents
Installation
18
If your sound card supports digital sound and is fitted with an SPDIF connector, you can also connect your
CD-R/RW device to it here. To do this use the 2-pin SPDIF cable, which is supplied with your sound card. Connect
the other end of the cable to your CD-R/RW device.
Step 6:
Connect the power cable.
A number of 4-pin power cables consisting of a red, two black and a yellow wire, leave your PC’s power supply unit.
Connect one of these cables to your device. Because the connector on the power cable has two rounded corners,
there is only one way that it will fit into the device.
Contents
Installation
Step 7:
Secure the device in position using the supplied screws.
Step 8:
Replace the cover on the computer and screw it back into position.
48/2
Step 9:
PX-7
4/48
A08A
Reconnect all cables, plug in the plugs into the wall socket and switch the computer on.
19
Contents
Installation
20
2.4 Installing the software
To make sure you can immediately start using your device, Plextor supplies the following software applications with
the PX-708A:
•
Ahead Nero: CD/DVD mastering software
•
Ahead InCD: Packet writing software
•
Pinnacle Studio: Video editing and authoring software
•
CyberLink PowerDVD: DVD player software
•
PlexTools Professional: CD/DVD Utility software
To install an application, insert the CD into the CD reader (or the PX-708A) on your PC. The installation program will
be launched automatically. Refer to the documentation available on the software installation CD to get more
information about the installation, setup and use of a particular application.
Contents
Operation and
maintenance
21
3. Operation and maintenance
3.1 The control panel
The control panel at the front of the PX-708A consists of the following elements:
1
PX-708 A
5
2
3
4
6
1. Disc tray
This disc tray is used to insert discs into the device (see “Loading a disc” on page 22). Press the eject button to
open and close the disc tray.
2. Headphone jack (3.5 millimeter)
Stereo mini jack for headphones or powered speakers to listen to your audio CDs.
3. Headphone volume control
You can adjust the volume of your headphone or powered speakers using this dial. This dial does not affect the
audio output of your sound card.
4. Disc/Busy indicator
The Disc/Busy indicator lights up green when the device is active.
5. Eject button
Press this button to open or close the disc tray.
Contents
Operation and
maintenance
22
6. Emergency eject hole
This opening may only be used to remove a disc if it is no longer possible to remove it in the usual way
(using the eject button). To do this use the supplied eject pin (see “Opening the device manually to remove a
disc” on page 24).
3.2 Using the disc tray
Loading a disc
Step 1:
Press the eject button on the control panel to open the disc tray.
PX-7
08
Step 2:
A
Place the disc in the disc tray.
48/2
4/4 PX-504
8A A
PX
-708
A
Contents
Step 3:
Operation and
maintenance
Gently press against the front edge of the disc tray or press the eject button again to close the
disc tray.
48/2
4/4 PX-504
8A A
48/2
4/4 PX-504
8A A
PX
PX
-708
A
-708
A
Removing a disc
Step 1:
Press the eject button on the control panel to open the disc tray.
PX-7
Step 2:
23
08
A
Hold the disc by its edges and carefully remove it from the disc tray.
48/2
PX
-708
A
4/48PX-50
A 4A
Contents
Step 3:
Operation and
maintenance
24
Gently press against the front edge of the disc tray or press the eject button again to close the
disc tray.
48/2
4/4 PX-504
8A A
48/2
4/4 PX-504
8A A
PX
-708
A
PX
-708
A
Never leave the disc tray open for long periods of time. Dust or dirt, which gets into the device, can cause read or
write errors.
Opening the device manually to remove a disc
It can happen that the disc tray cannot be opened in the usual way as a result of a power outage or a mechanical
defect. When this is the case follow the steps set out below to manually open the disc tray and remove the inserted
disc.
Step 1:
Switch off the power to your PC and remove the plugs from the wall socket.
Step 2:
Push the supplied eject pin into the emergency eject hole until the disc tray clicks open.
48/2
4/4 PX-504
8A A
Contents
Step 3:
Operation and
maintenance
Carefully continue to slide the disc tray open.
48/2
PX
Step 4:
-708
4/4 PX-504
8A A
A
Hold the disc by its edges and carefully remove it from the disc tray.
48/2
4/4 PX-504
8A A
PX
-708
A
Step 5:
Carefully push the disc tray shut.
48/2
PX
-708
A
4/4 PX-504
8A A
25
Contents
Operation and
maintenance
26
3.3 Maintenance
Device maintenance
Use a soft, dust-free cloth to maintain your device. Never use water or cleaning products to clean your device.
Some solvents may damage the enclosure of your device.
Disc maintenance
You can clean your discs using a commercially available CD/DVD anti-static spray or CD/DVD cleaning kit. Make
sure that you do not scratch the discs while cleaning them.
Always handle your discs carefully. CDs and DVDs are sensitive to fingerprints, dust and scratches. Dirty or
damaged discs may cause damage to your device and result in read or write errors.
Contents
Troubleshooting
27
4. Troubleshooting
4.1 Resolving problems yourself
Problems during installation
•
Press the eject button to check whether or not the device is getting any power. If this is not the case, then check
that the power connector is correctly connected.
•
When booting the system check whether the device is identified by the system. If this is not the case, then check
whether the E-IDE connector is correctly connected and whether the MASTER/SLAVE setting is correct. Also
check whether the device is connected to the end of the E-IDE cable.
•
Make sure that the most recent bus master drivers for your IDE controller have been installed. These are
normally supplied together with your motherboard or your PC. For further details consult your motherboard or
PC manual.
•
Check whether DMA (Direct Memory Access) has been activated.
Problems when reading a disc
•
Press the eject button to check whether or not the device is getting any power. If this is not the case, then check
that the power connector is correctly connected.
•
Check that the E-IDE connector is correctly connected and that the MASTER/SLAVE setting is correct. Also
check whether the device is connected to the end of the E-IDE cable.
•
Make sure that the most recent bus master drivers for your IDE controller have been installed. These are
normally supplied together with your motherboard or your PC. For further details consult your motherboard or
PC manual.
•
Check whether DMA (Direct Memory Access) has been activated.
•
Make sure that the disc is placed correctly in the disc tray.
•
Check that the disc that you wish to read is not dirty or damaged.
Contents
•
Troubleshooting
28
Check that the most recent firmware version is installed. To do this consult the Plextor web site:
http://www.plextor.com.
To check which firmware version is installed on your PC, click in Windows on Start | Settings ... | Control
Panel. Then double-click in the Control Panel on System and select the Device Manager tab. Select the
PX-708A in the CD-ROM group and click on Properties. Then select the Settings tab and make a note of the
number stated in the Firmware Revision field.
Problems when writing a disc
•
Press the eject button to check whether or not the device is getting any power. If this is not the case, then check
that the power connector is correctly connected.
•
Check that the E-IDE connector is correctly connected and that the MASTER/SLAVE setting is correct. Also
check whether the device is connected to the end of the E-IDE cable.
•
Make sure that the most recent bus master drivers for your IDE controller have been installed. These are
normally supplied together with your motherboard or your PC. For further details consult your motherboard or
PC manual.
•
Check whether DMA (Direct Memory Access) has been activated.
•
Make sure that the disc is placed correctly in the disc tray.
•
Check that you have placed the correct type of disc in the disc tray.
•
Check that the disc that you wish to write to has not already been written.
•
Check that the capacity of your disc has not been exceeded.
•
Check that the disc that you wish to write to is not dirty or damaged.
•
Check that the most recent firmware version is installed. To do this consult the Plextor website:
http://www.plextor.com.
To check which firmware version is installed on your PC, click in Windows on Start | Settings ... | Control
Panel. Then double-click in the Control Panel on System and select the Device Manager tab. Select the
PX-708A in the CD-ROM group and click on Properties. Then select the Settings tab and make a note of the
number stated in the Firmware Revision field.
•
Switch off all other applications.
•
Check that your screensaver has been switched off.
Contents
Troubleshooting
29
4.2 Technical support
If you are not able to resolve your problem yourself (see “Resolving problems yourself” on page 27), then contact
our technical support department:
Area
Europe, Middle-East and Africa
U.S.A. and Canada
Japan
China
Asia and Oceania
Contact
Opening hours: 8:00 - 18:00 M-F
For local telephone numbers: check www.plextor.be
Tel.: +32 2 718 03 99, Fax: +32 2 718 03 90
E-mail: [email protected]
Opening hours: 6:30 A.M. - 5:30 P.M., PST, M-F
Tel.: +1 510 440 2000, Toll Free (US/Canada): 1 800 886 3935
Fax: +1 510 651 9755
Technical support E-mail: [email protected]
RMA requests E-mail: [email protected]
Sales support E-mail: [email protected]
Opening hours: 9:30-12:00 13:00-17:00 M-F
Tel.: +81 3 3517 8064, Fax: +81 3 3517 8065
E-mail: www.plextor.co.jp/support/spt.html
Opening hours: 8:50 - 17:20 M-F
Tel.: +86 21 6443 8843, Fax: +86 21 6443 8583
E-mail: [email protected]
Opening hours: 9:00 - 17:30 M-F
Tel.: +81 3 5214 5591, Fax: +81 3 5214 6660
Technical support E-mail: [email protected]
Sales Inquiry E-mail: [email protected]
Contents
Warranty
30
5. Warranty
5.1 Warranty conditions
Plextor guarantees your PX-708A against all material and manufacturing faults for a warranty period from the date
of purchase. During the warranty period Plextor offers free support for faults, which occur assuming normal use of
the equipment. In the event that defects are found within the warranty period, Plextor, at its own discretion, shall
repair or replace the defective device.
This warranty shall no longer apply if; a) the device is operated or stored under conditions of abnormal operation or
maintenance; b) the device is repaired, adapted or modified, unless this repair, adaptation or modification was
expressly authorised by Plextor; c) the device was subjected to misuse, neglect, a lightning strike, an electrical fault,
incorrect packaging or accident; d) the device was incorrectly installed, or e) the device’s serial number is no longer
legible or is missing; f) the enclosed warranty card cannot be submitted; g) the defective component is a
replacement part, such as the sound recorder, disc tray, etc.
Plextor can under no circumstance be held liable for direct, special or indirect damages, such as, but not limited to,
data loss, damage or loss of property or equipment, loss of profit or income, costs for the replacement of goods or
expenses or inconvenience caused by an interruption in operation. Under no circumstance shall one be entitled to a
sum, which is greater than the purchase price of the device.
If a Plextor product shows signs of a defect during the warranty period, it can be returned to Plextor for repair or
exchange. The following options are available to you with respect to this service: Return for repair (the returned
product is repaired and sent back to you) or Return for exchange (the product is exchanged and sent to you).
Follow the specified procedure (see “Warranty RMA procedure”) for sending back your device to Plextor.
Plextor reserves the right to exchange the returned product if it cannot be repaired within a reasonable period and
at an acceptable price. If it is found that a returned drive is no longer under warranty, as set out in the warranty
conditions, Plextor reserves the right to invoice the user in respect of all costs for repair and transportation.
Contents
Spec sheet
31
6. Spec sheet
Disc
Recordable CD Format
CD-DA, CD EXTRA, CD-ROM Mode 1, CD-ROM Mode 2, CD-ROM XA,
Multisession, Photo CD, VideoCD, CD TEXT, CD+G, UDF, CD-I
Recordable DVD Formats
DVD-ROM, DVD-Video, Multisession, Multiborder, DVD+VR
Recording Disc type
CD-R, CD-RW, DVD-R, DVD-RW, DVD+R, DVD+RW
CD-R/RW Recording Method
Disc at Once, Track at Once, Session at Once, Multisession, Packet writing,
Mount Rainier
DVD-R/RW Recording methods
Disc at Once, Multiborder, Incremental, Restricted Overwriting
DVD+R/RW Recording methods
Sequential Write, Random Access Write, Multisession, Mount Rainier
Interface
Enhanced IDE (ATAPI)
Drive Performance
Data Transfer rate
DVD Read: 6,750 - 16,200 KB/S (MAX)
Write: 6,750 - 10,800 KB/S (MAX)
CD Read: 2,550 - 6,000 KB/S (MAX)
Write: 6,000 KB/S (MAX)
Burst Mode
PIO Mode 4, Ultra DMA Mode-2 (33 MB/S), DMA-2 (16.6 MB/S)
Access Time
CD < 100 ms
DVD < 150 ms
Data Buffer
2 MB
Optical Pick up
Laser: Semiconductor
Slide Mechanism
DC Motor, Gear
Spindle Motor
Brushless Motor
Error Rate
Mode-1: 1 Block/1012 Bits
Mode-2: 1 Block/109 Bits (Reference)
Contents
Spec sheet
Front Panel
Disc/Busy Indicator
Disc Loading
Auto, Disc Tray
Headphone jack
Stereo Mini-jack: 0.8 V 32 Ohm
Volume Control
Wheel knob
Rear Panel
Power Supply
DC +5V 1.5A
+12V 2.5A
Power Consumption
16W
Interface Connector
IDE Bus 40 Pin Header Type
Audio Output
Analog Output, SPDIF
Jumper Switches
Master, Slave, CSEL, DMA
Environmental Conditions
Setting Place
Temperature: 5 - 40°C
Humidity: 20 - 80% (Non condensing)
Storage Location
Unit Temperature: -40 - 60°C
Unit Humidity: 20 - 95% (Non condensing)
Dimensions/Weight
Dimensions (W x H x D)
146 x 41.3 x 190 (mm)
Weight
1.2 kg
Reliability
60,000 POH (duty 12%)
32