1
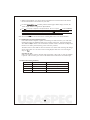
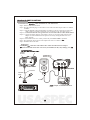
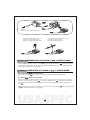
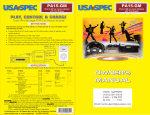
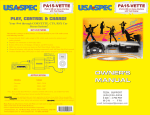
Model
PA11-VW6
to VW car stereo Interface
OWNER'S
MANUAL
TECH. SUPPORT
(626)336-3836
9 AM ~ 4 PM PST
MON ~ FRI
-2-
Thank you for purchasing
product. This manual describes the functions and operation of
PA11-VW6
interface for VW cars. Please read this manual before installing the product to your
vehicle.
!!IMPORTANT!!
It is strongly recommended that the unit is installed in an accessible location, so that it can
later be easily reset or upgraded.
Eject ALL CDs from the built-in CD player or CD changer before installation or
disconnect the power to radio!!!
sells its products through authorized dealers so we can insure customers will
receive proper services from the dealers.
reserves the right to offer technical
support or warranty only on products purchased through authorized
accounts.
It is strongly recommended that buy
product from sellers who provide
dedicated phone contact support.
will not provie technical support or warranty
for purchases made through any unauthorized internet sellers.
SAFETY NOTE: You should always give full attention to driving. Do not operate
such a way that distracts you while you are driving.
in
!!CAUTION!!
In general,
has not been designed to withstand temperature extremes in automobiles.
Please consult your
Owner's Manual regarding acceptable operation and storage
temperatures.
Do not disassemble or alter the cable and interface box.
Make the connections correctly.
Do not cut away the wire sheath or use the power for other equipments.
Do not install in locations which might hinder vehicle operation or create hazards for vehicle
occupants.
Having the wiring and installation done by professionals.
Arrange wiring so it is not crimped or pinched.
Do not use this product for purposes other than stated for the vehicle.
Section 1. ABOUT YOUR INTERFACE PA11-VW6
This interface connects an
directly to your VW audio system. Its on-board software translates
commands from your VW CD changer controls into commands that the
understands. This
interface enables the
to take the place of a VW CD changer and provides the following benefits:
Directs the
's audio output to VW vehicle audio system for optimal sound quality playback.
Controls the
via vehicle's radio and steering wheel controls.
Charges the
's internal battery, and charging stops automatically at one hour after
is paused.
will go to SLEEP mode after charging.
Future firmware updates for your
manual.
may affect the features and functions described in this owner's
-3-
Display of artist and song title information, track search by artist, song title, album or genre are NOT
supported. Only the Playlist number and track number are displayed on radio.
This interface is designed as an alternative replacement to the VW 6 disc CD changer unit in your VW
vehicle. Therefore it is not possible to have the slave VW 6 disc CD changer and PA11-VW6
interface simultaneously connected to your VW radio. The CD changer which is built-in the VW radio
is not affected.
Package Contents
PA11-VW6 contains one each of PA11-VW6 interface adopter, CAS-VW6 and CB-PA14 cables.
Applications
PA11-VW6 is applicable to the following VW vehicles:
Jetta
98-04
98-07
Cabrio
Passat
98-07
98-07
Beetle
Euro Van 01-04
98-05
Golf
Touareg
98-05
04-07
GTI
Rabbit/GTI
06-07
Note: 1998~2000 year radios must have round SCAN button.
PA11-VW6 is not applicable to some 98-99 year models equipped with BOSE or Premier
radio that have 13-pin DIN plug.
Section 2. HYBRID MODE, DIRECT MODE and AUX OPTION
PA11-VW6 provides two ways to control your
and Direct Mode.
through the car radio, namely Hybrid Mode
DIP switch #2 is for mode selection use. "ON" position is for Hybrid Mode and "OFF" position
is for Direct Mode.
2-1 Direct Mode: Search and select music on
directly just as you would in portable use.
The music will play back through your car stereo. Use the track up/down, fast forward, and
reverse buttons on your radio to control music playback. All control functions on
are
available to use too. Please see Section 4 of this manual for additional information.
2-2 Hybird Mode: This mode allows you to access up to 5 playlists on the
from the radio.
The instructions for playlist creation and playback controls are in Section 5 of this manual.
Additionally, while in Hybrid Mode, the keypads and the display on the
function
as if it were in Direct Mode or in portable use.
If the playback of a Playlist is manually interrupted by using the
's key pad, and a song
or music in a new category is played, the interface module memorizes the last played track
number of the new category. "New category" means file, or folder, or Playlist, or artist, etc.
which is different from the Playlist being played. When you return to the same DISC on radio
later, the interface module will use the "memorized" track number (note: just the track number,
not the last played song in the new category) to playback the Playlist related to this DISC.
When the
is connected to the interface module, the
will take approximately 30
seconds to complete its external control mode configuration. During this period of time, the
screen's display will continue to change until the configuration is completed.
-4-
While in Hybrid Mode, you can also fast forward and fast reverse the music track with the
fast forward and fast reverse buttons on your radio.
For those
interface products which support TEXT display on radio, the
TEXT dispaly features is supported in Hybrid Mode.
G3
is not fully compatible with Hybrid Mode. The screen of G3
s will be locked to
"OK to DISCONNECT" display. The Playlist on
can be accessed through the DISC
locations on radio, but user can not operate the keys on
directly when DIP switch #2 is
at ON position. However, G3
s are fully compatible with Direct Mode.
Note: Disconnect
from PA11-VW6 before switching DIP switch #2 for mode alteration.
2-3 Additional AUX INPUT Option Selection
PA11-VW6 interface adaptor is capable of connecting two audio sources to your VW radio
including the
. The additional audio source connects to the RCA input jack labeled as
AUX INPUT. If you choose to use AUX INPUT, the DIP switch #1 at the side of adaptor box
must be set to "OFF" position (factory presets it at "ON" position).
The audio source at AUX INPUT can be accessed at CD 6 Track 1 after selecting CD changer
source on the radio. CD 1 to CD 4 are for accessing Playlists and CD 5 is for accessing all
songs on
.
Operation of AUX
If the "AUX INPUT" option is selected, radio will display "CD 6 Track 1" when AUX button
is pressed. "CD 6 Track 1" gives access to the audio source connected to AUX INPUT port.
2-4 DIP Switch Setting Summary
DIP Switch
Position
Function
#1
ON
RCA Aux Input Disabled
#1
OFF
RCA Aux Input Enabled
#2
ON
Hybrid Mode Selected
#2
OFF
Direct Mode Selected
-5-
Section 3. INSTALLATION
3-1 Instruction of
Cable Installation for VW without SAT
Step 1- Remove radio from the dash.
Step 2- Plug the round din plug on CAS-VW6 to PA11-VW6 interface adaptor where it is labeled
"RADIO" .
Step 3-a- Plug the WHITE or BLUE (depending on whichever one fits) connector on CAS-VW6
cable to radio's CD changer connector. (If a CD changer exists, disconnect it first.)
Step 3-b- Connect the BLACK color ground wire on CAS-VW6 cable to radio's metal chassis.
Step 4-a- Connect the audio output of your auxiliary devices to AUX input jack on PA11-VW6
adapter box if the additional AUX option is selected by setting the DIP swich #1 to
"OFF" position.
Step 4-b- Set the DIP switch #2 to "OFF" position only if the Direct Mode is preferred.
Step 5- Plug CB-PA14 cable to PA11-VW6 adaptor box where it is labeled "
".
Step 6- Reinstall radio to the dash.
WARNING!!
Use only the
connection cable which comes with PA11-VW6 interface adaptor.
connection cables from other sources may look similar, but they may damage your
.
CONNECT
TO RADIO
TO RADIO
FRONT VIEW
TO iPod
CAS-VW6
REAR VIEW
GROUND
WIRE
CB-PA14
Player or Satellite Receiver
CAR AUDIO
-6-
3-2 Instruction of
Cable Installation for VW Equipped with SAT Receiver.
To retain your SAT reception, three wires on factory SAT connector need to be moved to the
white connector on
cable. Please follow the steps below to accomplish the installation.
Step 1. Unplug the 12-pin blue color factory SAT connector at the back of the radio.
Step 2. Reference the drawing below to disassemble the connectors. Pushing the inner piece of
the connector with a small tool through the open hole at the side of connector.
At meantime, push the horizontal bar on the other side of connector upward to release the
latch. The inner piece of the connector will slid out.
Step 3. Referrnce the drawing below, pull out the wire at pin #1 on factory SAT connector with
a tool. Reference the drawing below, raise the key on the pin and insert it into pin #1 of
white connector on
connector.
Step 4. Referrnce the drawing below, pull out the wire at pin #3 on factory SAT connector with
a tool. Reference the drawing below, raise the key on the pin and insert it into pin #3 of
white connector on
connector.
Step 5. Referrnce the drawing below, pull out the wire at pin #7 on factory SAT connector with
a tool. Reference the drawing below, raise the key on the pin and insert it into pin #7 of
white connector on
connector.
Step 6. Pull out the wire at pin #7 of factory SAT connector and insert it into pin #7 of white
connector on
cable.
Step 7. Assemble the white connector on
cable by push the inner piece into the outer
piece.
Step 8. Plug the white connector on
cable CAS-VW6 to the back of radio again.
CONNECT
TO RADIO
TO iPod
12
REAR VIEW
AUX input
SAT Receiver
Box
2-POSITION DIP SWITCH
ON: when switch is at
bottom position
CB-PA14
TO RADIO
Back of car radio
FRONT VIEW
Back of car radio
White
connector
Blue
connector
Step 1:
Unplug factory SAT
connector from the
Step 8: Plug CAS-VW6 to
back of car radios. Step 4/5/6: Pull out wires at pin #1,#3,#7
the back of car radio again
and insert into pin #1,#3,#7 of black inner piece
of white connector at CAS-VW6.
-7-
Step 2/3:
Connector disassemble illustration.
To pull out wires at pin #1, #3, #7:
pull the wire tight while press
the key by using a pinset as shown.
To insert the wires into pin #1, #3, #7:
raise the key up as shown,
then insert into the pin hole
Section 4. CONNECTING & PLAYING of
in DIRECT MODE
When the
is connected to the adaptor,
's screen will go blank for few seconds before the
normal screen returns. Set source to CD changer on your radio, the audio of
music will be played
back at DISC 5 and Track 1. Adjust VOLUME, BASS, TREBLE and etc. as you would normally do
for the other program sources on the radio.
Section 5. CONNECTING & PLAYING of
5-1 Connecting
After connection, the
5-2 Select
in HYBRID MODE
to the interface
will take a few moments to change to external control mode.
mode on VW radio
Press the CD button on radio repeatedly until "CD 6-x" appears on the radio display (x is the track
number of "Now Playing" song on
). This display confirms that
mode has been completely
synchronized and activated. Synchronization timing varies according to the number of Playlists on
your
.
If
was playing previously before radio or ACC power was OFF, and the
playback resumes from where it was stopped.
-8-
was not disconnected,
5-3 Disconnecting
from the interface
If your
is disconnected during playback in
FM mode.
mode, the radio will automatically switch to AM/
After disconnecting,
screen changes from the external control mode screen back to the normal
menu. Press and hold the Play/Pause button on
may get the normal menu back faster.
5-4 Playback of songs on
All audio tracks on your
will be played at disc 6. Track order is determined by the default order
on your
. Selecting disc 1 to disc 5 on radio will allow playback of 5 Playlists on
if adapter's
AUX option is not selected. Every time when
is connected to the interface adapter, the playback
starts from "Now Playing" song at disc 6 by default. If
was playing any of its Playlist right before
the connection, the same Playlist will continue to play and repeated at disc 6 and
will switch to
"All" as soon as the fast forward button ( ) is pressed.
5-5 Selecting a Playlist
Press DISC selection button on radio to select a Playlist. The selected Playlist will begin playing and
the Playlist number and track number will be displayed. In rare cases, this may take up to few seconds
for the completion of synchronization.
After playing the last song in the current Playlist, playback will start again from the first track of this
Playlist.
Playlist naming
When
is connected to your radio via PA11-VW6 interface adapter, the adapter scans all available
Playlists on
and look for designated VW Playlists which are created for direct access with the
DISC controls on VW radio. The designated VW Playlists are related to DISC number in the
following manner:
DISC 1: VW1...
DISC 2: VW2...
DISC 3: VW3...
DISC 4: VW4...
DISC 5: VW5...
DISC 6: ALL SONGS on
The naming of designated VW Playlists in iTune for PA11-VW6 interface must be exactly as shown.
VW must be in capital letters and there can be no spaces between VW text and number.
However, you may add any text after the correct naming of a Playlist.
(i.e. VW1-Jazz, VW3_Favorite3 are acceptable Playlist names for PA11-VW6
interface.)
If no designated VW Playlists are created, PA11-VW6 adapter automatically relates to the first five
Playlists on
to DISC number 1 to 5 regardless Playlist naming.
If less than five designated VW Playlists are created, PA11-VW6 adapter automatically fills up the
rest of DISC numbers beginning with the first available Playlist on
.
Example: if only three designated VW1, VW3 and VW5 Playlists are created, the disc number on
radio will be:
-9-
DISC 1: VW1...
DISC 2: (1st available Playlsit on
DISC 3: VW3...
DISC 4: (2nd available Playlist on
DISC 5: VW5...
)
)
The
interface does not recognize a Playlists that contains no audio tracks regardless of Playlist
naming. The
interface also does not recognize the "On-The-Go" Playlist on your
.
5-6 Playback function controls
You can control playback with several functions. These functions are generally cancelled when you
press select radio buttons; disconnect the
, or POWER OFF the radio or ACC.
SCAN
Press the scan button, each track in the current Playlist play for 10 seconds. If SCAN is pressed at
DISC 6, it will play all songs in
for 10 seconds each.
Random (Shuffle)
Press the "RDM" random button, songs and Playlist will playback in random order.
Some radio models use the "P scan" button to activate random mode.
Repeat
Repeat of a song being played is not supported.
Track Up/Down
Press the "NEXT" button to advance to the next track in the Playlist. Press the "PREV" button to go
to the beginning of the track that is being played. Press the track down button twice to go to the
previous track.
If the track up or track down buttons is pressed quickly in repetition, the track numbers displayed may
change unevenly. You may also hear short bits of audio during repeated presses of track up and track
down buttons.
If your VW radio currently displays a maximum of two digits for track number. Track number
100 will be displayed as 01, track 101as 02, track 102 as 03...
Changing source to AM/FM, CD, Cassette
When a source other then the
Note:
is selected on radio, the
will pause.
and iTune are registered trade marks of Apple Computer, Inc.
XM is a trade mark of XM Satellite Radio Inc.
VW is a registered trade mark of Volkswagen Group.
Design and specifications are subject to change without notice.
-10-
LIMITED WARRANTY
T
q
w
T
P
P
P
a
W
1
2
3
4
5
6
I
T
t
i
T
C
d
a
s
p
w
b
p
d
N
A
A
A
P
T
I
P
L
E
T
s
-11-
Model
PA11-VW6
to VW car stereo Interface
PLAY, CONTROL & CHARGE
Your
through VW Car Stereo System!
KEY FEATRES
This interface connects an
following benefits :
or
mini directly to your VW audio system with
Connect directly
's audio output to VW vehicle audio system for optimal sound quality playback.
can be accessed by using the radio's CD DISC
Hybrid Mode: Playlists and songs on the
buttons, as well as by using the click wheel on the
.
In Direct Mode: Search and select songs directly on
.
Maintain current Playlist when switching from portable to in-car use.
Charge the
battery while playing, charging automatically ends at one hour after
is paused
to prevent car battery drain.
Plus-DVD player, Satellite radio or other audio device can be used in conjunction with the
through Aux Audio Input jack.
Plug-n-Play : This complete package includes installation cables, mounting screws and user's manual.
Player or
Satellite Receiver
CAR AUDIO
Display of artist and song title information, track search by artist, song title, album or genre are NOT
supported. Only the Playlist number and track number are displayed on radio.
APPLICATIONS
PA11-VW6 is applicable to the following VW vehicles:
Cabrio
Beetle
Golf
GTI
98-04
98-07
98-05
98-05
Jetta
Passat
Euro Van
Touareg
98-07
98-07
01-04
04-07
Rabbit/GTI 06-07
Note: Radios must have round SCAN button.
PA11-VW6 is not applicable to some 98-99 year models equipped with BOSE or Premier
radio that have 13-pin din plug.
XM is a trade mark of XM Satellite Radio Inc.
VW is a registered trade mark of Volkswagen Group.
LTI Enterprises, Inc. 167 Mason Way, Unit A2. City of Industry, CA91746
www.usaspec.com or www.usaspec.net
Tel(626)336-3836
8
Made in Korea