1
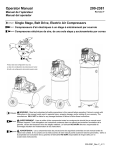
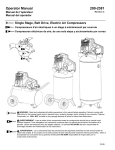
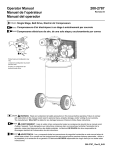
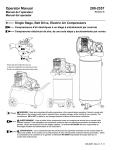
Owner’s Manual
Compressor Specifications
Model Number
APC4406
Horse Power
1.5
Tank Capacity
Gallons/Liters
4.6 Gallon
Voltage/Amps/Phase
120/2.6/1
Kick-In Pressure
85
Kick-Out Pressure
115
WARNING! The power cord on this product contains
lead, a chemical, known to the state of California to cause
cancer and birth defects or other reproductive harm.
Wash hands after handling
Precautions
• Drain the moisture from the tank daily to help prevent corrosion.
• Pull the pressure relief valve ring daily to ensure proper function and clear possible
obstructions
• To provide proper ventilation for cooling, the compressor must be kept at least 12
inches (31cm) from the nearest wall, in a well-ventilated area.
• Fasten the compressor securely and release tank pressure before transporting.
• Protect the air hose and electronic cord from damage and puncture. Inspect
them weekly for weak or worn spots, and replace if necessary.
• To reduce the risk of electric shock, do not expose to rain. Store indoors.
• Never operate the compressor if the power cord or plug are damaged. Take
the equipment to nearest authorized service center and a specialist technician
will replace it.
15
Owner’s Manual
Compressor (cont’d)
Basic Air Compressor Components
Oil-less aircompressor are factory
lubricated for life and do not require
any oil.
The basic components of the air
compressor the electric motor,
pump, pressure switch, and tank.
The electric motor (see A) powers
the pump. The electric motor is
equipped with an overload protector
and an automatic reset. If the motor
becomes overheated, the overload
protector will shut it down to prevent
damage to the motor. When the motor
sufficiently cools, it will automatically
restart.
A&B
The dual pump (see B) compresses the air
and discharges it into the tank.
C
The tank (see C) stores the compressed
air.
The pressure switch (located internally) shuts down the motor and relieves air
pressure in the pump and transfer tube when the air pressure in the tank reaches
the kick-out pressure. As compressed air is used and the pressure level in the
tank drops to the kick-in pressure, the pressure, the pressure switch restarts
the motor automatically, without warning, and the pump resumes compressing air.
Assembling the Air Compressor
Unpack the air compressor. Inspect the unit for damage. If the unit has been damaged
in transit, contact the carrier and complete a damage claim. Do this immediatly
because there are time limitations to damage claims. The carton should contain.
• Air Compressor
• Manual
16
Owner’s Manual
Compressor (cont’d)
Assembling the Air Compressor
Unpack the air compressor. Inspect the unit for damage. If the unit has been damaged
in transit, contact the carrier and complete a damage claim. Do this immediatly
because there are time limitations to damage claims. The carton should contain.
• Air Compressor
• Manual
• Air Fliter
1) Attach Air Filter and srew in properly.
Air Filter
17
Owner’s Manual
Compressor (cont’d)
COMPRESSOR CONTROLS
Power switch: This switch turns the compressor power ON and OFF.
Pressure Relieve Valve: If the pressure switch does not shut down the motor when
pressure reaches the preset level, this valve will pop open automatically to prevent
over pressurization. To operate manually, pull the ring on the valve to relieve air
pressure in the tank.
Tank Pressure Gauge: This gauge measures the pressure level of the air stored in
the tank. It is not adjustable by the operator and does not indicate line pressure.
Air Pressure Regulator: This air pressure regulator enables you to adjust line
pressure to the tool you are using.
WARNING! NEVER EXCEED THE MAXIMUM WORKING
PRESSURE OF THE TOOL. TURN THE KNOB CLOCKWISE TO INCREASE
PRESSURE, AND COUNTERCLOCKWISE TO DECREASE PRESSURE.
18
Owner’s Manual
Compressor (cont’d)
Electrical Power Requirements
Electrical Wiring
Refer to the air compressor’s serial label for the unit’s voltage and amperage
requirements. Use a dedicated circuit. For best performance and reliable starting, the
air compressor must be plugged into a dedicated circuit, as close as possible to the
fuse box or circuit breaker. The compressor will use the full capacity of a typical
15 amp household circuit. If other devices are on the same circuit, the compressor
may fail to start. Low voltage or an overloaded circuit can result in sluggish starting
that causes the motor overload protection system circuit breaker to trip, especially in
cold conditions.
Note: A circuit breaker is recommended. If the air compressor is connected to
a circuit protected by a fuse, use dual element time delay fuses (Buss Fusetron type“1”
only).
Note: Avoid use of extension cords. If using an extension cord is necessary,
be sure to use an extension with the correct specifications.
For optimum performance, plug the compressor power cord directly into a grounded
wall socket. Do not use an extension cord unless absolutely necessary. Instead, use a
longer air hose to reach the area where the air is needed.
If use of an extension cord cannot be avoided, the cord should be no longer than 100
feet and be a minimum wire size of 14 gauge (AWG).
19
Owner’s Manual
Compressor (cont’d)
ELECTRICAL POWER REQUIREMENTS (cont’d)
Extension Cord
Use the chart on the right for
the proper extension cord length.
Use only a 3-wire extension cord
that has a 3-blade grounding plug
and a 3-slot receptacle that will
accept the plug of the product. Make
sure your extension cord is in good
condition. An undersized cord will
cause a drop in line voltage as well
as a loss of power and overheating.
The smaller the gauge number, the
heavier the cord.
AMP
RATING
(120 Volts)
10-12
12-14
14-16
16-18
18-20
LENGTH OF
CORD IN FEET
25’
16
16
16
14
14
50’
14
12
12
12
12
100’
10
10
10
8
8
150’
8
8
8
8
8
Grounding Instructions
This product is equipped with a cord having a grounding wire an
appropriate grounding plug. The plug must be plugged into an outlet
that is properly installed and grounded in accordance with all local codes
and ordinance.
WARNING! IMPROPER INSTALLATION OF THE GROUNDING PLUG
CAN RESULT IN A RISK OF ELECTRIC SHOCK. IF REPAIR OR
REPLACEMENT OF THE CORD OR PLUG IS NECESSARY, DO NOT
CONNECT THE GROUNDING WIRE TO FLAT BLADE TERMINAL.
THE WIRE INSULATION HAVING AN OUTER SURFACE THAT IS GREEN
WITH, OR WITHOUT, YELLOW STRIPES IS THE GROUNDING WIRE.
This product is for use on a nominal 110 volt circuit. An outlet having the
same configuration as the plug. No adapter should be used with this product.
Do not alter the plug to fit into a non–Ground or 2-slot receptacle.
20
Owner’s Manual
Compressor (cont’d)
BREAKING IN THE PUMP
1.Turn the switch to the OFF position.
2. Open the petcock. Turn counterclockwise (loosen).
3. Plug in the power switch to the ON position.
4. The compressor will start.
ALLOW THE COMPRESSOR TO RUN FOR 15 MINUTES, TO BREAK IN THE
INTERNAL PARTS.
CAUTION: AFTER ABOUT 15 MINUTES. IF THE UNIT DOES NOT
OPERATE PROPERLY, SHUT DOWN IMMEDIATELY AND CONTACT
PRODUCT SERVICE CENTER 888-896-6881.
5. After about 15 minutes, turn the power switch to the OFF position.
6. Close the petcock. Turn in the clockwise direction.
7. Turn the power switch to the ON position. The compressor will start and fill the tank
to the kick-out pressure and stop.
Note: As compressed air is used, the pressure switch will restart the
motor automatically.
Note: During the initial break-in cycle, there will be a slight electrical
smell as the motor brushes seat.This is normal for universal motors and will last for
about 5 minutes.
OPERATING INSTRUCTIONS
Daily Startup
1. Turn the power switch to the OFF position.
2. Close the tank petcock. Turn in the clockwise direction.
3. Plug in the power cord.
4. Turn the power switch to the ON position.
21
Owner’s Manual
Compressor (cont’d)
OPERATING INSTRUCTIONS
WARNING! HIGH TEMPERATURES ARE GENERATED BY THE
ELECTRICAL MOTOR AND THE PUMP. TO PREVENT BURNS OR OTHER
INJURIES, DO NOT TOUCH THE COMPRESSOR WHILE IT IS RUNNING. ALLOW
IT TO COOL BEFORE HANDLING OR SERVICING. KEEP CHILDREN AWAY FROM
THE COMPRESSOR AT ALL TIMES.
WARNING! WHEN ADJUSTING FROM A HIGHER TO A LOWER
PRESSURE, TURN THE KNOB COUNTERCLOCKWISE TO REACH THE DESIRED
PRESSURE. DO NOT EXCEED OPERATING PRESSURE OF THE TOOL OR
ACCESSORY BEING USED.
5. Adjust the regulator to the working pressure of the tool. (never exceed 90 PSI)
Shut down
1. Turn the power switch to the OFF position.
2. Unplug the power cord.
3. Reduce pressure in the tank thorough the outlet hose. You can also pull the relief
valve ring and keep it open in the tank.
WARNING! ESCAPING AIR AND MOISTURE CAN PROPEL DEBRIS
THAT MAY CAUSE EYE INJURY. WEAR SAFETY GOGGLES WHEN OPENING
PETCOCK.
4. Tip the compressor (if necessary for your model ) so the petcock is at the bottom of
the tank(s).Then open the petcock to allow moisture to drain from the tank.
22
Owner’s Manual
Compressor (cont’d)
MAINTENANCE (cont’d)
Relieve the air pressure in the system and open the petcock on the
bottom of the tank to drain.
WARNING! CONDENSATION WILL ACCUMULATE IN THE TANK. TO
PREVENT CORROSION OF THE TANK FROM THE INSIDE, THIS MOISTURE
MUST BE DRAINED AT THE END OF EVERY WORKDAY. BE SURE TO WEAR
PROTECTIVE EYEWEAR.
Note: In cold climates, drain the tank after each use to reduce problems with
freezing of water condensation.
Testing for Leaks
Check that all connections are right. A small leak in any of the hoses or pipe
connections will substantially reduce the performance of your air compressor. If you
suspect a leak, spray a small amount of soapy water with spray bottle. If bubbles
appear, repair or replace the faulty component. Do not over tighten any connections.
Storage
Before storing the compressor for a prolonged period, use an air blow gun to clean all
dust and debris from the STORAGE compressor. Disconnect the power cord and coil
it up. Pull the pressure relief valve to release all pressure from the tank. Cover the
entire unit to protect it from moisture and dust.
Servicing
Perform the following maintenance at the intervals indicated below:
• Operate the pressure relief valve: Daily
• Drain air from tank daily
24
Owner’s Manual
LIMITED WARRANTY
All-Power warrants to the original purchaser who uses the product in a consumer
application (personal, residential or household usage) that all products covered under this
warranty are free from defects in material and workmanship for one year from the date of
purchase. All products covered by this limited warranty which are used in commercial
applications (i.e. income producing) are warranted to be free of defects in material and
workmanship for 90 days from the date of original purchase. Products covered under this
warranty include air compressors, air tools, service parts, pressure washers and generators.
All-Power America will repair or replace at All-Power’s sole option, products or
components which have failed within the warranty period. Service will be scheduled
according to the normal work flow and business hours at the service center location, and
the availability of replacement parts. All decisions of All-Power with regard to this
limited warranty shall be final. This warranty gives you specific legal rights, and you may
also have other rights which vary from state to state.
RESPONSIBILITY OF ORIGINAL PURCHASER (Initial User):
To process a warranty claim on this product, DO NOT return item to the retailer. The
product must be evaluated by an Authorized Warranty Service Center. For the location of
the nearest Authorized Warranty Service Center contact the retailer or place of purchase.
Retain original cash register sales receipt as proof of purchase for warranty work.
Use reasonable care in the operation and maintenance of the product as described in the
Owner’s Manual(s).
Deliver or ship the product to the nearest Authorized Warranty Service Center. Freight
costs, if any, must be paid by the purchaser.
Air compressors with 60 and 80 gallon tanks will be inspected at the site of installation.
Contact the nearest Authorized Warranty Service Center that provides on-site service calls
for service call arrangements.
If the purchaser does not receive satisfactory results from the Authorized Warranty Service
Center, the purchaser should contact All-Power .
31
Owner’s Manual
LIMITED WARRANTY (cont’d)
THIS WARRANTY DOES NOT COVER:
Merchandise sold as reconditioned, used as rental equipment, or floor or display
models.
Merchandise that has become damaged or inoperative because of ordinary wear,
misuse, cold, heat, rain, excessive humidity, freeze damage, use of improper
chemicals, negligence, accident, failure to operate the product in accordance
with the instructions provided in the Owner’s Manual(s) supplied with the
product, improper maintenance, the use of accessories or attachments not
recommended by All-Power, or unauthorized repair or alterations.
Repair and transportation costs of merchandise determined not to be defective.
Costs associated with assembly, required oil, adjustments or other installation and
start-up costs.
Expendable parts or accessories supplied with the product which are expected to
become inoperative or unusable after a reasonable period of use.
Merchandise sold by All-Power which has been manufactured by and
identified as the product of another company, such as gasoline engines. The
product manufacturer's warranty, if any, will apply.
ANY INCIDENTAL, INDIRECT OR CONSEQUENTIAL LOSS, DAMAGE, OR
EXPENSE THAT MAY RESULT FROM ANY DEFECTS, FAILURE OR
MALFUNCTION OF THE PRODUCT IS NOT COVERED BY THIS
WARRANTY. Some states do not allow the exclusion, so it may not apply to you.
IMPLIED WARRANTIES, INCLUDING THOSE OF MERCHANTABILITY OR
FITNESS FOR A PARTICULAR PURPOSE, ARE LIMITED TO ONE YEAR
FROM THE DATE OF ORIGINAL PURCHASE. Some states do not allow
limitations on how long an implied warranty lasts, so the above limitations may not apply.
STOP
DO NOT RETURN TO STORE
For Technical Assistance Please Call 888-896-6881
32