1
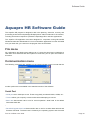
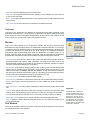
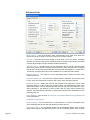
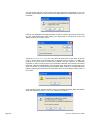
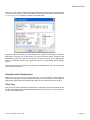
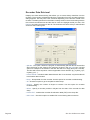
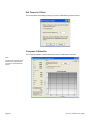
AQUADOPP HIGH RESOLUTION USER GUIDE May 2008 AQUADOPP HIGH RESOLUTION Copyright © Nortek AS 2008. July 2008. All rights reserved. This document may not – in whole or in part – be copied, photocopied, translated, converted or reduced to any electronic medium or machine-readable form without prior consent in writing from Nortek AS. Every effort has been made to ensure the accuracy of this manual. However, Nortek AS makes no warranties with respect to this documentation and disclaims any implied warranties of merchantability and fitness for a particular purpose. Nortek shall not be liable for any errors or for incidental or consequential damages in connection with the furnishing, performance or use of this manual or the examples herein. Nortek AS reserves the right to amend any of the information given in this manual in order to take account of new developments. Microsoft, ActiveX, Windows, Windows NT, Win32 are either registered trademarks or trademarks of Microsoft Corporation in the United States and/or other countries. Other product names, logos, designs, titles, words or phrases mentioned within this publication may be trademarks, servicemarks, or trade names of Nortek AS or other entities and may be registered in certain jurisdictions including internationally. Nortek AS, Vangkroken 2, NO-1351 RUD, Norway. Tel: +47 6717 4500 • Fax: +47 6713 6770 • e-mail: [email protected] • www.nortek.no Page Doc No: AHR00-0101-0508 Product Registration When you receive your Nortek instrument it is important that you visit our website and register the instrument to activate the warranty, you’ll find the from here: www.nortek-as.com/support/customer-warranty/warranty-form Software updates and technical support For software updates and technical support: www.nortek-as.com/support Nortek Support Forum If you have any comments, tips, suggestions for improvement or any other information that you think may be of interest then you should join the Nortek on-line forum: www.nortek-as.com/forum The Forum offers a great opportunity for you to share your experiences of using Nortek instruments and to allow you to benefit from other’s. Your Feedback is appreciated Your feedback is much appreciated. If you find errors, spelling mistakes, omissions or sections poorly explained or have other comments on this manual please let us know, email us at: [email protected] Contacting us If you need more information, support or other assistance, do not hesitate to contact us: Nortek AS Vangkroken 2 NO-1351 RUD, Norway Phone: +47 6717 4500, Fax: +47 6713 6770 e-mail: [email protected] Page Doc No: AHR00-0101-0508 Contents Contents Introduction Principles of operation Planning guidelines Getting Started Installing the AquaPro HR software The installation is simple and straightforward: Connecting to the instrument Direct Serial Communication Modem Communication Problems Testing the instrument Deployment planning Start recorder deployment Stop recorder deployment Data retrieval SD Memory Card Data conversion Online data collection Main display screen Current Sensors System Chart plots Sweep plots File menu Communication menu Serial Port Aquapro HR Software Guide Terminal Emulator Connect Modem Dial Modem Deployment menu Planning Doc No: AHR00-0101-0508 7 7 11 11 12 12 12 13 13 13 14 14 14 15 15 15 15 16 16 17 17 17 19 19 19 Standard tab Advanced tab Start Recorder Deployment Stop Recorder Deployment View Log Recorder Data Retrieval SD Memory Card Data Conversion Erase Recorder View menu Configuration menu On-line menu Start Data Collection Stop Data Collection Start With Recorder Disk Recording Start Disk Recording Stop Disk Recording Set Clock Set Pressure Offset Compass Calibration Temperature Calibration APPENDIX A Returning Instruments for Repair 22 24 25 27 27 28 29 30 30 31 31 31 31 32 32 32 33 33 33 34 34 35 37 20 21 21 21 22 22 Page Page Doc No: AHR00-0101-0508 Introduction Introduction Principles of operation A HR profiler operates by measuring the phase shift between two or more acoustic pulses. The instrument transmits a pulse, records the echo, transmits a second pulse, records that echo and calculates the phase shift between the two echoes. The phase shift is proportional to the velocity of the acoustic scatters, the result is a profile of the velocity along each of the acoustic beams. This velocity profile can be transformed to an orthogonal coordinate system using information on geometry and/or measured tilt and heading stored in the instrument. The first step, transmitting an acoustic pulse and recording the echo, is normally a trouble-free process. The second pulse is transmitted a short time after the first one, the time difference between the two pulses is in the order of ms. Recording the echo from the second pulse is the most critical process in any HR system. If for any reason the echo from the first pulse overpowers the echo from the second pulse, we have a situation referred to as “pulse-to-pulse interference”. Avoiding this situation is one of the main difficulties when configuring an HR profiler; the user is often forced to make a number of trade-offs. Planning guidelines To assist in configuring the HR-profiler the Deployment Planning section encourages the user to choose between three common mounting methods. The software then automatically selects configuration parameters we believe are appropriate for the selected mounting method. If none of these methods match the specific requirements, the user must manually configure the profiler. This is done using the Advanced options available under Deployment Planning. These are the three common mounting methods: 1) System oriented downward and mounted at a known distance from the bottom or seabed. If practical, this is the easiest way to get good data from an HR profiler. The software will use the distance entered as the key parameter and the spacing between the acoustic pulses is set to be slightly larger than the distance to the bottom. Because the strong bottom echo from the first pulse reaches the transducer right after the second pulses is transmitted, the acoustic interference does not affect the velocity close to the bottom. Also, the first pulse tends to completely die out once it hits the bottom and the instrument can record the echo from the second pulse as it propagates toward the bottom without any interferences from the first pulse. The result is very clean data and a clear view of the bottom boundary layer. If the distance to the bottom is set to less than the actual distance during the deployment, the second pulse will be transmitted too early. As a result the profiler will not collect data Doc No: AHR00-0101-0508 Page close to the bottom. If the distance to the bottom is set greater than the actual distance during the deployment, the second pulse will be transmitted too late. As a result data in a band close to the instrument will be lost. Normally the data close to the bottom is more important than the data close to the profiler. If the distance is not precisely known it is better to over estimate the distance to the bottom than under estimate. If the bottom is composed of materials of differing size and shape - large rocks, coral and some types of plants - which reflect the acoustic beams. The bottom will be acoustically “wider” than a smoother bottom composed of clay, silt or sand. This will cause velocity data close to the instrument to be lost and in extreme cases, the whole velocity profile can be contaminated, especially if the distance to the bottom is short. 2) System oriented toward the surface, deep water. For our purposes “deep water” can be loosely defined as water with a depth a little more than twice the desired profiling range. If you choose this configuration, the distance between the pulses is set to be a little more than the requested profiling range. In this situation, pulse interference is rarely a problem for high-frequency systems (1 MHz or greater). The exception is the case where strong acoustic scatters congregate just beyond the profiling range. For example, a fish swimming 1.5m above the bottom could give interference in the velocity profile if the profiling range is set to 1m. The interference will show up as an outlier in the data collected at a range of roughly 50cm. Since the amplitude data for the HR system is normally recorded while registering the echo from pulse number one, the source of the interference cannot easily be identified. In a low frequency system, the echo from pulse number 1 dies out more slowly because acoustic water absorption is lower and pulse-to-pulse interference can be caused by plankton layers in the water column. To alleviate this situation, the Nortek HR allows for the possibility of differentiating the transmit power. See the Advanced tab under Deployment Planning. 3) System oriented toward the surface, shallow water. Shallow water in this case means that we have to worry about acoustic interference from the surface echo. Intuitively it may seem that this situation is similar to the downward looking profiler (close to the bottom) but two phenomena make the surface acoustically different from the bottom: 1. The echo does not die out when it hits the surface. 2. The position of the surface can vary over time (tides or waves). The Deployment Planning section of the software takes a conservative approach to this situation and sets the profiling range to be a little less than half the distance from the instrument to the surface. This ensures that it is possible to listen to the echo from both pulses without interference. However, it is only possible to measure the lower part of the water column and data will be lost towards the end of the profile if there is significant wave activity. A more aggressive solution would be to pretend that this case is similar to the situation where the profiler is mounted to profile downwards, this approach will give high quality data only when the surface is very smooth. The velocity profiling can break Page Doc No: AHR00-0101-0508 Introduction down completely if there is significant wave activity. We recommend that alternative instrument configurations are considered only after direct experience from the specific situation at the deployment site. Velocity range In a system that measures the phase shift between two or more acoustic pulses, the max/min velocity is reached when the phase shift is +/- pi. This velocity is often referred to as the “ambiguity velocity” because the system will not stop working if the phase shift is outside this range. Instead, it will interpret the phase shift within an unambiguous range that extends over 2*pi. For example, in the Nortek HR profiler, a phase shift 3*pi/2 is interpreted as -pi/2. This misinterpretation is referred to as an “ambiguity wrap” and it is one of the intrinsic features of HR profilers. The estimated velocity is a function of the measured phase shift divided by the time between the two transmit pulses (“lag”). In the HR implementation, the profiling range cannot exceed the time between the pulses, which means that there is a coupling between the profiling range and the max/min velocity that can be measured. The longer the profiling range, the larger the time between the pulses, and the smaller the max/min velocity that can be measured. This can be expressed as limit on the product of the profiling range and the maximum velocity so that long profiling ranges can be obtained only in low flow environments. For this reason, we view the HR profiler as suitable primarily for low-velocity environments. In the software, this limitation of the HR profiler is expressed in terms of the maximum velocity that can be measured given a selected profiling range. The velocity should be interpreted in the direction perpendicular to the acoustic beams (normally horizontal) and it can be changed only by choosing a different profiling range. Doc No: AHR00-0101-0508 Page Page 10 Doc No: AHR00-0101-0508 Getting Started Getting Started This chapter provides you with the basic information you need to get up and running as quickly as possible. It covers installing the AquaPro HR software and essential things you need to know to configure and test your instrument. If you are familiar with Nortek instruments then this may well be all you need to start with. If you are new to our instruments and software then we recommend that you read the software section of this manual which provides more detailed information. Installing the AquaPro HR software The installation is simple and straightforward: • Ensure that you are installing AquaPro HR and have the correct CD-ROM. • Insert the CD-ROM, the installation program will start automatically. • Follow the instructions on screen. • If you wish to change the installation directory you can do so when asked. Once the installation is complete you can launch the application by clicking on the desktop icon or by selecting AquaPro HR from the Start->Nortek menu. The first time you run AquaPro application you should see the screen below. Note: By default all Nortek applications will be placed on the Start menu under the heading Nortek. Doc No: AHR00-0101-0508 Page 11 Note: Modem options are not available in the standard version of the software but information relating to these options is given in this manual. If you require another version of the AquaPro HR software which supports the use of a modem you should contact Nortek directly. The application window consists of three main areas: • Menu and tool bars at the top providing access to all functions. • Info on the instruments configuration in the centre. • Graphical representation of data is shown at the bottom of the screen Connecting to the instrument When you first receive your instrument it is wise to test it on the bench before going out into the field. You will need just a serial connection and a power connection. The software communicates with the instrument using either a direct serial or a modem with a (GSM) connection. Direct Serial Communication Connect the instrument to your PC using the cable supplied to one of the serial ports. Select Serial Port from the Communication menu and select which port number you are connected to. You can also select a baud rate but we recommend that you use the default baud rate setting of 9600. To check the connection to the instrument and verify that the instrument is alive select Connect from the Communication menu or click the corresponding tool bar button. A message box should appear with an identification or status message. You can also open the Terminal Emulator click the Send Break button to send a BREAK command to the instrument. A BREAK causes the instrument to report an identification or status message. Modem Communication Connect the instrument to the Nortek Power and Communications Interface Box (PCIB) (see system manual for details). Connect the computer serial port to a GSM/analog modem. The modem must support the standard AT command language. Select Serial Port from the Communication menu to select which port number you are connected to. You can also select a baud rate but we recommend that you use the default baud rate setting of 9600. This is the default instrument baud rate and the standard GSM data transfer rate. Select Modem from the Communication menu and enter the phone number to dial. The software always configures the modem to echo commands and send result codes in verbose format (ATE1Q0V1). Enter additional AT commands in the Configuration box. The default command is ATM0&D2. M0 sets the speaker off and &D2 sets the modem to disconnect the call when the DTR line goes off. This setting is recommended to ensure that the call is disconnected even if the hang-up command should fail. Uncheck the Automatic download box and click OK. Select Dial Modem from the Communication menu to call the instrument modem. Monitor the commands, status and result messages displayed in the Status window. When the connection is established a CONNECT <baudrate> message is displayed. To check the instrument communication and verify that the instrument is alive activate the Terminal Emulator window. Click the Send Break button to send a BREAK command to the instrument. A break command the instrument to report an identification or status message. To disconnect the call close the terminal window and select Hang Up from the Communication menu. When using modem communication always establish a connection with the Dial Modem Page 12 Doc No: AHR00-0101-0508 Getting Started command before selecting the Start/Stop Recorder Deployment, Recorder Data Retrieval and On-line menu commands. Remember to disconnect with the Hang Up command when finished. Problems Most problems concerned with connecting to the instrument are caused by poor connections or incorrect communication settings. Check that all serial and power connections are correct and robust. Ensure you have specified the correct COM port, this will vary from computer to computer. Your computer may have several ports, these are generally named COM1, COM2 etc... If you are unsure then try each port in turn. This connecting and testing process is generally trouble free but if you are still having problems then you should make contact with your nearest Nortek office or use our forum. Testing the instrument Assuming that you have established a connection with the instrument and everything seems to be working you can now run a simple test to ensure that the instrument is working as expected. This can also be down on the bench but you will of course not get any useful data. Deployment planning Select Planning from the Deployment menu or click the Configuration tool bar button to display the planning dialog box. The Planning sub-menu displays three options. The first option may serve as a starting point for your test deployment. • Use Existing to start with the previous settings. This is the same as clicking the Configuration tool bar button. • Select Load From File to read settings from a deployment (.dep) file. NOTE: Many of the menu options are also available as buttons on the Toolbar. Moving the mouse pointer over the buttons will show the name of its function. • Select Load From Instrument to read settings from the instrument. The dialog contains all parameters required to specify the operation of the instrument. The Deployment planning frame on the right hand of the dialog displays performance parameters that are automatically updated as you change the parameter settings. When you are finished click OK to accept the changes. You can use Save command in the File menu or the tool bar button to save the deployment parameters to file these can be reloaded at a later date when you are ready to deploy the instrument. The Deployment Planning dialog allows you to specify the instrument operation at two levels. Use the Standard tab to configure the system with default settings for various environments and mounting situations. Use the Advanced tab to fine tune the operating parameters. Note that the Use Advanced Settings check box on the Standard tab must be checked for the Advanced settings to be effective. Doc No: AHR00-0101-0508 Page 13 Start recorder deployment Assuming you have a connection and have finished with the planning section it is now time to start the data measurement. Select Start Recorder Deployment from the Deployment menu or click the Start Recorder Deployment button on the tool bar. This displays the Deployment dialog. Specify the date and time to start data recording by using the Start At date and time controls or select Start Now to begin recording immediately after the final deployment sequence is completed. In the Name field enter a 6 character name to identify the data stored in the recorder. In the Comments box you may enter up to 180 characters of text. This will be included in the data file and will help you to document the data set. After clicking OK the Set Clock dialog box is displayed. Check the Set clock to PC time box to set the instrument clock to the same as the PC clock or set the clock to any arbitrary time as entered in the Date and Time fields. Click Yes to continue. A confirmation dialog will display the deployment parameters and allow you to verify that the set-up is what you intended. Click Confirm to send the configuration to the instrument. The instrument will verify that the deployment has started. When prompted by the program to disconnect the computer serial cable that is used to communicate with the instrument, you should do so without delay. The configuration information from the deployment sequence is stored in a log file that has the same name as the deployment. This file is designed to be used as a deployment record and is formatted for standard printers. Stop recorder deployment When you are ready to stop the test you will first need to re-connect the serial cable and connect to the instrument by clicking the Connect button on the tool bar or selecting Connect from the Communication menu. Select Stop Recorder Deployment from the Deployment menu or click the Stop Recorder Deployment button on the toolbar to stop data recording. A confirmation dialog will allow you to verify that you want to stop the deployment. When data recording has stopped a dialog will display the current Aquadopp and PC clock time. Data retrieval First you must establish communication with the instrument. Then to extract data from the instrument recorder select Stop Recorder Deployment from the Deployment menu or click the Stop Recorder Deployment toolbar button. Then activate the Data Retrieval dialog by selecting Recorder Data Retrieval from the Deployment menu or clicking Recorder Data Retrieval on the toolbar. The dialog will show directory information from the recorder. This may take a few moments depending on the amount of data in the recorder. The recorder overview dialog will show a list of all files currently stored in the recorder, including the time of the first measurement and the size for each file. Select a file in the list by clicking on the filename. Click Retrieve to specify the name and disk location of the file. Page 14 Doc No: AHR00-0101-0508 Getting Started SD Memory Card If you have the optional memory card installed they you can use this command to display a list of data files stored on the internal memory card (option). The program will download directory information from the card before the dialog appears. This may take a few moments depending on the amount of data stored on the card. For more information on use of the SD memory card refer to the relevant section in the Software Guide Data conversion To convert binary data files retrieved from the recorder to a readable ASCII format select Data Conversion from the Deployment menu or click the Data Conversion toolbar button. Add files to the Files to convert list by using the Add file, file selection dialog. To convert files select items in the list and click the blue arrow. Specify the location for the converted files in the Save in folder field. An optional pre- or post fix that will be added to the recorder filename may be specified. Select from the View files drop-down list to open the converted (ASCII) files using a text editor such as Notepad. Online data collection An on-line data collection module is included for test purposes and to provide data collection from the instrument in real time. The program can also write data to binary files on a local hard drive or some other location for later processing and analysis. Use the Deployment Planning dialog to set data collection parameters or load a previously prepared deployment file. First establish communication with the instrument, select Start Data Collection from the On-line menu or click the Start Data Collection toolbar button to start data acquisition. The real time display shows velocity data and sensor data as it is collected. To capture the data that comes in over the serial port to disk select Disk Filename from the On-line menu and define the name of a file (without extension). Once this disk file is defined, the Start Disk Recording and Stop Disk Recording menu items and toolbar buttons will be enabled. Once data recording to disk has started, the status box on the display screen will show the name of the disk file and its size. To convert binary disk files to a readable ASCII format use the Data Conversion dialog box. Main display screen The main display consists of two panes that you can re-size by placing the mouse over the split bar and drag it to the position you want. The top pane contains a number of tabs listing measurement and status data. The bottom pane contains multiple chart and sweep plots of the measurement data. Use the tabs to select which data to display. The following provides some essential information on the sections of the main display. You will find m ore information in the detailed chapter on the Aquapro HR software. Doc No: AHR00-0101-0508 Page 15 Current • Cell is the cell number. • Dist is the distance from the instrument head in meters. • VelEN/DirEN shows the last velocity and direction output from the instrument in the horizontal plane. • VelE/N/U shows the three last velocities output from the instrument in the East-NorthUp coordinate system. • Amp1/2/3 shows the average signal strength (amplitude) from the measurement cell along each of the three beams. The values always refer to the along beam signal strength and is independent of the velocity coordinate system. • Corr1/2/3 shows the values of the signal correlation coefficient for each of the three receivers. The values are given as percent, where 100 means perfect correlation. Sensors The sensors tab shows the last data from the compass (Heading), tilt (Pitch/Roll), Temperature and Pressure sensors together with the current Battery voltage and the Analog input readings. Sound speed is the sound speed used by the instrument for velocity calculations. Status • Date & Time is the current date and time. • Disk file shows the name of the disk file in use for data recording. The field displays OFF if no data is stored to the computer disk. • File size is the size of the file being recorded to disk. • Error code is a binary code that shows if there is something wrong with the instrument: Bit 7 Not used 0 = OK 1 = error Bit 6 Not used 0 = OK 1 = error Bit 5 Not used 0 = OK 1 = error Bit 4 Flash 0 = OK 1 = error Bit 3 Tag bit 0 = OK 1 = error Bit 2 Sensor data 0 = OK 1 = error Bit 1 Measurement data 0 = OK 1 = error Bit 0 Compass 0 = OK 1 = error Status is a binary code showing some of the status parameters of the instrument: Page 16 Doc No: AHR00-0101-0508 Getting Started Bit 7 & 6 Power level 00 = 0 (high) 01 = 1 10 = 2 11 = 3 (low) Bit 5 & 4 Wakeup state 00 = bad power 01 = power applied 10 = break 11 = RTC alarm Bit 3 Roll 0 = OK 1 = out of range Bit 2 Pitch 0 = OK 1 = out of range Bit 1 Scaling 0 = mm/s 1 = 0.1mm/s Bit 0 Orientation 0 = up 1 = down System • Date & Time is the current date and time. • Serial number is the number of the instrument (Factory parameter). • Probe number is the number of the probe head (Factory parameter). • Firmware version is the current version of the software inside the instrument. It will change when downloading new firmware • Recorder size is the size of the recorder memory inside the instrument. Chart plots The chart plots will display the latest current profile data. • Profile displays current Velocity, Amplitude and Correlation profile plots. • Vel/Dir displays current Velocity and Direction profile plots. Sweep plots When on-line data collection (See On-line menu commands) has been started the sweep plots will update continuously as new data arrives. • Velocity and Amplitude displays the current velocity and signal strength for selected cells. • Correlation • Sound speed displays the sound speed used by the instrument for velocity calculations. • Temperature displays the temperature sensor data. • Pressure displays the pressure sensor data. • Battery displays the battery voltage. • Pitch/Roll/Heading displays the heading and tilt sensor data. • Analog inputs displays the analog input readings. Doc No: AHR00-0101-0508 Page 17 Page 18 Doc No: AHR00-0101-0508 Software Guide Aquapro HR Software Guide The AquaPro HR program is designed to aid in the planning, execution, recovery and processing of autonomous Aquadopp HR deployments. It also contains an on-line section, including all functions required to operate the Aquadopp HR in real-time applications. The AquaPro HR application has been designed for computers running Microsoft® Windows® 2000 and Windows® XP. You must install the application from the CD-ROM onto your hard disk; you cannot run the program from the CD-ROM. File menu All configuration and deployment settings can of course be saved and re-loaded at a later date. You’ll find these and other options to create new, print or open recent files on this menu. Communication menu The following commands are available on the Communication menu but note that the modem options are not available in the standard version of the software. Serial Port • Serial port which COM port to use. These are typically numbered COM1, COM2, etc... • Timeout allows you to specify a timeout value when attempting to connect. • Baud rate data transfer rate to use for normal operation. 9600 baud is the default instrument baud rate. • • Recorder/Upgrade baud rate data transfer rate to use for recorder data retrieval and firmware download. The baud rate is limited by the operating system and the serial Doc No: AHR00-0101-0508 Page 19 port on your computer. Higher data rates may be used to reduce downloading time, but you may encounter communication errors when using these higher baud rates. For firmware download we recommend using 9600 baud. For modem connections always set to the same as the normal operation rate. • SD Card used to increase storage capacity, check this box if it is present and you wish to you use it. • Search check box is used to enable searching across baud rates when trying to connect if the software fails to connect at the rate specified. • Hard break - The implementation of the BREAK signal depends on the instrument hardware version. If you experience connection problems try checking or unchecking this option. Terminal Emulator Displays a terminal emulator window that allows direct communication with the instrument over the serial port. The Terminal Emulator window allows you to communicate directly with the instrument using the serial line command interface. More information on using the command interface to communicate directly with the instrument is covered by our System Integrator Guide available from Nortek. • Clear All clears the terminal window. • Send Break sends a BREAK command over the serial port. A break causes the instrument to report an identification string. • Command file specifies the name of a file containing an ASCII or hexadecimal command to send to the instrument. • Log file displays a file selection dialog box where you can specify a file the instrument response will be saved in. • Command allows a command to be sent to the instrument, e.g. ‘ID’ to get the identification string. The command can be ASCII or in hexadecimal format if the Hex commands box is checked. The hex command to get the identification string is ‘4449’. Click the Send button to send the command to the instrument. ASCII commands may be typed directly in the terminal window. Page 20 Doc No: AHR00-0101-0508 Software Guide • Send the command specified in the Command field. • Echo On echoes typed characters locally. Displays every character you type before it is sent to the instrument. • Binary mode splits the terminal window in two, displaying text in both hexadecimal and ASCII format. • Hex commands shows instrument commands in hexadecimal format. Connect Connects to the instrument and displays an identification and status message. If the application finds difficulty in connecting to the instrument it will display a dialog indicating that it is trying to connect using different baud rates. In this case you can chose to cancel and re-check your connections or allow the program to finish. Modem The Modem dialog allows you to configure the modem and set up an automatic data download from the recorder that will run unattended at specified intervals. A connection is made to the remote modem and the most recent data is transferred from the instrument recorder and appended to a disk file on the local computer. The download procedure ensures the data transfer takes place when the instrument is in sleep mode, i.e. not actively collecting data. The specified connection times and intervals will be adjusted automatically to avoid data being downloaded during data measurement periods. • Phone Number is the phone number to dial. (Leave this field blank to use the automatic download feature with a direct cable connection. The program will then connect and download data regularly as specified in the automatic download settings but without using the modem dial-up/hang-up commands.) Successfully connected to the instrument. • Configuration The software always configures the modem to echo commands and send result codes in verbose format (ATE1Q0V1). Enter additional AT commands here. The default command is ATM0&D2. M0 sets the speaker off and &D2 sets the modem to disconnect the call when the DTR line goes off. This setting is recommended to ensure that the call is disconnected if the hang-up command should fail. • Automatic Download enables automatic data transfer. • Connect every specifies how often the program will run the data download procedure. • Begin at the number of minutes past the hour to run the data download procedure the first time. • Max number of re-dials the program will attempt to dial the remote modem after a failed call. • Timeout is the period of time during which a successful connection must be made. If the timeout value is reached before the connection is made, the procedure is cancelled. • Wait specifies the time to wait after a non-successful connection before re-dialing. • Download to folder allows you to choose a location for downloaded data files. • Browse displays a folder selection dialog box where you can select the location to put converted data files. Dial Modem Important: Automatic data download is normally enabled after the recorder deployment has been started. It is strongly recommended that the deployment configuration file used when the deployment was started is open before automatic data download is enabled. Instructs the modem to dial the instrument. This option does not appears on the menu in the standard version of the software. Doc No: AHR00-0101-0508 Page 21 • The Dial Modem instructs the modem to dial the instrument. • Hang Up instructs the modem to terminate the connection. Deployment menu Planning The Planning sub-menu displays the following three options, they will all ultimately bring you to the deployment Planning dialog but at least one of them should serve as a starting point for your deployment planning. • Use Existing displays the deployment planning dialog box with the current operating parameters or those last used. • Load From File loads operating parameters from a specified file and displays the deployment planning dialog box. • Load From Instrument loads operating parameters from the instrument and displays the deployment planning dialog box. The Deployment Planning dialog allows you to specify the instrument operation at two levels. Use the Standard tab to configure the system with default settings for various environments and mounting arrangements. Use the Advanced tab to fine tune the operation parameters. Note that the Use Advanced Settings box (Standard tab) must be checked for the advanced settings to be effective. The Deployment planning frame on the right hand of the dialog displays performance parameters that are automatically updated as you change the parameter settings. Standard tab • Frequency must agree with the instrument frequency for the performance calculations and parameter validation to be correct. • SD Card used to increase storage capacity, check this box if it is present and you wish Page 22 Doc No: AHR00-0101-0508 Software Guide to you use it. For more information on the SD card, how to use it and how to extract data from it check the section later in this chapter. • Environment choose the settings that best fit your deployment. • Measurement interval describes how often the instrument will collect current profile data, the value can be set from 1 to 65535 seconds. • Cell size - Specifies the vertical length of each depth cell in the profile. Standard deviation (accuracy) of the velocity measurements is inversely proportional to the depth cell size (larger depth cells give smaller standard deviations). • Mounting - Choose the settings that best fit your deployment. These parameters determine the Aquadopp pulse distance, profile range and number of cells. To see the consequences of the different choices check battery utilization and velocity range. For direct control, use the Advanced tab. • Pulse distance - The spacing between the transmitted acoustic pulses. The following options appear on both the Standard and the Advanced tabs, the provide you with a set of parameters defined by the software depending upon the Mounting method chosen. You will see as you select different mounting options the information displayed will change. NOTE: For more information on the Mounting settings see the Planning Guidelines section in the Introduction chapter. NOTE: For more information on the Pulse Distance see the Planning Guidelines section in the Introduction chapter. • Assumed duration - Enter the number of days you would like to collect data. This value, together with the other deployment parameters and the hardware configuration, will be used for calculating the performance parameters, i.e. battery utilization, recorder memory requirements and velocity precision. • Number of cells - The calculated number of cells based on the profiling range (pulse distance) and cell size. • Profile range - The vertical profiling range based on the mounting settings. • Horizontal/Vertical velocity range - A theoretical estimate of the actual velocity range along the vertical axis (along the transmit axis) and in the plane perpendicular to the transmit axis (usually the horizontal plane). See Velocity range. • Battery utilization - The expected battery life based upon total capacity for an unused battery and current duty cycle. • Memory required - The recorder memory required to fulfil the planned deployment as entered by the user configuration parameters and the planned length of the deployment. • Extended Velocity range • Use advanced settings - Must be checked for the advanced settings to be effective. Doc No: AHR00-0101-0508 Page 23 Advanced tab • Burst interval - Is the time between each measurement burst. After each burst, the instrument will go to sleep to conserve power and recorder capacity. • Cell size - Specifies the vertical length of each depth cell in the profile. Standard deviation (accuracy) of the velocity measurements is inversely proportional to the depth cell size (larger depth cells give smaller standard deviations). • Average interval - Specifies how long the instrument will be actively collecting data within each Profile Interval. Example: Profile interval is set to 600 seconds, averaging interval set to 60 seconds means that the instrument will collect data for 1 minute every 10 minutes. Averaging interval must be smaller than or equal to Profile interval. • Blanking distance - The distance from the Aquadopp sensor head to the start of the measurement cell. • Compass update rate - How often the compass data are collected. The maximum rate is once every second and the minimum rate is once every averaging interval. • Measurement load - Within each second, the instrument can either be in active mode (collecting data) or in idle mode (not collecting data). The Measurement load is the relative time spent in active mode within each second and can have value from 0 (no data collection) to 100 (always in active mode). With the Auto option selected, the program will automatically calculate an appropriate measurement load based on the averaging interval. • Pulse distance - See sections on Principles of operation and Planning guidelines for recommendations. • Extended Velocity Range. • Burst sampling - Sets the instrument to collect data for a number of samples at the given Sampling Rate at intervals specified by the Burst interval. • Coordinate system - The coordinate system can be selected to Beam, XYZ, or ENU. Beam means that the recorded velocity will be in the coordinate system of the acoustic Page 24 Doc No: AHR00-0101-0508 Software Guide beams. XYZ means that the measurements are transformed to an orthogonal XYZ coordinate system fixed relative to the instrument and ENU means that the data are converted to geographic coordinates every second. • File wrapping - If checked, data are logged to the internal instrument recorder in ringbuffer mode. This ensures that the recorder always holds the latest data. If not checked data logging will stop when the recorder is full. • Speed of sound - Speed of sound can be set by the user (Fixed) or calculated by the instrument based on the measured temperature and a user-input value for salinity (Measured). The salinity is 0 for fresh water and typically 35 for the ocean. The use of analog inputs requires a special internal harness. Some systems are equipped with this at the time of purchase. It is also possible to purchase the harness separately and upgrade the instrument. • Analog inputs - The instrument can read two analog inputs at the same time. The input range is 0-5 Volt, where 0 Volt equals 0 counts, 5 Volts equals 65535 counts and 2.5 Volts equals 32768 counts. • Output power check enables power from the instrument to your external sensor. The voltage output is fixed in production to either 5 Volts, 12 Volts or to the instrument voltage. Start Recorder Deployment There is a sequence of steps to successfully starting a recorder deployment, it is straightforward as this sequence will show. Selecting Start Recorder Deployment from the menu or clicking the button on the toolbar will display the Deployment dialog. This dialog allows you to specify the time and date to start the deployment. You can specify a date and time to suite you or you can choose Start Now! to start the deployment immediately you have completed this sequence. Enable serial output / TellTale. You must specify a Name for your deployment and you have the option to enter optional Comments. If you fail to enter a Name you will be prompted to do so before continuing, Comments are useful to help you keep track of different deployments. Doc No: AHR00-0101-0508 Page 25 The next dialog will give you the option to save the deployment information or not. It is probably a good idea if you plan to re-use the deployment. For simple testing it is not so important. Clicking Yes will display a file dialog to allow to select a location and provide a file name for your saved deployment. After saving your deployment of choosing not to the next dialog requires you to set the clock. Check the Set clock to PC time box to set the instrument clock to the same as the PC clock or set the clock to any arbitrary time as entered in the Date and Time fields. The purpose is to set the time as correctly as possible. The time reference is especially important in order to ensure proper synchronization between the instrument and other data sets collected independently. Correctly setting the time before a deployment can save a lot of time in post processing and analysis. After clicking Yes another dialog will display confirming the instrument clock has been set or an error dialog if it fails. Click OK to proceed. If the instrument clock was successfully set the next dialog will display basic information about the deployment. Click Yes or No to continue or to cancel. Page 26 Doc No: AHR00-0101-0508 Software Guide Clicking Yes will display another dialog with the deployment information displayed within it in a text format, you can use the scrollbars to view all the information. You must click Confirm or Cancel to continue or abandon the deployment. Clicking Confirm will display the final dialog of the sequence indicating a successful deployment, informing you to disconnect your serial connection before continuing and displaying the path to the log file. This log file has the same name as your deployment and is a permanent record of your deployment and is in a text-based, printer friendly format. Disconnect the serial connection as instructed immediately and click OK to complete your recorder deployment. Stop Recorder Deployment Select Stop Recorder Deployment from the menu or click the button on the toolbar. A sequence of dialog boxes will be displayed asking you to confirm that you wish to stop the deployment. Simply follow the dialog boxes and click the confirming buttons on each. View Log Every time you start a deployment information on that deployment will be written to this log file. New deployments will be appended top the log file each time. This provides a record of your deployments. Doc No: AHR00-0101-0508 Page 27 Recorder Data Retrieval Displays the data retrieval dialog that allows you to extract binary data files from the recorder. The program will download directory information from the recorder before the dialog appears. This may take a few moments depending on the amount of data in the recorder. The dialog shows a list of all files currently stored in the recorder along with the time of the first measurement and the size for each file. Highlight the file you want, click Retrieve and select a location for the file. The software recovers the file you selected and saves it at the location given. • Split file - This option causes the program to automatically split the data in several files when retrieving to disk. Specify the maximum file size in the Max size box. Use this option for example to save data in disk files that will fit on floppy disk (max 1.38 Mb). The files will have a sequence number appended to their filename (e.g. mydata_1.prf, mydata_2.prf, ...). • Include header - Includes header data with each file. If not checked, only the first file will have header data included. • Dump - Dumps data from the recorder. Use this option for recorder troubleshooting. • All - Check this option to get a complete recorder dump. • Amount - Specify the number of Kbytes to retrieve. Use this option for recorder troubleshooting. • Offset - Specify a recorder position in Kbytes from the start of the recorder for data dump. • Include FAT - Includes the recorder file allocation table (FAT) in the dump file. • CRC check - Check this option to enable CRC control during data conversion. Page 28 Doc No: AHR00-0101-0508 Software Guide SD Memory Card The SD Memory Card dialog shows all the files currently stored on the optional internal SD memory card. For each file the dialog displays the time of the first measurement and the file size. The amount of used and free space on the memory card is also displayed. You cannot retrieve data from the memory card using the AquaPro HR software. The memory card must be removed from the instrument and inserted into a memory card reader connected to a PC. The data is stored on the SD Memory Card as a data set, consisting of a configuration file and one or more data files: c_nnnnnn.nrc (configuration file) d_nnnnnn.nrd (data file) Where nnnnnn is a sequence number. The configuration file sequence number will be the same as the sequence number of its first data file. For example: c_000000.nrc (data set 1) d_000000.nrd d_000001.nrd d_000002.nrd c_000003.nrc (data set 2) d_000003.nrd d_000004.nrd d_000005.nrd d_000006.nrd The next data set’s configuration file would be: c_000007.nrc (data set 3) The data files sequence number would begin with the following and continue sequentially: d_000007.nrd Doc No: AHR00-0101-0508 Page 29 Data Conversion Displays the data conversion dialog box that is used to convert binary data files to a readable ASCII format. • Files to convert - Lists files that may be selected for conversion. To convert files select items in the list and click the blue arrow. • Converted files - Lists converted files. • Add file - Displays a file selection dialog box where you can select files to add to the Files to convert list. • Remove - Removes the selected files from the list. • Select All - Selects all files in the Files to convert list. • Checksum control - Performs checksum control during data conversion. • Burst files - Splits data collected in burst mode into separate files. The files will have a sequence number appended to their names. • Show pathnames - Shows files with full pathnames in file lists. • Add prefix - Specify text to be inserted in front of the recorder file name for the converted files. • Add postfix - Specify text to be appended to the recorder filename for the converted files. • View file - Selects a converted file in the drop-down list to open in Notepad. • Save in folder - Specify the location to put converted data files. Click on the tool icon to the right to browse to a location. Erase Recorder Follow the dialog boxes to erase the recorder. You will receive a confirmation message box confirming that all data in the recorder has been erased. Page 30 Doc No: AHR00-0101-0508 Software Guide View menu Toolbar - Shows or hides the toolbar. Use this command to display and hide the Toolbar, which includes buttons for some of the most common commands. A check mark appears next to the menu item when the Toolbar is displayed. The toolbar is displayed across the top of the application window, below the menu bar. The toolbar provides quick mouse access to the most common commands. Large Buttons - Use this command to display large toolbar buttons. Status Bar - Use this command to display and hide the Status Bar, which describes the action to be executed by the selected menu item or depressed toolbar button, and keyboard latch state. A check mark appears next to the menu item when the Status Bar is displayed. The status bar is displayed at the bottom of the application window. The left area of the status bar describes actions of menu items as you use the arrow keys to navigate through menus. This area similarly shows messages that describe the actions of toolbar buttons as you depress them, before releasing them. If after viewing the description of the toolbar button command you wish not to execute the command, then release the mouse button while the pointer is off the toolbar button. The right areas of the status bar indicate if an instrument is connected to the serial port and the baud rate in use. Format - Displays the font selection dialog that allows you to customize the text format. Analogue Inputs - Displays a dialog which allows you to define the type of sensor connected to these input. Configuration menu Firmware Upgrade - Use this command to download new firmware to the instrument. The command displays a file selection dialog box where you can select the firmware file to download. Sensor Head - Use this command to download new sensor head configuration to the instrument. The command displays a file selection dialog box where you can select the sensor head file to download. On-line menu Start Data Collection Select Starts Data Collection from the menu or click the button on the toolbar. This will start real-time data collection over the serial port. You will see the data being displayed in the main display. Data is not saved, if you want to save this data then you need to select Start With Recorder or Start Disk Recording. Doc No: AHR00-0101-0508 Page 31 Stop Data Collection Select Stop Data Collection from the menu or click the button on the toolbar. A confirmation dialog will be displayed. Click Yes to stop the data collection. Start With Recorder Starts data collection both to the internal recorder and over the serial port. Select Start With Recorder from the menu or click the button on the toolbar. You will need to enter a Name for your deployment and if you wish optional Comments. Data will be received over the serial port and displayed in the main display and it will also be stored in the instruments internal recorder. Disk Recording The disk files dialog allows you to specify a filename for on-line data recording to disk. Page 32 Doc No: AHR00-0101-0508 Software Guide • Base Name and Folder Specifies the full path and name of the file you want to use for data recording. Click on the tool icon to the right to browse to a location. • Binary format records data in binary (instrument raw) format. • ASCII format records data in ASCII format. • Append date/time to Filename option causes the program to automatically append the current date and time to the selected base name when starting data recording. Format: basename_YYYYMMDDhhmmss.ext Example: mydata_19980115142036.prf • Max Size Specifies the maximum file size in minutes when using automatic filename generation. A new file will be opened for data recording each time the specified interval has elapsed. • Append to file if Existing if the file already exists. You can click OK to save the setting for later use or click Start to save the settings and start recording straightaway. Start Disk Recording Select Start Disk Recording from the menu or click the button on the toolbar. If you have setup a file name etc.. Using the Disk Recording dialog these settings will be used and recording will start. If you have not, the Disk Recording dialog will be displayed to allow you to do so before recording starts. Stop Disk Recording Select Stop Disk Recording from the menu or click the button on the toolbar. Disk recording will simply stop unprompted. Set Clock The Set Clock dialog is used to set the instrument system clock. The time reference is especially important in order to ensure proper synchronization between the instrument and other data sets collected independently. Time spent to properly set the time before a deployment can save a lot of time in post processing and analysis. • Date / Time sets the instrument clock to the specified time. • Set clock to PC time sets the instrument clock to the same as the PC clock. Doc No: AHR00-0101-0508 Page 33 Set Pressure Offset The set pressure offset dialog instructs you how to calibrate the pressure sensor. Compass Calibration The compass calibration dialog instructs you how to calibrate the compass. Note: All data in the recorder will be erased when calibrating the compass or the temperature sensor. Page 34 Doc No: AHR00-0101-0508 Software Guide Temperature Calibration Note: The temperature calibration dialog instructs you how to calibrate the temperature sensor. The Temperature sensor is cailbrated at the factory. recalibration is not normally required and need only be done if you suspect an error. Doc No: AHR00-0101-0508 Page 35 Page 36 Doc No: AHR00-0101-0508 Appendix A APPENDIX A Returning Instruments for Repair In case an instrument or any module must be returned to the factory, it must be accompanied by a proforma Invoice. An example of a proforma Invoice can be found on the next page. Note: You will need a Return Merchandise Authorization (RMA) before the instrument or any module is returned to the factory. Contact the factory for this – see next page for contact information. Doc No: AHR00-0101-0508 Page 37 Page 38 Doc No: AHR00-0101-0508 Proforma Invoice Not a sale – temporary export to Norway for repair! SENDER (Exporter) RECEIVER Name: Name: Nortek AS Address: Vangkroken 2 Address: City: N-1351 Rud Country: City: Country: Tel.: Fax: Ref.: Norway Tel.: +47 67174500 Fax: +47 6713 6770 E-mail: [email protected] Contact: Jonas Røstad Customs Account No: 28605-56 VAT/Company No:976 119 185 About the Goods Date: No. of Units: Weight: Delivery Terms: Customs Account No.: 28605-56 Description of Goods: Origin: NO Value: Total Value: Nortek RMA No: Reason for Export: Place: Date: Exporter’s name: Page 39 Doc No: AHR00-0101-0508 Nortek AS, Vangkroken 2, NO-1351 RUD, Norway. Tel: +47 6717 4500 • Fax: +47 6713 6770 • e-mail: [email protected] • www.nortek.no