1
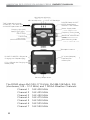
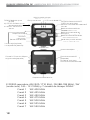
American Red Cross
SOLARLINK FR500 by Etón
Self-Powered and Solar-Powered AM/FM/Shortwave Radio with
NOAA Weatherband, Flashlight, Siren and Cell Phone Charger
Owner’s Manual
American Red Cross
Radio Line By:
American Red Cross SOLARLINK FR500 OWNER’S MANUAL
American Red Cross Radio Line By:
DO YOU NEED HELP?
If you need help, please contact us:
Monday-Friday, 8:30 a.m.-4:00 p.m., North American Pacific Time.
1-800-872-2228 from the U.S ; 1-800-637-1648 from Canada
650-903-3866, worldwide ; FAX: 650-903-3867 ; www.etoncorp.com
Etón Corporation, 1015 Corporation Way, Palo Alto, CA 94303, USA
WARNING
•
•
•
•
•
•
•
•
•
Do not expose this appliance to rain or moisture.
Do not submerge or expose for extended period to water.
Protect from high humidity and rain.
Only operate within specified temperature range (0 °C to 40 °C).
Unplug immediately if liquid has been spilled or object have fallen into the
apparatus.
Clean only with a dry cloth. Do not use detergents or chemical solvents as
this might damage the finish.
Unplug and disconnect external antennas (not included) during lightning
storms.
Do not remove cover [or back].
Refer servicing to qualified service personnel.
ENVIRONMENT
Disposal
According to the European Directive 2002/96/EC all
electrical and electronic products must be collected
separately by a local collection system.
Please act according to your local rules and do not dispose of your
old products with your normal household waste.
3
American Red Cross SOLARLINK FR500 OWNER’S MANUAL
MIN: Minute Adjusting
HR: HourAdjusting
LIGHT: LCD Backlight
POWER: Power On/OFF
SLEEP: Sleep Power
SNOOZE: 5 Min Snooze
TIME : clock adjust button
ALARM SET : set alarm time
AL/ON/OFF:open/close alarm function
Power Supply Knob
Charging Light (left)
Power Light (right)
Frequency Tuning Knob
Focus Lamp
Bouton de sélection des
bandes
Hand Crank
Band Selecting Knob
Multifunctional Knob
Speaker
Telescopic Antenna
PHONE CHARGER: USB Jack for
Charging the Cellphone (big)
DC in Jack (Adaptor)
Earphone Jack
Audio in Jack
DC in: USB Jack for Charging the
Radio (small)
Battery Compartment
The FR500 plays AM (520-1710 KHz), FM (88-108 MHz), SW
(shortwave, 5.8 – 12.2 MHz) and 7 NOAA Weather Channels:
Channel 1 162.400 MHz
Channel 2 162.425 MHz
Channel 3 162.450 MHz
Channel 4 162.475 MHz
Channel 5 162.500 MHz
Channel 6 162.525 MHz
Channel 7 162.550 MHz
4
American Red Cross SOLARLINK FR500 OWNER’S MANUAL
VOLUME CONTROL
Turning the Volume Adjusting Knob (located on the lower right
of the radio) clockwise turns up the volume; counterclockwise
turns down the volume. Always turn down the volume before
using earphones.
POWERING AND TURNING ON THE FR500
The FR500 is powered with 3 AA batteries, the solar cell, the Dynamo (rechargeable Ni-MH battery), the AC adapter (not included)
or the DC computer input. Select BATTERY, SOLAR or DYNAMO
power with the Power Supply Knob on the upper right side of the
radio. The power sockets are on the back of the radio, under the
rubber covers. After applying power, select the correct position
with the Power Supply Knob and by pressing the POWER button.
Turn it off by placing the Power Supply Knob in the Off position.
Note: the radio can be played while it’s charging.
BATTERY POWER
Install 3 AA batteries and set the power selector switch to the BATTERY position.
5
American Red Cross SOLARLINK FR500 OWNER’S MANUAL
SOLAR POWER
When you’re in sunlight set the power switch to the SOLAR position. This position also recharges the Ni-MH rechargeable battery.
DYNAMO POWER
The rechargeable Ni-MH (nickel-metal-hydride) battery is in the
battery compartment. To use it plug the battery into the socket
adjacent to it, then set the power switch to the DYNAMO position.
You may have to charge the battery; to do this turn the crank for
90 seconds. The rechargeable battery will eventually lose its ability
to hold a charge. Call Eton Corporation to order another one.
DC-IN 5V AC ADAPTER (not included)
This socket is located on the back of the radio, under the rubber
plugs. Plug in the AC adapter to the DC IN 5 volt socket. This also
charges the Ni-MH battery.
DC-IN USB COMPUTER SOCKET (usb cord not included)
This socket is located on the back of the radio, under the rubber
plugs. Plug in the AC adapter to the DC IN 5 volt socket. This also
charges the Ni-MH battery.
6
American Red Cross SOLARLINK FR500 OWNER’S MANUAL
ANSWERS TO YOUR QUESTIONS
REGARDING CHARGING
How much operating time does hand cranking provide?
Cranking 120 times per minute, for 1 minute, plays the radio for
about 4 minutes at low volume. Since volume is relative this may
be higher or lower depending on how loud the volume is.
How long does it take to fully charge the battery by hand
cranking? It is not practical to charge the battery via hand
cranking. Since the battery capacity is 600mAh (milliamp hours).
Fully charging it by cranking would take 3 hours at 120 turns per
minute.
How do you switch from hand crank direct power to just
charging the battery? When in the OFF position, cranking or
solar cell is charging the cell phone or MP3; when the switch is at
the other 3 positions, both the solar cell and cranking can charge
the battery.
Can the solar cell power the radio on its own, or is it just
used to charge the battery? Yes, the solar cell can power the
radio on its own, and also charge the battery.
How long does it take the solar cell to charge the battery? It
will take 12-15 hours for the solar cell to charge the battery.
A fully charged battery will last about 6 hours at low volume when
receiving radio programs and about 5 hours at low volume when
receiving aircraft band.
7
American Red Cross SOLARLINK FR500 OWNER’S MANUAL
ORDERING A CELL PHONE ADAPTER TIP
Send Eton Corporation a post card with your name, address and
preferably your email address (telephone number is OK). Include
the radio model and the brand and model of your cell phone (the
model is often found on the body of the cell phone, under the
battery). The first adapter tip is free of charge; additional adapter
tips are $5 each.
Alternately, you may call and order an adapter tip via our toll-free
number or send an email (go to www.etoncorp.com).
CHARGING CELL PHONES
If you revolve the Power Supply Knob to the OFF/PHONE CHARGER position the radio will charge cell phones. Plug the cell phone
charging cord into the USB PHONE.
CHARGER
Jack at the rear of the radio. Plug the cell phone charging adapter
tip into the other end of the cord and then into the jack of the cell
phone. Then put the radio in the sun or revolve the hand crank to
charge the cell phone. About 10 minutes of cranking results in one
or two short emergency calls.
8
American Red Cross SOLARLINK FR500 OWNER’S MANUAL
CHARGING AND POWER LIGHT
Charging Light
• If charged by turning the hand crank, the charging light is green.
• If charged by solar, the charging light is orange.
• If charged by the external adaptor, the charging light is red.
Power Light
• If the battery power is full, the power light is green.
• If the battery power is medium, the power light is orange.
• If the battery power is low, the power light is red, please charge.
LCD BACKLIGHT
Press the LIGHT button to turn on the LCD backlight. It will light
for 5 seconds and then turn off.
SELECTING BANDS AND TUNING IN STATIONS
Turn the radio on. Select the band with the BAND Selection Knob
and by looking at the red light above the radio’s display. The red
light appears to the left of the band or the weather channel that
you’ve selected.
When listening to FM, Shortwave and Weather channels, pull up
the telescopic antenna all the way. When tuning AM stations the
telescopic antenna is not needed and can be lowered. Tune in stations by revolving the Frequency Tuning Knob.
The weather frequencies are on channels WB1 through WB7. Try
all of them and find the one that’s strongest; the strongest one is
your weather station. Tune to it before setting the Weather Alert
feature, described below.
9
American Red Cross SOLARLINK FR500 OWNER’S MANUAL
SETTING THE WEATHER ALERT FEATURE
NOAA weather alerts warn you when a severe weather system is
approaching.
Turn on the radio and tune in the weather channel that has the
strongest signal. Then turn the Multifunction Knob (on the lower
left side of the front of the radio) up to the Weather Alert position
.Note that the weather alert LED lights up to the left of the
weather alert symbol above the display and to the farthest right.
After you’ve done this, the radio can be played on any other band,
when an alert comes it will be heard and you can change to the
weather channel.
SETTING THE TIME AND ALARM
IThe clock is a 12-hour clock, showing PM in the display starting
at Noon. Turn off the radio. While pressing and holding the TIME
or ALARM SET button, toggle the HR button (located above the
display) to adjust the hour. Then toggle the MIN button (located
above the display) to set the minutes.
TURNING THE ALARM ON AND OFF
With the radio on or off press the AL ON/OFF button. Notice that
when it’s on, ALARM appears in the lower right of the display.
10
American Red Cross SOLARLINK FR500 OWNER’S MANUAL
SNOOZE BUTTON
When the alarm activates, pressing the SNOOZE button deactivates it for 5 minutes, then it starts again.
SLEEP FEATURE
The sleep timer can be activated with the radio turned on or off.
Activating the sleep timer enables the radio to play for 90, 60, 30
and 10 minutes, then shut off automatically.
To activate it press the SLEEP button (in the upper right corner of
the front of the radio). 90 minutes appears. If you don’t want it to
play for 90 minutes, keep pressing the button over and over and
notice that the other minute selections appear. When it’s on the
one you want, stop pressing. The radio plays for the number of
minutes and then stops.
11
American Red Cross SOLARLINK FR500 OWNER’S MANUAL
MULTIFUNCTION KNOB (lower left corner) continued
The function switch has five positions. The top position is the
ALERT position, then the OFF, LIGHT, SOS and SIREN position. All
positions except OFF are labeled with an icon.
The ALERT position
radio on or off.
sets the Weather Channel alerts with the
The OFF position turns the function switch off.
The LIGHT position
turns the white lights on (left side of radio)
with the radio on or off.
The SOS position
turns the red flashing light on. Can be used
with the radio on or off.
The SIREN position
radio on or off.
turns on the siren. Can be used with the
EARPHONE JACK
Located on the back of the radio, under the rubber plugs. Plug in
any stereo earphones. Audio is heard in mono only. Always turn
down the volume before using earphone/headphoness.
AUDIO-IN JACK
Located on the back of the radio, under the rubber plugs, it enables you to listen to other devices, such as an iPod, using a stereo
3.5 mm (1/8 inch) cord to connected to it.
12
American Red Cross SOLARLINK FR500 OWNER’S MANUAL
WARRRANTY REGISTRATION
To ensure full warranty coverage or product updates, registration
of your product should be completed as soon as possible after
purchase or receipt. You may use one of the following options to
register your product:
1. By visiting our website at http://www.etoncorp.com.
2. Mail in enclosed warranty card.
3. Mail your warranty card or information to following address;
include your name, full mailing address, phone number, email
address, model purchased, date purchased, retail vendor name:
Etón Corporation
1015 Corporation Way
Palo Alto, CA 94303 USA
LIMITED WARANTY
Retain the warranty information from your warranty card with your
proof of purchase or the Limited Warranty information can also be
viewed at www.etoncorp.com.
SERVICE FOR YOUR PRODUCT
To obtain service for your product, we recommend first contacting an Etón service representative at 1-800-872-2228 US,
1-800-637-1648 Canada, (650) 903-3866, customersvc@etoncorp.
com or your respective country distributor in Europe (see enclosed
list) for problem determination and trouble-shooting. If further
service is required, the technical staff will instruct how to proceed
based on whether the radio is still under warranty or needs nonwarranty service.
13
American Red Cross SOLARLINK FR500 OWNER’S MANUAL
WARRRANTY
If your product is still in warranty and the Etón service representative determines warranty service is needed, a return authorization
will be issued and instructions will be given. DO NOT ship your
radio back without obtaining the return authorization.
NON-WARANTY
If your product is no longer under warranty and requires service,
the Etón service representative will refer you to the nearest repair
facility that will best handle the repair.
For service outside North America, please refer to the distributor
information included at time of purchase/receipt.
Note FCC
The manufacturer is not responsible for any radio or tv interference
caused by unauthorized modifications to this equipment. Such
modifications could void the user’s authority to operate the equipment.
14
American Red Cross SOLARLINK FR500 OWNER’S MANUAL
15
GUÍA DE OPERACIÓN DE American Red Cross SOLARLINK FR500
¿Necesita ayuda?
Si necesita ayuda, contáctenos de
lunes a viernes, de 8:30 a.m. a 4:00 p.m., hora estándar del Pacífico de EE. UU. 1-800-872-2228 desde los EE UU; 1-800-637-1648
desde Canadá; 650-903-3866 desde el resto del mundo; FAX:
650-903-3867; sitio Web, www.etoncorp.com; Etón Corporation,
1015 Corporation Way, Palo Alto, CA 94303, EE UU.
ADVERTENCIA
• No exponga este dispositivo a lluvia o humedad.
• No exponga o sumerja este aparato al agua durante un período largo.
• Proteja el aparato de gran humedad y lluvia.
• Utilice la unidad solamente dentro de un rango de temperatura especificado
(0 °C a 40 °C).
• Desenchufe la unidad inmediatamente si ha caído líquido algún objeto dentro
de la radio.
• Limpie la unidad solamente con un paño seco. No utilice detergentes o disolventes que puedan dañar la cubierta del dispositivo.
• Desenchufe y desconecte las antenas externas durante tormentas con relámpagos.
• No quite la cubierta [o la parte posterior].
• Si este producto muestra algún problema, póngase en contacto con personal
cualificado de servicio.
MEDIO AMBIENTE
Eliminación
De acuerdo a la Directiva Europea 2002/96/EC,
todos los aparatos eléctricos y electrónicos deben
ser recolectados en forma separada por un
sistema local de recolección.
Por favor, actúe según las normas de su localidad y no elimine los
aparatos antiguos en su basura del hogar usual.
17
GUÍA DE OPERACIÓN DE American Red Cross SOLARLINK FR500
MIN: Ajuste de minutos
TIEMPO: Botón de ajuste
de reloj
AJUSTE DE ALARMA: Ajuste
del tiempo de alarma:
AL ON/OFF: Iniciar/cerrar
alarma
HR: Ajuste de hora
LUZ: Luz de fondo LCD
POTENCIA: Potencia ON/OFF
SLEEP: Ajuste de sleep
SNOOZE: Activación de snooze de 5
minutos
Botón de alimentación de
corriente
Botón de sintonización de
frecuencia
Botón de selección de banda
Lámpara de enfoque
Manivela
Botón de ajuste de volumen
Bouton multifonction
Luz de carga (izquierda)
Luz de potencia (derecha)
Altoparlantes
Antena telescópica
Entrada DC: Enchufe USB para
carga de radio (pequeño)
Enchufe de entrada DC
(adaptador)
Entrada de auriculares
Enchufe de entrada de audio
Compartimento de baterías
El FR500 reproduce AM (520-1710 KHz), FM (88-108 MHz), SW
(onda corta, 5.8 – 12.2 MHz) y 7 canales de tiempo NOAA:
Canal 1 162.400 MHz
Canal 2 162.425 MHz
Canal 3 162.450 MHz
Canal 4 162.475 MHz
Canal 5 162.500 MHz
Canal 6 162.525 MHz
Canal 7 162.550 MHz
18
GUÍA DE OPERACIÓN DE American Red Cross SOLARLINK FR500
CONTROL DE VOLUMEN
Con el giro del botón de ajuste de volumen (ubicado en la parte
derecha inferior de la radio) en sentido de las agujas del reloj se aumenta el volumen, mientras se reduce con un giro contra el sentido
de las agujas del reloj. El volumen debe bajarse siempre antes de
usar los auriculares.
ALIMENTACIÓN DE POTENCIA
Y ACTIVACIÓN DEL FR500
El FR500 es alimentado con 3 baterías del tipo AA, la célula solar, el
dinámo, (batería NI-MH recargable), el adaptador AC (no incluido)
o la entrada del computador DC. Seleccione la alimentación de
potencia por BATERÍA, SOLAR o DINÁMO con el botón de alimentación de potencia ubicado en la parte derecha superior de la radio.
Los enchufes de potencia se encuentran en la parte posterior de la
radio, cubiertos con tapas de caucho. Después de la alimentación
de potencia, debe seleccionarse la posición correcta con el botón
de alimentación de potencia y pulsando a continuación el botón
POTENCIA. La radio se apaga mediante colocación del botón de
alimentación de potencia en la posición Off.
Nota: La radio puede seguir reproduciendo tocando durante su
carga
POTENCIA DE BATERÍA
Instale 3 baterías del tipo AA y coloque el selector de potencia en
la posición BATERÍA.
19
GUÍA DE OPERACIÓN DE American Red Cross SOLARLINK FR500
POTENCIA SOLAR
Instale 3 baterías del tipo AA y coloque el selector de potencia en
la posición BATERÍA.
POTENCIA POR DINÁMO
La batería recargable Ni-MH (níquel-metal-hidruro) se encuentra
en el compartimento de batería. Para usarla, debe enchufarse
la batería en el enchufe adyacente y colocar luego el botón de
potencia en la posición DINÁMO. Eventualmente tendrá que cargar
la batería, en este caso debe girarse la manivela durante aprox. 90
segundos. La batería recargable perderá eventualmente su capacidad para mantener la carga. En este caso recomendamos contactar
a Eton Corporation para pedir el suministro de otra batería.
ADAPTADOR AC DE ENTRADA DC 5V (no incluido)
Cette douille se trouve au dos de la radio sous les protections en
caoutchouc. Branchez l’adaptateur AC à la douille DC IN de 5 volts.
Ceci permet également de recharger la pile Ni-MH.
ENCHUFE USB DE ENTRADA DC DE
COMPUTADOR (cable USB no incluido)
Este enchufe se encuentra en la parte posterior de la radio, cubierto con una tapa de caucho. Permite la alimentación de potencia
desde un computador y recarga también la batería Ni-MH. Enchufe
el cable USB en el computador y en el enchufe USB de la radio.
20
GUÍA DE OPERACIÓN DE American Red Cross SOLARLINK FR500
RESPUESTAS PARA SUS PREGUNTAS SOBRE LA CARGA
¿Cuánto tiempo de servicio permite la generación de potenciapor manivela? Con 120 giros por minuto durante 1 minuto,
la radio reproduce durante aprox. 4 minutos con volumen bajo. Ya
que el volumen es relativo, puede resultar más alto o más bajo en
función de la intensidad del volumen.
¿Cuánto tiempo demora la carga completa de la batería mediante uso de la manivela? No resulta práctico recargar la batería
con la manivela. La capacidad de la batería asciende a 600mAh
(miliamperios/hora). La carga completa a través de la manivela
demoraría 3 horas con 120 giros por minuto.
¿Cómo puedo conmutar desde la alimentación directa por
manivela hacia la simple carga de batería? Al estar en posición
OFF, el uso de manivela o celda solar recarga el teléfono móvil o el
MP3. Cuando el conmutador se encuentra en una de las otras 3
posiciones, tanto la celda solar como la manivela pueden recargar
la batería.
¿Es posible que la celda solar alimente la radio en forma
independiente o se usa solamente para cargar la radio? Sí, la
celda solar puede alimentar la radio en forma independiente, así
como cargar la batería.
¿Cuánto tiempo demora la carga de la batería con la celda
solar? La celda solar demora aprox. 12 a 15 horas para la carga de
la batería.
Una batería completamente cargada trabaja durante aprox. 6
horas con volumen bajo al sintonizar programas de radio, así como
durante 5 horas con volumen bajo al sintonizar una banda aérea.
21
GUÍA DE OPERACIÓN DE American Red Cross SOLARLINK FR500
PEDIDO DE UNA PUNTA DE ADAPTADOR
PARA EL CARGADOR DE TELÉFONO MÓVIL
Envíe una tarjeta postal a Eton Corporation indicando su nombre y
apellido, dirección y preferentemente su dirección de e-mail (también se puede indicar el número de teléfono). También se deben
indicar el modelo de la radio, la marca y el modelo de su teléfono
móvil (el modelo se indica frecuentemente en el interior del teléfono móvil, debajo de la batería). La primera punta adaptadora se
suministra sin costos, los demás adaptadores tienen un costo de
US$5 por unidad.
En forma alternativa, puede llamar y pedir una punta de adaptador a través de nuestro gratuito o puede enviarse un e-mail (visite
www.etoncorp.com)
CARGA DE TELÉFONOS MÓVILES
Al conmutar el botón de alimentación de potencia a la posición
OFF/CARGA DE TELÉFONO en la radio, se procede con la carga del
teléfono móvil. Enchufe el cable de carga del teléfono móvil en el
enchufe USB del CARGADOR DE TELÉFONO ubicado en la parte
posterior de la radio. Enchufe la punta adaptadora de carga del
teléfono móvil en el otro extremo del cable y luego en el enchufe
del teléfono móvil. A continuación debe colocarse la radio en el
sol o bien se debe girar la manivela para cargar el teléfono móvil.
Aprox. 10 minutos de giro de manivela permiten la realización de
dos llamadas de emergencia.
22
GUÍA DE OPERACIÓN DE American Red Cross SOLARLINK FR500
CARGA Y LUZ DE POTENCIA
Luz de carga
• En caso de cargar mediante giro de la manivela, la luz de carga se
indica en color verde.
• En caso de carga solar, la luz de carga se indica en color naranja.
• En caso de carga con un adaptador externo, la luz de carga se
indica en color rojo.
Luz de potencia
• Cuando la potencia de batería está llena, la luz de potencia se
indica en color verde.
• Cuando la potencia de batería está media, la luz de potencia se
indica en color naranja.
• Cuando la potencia de batería está baja, la luz de potencia se
indica en color rojo y se debe proceder con la carga.
LUZ DE FONDO LCD
Pulse el botón LUZ para activar la luz de fondo LCD. Luego se
enciende durante 5 segundos y se apaga a continuación.
SELECIÓN DE BANDAS Y SINTONIZACIÓN
DE ESTACIONES
Encienda la radio. Seleccione la banda con el botón de selección
de BANDA y observando la luz roja que se indica sobre la pantalla
de la radio. La luz roja se indica al lado izquierdo de la banda o del
canal de tiempo que usted ha seleccionado.
23
GUÍA DE OPERACIÓN DE American Red Cross SOLARLINK FR500
SELECIÓN DE BANDAS Y SINTONIZACIÓN DE ESTACIONES
Al sintonizar la FM, onda corta o los canales de tiempo, debe
extenderse completamente la antena telescópica. No se requiere
la antena telescópica al sintonizar las estaciones AM, por lo cual
se puede guardar. Las estaciones se sintonizan mediante uso del
botón de sintonización de frecuencia.
Las frecuencias de tiempo se encuentran en los canales WB1 a
WB7. Pruebe todos los canales para encontrar el más fuerte, el
cual se convierte luego en su estación de tiempo. Sintonice el canal
antes de ajustar la función de alerta climática que se describe a
continuación.
AJUSTE DE LA FUNCIÓN DE ALERTA CLIMÁTICA
La alerta climática de NOAA emite advertencias en caso de aproximarse condiciones climáticas graves.
Active la radio y sintonice el canal de tiempo que tiene la señal
más intensa. Ajuste luego el botón multifuncional (ubicado en la
izquierda inferior de la parte frontal de la radio) en la posición de
Alerta climática. Observe que se enciende el LED de alerta climática
ubicado al lado izquierdo del símbolo de alerta climática en la pantalla, en el extremo derecho. Después de haber hecho esto, la radio
puede seguir sintonizando otra banda y cambia automáticamente
al canal de tiempo en caso de recibir una alerta climática.
24
GUÍA DE OPERACIÓN DE American Red Cross SOLARLINK FR500
AJUSTE DE LA HORA Y ALARMA
El reloj se indica en el formato de 12 horas y muestra PM en
la pantalla después del mediodía. Apague la radio. Durante la
pulsación y manteniendo pulsado el botón TIEMPO o AJUSTE DE
ALARMA, conmute con el botón HR (ubicado en la parte superior
de la pantalla) para ajustar la hora. Conmute luego con el botón
MIN (ubicado en la parte superior de la pantalla) para ajustar los
minutos.
ACTIVACIÓN Y DESACTIVACIÓN DE LA ALARMA
Con la radio en estado activado o desactivado, pulse el botón AL
ON/OFF. Observe que se indica ALARM en la derecha inferior de la
pantalla al estado activada.
BOTÓN SNOOZE
Cuando se activa la alarma, pulse el botón SNOOZE para desactivarla durante 5 minutos, luego se activa nuevamente.
25
GUÍA DE OPERACIÓN DE American Red Cross SOLARLINK FR500
FUNCIÓN DE SLEEP
El temporizador de sleep puede activarse cuando la radio está activada o desactivada. Con la activación del temporizador de sleep, la
radio seguirá reproduciendo durante 90, 60, 30 y 10 minutos para
apagarse a continuación automáticamente.
Para activar la función, pulse el botón SLEEP (en la esquina derecha
superior de la parte frontal de la radio). Se indica “90 minutos”. En
caso de no querer ajustar la opción de 90 minutos, siga pulsando el
botón repetidamente hasta que se indique otra opción de minutos.
Cuando desee ajustar la cantidad de minutos indicados, termine
de pulsar el botón. La radio trabaja ahora durante la cantidad de
minutos ajustados y se apaga luego.
BOTÓN MULTIFUNCIONAL
(en la esquina izquierda inferior)
El conmutador de función tiene cinco posiciones. La posición
superior es la posición de ALERTA, luego vienen las posiciones OFF,
LUZ, SOS y SIRENA. Todas las posiciones con excepción de OFF son
rotuladas con un ícono.
La posición ALERTA
ajusta la alerta de canal de tiempo con la
radio activada o desactivada.
La posición OFF desactiva el conmutador de función.
La posición LUZ
activa las luces blancas(lado izquierdo de la
radio) con la radio en estado activado o desactivado.
La posición SOS
activa la luz parpadeante de color rojo. Se
puede usar con la radio en estado activado o desactivado.
26
GUÍA DE OPERACIÓN DE American Red Cross SOLARLINK FR500
BOTÓN MULTIFUNCIONAL continuado
(en la esquina izquierda inferior)
La posición SIRENA
activa la sirena. Se puede usar con la radio
en estado activado o desactivado
ENTRADA DE AURICULARES
Este enchufe se encuentra en la parte posterior de la radio, cubierto con una tapa de caucho. Enchufe los auriculares estéreos. El
audio se escucha solamente en mono. El volumen debe bajarse
siempre antes de usar los auriculares.
ENCHUFE DE ENTRADA DE AUDIO
Ubicado en la parte posterior de la radio debajo de una tapa de
caucho, permite escuchar otros dispositivos, como un iPod, a través
de un cable con enchufe estéreo de 3,5 mm (1/8 pulgada) que se
debe conectar con éste.
REGISTRO DE GARANTÍA
Para asegurar la cobertura completa de la garantía o adquirir
actualizaciones del producto, debe registrar su producto tan pronto
posible después de la compra o recibo del producto. Usted puede
utilizar una de las siguientes opciones para registrar su producto:
1. Ya sea visitando nuestro sitio Web en http://www.etoncorp.com.
2. Enviando por correo la tarjeta de garantía suministrada.
27
GUÍA DE OPERACIÓN DE American Red Cross SOLARLINK FR500
REGISTRO DE GARANTÍA continuado
3. Envíe por correo su tarjeta de garantía suministrada o información a la dirección siguiente; escriba su nombre, dirección
postal completa, número de teléfono, dirección de e-mail,
modelo comprado, fecha de compra, nombre del distribuidor
del producto donde ha adquirido el producto:
Etón Corporation
1015 Corporation Way
Palo Alto, CA 94303 EE.UU.
GARANTÍA LIMITADA
Conserve la información de garantía de su tarjeta de garantía con
su comprobante de compra. La información de Garantía Limitada
puede ser también leída en www.etoncorp.com.
SERVICIO PARA SU PRODUCTO
Para solicitar algún servicio para su producto, le recomendamos
contactar primero al representante de servicio de Etón llamando al
número de teléfono 1-800-872-2228 para los EE.UU., o al número
de teléfono 1-800-637-1648 para Canadá ó (650) 903-3866,
[email protected] o bien su distribuidor respectivo del
país dentro de Europa (véase la lista adjunta) para la localización y
resolución del problema. Si requiere un servicio adicional, el equipo
técnico lo instruirá de como proceder considerando si la radio aún
posee garantía o si necesita servicio técnico para un producto que
ya no posee garantía.mentaire s’avère nécessaire, le personnel
technique vous informera de la marche à suivre. Elle diffère si votre
radio est toujours sous garantie ou si elle est soumise à une réparation hors garantie.
28
GUÍA DE OPERACIÓN DE American Red Cross SOLARLINK FR500
GARANTÍA
Si su producto aún posee garantía y el representante de servicio
de Etón determina que el servicio de garantía sea necesario, se
le enviará una autorización de retorno e instrucciones de envío a
una unidad de servicio de reparación autorizada de la garantía.
NO ENVÍE su radio de regreso sin haber recibido el número de
autorización de retorno.
SIN GARANTÍA
Si su producto ya no posee garantía y requiere servicio de nuestro
equipo técnico, el representante de servicio de Etón le indicará
la unidad de reparación más cercana de su localidad que pueda
ofrecer el mejor servicio de reparación.
Para servicio fuera de América del Norte, por favor, consulte la
información del distribuidor incluido en la fecha de la compra o del
recibo.
Nota FCC
El fabricante no asume la responsabilidad para cualquier tipo
de interferencia de radio o TV causada por modificaciones no
autorizadas en este equipo. Estas modificaciones podrían anular la
autorización del usuario para operar el equipo.
29
Etón Corporation
Corporate Headquarters
1015 Corporation Way
Palo Alto, California 94303 USA
tel +1 650-903-3866
tel +1 800-872-2228
fax +1 650-903-3867
Etón Canada
1 Yonge Street, Suite 1801
Toronto, Ontario M5E 1W7 Canada
tel +1 416-214-6885
Designed by Etón Corporation and assembled in China. I © Copyright 2008 Etón Corporation. All rights reserved.
v. 032408