1
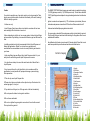
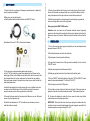
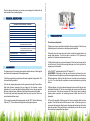
PORTABLE TANKLESS GAS WATER HEATER
INSTRUCTION MANUAL
GA5PORT MODEL
GAS
WATER/AGUA
Keep this manual with you after your unit has been installed,
you may need it for further technical information.
Congratulations!
You've just purchased a new Marey Portable tankless water heater
and will soon begin to enjoy the benefits of “going tankless.”
Take the time to thoroughly read and understand this safety and
installation manual in its entirety before you attempt to install your new
Marey Portable tankless water heater, as it contains important safety
tips and instructions.
Please carefully read all instructions and warnings. If you need
assistance or have any questions please contact us at:
1-512-332-2229
Please keep this manual for future reference.
02
WARNINGS
04
GENERAL DESCRIPTION
05
COMPONENTS
05
HOW TO START
06
INSTALLATION
07
TECHNICAL SPECIFICATIONS
08
ADJUSTMENTS
08
TROUBLE-SHOOTING
09
CUSTOMER SERVICE
11
OTHER PRODUCTS
11
03
Caution
If you detect a possible case of gas leak, contact your local gas supplier. There
may be some conditions which can diminish the intensity of the smell, making it
difficult to identify a gas leak.
- Outdoor use only.
- Liquid Propane Gas is denser than air and tends to condense first on lower
areas making it difficult to detect at nose level.
- Before attempting to start the unit, use a soapy product to check all gas fittings
and connections. Any bubbling at a connection indicates a gas leak that must be
fixed.
- Installing gas detectors is highly recommended for both Liquid Propane and
Natural gas applications. Please, turn to local laws, regulations and
manufacturer's recommendations in order to correctly install a gas detector in
your house.
The MAREY PORTABLE liquid propane gas water heater is capable of supplying
1.5 GPM (gallons per minute) – 5 (LPM liters per minute). This unit has a standard
½” NPT pipe fittings and an adapter for using a standard garden hose for inlet water
supply.
Ignition is automatic and powered by 2 “D” cell batteries (not included). Burners
start when water pressure is more than 5 PSI and turn off when water is shut off.
A shower head with multiple spray patterns is included.
For a gas supply a standard 20 pound-propane cylinder (not included) is required.
This is similar to the gas tanks used with outdoor grills. A regulator with a hose is
available with the heater.
An additional safety feature is an automatic 20 minutes shut off timer that is reset
each time operation stops or the shower head is turned off and back on.
Perfect for Camping!
- Units using Natural gas are different from Liquid Propane models. For your
safety do not use Natural gas with Liquid Propane and vice versa.
- You should never attempt to convert the water heater from Natural Gas to
Liquid Propane.
- Do not connect the unit to a fuel type that is not in accordance with the
specifications to avoid possible fire, equipment damage or personal injury.
Other precautions
1. This unit only uses Liquid Propane Gas.
2. Please do not place your hands or other objects on top of the heater or the
exhaust gas pipe, it is very hot.
1
2
3
4
5
6
7
10
11
12
13
14
15
16
17
3. If you detect smell of gas, turn off the gas valve at the tank immediately.
4. Do not expose the heater to strong wind conditions.
5. Do not leave unattended.
6. Do not over tighten the gas regulator connection to the unit with a wrench.
This may break the gas inlet.
04
18
8
9 19
20
1- Portable
2 - ODS Device
3 - Temperature Controller
4 - Sensor Pin
5 - Gas Adjusting Valve
6 - Solenoid Valve
7 - Pulse Generator
8 - Gas inlet
9 - Hot Water Outlet
10 - Wall Mounting Holes
11 - Back Plate
12 - Heat Exchanger
13 - Ignition Pin I
14 - Ignition Pin II
15 - Burner
16 - Water Adjusting Valve
17 - Micro-Active Switch
18 - Cell Box
19 - Release Device
20 - Water Inlet
05
1. Check the box for any damage. If damage is caused because of shipment, it
must be reported immediately.
2. Make sure you have all the parts:
a. Gas Regulator and Hand Shower Nozzle with ON/OFF Control.
7. Use the top and bottom tab of the back cover heater to hang it from the wall.
Do not use the handle as a hanger. Make sure you install the heater carefully
using a backup wrench in the gas inlet hose to avoid stress and break it.
8. Attach the gas regulator by hand pressure to avoid breaking any parts and
make sure the gas tank valve is in the off position.
Before going to the HOW TO USE section
Attention: make sure there are not flammable materials around, especially
gasoline or other fumes that can ignite. No objects can be placed on the top of the
heater since they can fall or burn. Both the top and the exhaust of the unit will be
hot.
b. Hardware Pack and ½” NPT to Garden Hose Adapter.
1. Turn on the incoming water supply ensuring that you have an adequate water
pressure, between 5-145 PSI.
2. Check that the shower nozzle is in the off position.
3. Open the gas valve on the cylinder all the way.
4. If a gas leak is detected, turn off the gas valve immediately. Do not touch the
“ON/OFF” switch.
5. Set the water regulator knob all the way to the left.
3. If you are using a regular standard garden hose, please u
se the ½” NPT to connect the garden hose adapter included. Please use the
sealing tape (Teflon) on the threads to avoid leaks. Also check if the screen filter
from the water inlet is in its place, make sure it is cleaned from any particles
blocking the water entrance. Having this done, then you are ready to attach the
water input/garden hose.
6. Set the gas regulator knob on the front of the unit to the half way mark.
7. Turn the “ON/OFF” switch at the bottom of the unit to “ON” (the “ON/OFF” switch
used is the international standard “I” for ON and “0” for OFF)
8. Turn the spray nozzle to the “ON” position.
4. Install the gas supply into the inlet gas pipe. Do not over tighten it since this
can break or crack the inlet pipe. After you tight the inlet pipe, make sure it
cannot be moved so as to avoid any gas leak or malfunction.
9. You will hear a series of clicks and the burner will ignite. If the burner does not
ignite after 5 seconds, turn off the heater and read the “Trouble shooting” section.
5. Connect the shower nozzle to the water outlet. Make sure you use Teflon and
connect it by hand pressure only.
10. To ensure the draining of water after its use, open the drain valve (ribbed
cylindrical stem next to the water input valve).
6. Install the two batteries size “D”. The batteries case will show you how to
install the batteries correctly.
IMPORTANT: Ensure that the drain valve is open and water is drained from the
unit after each use to avoid internal damage to the water regulator, especially if the
outside temperature is around or below 32ºF or 0ºC.
06
07
tThe lack of proper drainage in your unit may cause damage to the heater that will
not be mended. See our warranty policy.
TECHNICAL SPECIFICATIONS - PORTABLE
Fuel Type
LPG (Liquid Propane Gas)
Model
GA5PORT
Activation Flow Rate
2.2 LPM / 0.58 GPM
Maximmum Flow Rate
5 LPM / 1.4 GPM
BTU/h
35,000 BTU/h
Related Gas Pressure
0.4 PSI
Aplicable Water Pressure
3.6 - 145.0 PSI
Ignition
Electric Pulse, D Cell Battery Powered
Hot
water out
Cold
water in
The unit does not start at all
(No electrical connection required)
Protections
Auto-cut off water control, automatic ignition,
anti-dry combustion protection, over-pressure,
1.Make sure you have new batteries installed in the correct position. Check the cap
of the battery case for instructions on how they should be installed.
overheating and flameout protection
Height x Width x Depth
17.0" x 11.4" x 4.7"
Weight
12 lbs
Pipe Fittings
½" NPT, incoming/outgoing water & gas
Energy Efficiency
54 - 87%
2. Generally, the main reason why most units do not ignite is because there is not
enough water pressure. The unit must have a minimum of 5 PSI (pounds per
square inch) of sustained water pressure to turn on.
3. Verify that the water hose is connected properly. If this is not well-connected, the
unit will not work. Check that the incoming water pipe is on the far right and the
outgoing one is in the middle.
The temperature of the incoming water together with the amount of heat applied
are influential in the temperature of the outgoing water.
1. Set the gas regulator to low position and the water regulator to high position. This
is the lowest setting available.
2. To raise the outgoing temperature, turn the gas valve to the right. There will be a
slight delay between increasing the gas supply and the increase in water
temperature. If you want the highest setting available, then turn the gas regulator
all the way to the maximum. Adjust slowly and check the temperature frequently.
The water might reach high temperatures which can harm your skin. Make sure
you test the water before using it.
3. If you wish to use water without being heated, turn the “OFF” switch at the bottom
of the unit (“0”). This will disconnect the gas flow and the ignition process.
08
4. The “ON/OFF” switch should be in the “ON” position (“I”).
ADJUSTMENT: At the bottom of the unit you will see two oval holes in the case.
The furthest hole on the right looks up at the water regulator where you will see two
Phillips head screws. Further on the right, there is a screw that you must turn about
a ¼ or a ½. The unit will be able to operate on a lower water pressure by restricting
the flow.
5. During shipping, if a wire had been disconnected, make sure that the gas valve
and the switch are shut off. The front cover is held by four screws, two at the top and
two at the bottom. The knobs can be pulled off. All the wiring is done by pushing
together plastic connectors and everything becomes visible when the unit is
dismantled.
6. There is the possibility of finding some kind of epoxy or debris within the water
regulator. Check that the water inlet filter screen is clean. To flush the system you
can reverse the hookup by taking the water inlet pipe and hooking it up to the water
outlet side and back. If the gas cylinder is contaminated by air, turn the unit on and
off several times to purge the air from the gas.
09
7. Verify that you have your water supply (cold water inlet) and shower handle (water
outlet).
Water flows through the unit, but there is no hot water coming out:
AtMarey,weprideourselvesontheexcellenceofourcustomerservice and support team.
Please feel free to contact us if you have any questions about our products, warranty
service, or if you need assistance installing a unit. We also strive for continuous
improvement, so we welcome your comments, feedback and s uggestions.
1. New batteries may be required for the ignition switch. Verify that the batteries are
aligned in the proper polarity (+/-). Check the battery case for instructions on how to
install the batteries properly.
1-512-332-2229
[email protected]
2. Check that the water pressure is, at least, 5 PSI sustained.
3. Ensure that the Liquid Propane regulator is threaded all of the way to the unit and that
you have an adequate amount of gas in your propane bottle.
4. Verify that you have hooked up both the incoming and outgoing water supply
properly. The shower head should be attached to the outgoing water inlet (located at the
center) and the water inlet should be attached to your incoming connection (located at
the far right).
Please visit our website to get to know more about other Marey products.
Water is coming out warm:
1. Check if there is a blue flame on the screen. If you see a yellow flame it could mean a
breakdown in the gas regulator. Please call Marey Heater Corp directly if this happens,
do not attempt to use it.
2. The unit is being operated at an altitude above 6,000 feet. The unit has been tested at
altitudes of more than 7,000 feet but we only recommend using it below elevations of no
more than 6,000 feet.
GAS PORTABLE
POWER PAK
SANTON
AQUAMATIC
MINI MAREY
POWER GAS
The unit starts for a short amount of time and then shuts off:
1. Check that the thermocouple is able to complete the circuit by checking that water is
flushed in the heat exchanger. If the heater shuts off is because the temperature is
either too low or high to complete its circuit.
2. Look if the gas sensors have come loose or check that it is properly connected.
3. If you run out of gas, have low gas, or your Propane gas cylinder is contaminated with
air (especially new tanks upon their first filling), then cycle the unit on and off by using
the shower head switch several times to purge the air from the gas.
4. Do not expose the water heater to strong winds.
5. This unit activates at a sustained water pressure of 5 PSI. If your house water
pressure is below the minimum the unit will not ignite. You will need a sustained water
pressure of approximately 40-60 PSI for an adequate use.
10
Delbrey Street, 211
San Juan, Puerto Rico
00912
Tel. 1-512-332-2229
www.marey.com
11