1
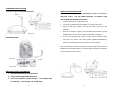
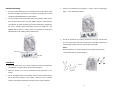
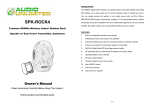
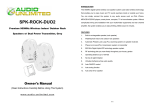
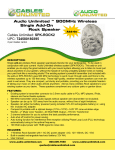
INTRODUCTION
This add-on unit is to be used with your current 900 MHz wireless Rock speaker
SPK-ROCK2
system (SPK-ROCK).900 MHz digital hybrid wireless rock speaker system uses the
latest wireless technology to enable you to enjoy music and TV sound anywhere
inside or outside your home. You simply connect the system to any audio source
Add-On
such as Radio, TV, VCR, Hi-Fi and CD/MP3/VCD/DVD/Blu-ray player. Without any
complicated wiring and installation this system enables you to enjoy incredible, bona
900MHz Digital Wireless
Rock Speaker
fide sound in minutes.
FEATURES
1.
Weatherproof outdoor rock speaker.
2.
Automatic Phase Lock Loop (PLL) scanning system on speaker receiver.
3.
Phase Lock Loop (PLL) transmission system on transmitter.
4.
900 MHz RF technology rock-type outdoor speaker system.
5.
RF technology lets you place the rock speaker freely anywhere in your
home/garden.
Single Add-On Unit
to be used in conjunction with your previously purchased
SPK-ROCK 900MHz Wireless Rock Speaker Set
6.
Operating distance up to 150 feet.
7.
No line of sight limitation.
8.
Virtually interference free audio quality.
9.
Auto ON/OFF.
10.
Auto tuning function.
11.
Auto shut-off on speaker.
12. Volume up/down control.
13. Power on/off.
14. 2-way speaker.
User Manual
www.audio-unlimited.com
www.cablesunlimited.com
P.1
COMPONENT IDENTIFICATION
INSTALLATION INSTRUCTIONS
TRANSMITTER (Not included with SPK-ROCK2)
TRANSMITTER (Not applicable with SPK-ROCK2 -already set up with your
Antenna
SPK-ROCK system).
USE THE SAME GUIDELINES TO CONNECT YOUR
ADD-ON WIRELESS SPEAKER (SPK-ROCK2)
1.
Insert the antenna tube into the antenna wire.
2.
Connect the supplied AC/DC power adapter to an electrical wall outlet.
3.
Plug the AC/DC power adapter in the DC jack located on the rear of the
transmitter.
4.
Signal On Indicator (green)
Power On Indicator (red)
When the AC adapter is plugged in, the red POWER LED illuminates. If the red
POWER LED does not illuminate, make sure the adapter is plugged in.
5.
SPEAKER RECEIVER
The rear of the transmitter has one audio cord that can be connected to audio
output jack of TV, Monitor, VCR, Radio recorder, CD/MP3/VCD/DVD/Blu-ray
players or to headphone/earphone jack with the connector provided.
When the transmitter received an audio signal, the green SIGNAL LED and the red
POWER LED will illuminate together. If the green SIGNAL LED does not illuminate,
ensure the audio source is turned on.
Power LED
Power On/Off
DC Jack
Volume Up/Down
Auto Tune
IMPORTANT SAFETY INFORMATION
1. Read and understand all instructions.
2. Follow all warnings and instructions.
3. Do not use liquid or aerosol cleaners.
for cleaning.
Use a damp cloth
If necessary, use a mild soap.
P.2
P.3
SPEAKER RECEIVER
1.
4.
Volume can be adjusted up by pressing the “+” button, or down by pressing the
button “-“ to the desired listening level.
Plug in the power adapter with the rock speaker and AC power outlet to charge
the lead acid battery built inside the rock speaker. The battery pack must be
charged at least 15 hours before the first operation.
2.
The rock speaker can be operated either with power supplied by battery pack or
from AC outlet with connection of power adapter. When the power adapter is
connected with AC outlet, the battery pack will be simultaneously charged when
the unit is in operation. Press On/Off button and turn the speaker ON. The
POWER LED will light up in green. Switch off the speaker by pressing the
ON/OFF button on the speaker, and the LED will be off.
5.
Should you experience any frequency interference, move your channel switch
from one channel to the other channel (there are two channels for selection) on
the transmitter, and then press the “AUTO-TUNE” button again.
NOTE:
Keep the speaker up to 7 meters apart from the transmitter, and then press
Power LED
“AUTO TUNE” button for the best reception.
DC Jack
OPERATION
1.
Turn on the audio source (TV or audio component) to which the transmitter is
connected with. The green LED on the transmitter will light up.
2.
Select the channel (1 or 2) of the transmitter for best performance in your
location.
3.
Turn on the ON/OFF button on the speaker. Press the “AUTO TUNE” button to
get the best tuning reception in the speaker. When the button is pressed,
frequency tuning starts automatically and it stops when a signal is detected.
P.4
P.5
6.
Switching Off
a)
To protect the transmitter and save power, the transmitter will turn off
TROUBLE SHOOTING
automatically if it detects that the unit is not being operated or, there is
NO SOUND
weak reception from the signal audio source, for 4 minutes.
-
In other words, if the signal comes back, the transmitter will work again
automatically.
b)
power connection input on the transmitter.
-
Ensure the speaker is switch ON.
-
Speaker’s battery capacity is low, replace with new battery or connect the
Turn off the speaker by pressing the ON/OFF button and the LED light will
AC/DC adapter to the speaker.
then turn off, or it will automatically turn off in approximately 4 minutes
-
Ensure the TV or audio component is ON.
-
The connected audio / video equipment is not playing. Start playing the
when the transmitter turns off.
7.
Weather Conditions
a)
Ensure the AC/DC adapter is fully inserted into the AC outlet and the
equipment.
The rock speaker unit should be operated between the temperature range
-
of 14˚F – 122˚F. Operation at temperature conditions beyond this range
The volume of speaker is too low, adjust the volume to an appropriate
level.
will likely cause some damage to the unit.
b)
The rock speaker unit should be moved indoors during adverse weather
DISTORTED
conditions such as heavy downpours, hail, snow, or at temperatures below
-
14˚F and above 122˚F.
Press the “AUTO-TUNE” button on the speaker until matching the
frequency of the transmitter.
-
WARNING:
The Power adapters are for indoor use only.
Change the position of the channel selector on the transmitter. You must
press the “AUTO TUNE” button on the speaker.
If it is wet outside or
raining, you can continue to operate your speakers via their internal
-
Ensure the volume level of speaker is adjusted properly.
batteries.
-
The speaker is too far away from the transmitter, move it closer.
-
The input level of the audio signal is too low. Turn up the volume of the
Please move the adapters out of the rain by removing
them and placing them in a safe dry place.
audio source equipment.
When powering by AC household current this device must be
used with the AC/DC adapters supplied within the package.
Do
-
The input level of the transmitter is too high, lower the volume of the
audio source equipment.
not try to power using other AC or DC adapters.
8.
Re-charging battery
a)
Connect the power cable to the AC power outlet and speaker. Batteries
will automatically be re-charged.
P.6
P.7
NOTE:
TECHNICAL SPECIFICATIONS
This equipment has been tested and found to comply with the limits for a Class B
digital device, pursuant to Part 15 of the FCC Rules. These limits are designed to
Transmission Mode
:
UHF
provide reasonable protection against harmful interference in a residential installation.
Carrier Frequency
:
900 MHz Digital Hybrid
This equipment generates, uses and can radiate radio frequency energy and, if not
Operation Voltage
:
Transmitter, DC 12V 150mA
installed and used in accordance with the instructions, may cause harmful
Speaker, built-in lead acid rechargeable battery
interference to radio communications. However, there is no guarantee that
or DC 15V 1A adapter
interference will not occur in a particular installation. If this equipment does cause
Frequency Response
:
40Hz – 12KHz
harmful interference to radio or television reception, which can be determined by
Distortion
:
1%
turning the equipment off and on, the user is encouraged to try to correct the
S/N Ratio
:
65dB
interference by one or more of the following measures:
Operation Distance
:
Up to 150 feet
-- Reorient or relocate the receiving antenna.
Speaker
:
2-way
-- Increase the separation between the equipment and receiver.
Output Power
:
100Watts (PMPO)
-- Connect the equipment into an outlet on a circuit different from that to which the
Storage Conditions
:
Place the speaker indoors during
1) Rain, Hail or Heavy downpours
receiver is connected.
-- Consult the dealer or an experienced radio/TV technician for help.
2) Snow
Operation Conditions
:
3) Temperatures below 14˚F, above 122˚F
Changes or modifications not expressly approved by the party responsible for
At temperatures below 122˚F, above 14˚F
compliance could void the user’s authority to operate the equipment.
This device must be used with the AC/DC adapters supplied in the package.
P.8
P.9