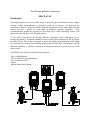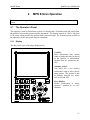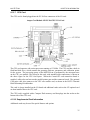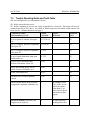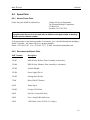
1
OPERATING AND SERVICE MANUAL
MDS E-S CAN
Monitor Divert E-Scan System
Designed and Manufactured by
THE ELECTRON MACHINE CORPORATION
15824 CR 450 West
PO Box 2349
Umatilla, FL 32784-2349
111206
(352)-669-3101
FAX: (352)-669-1373
E-Mail: [email protected]
http://www.electronmachine.com
The Electron Machine Corporation
MDS E-SCAN
Introduction
Increasing emphasis on recovery boiler safety in pulp and paper manufacture requires highly
accurate, reliable instrumentation at prescribed points in the process. In particular, the
prevention of furnace explosions resulting from the introduction of low solids liquor into the
furnace has been a subject of recent study by industrial insurance companies. Their
recommendations include the provision of dual black liquor solids monitoring devices with
adjunctive alarm and shut-off or diversion systems.
To meet these requirements, the Electron Machine Corporation whose refractometers have
become the industry’s worldwide standard for heavy black liquor measurement, has developed
the MDS E-Scan. This system is designed to detect and display any malfunctions, which might
be encountered for whatever reason during normal operation of the EMC refractometers with the
additional capability, if required, of initiating an emergency shut-off or quick diversion of the
process liquor.
The MDS E-Scan consists of the following equipment:
·One (1) MDS Monitor
·Two (2) MPR E-Scan Refractometers
·Two (2) Isolation Valves
·Printer
·Remote Status Panel (option)
The MPR E-Scan is a microprocessor driven critical angle refractometer. It is used to measure
the refractive index of process fluids which directly correlate with customer request for dissolved
solids. It is equipped with a broad range of diagnostics to aid in fault isolation without the use of
special test equipment. The instrument is calibrated before leaving the factory and should not
need recalibration unless some modification is made to the sensing head. Calibration procedures
are available to change system parameters.
Important Manual Information
The Chapter title is at the top of each page for quick reference through the manual. Important
points, reminders, and warning messages are printed in bordered boxes as:
NOTE: Box indicates important messages.
CAUTION
When removing the sensing head from an operating line, do not assume that the line is empty or
that the isolation or bypass means is working properly. If an EMC isolation valve is used, be
sure its travel is not limited by any external attachments or other interference and the valve is
closed tightly. No pressure should be felt on the head as the mounting nut is being removed.
ANY PRESSURE FELT WHEN THE NUT IS LOOSENED MUST BE INVESTIGATED
BEFORE PROCEEDING. Steam should be turned off before attempting to remove the head.
Use a face shield and protective clothing. Stand to the side when removing the sensing head.
Clean all black liquor residue from spud-piece on adapter prior to re- insertion of sensing head.
The o-ring seal should be replaced before re- installation.
Table of Contents
1.
MDS E-Scan Installation......................................................... 9
1.1
Site Selection............................................................................... 9
1.2
Power Requirements ................................................................... 9
1.3
Installation of Sensing Heads.................................................... 10
1.4
Steam Purge Attachment .......................................................... 11
1.5 Cooling System Requirements................................................... 12
1.6
Start-Up ...................................................................................... 12
1.7
Outputs....................................................................................... 12
1.7.1
1.7.2
1.7.3
2.
MPR E-Scan Operation.......................................................... 13
2.1
The Operator’s Panel ................................................................ 13
2.1.1
2.1.2
2.2
Display.....................................................................................................13
Button Touch Pad Function Chart ......................................................14
Normal Mode.............................................................................. 15
2.2.1
2.2.2
2.2.3
2.2.4
3.
Relays .....................................................................................................12
Printer Output.........................................................................................12
Analog Outputs ......................................................................................12
What Normal Mode Does.....................................................................15
System Indicators ..................................................................................15
The Menu Options in Normal Mode ...................................................16
Overview of Menu Options ..................................................................17
2.3
Calibration Selection.................................................................. 18
2.4
Print Selection............................................................................ 23
2.5
Diagnostic Selection.................................................................. 24
2.6
Purge Selection.......................................................................... 27
2.7
Configuration Selection ............................................................. 28
MPR E-Scan Problem Analysis .......................................... 29
3.1
Procedures.................................................................................. 29
3.2
Trouble Shooting Chart............................................................... 30
4.
MPR E-Scan Information...................................................... 31
4.1
Technical Description ................................................................ 31
4.1.1
Sensing Head ........................................................................................31
4.1.1.1 Optics ...........................................................................................31
4.1.1.2 CCD Linear Array ...................................................................32
4.1.1.3 Signal........................................................................................32
4.1.2 Console ...................................................................................................33
4.1.2.1 Displa y......................................................................................33
4.1.2.2 Switch Matrix ...........................................................................33
4.1.2.3 IB (interface board) for external connection ......................34
4.1.2.4 Power supply ...........................................................................34
4.1.2.5 I/O card .....................................................................................34
4.1.2.6 Comm/LPT card ......................................................................34
4.1.2.7 CPU Card.................................................................................35
4.1.2.8 Supplemental Card Information............................................35
5.
4.2
Refractometer Specifications .................................................... 36
4.3
Available Options ....................................................................... 36
Monitor Operation.................................................................. 37
5.1
The Operator’s Panel ................................................................ 37
5.1.1
5.1.2
5.2
Display.....................................................................................................37
Button Touch Pad Function Chart ......................................................38
Normal Mode.............................................................................. 39
5.2.1
5.2.2
5.2.3
5.2.4
What Normal Mode Does.....................................................................39
Monitor MPR E-Scan Status Boxes in Normal Mode ......................39
Monitor Status Box MDS in Normal Mode ........................................41
The Menu Options in Normal Mode ...................................................43
5.3
Log Selection ............................................................................. 44
5.4
Configuration Selection ............................................................. 45
5.5
Configuration States Selection.................................................. 46
5.6
Configuration Limits Selection................................................... 47
5.7
Diagnostic Mode Selection........................................................ 48
5.8
Diagnostic Voltages Selection................................................... 49
5.9
Diagnostic Relay Selection........................................................ 51
5.10 Diagnostic Time/Date Selection................................................ 52
5.11 Print Selection............................................................................ 52
6.
7.
Monitor Problem Analysis................................................... 53
6.1
Procedures................................................................................. 53
6.2
Trouble Shooting Chart ............................................................. 53
Monitor Information................................................................. 54
7.1
Console Technical Description.................................................. 54
7.1.1
7.2
Monitor Specifications ............................................................... 55
7.3
Features ..................................................................................... 56
7.4
Specific Functions...................................................................... 57
7.5
Trouble Shooting Guide and Truth Table ................................. 59
7.5.1
7.5.2
8.
Error Alarm Conditions .........................................................................60
Warning Alarm Conditions ...................................................................61
Service ........................................................................................... 62
8.1
EMC Warranty............................................................................ 62
8.2
Return of Defective Parts .......................................................... 62
8.3
Service in the Field .................................................................... 62
8.4
Spare Parts ................................................................................ 63
8.4.1
8.4.2
9.
Console Cards .......................................................................................55
How to Order Parts ...............................................................................63
Spare Parts ............................................................................................63
8.5
Maintenance............................................................................... 64
8.6
Caution ....................................................................................... 65
Drawing List................................................................................ 67
MDS E-SCAN
MPR E-SCAN /INSTALLATION
1.
1.1
MDS E-Scan Installation
Site Selection
The MDS E-Scan cabinet can be mounted in any area
where ambient conditions allow personnel to remain
for extended periods and is suitable for the atmosphere
and service conditions normal to a recovery boiler
installation. A vortex cooler or a cooling fan is
supplied with the cabinet to prevent excess heat buildup. The cabinet should be kept closed to maintain
environmental resistance.
1.2
MDS E-Scan NEMA 4X Console
Power Requirements
The electrical power supply to the refractometer
system must be from a dependable non- interrupted
source. It is suggested that the power supply be the
same as that used for the auxiliary burner safeguard
system and the black liquor firing safety system. We
recommend that cables be run in conduit.
Note: The MDS E-Scan system is designed for a 120VAC power supply. If other voltages are
used, a transformer must be supplied.
Once the cabinet is fastened securely in place, the interconnecting wiring may be run between
TB13 and the control room. Use the interconnection diagram supplied in this manual for running
the interconnecting wiring. Close observance of the required shielding will ensure proper
operation of the Monitor. Signal wires should be kept separate from “POWER IN” and
“RELAY CIRCUITS” to the control room. After completing the interconnection wiring,
carefully recheck all connections to satisfy yourself that all are correctly terminated.
Important: Prior to shipment of an MDS E-Scan system, the sensing heads are
matched to the consoles and factory calibrated. DO NOT ATTEMPT TO CALIBRATE!
9
MDS E-SCAN
1.3
MPR E-SCAN /INSTALLATION
Installation of Sensing Heads
Sensing Head
The sensing heads are attached to the process line
by Isolation Valves. These adapters must not be
placed in an area where vibration is severe or
excessive. They should be installed a minimum of
six feet apart to prevent interaction of the purges.
The adapter should be oriented to place the head in a horizontal plane to assure that
deposit buildup and air pocket creation will be minimal.
If the sensing head is to be mounted on a vertical pipe, the fluid
flow should be upward. The arrow on the adapter should point in
the direction of fluid flow. (See Sensing Head to Adapter
Positioning.) The probe end of the sensing head has a groove for an
interface o-ring.
The head is attached to the adapter by a 2- inch sanitary nut.
This o-ring must be in place prior to installing the head
into the adapter to prevent the process leaking out.
The nut should be tightened with a wrench (supplied by EMC) to a maximum 50 foot
pounds of torque (68 Newton-Metre). Alignment marks are provided to ensure that the
thermistor probe will not be in a direct line of the steam blast. (See Sensing Head to
Adapter Positioning)
The sensing head houses optical components, which are susceptible to the effects of moisture.
The cover is moisture proof and contains a small amount of desiccant to absorb any moisture
remaining in the head after assembly. The sight glass on the head allows inspection of the
desiccant. Sensing heads manufactured after June of 2006 use a RoHS compliant desiccant that
is light orange when effective and clear when no longer effective. The desiccant can be renewed
by heating to approximately 250° F (121°C) until it recovers its original color.
10
MDS E-SCAN
1.4
MPR E-SCAN /INSTALLATION
Steam Purge Attachment
The steam purge valve must be similarly mounted to the adapter with a minimum of 6" and a
maximum of 18" from the steam port on an adapter preferably with 1/4" tubing.
It is essential that NO LEAKS be present in this line that could allow evaporation of liquids,
thereby plugging the purge line.
Steam Purge Connections – for liquids
which exhibit a tendency to “coat”
Steam pressure must be at least 50 psi (3.44 bar)
above process pressure but less than 100 psi
(6.89 bar) above process pressure with adequate
condensation drainage at the steam valve in
order to ensure hot steam for cleaning the prism.
Trial and error must, of necessity, be employed
in determining the minimum steam time
necessary for proper steam cleaning of the prism
due to variables from application to application.
To avoid excessive prism deterioration keep the intervals between the purge times at maximum,
which may vary from minutes to 120 minutes, and the prism clean time at a minimum of
approximately 10 seconds. IMPORTANT: A major cause of refractometer trouble is the prism
wash.
11
MDS E-SCAN
MPR E-SCAN /INSTALLATION
1.5 Cooling System Requirements
When supplied with a vortex cooler a clean and dry air supply of the proper pressure
(approximately 90 PSI at 8 cubic ft/min.) is required. If equipped with the cooling fan option the
console must be mounted in a controlled environment.
1.6
Start-Up
Turn power on. Allow sufficient time for the sensing head to stabilize at the process
temperature. It is recommend that no adjustments be made for at least 15 minutes after start-up.
Compare the reading against a sample taken from the process line close to where the unit is
installed and at the process operating temperature. If the sample does not equal the displayed
reading, adjust the analog zero per Operation/Calibration section.
Important: Prior to shipment the sensing head is matched to the console and factory
calibrated. DO NOT ATTEMPT TO RE-CALIBRATE
1.7
Outputs
1.7.1 Relays
All alarm contacts are 5A, 250 VAC, resistive.
1.7.2 Printer Output
The MDS E-Scan includes a printer mounted in the cabinet.
1.7.3 Analog Outputs
The MDS E-Scan offers current or voltage outputs for the measurement. The standard output for
these readings is a 4 to 20 ma signal that is referenced to ground (non-isolated) so that any device
that is connected to these outputs must have a floating (or isolated) input. Isolated current output
modules are available as an option.
12
MDS E-SCAN
MPR E-SCAN OPERATION
2.
MPR E-Scan Operation
This equipment is designed for continuous operation and may be left on for extended periods
of time.
2.1
The Operator’s Panel
The Operator’s Panel or Front Panel consists of a display and a 20-button touch pad, which form
the interface between the operator and the instrument. The display consists of a 640 x 480 pixel
LCD screen, which provides the operator with various messages. The 20-button touch pad allows
the operator to make entries and instigate commands.
2.1.1 Display
The three basic types of messages displayed are:
Variable:
These information lines contain
either set points that may be altered
by the operator, or measurement
variables that are updated by the
CPU.
Alternate Action:
Acts much like a two position
switch and is used to select various
menu options. The operator is able
to alternate between two states,
such as ON and OFF.
Error Display:
Flashes continuously to attract
operator’s attention to an error
condition.
13
MDS E-SCAN
MPR E-SCAN OPERATION
2.1.2 Button Touch Pad Function Chart
Scrolls cursor horizontally to the left and also used to initiate editing of
calibration voltages in the calibration table, and temperature values in the
compensation table.
Scrolls cursor horizontally to the right and also used to initiate editing of
all system parameters excluding those accessed by the LEFT ARROW.
Scrolls cursor vertically in the “Up” direction.
Scrolls cursor vertically in the “Down” directio n.
ENTER
Used to select all cursor items and to save edited data.
Esc
Used to abort to previous operation without saving edited data.
Menu
Used to immediately display the normal mode of operation without saving
information or main menu selections if already in normal mode.
PgUp
Displays previous screen of information or mode of operation, and is
applicable when indicated on the screen.
PgDn
Displays next screen of information or mode of operation, and is
applicable when indicated on the screen.
+/_
0–9
Allows data fields to be either positive or negative. Also used to create
calibration table end, to toggle diagnostic options, and to record sample
readings used for Analog Zero adjustment.
Numeric characters used to input data.
14
MDS E-SCAN
2.2
MPR E-SCAN OPERATION
Normal Mode
2.2.1 What Normal Mode Does
In normal mode the system displays the following information:
•
•
•
•
•
•
•
•
Name of the current product being measured along with an associated unit number.
Software version number.
Current time and date.
On-line SOLIDS measurement.
On-line temperature in Degrees Fahrenheit and Centigrade.
Alarm points for measurement.
Error status for system measurement, communication and voltage levels.
Graphics menu to allow access to other MPR E-Scan system features.
Note: In normal mode set points cannot be changed or adjustments made.
2.2.2 System Indicators
C
Isolation valve is closed. The MPR E-Scan will not initiate a prism clean.
T
Below temperature compensation range. No prism clean allowed. Temperature at least
10 degrees C below set temperature.
H
Measurement Hold. Current readings and analog outputs are maintained until complete.
Indicates a cleaning cycle is in progress by a purge message, as well as a current
measurement voltage display while in normal mode.
P
Purge failed. This means the previous purge cycle did not properly clean the prism.
O
Measurement over range. Current reading above last calibration point for MPR E-Scan
in the calibration table.
U
Measurement under range. Current reading below first calibration point for MPR E-Scan
in the calibration table.
S
Measurement sample reading has been recorded as the reference for Analog Zero
adjustment .
15
MDS E-SCAN
MPR E-SCAN OPERATION
2.2.3 The Menu Options in Normal Mode
Normal mode is entered by default, upon power up. To gain access to other system features
select the MENU button on the Front Panel Touch Pad.
Note: The screen names and set points below are just an example, they will vary from
application to application.
Normal Mode Screen With Menu Options
When the MENU button is
selected,
these
menu
options are displayed on the
normal mode screen:
16
MDS E-SCAN
2.2.4
MPR E-SCAN OPERATION
Overview of Menu Options
CALIB (Password required) option allows the operator to enter calibration set points. This
consists of calibration limits, measurement, temperature compensation, and analog zero
adjustment. Since a complete calibration is performed in advance by EMC, it would be a rare
condition for the operator to access calibration measurement and temperature compensation.
However, system limits may be changed more frequently if the operator chooses to change the
alarm limits, analog output limits, alarm delays, purge cycle information, or other limits. An
analog zero adjustment is provided to “zero in” the instrument to match lab samples or reach a
target measurement if needed.
CONFIG options are selected in advance by EMC and would not normally be changed by the
operator. Thus, access to system configurations is gained only by entering a correct password,
except for selection of unit # 1 or 2.
PRINT option allows the operator to print all system calibration and configuration settings.
DIAG option provides the operator with data that can be used to test and troubleshoot system
problems. The operator can display all voltages from the sensing head, test relays on the
interface board, output min., mid., and max., analog data to test and calibrate analog output, and
enter system time and date in cases of battery failure.
PURGE option allows the operator to initiate a purge from normal mode in addition to the
automatic purge cycle timing setup in calibration limits. The purge function cleans the sensing
head prism and since configured for intelligent cleaning will automatically start another purge
cycle if the previous purge was unsuccessful. Purge can be aborted using the Front Panel ESC
button.
Analg. 0 option allows the operator direct access to the calibration menu Analg. 0 section. See
section 2.3 for more details concerning this type of calibratio n.
17
MDS E-SCAN
2.3
MPR E-SCAN OPERATION/CALIBRATION
Calibration Selection (Note: To access calibration enter password “0000")
Calibration Mode Screen
The calibration menu contains
four menu options:
1. Limits - This option contains
the system limits for alarms,
purge cycle, analog output and
filter weight.
2. Meas. - This option allows
entry
to
the
calibration
measurement routine. This is used
to
calibrate
the
process
measurement so that a linear
interpolation can be made to get
the Refractive Index based on the
current measurement voltage.
3. Temp. - This option allows
entry to the calibration temperature compensation routines. This is used to compensate the
process measurement changes that are caused by temperature changes.
4. Anlg. 0 (Analog Zero) - This option is used to adjust or “zero in” the instrument to match a
target value.
Using the Front Panel buttons, the operator can highlight and then select the specified calibration
menu options. Selecting the “Limits” menu option would generate the following display:
Calibration Limits Screen 1
Using the Front Panel arrow
buttons, the operator can scroll
through and edit selected system
limits.
In
this
example,
Measurement Alarm Divert can
now be changed using the
RIGHT ARROW button.
18
MDS E-SCAN
MPR E-SCAN OPERATION/CALIBRATION
Measurement Alarm Divert : If the measurement falls below this limit, a system alarm is
activated. An error message will appear in the status window in normal mode, and the divert
alarm relay will be turned off to activate a divert to the Monitor.
Measurement Alarm Low: If the measurement drops below this limit, a system alarm is
activated. An error message will appear in the status window in normal mode, and the low
measurement alarm relay will be turned on.
Measurement Alarm Delay: This is the alarm delay time in seconds for the process
measurement that must expire while a limit is exceeded before an error is activated.
Purge Cycle Time: This is the time interval in minutes between automatic purging. During
purging, all system readings and analog outputs are frozen. A “0" setting disables automatic
purging.
Condensate Drain Time: When the purge cycle is activated, this is the time in seconds that
elapse before a prism clean occurs. During this time the condensate drain relay is activated and
condensation is allowed to drain before steam cleaning.
Prism Clean Time: This is the time in seconds during which cleaning of the prism occurs and
the prism clean relay is activated.
Hold Delay Time: This is the time in seconds that elapse after a prism clean occurs. This time
allows a delay to occur before resuming normal process measurement. Readings are held
constant during the period.
Meas. Anlg. Min. Output: This is the measurement reading that will produce a 4 ma or 0 volt
output.
Meas. Anlg. Max. Output: This
Calibration Limits Screen 2
is the measurement reading that
will produce a 20 ma or 10 volt
output.
Filter Weight: This is a value
that controls system response
time to process measurement
changes. The larger the value the
slower the response time. The
filter weight divided by 10 will
give approximate response time
in seconds to achieve 63% output
of a step input change.
19
MDS E-SCAN
MPR E-SCAN OPERATION/CALIBRATION
Min. Purge Temperature: This value determines the point below which a steam purge will
not be allowed.
Selecting the “Meas.” option from the calibration menu results in the following display:
Calibration Measurement Screen
The calibration measurement
table is created when you place
actual solution samples to be
measured on the sensing head and
then
save
the
desired
measurement reading for that
sample along with the current
measurement voltage. This table
is graphically equivalent to
approximating a measurement
curve with a series of straight
lines.
Use the RIGHT ARROW button
on the Front Panel to edit the
sample value, and ENTER to
capture the measurement voltage.
To give the operator more flexibility, the voltages can also be edited by using the LEFT
ARROW button. Following calibration samples, a table end should be created using the RIGHT
ARROW button to select the sample and the +/ - button to end the table. After creating the table
end, select the ENTER button to permanently save calibration.
Calibration Sample Example Screen
Example: what is displayed while
calibrating Sample #1 shown:
At this point, sample #1 should be
on the sensing head, and a sample
value should be entered. When
the ENTER button is selected, the
measurement voltage displayed at
the bottom is put in the table as
the measurement voltage for the
current sample. This
measurement voltage is a raw
voltage without analog 0 or
temperature compensation
adjustment.
20
MDS E-SCAN
MPR E-SCAN OPERATION/CALIBRATION
Selecting the “Temp.” option from the calibration menu results in the following display:
(Circulation bath with temperature adjustment and pump is needed for temperature
compensation.) (Not normally used on the MDS-E-Scan system.)
Calibration Temperature Screen
This
is
the
temperature
compensation
table.
The
“VALUE” column represents the
compensation values, and the
“DEG. C” column represents the
temperatures at which those
compensations occurred.
Using the Front Panel buttons,
both columns of data can be
edited and saved. Since these
values are generated by an actual
temperature run, any changes
made should be done with
extreme caution!
Note: To save sample compensation enter Password
“0000”.
21
MDS
E-SCAN
MPR E-SCAN OPERATION/CALIBRATION
The final option of the calibration menu is “Anlg. 0" which activates the following display:
Analog Zero Adjustment Screen
The analog zero adjustment is
used to correct for any shifts in
the measurement voltage. After
calibration
and
before
compensation, an analog zero
adjustment may be needed to
“zero in” the measurement
reading due to measurement
voltage shifts that could occur
when
going
from
room
temperature to the process base
temperature
used
for
the
temperature compensation run.
Analog zero adjustment may also
be needed after installation to
make instrument readings agree
with normal testing methods.
The measurement voltage displayed contains both analog zero and temperature compensation
adjustment. This is the voltage used to obtain an interpolated value from the calibration table
that will reflect an accurate displayed reading in Brix, Solids... (Range is 0-10 volts.)
The analog adjustment value ranges from 0 to 4095, with 2048 representing the zero voltage
point. Therefore, any value above 2048 results in a positive voltage adjustment and any value
below 2048 results in a negative voltage adjustment. The maximum manual adjustment allowed
in either the positive or negative direction is 1.5 volts, so there are 614 counts for a 1.5 volt span
or 41 counts for a .1 volt shift. The remainder of the resolution beyond +/- 1.5 volts is used for
temperature compensation.
Auto Adjustment
To perform automatic analog zero adjustment, the current measurement reading should be
recorded in the E-Scan when the sample is taken from the process. This can be accomplished in
normal mode of operation using the +/- button on the front panel. An “S” character is displayed
on the normal mode screen to indicate that the sampled reading has been recorded. The sampled
reading can also be recorded via the analog zero adjustment screen shown above.
The final part of automatic adjustment consists of entering the lab reading of the sample taken.
Using the previously recorded sampled reading and the lab reading, the software will
automatically determine the amount of analog offset needed to “zero” the instrument. The newly
calculated analog zero value is displayed as a digital number in the range of 1434-2662.
22
MDS
E-SCAN
MPR E-SCAN OPERATION/CALIBRATION
Note: If the process measurement changes after the sampled reading is recorded then the final
adjusted reading will not reflect the lab reading. However, since the adjustment is calculated
from the recorded sampled reading, the final reading will be accurate and will not require further
manual adjustment. Thus the lab reading should only be thought of as the desired reading if the
process is stable. In all other cases, the lab reading simply provides a means of calculating an
error adjustment from a previously recorded reference point.
Manual Adjustment
The operator should proceed with caution when adjusting analog zero manually since this will
change the output of the instrument. To reduce the likelihood of manual adjustment error, it is
suggested that the default least significant digit be altered first so the operator can observe the
effects on the measurement reading. Pressing the up or down arrow buttons will output the
altered analog zero adjustment.
2.4
Print Selection
Prints all System Calibration and Configuration Settings.
23
MDS
2.5
E-SCAN
MPR E-SCAN OPERATION/ DIAGNOSITIC SELECTION
Diagnostic Selection
The Diagnostics menu contains the following options :
Diagnostics Mode Screen
1. Voltages - This displays all
pertinent system voltages such as:
measurement voltage, temperature
voltage, and lamp voltage.
2. Relays - This allows the
operator to toggle system relays
for testing or troubleshooting
purposes. The toggled relays can
be visually checked by examining
the relay LEDS on the interface
board. This option also allows the
operator to test custom inputs.
3. Anlg. Out - This option enables the operator to test system output as well as calibrate the
output to work with various analog loads.
4. Time/Date - This option enables the operator to reset the system clock with a valid time and
date. Such adjustments may be necessary as a result of time zone differences or when the system
clock batteries fail.
The “Voltages option results in the following display:
Diagnostic Voltages Screen
Measurement
Voltage:
The
voltage produced when measuring a
solution sample. The first voltage
displayed is the raw sensing head
voltage. The voltage in brackets is
the compensated voltage. Range is
(0-10 volts). See also Analog O
menu.
Temperature Voltage: A voltage
that
produces
the
process
temperature readout as follows:
(Voltage - .5v) * 50 = Deg. C.
Lamp Voltage: A nominal voltage
needed to maintain a signal of
proper amplitude.
24
MDS
E-SCAN
MPR E-SCAN OPERATION/ DIAGNOSITIC SELECTION
The “Relays” option activates the following display:
Diagnostics Relay Screen
There are eight total relays, two
of which are used as inputs
coming from the Monitor and
two are unused. The other four
relays are activated when either
measurement
alarms
are
occurring or when purging.
Using the Front Panel buttons,
all relays except the input relays
can be tested by toggling the
output conditions and visually
checked by examining the relay
LEDS on the interface board.
Also, by supplying an external
voltage, the operator can test the
custom input relays.
The “Anlg. Out" diagnostic option activates the following display:
Diagnostics Analog Output Screen
There are two standard outputs
that produce a 0 - 10 volt and 420 ma signal and are used for
process measurement and temp.
They are displayed as Analog 1
Out and Analog 2 Out
respectively.
Using the Front Panel buttons,
the operator can test the outputs
in min.., mid., and max., value
conditions. Also by editing the
min. and max. values, the
operator can even calibrate the
output to work more accurately
with various analog loads.
25
MDS
E-SCAN
MPR E-SCAN OPERATION/ DIAGNOSITIC SELECTION
NOTE: The information displayed at the bottom gives the operator the output resolution,
which is useful when editing the output values for analog load calibration.
The “Time/Date” diagnostic option activates the following display:
Diagnostics Time/Date Screen
This menu enables the
operator to set the system
time and date.
System Time: This is the
time displayed in military
format in normal mode.
System Date: This is the
date displayed in normal
mode.
26
MDS
2.6
E-SCAN
MPR E-SCAN OPERATION/ PURGE SELECTION
Purge Selection
Purge Mode Screen
Selecting
the
“Purge”
option from normal mode
adds purge information to the
current
display.
When
purging, the ‘H’ system
indicator (measurement hold)
is displayed to the far right of
the displayed reading, and the
measurement voltage as well
as the current purge mode is
displayed at the bottom. The
timing
information
for
purging is set in the
calibration limits menu.
During the purge process, all
readings and analog output are
“on hold” or frozen.
Each purge operation mode can be aborted before the selected time expiration by
selecting the ESC button from the Front Panel at which time the system will resume
normal operation. Following the termination of the purge cycle, the ‘H’ indicator and the
information at the bottom is removed. With intelligent cleaning activated, successive
purge cycles will be started if the previous purge was unsuccessful. This will continue for
three entire purge cycles, at which time a ‘P’ system indicator is displayed if all purges
were unsuccessful.
The purging consists of three internal modes:
1. Condensate Drain Time: This time allows any condensation to drain before steam
cleaning if steam is being used as the cleaning agent.
2. Prism Clean Time: This is the actual time during which cleaning of the prism occurs.
3. Hold Delay Time: This time allows a delay to occur before resuming normal
operation.
NOTE: Purging can be automatically initiated by setting up a purge cycle time in the
calibration limits.
27
MDS
E-SCAN
MPR E-SCAN OPERATION/ PURGE SELECTION
2.7 Configuration Section Display
Unit Number
This is used to identify refract
#1 or #2.
Selecting unit number requires a
“0000” password.
28
MDS
E-SCAN
MPR E-SCAN OPERATION / PROBLEM ANAYLSIS
3.
3.1
MPR E-Scan Problem Analysis
Procedures
The following analysis procedures are meant to aid in isolating MPR E-Scan failures down to the
board, or in the case of the sensing head--device level. Board or device replacement with a fast
turnaround is available from EMC.
These abbreviations are used:
I/O
Main E-Scan I/O board
Conditions analog voltages for digital microprocessor.
CPU Ampro 420 core module
Microprocessor, plugs into the I/O board.
IB
Most external connections are made to this board.
Interface board
Typical display ranges for voltages in test mode are:
LED voltage
2.5 - 4.0V (Varies slightly with temperature and cable length.)
Measure voltage
Varies with process 0-10V range with 2-8 Vdc nominal.
Temperature voltage
0 to 5 vdc = -25 to 225°C
Before any troubleshooting always check that all cards are properly plugged in, ribbon cables are
properly socketed and that correct power is supplied.
29
MDS
3.2
E-SCAN
MPR E-SCAN OPERATION / PROBLEM ANAYLSIS
Trouble Shooting Chart
SYMPTOM
POSSIBLE CAUSE
No display, failsafe LED off.
No display, backlighting.
Fuse blown.
Power supply failure, check ±15vdc and
5vdc.
No display and failsafe LED on.
Display failure.
Video cable failure.
Display on but is garbled.
CPU failing, Display or Video cable failure
Buttons do not respond properly.
Connector from overlay to I/O board not, or
improperly mated with J5.
Front panel overlay defective.
Defective I/O board (keyboard section).
E-Scan does not appear to take calibration.
CPU card failure.
“NO TEMP. VOLTAGE” flashing on
display.
If voltage between TB1-3 and TB1-10 on the
IB is less than 0.2 volt and the process
temperature is above 25° C, check 2.5 volt
regulator VR-1 in the head.
Sensing head failed.
I/O card failed.
“NO MEAS. VOLTAGE” flashing on
display.
If positive voltage does not exist between
TB1-12 and TB1-3 on the IB, check for
process flow across the prism.
Sensing head failed.
I/O card failed.
Measurement incorrect.
Check display for O, U, or T indicators.
Check for large digital offset value.
Re-zero using analog zero (in software).
Re-zero head using zero pot in sensing head.
“NO LAMP VOLTAGE” flashing on display.
Sensing head failed.
Check for AGC voltage on LED.
Analog card failed.
I/O card failed.
30
MDS
E-SCAN
MPR
4.
4.1
E-SCAN INFORMATION
MPR E-Scan Information
Technical Description
4.1.1 Sensing Head
The MPR E-Scan uses an LED as a light
source and utilizes state of the art CCD
(charge coupled device) technology to
accomplish scanning the reflected light
returned from the prism.
4.1.1.1 Optics
Light radiated from the LED passes through
the prism surface to be reflected off mirror 1
to the prism-to-process interface. The light
reaching this interface intersects the same
interface over a series of angles chosen to
include critical angle for the process being
measured. Light intersecting the interface
at an angle greater than critical angle is
refracted into the solution.
Light
intersecting the interface at less than critical
angle is reflected up to mirror 2 and out of
the prism up to the CCD linear array to be
scanned.
Optical Path
31
MDS
E-SCAN
MPR
E-SCAN INFORMATION
4.1.1.2 CCD Linear Array
The linear array used in the E-Scan includes 2048 individual photo sites. Each of these photodiodes independently measures the incident radiation between scan intervals and stores an
electrical charge, which reflects the measured intensity. At the end of this interval the shift gate
is activated and the charges are simultaneously transferred into the shift register. The charges are
transferred out of the shift register in "bucket brigade" fashion through the signal output buffer.
The output is an analog voltage representative of the charge per pixel (photo site) and is
reset to ground between each transfer.
4.1.1.3 Signal
CCD Signal
To further increase resolution the signal is rectified and averaged as shown in the following
figure. This signal is used to control the LED current to eliminate the effects of process color
changes, suspended solids, entrained air and other problems associated with non scanning
refractometers. The refractive index information is also contained in this signal in the form of
the ratio of A to B.
32
MDS
E-SCAN
MPR
E-SCAN INFORMATION
The signal is passed through circuitry to develop a DC voltage, which is related to the ratio of the
time of A to B. This voltage is sent to the console to be processed by the microprocessor and
displayed in the customers preferred units of measurement.
Filtered CCD Signal
4.1.2 Console
The console is constructed of molded fiberglass
polyester to give protection in harsh environments.
4.1.2.1 Display
The LCD (liquid crystal display) has a pixel count
of 640 by 480 to give very sharp resolution. The
display is suitable for both graphics and text
information.
4.1.2.2 Switch Matrix
The switch matrix is located on the outside of the
console and allows the operator to make
modifications and changes to the operating
conditions of the instrument. The operation of this
switch matrix is further exp lained in the
operations section of this manual.
Display and Switch Matrix
33
MDS
E-SCAN
MPR
E-SCAN INFORMATION
4.1.2.3 IB (interface board) for external connection
The interface board is located on the back wall of the console. Most external connections are
made to connectors that plug into this board. The only exceptions are optional features that
require connections to optional available connectors located on the side of the console.
4.1.2.4 Power supply
The power supply is located in the top of the console and serves as a hold down clamp for the
analog output modules. The power supply supplies power to both the I/O card and also the IB.
The voltages supplied are +5 vdc and +/- 15 vdc.
4.1.2.5 I/O card
The I/O card handles most of the signal inputs and outputs from the instrument. Two ribbon
cables route these signals from the IB to the I/O card and power is supplied through a power
cable from the power supply.
4.1.2.6 Comm/LPT card
This card is mounted to the left and above the interface board and is used to allow
communication between the MPR E-Scan unit and the Monitor. It also enables the MPR E-Scan
to drive the printer.
34
MDS
E-SCAN
MPR
E-SCAN INFORMATION
4.1.2.7 CPU Card
The CPU card is found plugged into the PC/104 bus connectors of the I/O card.
Ampro CoreModule 430 PC/104 CPU/VGA Card
The CPU card operates with a microprocessor running at 133 MHz. The CPU card has a built- in
flash hard disk drive, which contains the operating software, parameters and calibration points
for the system. The processing power of the MPR E-Scan is performed by the microprocessor
on the CPU core module. The layout for this card, with standard cable connections, is shown on
the above figure for the CPU card layout. When the Comm/LPT card connection board is
supplied, cables also run between the parallel printer port and the connector board. The optional
Com ports cable also connects to the CPU core module card, as shown in the RS232 Terminal
Block Mounting Kit addendum.
This card is always installed on the I/O board and additional cards such as the 422 optional card
are then installed above the CPU card.
The CPU card is supplied with a Compact Flash memory card that plugs into the socket on the
bottom side of the CPU card.
4.1.2.8 Supplemental Card Information
Additional cards may be used for special features and options.
35
MDS
4.2
E-SCAN
MPR
Refractometer Specifications
Accuracy
Span
Repeatability
Sensitivity
Stability
Response time
Console
Head
+/- 1% of span or .000075 R.I., whichever is greater
.0015 R.I. minimum
.132 R.I. maximum
.5% of span or better
.5% of span or better
No recorded drift /24 hour period.
250m.s. to 15 min.
<500m.s. for .0015 R.I. change with 90% recovery on .015R.I.
span.
Process temperature
Ambient temperature
Up to 300° F (150°C)
Up to 125°F (52°C)
Console – 32°F to 120°F (0°C to 50°C)
Calibration
See Engineering Order Sheet
Sensing head
wetted materials
of construction
Outputs
4.3
E-SCAN INFORMATION
2205 Duplex SS, sapphire, PEEK, Viton (other alloys and
elastomers available)
4-20ma non- isolated
0 - 10vdc non- isolated
Available Options
Optional E-Scan Outputs
1. Isolated 4-20 mA output for
measurement
2. Isolated or non- isolated 4-20mA
output for temperature
Optional E-Scan Features
1.
SS NEMA IV head connector
36
MDS E-SCAN
M ONITOR OPERATION
5.
Monitor Operation
This equipment is designed for continuous operation and may be left on for extended periods
of time.
5.1
The Operator’s Panel
The Operator’s Panel or Front Panel consists of a display and a 20-button touch pad, which form
the interface between the operator and the instrument. The display consists of a 640 x 480 pixel
LCD screen, which provides the operator with various messages. The 20-button touch pad allows
the operator to make entries and instigate commands.
5.1.1 Display
The three basic types of messages
displayed are:
Variable :
These information lines contain either
set points that may be altered by the
operator, or measurement variables
that are updated by the CPU.
Alternate Action:
Acts much like a two position switch
and is used to select various menu
options.
The operator is able to
alternate between two states, such as
ON and OFF.
Error Display:
Flashes continuously to attract
operator’s attention to an error
condition.
37
MDS E-SCAN
M ONITOR OPERATION
5.1.2 Button Touch Pad Function Chart
Scrolls cursor horizontally to the left.
Scrolls cursor horizontally to the right and also used to initiate editing of
all system parameters.
Scrolls cursor vertically in the “Up” direction.
Scrolls cursor vertically in the “Down” direction.
ENTER
Used to select all cursor items and to save edited data.
Esc
Used to abort to previous operation without saving edited data.
Menu
Used to immediately display the normal mode of operation without saving
information or main menu selections if already in normal mode.
PgUp
Displays previous screen of information or mode of operation, and is
applicable when indicated on the screen.
PgDn
Displays next screen of information or mode of operation, and is
applicable when indicated on the screen.
+/_
Used to toggle diagnostic and configuration options.
0–9
Numeric characters used to input data.
38
MDS E-SCAN
5.2
M ONITOR OPERATION
Normal Mode
5.2.1 What Normal Mode Does
The Normal Mode of operation consists of the following information:
•
•
•
•
•
System time, date and software version number.
Current solids readings from the MPR E-Scan units.
Current time until next purge for the MPR E-Scan units.
System status for the MPR E-Scan units.
System status for the Monitor.
5.2.2 Monitor MPR E-Scan Status Boxes in Normal Mode
Note: The readings below are just an example, they will vary from application to application.
P/SUPPLY:
This status field monitors the MPR E-Scan unit +15, -15, and +5 volt power supply lines.
The following errors can be displayed in this status field:
39
MDS E-SCAN
M ONITOR OPERATION
+15 VOLT ERROR:
This indicates that the plus 15 volt supply is outside the allowable
10% tolerance levels, which means it is either below +13.5 volts or
above +16.5 volts.
-15 VOLT ERROR:
This indicates that the minus 15 volt supply is outside the
allowable 10% tolerance levels, which means it is either above
-13.5 volts or below -16.5 volts.
+5 VOLT ERROR:
This indicates that the plus 5 volt supply is outside the allowable
10% tolerance levels, which means it is either below +4.5 volts or
above +5.5 volts.
SENS . HEAD:
This status field monitors the status of the MPR E-Scan unit sensing head voltage levels. The
following errors can be displayed in this status field:
MEAS . VOLT ERROR :
This indicates that the measurement voltage in the sensing
head is out of specification and is either below 0.5 volts or above
9.5 volts.
TEMP. VOLT ERROR :
This indicates that the temperature reading derived from the
sensing head voltage is out of specification and exceeds the
temperature high or low limits set in the Monitor Configuration
Limits Menu.
LAMP . VOLT ERROR:
This indicates that the voltage needed to maintain a signal of
proper amplitude for the light source is out of specification.
Below 2.5 or above 4.2 volts D.C.
COMM:
This status field is used to indicate an RS-232 communication error between the Monitor and the
MPR E-Scan units. The following error can be displayed in the status field:
COMM. FAILED:
This indicates a communication failure, which could be the result
of a bad serial port, bad wiring, or a dead CPU.
PURGE:
This status field monitors all system steam purge functions. The following errors pertaining to
purging can be displayed in this status field:
PURGE FAILED :
This indicates that a proper measurement voltage drop was not
seen by either the MPR E-Scan or the Monitor during the purge
operation and thus intelligent cleaning was not effective.
40
MDS E-SCAN
M ONITOR OPERATION
PURGE MISSED :
This indicates that the steam solenoid relay was not activated
during the purge operation and therefore the purge did not occur.
PURGE INVALID :
This indicates that either the steam solenoid relay was activated
during a non-purging operation or there is an open- line condition.
PURGE NOT ACTIVE:
This is caused by not having purge cycle times set. This alarm
flashes above the alarm box and does not take the refractometer off
line.
ISO.VALVE:
This status field monitors the Isolation Valve in order to indicate valve open or valve closed
status.
VALVE CLOSED:
5.2.3
This indicates that the isolation valve is closed.
Monitor Status Box MDS in Normal Mode
P/SUPPLY:
This status field monitors the Monitor +15 and -15 volt power supply lines. The following errors
can be displayed in this status field:
+15 VOLT ERROR:
This indicates that the plus 15 volt supply is outside the allowable
10% tolerance levels which means it is either below +13.5 volts or
above +16.5 volts.
-15 VOLT ERROR:
This indicates that the minus 15 volt supply is outside the
allowable 10% tolerance levels which means it is either above
-13.5 volts or below -16.5 volts.
COMPARATOR:
This status field monitors the readings from both MPR E-Scan units and is used to indicate an
error if the difference in the solids readings exceeds the comparator limit. The operator has the
capability of changing the comparator limit to a value between 1% and 2% absolute solids by
using the Monitor Configuration Limits menu option.
COMPARATOR ERROR:
The difference in solids readings exceeds the comparator limit.
41
MDS E-SCAN
M ONITOR OPERATION
SYSTEM:
This status field is used to monitor many system functions and to issue warnings instead of errors
so that the operator can be notified of problems that are not fatal but need to be addressed. The
following warnings can be displayed in this status field:
CHK LAMP VOLTAGE: This
indicates the lamp voltage in a sensing head is above 4.0
volts. CAUTION- If lamp voltage reaches 4.2 volts the
refractometer will be taken out of service. To adjust see
Maintenance section 8.5.
CHK PURGE LOG:
This indicates that a second or third attempt was needed to clean
the prism. Therefore, the operator should check the purge log in
order to determine how much steam time was needed during the
purge operation.
CHK ANLG. SOLIDS :
This indicates that the solids reading derived by the 0-10 volt input
to the Monitor unit does not agree with the solids reading sent to
the Monitor unit via the serial port.
CHK ANLG. TEMP.:
This indicates that the temperature reading derived by the
temperature voltage input to the Monitor unit does not agree
with the temperature reading sent to the Monitor unit via the
serial port.
CHK U1 - U2 COM2 :
This indicates that the communication between the MPR E-Scan
units via serial port 2 has failed, and therefore all communication
between the MPR E-Scan units is now going through the Monitor
unit.
PRINTER ERROR:
This indicates that there is a problem with the printer.
TREND :
This status field is used to monitor the rate of change in solids readings in order to predict how
much time would have to pass at the present rate of change until a divert occurred. This is also a
warning status, and is triggered by the trend limit specified by the operator in the Monitor
Configuration Limits menu option. For example, if the trend limit is set for 30 minutes, then a
trend warning will only be activated if a divert is anticipated within 30 minutes.
DIVERT ERROR :
This indicates a divert has occurred. The cause could be any of the
following which would be specified by the printout: Low solids
Divert, Unit Failure Divert, Remote Divert, Diagnostic Divert.
42
MDS E-SCAN
M ONITOR OPERATION
5.2.4 The Menu Options in Normal Mode
Normal mode is entered by default, upon power up. To gain access to other system features
select the MENU button on the Front Panel Touch Pad.
Note: The readings below are just an example, they will vary from application to application.
Normal Mode Screen With Menu Options
When the MENU button is
selected, these menu options are
displayed on the normal mode
screen:
RESET:
Option resets the Monitor console
and clears all error conditions. It
performs the same function as the
reset button located on the door of
the MDS E-Scan cabinet. All
errors require manual reset as per
BLRBAC standards.
LOGS :
Option allows the operator to view historical data pertaining to system errors and warnings,
purge cycle, divert conditions, and comparator readings.
CONFIG:
Option allows the operator to change system parameters. This consists of state conditions such
as trending, as well as configuration for a one or two unit divert. In addition, the operator can
enter set points for all system limits, such as trending, comparator, and temperature limits.
DIAG:
(DIAGNOSTICS )
Option provides the operator with data that can be used to test and troubleshoot system problems
(see Diagnostics Mode Selection). The operator can display all monitored voltages, test relays
on the interface board, and enter system time and date in cases of battery failure.
PRINT :
Option allows the operator to dump all system logs to the printer.
43
MDS
5.3
E-SCAN
M ONITOR
LOG SELECTION
Log Selection
Log Mode Screen
The logs menu contains four
menu options:
1. ERR/WARN LOG
This option allows the operator to
view a log containing a history of
system errors and warnings. Each
log
entry
contains
the
error/warning message along with
a time and date stamp.
2. PURGE LOG
This option allows the operator to
view a log containing a purge
history. This log will enable the
operator to see how many
seconds of steam cleaning were required to successfully clean the MPR E-Scan prisms during
each purge cycle.
3. DIVERT LOG
This option allows the operator to view a log containing a history of divert conditions. These log
entries reveal not only the time and date of the divert, but also the reason the divert occurred.
This will enable the operator to determine if the cause of the divert was instrument failure, a
remote device or a low solids reading.
4. COMPARATOR LOG
This option allows the operator to view a log containing a history of comparator solids readings.
This log keeps track of differences between the MPR E-Scan readings and enables the operator
to determine the magnitude of difference, which may be useful for troubleshooting purposes.
5. CLEAR LOGS
This option allows the operator to clear all of the logs.
44
MDS
5.4
E-SCAN
M ONITOR CONFIGURATION SELECTION
Configuration Selection
The configuration menu contains two menu options:
Configuration Mode Selection
1. STATES
This allows the operator to set up
the Monitor for either a 1 unit or 2
unit divert configuration. The
operator can also enable/disable
trending which is used as a divert
prediction indicator.
2. LIMITS
This allows the operator to enter
set points for all system limits,
such as trending, comparator, and
temperature limits.
45
MDS
5.5
E-SCAN
M ONITOR CONFIGURATION STATES SELECTION
Configuration States Selection
The first configuration option, “States”, activates the following display:
Configuration States Selection
One Unit Divert will allow the
Monitor to activate the divert relay
when (1) MPR E-Scan unit
contains a solids reading below the
divert point with no alarm present.
Two Unit Divert will allow the
Monitor to activate the divert relay
only when both MPR E-Scan units
contain solids readings below the
divert point with or without alarms.
In addition, the divert relay will be
activated if one unit contains a low
solids reading while the other unit
is purging.
Trending enables the divert prediction indicator. This will generate a warning when a divert is
predicted to occur within the trend time set in Configuration Limits.
Printer allows printer to be turned off and not give warning light.
Printer Port allows the selection of type of printer to be used and port it will be connected to.
The choices are USB, Com3, or LPT1. The standard configuration is LPT1 for the printer
supplied with the MDS system.
Temp. Units selects RSP readout in Deg F or Deg C.
46
MDS
5.6
E-SCAN
M ONITOR CONFIGURATION LIMITS SELECTION
Configuration Limits Selection
The next configuration option, “Limits”, activates the following display:
Configuration Limits Screen
Using the Front Panel arrow
buttons, the operator can scroll
through and edit selected system
limits.
In
this
example,
Comparator Span % can now be
changed using the RIGHT
ARROW button.
Comparator Span %:
This x represents the maximum
percent of solids readings
difference that is allowable. If the
difference in solids readings
between the MPR E-Scan units
exceeds this limit, a Monitor
error will be activated.
The comparator span is adjustable between 1% and 2%.
Trend Limit:
This is a time frame in minutes that is used for a divert prediction indicator. If a divert is
predicted within the trend limit time frame, a Monitor warning will be activated. The trend limit
is adjustable between 10 and 99 minutes.
Temp. Low:
If the process temperature reading from an MPR E-Scan unit falls below this limit, a unit specific
error is activated and the offending unit is taken offline. An error message will appear in the unit
status window in normal mode and the unit error relay will be turned on.
Temp. High:
If the process temperature reading from an MPR E-Scan unit exceeds this limit, a unit specific
error is activated and the offending unit is taken offline. An error message will appear in the unit
status window in normal mode and the unit error relay will be turned on.
47
MDS
5.7
E-SCAN
M ONITOR DIAGNOSTICS MODE SELECTION
Diagnostic Mode Selection
The Diagnostics menu contains the following options:
Diagnostics Mode Screen
1. Voltages:
This displays all pertinent system
voltages for both MPR E-Scan
units as well as the Monitor.
2. Relays:
This allows the operator to toggle
system relays for testing or
troubleshooting purposes. The
toggled relays can be visually
checked by examining the relay
LEDS on the Monitor /MPR EScan interface board.
3. Time/Date:
This option enables the operator to reset the system clock with a valid time and date. Such
adjustments may be necessary as a result of time zone differences or when the system clock
batteries fail.
48
MDS
5.8
E-SCAN
M ONITOR DIAGNOSTIC VOLTAGES SELECTION
Diagnostic Voltages Selection
The “Voltages” option results in the following display:
Diagnostics Voltages Screen
U1 Meas:
The voltage produced when
measuring a solution sample. It is
used by MPR E-Scan unit 1 to
obtain an interpolated value from
the calibration table that will
reflect an accurate displayed
solids reading.
U1 Temp:
A voltage that produces the
process temperature readout on
MPR E-Scan unit 1 as follows:
(Voltage - .5v) * 50 = Deg. C.
U1 Lamp:
A nominal voltage needed to maintain a signal of proper amplitude for MPR E-Scan unit 1 light
source.
U1 0-10:
An interpolated voltage based on MPR E-Scan unit 1 Meas. Anlg. Min. and Meas. Anlg. Max.
Output limits.
U1 +5:
MPR E-Scan unit 1 power supply. The +5 volt supply line has a +/- .5 volt tolerance.
U1 +15:
MPR E-Scan unit 1 power supply. The +15 volt supply line has a +/- 1.5 volt tolerance.
U1 -15:
MPR E-Scan unit 1 power supply. The -15 volt supply line has a +/- 1.5 volt tolerance.
49
MDS
E-SCAN
M ONITOR DIAGNOSTIC VOLTAGES SELECTION
U2 Meas:
The voltage produced when measuring a solution sample. It is used by MPR E-Scan unit 2 to
obtain an interpolated value from the calibration table that will reflect an accurate displayed
Solids reading.
U2 Temp:
A voltage that produces the process temperature readout on MPR E-Scan unit 2 as follows:
(Voltage - .5v) * 50 = Deg. C.
U2 Lamp:
A nominal voltage needed to maintain a signal of proper amplitude for MPR E-Scan unit 2 light
source.
U2 0-10:
An interpolated voltage based on MPR E-Scan unit 2 Meas. Anlg. Min. and Meas. Anlg. Max.
Output limits.
U2 +5:
MPR E-Scan unit 2 power supply. The +5 volt supply line has a +/- .5 volt tolerance.
U2 +15:
MPR E-Scan unit 2 power supply. The +15 volt supply line has a +/- 1.5 volt tolerance.
U2 -15:
MPR E-Scan unit 2 power supply. The -15 volt supply line has a +/- 1.5 volt tolerance.
MDS +15:
Monitor power supply. The +15 volt supply line has a +/- 1.5 volt tolerance.
MDS -15:
Monitor power supply. The -15 volt supply line has a +/- 1.5 volt tolerance.
50
MDS
5.9
E-SCAN
M ONITOR DIAGNOSTIC RELAY SELECTION
Diagnostic Relay Selection
The “Relays” option activates the following display:
Diagnostics Relay Screen
There are eleven total relays, six
of which are inputs. Four input
relays are activated by the MPR
E-Scan units when the Isolation
Valves are closed or when there
are purge failures. One input is
activated by pressing the reset
button attached to the door of the
MDS E-Scan cabinet.
The
remaining input is activated
when the divert button is pressed
on the Remote Status Panel, or
when any other remote divert is
configured. Relays 6, 7, 8, 13,
14 and 15 are inputs.
The remaining relays are activated by the Monitor and are as follows:
Relay #01-Divert:
This is activated to create a divert condition.
Relay #02-Common Error:
This is activated for all error conditions, whether they are Monitor or MPR errors.
Relay #03-Unit1 Error:
This is activated only for errors associated with MPR E-Scan unit 1 and is accompanied by an
error message in the Monitor Unit1 status box while in normal mode.
Relay #04-Unit2 Error:
This is activated only for errors associated with MPR E-Scan unit 2 and is accompanied by an
error message in the Monitor Unit 2 status box while in normal mode.
Relay #05-Common Warning:
This is activated for all system warning conditions and is accompanied by a warning message in
the Monitor status box while in normal mode.
51
MDS
E-SCAN
M ONITOR DIAGNOSTIC TIME /DATE SELECTION
5.10 Diagnostic Time/Date Selection
The “Time/Date” diagnostic option activates the following display:
Diagnostic Time/Date Screen
This menu enables the operator
to set the system time and date.
System Time:
This is the time displayed in
military format in normal mode.
System Date:
This is the date displayed in
normal mode.
5.11 Print Selection
This dumps all logs to the printer for permanent hard copy output.
52
MDS
E-SCAN
MONITOR PROBLEM ANALYSIS
6.
6.1
Monitor Problem Analysis
Procedures
The following analysis procedures are meant to aid in isolating Monitor failures down to the
board. Board or device replacement with a fast turnaround is available from EMC.
These abbreviations are used:
I/O
Main Monitor I/O Board
Conditions analog voltages for digital microprocessor.
CPU CPU Card
Microprocessor, plugs into the I/O board.
IB
Most external connections are made to this board.
Interface Board
Before any troubleshooting always check that all cards are properly plugged in, ribbon
cables are properly socketed and that correct power is supplied.
6.2
Trouble Shooting Chart
SYMPTOM
POSSIBLE CAUSE
No display, failsafe LED off.
No display, backlighting.
Fuse blown.
Power supply failure, check ±15vdc and
5vdc.
No display and failsafe LED on.
Display failure.
Video cable failure.
Display on but is garbled.
CPU card failing.
Buttons do not respond properly.
Connector from overlay to I/O board not, or
improperly mated with J5.
Front panel overlay defective.
Defective I/O board (keyboard section).
Monitor does not save configuration changes
CPU card failure.
53
MDS
E-SCAN
MONITOR INFORMATION
7.
7.1
Monitor Information
Console Technical Description
The console is constructed of molded fiberglass polyester to give protection in harsh
environments.
Display
The LCD (liquid crystal display) has a
pixel count of 640 by 480 to give very
sharp resolution. The display is suitable
for both graphics and text information.
Switch Matrix
The switch matrix is located on the outside
of the console and allows the operator to
make modifications and changes to the
operating conditions of the instrument.
The operation of this switch matrix is
further explained in the operations section
of this manual.
Display and Switch Matrix
54
MDS
E-SCAN
MONITOR INFORMATION
7.1.1 Console Cards
IB (interface board) for external connection
The interface board is located on the back wall of the console. Most external connections are
made to connectors that plug into this board. The only exceptions are optional features that
require connections to optional available connectors located on the side of the console.
Power supply
The power supply is located in the top of the console and serves as a hold down clamp for the
analog output modules. The power supply supplies power to both the I/O card and also the IB.
The voltages supplied are +5 vdc and +/- 15 vdc.
I/O card
The I/O card handles most of the signal inputs and outputs from the instrument. Three ribbon
cables from this card route the signals from the IB to the I/O card and power is supplied through
a power cable to the I/O card from the power supply.
CPU card
The CPU card is found plugged into the PC/104 bus connectors of the I/O card. The CPU card
operates with a X86 based STPC Atlas microprocessor running at 133 MHZ. The CPU card has
a built- in flash EPROM hard disk drive, which contains the operating software, parameters and
calibration points for the system.
Comm/LPT card
This card is mounted to the left above the interface board and is used to allow communicatio n
between the Monitor and the MPR E-Scan units. It also enables the Monitor to drive the printer
and provides connections for the Remote Status Panel (RSP).
7.2
Monitor Specifications
Ambient temperature
Up to 125°F (52°C)
Console – 32°F to 120°F (0°C to 50°C)
Processor
Ampro Core Module 420, 133mhz
55
MDS
E-SCAN
MONITOR INFORMATION
7.3
Features
•
Continuously monitors both refractometers and associated equipment, looking at all vital
signals per unit to determine whether the displayed solids should be considered valid.
•
Removes from service either refractometer whose associated signals do not meet a
prescribed tolerance. An alarm will actuate, identifying the refractometer and circuit at
fault. This feature greatly reduces the possibility of diverting unnecessarily due to a
malfunctioning refractometer when relying on one refractometer reading low solids to
divert.
•
Configurable for divert when:
Either refractometer reads dissolved solids content 58% or below, an automatic divert
must take place or:
Both refractometers read solids 58% or below an automatic diversion must take place.
(Either of the above is in compliance with BLRBAC recommendations .)
•
Provides failsafe monitoring of its own supply voltages. If a supply should fail, the
Monitor will display its malfunction and go out of service.
•
A trending option is also available through software configuration. This will provide a
warning status that is triggered by an operator defined time constraint which acts as a
divert predict window. Based on a build- in rate of change algorithm, the Monitor can
determine whether or not a divert could occur within a specified time frame.
•
All system errors, divert conditions, comparator and purge information are logged and
can be viewed and printed by the operator.
•
Intelligent Purge Cycle
The measurement voltage is monitored in order to determine if the preceding prism wash
was successful. If unsuccessful another purge cycle will be automatically initiated. In the
case of three unsuccessful purge attempts, a purge error indicator is activated. In addition,
the intelligent purge will terminate as soon as the prism is clean, thus protecting the prism
from unnecessary purge action.
56
MDS
7.4
E-SCAN
MONITOR INFORMATION
Specific Functions
(Dwg. A-11585)
Note: 58% +2% noted below are industry standards but may vary depending upon the
application.
The Monitor is capable of performing the following functions:
1.
Monitor the (+15), (-15) and (+5) supply voltage of each refractometer
independently.
Should either refractometer's supply voltages exceed a predetermined safe operating
voltage range with a minimum and maximum limit of ±10%:
a.
An alarm will be activated, identifying the refractometer and circuit at fault.
b.
This refractometer will automatically have its output forced low (and removed
from service).
c.
No liquor diversion will take place.
2.
Monitor the lamp voltage of each refractometer independently.
Should either refractometer's lamp voltage exceed a predetermined safe operating
voltage range with a minimum and maximum limit, steps (a), (b) and (c) will be
implemented.
3.
Monitor the measurement voltage of each refractometer independently.
Should either refractometer's measurement voltage exceed a predetermined safe operating
voltage range with a minimum and maximum limit, steps (a), (b) and (c) will be
implemented.
4.
Monitor the liquor temperature of each refractometer's sensing head
independently. Should either refractometer's liquor temperature exceed a
predetermined safe operating range with a minimum and maximum limit, steps (a), (b)
and (c) will be implemented.
5.
Monitor the communications port.
Should either refractometer's serial communications port fail, steps (a), (b), and (c) will
be implemented.
6.
Monitor the automatic prism cleaning system of each refractometer.
Measurement signal must drop a proper amount during the purge cycle or an alarm will
be activated. Also, the prism cleaning system must purge within a specified time or an
alarm will be activated. In addition, any purge relays activated during non-purging
operation will result in an alarm condition. In all these cases, steps (a), (b) and (c) will be
implemented.
57
MDS
E-SCAN
MONITOR INFORMATION
7.
Monitor the isolation valve position.
A partially closed or closed valve will initiate steps (a), (b) and (c).
8.
Compare meter outputs.
Should a difference of 2% solids or greater exist between refractometer readings, an
alarm will be activated.
9.
Monitor the supply voltages of the Monitor.
Should either supply fail, an alarm will be activated.
10.
With both refractometers in service, if either or both instruments (depending on
configuration) read below 58% liquor, diversion will take place.
If the instrume nt readings disagree on the percent of solids by 2%, an alarm will be
activated.
11.
If one refractometer fails (or is removed from service), black liquor diversion will
be controlled by the instrument remaining in service. If this remaining instrument
reaches 58% or below or an alarm is activated on remaining refractometer, diversion will
take place.
12.
If the Monitor fails diversion will be controlled by the limit alarms on the
refractometers .
Both refractometers must read below 58% before diversion will take place.
13.
All system alarms are shown by flashing indicators on the Monitor.
Requires OPERATOR or INST. TECH. action to clear. Each alarm condition is
automatically printed on the Monitor on-line printer at the occurrence of the error.
58
MDS
7.5
E-SCAN
MONITOR INFORMATION
Trouble Shooting Guide and Truth Table
(For unit configured for two refractometer divert.)
(X) Refrac removed from service
(Y) Refrac remaining in service now solely responsible for diversion. Diversion will occur if
reading drops below 58% due to low solids or alarm being activated which would remove unit
from service. (Alarms shown on next page.)
Condition for either
Refractometer (1) or (2)
Alarms
Activated
Liquor
Diversion
Additional
Notes
Loss of power to console, fuse open,
etc.
1,2,3,5,8 (X)
(Y)
No (+)15 supply, defective component,
fuse open, etc.
1,2,5,8 (X)
(Y)
No (-)15 supply, defective component,
fuse open, etc.
1,2 (X)
(Y)
Loss of signal from head, lamp open,
bad detector, etc.
2,7 (X)
(Y)
Process out of operating range,
defective thermistor circuit, etc.
2 (X)
(Y)
Purge not cleaning prism, loss of
steam, defective solenoids, etc.)
4 (X)
(Y)
Prism clean inoperative
4 (X)
(Y)
Isolation valve closed or partially
closed.
5 (X)
(Y)
Drift in meter output due to defective
components, improper calibration, etc.
7
If reading is below
58% solids on one
unit & no alarms
other than #7 are
activated will divert
when other refract
purges
Defective Monitor (+)15 or (-) 15
supply or loss of power.
6
If both refracs are
reading below 58%.
59
MDS
E-SCAN
MONITOR INFORMATION
Condition for either
Refractometer (1) or (2)
Alarms
Activated
Liquor
Diversion
Loss of power to both refracs.
1,2,3,5,8
Will divert
Failure of both refracs which would
activate both alarms.
any
combination
Will divert
Refrac (1) and (2) indicates solids
below 58%.
Will divert
Loss of power to both refracs &
Monitor.
Will divert
Additional
Notes
7.5.1 Error Alarm Conditions
Alarm
Condition
1
Refract Power Supply out of tolerance.
* +15 VDC power supply out of tolerance.
* -15 VDC power supply out of tolerance.
* +5 VDC power supply out of tolerance.
2
Sensing Head voltages out of tolerance.
* Measurement voltage out of tolerance.
* Temperature voltage out of tolerance.
* Lamp voltage out of tolerance.
3
Serial communications port failure.
4
Purge errors.
* Purge failure (prism not properly cleaned).
* Purge missed (solenoid not activated at purge time).
* Purge invalid (solenoid activated at non-purge time).
* Purge not active (no times set in purge cycle).
5
Isolation valve closed.
6
Monitor Power Supply out of tolerance.
* +15 VDC power supply out of tolerance.
* -15 VDC power supply out of tolerance.
7
Comparator error, difference in readings greater than tolerance.
60
MDS
E-SCAN
MONITOR INFORMATION
7.5.2 Warning Alarm Conditions
Alarm
Condition
8
System Warning.
* Check lamp voltage, indicates lamp voltage in either sensing head is about
4.0Vdc. See maintenance section 8.5.
* Check purge log, ind icates successful purge after second or 3 attempt. Purge
log contains duration of steam time needed.
* Check analog solids, indicates direct voltage derived solids does not agree with
RS-232 solids readings.
* Check analog temperature, indicates direct vo ltage derived temperature does
not agree with RS-232 temperature readings.
* Check U1-U2 Com2, indicates E-Scan units are no longer able to communicate
via serial port 2, thus all communications are going thru the Monitor unit.
* Printer error/out of paper, indicates a problem with the printer.
9
Trend warning, indicates that a divert is predicted to occur within the operator
defined trend limit time frame.
61
MDS
E-SCAN
SERVICE
8.
8.1
Service
EMC Warranty
The Electron Machine Corporation warrants that the equipment manufactured by EMC is free of
defects in material and workmanship. Should such fault appear within one year of date of
shipment from our factory, the Electron-Machine Corporation will repair or replace the defective
part upon its prepaid return to Umatilla, Florida USA. (This warranty does not apply to
equipment which has been tampered with or abused).
8.2
Return of Defective Parts
No return authorization is necessary. Pack defective parts carefully to avoid damage in transit.
The shipper will be liable if, in the opinion of the carrier, insufficient packing was used. Attach
a letter stating the nature of the difficulty encountered, the reason for failure (if known), the date
of delivery of original equipment, and the approximate number of hours of operation.
Please include model number and serial number in all correspondence .
All return shipments must be prepaid.
8.3
Service in the Field
Services of factory trained field engineers are available at standard rates upon request.
Requests should be addressed to:
Technical Services Department
The Electron-Machine Corporation
P O Box 2349
Umatilla, FL 32784-2349
For after hours emergency technical service please call 352-669-3101 to obtain the Technical
Service phone number.
62
MDS
E-SCAN
8.4
SERVICE
Spare Parts
8.4.1 How to Order Parts
Orders for parts should be addressed to:
Technical Services Department
The Electron-Machine Corporation
P O Box 2349
Umatilla, FL 32784-2349
Purchase orders should include the model number and the serial number of the
equipment that the part is to be used with, in addition to the part number or drawing
number and the chassis number.
If the part number or the drawing number is not known, give a detailed description including a
sketch, if possible. All orders will receive prompt attention.
Phone: (352)-669-3101 Fax: (352)-669-1373 E-Mail: [email protected]
8.4.2 Recommended Spare Parts
EMC Number
Description
511007
MDS E-Scan ‘Refract’ Door Assembly w/electronics
511008
MDS E-Scan ‘Monitor’ Door Assembly w/electronics
187304
4-20mA Module
187496
Power Supply PS-40
511002
Sensing Head E-Scan
73500
Relay 2940427 Phoenix
69655
Printer Paper
596405
O-ring 03-030 Viton
46601
Fuse Pico 5 amp (little fuse)
45801
Fuse 1 amp Slo Blo (little fuse)
44103
1 PSI Check Valve SS-4CP-2-1 (Nupro)
63
MDS
8.5
E-SCAN
SERVICE
Maintenance
MDS E-Scan Monitor Divert System Periodic Inspection Checklist
We recommend the following checks be performed at least on a monthly basis under normal
operation.
§
Desiccant condition: The desiccant seen through the view plug on the sensing head should
be light orange when effective and clear when no longer effective. The desiccant can be
renewed by heating to approximately 250°F (121°C) until it recovers its original color.
§
Isolation valve position: Verify (if equipped) it is turned fully counter-clockwise
(completely open)
§
Check printer for error/warning logs: Refer to chapter 5 in the manual for explanations.
Keep a copy of printouts for EMC service personnel.
The following checks are made from the Monitor panel of the system by pressing MENU,
selecting DIAG and then VOLTAGES.
§
U1 Meas / U2 Meas: between 2.00 to 8.00 (depends on calibration and current product
strength)
§
U1 Temp / U2 Temp: Compare temp. on solids meter to the voltage using (Voltage 0.5V)x50=°C
§
U1 Lamp / U2 Lamp: Less than 3.80 (If not adjust R20 on Analog Board in sensing head
for approx. 3.50. Measure lamp voltage in the sensing head across TB1-3 and TB1-9.)
§
U1 0–10 / U2 0–10: Depends on range of unit and current product strength (Ex: If 50-80%
is the range, 50%=0 and 80%=10)
§
U1 +5 / U2 +5: Between 4.75 and 5.25
§
U1 +15 / U2 +15: Between 13.50 and 16.50
§
U1 –15 / U2 –15: Between –16.50 and –13.50
§
MDS +15: Between 13.50 and 16.50
§
MDS –15: Between –16.50 and –13.50
64
MDS
8.6
E-SCAN
SERVICE
Caution
CAUTION
When removing the sensing head from an operating line , do not assume that the
line is empty or that the isolation or bypass means is working properly . If an
EMC isolation valve is used, be sure its travel is not limited by any external
attachments or other interference and the valve is closed tightly. No pressure should
be felt on the head as the mounting nut is being removed.
ANY PRESSURE FELT WHEN THE NUT IS LOOSENED MUST BE INVESTIGATED
BEFORE PROCEEDING. Steam should be turned off before attempting to remove
head.
Use a face shield and protective clothing. Stand to the side when removing the
sensing head.
Clean all black liquor residue from spud-piece on adapter prior to re-insertion of
sensing head. The o-ring seal should be replaced before re-installation.
CAUTION
Close off isolation valve or remove the sensing head and replace with
maintenance plug prior to steam cleaning process lines to prevent prism
breakage.
65
MDS
E-SCAN
SERVICE
-Notes-
66
MDS
E-SCAN
DRAWING LIST
9.
Drawing #
Rev
Drawings List
Description
A-11575
B
Outline, MDS E-Scan Hoffman Console
B-11586
H
MDS E-Scan System Interconnection Diagram
A-12588
A
Outline, Remote Switch & Indicator Console
A-12587
A
Interconnection Diagram Remote Switch & Indicator Console
B-11572
K
Interconnection Diagram, MDS E-Scan Console
A-11585
Diagram-Black Liquor Measurement & Diversion Control
A-12208
A
Block Diagram - MPR E-Scan
B-12699-1
A
Assembly MPR E-Scan I/O CPLD Board ( Two Sheets )
A-12698
G
Schematic MPR E-Scan I/O/ CPLD Board ( Six Sheets )
B-11859
F
Isometric, Low Power MPR E-Scan Sensing Head
B-11487-1
Parts Ident., Single/Dual Head, with/without S/S Connectors
B-11365
H
Assembly MPR E-Scan Interface Board
B-11366
C
Schematic E-Scan Interface Board
B-11480
D
Assembly E-Scan MDS Monitor Interface Board
B-11481
A
Schematic MDS E-Scan Interface Board
B-13024
A
Assembly, Analog Conditioning Board
B-13025
A
Schematic Diagram, Analog Conditioning Board
A-11792
H
Assembly Low Power CCD Sensor Board
A-11794
H
Low Power CCD Sensor Board
B-11423
A
Interconnecting Cable Console to Head, E-Scan
A-11768
B
Outline, MDS E-Scan Panel Mount (Option)
A-12901
Component Assembly E-Scan Backlight
A-12902
Schematic CCFL Inverter
67