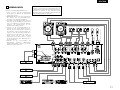
1
DJ MIXER / DJ 混音台 DN-X1500 OPERATING INSTRUCTIONS BEDIENUNGSANLEITUNG MODE D’EMPLOI ISTRUZIONI PER L’USO INSTRUCCIONES DE OPERACION GEBRUIKSAANWIJZING BRUKSANVISNING 操作說明書 FOR ENGLISH READERS FÜR DEUTSCHE LESER POUR LES LECTEURS FRANCAIS PER IL LETTORE ITALIANO PARA LECTORES DE ESPAÑOL VOOR NEDERLANDSTALIGE LEZERS FOR SVENSKA LÄSARE 中 文 PAGE 2 SEITE 14 PAGE 23 PAGINA 32 PAGINA 41 PAGINA 50 SIDA 59 第 68 頁 ~ ~ ~ ~ ~ ~ ~ ~ PAGE 13 SEITE 22 PAGE 31 PAGINA 40 PAGINA 49 PAGINA 58 SIDA 67 第 77 頁 SAFETY INSTRUCTIONS CAUTION 1. Read Instructions – All the safety and operating instructions should be read before the product is operated. 2. Retain Instructions – The safety and operating instructions should be retained for future reference. 3. Heed Warnings – All warnings on the product and in the operating instructions should be adhered to. 4. Follow Instructions – All operating and use instructions should be followed. 5. Cleaning – Unplug this product from the wall outlet before cleaning. Do not use liquid cleaners or aerosol cleaners. The lightning flash with arrowhead symbol, within an equilateral triangle, is intended to alert the user to the presence of uninsulated “dangerous voltage” within the product’s enclosure that may be of sufficient magnitude to constitute a risk of electric shock to persons. 6. Attachments – Do not use attachments not recommended by the product manufacturer as they may cause hazards. 7. Water and Moisture – Do not use this product near water – for example, near a bath tub, wash bowl, kitchen sink, or laundry tub; in a wet basement; or near a swimming pool; and the like. The exclamation point within an equilateral triangle is intended to alert the user to the presence of important operating and maintenance (servicing) instructions in the literature accompanying the appliance. 8. Accessories – Do not place this product on an unstable cart, stand, tripod, bracket, or table. The product may fall, causing serious injury to a child or adult, and serious damage to the product. Use only with a cart, stand, tripod, bracket, or table recommended by the manufacturer, or sold with the product. Any mounting of the product should follow the manufacturer’s instructions, and should use a mounting accessory recommended by the manufacturer. RISK OF ELECTRIC SHOCK DO NOT OPEN CAUTION: TO REDUCE THE RISK OF ELECTRIC SHOCK, DO NOT REMOVE COVER (OR BACK). NO USER SERVICEABLE PARTS INSIDE. REFER SERVICING TO QUALIFIED SERVICE PESONNEL. WARNING: TO PREVENT FIRE OR SHOCK HAZARD, DO NOT EXPOSE THIS APPLIANCE TO RAIN OR MOISTURE. 9. CAUTION: LABELS: 1. Handle the power supply cord carefully Do not damage or deform the power supply cord. If it is damaged or deformed, it may cause electric shock or malfunction when used. When removing from wall outlet, be sure to remove by holding the plug attachment and not by pulling the cord. 2. Do not open the top cover In order to prevent electric shock, do not open the top cover. If problems occur, contact your DENON dealer. This device complies with Part 15 of the FCC Rules. Operation is subject to the following two conditions: (1) This device may not cause harmful interference, and (2) this device must accept any interference received, including interference that may cause undesired operation. This Class B digital apparatus meets all requirements of the Canadian Interference-Causing Equipment Regulations. 3. Do not place anything inside Do not place metal objects or spill liquid inside the DJ mixer. Electric shock or malfunction may result. Please, record and retain the Model name and serial number of your set shown on the rating label. Model No. DN-X1500 Serial No. Cet appareil numérique de la classe B respecte toutes les exigences du Règlement sur le matériel brouilleur du Canada. CAUTION TO PREVENT ELECTRIC SHOCK, MATCH WIDE BLADE OF PLUG TO WIDE SLOT, FULLY INSERT. A product and cart combination should be moved with care. Quick stops, excessive force, and uneven surfaces may cause the product and cart combination to overturn. 11. Power Sources – This product should be operated only from the type of power source indicated on the marking label. If you are not sure of the type of power supply to your home, consult your product dealer or local power company. For products intended to operate from battery power, or other sources, refer to the operating instructions. 12. Grounding or Polarization – This product may be equipped with a polarized alternating-current line plug (a plug having one blade wider than the other). This plug will fit into the power outlet only one way. This is a safety feature. If you are unable to insert the plug fully into the outlet, try reversing the plug. If the plug should still fail to fit, contact your electrician to replace your obsolete outlet. Do not defeat the safety purpose of the polarized plug. ATTENTION POUR ÉVITER LES CHOCS ÉLECTRIQUES, INTERODUIRE LA LAME LA PLUS LARGE DE LA FICHE DANS LA BORNE CORRESPONDANTE DE LA PRISE ET POUSSER JUSQU’ AU FOND. ANTENNA LEAD IN WIRE GROUND CLAMP ANTENNA DISCHARGE UNIT (NEC SECTION 810-20) ELECTRIC SERVICE EQUIPMENT GROUNDING CONDUCTORS (NEC SECTION 810-21) GROUND CLAMPS POWER SERVICE GROUNDING ELECTRODE SYSTEM (NEC ART 250, PART H) NEC - NATIONAL ELECTRICAL CODE 15. Outdoor Antenna Grounding – If an outside antenna or cable system is connected to the product, be sure the antenna or cable system is grounded so as to provide some protection against voltage surges and built-up static charges. Article 810 of the National Electrical Code, ANSI/NFPA 70, provides information with regard to proper grounding of the mast and supporting structure, grounding of the lead-in wire to an antenna discharge unit, size of grounding conductors, location of antenna-discharge unit, connection to grounding electrodes, and requirements for the grounding electrode. See Figure A. 16. Lightning – For added protection for this product during a lightning storm, or when it is left unattended and unused for long periods of time, unplug it from the wall outlet and disconnect the antenna or cable system. This will prevent damage to the product due to lightning and power-line surges. 17. Power Lines – An outside antenna system should not be located in the vicinity of overhead power lines or other electric light or power circuits, or where it can fall into such power lines or circuits. When installing an outside antenna system, extreme care should be taken to keep from touching such power lines or circuits as contact with them might be fatal. 18. Overloading – Do not overload wall outlets, extension cords, or integral convenience receptacles as this can result in a risk of fire or electric shock. 10. Ventilation – Slots and openings in the cabinet are provided for ventilation and to ensure reliable operation of the product and to protect it from overheating, and these openings must not be blocked or covered. The openings should never be blocked by placing the product on a bed, sofa, rug, or other similar surface. This product should not be placed in a built-in installation such as a bookcase or rack unless proper ventilation is provided or the manufacturer’s instructions have been adhered to. FIGURE A EXAMPLE OF ANTENNA GROUNDING AS PER NATIONAL ELECTRICAL CODE 13. Power-Cord Protection – Power-supply cords should be routed so that they are not likely to be walked on or pinched by items placed upon or against them, paying particular attention to cords at plugs, convenience receptacles, and the point where they exit from the product. 19. Object and Liquid Entry – Never push objects of any kind into this product through openings as they may touch dangerous voltage points or short-out parts that could result in a fire or electric shock. Never spill liquid of any kind on the product. 20. Servicing – Do not attempt to service this product yourself as opening or removing covers may expose you to dangerous voltage or other hazards. Refer all servicing to qualified service personnel. 21. Damage Requiring Service – Unplug this product from the wall outlet and refer servicing to qualified service personnel under the following conditions: a) When the power-supply cord or plug is damaged, b) If liquid has been spilled, or objects have fallen into the product, c) If the product has been exposed to rain or water, d) If the product does not operate normally by following the operating instructions. Adjust only those controls that are covered by the operating instructions as an improper adjustment of other controls may result in damage and will often require extensive work by a qualified technician to restore the product to its normal operation, e) If the product has been dropped or damaged in any way, and f) When the product exhibits a distinct change in performance – this indicates a need for service. 22. Replacement Parts – When replacement parts are required, be sure the service technician has used replacement parts specified by the manufacturer or have the same characteristics as the original part. Unauthorized substitutions may result in fire, electric shock, or other hazards. 23. Safety Check – Upon completion of any service or repairs to this product, ask the service technician to perform safety checks to determine that the product is in proper operating condition. 24. Wall or Ceiling Mounting – The product should be mounted to a wall or ceiling only as recommended by the manufacturer. 25. Heat – The product should be situated away from heat sources such as radiators, heat registers, stoves, or other products (including amplifiers) that produce heat. 2 FRANÇAIS ITALIANO ESPAÑOL NEDERLANDS SVENSKA REAR PANEL DIAGRAM / HINTERES ANSCHLUSSFELD-SCHEMA / SCHEMA DU PANNEAU ARRIERE / SCHEMA PANNELLO POSTERIORE / DIAGRAMA DEL PANEL POSTERIOR / OVERZICHT VAN ACHTERPANEEL / BAKPANELEN / 後面板視圖 TOP PANEL DIAGRAM / OBERES BEDIENFELD-SCHEMA / SCHEMA DU PANNEAU SUPERIEUR / SCHEMA PANNELLO SUPERIORE/ DIAGRAMA DEL PANEL SUPERIOR / OVERZICHT VAN BOVENPANEEL / BILD ÖVER ÖVERSTA PANELEN / 頂面板視圖 #4 #6 #5 #6 #5 #6 #5 #6 #5 #7 q #3 #2 #8 #8 #8 #8 w e #1 #0 @9 @8 @7 @6 @5 @4 $0 $1 $0 $3 $0 $2 $0 $0 $2 $1 $2 $1 $4 $5 #9 !6 !0 #9 !6 #9 !6 r #9 !6 t y u i o !0 !1 !2 !3 !4 @3 @2 @1 @0 !7 !9 !8 !7 !6 %5 %4 %2 %0 $9 %3 %1 $8 %6 %7 %8 ^5 ^4 %9 ^0 ^3 ^1 ^2 90 (3-35/64”) 310 (12-13/64”) !5 20 (25/32”) 3 $7 $6 DISPLAY / DISPLAY / AFFICHAGE / DISPLAY / VISUALIZADOR / DISPLAY / DISPLAYEN / 顯示屏 327 (12-7/8”) ENGLISH DEUTSCH Unit: Gerät: Unité: Unità: Unidad: Toestel: Enhet: 單位: mm mm mm mm mm mm mm mm NOTE ON USE / HINWEISE ZUM GEBRAUCH / OBSERVATIONS RELATIVES A L’UTILISATION / NOTE SULL’USO NOTAS SOBRE EL USO / ALVORENS TE GEBRUIKEN / OBSERVERA • Avoid high temperatures. Allow for sufficient heat dispersion when installed on a rack. • Vermeiden Sie hohe Temperaturen. Beachten Sie, daß eine ausreichend Luftzirkulation gewährleistet wird, wenn das Gerät auf ein Regal gestellt wird. • Eviter des températures élevées Tenir compte d’une dispersion de chaleur suffisante lors de l’installation sur une étagère. • Evitate di esporre l’unità a temperature alte. Assicuratevi che ci sia un’adeguata dispersione del calore quando installate l’unità in un mobile per componenti audio. • Evite altas temperaturas Permite la suficiente dispersión del calor cuando está instalado en la consola. • Vermijd hoge temperaturen. Zorg voor een degelijk hitteafvoer indien het apparaat op een rek wordt geplaatst. • Undvik höga temperaturer. Se till att det finns möjlighet till god värmeavledning vid montering i ett rack. • Handle the power cord carefully. Hold the plug when unplugging the cord. • Gehen Sie vorsichtig mit dem Netzkabel um. Halten Sie das Kabel am Stecker, wenn Sie den Stecker herausziehen. • Manipuler le cordon d’alimentation avec précaution. Tenir la prise lors du débranchement du cordon. • Manneggiate il filo di alimentazione con cura. Agite per la spina quando scollegate il cavo dalla presa. • Maneje el cordón de energía con cuidado. Sostenga el enchufe cuando desconecte el cordón de energía. • Hanteer het netsnoer voorzichtig. Houd het snoer bij de stekker vast wanneer deze moet worden aan- of losgekoppeld. • Hantera nätkabeln varsamt. Håll i kabeln när den kopplas från el-uttaget. • Keep the set free from moisture, water, and dust. • Halten Sie das Gerät von Feuchtigkeit, Wasser und Staub fern. • Protéger l’appareil contre l’humidité, l’eau et lapoussière. • Tenete l’unità lontana dall’umidità, dall’acqua e dalla polvere. • Mantenga el equipo libre de humedad, agua y polvo. • Laat geen vochtigheid, water of stof in het apparaat binnendringen. • Utsätt inte apparaten för fukt, vatten och damm. • Unplug the power cord when not using the set for long periods of time. • Wenn das Gerät eine längere Zeit nicht verwendet werden soll, trennen Sie das Netzkabel vom Netzstecker. • Débrancher le cordon d’alimentation lorsque l’appareil n’est pas utilisé pendant de longues périodes. • Disinnestate il filo di alimentazione quando avete l’intenzione di non usare il filo di alimentazione per un lungo periodo di tempo. • Desconecte el cordón de energía cuando no utilice el equipo por mucho tiempo. • Neem altijd het netsnoer uit het stopkontakt wanneer het apparaat gedurende een lange periode niet wordt gebruikt. • Koppla ur nätkabeln om apparaten inte kommer att användas i lång tid. ✽ (For sets with ventilation holes) • Do not obstruct the ventilation holes. • Die Belüftungsöffnungen dürfen nicht verdeckt werden. • Ne pas obstruer les trous d’aération. • Non coprite i fori di ventilazione. • No obstruya los orificios de ventilación. • De ventilatieopeningen mogen niet worden beblokkeerd. • Täpp inte till ventilationsöppningarna. CAUTION • The ventilation should not be impeded by covering the ventilation openings with items, such as newspapers, table-cloths, curtains, etc. • No naked flame sources, such as lighted candles, should be placed on the apparatus. 4 • Do not let foreign objects in the set. • Keine fremden Gegenstände in das Gerät kommen lassen. • Ne pas laisser des objets étrangers dans l’appareil. • E’ importante che nessun oggetto è inserito all’interno dell’unità. • No deje objetos extraños dentro del equipo. • Laat geen vreemde voorwerpen in dit apparaat vallen. • Se till att främmande föremål inte tränger in i apparaten. • Do not let insecticides, benzene, and thinner come in contact with the set. • Lassen Sie das Gerät nicht mit Insektiziden, Benzin oder Verdünnungsmitteln in Berührung kommen. • Ne pas mettre en contact des insecticides, du benzène et un diluant avec l’appareil. • Assicuratevvi che l’unità non venga in contatto con insetticidi, benzolo o solventi. • No permita el contacto de insecticidas, gasolina y diluyentes con el equipo. • Laat geen insektenverdelgende middelen, benzine of verfverdunner met dit apparaat in kontakt komen. • Se till att inte insektsmedel på spraybruk, bensen och thinner kommer i kontakt med apparatens hölje. • Never disassemble or modify the set in any way. • Versuchen Sie niemals das Gerät auseinander zu nehmen oder auf jegliche Art zu verändern. • Ne jamais démonter ou modifier l’appareil d’une manière ou d’une autre. • Non smontate mai, nè modificate l’unità in nessun modo. • Nunca desarme o modifique el equipo de ninguna manera. • Nooit dit apparaat demonteren of op andere wijze modifiëren. • Ta inte isär apparaten och försök inte bygga om den. • Please be care the environmental aspects of battery disposal. • The apparatus shall not be exposed to dripping or splashing for use. • No objects filled with liquids, such as vases, shall be placed on the apparatus. • DECLARATION OF CONFORMITY We declare under our sole responsibility that this product, to which this declaration relates, is in conformity with the following standards: EN60065, EN55013, EN55020, EN61000-3-2 and EN61000-3-3. Following the provisions of 73/23/EEC, 89/336/EEC and 93/68/EEC Directive. • ÜBEREINSTIMMUNGSERKLÄRUNG Wir erklären unter unserer Verantwortung, daß dieses Produkt, auf das sich diese Erklärung bezieht, den folgenden Standards entspricht: EN60065, EN55013, EN55020, EN61000-3-2 und EN61000-3-3. Entspricht den Verordnungen der Direktive 73/23/EEC, 89/336/EEC und 93/68/EEC. • DECLARATION DE CONFORMITE Nous déclarons sous notre seule responsabilité que l’appareil, auquel se réfère cette déclaration, est conforme aux standards suivants: EN60065, EN55013, EN55020, EN61000-3-2 et EN61000-3-3. D’après les dispositions de la Directive 73/23/EEC, 89/336/EEC et 93/68/EEC. • DICHIARAZIONE DI CONFORMITÀ Dichiariamo con piena responsabilità che questo prodotto, al quale la nostra dichiarazione si riferisce, è conforme alle seguenti normative: EN60065, EN55013, EN55020, EN61000-3-2 e EN61000-3-3. In conformità con le condizioni delle direttive 73/23/EEC, 89/336/EEC e 93/68/EEC. QUESTO PRODOTTO E’ CONFORME AL D.M. 28/08/95 N. 548 • DECLARACIÓN DE CONFORMIDAD Declaramos bajo nuestra exclusiva responsabilidad que este producto al que hace referencia esta declaración, está conforme con los siguientes estándares: EN60065, EN55013, EN55020, EN61000-3-2 y EN61000-3-3. Siguiendo las provisiones de las Directivas 73/23/EEC, 89/336/EEC y 93/68/EEC. • EENVORMIGHEIDSVERKLARING Wij verklaren uitsluitend op onze verantwoordelijkheid dat dit produkt, waarop deze verklaring betrekking heeft, in overeenstemming is met de volgende normen: EN60065, EN55013, EN55020, EN61000-3-2 en EN61000-3-3. Volgens de bepalingen van de Richtlijnen 73/23/EEC, 89/336/EEC en 93/68/EEC. • ÖVERENSSTÄMMELSESINTYG Härmed intygas helt på eget ansvar att denna produkt, vilken detta intyg avser, uppfyller följande standarder: EN60065, EN55013, EN55020, EN61000-3-2 och EN61000-3-3. Enligt stadgarna i direktiv 73/23/EEC, 89/336/EEC och 93/68/EEC. ENGLISH 2 INTRODUCTION Thank you very much for purchasing the DENON DN-X1500 DJ MIXER. DENON proudly presents this advanced DJ MIXER to audiophiles and music lovers as a further proof of DENON’s non-compromising pursuit of the ultimate in sound quality. The high quality performance and easy operation are certain to provide you with many hours of outstanding listening pleasure. – TABLE OF CONTENTS – z x c v b MAIN FEATURES ...............................................5 INSTALLATION ...................................................5 PART NAMES AND FUNCTIONS ................5 ~ 7 CONNECTIONS ..................................................8 SPECIFICATIONS................................................9 n m , . ⁄0 FADER START ..................................................10 EFFECTOR........................................................11 12. PFL (Pre Fader Level) This feature provides a means to adjust the input level gain of each channel to avoid over loading. By making this adjustment in advance will insure a smooth transition between cross fades or channel fades. 13. Preset functions It is possible to customise the machine to your preference by saving your favourite setting to internal memory. For items found in the presets, please see page 13. 2 INSTALLATION When the DN-X1500 is installed inside a coffin or DJ booth, separate it from the foam (sponge), walls or other equipment to improve heat radiation. Min. 2 cm Min. 2 cm SAMPLER.........................................................12 PFL (Pre Fader Level) .......................................12 PRESET ............................................................13 2 ACCESSORIES Please check to make sure the following items are included with the main unit in the carton: q Operating instructions.......................................1 Min. 2 cm 1 MAIN FEATURES 2. Penny & Giles Crossfader Smooth and reliable mixing is excelled by Penny & Giles Crossfader. 7. Digital output The DN-X1500 allows you to record directly to CDR, MiniDisc or a hard disk device through it’s exclusive coaxial digital output. The digital output maintains a constant 44.1 kHz signal. 3. Sampler On-board digital Sampler can record up to 8 seconds CD quality sound. You can seamlessly Loop this Sampler or play it backwards (REVERSE). The pitch and output level of Sampler can be adjusted independently. 8. Enhanced SEND/RETURN terminals 8 LINE, 3 PHONO, 2 Microphone systems, 2 MASTER outputs, BOOTH output and REC output are provided independently. Effect SEND/RETURN terminals are also provided for a external effects processor. 4. Internal Effector Various sound effects can be performed. (DELAY, ECHO, PAN, TRANS, FILTER, FLANGER, KEY) 9. 3-Band equalizer/gain LOW, MID, HI and GAIN controls are available on every input channel. 5. Auto BPM counter, BPM Lock, TAP and Manual BPM input In addition to an Auto BPM counter and Tap function, the DN-X1500 is also equipped with the temporarily Lock function of the Auto BPM counter and the Manual BPM input function. 10. Crossfader Contour This feature allows adjusting the “shape” of the Crossfader response from a gentle curve for smooth, long running fades, to the steep pitch required for top performance cut and scratch effects. 6. Channel Fader and Crossfader Start The CD player can be started or stopped simply by increasing or decreasing the level of the Ch. Fader or by using the Crossfader left to right or right to left. (This function can only be used when the DENON CD players DN-S3000, DN-S5000, DND4000 or etc. is connected to the DN-X1500.) 11. Mic Post This feature will pass the Mic signal into the BOOTH, REC output and DIGITAL output signal path. In the OFF mode, the Mic signal will not be routed through the above outputs. 1. Matrix input assignment 8 input sources is freely assignable to each channels. Min. 3 mm 3 PART NAMES AND FUNCTIONS (Refer to page 3.) (1) Top panel q Power operation switch (POWER) • The power turns switched from the position (¢). • The power turns switched from the position (£). on when the button is off position (£) to the on off when the button is on position (¢) to the off w MASTER BALANCE control • Adjusts the L/R balance of the MASTER output. e MASTER LEVEL control • Adjusts the level of the MASTER outputs. r BOOTH ASSIGN switch • Selects the source of the BOOTH output. t BOOTH LEVEL control y SAMPLER ASSIGN switch • Use this to select the source for Sampler recording. u SAMPLER MODE knob • Use this to set the Sampler playback mode or edit the Sampler. • Push this knob during the Sampler playback or recording, the Sampler playback or recording is stopped. i SAMPLER A button • Push this button, the Sampler recording or playback starts. o SAMPLER B button • Use this to set the Sampler B point. • Adjusts the level of the BOOTH output. 5 ENGLISH !0 CROSSFADER ASSIGN switch A, B: • The channel source is assigned to A or B of the Crossfader. POST: • Select when you don’t assign the channel source into the Crossfader. !1 EFFECTS ASSIGN switch • Use this to select the source of the internal Effector. !2 MODE PARAMETER knob • Use this to set the effect mode and parameters. !3 EFFECTS WET/DRY control • Use this to adjust the ratio of original and effected sound. !4 EFFECTS ON/OFF button • Use this to switch the internal Effector function ON and OFF. !5 TAP button • TAP: When you push this button repeatedly, the AUTO mode turns off and starts measuring your Beats Per Minute (BPM) by tapping. • LOCK: When this button is pressed once while the auto BPM counter is operating, the data measured by the auto BPM counter is locked. • AUTO: When pushing the TAP button for 1 second, activates AUTO BPM mode. The measured BPM is displayed in the BPM display. • INPUT BPM: When the TAP button is pressed and held in for more than 2 seconds, the BPM input mode is set and the BPM value can be input directly with the MODE PARAMETERS knob !2. When the button is pressed again, the BPM input mode is turned off. !6 CUE buttons • Pressing in any or all of the CUE buttons routes the respective source to the headphone and meter cue sections. Pressing multiple buttons makes it possible to derive mixed sound from the selected sources. 6 !7 CROSSFADER START A, B switches • Use this to switch the Crossfader Start function ON and OFF. !8 Crossfader • Controls the relative output level from the summed A and B Mixes. When the fader is at its far left, only the A Mix is heard from the outputs. As the fader is moved toward the right, the amount of B Mix is increased and the amount of A Mix is decreased. When the fader is centered, equal amounts of A and B Mixes are routed to the outputs. Fully right is all B Mix at the outputs. !9 Source input fader (Ch. Fader) • Controls the level of the selected Input. @0 CROSSFADER CONTOUR control • Allows adjusting the “shape” of the Crossfader response from a gentle curve for smooth, long running fades, to the steep pitch required for top performance cut and scratch effects. @1 HEADPHONE output jack • Accepts 1/4” stereo headphone plugs. @2 HEADPHONE LEVEL control • Adjusts the volume for the headphones. @3 HEADPHONE PAN control • Serves two purposes…In the STEREO mode it changes the relative levels of the Cue and Program (CUE MASTER) mixed together in both earcups. In the SPLIT CUE (MONO) mode it changes the balance between the Mono Cue in the left ear cup and the Mono Program (MASTER) in the right. @4 SPLIT CUE button • In the STEREO mode, this button feeds STEREO Program (CUE MASTER) and Cue to both earcups, in the SPLIT CUE (MONO) mode, the headphone circuit provides MONO Cue to the left ear and MONO Program (MASTER) to the right. • In the STEREO mode, the meter indicates the stereo level in the LEFT and RIGHT Master Outputs. In the SPLIT CUE (MONO) mode, mono Cue level is displayed on the Left meter and mono Program (CUE MASTER) level is displayed on the Right meter. • In the SPLIT CUE (MONO) mode, the button is lit. @5 EFFECT LOOP WET/DRY control • Use this to adjust the ratio of original and effected sound. @6 CH FADER START switch • Use this to switch the Channel Fader Start function ON and OFF. @7 EFFECT LOOP ASSIGN switch • Use this to select the source of the external processor. @8 EFFECT LOOP ON/OFF button • Routes the assigned signal through the external processor attached to the SEND/RETURN connectors on the rear. • When the EFFECT is ON, the button is lit. (When the processor isn’t connected, the button will blink when activated.) @9 TALK OVER ON/OFF button • Use this to switch the Talk Over function ON and OFF. • When the button is lit, level of signals except Mics is attenuated. • The Talk Over attenuation level can be adjusted in the Preset mode. NOTE: When this button is pushed, volume changes rapidly. #0 MIC POST ON/OFF button • Puts the Mic signals into the BOOTH, REC and DIGITAL out signal path. #1 MIC EQ controls • Contour the frequency response of the MIC input –12 dB to +12 dB. At the center position, sound is flat. #2 MIC LEVEL controls • Adjusts the level of the Mic signal. #3 MIC ON/OFF buttons • When the button is lit, Mic signal is transferred to output section, otherwise Mic input is muted. #4 INPUT ASSIGN (Input selectors) • Select any source from eight inputs (PHONO1/LINE1, LINE2, PHONO2/LINE3, LINE4, PHONO3/LINE5, LINE6, LINE7, LINE8) for each channel independently. • You also can assign the same input to several channels for creative mixing. LINE1 LINE2 LINE3 LINE4 LINE5 LINE6 LINE7 LINE8 INPUT ASSIGN • • • • • INPUT ASSIGN CH1 CH4 #5 GAIN (Line input level controls) • Adjusts the level of the selected input. • You can adjust each GAIN volume to indicate 0dB on source level meter. #6 Source EQ controls • Contour the frequency response of the selected inputs. At the center position, sound is flat. HI and MID: • Adjusts the high-tone and mid-tone sound –40 dB to +10 dB. LOW: • Adjusts the low-tone sound –40 dB to +6 dB. NOTE: Clipping may occur if adjustments are set to harsh. #7 CUE MASTER level meter • Displays the output level following MASTER LEVEL adjustment. • Can switch between two display mode. See below @4. #8 Source level meters • Displays the input level after adjusted with GAIN #5 and EQ #6 controls. NOTE: If this meter indicates over +12 dB, inputted sound may be clipped. #9 EQ ON/OFF buttons • When this button is lit EQ is on, otherwise EQ is bypassed. ENGLISH (2) Rear panel $0 LINE2, 4, 6, 7, 8 input jacks • These stereo pairs of unbalanced RCA jacks are inputs for any line level device. $1 PHONO1, 2, 3 / LINE1, 3, 5 input jacks • These stereo pairs of unbalanced RCA jacks are inputs for a PHONO (RIAA) stage for magnetic (MM) cartridges or a LINE stage suitable for any device, such as a CD player. $2 PHONO1, 2, 3 / LINE1, 3, 5 switches • These switches change the input from PHONO to a LINE level inputs. • These switches set a LINE level inputs when turntable is not connected. $3 Phono ground screw (GND) • This screws provide a place to connect the ground wire from a turntable. This terminal is exclusively for a turntable grounding and not a safety earth ground. $4 AUX MIC input jack • Accepts an balanced microphone with 1/4” TRS mono jacks. • Pin layout: Tip=Hot Ring=Cold Sleeve=GND $5 MAIN MIC input connector • Neutrik combo jack. • Accepts either a balanced microphone with an XLR connector or a balanced microphone with 1/4” TRS mono jacks. • Pin layout: XLR: 1. GND 2. Hot 3. Cold 1/4” TRS: Tip=Hot Ring=Cold Sleeve=GND $6 Maintenance connector NOTE: This connector can be used only for firmware updating. Do not connect device, or may cause damage. $7 LINE2, 4, 6, 8 FADER output jacks • Connect these jacks to the FADER input jacks of DN-S3000, DN-S5000, DN-D4000 and etc. using the 3.5 mm stereo mini cord. $8 SEND / RETURN jacks • These 1/4” TS mono jacks allow external processing of the program signal. • When connect monaural type effect processor, use Lch input and output. (3) Display $9 DIGITAL OUT (COAXIAL) jack • This RCA jack provides a digital output data. The signal is unaffected by the MASTER LEVEL control. • We recommend using a 75 Ω/ohm RCA cord for best digital transfer. (available from any audio/video retailer) %0 REC OUT jacks • This stereo pair of RCA jacks provide a line level output. The signal is unaffected by the MASTER LEVEL control. %1 BOOTH OUT jacks • This stereo pair of RCA jacks provide a unbalanced line level output with independent top panel BOOTH LEVEL control. %2 MASTER OUT (UNBALANCED) jacks • This stereo pair of RCA jacks provide a unbalanced line level output. • Connect these jacks to the unbalanced analog input jacks on an amplifier or console. %3 LEVEL ATT (Master out level attenuator) • Use this to attenuate the MASTER output level. (–∞ ~ 0 dB) • Reference is 0 dB. %4 MASTER OUT (BALANCED) connectors • These XLR type connectors provide a balanced line level output. • Connect these connectors to the balanced analog input connectors on an amplifier or console. • Pin layout: 1. GND 2. Hot 3. Cold • Applicable connector: Cannon XLR-3-31 or equivalent. NOTE: Do not short-circuit the hot or cold pin with the GND pin. %5 MASTER MONO OUT ON/OFF switch • When this switch is on, mixed L and R signal is outputted from the MASTER OUT (Both BALANCED and UNBALANCED). %6 Crossfader A assign indicators • This indicator shows channels of assigned channel to Crossfader A side. %7 Preset mode indicators %8 Sampler mode indicators SAMP.: • The Sampler sound is recorded. LOOP: • Playing Sampler in Loop mode. REV.: • Reverse Sampler playback. %9 Character display • This displays various operational information, etc.. • [ 1 ] : CH-1 indicator [ 2 ] : CH-2 indicator [ 3 ] : CH-3 indicator [ 4 ] : CH-4 indicator The number of assigned input source is displayed on the character display under these indicator. ^0 Effect assign indicators • Selected Effector source is indicated here. ^1 Crossfader B assign indicators • This indicator shows channels of assigned channel to Crossfader B side. ^2 Effector BPM display • This display indicates the BPM of the assigned source. ^3 BPM mode indicators AUTO: • This indicator is lit, when the BPM mode is AUTO BPM. • This indicator is flashed, when the AUTO BPM is locked. MANUAL: • This indicator is lit, when the BPM mode is manual BPM input. You can input desired BPM by MODE PARAMETER knob. ^4 Cue button indicators • Channels of CUE selected are indicated. ^5 Cue BPM display (Auto count) • This display indicates the BPM of the selected channel. NOTE: BPM will not be displayed, if 2 or more channels are selected. 7 ENGLISH CD player CD player Turntable 2 ANTI-S PITCH KEY ADJUST -12 0 PITCH KEY ADJUST -12 SLOW BRAKE Quartz 0 Quartz 0 ON 0 POWER +12 +12 START /STOP 78 DP-DJ151 Digital 45 78 33 DP-DJ151 Digital 45 1/4” TRS mono jack 33 R R R R L R L L L L R R R L L R 3.5 mm stereo mini cord L L 1/4” TS mono jack R L 1/4” TS mono jack L R 1/4” TS mono jack L 1/4” TS mono jack Main balanced power amplifier R Main unbalanced power amplifier Booth unbalanced power amplifier Tape deck 8 CD recorder or PC MD recorder Effects processor 3.5 mm stereo mini cord START /STOP DP-DJ151 Digital 45 ON OFF POWER 78 33 XLR or 1/4” TRS mono jack OFF +12 START /STOP PITCH -12 SLOW BRAKE Quartz ON POWER 2 2 1 3 210 1 1 ANTI-S 2 4 3 210 0 SLOW BRAKE OFF 765 ANTI-S TING KA 765 0 Balanced microphones 3 3 4 3 4 TING KA 4 TING KA KEY ADJUST Turntable 1 4 Turntable 3 765 1. Make certain AC power is off while making connections. 2. Quality cables make a big difference in fidelity and punch. Use high-quality, audio cables. 3. Do not use excessively long cables. Be sure plugs and jacks are securely fastened. Loose connections cause hum, noise, or intermittents that could damage your speakers. 4. Connect all stereo input sources. Then connect any effects into the stereo effect, if used. Connect your microphone(s) and monitor headphones. Make sure all faders are at “zero” and the unit is off. Take care to connect only one cable at a time. pay attention to L and R position of jacks, on both the DN-X1500 and outboard gear. 5. Connect the stereo outputs to the power amplifier(s) and/or tape deck(s) and/or MD recorder(s) and/or CD recorder(s). Plug the DNX1500 into AC power outlet. 3 210 Refer to the connection diagram below. NOTE: Always switch on your audio input sources such as CD players first, then your mixer, and finally any amplifiers. When turning off, always reverse this operation by turning off amplifiers, then your mixer, and then input units. 4 4 CONNECTIONS ENGLISH • Master Output: Balanced 5 SPECIFICATIONS • Phono Inputs: Input Impedance Level 3 Stereo 50 kΩ/kohms –50 dBV (3 mV) Unbalanced RCA jacks • Line Inputs: Input Impedance Level 5 Stereo 50 kΩ/kohms –14 dBV (200 mV) Unbalanced RCA jacks Output Impedance Level Frequency Response THD+N S/N Cross Talk Unbalanced Output Impedance Level Frequency Response THD+N S/N Stereo, Active Balanced XLR jacks (1: GND, 2: Hot, 3: Cold) 150 Ω/ohms +4 dBu (1.23 V) 20 Hz to 20 kHz (±2 dB) Below 0.02 % 85 dB (Line) (When noise gate function set with presettings) 70 dB (Phono) Over 70 dB Stereo RCA jacks 1 kΩ/kohms 0 dBV (1 V) 20 Hz to 20 kHz (±2 dB) Below 0.02 % 85 dB (Line) (When noise gate function set with presettings) 70 dB (Phono) Over 70 dB • EQ Control (Line): 3 Bands [Auto EQ] Control Range & Frequency HI: –33 dB (15 kHz) to +10 dB (8 kHz) MID: –40 dB (1 kHz) to +10 dB (1 kHz) LOW: –40 dB (60 Hz) to +6 dB (60 Hz) [Parametric EQ] Control Range HI: –40 to +10 dB MID: –40 to +10 dB LOW: –40 to +6 dB Frequency HI: 6 kHz to 20 kHz Default 13 kHz MID: 200 Hz to 6 kHz Default 1 kHz LOW: 20 Hz to 200 Hz Default 100 Hz • Rec Output: Output Impedance Level Stereo 1 kΩ/kohms –10 dBV (316 mV) Unbalanced RCA jacks • Return Inputs: Input Impedance Level 2 Mono 50 kΩ/kohms –14 dBV (200 mV) • Booth Output: Output Impedance Level Stereo 1 kΩ/kohms 0 dBV (1 V) Unbalanced RCA jacks • Mic Inputs: Main Mic 2 Mono Active Balanced • Send Output: Output Impedance Level 2 mono 1 kΩ/kohms –14 dBV (200 mV) Unbalanced 1/4” TS jacks • Headphone Output: Output Impedance Level Stereo 100 Ω/ohms 0 dBV (1 V) • Digital Output: Coaxial • Power Supply, Consumptions: USA, Canada Europe, Asia, Oceania Unit Size Mass AC 120 V ± 10 %, 60 Hz 45 W AC 230 V ± 10 %, 50 Hz 45 W 310 (W) x 90 (D) x 327 (H) mm 6.7 kg Input Impedance Level Frequency Response S/N Aux Mic 2 kΩ/kohms –54 dBV (2 mV) 20 Hz to 20 kHz (±3 dB) 65dB Active Balanced Input Impedance Level Frequency Response S/N 1 kΩ/kohms –60 dBV (1 mV) 20 Hz to 20 kHz (±3 dB) 60dB • EQ Control (Mic): Control Range Frequency 3 Bands HI: –12 to +12 dB MID: –12 to +12 dB LOW: –12 to +12 dB HI: 10 kHz MID: 1 kHz LOW: 100 Hz Unbalanced 1/4” TS jack XLR and 1/4” TRS jack (1: GND, 2: Hot, 3: Cold) (Tip: Hot, Ring: Cold, Sleeve: GND) 1/4” TRS jack (Tip: Hot, Ring: Cold, Sleeve: GND) Cross Talk IEC958 Type II ✽ Specifications and design are subject to change without notice for purpose of improvement. 9 ENGLISH 6 FADER START Channel Fader Start If the separately sold DN-S5000, DN-S3000, DN-D9000, DN-D4000 and etc. players are connected to LINE2, 4, 6 or 8, they can be started using the source input fader (Ch. Fader) or Crossfader, as long as the 3.5 mm stereo mini cords have been connected. 1 FADER FADER FADER FADER LINE 2 LINE 4 LINE 6 LINE 8 LINE 2 LINE 4 LINE 6 LINE 8 Turn on the CH FADER START switch @6. 2 DN-X1500 FADER FADER MAIN ALPHA MAIN ALPHA Turn the INPUT ASSIGN switch #4 to select the desired source from LINE2, 4, 6 or 8. FADER FADER MAIN ALPHA MAIN ALPHA RCA cord 3 Move the source input fader (Ch. Fader) !9 of CH-1, CH-2, CH-3 or CH-4 control all the way to the bottom. Crossfader Start 1 2 Turn the INPUT ASSIGN switch #4 to select the desired source from LINE2, 4, 6 or 8. Using the CROSSFADER ASSIGN switch !0, assign the channel or Sampler source into A or B of Crossfader. Turn on the CROSSFADER START A, B switches !7. 3 3.5 mm stereo mini cord DN-S5000 CD1 DN-S5000 CD2 4 Set the standby mode on CD player. 5 When you want to start the player, move up the source input fader (Ch. Fader) !9 and the CD player will begin playing. NOTE: • Channel Fader Start and Crossfader Start for the same source will not operate simultaneously. You must select from either one. If both CH FADER START and CROSSFADER START A, B switches are ON, priority will be the cross fader. 10 Slide the Crossfader !8 all the way in direction opposite the source you want to start. (In the following example, startup is done with the CD player connected set to Assign A.) 4 5 Set the standby mode on CD player. 6 Use the CROSSFADER CONTOUR control @0 to control the cross fader startup curve. When the Crossfader !8 is slid in the opposite direction, CD player play will begin. 7 ENGLISH 7 EFFECTOR First selection Time select (Third selection for Delay, Echo1, Echo2, Pan, Trans, Filter2 and Flanger) Select the source of Effector 1 • Turn the ASSIGN switch !1 in the EFFECTS part to select the desired source. Set BPM (See page 6.) • Using the TAP button !5 and the MODE PARAMETERS knob !2, the BPM can be set with either the AUTO BPM , TAP or MANUAL input. 2 [About BPM] • When using the auto BPM function, perform the lock operation. When the BPM changes, the effect sound changes. • When the auto BPM cannot be measured, use the TAP button and input the BPM. • If you know the selection’s BPM, we recommend inputting it in the manual mode. 5 Select Effector mode (First selection) Echo2, Filter2, Pan, Trans and Key% are set in the preset mode. 3 • Turn the MODE PARAMETERS knob !2 to select prefer effect mode. • The effect mode changes and is displayed on display by one click. None Delay Echo 1 Flanger (Pan) (Filter 2) (Trans) Key% select (Second selection for Key%) 6 (Echo 2) Filter 1 7 Beat effect and manual effect mode (Second selection for Delay, Echo1, Echo2, Pan, Trans, Filter2 and Flanger) Manual effect mode is set in the preset mode. The default is “Manual OFF”. In this case, skip to third selection (step 5). 4 • All effect modes excluded Key and Filter1 work with beat mode or manual mode. You can choose beat or manual with MODE PARAMETERS knob !2. • After select prefer mode then push MODE PARAMETERS knob !2 to complete the second selection and go to the third selection. • Key is selected with MODE PARAMETERS knob !2. Selected Key is used soon. • After select prefer parameter then push MODE PARAMETERS knob !2 to return to the first selection. • DN-X1500 can adjust the mixing ratio of source sound and effected sound using WET/DRY control !3. • When turn to WET position Effector sound is only outputted. Otherwise at DRY position only source sound is outputted. Effector On/Off 8 Delay time is selectable 1/4, 1/2, 3/4, 1/1, 2/1, 4/1, 8/1 of BPM. Manual input mode Delay time can be set 1 to 3500 msec. Beat Effect mode Echo time is selectable 1/4, 1/2, 3/4, 1/1, 2/1, 4/1, 8/1 of BPM. Manual input mode Echo time can be set 1 to 3500 msec. Beat Effect mode Echo time is selectable 1/4, 1/2, 3/4, 1/1, 2/1, 4/1, 8/1 of BPM. Manual input mode Echo time can be set 1 to 3500 msec. Delay Echo 1 (Loop Echo) • When the WET/DRY control is turned clockwise, the Echo sound is looped. Echo 2 (Normal Echo) Preset functions Filter 1 (Manual Filter) • When the WET/DRY control is turned, the Filter frequency is moved. Filter type is selectable LowP.F. (Low-pass filter), MidP.F. (Band-pass filter), Hi P.F. (High-pass filter) 9 • When the EFFECTS CUE button !6 is pressed, you can check the effected sound by headphone. • The sound is unaffected by the EFFECTS ON/OFF button !4. – Beat Effect mode Filter time is selectable 1/2, 1, 2, 4, 8, 16, 32 of BPM. Manual input mode Filter time can be set 10 to 16000 msec. Beat Effect mode Flanger time is selectable 1/2, 1, 2, 4, 8, 16, 32 of BPM. Manual input mode Flanger time can be set 10 to 16000 msec. Beat Effect mode Panning time is selectable 1/4, 1/2, 3/4, 1/1, 2/1, 4/1, 8/1 of BPM. Manual input mode Panning time can be set 10 to 16000 msec. Beat Effect mode Trans time is selectable 1/4, 1/2, 3/4, 1/1, 2/1, 4/1, 8/1 of BPM. Manual input mode Trans time can be set 10 to 16000 msec. Filter 2 (Auto Filter) Preset functions Flanger Pan Preset functions • Pushing ON/OFF button !4 to turn on and off the Effector. When the Effector on, this button lights. Effector Cue Third selection Beat Effect mode WET/DRY control (Key %) • After select prefer effect then push MODE PARAMETERS knob !2 to complete the first selection and go to the second selection. • Beat mode: Time parameter of effect is determined based on countered BPM. BPM is countered automatically in AUTO BPM mode or manually inputted in MANUAL mode or tapped in TAP mode. Using the MODE PARAMETERS knob !2, you can select time parameter. Selected time parameter is used soon. • Manual mode: Time parameter of effect is inputted with MODE PARAMETERS knob !2. Selected time parameter is used soon. • After select prefer parameter then push MODE PARAMETERS knob !2 to return to the first selection. Second selection Trans Preset functions Key % Preset functions Key% is selectable –100 % to +100 %. – 11 ENGLISH 8 SAMPLER Sampler A/B Trim Sampler playback Select the source of Sampler 1 • Turn the ASSIGN switch y in the SAMPLER part to select the desired source. Record in Sampler 2 When the A button i is pushed, the sound of the selected source is recorded to Sampler memory up to 8 seconds. • The A button i flashes after recording starts. • When the recording is completed, B button o lights up. Setting B point / Stop recording 3 When the B button o is pushed during recording, the B point is set. • Recording continues for approximately 8 seconds without stopping after set B point. • If the B point is not set, recording end point set as B point automatically. 1 To select Loop/Reverse mode, turn the MODE knob u then push after recording and before playing. q Play mode: • To select “P_Mode” turn the MODE knob u and push. 5-2 • Turn the MODE knob u and select “Loop”, “Exit B”, “Single” or “Stutter”. w Play direction: • To select “DirMode” turn the MODE knob u and push. • Turn the MODE knob u and select “Forward” or “Reverse”. 6 4 • Playback of the Sampler sound starts when the A button i is pushed after recording has completed. • To stop the Sampler sound, push the MODE knob u. • When the CROSSFADER ASSIGN switch !0 in the SAMPLER part is set A or B, you can perform the Sampler Fader Start by the Crossfader !8. See page 10. 7 Select Sampler play mode You can select play mode for Sampler when Sampler playback stop. Loop (default): Sampler playback continues with looping. Single: Sampler playback stops at B point. Stutter: Sampler is played while the A button i is pressed and held down. 5-1 Loop + Reverse: Reverse Sampler playback continues with looping. Single + Reverse: Reverse Sampler stops at A point. Stutter + Reverse: Reverse Sampler is played while the A button i is pressed and held down. Exit B: Sampler playback continues over B point up to recording length. 12 3 Setting the Sampler pitch 8 The sound pitch can be set for Sampler. • To select “S_Pitch” turn the MODE knob u and push. • Turn the MODE knob u and select between “–100 %” and “+100 %”. Clearing the Sampler data 9 • While pressing the MODE knob u, push the A button i to clear the Sampler. Monitoring the Sampler data (SAMPLER CUE) 10 • When the SAMPLER CUE button !6 is pressed, you can check the Sampler data. NOTE: When the SAMPLER CUE button is lit, the Sampler sound is not output into the Crossfader or MASTER OUT. 1. Press the SPLIT CUE button @4. • To select “A/BTrim” turn the MODE knob u and push. 2. Press the CUE button !6 that you wish to monitor 1~ 4 (make sure your source is playing). Select A point (in A-B Trim) 3. Turn the GAIN control #5 until the meters peak at the 0 dB level. • Push the A button i. • The A button i illumination flashes and Loop playback starts. • Turn the MODE knob u. You can move the A point. Save the A point 4 • Push the MODE knob u to save new the A point. Select B point (in A-B Trim) 5 • Select the A-B Trim mode and push the B button o. • The B button o illumination flashes. Trim B point 6 Moving Sampler B point • When the B button o is pushed during Sampler playback, the B point moves to the point at which the button was pushed, and Loop playback from point A starts. Select A-B Trim mode Trim A point Play Sampler sound Setting the Sampler sound level The sound level (volume) can be set for Sampler. • To select “S_Level” turn the MODE knob u and push. • Turn the MODE knob u and select between “–14 dB” and “+6 dB”. 2 • Turn the MODE knob u. You can move the B point. Save the B point 7 9 PFL (Pre Fader Level) • Push the MODE knob u to save new the B point. 4. Perform your mix using the Crossfader !8 or Ch. Fader !9 at your desire. NOTES: • For proper operation, your channel levels should always be set to or left on reference line 8. • This adjustment can be made even if the Ch. Fader is set to zero level. ENGLISH 10 PRESET 1. Preset mode q Turn the EFFECTS ASSIGN switch !1 to select “OFF”. w The preset mode is available when the TAP button !5 is pushed for more than 2 seconds. e Turn the MODE PARAMETERS knob !2 to select the preset item. r After selecting an item, push the MODE PARAMETERS knob !2 to select the preset data. t To change other preset items, repeat these steps. y To exit from preset mode, press the TAP button !5. 2. Preset items and data The “*” mark next to the data indicates the default value. (1) EQ Mode : EQ sound can select Auto or Parametric. EQMode : Auto* / Para. (2) High EQ Frequency : When EQ mode is selected “Para.”, you can select high range frequency of 3 band EQ 6 kHz to 20 kHz. HEQFreq : xxx Hz (13 kHz*) (3) Middle EQ Frequency : When EQ mode is selected “Para.”, you can select middle range frequency of 3 band EQ 200 Hz to 6 kHz. MEQFreq : xxx Hz (1 kHz*) (4) Low EQ Frequency : When EQ mode is selected “Para.”, you can select low range frequency of 3 band EQ 20 Hz to 200 Hz. LEQFreq : xxx Hz (100 Hz*) (5) High EQ Q : When EQ mode is selected “Para.”, you can select high range Q of 3 band EQ. HI_EQ_Q : Wide / Normal* / Narrow (6) Middle EQ Q : When EQ mode is selected “Para.”, you can select middle range Q of 3 band EQ. MIDEQ_Q : Wide / Normal* / Narrow (7) Low EQ Q : When EQ mode is selected “Para.”, you can select low range Q of 3 band EQ. LOWEQ_Q : Wide / Normal* / Narrow (8) Headphone EQ : Select EQ of headphone, High range boost, Low range boost or High + Low range boost. H/P_EQ : Normal* / H_Boost / L_Boost / HLBoost (9) Channel Fader Curve : Select the startup curve of channel fader. CHCurve : Slow / Normal* / Sharp (15) Filter2 (Auto Filter) ON/OFF : Setting of whether or not to perform the Filter2 (Auto Filter) of the internal Effector. Filter 2 : ON / OFF* (16) Pan ON/OFF : Setting of whether or not to perform the Pan of the internal Effector. Pan : ON / OFF* (17) Trans ON/OFF : Setting of whether or not to perform the Trans of the internal Effector. Trans : ON / OFF* (18) Key% ON/OFF : Setting of whether or not to perform the Key of the internal Effector. Key% ↑ ↓ : ON / OFF* (19) Noise Gate (CH) : Setting of the function for attenuating the noise of the signals output from channels 1 to 4. N.Gate CH : OFF* / Low / Hi (20) Noise Gate (MIC) : Setting of the function for attenuating the noise of the MIC signals. N.Gate Mic : OFF* / ON NOTES: • The Noise Gate function is a function for attenuating the noise on the analog circuitry using internal digital signal processing. Set it as desired. • With the Noise Gate Function, the sound may seem distorted, for example when low level input signals are input or when the level of the input signals is set low with the GAIN control. (21) Display the microprocessor version. (“xxxx” is a number.) Version : Sysxxxx / Panxxxx / Dspxxxx (22) Preset Clear : Set all the preset data back to factory defaults. (“P.Init?”) q To clear the PRESET data, push the MODE PARAMETERS knob !2. • “InitOK?” displays on the character display. w Push the MODE PARAMETERS knob !2 again and start to clear the preset data. • “Preset” and “Initial” are displayed on the character display while data clearing. (10) Crossfader Curve : Set the startup curve of Crossfader. CRCurve : Normal / Sharp* (11) Auto BPM : Auto BPM displays when the CUE button !6 is pressed. AutoBPM : ON / OFF* (12) Talk Over Level : You can select decreased level of the Talk Over function. T.Over : –6 dB / –10 dB / –20 dB* (13) Effector Manual mode ON/OFF : Setting of whether or not to perform the Manual parameter mode of the internal Effector. Manual Eff. : ON / OFF* (14) Echo2 (Normal Echo) ON/OFF : Setting of whether or not to perform the Echo2 (Normal Echo) of the internal Effector. Echo 2 : ON / OFF* 13 DEUTSCH 2 EINFÜHRUNG Wir danken Ihnen sehr für den Kauf des DENON DN-X1500 DJ MIXER. DENON ist stolz darauf, Audio-Freunden und Musikliebhabern diesen erweiterten DJ MIXER als einen weiteren Beweis der kompromisslosen Bestrebungen von DENON nach Erreichen der ultimativen Klangqualität zu präsentieren. Aufgrund der hochqualitativen Leistungsfähigkeit und der leichten Bedienung dieses Gerätes werden Sie beim Zuhören viele Stunden lang Ihre Freude haben. – INHALT – z x c HAUPTMERKMALE..........................................14 v b VERBINDUNGEN..............................................17 INSTALLATION .................................................14 BEZEICHNUNG DER TEILE UND DEREN FUNKTIONEN ..........................................14 ~ 16 n m , . ⁄0 FADER-START ..................................................19 EFFECTOR........................................................20 SAMPLER.........................................................21 VOR-FADER-PEGEL PFL (Pre Fader Level) ......21 PRESET ............................................................22 TECHNISCHE DAREN ......................................18 2 ZUBEHÖR Überprüfen Sie bitte, ob folgende Komponenten zusammen mit der Haupteinheit im Karton vorhanden sind: q Bedienungsanleitung ........................................1 1 HAUPTMERKMALE 1. Matrix-Eingangszuordnung Eingangsquellen können für alle Kanäle frei zugeordnet werden. 2. Penny & Giles Crossfader Sanftes und zuverlässiges Mischen zeichnet sich durch den Penny & Giles Crossfader aus. 3. Sampler Der integrierte Digital-Sampler kann bis zu 8 Sekunden CD-Qualitätssound aufzeichnen. Sie können diesen Sampler nahtlos Loopen oder rückwärts (REVERSE) wiedergeben. Der Pitch und der Ausgangspegel des Sampler können unabhängig voneinander eingestellt werden. 4. Interner Effektor Verschiedene Soundeffekte können ausgeführt werden. (DELAY, ECHO, PAN, TRANS, FILTER, FLANGER, KEY) 5. Auto BPM-Zähler, BPM-Sperre, TAP- und Manueller BPM-Eingang Neben einem Auto BPM-Zähler und der TapFunktion ist der DN-X1500 ferner mit der vorübergehenden Sperrfunktion für den Auto BPM-Zähler und der manuellen BPMEingangsfunktion ausgestattet. 6. Channel-Fader- und Crossfader-Start Der CD-Player kann einfach durch das Anheben oder Senken des Pegels des Ch.-Faders oder durch Verschieben des Crossfader von links nach rechts oder von rechts nach links gestartet oder gestoppt werden. (Diese Funktion kann nur angewendet werden, wenn die DENON CDPlayer DN-S3000, DN-S5000, DN-D4000 usw. am DN-X1500 angeschlossen sind.) 7. Digitalausgang Der DN-X1500 mit seinem exklusiven KoaxialDigitalausgang ermöglicht es Ihnen, direkt auf eine CD-R, MiniDisc oder einer Festplattenvorrichtung aufzunehmen. Der Digitalausgang hält ein konstantes 44.1 kHzSignal aufrecht. 8. Verbesserte SEND/RETURN-Anschlüsse 8 LINE, 3 PHONO, 2 Mikrofonsysteme, 2 MASTER-Ausgänge, BOOTH-Ausgang und RECAusgang sind unabhängig voneinander vorhanden. Effekt-SEND/RETURN-Anschlüsse sind für einen externen Effektprozessor ebenfalls vorhanden. 9. 3-Band-Equalizer/Verstärkung Die Steuerungen LOW, MID, HI und GAIN sind bei jedem Eingangskanal vorhanden. 10. Crossfader-Kontur Dieses Funktionsmerkmal ermöglicht die Einstellung der Kontur der Umblendreaktion von von einer sanften Kurve für glatte, lang dauernde Ausblendungen bis zu einer steilen Stufe, die für Top-Performance-Schnitte und Scratch-Effekte benötigt wird. 11. Mikro am Platz Dieses Merkmal führt das Mik-Signal in den BOOTH-, REC-Ausgang und DIGITALAusgangssignalweg. Im OFF-Modus wird das Mik-Signal nicht durch die oben aufgeführten Ausgänge geführt. Wenn der DN-X1500 in einem Koffer oder DJ-Booth installiert ist, separieren Sie ihn vom Schaumstoff (Schaumgummi), den Wänden oder anderen Geräten, um die Wärmestrahlung zu verbessern. Min. 2 cm Min. 2 cm 12. Vor-Fader-Pegel PFL (Pre Fader Level) Diese Funktion ermöglicht es, den Verstärkungsfaktor des Eingangspegels jedes einzelnen Kanals einzustellen, damit eine Übersteuerung vermieden wird. Indem diese Einstellung zu Beginn ausgeführt wird, kann sichergestellt werden, dass ein sanfter Übergang zwischen Cross-Fades und Kanal-Fades stattfindet. Min. 2 cm 13. Voreinstellungsfunktionen Es ist möglich, das Gerät an Ihre Wünsche anzupassen, in dem Sie Ihre bevorzugten Einstellungen im internen Speicher ablegen. Für Punkte, die in den Presets gefunden werden können, siehe Seite 22. Min. 3 mm 3 BEZEICHNUNG DER TEILE UND DEREN FUNKTIONEN (Beziehen Sie sich auf Seite 3.) (1) Oberes bedienfeld q Netzbetriebschalter (POWER) • Die Stromzufuhr schaltet sich ein, wenn die Taste von der Aus-Position (£) in die EinPosition (¢) umgeschaltet wird. • Die Stromzufuhr schaltet sich aus, wenn die Taste von der Ein-Position (¢) in die AusPosition (£) umgeschaltet wird. w MASTER BALANCE-Regler • Stellt die L/R-Balance des MASTER-Ausgangs ein. e MASTER LEVEL-Regler • Stellt den Pegel der MASTER-Ausgänge ein. r BOOTH ASSIGN-Schalter • Wählt die Quelle des BOOTH-Ausgangs aus. t BOOTH LEVEL-Regler • Stellt den Pegel des BOOTH-Ausgangs ein. 14 2 INSTALLATION y SAMPLER ASSIGN-Schalter • Damit wird die Quelle für die SamplerAufnahme ausgewählt. u SAMPLER MODE-Knopf • Damit wird der Sampler-Wiedergabemodus eingestellt oder der Sampler bearbeitet. • Diesen Knopf während der SamplerWiedergabe oder -Aufnahme drücken; die Sampler-Wiedergabe oder -Aufnahme wird gestoppt. i SAMPLER A-Taste • Diesen Taste drücken, um die SamplerAufnahme oder -Wiedergabe zu starten. o SAMPLER B-Taste • Damit wird der Sampler B-Punkt eingestellt. DEUTSCH !0 CROSSFADER ASSIGN-Schalter A, B: • Die Kanalquelle wird auf A oder B des Crossfader zugeordnet. POST: • Auswählen, wenn Sie die Kanalquelle im Crossfader nicht zugeordnet haben. !1 EFFECTS ASSIGN-Schalter • Damit wird die Quelle des internen Effektors ausgewählt. !2 MODE PARAMETER-Knopf • Damit werden der Effektmodus und die Parameter eingestellt. !3 EFFECTS WET/DRY-Regler • Damit wird das Verhältnis des Original- und Effektsounds eingestellt. !4 EFFECTS ON/OFF-Taste • Damit wird die interne Effektorfunktion ein- und ausgeschaltet. !5 TAP-Taste • TAP: Wenn Sie diese Taste wiederholt drücken, wird der AUTO-Modus ausgeschaltet und misst die Beats Pro Minute (BPM) durch Tapping. • LOCK: Wenn diese Taste einmal betätigt wird, während der autom. BPM-Zähler in Betrieb ist, werden die vom autom. BPM-Zähler gemessenen Daten gesperrt. • AUTO: Wenn Sie die TAP-Taste 1 Sekunde lang drücken, wird der AUTO BPM-Modus aktiviert. Der gemessene BPM wird im BPM-Display angezeigt. • INPUT BPM: Wenn die TAP-Taste gedrückt und länger als 2 Sekunden gedrückt gehalten wird, wird der BPM-Eingabemodus eingestellt, und der BPMWert kann mit dem MODE PARAMETERSKnopf !2 direkt eingegeben werden. Wenn die Taste noch einmal gedrückt wird, wird der BPMEingabemodus ausgeschaltet. !6 CUE-Tasten • Das Drücken einer oder aller CUE-Tasten leitet jeweils die entsprechende Quelle zum Kopfhörer und zu den Meter-Cue-Abschnitten. Das Drücken mehrerer Tasten ermöglicht gemischten Sound von allen ausgewählten Quellen einzuleiten. !7 CROSSFADER START A-, B-Schalter • Damit wird die Crossfader-Startfunktion ein- und ausgeschaltet. !8 Crossfader @5 EFFECT LOOP WET/DRY-Regler • Steuert die relativen Ausgangspegel von der summierten A- und B-Mischsignalen. Wenn der Crossfader ganz links steht, wird nur das AMischsignal über die Ausgänge gehört. Wenn Crossfader nach rechts bewegt wird, erhöht sich der Pegel des B-Mischsignales und der Pegel des A-Mischsignales wird schwächer. Wenn der Crossfader in der Mitte steht, werden gleiche Pegel der A- und B-Mischsignale zu den Ausgängen geleitet. Bei voll rechts steht nur das B-Mischsignal gesamt an den Ausgängen an. !9 Quellen-Eingangsfader (Ch. Fader) • Regelt den Pegel des ausgewählten Einganges. @0 CROSSFADER CONTOUR-Regler • Ermöglicht die Einstellung der Kontur der Crossfaderreaktion von einer sanften Kurve für glatte, lang dauernde Ausblendungen bis zu einer steilen Stufe, die für Top-PerformanceSchnitte und Scratch-Effekte benötigt wird. @1 HEADPHONE-Ausgangsbuchse • Akzeptiert 6,5 Kopfhörerstecker. mm (1/4”) Stereo @2 HEADPHONE LEVEL-Regler • Einstellung der Kopfhörer-Lautstärke. @3 HEADPHONE PAN-Regler • Dient zwei Zwecken… Im STEREO-Betrieb ändert der Regler die relativen zusammengemischten Pegel des Cue und des Programms (CUE MASTER) zueinander in beiden Ohrenkappen. Im SPLIT CUE (MONO)Betrieb ändert er die Balance zwischen dem Mono-Cue in der linken und dem MonoProgramm (MASTER) in der rechten Ohrenkappe. @4 SPLIT CUE-Taste • Im STEREO-Betrieb leitet diese Taste das STEREO-Programm (CUE MASTER) und das CUE an beide Ohrenkappen. Im SPLIT CUE (MONO)-Betrieb leitet der Kopfhörer-Verstärker das MONO-Cue zum linken und das MONOProgramm (MASTER) zum rechten Ohr. • Im STEREO-Modus zeigt das Messgerät den Stereopegel in den LEFT und RIGHT MasterAusgängen an. Im SPLIT CUE (MONO)-Betrieb wird das CUE auf dem linken und das MonoPROGRAMM (CUE MASTER) auf dem rechten Pegelmeter angezeigt. • Im SPLIT CUE (MONO)-Modus leuchtet die Taste. • Damit wird das Verhältnis des Original- und Effektsounds eingestellt. @6 CH-FADER START-Schalter • Damit wird die Kanal-Fader-Startfunktion einund ausgeschaltet. @7 EFFECT LOOP ASSIGN-Schalter • Damit wird die Quelle des externen Prozessors ausgewählt. @8 EFFECT LOOP ON/OFF-Taste • Führt das zugewiesene Signal durch den externen Prozessor, der an den SEND/RETURNAnschlüssen auf der Rückseite angeschlossen ist. • Wenn EFFECT aktiviert ist, leuchtet die Taste. (Wenn der Prozessor nicht angeschlossen ist, blinkt die Taste bei der Aktivierung.) @9 TALK OVER ON/OFF-Taste • Damit wird die Talk-Over-Funktion ein- und ausgeschaltet. • Wenn die Taste leuchtet, wird der Pegel der Signale außer dem Mik-Signal gedämpft. • Der Talk Over-Dämpfungspegel kann im Voreinstellungsmodus eingestellt werden. HINWEIS: Wenn die Taste gedrückt wird, wird die Lautstärke unverzüglich geändert. #0 MIC POST ON/OFF-Taste • Leitet die Mik-Signale in den BOOTH-, REC- und DIGITAL-Ausgangssignalweg. #1 MIC EQ-Regler • Kontur des Frequenzganges des MIC-Einganges –12 dB bis +12 dB. In der Mittelposition ist der Sound flach. #2 MIC LEVEL-Regler • Stellt den Pegel des Mik-Signals ein. #3 MIC ON/OFF-Taste • Wenn die Taste leuchtet, wird das Mik-Signal in den Ausgangsbereich übertragen, anderenfalls wird der Mik-Eingang stummgeschaltet. #4 INPUT ASSIGN (Eingangswähler) • Eine beliebige Quelle von acht Eingängen (PHONO1/LINE1, LINE2, PHONO2/LINE3, LINE4, PHONO3/LINE5, LINE6, LINE7, LINE8) für jeden Kanal individuell auswählen. • Sie können denselben Eingang auch für mehrere Kanäle für kreatives Mischen zuordnen. LINE1 LINE2 LINE3 LINE4 LINE5 LINE6 LINE7 LINE8 INPUT ASSIGN • • • • • INPUT ASSIGN CH1 CH4 #5 GAIN (Leitungseingangspegelkontrollen) • Stellt den Pegel des ausgewählten Eingangs ein. • Sie können jede GAIN-Lautstärke einstellen, um 0 dB auf dem Quellpegelmessgerät anzeigen zu lassen. #6 Quellen-EQ-Regler • Kontur des Frequenzganges der ausgewählten Eingänge. In der Mittelposition ist der Sound flach. HI (Hoch) und MID (Mittel): • Stellt den Hochton- und Mitteltonsound zwischen –40 dB und +10 dB ein. LOW (Tief): • Stellt die Tiefen des Sounds ein –40 dB bis +6 dB. HINWEIS: Wenn die Einstellungen zu rau sind, könnte es zum Auftreten von Clipping kommen. #7 CUE MASTER-Pegelmesser • Zeigt den Ausgangspegel im Anschluss an die MASTER LEVEL-Einstellung an. • Kann zwischen zwei Anzeigebetriebsarten umschalten. Siehe unten @4. #8 Quellenpegelmesser • Zeigt den Eingangspegel an, nachdem er mit der GAIN #5 und EQ #6 Steuerungen eingestellt wurde. HINWEIS: Wenn dieser Messer über +12 dB anzeigt, kann der eingegebene Sound begrenzt sein. #9 EQ ON/OFF-Tasten • Wenn diese Taste leuchtet, ist EQ aktiviert, ansonsten wird EQ umgangen. 15 DEUTSCH %4 MASTER OUT (BALANCED)- (2) Hinteres anschlussfeld $0 LINE-Eingangsbuchsen 2, 4, 6, 7 und 8 • Diese Stereopaare mit Cynch-Buchsen sind asymmetrische Eingänge für jegliche Geräte mit Line-Pegel. $1 PHONO 1, 2, 3, / LINE 1, 3, 5 Eingangsbuchsen • Diese Stereopaare mit Cynch-Buchsen sind asymmetrische Eingänge für Plattenspieler (RIAA) und Magnetkassetten (MM) oder für Line-Signalpegel passend für jegliche Geräte wie CD-Player. $2 PHONO 1, 2, 3, / LINE 1, 3, 5Schalter • Diese Schalter schalten den Eingang zwischen Plattenspieler- und Line-Signalpegeln um. • Diese Schalter stellen einen Line-Signalpegel ein, wenn kein Plattenspieler angeschlossen ist. $3 Phono-Erdungsschraube (GND) • Diese Schraube ermöglicht den Anschluss einer Erdungsleitung vom Plattenspieler. Dieser Anschluss ist lediglich für die Erdung eines Plattenspielers vorgesehen und nicht als Anschluss der Schutzerde geeignet. $4 AUX MIC-Eingangsbuchse • Akzeptiert ein symmetrisches Mikrofon mit 1/4” TRS-Monobuchsen. • Pin-Zuordnung: Spitze=Spannungsführend Ring=Spannungslos Buchse=GND $5 MAIN MIC-Eingangsanschluss • Neutrik-Combo-Buchse. • Akzeptiert entweder ein symmetrisches Mikrofon mit einem XLR-Anschluss oder ein symmetrisches Mikrofon mit 1/4” TRSMonobuchsen. • Pin-Zuordnung: XLR: 1. GND 2. Spannungsführend 3. Spannungslos 1/4” TRS: Spitze=Spannungsführend Ring=Spannungslos Buchse=GND $6 Wartungsanschluss HINWEIS: Dieser Anschluss kann nur für die Aktualisierung der Firmware verwendet werden. Schließen Sie dort kein Gerät an, anderenfalls kann eine Beschädigung verursacht werden. $7 LINE2, 4, 6, 8 FADERAusgangsbuchsen • Diese Buchsen und die FADEREingangsbuchsen des DN-S3000, DN-S5000, DN-D4000 usw. mithilfe eines 3,5 mm Stereominikabel anschließen. Schalter • Diese XLR-Typ-Anschlüsse liefern einen symmetrischen Line-Pegel-Ausgang. • Verbinden Sie diese Anschlüsse mit den symmetrischen Analogeingängen eines Verstärkers oder einer Konsole. • Pin-Zuordnung: 1. GND 2. Spannungsführend 3. Spannungslos • Anwendbare Anschlüsse: Cannon XLR-3-31 oder entsprechende. • Wenn dieser Schalter aktiviert ist, wird das gemischte L- und R-Signal vom MASTER OUT (BALANCED sowie UNBALANCED) ausgegeben. HINWEIS: Den spannungsführenden oder spannungslosen Stift nicht mit dem GND-Stift kurzschließen. $8 SEND / RETURN-Buchsen • Diese 1/4” TS-Monobuchsen ermöglichen die externe Verarbeitung des Programmsignals. • Wenn ein Mono-Effektprozessor angeschlossen wird, den L-Kan.-Eingang und -Ausgang verwenden. $9 DIGITAL OUT (COAXIAL)-Buchse • Diese Cinchbuchse enthält Digitalausgangsdaten. Das Signal bleibt von der MASTER-LEVEL-Regler unbeeinflusst. • Wir empfehlen die Verwendung eines 75 Ω/Ohm Cynchkabels für eine bestmögliche Digitalübertragung. (Erhältlich bei jedem Audio/Videohändler) %0 REC OUT-Buchsen • Dieses Stereopaar liefert einen Line-PegelAusgang. Das Signal wird vom MASTER LEVELRegler nicht beeinflusst. %1 BOOTH OUT-Buchsen • Dieses Cinchbuchsen-Stereopaar enthält einen asymmetrischen Leitungspegelausgang mit einer unabhängigen BOOTH LEVEL-Regler auf der Oberseite. %2 MASTER OUT (UNBALANCED)Buchsen • Dieses Stereopaar Cinch-Buchsen liefern einen asymmetrischen Line-Pegel-Ausgang. • Verbinden Sie diese Buchsen mit asymmetrischen Analogeingangsbuchsen eines Verstärkers oder einer Konsole. %3 LEVEL ATT (Master-Ausgangspegeldämpfer) • Damit wird der MASTER-Ausgangspegel gedämpft. (–∞ ~ 0 dB) • Referenz ist 0 dB. 16 %5 MASTER MONO OUT ON/OFF- Anschlüsse (3) Display %6 Crossfader A-Zuordnungsanzeigen • Diese Anzeige zeigt die Kanäle des zugeordneten Kanals auf der Crossfader A-Seite an. %7 Voreinstellungsmodus-Anzeigen %8 Sampler-Modus-Anzeigen SAMP.: • Der Sampler-Sound wird aufgenommen. LOOP: • Wiedergabe des Sampler im Loop-Modus. REV.: • Sampler-Rückwärtswiedergabe. %9 Zeichendisplay • Hier werden die verschiedenen Betriebsinformationen, usw. angezeigt. • [ 1 ] : CH-1-Anzeige [ 2 ] : CH-2-Anzeige [ 3 ] : CH-3-Anzeige [ 4 ] : CH-4-Anzeige Die Nummer der zugeordneten Eingangsquelle wird im Zeichendisplay unter dieser Anzeige angezeigt. ^0 Effektzuordnungsanzeigen • Hier wird die ausgewählte Effektorquelle angezeigt. ^1 Crossfader B-Zuordnungsanzeigen • Diese Anzeige zeigt die Kanäle des zugeordneten Kanals auf der Crossfader B-Seite an. ^2 Effektor-BPM-Display • Auf diesem Display wird der BPM der zugeordneten Quelle angezeigt. ^3 BPM-Modus-Anzeigen AUTO: • Diese Anzeige leuchtet, wenn der BPM-Modus auf AUTO BPM eingestellt ist. • Diese Anzeige blinkt, wenn AUTO BPM gesperrt ist. MANUAL: • Diese Anzeige leuchtet, wenn der BPM-Modus auf Manuellen BPM-Eingang eingestellt ist. Sie können den gewünschten BPM durch den MODE-PARAMETER-Knopf eingeben. ^4 Cue-Tastenanzeigen • Die ausgewählten angezeigt. CUE-Kanäle werden ^5 Cue-BPM-Display (Autom. Zählung) • Auf diesem Display wird der BPM des ausgewählten Kanals angezeigt. HINWEIS: BPM wird nicht angezeigt, wenn 2 oder mehr Kanäle ausgewählt worden sind. DEUTSCH CD-Player CD-Player Plattenspieler 2 ANTI-S KEY ADJUST 0 PITCH KEY ADJUST -12 SLOW BRAKE Quartz Quartz 0 ON OFF POWER +12 START /STOP 78 DP-DJ151 Digital 45 +12 START /STOP 78 33 DP-DJ151 Digital 45 78 33 DP-DJ151 Digital 45 6,5 mm (1/4”) TRS-Monobuchse 33 0 ON OFF POWER START /STOP PITCH -12 SLOW BRAKE 0 +12 R R R R L R L L L L R R R L L R 3,5 mm Stereo-Minikabel L L 6,5 mm (1/4”) TS-Monobuchse R L 6,5 mm (1/4”) TS-Monobuchse L R 6,5 mm (1/4”) TS-Monobuchse L 6,5 mm (1/4”) TS-Monobuchse Symmetrischer Hauptverstärker R 3,5 mm Stereo-Minikabel PITCH -12 Quartz ON POWER XLR oder 6,5 mm (1/4”) TRS-Monobuchse 0 SLOW BRAKE 2 2 1 3 210 1 1 ANTI-S 4 3 210 0 OFF 765 2 TING KA 765 ANTI-S 3 3 4 3 4 TING KA 4 TING KA KEY ADJUST Plattenspieler 1 Symmetrische Mikrofone 4 Plattenspieler 3 765 1. Stellen Sie sicher, dass die Stromversorgung ausgeschaltet ist, während die Verbindungen vorgenommen werden. 2. Qualitätskabel machen einen großen Unterschied in der Tontreue und der Wiedergabeenergie. Verwenden Sie hochqualitative Audiokabel. 3. Verwenden Sie keine überlangen Kabel. Stellen Sie sicher, dass Stecker und Buchsen sicher gesteckt sind. Lose Verbindungen verursachen Brummen, Störungen oder Unterbrechungen, die Ihre Lautsprecher beschädigen könnten. 4. Schließen Sie alle Stereo-Eingangsquellen an. Schließen Sie dann jegliche Effekte am StereoEffekt an, wenn Sie solche benutzen. Schließen Sie Ihre Mikrofone und die Monitor-Kopfhörer an. Stellen Sie sicher, dass alle Fader auf Null stehen und diese Einheit abgeschaltet ist. Achten Sie darauf, immer nur ein Kabel gleicheitig anzuschließen und beachten Sie die L- und RPosition der Buchsen an dem DN-X1500 und an den externen Geräte. 5. Verbinden Sie die Stereoausgänge mit Endverstärkern, Tapedecks, MD-Recordern und/oder CD-Recordern. Schließen Sie den DNX1500 an der Netzsteckdose an. 3 210 Beachten Sie das Verbindungsdiagramm unten. HINWEIS: Schalten Sie immer zuerst Ihre Audio-Eingangsquellen, wie z. B. CD-Player, dann Ihren Mixer und zuletzt irgendwelche Verstärker ein. Verfahren Sie beim Ausschalten immer umgekehrt, indem Sie Ihre Verstärker, dann den Mixer und zuletzt die Eingangseinheiten abschalten. 4 4 VERBINDUNGEN Asymmetrischer Hauptverstärker Asymmetrischer Pult-Endverstärker Tape Deck CD-Recorder oder PC MD-Recorder Effekt-Prozessor 17 DEUTSCH • Master-Ausgang: Symmetrisch 5 TECHNISCHE DAREN • Phono-Eingänge: Eingangsimpedanz Pegel 3 Stereo 50 kΩ/kohms –50 dBV (3 mV) Asymmetrische Cinchbuchsen • Leitungseingänge: Eingangsimpedanz Pegel 5 Stereo 50 kΩ/kohms –14 dBV (200 mV) Asymmetrische Cinchbuchsen • EQ-Kontrolle (Leitung): 3 Bänder [Auto EQ] Steuerbereich und Frequenz HI: –33 dB (15 kHz) bis +10 dB (8 kHz) MID: –40 dB (1 kHz) bis +10 dB (1 kHz) LOW: –40 dB (60 Hz) bis +6 dB (60 Hz) [Parametrisch EQ] Steuerbereich HI: –40 bis +10 dB MID: –40 bis +10 dB LOW: –40 bis +6 dB Frequenz HI: 6 kHz bis 20 kHz Grundeinstellung 13 kHz MID: 200 Hz bis 6 kHz Grundeinstellung 1 kHz LOW: 20 Hz bis 200 Hz Grundeinstellung 100 Hz • Rückeingänge: Eingangsimpedanz Pegel 2 Mono 50 kΩ/kohms –14 dBV (200 mV) • Mik-Eingänge: Haupt-Mik 2 Mono Aktiv symmetrisch Eingangsimpedanz Pegel Frequenzgang S/N Aux-Mik Eingangsimpedanz Pegel Frequenzgang S/N • EQ-Kontrolle (Mic): Steuerbereich Frequenz 18 2 kΩ/kohms –54 dBV (2 mV) 20 Hz bis 20 kHz (±3 dB) 65dB Aktiv symmetrisch 1 kΩ/kohms –60 dBV (1 mV) 20 Hz bis 20 kHz (±3 dB) 60dB 3 Bänder HI: –12 bis +12 dB MID: –12 bis +12 dB LOW: –12 bis +12 dB HI: 10 kHz MID: 1 kHz LOW: 100 Hz Asymmetrische 1/4” TS-Buchse XLR und 1/4” TRS-Buchse 1: GND 2: Spannungsführend 3: Spannungslos Spitze : Spannungsführend Ring : Spannungslos Buchse: GND 1/4” TRS-Buchse Spitze : Spannungsführend Ring : Spannungslos Buchse: GND Ausgangsimpedanz pegel Frequenzgang THD+N S/N Kopiereffekt Asymmetrisch Ausgangsimpedanz pegel Frequenzgang THD+N S/N Kopiereffekt Stereo, Aktiv symmetrisch XLR-Buchsen 1: GND 2: Spannungsführend 3: Spannungslos 150 Ω/ohms +4 dBu (1.23 V) 20 Hz bis 20 kHz (±2 dB) Unter 0.02 % 85 dB (Line) (Wenn die Geräusch-Gatefunktion mit den Voreinstellungen eingestellt wurde) 70 dB (Phono) Über 70 dB Stereo-Cinchbuchsen 1 kΩ/kohms 0 dBV (1 V) 20 Hz bis 20 kHz (±2 dB) Unter 0.02 % 85 dB (Line) (Wenn die Geräusch-Gatefunktion mit den Voreinstellungen eingestellt wurde) 70 dB (Phono) Über 70 dB • Rec-Ausgang: Ausgangsimpedanz pegel Stereo 1 kΩ/kohms –10 dBV (316 mV) Asymmetrische Cinchbuchsen • Booth-Ausgang: Ausgangsimpedanz pegel Stereo 1 kΩ/kohms 0 dBV (1 V) Asymmetrische Cinchbuchsen • Send-Ausgang: Ausgangsimpedanz pegel 2 Mono 1 kΩ/kohms –14 dBV (200 mV) Asymmetrische 1/4” TS-Buchse • Kopfhörer-Ausgang: Ausgangsimpedanz pegel Stereo 100 Ω/ohms 0 dBV (1 V) • Digital-Ausgang: Koaxial • Stromversorgung, Verbrauch: USA, Kanada Europa, Asien, Ozeanien Geräteformat Masse AC 120 V ± 10 %, 60 Hz 45 W AC 230 V ± 10 %, 50 Hz 45 W 310 (B) x 90 (H) x 327 (T) mm 6.7 kg IEC958 typ II ✽ Änderungen der technischen Daten und des Designs ohne votherige Ankündigung vorbehalten. DEUTSCH 6 FADER-START Channel-Fader-Start Wenn die getrennt erhältlichen Player DN-S5000, DN-S3000, DN-D9000, DN-D4000 usw. an LINE2, 4, 6 oder 8 angeschlossen werden, können sie mit dem Quellen-eingangsfader (Kan.-Fader) oder Crossfader gestartet werden, sofern der Anschluss mit den 3,5 mm Stereominikabeln erfolgt ist. 1 FADER FADER FADER FADER LINE 2 LINE 4 LINE 6 LINE 8 LINE 2 LINE 4 LINE 6 LINE 8 2 2 FADER FADER MAIN ALPHA MAIN ALPHA 1 Schalten Sie die CH-FADER START-Schalter @6 ein. DN-X1500 FADER FADER MAIN ALPHA MAIN ALPHA Drehen Sie den INPUT ASSIGN-Schalter #4, um die gewünschte Quelle von LINE2, 4, 6 oder 8 auszuwählen. Crossfader-Start Cinch-Kabel 3 Stellen Sie die QuellenEingangsfader (Ch.-Fader) !9 der CH-1-, CH-2-, CH-3- oder CH-4-Regelung ganz nach unten geschoben sind. Drehen Sie den INPUT ASSIGN-Schalter #4, um die gewünschte Quelle von LINE2, 4, 6 oder 8 auszuwählen. Wenn der CROSSFADER ASSIGN-Schalter !0 verwendet wird, dem Kanal oder der Quelle A oder B des Crossfader zuordnen. Aktivieren Sie die CROSSFADER START A-, BSchalter !7. 3 3,5 mm Stereo-Minikabel DN-S5000 CD1 DN-S5000 CD2 4 Den Standby-Modus am CD-Player einstellen. 5 Wenn Sie den Player starten wollen, schieben Sie den Quellen-Eingangsfader (Ch.Fader) !9 nach oben und der Player beginnt abzuspielen. HINWEIS: • CH.-Fader-Start und Crossfader-Start für dieselbe Quelle funktionieren nicht gleichzeitig. Sie müssen einen davon auswählen. Falls beide CH FADER START- und CROSSFADER START A-, BSchalter aktiviert sind, hat der Crossfader Priorität. 4 Schieben Sie den Crossfader !8 vollständig in die entgegengesetzte Richtung der Quelle, die Sie starten wollen. (Im folgenden Beispiel erfolgt der Start mit dem angeschlossenen CD-Player mit der Zuordnung A.) 5 Den Standby-Modus am CD-Player einstellen. 6 Verwenden Sie die CROSSFADER CONTOUR -Regler @0 für die Steuerung der Startkurve. Wenn der Crossfader !8 in die Gegenrichtung geschoben wird, startet die CDPlayerwiedergabe. 7 19 DEUTSCH 7 EFFECTOR Auswahl der Quelle des Effektors 1 Zeitauswahl (Dritte Auswahl für Delay, Echo1, Echo2, Pan, Trans, Filter2 und Flanger) • Den ASSIGN-Schalter !1 auf EFFECTS drehen, um die gewünschte Quelle auszuwählen. Einstellung von BPM (Siehe Seite 15.) • Mit der TAP-Taste !5 und dem MODE PARAMETERS-Knopf !2, kann der BPM entweder mit dem AUTO BPM- , TAP- oder MANUAL-Eingang eingestellt werden. 2 [Wissenswertes über BPM] • Wenn Sie die automatische BPM-Funktion verwenden, führen Sie bitte den Verriegelungsbetrieb durch. Wenn der BPM sich verändert, verändert sich auch das Effektgeräusch. • Wenn der automatische BPM nicht gemessen werden kann, verwenden Sie bitte die TAP-Taste und geben Sie den BPM ein. • Wenn Sie den BPM der Auswahl kennen, empfehlen wir Ihnen dessen Eingabe im manuellen Modus. 5 Auswahl des Effektor-Modus (Erste Auswahl) Echo2, Filter2, Pan, Trans und Key% sind im Voreinstellungsmodus eingestellt. 3 • Den MODE PARAMETERS-Knopf !2 drehen, um den bevorzugten Effektmodus auszuwählen. • Der Effektmodus ändert sich und wird durch einmaliges Klicken auf dem Display angezeigt. None Delay Echo 1 Flanger (Pan) (Filter 2) (Trans) Auswahl von Key% (Zweite Auswahl für Key%) 6 (Echo 2) Filter 1 (Key %) • Nach der Auswahl des bevorzugten Effektes den MODE PARAMETERS-Knopf !2 drücken, um die erste Auswahl abzuschließen und zur zweiten Auswahl überzugehen. 4 20 • Alle Effektmodi außer Key und Filter1 arbeiten zusammen mit dem Beat-Modus oder manuellem Modus. Sie können den Beat-Modus oder den manuellen Modus mit dem MODE PARAMETERS-Knopf !2 auswählen. • Nach der Auswahl des bevorzugten Modus den MODE PARAMETERS-Knopf !2 drücken, um die zweite Auswahl abzuschließen und zur dritten Auswahl überzugehen. • Key wird mit dem MODE PARAMETERSKnopf !2 ausgewählt. Der ausgewählte Key wird unverzüglich verwendet. • Nach der Auswahl des gewünschten Parameters den MODE PARAMETERS-Knopf !2 rücken, um zur ersten Auswahl zurückzukehren. WET/DRY-Regler 7 Beat-Effekt- und manueller Effektmodus (Zweite Auswahl für Delay, Echo1, Echo2, Pan, Trans, Filter2 und Flanger) Im Voreinstellungsmodus ist der manuelle Effektmodus eingestellt. Die Grundeinstellung ist “Manual OFF”. In diesem Fall zur dritten Auswahl übergehen (Schritt 5). • Beat-Modus: Der Zeitparameter des Effektes wird basierend auf BPM bestimmt. BPM wird im AUTO BPM-Modus automatisch gezählt, manuell im MANUAL-Modus eingegeben oder im TAP-Modus getappt. Sie können den Zeitparameter mit dem MODE PARAMETERS-Knopf !2 auswählen. Der ausgewählte Zeitparameter wird unverzüglich verwendet. • Manueller Modus: Der Zeitparameter des Effektes wird mit dem MODE PARAMETERS-Knopf !2 eingegeben. Der ausgewählte Zeitparameter wird unverzüglich verwendet. • Nach der Auswahl des gewünschten Parameters den MODE PARAMETERS-Knopf !2 rücken, um zur ersten Auswahl zurückzukehren. • Der DN-X1500 kann das Mischverhältnis des Quellsounds und des Effektsounds mit der WET/DRY-Regler !3 einstellen. • Wenn sie auf die Position WET gestellt wird, wird nur der Effektorsound ausgegeben. Anderenfalls wird auf der Position DRY nur der Quellsound ausgegeben. Erste Auswahl Echo 1 (Loop-Echo) • Wenn die WET/DRY-Regler im Uhrzeigersinn gedreht wird, wird der Echosound geloopt. • Die ON/OFF-Taste !4 drücken, um den Effektor ein- und auszuschalten. Wenn der Effektor eingeschaltet ist, leuchtet diese Taste. Beat-Effektmodus Manueller Eingabemodus Die Verzögerungszeit kann von 1 bis 3500 mSek. eingestellt werden. Beat-Effektmodus Die Echozeit kann unter 1/4, 1/2, 3/4, 1/1, 2/1, 4/1, 8/1 BPM ausgewählt werden. Manueller Eingabemodus Die Echozeit kann von 1 bis 3500 mSek. eingestellt werden. Beat-Effektmodus Die Echozeit kann unter 1/4, 1/2, 3/4, 1/1, 2/1, 4/1, 8/1 BPM ausgewählt werden. Manueller Eingabemodus Die Echozeit kann von 1 bis 3500 mSek. eingestellt werden. Echo 2 (Normal-Echo) Voreinstellungsfunktione Filter 1 (Manuell-Filter) • Wenn die WET/DRY-Regler gedreht wird, wird die Filterfrequenz verschoben. Filtertyp ist wählbar LowP.F. (Tiefpassfilter), MidP.F. (Bandpassfilter), Hi P.F. (Hochpassfilter) 9 – Beat-Effektmodus Die Filterzeit kann unter 1/2, 1, 2, 4, 8, 16, 32 BPM ausgewählt werden. Manueller Eingabemodus Die Filterzeit kann von 10 bis 16000 mSek. eingestellt werden. Beat-Effektmodus Die Effektstellerzeit kann unter 1/2, 1, 2, 4, 8, 16, 32 BPM ausgewählt werden. Manueller Eingabemodus Die Effektstellerzeit kann von 10 bis 16000 mSek. eingestellt werden. Beat-Effektmodus Die Signalpositionierungszeit kann unter 1/4, 1/2, 3/4, 1/1, 2/1, 4/1, 8/1 BPM ausgewählt werden. Manueller Eingabemodus Die Signalpositionierungszeit kann von 10 bis 16000 mSek. eingestellt werden. Beat-Effektmodus Die Trans-Zeit kann unter 1/4, 1/2, 3/4, 1/1, 2/1, 4/1, 8/1 BPM ausgewählt werden. Manueller Eingabemodus Die Trans-Zeit kann von 10 bis 16000 mSek. eingestellt werden. Filter 2 (Auto-Filter) Voreinstellungsfunktione Flanger Pan Voreinstellungsfunktione Trans Voreinstellungsfunktione Effector Cue • Wenn die EFFECTS CUE-Taste !6 gedrückt wird, können Sie den Effektsound über Kopfhörer prüfen. • Der Sound bleibt durch die EFFECTS ON/OFF-Taste !4 unbeeinflusst. Dritte Auswahl Die Verzögerungszeit kann unter 1/4, 1/2, 3/4, 1/1, 2/1, 4/1, 8/1 BPM ausgewählt werden. Delay Effektor Ein/Aus 8 Zweite Auswahl Key % Voreinstellungsfunktione Key% zwischen –100 % und +100 % wählbar. – DEUTSCH 8 SAMPLER Verschieben des Sampler B-Punktes 7 Sampler-Wiedergabe Auswahl des Sampler-Wiedergabemodus Auswahl der Quelle für den Sampler 1 • Den ASSIGN-Schalter y auf SAMPLER drehen, um die gewünschte Quelle auszuwählen. Sampler-Aufnahme 2 Wenn die A-Taste i gedrückt wird, wird der Sound der ausgewählten Quelle von bis zu 8 Sekunden Länge im Sampler-Speicher gespeichert. • Die A-Taste i blinkt, nachdem die Aufnahme gestartet wurde. • Wenn die Aufnahme abgeschlossen ist, leuchtet die B-Taste o. 5 Einstellen des B-Punktes / Aufnahme stoppen 3 Für die Auswahl des Loop/Rückwärtsmodus den MODE-Knopf u drehen und nach der Aufnahme und vor der Wiedergabe drücken. q Wiedergabemodus: • Für die Auswahl von “P_Mode” den MODE-Knopf u drehen und drücken. • Den MODE-Knopf u drehen und “Loop”, “Exit B”, “Single” oder “Stutter” auswählen. w Wiedergaberichtung: • Für die Auswahl von “DirMode” den MODE-Knopf u drehen und drücken. • Den MODE-Knopf u drehen und “Forward” oder “Reverse” auswählen. Wenn die B-Taste o während der Aufnahme gedrückt wird, wird der B-Punkt eingestellt. • Nach Einstellen des B-Punktes erfolgt die Aufnahme für etwa 8 Sekunden ohne Unterbrechung. • Wenn der B-Punkt nicht eingestellt ist, wird der Aufnahme-Endpunkt automatisch als BPunkt festgelegt. Wiedergabe des Sampler-Sounds Einstellung des Sampler-Soundpegels 4 Der Soundpegel (Lautstärke) kann für den Sampler eingestellt werden. • Für die Auswahl von “S_Level” den MODEKnopf u drehen und drücken. • Den MODE-Knopf u drehen und zwischen “–14 dB” und “+6 dB” auswählen. Sie können den Wiedergabemodus für den Sampler auswählen, wenn die SamplerWiedergabe gestoppt ist. Loop (Grundeinstellung): Sampler-Wiedergabe wird mit Schleifen fortgesetzt. Single: Sampler-Wiedergabe stoppt am Punkt B. Stutter: Der Sampler wird abgespielt, während die A-Taste i gedrückt und gedrückt gehalten wird. Loop + Reverse: Die Sampler-Rückwärtswiedergabe wird geloopt fortgesetzt. Single + Reverse: Der Rückwärts-Sampler stoppt am APunkt. Stutter + Reverse: Der Rückwärts-Sampler wird abgespielt, während die A-Taste i gedrückt und gedrückt gehalten wird. Exit B: Sampler-Wiedergabe wird über Punkt B bis zur Aufnahmelänge fortgesetzt. 6 • Die Wiedergabe des Sampler-Sounds startet, wenn die A-Taste i nach Abschluss der Aufnahme gedrückt wird. • Drücken Sie die MODE-Knopf u, um den Sampler-Sound auszuschalten. • Wenn der CROSSFADER ASSIGN-Schalter !0 im SAMPLER-Part auf A oder B gestellt ist, können Sie den Sampler Fader-Start mit dem Crossfader !8 ausführen. Siehe Seite 19. • Wenn die B-Taste o während der SamplerWiedergabe gedrückt wird, wird der B-Punkt zu der Position verschoben, an der die Taste gedrückt worden ist, und die LoopWiedergabe startet ab Punkt A. Sampler A/B Trim Aktivieren des A-B Trim-Modus 1 Wählen Sie den A-Punkt aus (A-B-Trim) Einstellung des Sampler-Pitch 8 Der Sound-Pitch kann für den Sampler eingestellt werden. • Für die Auswahl von “S_Pitch” den MODEKnopf u drehen und drücken. • (Den MODE-Knopf u drehen und zwischen “–100 %” und “+100 %” auswählen. • Für die Auswahl von “A/BTrim” den MODEKnopf u drehen und drücken. 2 • Die A-Taste i drücken. • Die A-Taste i blinkt und die LoopWiedergabe startet. Trim-Funktion für den A-Punkt 3 • Den MODE-Knopf u drücken. Sie können den A-Punkt verschieben. Löschen der Sampler-Daten 9 • Drücken Sie die MODE-Knopf u während die A-Taste i gedrückt gehalten, um den Sampler zu löschen. Überwachen der Sampler-Daten (SAMPLER CUE) 10 • Wenn die SAMPLER CUE-Taste !6 gedrückt wird, können Sie die Sampler-Daten prüfen. HINWEIS: Wenn die SAMPLER CUE-Taste leuchtet, wird der Sampler-Sound nicht am FADER oder MASTER OUT ausgegeben. A-Punkt speichern 4 • Den MODE-Knopf u drücken, um den neuen A-Punkt zu speichern. 5 • Den A-B Trim-Modus auswählen und die BTaste o drücken. • Die B-Tastenbeleuchtung o blinkt. Wählen Sie den B-Punkt aus (A-B-Trim) Trim-Funktion für den B-Punkt 6 • Den MODE-Knopf u drücken. Sie können den B-Punkt verschieben. B-Punkt speichern 7 • Den MODE-Knopf u drücken, um den neuen B-Punkt zu speichern. 9 VOR-FADER-PEGEL PFL (Pre Fader Level) 1. Drücken Sie die SPLIT CUE-Taste @4. 2. Drücken Sie die gewünschte CUE-Taste !6, um 1~4 zu überwachen (stellen Sie sicher, dass Ihre Quelle wiedergegeben wird). 3. Die GAIN-Steuerung #5 drehen, bis Messgerätspitze den Pegel von 0 dB erreicht. die 4. Führen Sie Ihre Mischung durch, indem Sie je nach Wunsch den Crossfader !8 oder den Kanal-Fader !9 verwenden. HINWEISE: • Für das Gewährleisten eines ordnungsgemäßen Betriebes sollten Ihre Kanalpegel stets auf die Bezugslinie 8 oder links davon eingestellt sein. • Diese Einstellungen kann auch dann vorgenommen werden, wenn der Kanal-Fader auf Null eingestellt worden ist. 21 DEUTSCH 10 PRESET 1. Preset-Modus q Den EFFECTS ASSIGN-Schalter !1 drehen, um “OFF” auszuwählen. w Der Voreinstellmodus wird aufgerufen, wenn die TAP-Taste !5 länger als 2 Sekunden gedrückt wird. e Drehen Sie den MODE PARAMETERS-Knopf !2, um den Preset-Punkt auszuwählen. r Nach der Auswahl des Punktes den MODE PARAMETERS-Knopf !2 drücken, um die Preset-Daten auszuwählen. t Wiederholen Sie diese Schritte, um die Preset-Daten zu ändern. y Die TAP-Taste !5 drücken, um den Voreinstellmodus zu verlassen. 2. Preset-Punkte und -Daten Das “*” neben den Daten gibt den Grundwert an. (1) EQ-Modus : Für den EQ-Sound kann Auto oder Parametrisch ausgewählt werden. EQMode : Auto* / Para. (2) Hohe EQ-Frequenz : Wenn im EQ-Modus “Para.” ausgewählt wird, können Sie die hohe Bereichsfrequenz von 3-Band EQ 6 kHz bis 20 kHz auswählen. HEQFreq : xxx Hz (13 kHz*) (14) Echo2 (Normal-Echo) ON/OFF : Einstellen, ob Echo2 (Normal-Echo) des internen Effektors ausgeführt werden soll oder nicht. Echo 2 : ON / OFF* (15) Filter2 (Auto Filter) ON/OFF : Einstellen, ob Filter2 (Auto Filter) des internen Effektors ausgeführt werden soll oder nicht. Filter 2 : ON / OFF* (16) Pan ON/OFF : Einstellen, ob Pan des internen Effektors ausgeführt werden soll oder nicht. Pan : ON / OFF* (17) Trans ON/OFF : Einstellen, ob Trans des internen Effektors ausgeführt werden soll oder nicht. Trans : ON / OFF* (18) Key% ON/OFF : Einstellen, ob Key des internen Effektors ausgeführt werden soll oder nicht. Key% ↑ ↓ : ON / OFF* (3) Mittlere EQ-Frequenz : Wenn im EQ-Modus “Para.” ausgewählt wird, können Sie die mittlere Bereichsfrequenz von 3Band EQ 200 Hz bis 6 kHz auswählen. MEQFreq : xxx Hz (1 kHz*) (19) Noise Gate (CH) : Hierbei handelt es sich um die Einstellung der Funktion zur Dämpfung der von den Kanälen 1 bis 4 ausgegebenen Signalgeräusche. N.Gate CH : OFF* / Low / Hi (4) Niedrige EQ-Frequenz : Wenn im EQ-Modus “Para.” ausgewählt wird, können Sie die niedrige Bereichsfrequenz von 3Band EQ 20 Hz bis 200 Hz auswählen. LEQFreq : xxx Hz (100 Hz*) (20) Noise Gate (MIC) : Hierbei handelt es sich um die Einstellung der Funktion zur Dämpfung der MIC-Signalgeräusche. N.Gate Mic : OFF* / ON (5) Hohe EQ Q : Wenn im EQ-Modus “Para.” ausgewählt wird, können Sie die hohe Bereichs-Q von 3-Band EQ auswählen. HI_EQ_Q : Wide / Normal* / Narrow (6) Mittlere EQ-Q : Wenn im EQ-Modus “Para.” ausgewählt wird, können Sie die mittlere Bereichs-Q von 3-Band EQ auswählen. MIDEQ_Q : Wide / Normal* / Narrow (7) Niedrige EQ Q : Wenn im EQ-Modus “Para.” ausgewählt wird, können Sie die niedrige Bereichs-Q von 3-Band EQ auswählen. LOWEQ_Q : Wide / Normal* / Narrow (8) Kopfhörer-EQ : EQ für Kopfhörer, hohe Bereichsverstärkung, niedrige Bereichsverstärkung oder hohe + niedrige Bereichsverstärkung auswählen. H/P_EQ : Normal* / H_Boost / L_Boost / HLBoost (9) Kanal-Fader-Kurve : Die Startkurve des Kanal-Fader auswählen. CHCurve : Slow / Normal* / Sharp (10) Crossfader-Kurve : Die Startkurve des Crossfader einstellen. CRCurve : Normal / Sharp* (11) Auto BPM : Auto BPM wird angezeigt, wenn die CUE-Taste !6 gedrückt wird. AutoBPM : ON / OFF* (12) Talk-Over-Pegel : Sie können den verringerten Pegel der Talk-Over-Funktion auswählen. T.Over : –6 dB / –10 dB / –20 dB* 22 (13) Manueller Effektormodus ON/OFF : Einstellen, ob der manuelle Parameter-Modus des internen Effektors ausgeführt werden soll oder nicht. Manual Eff. : ON / OFF* HINWEISE: • Bei der Noise Gate-funktion handelt es sich um eine Funktion zur Dämpfung des Geräuschs, das bei einem analogen Schaltkreis anfällt, unter Verwendung einer internen digitalen Signalverarbeitung. Stellen Sie die Funktion wie gewünscht ein. • Bei Verwendung der Noise Gate-funktion erscheint der Sound unter Umständen gestört, wenn beispielsweise niedrigpegelige Eingangssignale eingegeben werden oder wenn der Pegel der Eingangssignale unter Verwendung der GAIN-Regler niedrig eingestellt wurde. (21) Zeigt die Mikroprozessor-Version an. (“xxxx” ist eine Nummer.) Vresion : Sysxxxx / Panxxxx / Dspxxxx (22) Voreinstellungen löschen : Stellen Sie alle voreingestellten Daten auf die werkseitigen Grundeinstellungen. (“P.Init?”) q Drücken Sie Titelwahlknopf, um die MODE PARAMETERS-Knopf !2 zu löschen. • “InitOK?” wird im Zeichendisplay angezeigt. w Den MODE PARAMETERS-Knopf !2 erneut drücken und damit beginnen, die Voreinstellungsdaten zu löschen. • “Preset” und “Initial” wird während der Datenlöschung auf dem Zeichendisplay angezeigt. 16-11, YUSHIMA 3-CHOME, BUNKYO-KU, TOKYO 113-0034, JAPAN Telephone: (03) 3837-5321 Printed in Japan 511 4143 007