1
MODEL
MF 9325
MF 9331
DIGITAL MULTIFUNCTIONAL
SYSTEM
OPERATION MANUAL
(for network scanner)
Page
INTRODUCTION
1
BEFORE USING THE NETWORK
3
SCANNER FUNCTION
HOW TO USE THE NETWORK
20
SCANNER FUNCTION
32
TROUBLESHOOTING
37
SPECIFICATIONS
Warranty
While every effort has been made to make this operation manual as accurate and helpful as possible, SAGEM
Corporation makes no warranty of any kind with regard to its content. All information included herein is subject to
change without notice. SAGEM is not responsible for any loss or damages, direct or indirect, arising from or related
to the use of this operation manual.
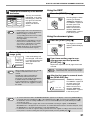
INTRODUCTION
The network scanner expansion Kit enables the machine to be used as a network scanner.
• To enable the network scanner function of this machine, a product key (password) must be entered using a key
operator program. This is only required once. Use the "PRODUCT KEY" program to enter the product key. If you
do not know your product key, please ask your dealer. (For information on using key operator programs, refer to
key operator's guide.)
• The printer expansion kit (SG-KI1A) is required to use the network scanner function.
• For the procedures for using the software programs, see the user's guides on the CD-ROM.
● This manual only explains features that can be used when the Network Scanner Expansion Kit is installed. For
information on loading paper, replacing toner cartridges, clearing paper misfeeds, handling peripheral devices,
and other copier-related information, please refer to your operation manual for copier.
● The explanations in this manual assume that the person who will install the product and the users of the product
have a working knowledge of Microsoft Windows.
● In this manual, American spellings are used.
● For information on the operating system, please refer to your operating system manual or the online Help function.
● The explanations of screens and procedures in this manual are for Windows XP. The screens may vary
depending on your Windows version and settings.
● This manual refers to the Reversing single pass feeder as the "RSPF".
1
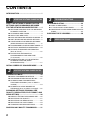
CONTENTS
INTRODUCTION ............................................... 1
1
BEFORE USING THE NETWORK SCANNER FUNCTION
3
TROUBLESHOOTING
ABOUT THE NETWORK SCANNER FUNCTION.... 3
TROUBLESHOOTING.....................................32
SETTINGS AND PROGRAMMING REQUIRED
FOR THE NETWORK SCANNER FEATURE........ 4
● DISPLAY MESSAGES.................................. 33
● IF YOUR E-MAIL IS RETURNED ................. 34
● IMPORTANT POINTS WHEN USING SCAN TO
E-MAIL .......................................................... 35
● SETTINGS REQUIRED FOR THE NETWORK
SCANNER FUNCTION....................................4
● ACCESSING WEB PAGES .............................4
● ABOUT THE WEB PAGE ................................5
● BASIC SETTINGS FOR NETWORK SCANNING ...6
● SMTP SERVER AND DNS SERVER SETTINGS.....7
● CONFIGURING LDAP SERVER SETTINGS
(WHEN USING AN LDAP SERVER) ...............8
● PROGRAMMING CUSTOM INDEX NAMES...9
● SETTING UP DESTINATION INFORMATION .....10
● STORING THE SENDER INFORMATION
(Scan to E-mail) .............................................15
● PROTECTING INFORMATION
PROGRAMMED IN THE WEB PAGE
("Passwords") ................................................16
● RESTRICTING USE OF THE NETWORK
SCANNER FUNCTION (USER
AUTHENTICATION) ......................................17
INITIAL SCREEN OF SCANNER MODE ....... 18
2
HOW TO USE THE NETWORK SCANNER FUNCTION
SENDING AN IMAGE ..................................... 20
● BASIC TRANSMISSION METHOD ...............20
● TRANSMISSION METHODS FOR SCAN TO E-MAIL .......22
● SCANNING AND TRANSMITTING A
TWO-SIDED ORIGINAL (when an RSPF is
installed).........................................................24
● SCANNING A LARGE NUMBER OF
ORIGINALS (when an RSPF is installed) ......25
SCANNING SETTINGS (ORIGINAL SIZE,
QUALITY, RESOLUTION, FILE FORMAT, AND
SEND SETTING)............................................. 26
●
●
●
●
●
MANUALLY SETTING THE SCANNING SIZE.......26
SELECTING THE QUALITY ..........................27
SELECTING THE RESOLUTION ..................28
SELECTING THE FILE FORMAT..................29
CHANGING THE SEND SETTINGS .............30
CANCELING AN E-MAIL/FTP TRANSMISSION ....... 31
2
CHECKING THE IP ADDRESS .......................36
4
SPECIFICATIONS
1
Chapter 1
BEFORE USING THE NETWORK SCANNER FUNCTION
ABOUT THE NETWORK SCANNER
FUNCTION
When the network scanner function is added to the machine, a document or photo can be scanned into an image file
and sent over a network or the Internet to a file server, e-mail destination, or your own computer. The scanned
image can be sent to the following types of destinations:
1. The scanned image can be sent to a memory
storage device on a network (a designated
directory on an FTP server). (This is called
"Scan to FTP" in this manual.)
When sending scanned image to an FTP
server, an e-mail message can also be sent to a
preset e-mail address to inform the recipient of
the location of the scanned image data. (This is
called "Scan to FTP (Hyperlink)" in this
manual.)
2. A scanned image can be sent to a computer
connected to the same network as the
machine. (This is called "Scan to Desktop" in
this manual.)
* Before Scan to Desktop can be performed, the
"Network Scanner Tool" software in the
CD-ROM that accompanied the Network
Scanner Expansion Kit (SG-NSX1) must be
installed. For information on Scan to Desktop
system requirements, installing the Network
Scanner Tool, and storing the destination, see
the Users Guide for the Network Scanner Tool
on the CD-ROM that accompanies the network
scanner expansion kit.
3. The scanned image can be sent to an e-mail
recipient. (This is called "Scan to E-mail" in
this manual.)
* A limit is set in the Web page for the size of
image files that can be sent using Scan to
E-mail (p.6).
3
SETTINGS AND PROGRAMMING
REQUIRED FOR THE NETWORK
SCANNER FEATURE
To use the Network Scanner feature, settings for the SMTP server, DNS server, and destination addresses must be
established.
To establish the settings, use a computer that is connected to the same network as the machine to access the
machine's Web page. The Web page can be displayed with your Web browser (Internet Explorer 6.0 or later,
Netscape Navigator 7.0 or later, or Safari 1.2 or later).
SETTINGS REQUIRED FOR THE NETWORK SCANNER FUNCTION
To use transmit images using the network scanner function, configure the settings in the Web pages as follows:
Scan to FTP
Scan to FTP (Hyperlink)
Scan to E-mail
Scan to Desktop
Access the Web pages (see below)
Configure basic settings for network scanning (p.6)
Configure your SMTP and DNS server settings (p.7)
Configure LDAP server settings
(when using an LDAP server) (p.8)
Store destination information (p.10 to 13)
Store your sender information (p.15)
The following settings can also be configured to enable convenient use of the network scanner function:
• Programming custom index names. (p.9)
• Setting passwords. (p.16)
ACCESSING WEB PAGES
Use the following procedure to access the Web pages.
1
Open the Web browser on your
computer.
Supported browsers: Internet Explorer 6.0 or later
(Windows)
Netscape Navigator 7.0 or
later
Safari 1.2 or later
(Macintosh)
2
In the "Address" field of your Web
browser, enter the IP address of the
machine as a URL.
Enter the IP address that
has been programmed in
the machine.
If you do not know the IP
address, see page 36.
When the connection is completed, the Web
page will appear in your Web browser. (p.5)
4
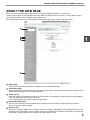
BEFORE USING THE NETWORK SCANNER FUNCTION
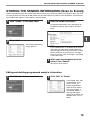
ABOUT THE WEB PAGE
When you access the Web page in the machine, the following page will appear in your browser.
A menu frame appears on the left side of the page. When you click an item in the menu, a screen appears in the
right frame that allows you to establish settings for that item.
For detailed explanations of the procedures for establishing settings, click "Help" in the menu frame.
1
1
Menu frame
Click the menu items displayed here to configure the corresponding settings.
2
Destination (p.10)
Set up destinations for Scan to FTP, Scan to FTP (Hyperlink), Scan to Desktop, and Scan to E-mail. You can also
edit or delete previously set destination information.
3
Sender (p.15)
Enter the sender's information that appears in the recipient's e-mail program (sender name and e-mail address)
when you send an image using Scan to E-mail.
If user authentication is being used, enter the login name.
4
Network Scanning (p.6)
This lets you select transmission methods for the network scanner function, configure settings for Scan to
E-mail, and program group indexes.
5
Services (p.7)
This lets you establish SMTP server settings, DNS server settings, and WINS server settings for Scan to E-mail
and Scan to FTP (Hyperlink), and for entering a host name instead of an IP address when storing a transmission
destination. Configure LDAP server settings if an LDAP server is used.
5
BEFORE USING THE NETWORK SCANNER FUNCTION
BASIC SETTINGS FOR NETWORK SCANNING
Click "Network Scanning" in the menu frame, and then establish the required settings. These settings should only be
established by the network administrator.
For detailed explanations of the procedures for establishing settings, click "Help" in the menu frame.
1
Click "Network Scanning" in the menu
frame.
4
A limit can be set for the size of image files sent
by Scan to E-mail to prevent excessively large
files from being sent.
If the image file created from the scanned image
is larger than the set limit, the image file is
discarded. The limit can be set from 1 MB to 10
MB in increments of 1 MB.
The factory default setting is "Unlimited". If you wish to
set a limit, remove the checkmark from the "Unlimited"
checkbox and enter the desired limit in "Upper Limit".
The Network Scanning
Setup page appears.
2
Select the transmission methods that
you wish to use.
Select the scanner delivery methods that you
want to use. In the "Enable Scanner Delivery to:"
field, click the checkbox next to each method that
you want to use so that a checkmark appears in
the checkbox.
All transmission methods are initially selected
(factory default settings).
5
Note
6
• If you are going to send images to the same
recipient more than once, we recommend that
you also select "Session Page Counter" or
"Unique Identifier" to prevent sending multiple
files with the same name, which would result in
each successive file overwriting the previous file.
• If a file name is entered at the time of
transmission, the file name entered here
will be disregarded.
Selecting an e-mail subject (only used
for Scan to E-mail).
The setting is used to enter the subject that
appears in the recipient's e-mail program when
you perform Scan to E-mail. (This setting is not
necessary if you will not be using Scan to E-mail.)
The subject can be up to 80 characters long. Only
one subject can be entered. If nothing is entered,
"Scanned image from <Device Name>" will appear.
* The name that appears in <Device Name> is
the name stored in "Name" in the screen that
appears when you click "System Information" in
the menu frame. If a name has not been stored,
the product name will appear.
Configure the Advanced Setup settings.
Select advanced functions that can be used for
Scan to E-mail.
Select the checkboxes of the functions that you
wish to use.
• The "Enable User Authentication" checkbox
can be selected to restrict use of the network
scanner function to authorized users. (p.17)
• To allow a sender to be selected when sending
an image by Scan to E-mail, make sure that
"Disable selection of sender from Sender List"
is not selected. (p.30)
• If you wish to Bcc a copy of a Scan to E-mail
transmission to an e-mail address, select the
"Bcc:" checkbox and enter the e-mail address.
Select the method for assigning a file
name to a scanned image.
Select the method for assigning a file name to a
scanned image. In "File Naming", click the items
that you wish to use in the file name. "Destination
Name" and "Date & Time" are initially selected.
6
3
Set a limit for the size of image files.
Note
7
If a subject is entered at the time of transmission,
the subject entered here will be disregarded.
Click "Submit".
After entering the
settings, be sure to click
"Submit" to store them.
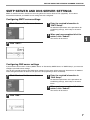
BEFORE USING THE NETWORK SCANNER FUNCTION
SMTP SERVER AND DNS SERVER SETTINGS
SMTP is used to transmit e-mail that is sent using Scan to E-mail or Scan to FTP (Hyperlink). To use these
transmission methods, your SMTP server settings must be configured.
Configuring SMTP server settings
1
Click "Services" in the menu frame.
3
Enter the required information in
"SMTP Setup".
For detailed explanations of the procedures for
establishing settings, click "Help" in the menu
frame.
4
When you have completed all of the
entries, click "Submit".
1
The entries will be stored.
2
Click "SMTP".
Configuring DNS server settings
If you entered a host name in "Primary SMTP Server" or "Secondary SMTP Server" of "SMTP Setup", you must also
configure your DNS server settings.
You will also need to configure your DNS server settings if host names will be entered in "Hostname or IP Address"
when storing destinations for Scan to FTP (Scan to FTP (Hyperlink)) or Scan to Desktop.
1
Click "Services" in the menu frame.
3
Enter the required information in
"DNS Setup".
For detailed explanations of the procedures for
establishing settings, click "Help" in the menu
frame.
4
When you have completed all of the
entries, click "Submit".
The entries will be stored.
2
Click "DNS".
7
BEFORE USING THE NETWORK SCANNER FUNCTION
CONFIGURING LDAP SERVER SETTINGS (WHEN
USING AN LDAP SERVER)
If mail addresses are managed on your network by an LDAP server, the e-mail addresses stored in the LDAP server
can be used for Scan to E-mail.
In addition, user authentication can be enabled to restrict use of the network scanner function by means of user
passwords stored in the LDAP server. (p.17)
To allow the machine to use the e-mail addresses in the LDAP server, the LDAP server settings must be configured in the Web page.
1
Click "LDAP" in the menu frame.
2
Select "Enable" in the "LDAP Setup" menu.
3
Click "Submit".
4
Configure the settings in "Global
Address Books List".
For detailed explanations of the procedures for
establishing settings, click "Help" in the menu frame.
5
When you have completed all of the
entries, click "Submit".
The entries will be stored.
8
BEFORE USING THE NETWORK SCANNER FUNCTION
PROGRAMMING CUSTOM INDEX NAMES
Stored destinations appear as one-touch keys in the Address book screen of the touch panel (p.19). Each stored
destination appears in the ABC (alphabetical) index, and can also be included in one of the six custom indexes (note
that these are called "group indexes" in the touch panel). To program names for the custom indexes, follow the steps
below.
Note
1
• To change a previously programmed custom index name, simply overwrite the old name.
• To switch between the ABC index and the custom indexes in the Address book screen, see page 19.
Click "Network Scanning" in the menu
frame.
1
2
Click "Custom Index".
3
Enter names for groups 1 to 6.
Six group indexes are available, and a name up
to six characters long can be assigned to each.
The names "USER 1" to "USER 6" are initially
entered. Change the names as needed.
4
When you have completed all of the
entries, click "Submit".
The entries will be stored.
9
BEFORE USING THE NETWORK SCANNER FUNCTION
SETTING UP DESTINATION INFORMATION
To store the name and address of a destination in a one-touch key, click "Destination" in the Web page menu frame.
"Destination" can also be used to edit or clear stored destinations. (p.14)
A total of 200 destinations can be stored, including E-mail, FTP, Desktop, and Group destinations.
Stored destinations can be selected in the machine's touch panel when transmission is performed.
* Multiple e-mail addresses (up to 100) can be stored as a group. Note that this may reduce the maximum number
of destinations (normally 200) that can be stored.
E-mail:
FTP:
Desktop:
Group:
Click here.
Note
See below
Refer to page 11.
Refer to page 12.
Refer to page 13.
Make sure that the address book screen (p.19) does not appear in the machine's touch panel when you store,
edit, or delete destinations. Destinations cannot be edited or deleted when the address book screen appears.
Storing destinations for Scan to E-mail
1
Click "Destination" in the menu frame.
3
Enter the destination information.
For detailed explanations of the procedures for
establishing settings, click "Help" in the menu
frame.
2
Click "E-mail".
Note
4
If user authentication is enabled and you wish
to allow login using the above stored
information, select the "It adds also to the
Sender List." checkbox and enter the "Login
Name" (maximum of 32 characters). The login
name must be the same as the login name
stored in the LDAP server.
When you have completed all of the
entries, click "Submit".
The entries will be stored.
Note
10
To perform Scan to E-mail, the SMTP server settings must first be established. Click "Application" in the Web
page, click "SMTP" in the screen that appears, and then enter the settings under "SMTP Setup" (p.7).
BEFORE USING THE NETWORK SCANNER FUNCTION
Storing destinations for Scan to FTP
1
Click "Destination" in the menu frame.
2
Click "FTP".
Note
4
If you select the "Enable Hyperlink to FTP
server to be e-mailed" checkbox and select
a previously stored recipient (p.10) from
"E-mail Destination", an e-mail will be sent
to the recipient informing them of the file
format and location of the scanned image
data. A hyperlink to the file server to which
the scanned image data was sent appears
in the e-mail, and the recipient can click the
hyperlink to go directly to the location where
the image data is stored.
When you have completed all of the
entries, click "Submit".
The entries will be stored.
3
Enter the destination information.
For detailed explanations of the procedures for
establishing settings, click "Help" in the menu
frame.
Note
If you entered a host name in "Hostname or IP Address", you will need to enter the DNS server or WINS server
settings. Click "Application" in the menu frame and then click "DNS" or "WINS" in the page that appears to
configure the corresponding settings.
To perform Scan to FTP (Hyperlink), you must also click "SMTP" and then enter the settings under "SMTP
Setup" for the SMTP server (p.7).
11
1
BEFORE USING THE NETWORK SCANNER FUNCTION
Storing destinations for Scan to Desktop
The destination for Scan to Desktop is stored by the Sagem Network Scanner Tool Setup Wizard when "Network
Scanner Tool" is installed in your computer. For this reason, there is no need to store the Scan to Desktop
destination in the Web page. (The Network Scanner Tool is on the CD-ROM that accompanied the Network Scanner
Expansion Kit .)
For information on Scan to Desktop system requirements, installing the Network Scanner Tool, and storing the
destination, see the Users Guide for the Network Scanner Tool on the CD-ROM that accompanies the network
scanner expansion kit.
Normally your computer is stored as the destination by the method indicated above.
The following page for storing Scan to Desktop destination information appears when "Destination" is selected in the
menu frame, followed by "Desktop". This page is used by mainly by the system administrator in the following
circumstance.
• When another machine with the network scanner function has been added to the same network, and you wish to
perform Scan to Desktop from the added machine to a destination programmed in the previously existing machine.
Refer to "Editing and deleting programmed transmission destinations" (p.14), and select the Scan to Desktop
destination information that you wish to transfer to the new machine. Enter the displayed information in the same
setting screen of the new machine. (When all information has been entered, click "Submit".)
If there are additional destinations that you want to transfer to the new machine, repeat this procedure for each
destination.
Note that if there are any discrepancies between the newly programmed information and the information in the host
computer, transmission and reception may not be possible.
Note
12
• For detailed explanations of the procedures for establishing settings, click "Help" in the menu frame.
• If you entered a host name in "Hostname or IP Address", you will need to enter the DNS server or WINS server
settings. Click "Application" in the menu frame and then click "DNS" or "WINS" in the page that appears to
configure the corresponding settings.
BEFORE USING THE NETWORK SCANNER FUNCTION
Storing Groups (Scan to E-mail)
If you are using Scan to E-mail, a scanned image can be sent to multiple destinations in a single operation.
Note
1
Up to 100 destinations can be stored in one group.
Click "Destination" in the menu frame.
1
2
Click "Group".
3
Enter the destination information.
For detailed explanations of the procedures for
establishing settings, click "Help" in the menu
frame.
4
When you have completed all of the
entries, click "Submit".
The entries will be stored.
13
BEFORE USING THE NETWORK SCANNER FUNCTION
Editing and deleting programmed transmission destinations
To edit or delete programmed destinations, click "Destination" in the menu frame of the Web page.
1
Click "Destination" in the menu frame
of the Web page.
2
In the Destinations List, click the
checkbox of the destination that you
want to edit or delete.
3
To edit the selected destination, click
"Edit" under the Destinations List.
The programming screen
of the destination
selected in step 2
appears. Edit the
information in the same
way as you initially stored
it.
When finished, be sure to click "Submit" to save
your changes.
4
To delete the selected destination,
click "Delete" under the Destinations
List.
A message appears
asking you to confirm the
deletion. Click "Yes" to
delete.
Note
14
If you attempt to edit or delete a programmed destination in the following situations, a warning message will
appear and editing/deletion will not be possible.
• The destination that you wish to edit or delete is currently being used for transmission.
• The destination is included in a group.
If the destination is being used for a current transmission, cancel the transmission or wait until it is completed and
then edit or delete the destination. If the destination is included in a group, delete the destination from the group
and then edit or delete the destination.
BEFORE USING THE NETWORK SCANNER FUNCTION
STORING THE SENDER INFORMATION (Scan to E-mail)
Use this procedure to store the sender information (sender name and e-mail address) that appears when you send
an image by Scan to E-mail. Up to 200 senders can be stored (only one sender can be selected for a transmission).
The sender name appears in the recipient's e-mail program.
1
Click "Sender" in the menu frame.
3
Enter the sender information.
For detailed explanations of the procedures for
establishing settings, click "Help" in the menu
frame.
2
1
Click "Add".
The sender programming
screen appears.
If user authentication is enabled and you wish to
allow login using the above stored information,
enter the login name for that information in "Login
Name" (maximum of 32 characters). The login
name must be the same as the login name stored
in the LDAP server.
4
When you have completed all of the
entries, click "Submit".
The entries will be stored.
Editing and deleting programmed sender's information
1
Click "Sender" in the menu frame.
2
Click "Edit" or "Delete".
If you clicked "Edit", edit
the information in the
same way that you
initially programmed it
and then click "Add" to
save your changes. If
you clicked "Delete", a
message will appear
asking you to confirm the
deletion. Click "Yes" to
delete.
15
BEFORE USING THE NETWORK SCANNER FUNCTION
PROTECTING INFORMATION PROGRAMMED IN THE
WEB PAGE ("Passwords")
Passwords can be established to protect the settings and information stored in the Web page. Note that it is not
necessary to set passwords; the network scanner functionality can also be used without passwords.
A password can be set for the administrator and a password can be set for users. When the Web page is accessed
with the user password, the "Device Setup" and "Network Setup" settings cannot be configured.
1
Click "Passwords" in the menu frame.
5
When you have completed all of the
entries, click "Submit".
The entered password is stored.
After setting the password, turn the machine
power off and then back on.
2
Select the "Enable Password
Protection of this Web Site"
checkbox.
3
Enter the current password in "Admin
Password".
When establishing a password for the first time,
enter "sagem" in "Admin Password".
Caution
4
Be sure to enter "sagem" in lower case
(passwords are case sensitive).
Enter passwords in "User Password"
and "Admin Password".
A maximum of 7 characters and/or numbers can
be entered for each password (passwords are
case sensitive).
Be sure to enter the same password in "New
Password" as you did in "Confirm Password".
16
When a password is set, you will be prompted for the
password when you attempt to access a Web page
with protected settings. For the "User name", enter
"user" if you are accessing the page as a user, or
"admin" if you are accessing the page as an
administrator. For detailed information on setting
passwords, refer to "Help".
BEFORE USING THE NETWORK SCANNER FUNCTION
RESTRICTING USE OF THE NETWORK SCANNER
FUNCTION (USER AUTHENTICATION)
Use of the network scanner function can be restricted by means of user passwords stored in an LDAP server.
Settings required for user authentication
To implement user authentication, the following settings are required:
• Enable user authentication (step 3 on page 6)
• Configure LDAP server settings (p.8)
• Store login names (p.15)
Logging in when user authentication is enabled
To use the network scanner function when user authentication is enabled, you must first log in. Follow these steps:
1
Press the [SCAN] key on the operation panel.
The login screen will appear in the touch panel.
PRINT
ON LI
DATA
SCAN
DATA
FAX
LINE
DATA
1
If you will use the [SELECT FROM SENDER LIST] key, go to step 3.
2
USER AUTHENTICATION
LOGIN NAME
SENDER NAME
E-MAIL ADDRESS
PASSWORD
4
3
Touch the [LOGIN NAME] key,
[E-MAIL ADDRESS] key.
:
Touch the [SELECT FROM SENDER
LIST] key.
A text entry screen will
appear when each key is
touched. Enter the
LOGIN NAME, SENDER
NAME, and E-MAIL
ADDRESS. (Go to step
4.)
OK
SELECT FROM
SENDER LIST
Enter the password.
For the password, enter the user password that is stored in the server.
PASSWORD
CANCEL
OK
ABC
SPACE
5
The sender list screen
appears. When you
select your login name,
sender name and e-mail
address are entered.
AB/ab
abc
12#$%
Touch the [OK] key.
If the login name and password are valid, the initial screen (p.18) of scanner mode appears.
Note
• To logout, press the [*] key. If audit mode is enabled, you will also log out of your account.
• To switch to a mode other than network scanner mode, you must log out.
17
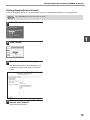
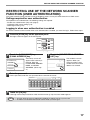
INITIAL SCREEN OF SCANNER MODE
The condition setting screen of scanner mode is displayed by pressing the [SCAN] key (refer to the operation
manual for copier) while the copy mode, print mode, fax mode, or job status screen appears in the touch panel.
If user authentication is enabled, the initial screen will appear after authentication. (p.17)
In the explanations that follow, it is assumed that the initial screen that appears after pressing the [SCAN] key is the
condition setting screen (shown below). If you have set the display to show the address book screen (following
page) when the [SCAN] key is pressed, touch the [CONDITION SETTINGS] key in the address book screen to
display the condition setting screen.
Note
• The key operator program "DEFAULT DISPLAY SETTINGS" can be used to set the display to show either the
condition setting screen (shown below) or the address book screen (following page) when the [SCAN] key is
pressed (refer to the key operator's guide).
• For information on the parts of the machine and the operation panel that are used for network scanning, refer
to the operation manual for copier.
Condition settings screen
The display is initially set (factory setting) to show the following condition setting screen as the initial screen.
1
READY TO SEND.
10
AUTO
QUALITY
9
300dpi
RESOLUTION
8
TIFF-G4
FILE FORMAT
7
AUTO
ORIGINAL
ADDRESS
BOOK
2
ADDRESS REVIEW
3
ADDRESS ENTRY
4
SEND SETTINGS
5
6
1
Message display
Messages appear here to indicate the current
status of the machine.
2
[ADDRESS BOOK] key (p.19)
This displays the address book screen (next page).
Touch this key when you wish to use a one-touch key
that has a destination (or group) programmed in it.
3
[ADDRESS REVIEW] key (p.22)
When performing Scan to E-mail broadcast
transmission, touch this key to check your selected
destinations. A list of the destinations will appear,
and you can delete any incorrect destinations.
4
[ADDRESS ENTRY] key (p.22)
When performing Scan to E-mail, touch this key if
you wish to enter the e-mail address of the recipient
manually instead of using a one-touch key.
5
[SEND SETTINGS] key (p.30)
Touch this key to change the subject*, file name, or
sender* when sending a scanned image.
* When using Scan to E-mail.
18
6
Two-sided original and job build icon display
(p.24, 25)
Either icon appears when two-sided scanning or
job build scanning (when an RSPF is installed) is
selected after pressing the [ORIGINAL] key. The
icon can be touched to open a function selection
screen.
7
[ORIGINAL] key (p.24, 25, 26)
Touch this key to set the original size manually,
select two-sided scanning, or select job build
(when an RSPF is installed).
8
[FILE FORMAT] key (p.29)
Touch this key to change the format of the image
file to be sent, or change the number of pages per
file. The selected format is highlighted at the top of
the key.
9
[RESOLUTION] key (p.28)
Touch this key to change the resolution setting for
the original to be scanned. The selected resolution
setting will be highlighted above the key.
10
[QUALITY] key (p.27)
Touch this key to change the image quality and
density settings for scanning. The selected image
quality and density are highlighted at the top of the
key.
BEFORE USING THE NETWORK SCANNER FUNCTION
Address book screen
Touch the [ADDRESS BOOK] key in the condition setting screen (previous page) to display the screen shown below
at right.
Destinations stored using the Web page are grouped in indexes ( 6 ) according to the letter entered in "Initial" for
each destination, and the name entered in "Display Name" is displayed in the one-touch key ( 1 ).
1
2
3
1/2
CONDITION
SETTINGS
4
READY TO SEND.
TEST1
TEST2
TEST3
TEST4
6
TEST5
TEST6
1
TEST7
TEST8
ADDRESS REVIEW
GLOBAL
ADDRESS SEARCH
6
FREQUENT USE
ABCD
EFGHI
JKLMN
OPQRST
UVWXYZ
ABC
GROUP
5
6
E-mail Destination Management page
USER 1
1
One-touch key display
This shows the one-touch keys that have been
stored on the selected "index card". The key type is
indicated by the icon at the right.
:Scan to E-mail
:Scan to FTP
:Scan to Desktop
The number of one-touch keys that appear in one
screen can be changed to 6, 8, or 12 using "THE
NUMBER OF DIRECT ADDRESS / SENDER
KEYS DISPLAYED SETTING" in the key operator
programs.
2
Display switching keys
In cases where the one-touch keys cannot all be
displayed on one screen, this shows how many
screens are left. Touch the "
""
" keys to
move through the screens.
3
[CONDITION SETTINGS] key
This displays the condition setting screen (p.18),
which is used to set various conditions.
4
[GLOBAL ADDRESS SEARCH] key (p.23)
If an LDAP server is used, touch this key to select
a Scan to E-mail destination in the LDAP server. If
an LDAP server is not used, the key is grayed out
and cannot be selected.
Note
USER 2
USER 3
USER 4
USER 5
USER 6
ABC
GROUP
5
[ABC
GROUP] key
Touch this key to switch between the alphabetical
index and the group index. The selected index type
is displayed.
6
Index keys
One-touch key destinations are stored on each of
these index cards (alphabetical index or group
index). Touch an index key to display the card.
Group indexes make it possible to store one-touch
keys by group with an assigned name for easy
reference. This is done with the custom settings
(p.9). Frequently used one-touch key destinations
can be stored on the [FREQUENT USE] card for
convenient access.
• If the initial screen has been set to the address book screen in the key operator programs, the above screen
will be the initial screen.
• If desired, you can use the key operator program, "DEFAULT DISPLAY SETTINGS", to set the default screen
to the group index. (Refer to the key operator's guide.)
19
1
Chapter 2
2
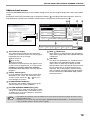
HOW TO USE THE NETWORK SCANNER FUNCTION
SENDING AN IMAGE
BASIC TRANSMISSION METHOD
1
Make sure the machine is in scanner
mode.
COPY
PRINT
ON LI
DATA
SCAN
DATA
2
When the [SCAN] key
light is on, the machine is
in scanner mode. If the
light is not on, press the
[SCAN] key.
If user authentication is
enabled, you must log in.
(p.17)
4
For detailed information
on loading an original,
refer to the operation
manual for copier.
The factory default
settings are:
• Image quality:
TEXT/PHOTO
• Density: AUTO
AUTO
QUALITY
300dpi
RESOLUTION
TIFF-G4
FILE FORMAT
AUTO
5
Load the original.
Adjust the quality setting. (p.27)
8½X11
Adjust the resolution setting. (p.28)
QUALITY
The factory default
setting is "300dpi".
300dpi
RESOLUTION
TIFF-G4
FILE FORMAT
AUTO
8½X11
ORIGINAL
Note
3
You cannot load documents in both the
RSPF and on the document glass and send
them in a single transmission. If documents
are loaded in both the RSPF and on the
document glass, only the document in the
RSPF will be scanned and transmitted.
Check the original size that appears in
the top half of the [ORIGINAL] key.
300dpi
RESOLUTION
TIFF-G4
FILE FORMAT
AUTO
8½X11
ORIGINAL
The original size is
automatically detected.
If you loaded a
non-standard size
document or wish to
change the scanning size,
touch the [ORIGINAL] key
and set the document
size. (Refer to page 26.)
6
Select the file format. (p.29)
QUALITY
The factory default
settings are:
• FILE TYPE: TIFF
• COMPRESSION MODE:
MMR (G4)
• PAGES PER FILE: ALL
300dpi
RESOLUTION
TIFF-G4
FILE FORMAT
AUTO
8½X11
ORIGINAL
7
Touch the [ADDRESS BOOK] key.
ADDRESS
BOOK
ADDRESS REVIEW
ADDRESS ENTRY
Note
20
• To scan a two-sided original (when an RSPF
is installed), refer to page 24.
• If you are scanning a large number of
originals (and the RSPF is installed), follow
the procedure on page 25.
• To rotate the document image 90° before
transmission, see page 26.
SEND SETTINGS
The address book screen
appears.
HOW TO USE THE NETWORK SCANNER FUNCTION
8
Touch the one-touch key of the desired
destination.
READY TO SEND.
TEST1
TEST2
TEST3
TEST4
TEST5
TEST6
TEST7
TEST8
FREQUENT USE
Note
9
ABCD
EFGHI
JKLMN
OP
The key you touched is
highlighted. If you touch
the wrong key, touch the
key again to cancel the
selection. The key
display will return to
normal.
• Refer to pages 10 to 13 for information on
programming one-touch key destinations.
• When touching a one-touch key,
corresponding information from the email
destination screen is shown in the
message display.
• The destination e-mail address for Scan to
E-mail can be entered manually, or you
can search for a destination in an LDAP
server on the network (p.22 to 23).
• Multiple destinations can be specified for
a Scan to E-mail transmission (p.22).
Using the RSPF
10
Press the [START] key (
).
Scanning begins. When
scanning is finished,
"SENDING. PRESS [C]
TO CANCEL." appears in
the touch panel and
transmission begins.
When transmission is
finished, "SENDING
COMPLETED." appears
in the touch panel.
Using the document glass
10
Press the [START] key (
2
).
The original is scanned
and the [READ-END] key
appears.
Enter a file name for the scanned
image. (p.30)
ADDRESS
BOOK
ADDRESS REVIEW
ADDRESS ENTRY
If the send settings are
not changed, a file name
is assigned based on the
items specified in the
Web page.
11
Repeat this sequence until all pages have been
scanned.
SEND SETTINGS
Note
When sending an image by Scan to E-mail,
a subject and sender's name can be
entered.
Normally the subject and sender are
automatically entered based on the
information stored in "Reply E-mail Address"
in "SMTP Setup" in the Web page.
If user authentication is enabled, the e-mail
address of the user who logged in is used as
the sender.
If you have another page to scan,
change pages and then press the
[START] key ( ).
If no action is taken for one minute, scanning
automatically ends and transmission begins.
Note
12
After the final page is scanned, touch
the [READ-END] key.
ESS [START].
EAD-END].
READ-END
Note
"SENDING. PRESS [C]
TO CANCEL." appears in
the touch panel and
transmission begins.
When transmission is
finished, "SENDING
COMPLETED." appears
in the touch panel.
• To cancel transmission while "SCANNING ORIGINAL." appears in the display or before the [READ-END] key
is touched, press the [CLEAR] key (
) or the [CLEAR ALL] key (
). If you press the [CLEAR] key (
),
the destination and scan settings are saved. To cancel a transmission, press the [JOB STATUS] key and
cancel the job. (p.31)
• If you exceed the number of pages that can be scanned while scanning an original, "THE MEMORY
BECOMES FULL." will appear in the touch panel. To send the data that has been scanned to that point, touch
the [SEND] key. To cancel the transmission, touch the [CANCEL] key.
• If a misfeed occurs while an original is being scanned, remove the original according to the instructions in the
touch panel. To resume scanning after removing the misfeed, press the [START] key (
).
21
HOW TO USE THE NETWORK SCANNER FUNCTION
TRANSMISSION METHODS FOR SCAN TO E-MAIL
The destination for a Scan to E-mail transmission can be selected from the address book or entered manually. You
can also use an e-mail address stored on an LDAP server.
It is possible to select multiple destinations for a Scan to E-mail transmission using a combination of these methods.
Use the following procedure when you wish to enter the e-mail address manually or use an e-mail address stored on
an LDAP server.
Sending an image by entering an e-mail address manually
1
Perform steps 1 through 6 of "BASIC
TRANSMISSION METHOD". (p.20)
2
5
If you wish to select an e-mail address from the
address book screen, follow steps 7 and 8 of
"BASIC TRANSMISSION METHOD" (p.20 to 21).
If you wish to select an e-mail address in an
LDAP server, follow the steps in "Sending an
image by selecting an e-mail address in an LDAP
server" (p.23).
Touch the [ADDRESS ENTRY] key.
ADDRESS
BOOK
If you wish to enter another e-mail
address, repeat steps 2 through 4.
The e-mail address entry
screen appears.
ADDRESS REVIEW
ADDRESS ENTRY
Note
SEND SETTINGS
3
Touch the keys on the keyboard to
enter the e-mail address.
6
If you frequently transmit to a fixed group of
destinations, you can store the destinations
as a group (p.13).
Touch the [ADDRESS REVIEW] key
and check the destinations.
ADDRESS
BOOK
ADDRESS REVIEW
ADDRESS ENTRY
SEND SETTINGS
• If you make a mistake, touch the
key to move the
cursor ( ) back to the mistake and then enter the
correct character.
• To enter a number, touch the [AB/ab
12#$%] key.
The screen will change to the number entry screen.
To return to the text entry screen, touch the [AB/ab
12#$%] key again.
4
Touch the [OK] key.
CANCEL
Note
7
Note
Caution
22
The entered or selected destinations appear in
the address review screen as one touch keys.
A maximum of 18 characters of the name or
e-mail address can appear in each key.
Continue from step 9 of "BASIC
TRANSMISSION METHOD" (p.21).
OK
ABC
When the [ADDRESS
REVIEW] key is touched,
only the entered
destinations are displayed.
To delete a destination,
touch the key of the
destination that you wish
to delete.
Touch the [OK] key to
return to the initial screen.
To cancel the operation when selecting
destinations, press the [CLEAR ALL] key (
).
abc
• Important points when using Scan to E-mail
Be very careful not to send image data files that are too large. Your mail server's system administrator may
have placed a limit on the amount of data that can be sent in one e-mail transmission. If this limit is
exceeded, the e-mail will not be delivered to the recipient. Even if there is no limit and your e-mail is
successfully delivered, a large data file may take a long time to be received and place a heavy burden on the
recipient's network, depending on the recipient's network (Internet) connection environment. If large image
data files are repeatedly sent, the resulting burden on the network may slow down the speed of other,
unrelated data transmissions and in some cases, may even cause the mail server or network to go down. In
cases where you need to send multiple documents, try such measures as lowering the resolution mode.
• A limit can be set for the size of image files sent by Scan to E-mail in "Maximum Size of File" (p.6) in the Web page.
HOW TO USE THE NETWORK SCANNER FUNCTION
Sending an image by selecting an e-mail address in an LDAP server
To use an LDAP server, the LDAP server settings must be configured in the Web page.
1
2
5
Perform steps 1 through 6 of "BASIC
TRANSMISSION METHOD". (p.20)
The server begins searching.
When the search is finished, a list of the matching
e-mail addresses appears.
Touch the [ADDRESS BOOK] key.
ADDRESS
BOOK
Touch the [OK] key.
The address book screen
appears.
Note
ADDRESS REVIEW
ADDRESS ENTRY
6
SEND SETTINGS
If there are no matches, touch the [OK] key
in the message screen that appears. Touch
the [SEARCH AGAIN] key and repeat the
procedure from step 4.
Touch the one-touch key of the
desired destination.
If you touch the wrong
key, touch the correct key.
READY TO SEND.
3
Touch the [GLOBAL ADDRESS
SEARCH] key.
ADD SELECTED
tes
The global address
search screen appears.
CONDITION
SETTINGS
1/2
test1
test2
test3
test4
test5
test6
ADDRESS REVIEW
7
GLOBAL
ADDRESS SEARCH
JKLMN
OPQRST
Note
UVWXYZ
ABC
If multiple LDAP servers have been
configured, the server select screen appears.
Touch the key of the server that you wish to
search and then touch the [OK] key.
SERVER SELECT
CANCEL
SERVER 1
OK
The destination selected
in step 6 is entered as a
destination of the
transmission.
No.001:test1
[email protected]
ADD SELECTED
tes
test1
test2
test3
test4
test5
test6
1/2
SERVER 2
8
SERVER 3
SERVER 4
Touch the key of the server that you
wish to search and then touch the
[OK] key.
GLOBAL ADDRESS SEARCH
CANCEL
If you wish to enter another e-mail
address, repeat steps 6 through 7.
If multiple LDAP servers have been configured and
you wish to select a different server, touch the
[ADDRESS BOOK] key and then touch the
[GLOBAL ADDRESS SEARCH] key.
The selected server key is highlighted.
4
Touch the [ADD SELECTED] key.
GROUP
9
Touch the [ADDRESS REVIEW] key
and check the destinations.
OK
test
CONDITION
SETTINGS
ADDRESS REVIEW
ABC
abc
SEARCH AGAIN
SPACE
AB/ab
12#$%
ADDRESS BOOK
• If you make a mistake, touch the
key to move the
cursor ( ) back to the mistake and then enter the
correct character.
• To enter a number, touch the [AB/ab
12#$%] key.
The screen will change to the number entry screen.
To return to the text entry screen, touch the [AB/ab
12#$%] key again.
10
When the [ADDRESS
REVIEW] key is touched,
only the entered
destinations are displayed.
To delete a destination,
touch the key of the
destination that you wish
to delete.
Touch the [OK] key to
return to the initial screen.
Continue from step 9 of "BASIC
TRANSMISSION METHOD" (p.21).
Note
To cancel the operation when selecting
destinations, press the [CLEAR ALL] key (
).
23
2
HOW TO USE THE NETWORK SCANNER FUNCTION
SCANNING AND TRANSMITTING A TWO-SIDED
ORIGINAL (when an RSPF is installed)
Follow these steps to automatically scan a two-sided original.
1
Make sure the machine is in scanner
mode and then load the document in
the RSPF. (p.20)
4
Touch the [OK] key.
INAL SIZE
OK
MANUAL
2
You will return to the
initial screen.
Touch the [ORIGINAL] key.
2-SIDED
TABLET
300dpi
RESOLUTION
JOB
BUILD
ROTATE THE IMAGE 90 DEGREES
TIFF-G4
FILE FORMAT
A two-sided original icon appears next to the
[ORIGINAL] key.
(Example: The icon that appears when the
[2-SIDED BOOKLET] key is touched.)
AUTO
8½X11
ORIGINAL
QUALITY
3
Touch the [2-SIDED BOOKLET] key or
the [2-SIDED TABLET] key as
appropriate for the original you
loaded.
ORIGINAL SIZE
AUTO
2-SIDED
BOOKLET
MANUAL
2-SIDED
TABLET
ROTATE THE
Note
Note
24
If you wish to rotate the
original 90° when
creating an image file,
touch the [ROTATE THE
IMAGE 90 DEGREES]
checkbox (a checkmark
should appear in the
box).
300dpi
RESOLUTION
TIFF-G4
FILE FORMAT
AUTO
8½X11
ORIGINAL
5
Continue from step 4 of "BASIC
TRANSMISSION METHOD" (p.20 to 21).
If the correct original size does not appear in
the screen of step 2, touch the [MANUAL]
key and specify the correct original size
(p.26).
• Booklets and tablets
Two-sided originals that are bound at the side are booklets, and two-sided
originals that are bound at the top are tablets.
• Two-sided scanning mode turns off after transmission is finished. Two-sided
scanning mode can also be canceled by pressing the [CLEAR ALL] key
(
).
Booklet
Tablet
HOW TO USE THE NETWORK SCANNER FUNCTION
SCANNING A LARGE NUMBER OF ORIGINALS (when
an RSPF is installed)
If you have a large number of originals, the originals can be scanned in batches using the RSPF.
1
2
Make sure the machine is in scanner
mode and then load the document in
the RSPF. (p.20)
Touch the [ORIGINAL] key.
5
Perform steps 4 through 9 of "BASIC
TRANSMISSION METHOD". (p.20 to 21)
6
Press the [START] key (
).
Scanning of the originals
begins. A message
appears in the touch
panel.
300dpi
RESOLUTION
TIFF-G4
FILE FORMAT
2
AUTO
8½X11
ORIGINAL
3
Touch the [JOB BUILD] key.
RIGINAL SIZE
OK
MANUAL
2-SIDED
TABLET
JOB
BUILD
ROTATE THE IMAGE 90 DEGREES
Note
4
If you wish to rotate the
original 90° when creating
an image file, touch the
[ROTATE THE IMAGE 90
DEGREES] checkbox (a
checkmark should appear
in the box).
If the correct original size does not appear in
the screen of step 2, touch the [MANUAL] key
and specify the correct original size (p.26).
Touch the [OK] key.
NAL SIZE
OK
MANUAL
2-SIDED
TABLET
7
You will return to the
initial screen.
When all of the originals in the RSPF
have been scanned, load the next
batch and press the [START] key ( ).
Repeat this sequence until all pages have been
scanned.
If no action is taken for one minute, scanning
automatically ends and transmission begins.
Note
8
When all originals have been
scanned, touch the [READ-END] key.
ESS [START].
EAD-END].
READ-END
"SENDING. PRESS [C]
TO CANCEL." appears in
the touch panel and
transmission begins.
When transmission is
finished, "SENDING
COMPLETED." appears
in the touch panel.
JOB
BUILD
ROTATE THE IMAGE 90 DEGREES
A job build icon appears next to the [ORIGINAL] key.
QUALITY
300dpi
RESOLUTION
TIFF-G4
FILE FORMAT
AUTO
8½X11
ORIGINAL
Note
• Job build mode turns off after transmission is finished. Job build mode can also be canceled by pressing the
[CLEAR ALL] key (
).
• When performing Scan to E-mail, see the notes on page 22.
25
SCANNING SETTINGS
(ORIGINAL SIZE, QUALITY, RESOLUTION,
FILE FORMAT, AND SEND SETTING)
When sending an image, you can change the original scan size, quality, resolution, file format, and file name.
MANUALLY SETTING THE SCANNING SIZE
If you load an original that is not a standard size, or if you wish to change the scanning size, touch the [ORIGINAL]
key and set the original size manually.
Perform the following steps after loading the document in the RSPF or on the document glass.
Standard sizes:
Note
1
The following originals sizes will be correctly detected:
A3, A4, A4R, A5, A5R*, B4, B5, B5R
* These sizes can only be automatically detected when the RSPF is used.
If a non-standard size original is loaded (including special sizes), the closest standard size may be displayed, or
the original size may not appear.
If you wish to select an AB size, touch
the [AB INCH] key and then touch
the desired original size key.
Touch the [ORIGINAL] key.
300dpi
RESOLUTION
TIFF-G4
FILE FORMAT
ORIGINAL SIZE
AUTO
8½X11
ORIGINAL
2
The sizes that can be
selected are displayed.
ORIGINAL SIZE
MANUAL
O
DED
LET
JOB
BUIL
2-SIDED
TABLET
A5
A5R
B5
OK
B5R
A4
A4R
AB
B4
A3
4
Touch the [MANUAL] key.
OK
MANUAL
AUTO
INCH
[AB] is highlighted and
AB size keys are
displayed. To return to
the inch size, touch the
[AB INCH] key once
again.
Touch the outer [OK] key.
INAL SIZE
OK
MANUAL
A4
5R
B5
OK
4
A4R
AB
You will return to the
initial screen.
Touching the inner [OK]
key in the step above
returns you to step 2.
ROTATE THE IMAGE 90 D
INCH
3
• If you wish to rotate the original 90° when
creating an image file, touch the [ROTATE
THE IMAGE 90 DEGREES] checkbox (a
checkmark should appear in the box).
• The [2-SIDED] key and [JOB BUILD] key
do not appear on models that do not have
an RSPF installed.
Note
3
Touch the desired original size key.
ORIGINAL SIZE
AUTO
OK
MANUAL
51/2 X81/2
51/2 X81/2 R
81/2 X11
8 X11R
8 X13
8 X14
1/
2
11X17
26
1/
2
1/
2
OK
AB
INCH
[AUTO] is no longer
highlighted. [MANUAL]
and the original size key
you touched are
highlighted.
5
The selected size appears in the top
half of the [ORIGINAL] key.
300dpi
RESOLUTION
TIFF-G4
FILE FORMAT
A4
ORIGINAL
Note
You can return to automatic detection by
pressing the [CLEAR ALL] key (
).
HOW TO USE THE NETWORK SCANNER FUNCTION
SELECTING THE QUALITY
You can adjust the quality manually to match the type of original. After loading the original in scanner mode, follow
the steps below. The factory default settings are "TEXT/PHOTO" for the image quality, and "AUTO" for the density.
1
Touch the [QUALITY] key.
5
Touch the [OK] key.
AUTO
QUALITY
OK
300dpi
RESOLUTION
AUTO
2
MANUAL
AUTO
TIFF-G4
FILE FORMAT
1
·
You will return to the
initial screen.
3
5
8½X11
2
Selecting the original type.
ORIGINAL
IMAGE TYPE
TEXT
TEXT/PHOTO
1
PHOTO
Touch the appropriate
key for the type of
original to be scanned.
The image will be
processed according to
the selected type.
You can select the
original type from
"TEXT", "TEXT/PHOTO"
or "PHOTO".
TEXT ( ) : Text original
TEXT/PHOTO ( ) : Original with mixed text and photos.
PHOTO ( ) : Photograph or illustration
3
Touch the [AUTO
OK
4
"MANUAL" is highlighted.
MANUAL
AUTO
1
MANUAL] key.
3
5
Adjust the density.
OK
MANUAL
AUTO
1
3
5
Touch the
or
key
to adjust the scanning
density. (Touch the
key for a darker image or
the
key for a lighter
image.)
27
HOW TO USE THE NETWORK SCANNER FUNCTION
SELECTING THE RESOLUTION
The resolution for scanning an original can be selected. Load the original in scanner mode and then follow the steps
below. The factory default setting for the resolution is "300 dpi".
Change the resolution
1
Touch the [RESOLUTION] key.
QUALITY
300dpi
RESOLUTION
TIFF-G4
FILE FORMAT
AUTO
8½X11
ORIGINAL
2
Touch the desired resolution key.
Touch the resolution key
that is most suitable for
the original.
The selected key will be
highlighted.
200dpi
300dpi
600dpi
3
Touch the [OK] key.
OK
You will return to the
initial screen.
200dpi
300dpi
600dpi
Note
28
• The resolution is initially set to 300 dpi (factory default setting). A resolution of 200 dpi or 300 dpi produces
sufficiently clear image data for normal text originals. (200 dpi is equivalent to the "Fine" character mode used
for facsimiles).
The 600 dpi setting should only be used in cases where high-clarity image reproduction is required, such as a
photograph or an illustration. Note that a high resolution setting will result in a larger file size, and transmission
may not be successful if there is insufficient disk capacity in the server to which the image is sent (or if the
administrator of the server has restricted the file size). If transmission is not successful, you can try such
measures as reducing the number of scanned pages in the file or reducing the scan size setting for the original
("MANUALLY SETTING THE SCANNING SIZE" (p.26)).
• The default resolution setting can be changed in the key operator programs. (See "INITIAL RESOLUTION
SETTING" in the key operator's guide.)
• The resolution setting cannot be changed once scanning has begun.
HOW TO USE THE NETWORK SCANNER FUNCTION
SELECTING THE FILE FORMAT
You can select the format of the image file that will be created (file type, compression mode, and pages per file). The
factory default settings are "TIFF" for the file type, "MMR (G4)" for the compression mode, and "ALL" for the pages
per file.
1
Touch the [FILE FORMAT] key.
Note
QUALITY
300dpi
RESOLUTION
TIFF-G4
FILE FORMAT
AUTO
8½X11
ORIGINAL
2
Select the file type and the
compression mode.
Either [TIFF] or [PDF] can be selected for the file
type of the image data to be created, and
[NONE], [MH (G3)] or [MMR (G4)] can be
selected for the compression format.
3
• The factory default setting can be
changed in the key operator programs.
(See "INITIAL FILE FORMAT SETTING"
in the key operator's guide.)
• To open the scanned image without using
the software program in the CD-ROM that
accompanies the network scanner
expansion kit, the recipient must have a
viewer program that can open the image
format (file type) that was selected as
explained above.
• The factory default setting for the image
format produces the smallest file (TIFF
G4). If the recipient cannot open the
image, try sending the image in a different
format.
• If the number of scanned originals is not
divisible by the number set in "PAGES
PER FILE", the last file will have less
pages.
Set the number of pages per file.
FILE TYPE
QUALITY
300dpi
RESOLUTION
OK
TIFF
PDF
COMPRESSION MODE
MH (G3)
NONE
FILE FORMAT
MMR (G4)
PAGES PER FILE
AUTO
8½X11
ORIGINAL
ALL
1
2
3
4
5
6
Touch the "ALL" key or one of keys [1] to [6].
• [ALL]: The scanned images are combined into a
single file.
• [1] to [6]: Multiple image files are created, each with
the selected number of pages per file.
4
Touch the [OK] key.
You will return to the
initial screen.
OK
MMR (G4)
29
2
HOW TO USE THE NETWORK SCANNER FUNCTION
CHANGING THE SEND SETTINGS
The file name of the scanned image can be changed.
When performing Scan to E-mail, the subject and sender can also be changed.
If the send settings are not changed, these items are entered automatically using the information stored in the Web page.
1
4
Touch the [SEND SETTINGS] key.
ADDRESS
BOOK
The [GLOBAL ADDRESS SEARCH] key is used
to select a user stored in a global address book
as a sender. (p.23)
The [ADDRESS ENTRY] key is used to directly
enter an e-mail address.
ADDRESS REVIEW
ADDRESS ENTRY
SEND SETTINGS
2
Touch the [SUBJECT], [FILE NAME],
or [SENDER] key to change the
corresponding entry.
If the [Enable User
Authentication] or
[Disable selection of
sender from Sender List]
checkbox is selected in
"Advanced Setup" in
"Network Scanning" in the
Web page, the [SENDER]
key will be grayed out and
cannot be selected (p.6).
SEND SETTINGS
SUBJECT
(USE DEF
FILE NAME
(USE DEF
SENDER
(USE DEF
If [SENDER] is touched, a sender
selection screen will appear. Touch
the desired one-touch key and then
touch the [OK] key.
TEST2
TEST3
TEST4
TEST5
TEST6
FREQUENT USE
Note
3
If the [SUBJECT]
key or [FILE NAME] key is touched, a
keyboard will appear. Enter the desired
text and then touch the [OK] key.
Up to 64 characters can be entered.
SUBJECT
CANCEL
OK
XXXXX
ABC
12#$%
AB/ab
SPACE
5
abc
ABCD
GLOBAL
ADDRESS SEARCH
ADDRESS ENTRY
EFGHI
JKLMN
\
?
/
"
;
:
,
<
>
!
*
|
&
#
Depending on the environment of use of
the OS, it may not be possible to use
spaces and the symbols indicated below.
For example, hyperlinks will not operate
correctly or nonsense characters may appear.
$ % ' ( ) + - . = @ [ ] ^ ` { } _
30
UVWXYZ
ABC
GROUP
Touch the [OK] key in the send
settings screen.
ÃÄÂ/ãäâ
• A maximum of only 54 characters can be
displayed in the send settings screen.
• When entering a file name, there is no
need to enter a file extension.
The file extension is added automatically
based on the selected file format.
• The following symbols cannot be used
when entering a file name or folder name.
OPQRST
• The senders that have been stored in
"Sender" in the Web page appear in the
sender select screen. If the desired
sender does not appear, you must first
store it as a Scan to E-mail destination in
"Sender" in the Web page. (p.15)
• When a checkmark appears in the
[Disable selection of sender.] checkbox in
the Web page, the [SENDER] key in the
"SEND SETTING" screen is grayed out to
prevent selection of senders and entry of
e-mail addresses.
• If an LDAP server is not configured in the
Web page, the [GLOBAL ADDRESS
SEARCH] key will be grayed out and
searching will not be possible.
OK
Note
OK
1/2
TEST1
You will return to the
initial screen.
CANCELING AN E-MAIL/FTP
TRANSMISSION
You can cancel a transmission job that is in progress. Cancellation is done from the scanner job status screen.
Note
1
You can cancel a transmission after scanning is finished by pressing the [CLEAR] key (
key (
) while "SENDING. PRESS [C] TO CANCEL." appears in the touch key.
Press the [JOB STATUS] key.
LINE
DATA
FAX
JOB STATUS
2
) or the [CLEAR ALL]
CUSTOM SE
2
Touch the [SCAN TO] key.
SCAN TO
3
Touch the job key of the transmission
job that you wish to cancel.
The touched key is highlighted.
4
Touch the [STOP/DELETE] key.
STOP/DELETE
Note
A message appears to
confirm the cancellation.
Touch the [YES] key to
delete the selected job
key and cancel the
transmission.
If you do not wish to cancel the
transmission, touch the [NO] key.
31
3
Chapter 3
TROUBLESHOOTING
TROUBLESHOOTING
If a problem or question arises, try to solve the situation using the following information before contacting your
authorized SAGEM dealer.
Problem
Cause and solution
Page
The original is loaded upside down.
The image cannot be scanned.
→ If you are using the document glass, the original must be placed
face down. If you are using the RSPF, the original must be
inserted face up.
20
A slight amount of moiré sometimes appears when
printed matter is scanned.
A moiré (stripe pattern) appears on
the scanned image.
The scanned image is fuzzy or has
smudges.
→ Moiré can in some cases be reduced by changing the scanning
resolution.
If you are using the document glass, also try shifting the position
and/or angle of the original on the document glass.
The document glass or the underside of the RSPF (or
document cover) is dirty.
→ To clean the document glass and the underside of the document
cover, see operation manual for copier.
28
—
The set original scanning size is smaller than the actual
original size.
The scanned image is clipped.
→ Set the actual original size.
If you intentionally selected a size setting smaller than the actual
original size, take into consideration the part of the original that
you wish to scan when placing the original. For example, if the
actual size is 8-1/2" x 11" and you selected 5-1/2" x 8-1/2" for the
size setting, place the original so that the part that you wish to
scan is within the 5-1/2" x 8-1/2" area indicated by the guides on
the far left side of the document glass.
26
The original was not placed in the correct orientation.
The scanned image is upside down
or on its side.
→ Place the original in the correct orientation. (See operation
manual for copier)
To rotate the image 90 degrees, touch the [ORIGINAL] key in the
initial screen and then touch the "ROTATE THE IMAGE 90
DEGREES" checkbox to make a checkmark appear.
26
The viewer program used by the recipient does not
support the format of the received image data.
The received image data cannot be
opened.
When the same file name is used for
two successive Scan to FTP
transmissions, the second file is not
sent.
32
→ Try selecting a different file type (TIFF or PDF) and/or a different
compression format (NONE, MH (G3), MMR (G4)) when sending
the image data.
Otherwise, have the recipient use Sagem MF 9000 Companion
or a viewer program that supports the above combinations of file
types and compression formats.
The first file may still remain in the cache of the file server
client. Disable use of the cache in the client software.
29
—
TROUBLESHOOTING
Problem
Cause and solution
Page
An incorrect destination was selected.
Otherwise, there is a mistake in the information stored
for the destination (e-mail address or FTP server
information).
The recipient does not receive
transmitted data.
The recipient does not receive data
sent by e-mail (Scan to E-mail).
Transmission takes a long time.
Caution
→ Select the correct destination and make sure the correct
information is stored for the destination.
10 - 13
* If delivery by e-mail (Scan to E-mail) is unsuccessful, an
error message such as "Undelivered Message" may be
sent to the designated administrator's e-mail address.
This information may help you determine the cause of
the problem.
Check the Web page to see if a limit has been set for the size
of image files sent using Scan to E-mail (the factory default
setting is "Unlimited").
A limit can be set from 1 MB to 10 MB. Consult the
administrator of the Web page to select a suitable limit.
6
The amount of data that can be sent in one e-mail
transmission is sometimes limited by the administrator of the
mail server. Even if the amount of data sent is within the limit
setting explained above, if it exceeds the limit set by the
administrator of the mail server, the data will not be delivered
to the recipient.
Decrease the amount of data sent in the e-mail transmission
(reduce the number of pages scanned). (Ask your mail server
administrator what the data limit is for one e-mail transmission.)
—
When there is a large amount of image information, the data
file is also large and transmission takes a long time.
—
3
In order to select image quality and data compression settings that are suited to the purpose
of transmission and create image data that is well-balanced in terms of image quality and file
size, pay attention to the following points:
• Image quality modes (TEXT, TEXT/PHOTO, PHOTO)
The factory default setting is "TEXT/PHOTO". If the original does not contain photographs, illustrations, or
other halftone images, "TEXT" mode will give you the most workable scanned image. "TEXT/PHOTO" should
only be selected when the original includes a photograph and you wish to give priority to the quality of the
photograph. (There is no advantage to scanning a text-only original in "TEXT/PHOTO" or "PHOTO" mode.)
"PHOTO" mode should only be used to scan a photograph or illustration. Note that this will produce a larger file
size than the other modes.
• Resolution
The factory default setting is "300 dpi". This is suitable for originals with mixed text and
illustrations/photographs; however, it produces a slightly larger file size. For normal text originals, a resolution
setting of 200 dpi produces an image that is sufficiently readable. (200 dpi is equivalent to the "Fine" resolution
setting of fax machines.)
The 600 dpi setting should only be used in cases where high-clarity image reproduction is required, such as an
original that includes photographs or illustrations. Note that a high-resolution setting will result in a larger file
size and transmission may not be successful if there is insufficient disk capacity in the server to which the
image is sent (or if the administrator of the server has restricted the file size). If transmission is not successful,
you can try such measures as reducing the number of scanned pages in the file or reducing the scan size
setting for the original.
DISPLAY MESSAGES
If one of the following messages appears in the display, promptly take action as instructed by the message.
Message
THE DOCUMENT FEEDER IS
DISABLED.
Solution
Page
Use of the RSPF has been disabled in the key operator programs.
Use the document glass.
—
33
TROUBLESHOOTING
Message
Solution
Page
YOUR FILENAME IS WRONG.
The characters ¥/;:*?"<> cannot be used in a file name. Select a
name that does not use those characters.
NO MATCHING ADDRESS
FOUND.
PRESS [OK] THEN [SEARCH
AGAIN].
There are no addresses in the LDAP server that match your search
text. Select a different server or change the search text.
UNABLE TO ACCESS THE
SERVER.
CHECK SERVER ADDRESS ON
DEVICE WEB PAGE.
The server settings are not configured correctly. Check the server
settings.
THE ADDRESS LIMIT HAS
BEEN REACHED.
NO MORE ADDRESSES CAN BE
ENTERED.
The maximum number of destinations that can be selected for a
single Scan to E-mail transmission is 100. Do not select more than
100 destinations.
THE MEMORY BECOMES FULL.
SCANNED DATA IS
TRANSMITTED.
The memory became full while scanning the originals. If you wish to
send just the originals that were scanned, touch the [SEND] key. If
you wish to cancel the entire transmission, touch the [CANCEL]
key.
NO RESPONSE FROM SERVER.
COMMUNICATION
TERMINATED DUE TO
TIMEOUT.
The scanned image was not sent because the server was busy or
there was too much traffic. Wait briefly and then try again.
NETWORK ERROR
THE DIRECTORY NAME OF FTP
SERVER IS INVALID.
The scanned image was not sent because the directory of the
destination FTP server was not correct. Make sure that the correct
FTP server information is configured in the Web page.
11
SERVER ACCESS DENIED.
CHECK ACCOUNT
INFORMATION ON DEVICE WEB
PAGE.
The scanned image was not sent because a connection to the
server could not be established. Make sure that the SMTP server
settings or FTP server settings in the Web page are correct.
7
Make sure that your login name and password are correct.
—
NETWORK ERROR. (
CONSULT YOUR KEY
OPERATOR OR SYSTEM
ADMIN. FOR SPECIFIC
INFORMATION.
Turn off the power and turn it back on. Consult with your network
administrator to make sure that no problems exist on the network or
in the server. If the error is not cleared after turning the power off
and on, write down the 2-digit main code and 2-digit sub-code, turn
off the power, and contact your dealer.
—
)
—
23
7
—
—
—
Error codes
If a transmission error occurs when you send a scanned image, a message informing you of the error and an error
code will appear in the touch panel on the machine.
Error Code Table
Error Code
Description of the Error
CE-01
An interface hardware error has occurred.
CE-03
The server was down during the scanning of the original.
CE-00
An error other than the above has occurred.
IF YOUR E-MAIL IS RETURNED
If a Scan to E-mail is not successfully transmitted, an e-mail informing you of this fact is sent to the sender selected
at the time of transmission. If this happens, read the e-mail and determine the cause of the error, and then repeat
the transmission.
34
TROUBLESHOOTING
IMPORTANT POINTS WHEN USING SCAN TO E-MAIL
Be very careful not to send image data files that are too large.
Your mail server's system administrator may have placed a limit on the amount of data that can be sent in one e-mail
transmission. If this limit is exceeded, the e-mail will not be delivered to the recipient. Even if there is no limit and
your e-mail is successfully delivered, a large data file may take a long time to be received and place a heavy burden
on the recipient's network, depending on the recipient's network (Internet) connection environment.
If large image data files are repeatedly sent, the resulting burden on the network may slow down the speed of other,
unrelated data transmissions and in some cases, may even cause the mail server or network to go down.
The images on the following page will produce the following file sizes when scanned as 8-1/2" x 11" or A4 size
originals:
Resolution
File size of text original A when scanned
in "TEXT" mode.
File size of photo original B when
scanned in "TEXT/PHOTO" mode.
300dpi
Approx. 50 KB
Approx. 1400 KB
600dpi
Approx. 90 KB
Approx. 5000 KB
3
* If multiple images are scanned, the file size will be approximately (Size of each image as indicated above) x
(Number of images scanned).
Although the actual limitation depends on your network environment, a general guideline for the maximum file size
for Scan to E-mail is 2000 KB. In cases where you need to send multiple documents, try such measures as lowering
the resolution mode.
Original image samples
The original images shown below are samples to help you understand the above explanations. Note that these
images are smaller than the actual originals (the actual originals are 8-1/2" x 11" size).
Text original A
Photo original B
35
CHECKING THE IP ADDRESS
To check the IP address of the machine, print out the settings list from the operation panel of the machine.
1
Press the [CUSTOM SETTINGS] key.
The custom settings
screen will appear.
LINE
DATA
B STATUS
2
CUSTOM SETTINGS
Touch the [LIST PRINT] key.
LAY
AST
LIST PRINT
CL
ESS
ROL
RECEIVE MODE
FA
F
3
Touch the [PRINTER TEST PAGE] key.
PRINTER TEST PAGE
FAX REPORT
SENDING ADDRESS LIST
4
Touch the [PRINTER SETTINGS LIST]
key.
PRINTER
SETTINGS LIST
PCL SYMBO
SET LIST
PCL EXTENDED
FONT LIST
NIC PAGE
36
"PRINT JOB IN
MEMORY. PLEASE
WAIT UNTIL PRINT
OUT." appears in the
message screen and
printing begins.
4
Chapter 4
SPECIFICATIONS
For information on power requirements, power consumption, dimensions, weight, and other specifications that are
common to all features of the machine, refer to the operation manual for copier.
Maximum original size
11" x 17" or A3
Optical resolution
400dpi
Output resolution
200, 300, 600dpi
Output modes
1bit/pixel
Halftone processing
Error dispersion (200/300/600dpi)
File format
File type: TIFF/PDF
Compression mode: MH (G3)/MMR (G4)/NONE
File creation method
One file for all pages/One file per each 1 to 6 pages
Two-sided originals
Possible (when an RSPF is installed)
Scan destinations
Scan to FTP, Scan to Desktop, Scan to E-mail
Supported client PC operating systems (for
Scan to Desktop function)
Windows 98, Windows Me,
Windows NT Workstation 4.0 (Service Pack 5 or later),
Windows 2000 Professional, Windows XP Home Edition,
Windows XP Professional, Windows Server 2003, Windows Vista,
Windows Server 2008
Web browser
Internet Explorer 6.0 or later (Windows), Netscape Navigator 7.0
or later, Safari 1.2 or later (Macintosh)
Management system
Uses built-in Web server
Network protocol
TCP/IP, SMTP, LDAP, FTP
Supported mail system
Mail servers supporting SMTP
LAN connectivity
10Base-T/100Base-TX
Number of destinations
200 maximum
Number of destinations for Scan To E-mail
broadcast transmission
100 maximum*
* Multiple e-mail addresses (up to 100) can be stored as a group. Note that this may reduce the maximum number
of destinations (normally 200) that can be stored.
Some discrepancies may exist in the illustrations and content due to improvements to the machine.
Scanning margins
When scanning an original, the area indicated in the
following diagram cannot be scanned.
Approx. 0.1" (2.5mm)
Approx. 0.1" (2.5mm)
Approx. 0.1" (2.5mm)
Scanning
margins
Area that can
be scanned
Scan size
setting
Approx. 0.1" (2.5mm)
Scan size
setting
37
MF 9325/MF 9331 OPERATION MANUAL (for network scanner)