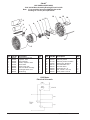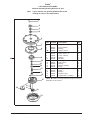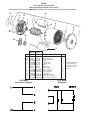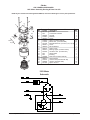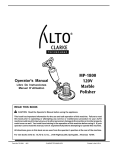
1
Division of C2K Series 120V Polisher Operator's Manual Libro De Instrucciones Manuel D’utilisation READ THIS BOOK CAUTION: Read the Operator's Manual before using the appliance. This book has important information for the use and safe operation of this machine. Failure to read this book prior to operating or attempting any service or maintenance procedure to your Clarke machine could result in injury to you or to other personnel; damage to the machine or to other property could occur as well. You must have training in the operation of this machine before using it. If your operator cannot read this manual, have it explained fully before attempting to operate this machine. All directions given in this book are as seen from the operator’s position at the rear of the machine. For new books write to: Clarke®, 2100 Highway 265, Springdale, Arkansas 72764. Form No. 70081A 2/04 Clarke® Printed in the U.S.A. CONTENTS OF THIS BOOK Operator Safety Instructions ............................................................................................... 5 Machine Introduction .......................................................................................................... 6 Accessories ..................................................................................................................... 11 Machine Specifications .................................................................................................... 14 How To Prepare the Machine for Operation ....................................................................... 18 How to Install the Brush or Pad Driver ........................................................................ 18 How to Adjust the Handle ........................................................................................... 18 Instructions for Connection to Power Supply & Elect. Ground, 120V ................................ 20 How to Operate the Machine ............................................................................................ 22 How To Start/Stop The Machine ................................................................................. 22 How to Control the Machine ....................................................................................... 22 Maintenance .................................................................................................................... 22 Section II Parts and Service Manual Maintenance .................................................................................................................... 26 Assembly Drawing ........................................................................................................... 28 Assembly Parts List ................................................................................................. 29 Assembly Drawing ........................................................................................................... 30 Assembly Parts List .................................................................................................. 31 Motor Assembly Drawing & Parts List .............................................................................. 32 Gearbox Assembly Drawing & Parts List ......................................................................... 33 Motor Assembly Drawing & Parts List .............................................................................. 34 Gearbox Assembly Drawing & Parts List ......................................................................... 35 Motor Assembly Drawing and Parts List ........................................................................... 36 Gearbox Assembly Drawing and Parts List ...................................................................... 37 Wiring Diagrams .............................................................................................................. 38 Page -2 - Clarke® Operator's Manual- C2K Series 120V C2K Series LIBRO DE INSTRUCCIONES LEA ESTE LIBRO CUIDADO: Lea el Libro de Instrucciones antes de usar este aparato. Contiene información importante para el uso y funcionamiento correcto y seguro de la máquina. Lea este libro completamente antes de arrancar la máquina o hacer cualquier operación de mantenimiento. Si non sigue las instrucciones, corre el peligro de herirse o causar lesiones al personal, o causar daños importantes a la máquina o a su entorno. Antes de usar la máquina, es indispensable seguir una formación. Si Usted (o el operador) no habla español, solicite (o proporciónele) todas las informaciones necesarias. El libro está traducido en otros idiomas. Todas las indicaciones de dirección dadas en este libro están dadas desde la posición del operador en la parte de atrás de la máquina. Puede Ud. conseguir libros suplementarios dirigiéndose a su distribuidor Clarke. INDICE Instrucciones de seguridad para el operador .......................................................................... 7 Presentación de la máquina .................................................................................................... 8 Accesorios ............................................................................................................................ 12 Especificaciones de la puilidora C2K .................................................................................... 15 Preparación de la máquina para trabajar .............................................................................. 19 Instalación del cepillo o del portadisco .................................................................................. 19 Reglaje de la tobera .............................................................................................................. 19 Instrucciones para la conexión con la red 120 V ................................................................... 21 Funcionamiento de la máquina ............................................................................................. 23 Arranque y parada ................................................................................................................. 23 Dominio del desplazamiento de la máquina.......................................................................... 23 Mantenimiento ....................................................................................................................... 23 SECCION II PIEZAS Y SERVICO Mantenimiento ....................................................................................................................... 27 Clarke® Operator's Manual- C2K Series 120V Page - 3 - C2K Series MANUEL D’UTILISATION LISEZ CE MANUEL ATTENTION: Lire le manuel d'utilisation avant de faire fonctionner l'appareil. Il contient des informations importantes pour une utilisation correcte de la machine, en toute sécurité. Lisez-le complètement avant de mettre la machine en marche ou d’effectuer un entretien. A défaut, vous risqueriez de vous blesser ou de blesser d’autres membres du personnel, d’endommager sérieusement la machine ou de provoquer des dégâts dans son environnement. Avant de se servir de la machine, il est indispensable d’avoir reçu une formation. Si vous-même (ou l’opérateur) ne parlez pas français, veuillez demander (ou lui fournir) toutes les explications nécessaires. Des versions du manuel existent en d’autres langues. Toutes les indications de direction figurant dans ce manuel sont visualisées depuis la position du conducteur, à l’arrière de la machine. Pour toute commande de manuels, adressez-vous à votre revendeur Clarke. INDEX Consignes de sécurité pour l’opérateur ............................................................................... 9 Présentation de la machine ................................................................................................ 10 Accessoires ....................................................................................................................... 13 Spécifications de la cireuse de série C2K.......................................................................... 16 Préparation de la machine avant la mise en service .......................................................... 19 Installation de la brosse ou du porte-disque ....................................................................... 19 Réglage du timon ............................................................................................................... 19 Instructions pour le raccordement au réseau 120V ........................................................... 21 Fonctionnement de la machine .......................................................................................... 23 Mise en marche et arrêt ..................................................................................................... 23 Maîtrise du déplacement de la machine ............................................................................. 23 Entretien ............................................................................................................................. 23 SECTION II, PIECES ET DEPANNAGE Entretien ............................................................................................................................. 27 Page -4 - Clarke® Operator's Manual- C2K Series 120V OPERATOR SAFETY INSTRUCTIONS WARNING AVERTISSEMENT ADVERTENCIA DANGER means: Severe bodily injury or death can occur to you or other personnel if the DANGER statements found on this machine or in this Owner's Manual are ignored or are not adhered to. Read and observe all DANGER statements found in this Owner's Manual and on your machine. WARNING means: Injury can occur to you or to other personnel if the WARNING statements found on your machine or in this Owner's Manual are ignored or are not adhered to. Read and observe all WARNING statements found in this Owner's Manual and on your machine. CAUTION means: Damage can occur to the machine or to other property if the CAUTION statements found on your machine or in this Owner's Manual are ignored or are not adhered to. Read and observe all CAUTION statements found in this Owner's Manual and on your machine. DANGER: Failure to read the Owner's Manual prior to operating or attempting any service or maintenance procedure to your machine could result in injury to you or to other personnel; damage to the machine or to other property could occur as well. You must have training in the operation of this machine before using it. If you or your operator(s) cannot read English, have this manual explained fully before attempting to operate this machine. DANGER: To reduce the risk of fire, use only commercially available floor cleaners and waxes intended for machine application. DANGER: Risk of explosion. Floor sanding can result in an explosive mixture of fine dust and air. To reduce risk of explosion, use floor sanding machine only in well ventilated area. DANGER: Operating a machine that is not completely or fully assembled could result in injury or property damage. Do not operate this machine until it is completely assembled. Inspect the machine carefully before operation. DANGER: Electrocution could occur if maintenance and repairs are performed on a unit that is not disconnected from the power source. Disconnect the power supply before attempting any maintenance or service. Always remove the electrical plug from the electrical outlet before changing the brush, pad or other attachment and before leaving the machine. DANGER: Using a machine with a damaged power cord could result in an electrocution. Do not use the machine if the power cord is damaged. Do not use the electrical cord to move the machine. WARNING: Maintenance and repairs performed by unauthorized personnel could result in damage or injury. Maintenance and repairs must be performed by authorized personnel only. Keep all fasteners tight. Keep adjustments according to specifications. WARNING: Electrical components of this machine can "short-out" if exposed to water or moisture. Keep the electrical components of the machine dry. Wipe the machine down after each use. For storage, keep the machine in a dry building. WARNING: Always use a three-wire electrical system connected to the electrical ground. For maximum protection against electric shock, use a circuit that is protected by a ground fault interrupter. Consult your electrical contractor. WARNING: To prevent damage to the power cord, do not let the brush, pad, pad driver or wheels touch the power cord when the machine is running. Always lift the cord over the machine. Do not pull the power cord to move the machine. WARNING: Operating a machine without observing all labels and instructional information could result in injury or damage. Read all machine labels before attempting to operate. Make sure all of the labels and instructional information are attached or fastened to the machine. Get replacement labels and decals from your authorized distributor. Clarke® Operator's Manual- C2K Series 120V Page - 5 - OPERATOR SAFETY INSTRUCTIONS (cont.) WARNING: Use of this machine as a step or furniture could result in injury or damage. Do not use this machine as a step or furniture. Do not ride on this machine. WARNING: To avoid injury keep hands, feet and loose clothing away from all moving parts of this machine. WARNING: Injury to operator or bystanders could occur if an abrupt change in floor surface texture is encountered when using this machine. Abrupt change in floor surface texture can cause a sudden pulling motion by this machine. This sudden pulling motion can result in loss of control of the machine which could injure the operator or bystanders. Avoid motions that could cause machine to cross from a smooth floor surface to a carpeted or rough texture floor surface Avoid motions that could allow the machine to come in contact with low obstacles, such as floor electrical outlets, door stops or entry molding, etc. WARNING: Water solutions or cleaning materials used with this type of machine can leave wet areas on the floor surface. These areas can cause a dangerous condition for the operator or other persons. Always put CAUTION signs near the area being cleaned. WARNING: Any alterations or modifications of this machine could result in damage to the machine or injury to the operator or other bystanders. Alterations or modifications not authorized by the manufacturer voids any and all warranties and liabilities. CAUTION: The machine is heavy. Get assistance before attempting to transport or move it. NOTE: This machine is intended for commercial use. MACHINE INTRODUCTION The Clarke C2K Series The C2K Series are floor maintaining machines that can be used for polishing, spraying, buffing, stripping and shampooing. The machines can be used on wood, vinyl, terrazzo or cement floors. With the shampoo brush, the machines can be used to clean carpet and with the sanding disc they can be used to sand floors. Page -6 - Clarke® Operator's Manual- C2K Series 120V INSTRUCCIONES PARA LA SEGURIDAD DEL OPERADOR WARNING AVERTISSEMENT ¡ AVISO ! ¡ PELIGRO ! : Si no sigue la indicación PELIGRO, se pueden causar lesiones graves, incluso mortales. Lea y siga todas las indicaciones PELIGRO que se encuentran en el libro y en la máquina. ¡ AVISO ! : Si no sigue la indicación AVISO, se pueden causar lesiones sea al operador sea a otro personal y/o daños materiales. Lea y siga todas las indicaciones AVISO que se encuentran en el libro y en la máquina. ¡ CUIDADO ! : Si no sigue la indicación CUIDADO, se puede estropear la máquina o causar daños materiales. Lea y siga las indicaciones CUIDADO que se encuentran en el libro y en la máquina. ¡ CUIDADO ! Siempre lea este libro de instrucciones antes de arrancar la máquina o hacer un mantenimiento. A falta de esta precaución, corre el peligro de herirse o causar lesiones a colegas ; podría Ud. también causar daños a la máquina o a su lugar de trabajo. Se debe aprender el manejo de esta máquina antes de usarla. Si Usted (o su plantilla) no conoce el español, se ruega dejarse explicar todo el libro antes de usar la máquina. ¡ CUIDADO ! Para evitar un peligro de incendio, use sólo productos de limpieza y cera para el suelo especialmente concebidos para máquinas. ¡ CUIDADO ! Peligro de explosión : mientras apomaza un parqué, una mezcla explosiva de partículas de polvo y aire puede formarse. Para reducir el peligro de explosión, use la máquina sólo en locales perfectamente ventilados. ¡ CUIDADO ! Si usa una máquina antes de que esté completamente montada, corre el peligro de herirse o causar daños materiales. No opere la máquina antes de que esté completamente montada. Compruebe cuidadosamente el estado de la máquina antes de cada utilización. ¡ CUIDADO ! Si efectúa un mantenimiento o una reparación sin desconectar la máquina, hay un riesgo de electrocución. Desconecte el enchufe de la caja conectada con la red antes de empezar el mantenimiento o la reparación. Siempre desconecte el enchufe de la caja de enchufe conectada con la red antes de cambiar el cepillo, el disco o cualquier otro accesorio y si deja la máquina sin vigilarla. ¡ CUIDADO ! Si opera la máquina con un cable de alimentación estropeado, se puede causar una electrocución. No use nunca la máquina si el cable de alimentación está estropeado. No tire de la máquina usando el cable eléctrico. ¡ AVISO ! Una reparación o un mantenimiento efectuado por personas no cualificadas puede causar lesiones y/o daños materiales. Todas las operaciones de mantenimiento o de reparación de la máquina deben ser efectuadas por técnicos cualificados. Compruebe que las fijaciones están correctamente apretadas. Haga reglajes conforme a las indicaciones dadas en el libro. ¡ AVISO ! Hay un riesgo de cortocircuito si los componentes eléctricos de una máquina están expuestos a la humedad o son mojados. Procure que los componentes eléctricos sean siempre secos. Seque cuidadosamente la máquina después de cada utilización. Guarde la máquina en un local seco. Clarke® Operator's Manual- C2K Series 120V Page - 7 - ¡ AVISO ! Use siempre un cable con tres conductores puestos a tierra. Para una protección óptima, conecte la máquina con una caja de enchufe conectada con la red que tiene un diferencial. Si tiene alguna duda, sírvase acudir a un eléctrico cualificado. ¡ AVISO ! Para evitar daños al cable de alimentación, procure que el cepillo, el disco, el portadisco o las ruedas no toquen el cable, cuando la máquina funciona. Levante siempre el cable por encima de la máquina. No tire de la máquina para acercar la máquina. ¡ AVISO ! Si usa la máquina sin respetar todas las instrucciones escritas en los adhesivos y los carteles, corre el peligro de causar lesiones y daños materiales. Lea todas las indicaciones escritas en la máquina antes de la primera utilización. Compruebe que todos los adhesivos y las instrucciones estén colocados en los sitios previstos. Si es preciso, haga un nuevo pedido a su distribuidor Clarke. ¡ AVISO ! No use la máquina como escabel o mueble. Corre el peligro de causar lesiones o daños materiales. No use la máquina como medio de transporte. ¡ AVISO ! Para evitar herirse, sírvase mantener une distancia de seguridad suficiente entre las partes móviles de la máquina y sus manos o sus pies. No lleve ropas holgadas. ¡ AVISO ! Una modificación brusca de la textura del suelo puede causar un sobresalto de la máquina de la cual el operador pierde momentáneamente el dominio. Eso puede causar lesiones al operador o a otras personas encontrándose cerca. Procure que la máquina no pase de una superficie lisa a una alfombra o una superficie más rugosa. Procure que la máquina no esté en contacto con cajas de enchufe colocadas en el suelo, topes de puerta o casquillos, etc. ¡ AVISO ! Las soluciones acuosas o los productos de limpieza usados con esta máquina pueden dejar zonas húmedas en el suelo, que pueden ser causa de peligro para el operador u otras personas. Ponga siempre señales de PRECAUCION cerca de la superficie que está limpiando. ¡ AVISO ! Esta máquina pesa. Transpórtela o desplácela con ayuda de otra persona. NOTA : Esta máquina es de uso comercial. PRESENTACION DE LA MAQUINA Modelos Clarke Serie C2K Estos modelos se concibieron para el mantenimiento del suelo y pueden ser utilizados para el pulido, el alisado, el decapado y la limpieza con champú. Son convenientes para los suelos de madera, de vinilo, de terrazo o de cemento. Con el cepillo de champú se puede limpiar el alfombra, mientras que el disco de pulido se usa para pulir los suelos. Page -8 - Clarke® Operator's Manual- C2K Series 120V INSTRUCTIONS POUR LA SECURITE DE L’OPERATEUR WARNING AVERTISSEMENT ¡ AVISO ! ! DANGER ! Le non-respect des consignes précédées du mot DANGER peut occasionner des blessures graves, voire entraîner la mort. Lisez et respectez toutes les consignes DANGER figurant dans ce manuel et sur la machine. AVERTISSEMENT Le non-respect des consignes AVERTISSEMENT peut entraîner des blessures pour l’opérateur ou d’autres membres du personnel et/ou occasionner des dégâts matériels. Lisez et respectez toutes les consignes AVERTISSEMENT figurant dans ce manuel et sur la machine. ATTENTION Le non-respect des consignes signalées par le mot ATTENTION peut entraîner des dégâts à la machine ou dans son environnement. Lisez et observez toutes les consignes ATTENTION figurant dans ce manuel et sur la machine. ! DANGER ! Lisez toujours ce manuel d’instructions avant de mettre la machine en service ou de procéder à un entretien. A défaut, vous risqueriez de vous blesser ou de blesser des collègues de travail; vous pourriez également provoquer des dégâts à la machine ou sur votre lieu de travail. Vous devez avoir reçu une formation avant d’utiliser la machine. Si vous (ou les membres de votre personnel) ne connaissez pas le français, veuillez vous faire expliquer le manuel complètement avant de commencer à utiliser la machine. ! DANGER ! Pour éviter tout risque d’incendie, n’utiliser que des produits de nettoyage et des cires pour sol spécialement conçus pour un usage en machine ! DANGER ! Risque d’explosion : lors du ponçage d’un parquet, un mélange explosif de particules de fine poussière et d’air peut se former. Pour réduire le risque d’explosion, n’utiliser la machine que dans des locaux parfaitement ventilés. ! DANGER ! Si vous utilisez une machine avant qu’elle ne soit complètement montée, vous risquez de vous blesser ou de provoquer des dégâts matériels. Ne mettez pas la machine en service avant qu’elle ne soit complètement montée. Vérifiez soigneusement l’état de la machine avant chaque utilisation. ! DANGER ! Si vous procédez à un entretien ou à une réparation sans avoir débranché la machine, il y a risque d’électrocution. Débranchez la fiche de la prise réseau avant de commencer tout entretien ou toute réparation. Débranchez toujours la fiche de la prise réseau avant de changer la brosse, le disque ou tout autre accessoire et si vous laissez la machine sans surveillance. ! DANGER ! L’utilisation d’une machine lorsque le câble d’alimentation est endommagé peut provoquer une électrocution. Ne jamais utiliser la machine si le câble d’alimentation est endommagé. Ne pas utiliser le câble électrique pour tirer la machine. AVERTISSEMENT Un entretien ou des réparations effectués par des personnes non qualifiées risque de provoquer des blessures et/ou des dégâts matériels. Tous les travaux d’entretien ou de réparation de la machine doivent être effectués par des techniciens qualifiés. Bien veiller à ce que les fixations soient correctement serrées. Effectuer les réglages conformément aux indications figurant dans le manuel. AVERTISSEMENT Risque de court-circuit si les composants électriques d’une machine ont été exposés à l’humidité ou sont mouillés. Veillez à ce que les composants électriques soient toujours secs. Essuyer soigneusement la machine après chaque utilisation. Entreposer la machine dans un local sec. Clarke® Operator's Manual- C2K Series 120V Page - 9 - AVERTISSEMENT Utiliser toujours un câble à trois conducteurs, relié à la terre. Pour une protection optimale, branchez la machine sur une prise réseau équipé d’un différentiel. En cas de doute, veuillez faire appel à un électricien qualifié. AVERTISSEMENT Pour éviter d’endommager le câble d’alimentation, veillez à ce que la brosse, le disque, le porte-disque ou les roues ne touchent pas le câble, lorsque la machine fonctionne. Soulevez toujours le câble au-dessus de la machine. Ne tirez pas le câble pour faire avancer la machine. AVERTISSEMENT Si vous utilisez une machine sans respecter toutes les consignes figurant sur les auto-collants et les panneaux d’instructions, vous risquez de provoquer des blessures et des dégâts matériels. Lisez toutes les indications figurant sur la machine avant la première utilisation. Vérifiez que tous les auto-collants et les instructions sont positionnés aux endroits requis . Au besoin, recommandez-en chez votre revendeur Clarke. AVERTISSEMENT Ne pas utiliser cette machine comme escabeau ou comme meuble. Risque de blessure ou de dégât matériel. Ne pas utiliser la machine comme moyen de transport. AVERTISSEMENT Pour éviter d’être blessé, veillez à maintenir une distance de sécurité suffisante entre les parties mobiles de la machine et vos mains ou vos pieds. Ne portez pas de vêtements amples. AVERTISSEMENT Une modification abrupte de la texture du sol peut provoquer un sursaut de la machine qui échapperait ainsi momentanément au contrôle de l’opérateur, risquant de le blesser ou de blesser des personnes se trouvant à proximité immédiate. Soyez attentif à ne pas faire passer la machine d’une surface lisse sur un tapis ou sur une surface plus rugueuse. Veillez à ce que la machine n’entre pas en contact avec des prises électriques placées dans le sol, des arrêts de porte ou des entretoises, etc. AVERTISSEMENT Les solutions aqueuses ou les produits de nettoyage utilisés avec ce type de machine peuvent laisser des zones humides sur le sol, qui représentent un danger potentiel pour l’opérateur ou pour d’autres personnes. Placez toujours des panneaux d’avertissement “ATTENTION” près de la surface que vous nettoyez. AVERTISSEMENT Cette machine est lourde. Faites-vous aider pour la transporter ou pour la déplacer. NOTE: Cette machine est destinée à un usage commercial. PRESENTATION DE LA MACHINE Modèles Clarke Série C2K Ces modèles sont destinés à l’entretien du sol et peuvent être utilisés pour le polissage, le lissage, le décapage et le nettoyage avec un shampoing. Ils conviennent pour des sols en bois, en vinyle, en terrazzo ou en ciment. La brosse à shampoing permet de nettoyer les tapis, tandis que le disque de ponçage s’utilise pour le ponçage des sols. Page -10 - Clarke® Operator's Manual- C2K Series 120V ACCESSORIES The following accessories are available. 5. Synthetic pads for polishing, scrubbing, stripping and spray buffing. 6. Brushes with metal or wood backs and with holes to let the solution flow through. 1. Polishing and waxing brushes. 2. Brushes with natural or synthetic bristles for scrubbing. 7. Solution tank. 3. Brushes with steel wire bristles. 8. Sanding discs. 4. Synthetic pad holders. 9. Solution Buff Accessory Model C2KCode Number Solution Tank Assembly Spray Buff Attachment Weight Kit Polyproplene Scrub Brush Standard Pad Driver Perma Grip Pad Driver Super Grip Drive Pad Carpet Nylon Brush High Speed Pad Driver Sanding Disc Driver Abrasive Coated Tynex Steel Wire Brush Capture (Carpet) Scrub Brush Grinding Disk Assembly Dust Skirt Kit 160 01196A 50026A ------------------51704A 50864B 53159A 37007A ----------------------------51443A 410963 ------------------10087A 180 01197A 50026A ------------------51706A 50865B 53157A 37009A ---------------------------51445A 410984 ------------------10088A 200 01198A 50026A ------------------51707A 50866B 53156A 37011A -----------------------------51446A 480924 ------------------10089A 1600 01199A 50026A ---------10086A 51704A 50864B 53159A 37007A 51498A ---------450214 51443A 410963 ---------450212 10087A Model C2KCode Number Solution Tank Assembly Spray Buff Attachment Weight Kit Polyproplene Scrub Brush Standard Pad Driver Perma Grip Pad Driver Super Grip Drive Pad Carpet Nylon Brush High Speed Pad Driver Sanding Disc Driver Abrasive Coated Tynex Steel Wire Brush Capture (Carpet) Scrub Brush Grinding Disk Assembly Dust Skirt Kit 160HS 01202A 50026A 440570 ---------51704A 50864B 53159A 37007A ----------53154A --------------------------------------------------10087A 200HS 01204A 50026A 440570 ---------51707A 50866B 53156A 37011A ---------17518A --------------------------------------------------10089A 1600DS 01205A 50026A 440570 10086A 51704A 50864B 53159A 37007A ----------53154A --------------------------------------------------10087A 2000DS 01206A 50026A 440570 10086A 51707A 50866B 53156A 37011A ----------17518A --------------------------------------------------10089A 1800 01200A 50026A ---------10086A 51706A 50865B 53157A 37009A 51701A ---------460215 51445A 410984 11405A 500212 10088A 2000 01201A 50026A ---------10086A 51707A 50866B 53156A 37011A ---------------------------51446A 48092A 11406A ---------10089A WARNING: Use only brushes and accessories supplied by the manufacturer. Clarke® Operator's Manual- C2K Series 120V Page - 11 - ACCESORIOS Los accesorios siguientes son disponibles : 1. Cepillos para encerar y pulir. 2. Cepillos para fregar con filamentos en fibras naturales o sintéticas. 3. Cepillos de alambre de acero. 4. Portadiscos sintéticos. 5. Discos sintéticos para pulir, fregar, decapar y lustrar con tampón. 6. Cepillos con el dorso de metal o de madera y con canales para dispersar la solución. 7. Depósito de solución. 8. Discos para pulir. 9. Juego de accesorios para lustrar por pulverización con tampón. ModeloC2K Número de código Conjunto de depósito de solución Conjunto del vaporizador Juego de pesas Cepillo de polipropileno para fregar Portadisco con sujeción Standard Portadisco con sujeción Perma Grip Portadisco con sujeción Super Grip Cepillo de nilón para alfombras Portadisco de alta velocidad Portadisco para discos de arenado Tynex cubierto de abrasivo Cepillo de alambre de acero Cepillo para fregar alfombras (Capture) Conjunto de disco de amolar Faldón de protección contra el polvo 160 01196A 50026A ------------------51704A 50864B 53159A 37007A -----------------------------51443A 410963 ------------------10087A 180 01197A 50026A ------------------51706A 50865B 53157A 37009A -----------------------------51445A 410984 ------------------10088A 200 01198A 50026A -------------------51707A 50866B 53156A 37011A ------------------------------51446A 480924 ------------------10089A 1600 01199A 50026A ---------10086A 51704A 50864B 53159A 37007A 51498A ---------450214 51443A 410963 ---------450212 10087A ModeloC2K Número de código Conjunto de depósito de solución Conjunto del vaporizador Juego de pesas Cepillo de polipropileno para fregar Portadisco con sujeción Standard Portadisco con sujeción Perma Grip Portadisco con sujeción Super Grip Cepillo de nilón para alfombras Portadisco de alta velocidad Portadisco para discos de arenado Tynex cubierto de abrasivo Cepillo de alambre de acero Cepillo para fregar alfombras (Capture) Conjunto de disco de amolar Faldón de protección contra el polvo 160HS 01202A 50026A 440570 ---------51704A 50864B 53159A 37007A ----------53154A --------------------------------------------------10087A 200HS 01204A 50026A 440570 ---------51707A 50866B 53156A 37011A ----------17518A --------------------------------------------------10089A 1600DS 01205A 50026A 440570 10086A 51704A 50864B 53159A 37007A ----------53154A --------------------------------------------------10087A 2000DS 01206A 50026A 440570 10086A 51707A 50866B 53156A 37011A ----------17518A --------------------------------------------------10089A 1800 01200A 50026A ----------10086A 51706A 50865B 53157A 37009A 51701A ----------460215 51445A 410984 11405A 500212 10088A 2000 01201A 50026A ----------10086A 51707A 50866B 53156A 37011A ------------------------------51446A 480924 11406A ----------10089A AVISO: Utilice únicamente las escobillas y los accesorios suministrados por el fabricante. Page -12 - Clarke® Operator's Manual- C2K Series 120V ACCESSOIRES Les accessoires suivants sont disponibles: 1. 2. 3. 4. 5. Brosses pour cirer et polir Brosses de récurage, avec brins en fibres naturelles ou synthétiques. Brosses avec brins en acier Porte-disques synthétiques Disques synthétiques pour le polissage, le récurage, le décapage et le lustrage au tampon. 6. 7. 8. 9. Brosses avec dos en métal ou en bois et avec gouttières pour la dispersion de solution. Réservoir de solution Disques de ponçage Kit d’accessoires pour le lustrage par pulvérisation au tampon. ModèleC2K Numéro de code Ensemble de réservoir de solution Ensemble du vaporisateur Poids du Kit Brosse de récurage en polypropylène Ensemble porte-disque avec fixation Standard Ensemble porte-disque avec fixation Perma Grip Ensemble porte-disque avec fixation Super Grip Brosse nylon pour tapis Porte-disque grande vitesse Disque d'abrasif Nylon Tynex revêtu d'abrasif Brosse brins d'acier Brosse de récurage Capture pour tapis Ensemble de meulage Tablier à poussière 160 01196A 50026A ------------------51704A 50864B 53159A 37007A ----------------------------51443A 410963 ------------------10087A 180 01197A 50026A ------------------51706A 50865B 53157A 37009A -----------------------------51445A 410984 --------------------10088A 200 01198A 50026A --------------------51707A 50866B 53156A 37011A -----------------------------51446A 480924 --------------------10089A 1600 01199A 50026A ---------10086A 51704A 50864B 53159A 37007A 51498A ----------450214 51443A 410963 ----------450212 10087A ModèleC2K Numéro de code Ensemble de réservoir de solution Ensemble du vaporisateur Poids du Kit Brosse de récurage en polypropylène Ensemble porte-disque avec fixation Standard Ensemble porte-disque avec fixation Perma Grip Ensemble porte-disque avec fixation Super Grip Brosse nylon pour tapis Porte-disque grande vitesse Disque d'abrasif Nylon Tynex revêtu d'abrasif Brosse brins d'acier Brosse de récurage Capture pour tapis Ensemble de meulage Tablier à poussière 160HS 01202A 50026A 440570 ----------51704A 0864B 53159A 37007A ----------53154A --------------------------------------------------10087A 200HS 01204A 50026A 440570 ---------51707A 50866B 53156A 37011A ----------17518A --------------------------------------------------10089A 1600DS 01205A 50026A 440570 10086A 51704A 50864B 53159A 37007A ----------53154A --------------------------------------------------10087A 2000DS 01206A 50026A 440570 10086A 51707A 50866B 53156A 37011A ----------17518A --------------------------------------------------10089A 1800 01200A 50026A ----------10086A 51706A 50865B 53157A 37009A 51701A ----------460215 51445A 410984 11405A 500212 10088A 2000 01201A 50026A ---------10086A 51707A 50866B 53156A 37011A ---------------------------51446A 480924 11406A ---------10089A AVERTISSEMENT: N'utiliser que les brosses et accessoires fournis par le fabricant. Clarke® Operator's Manual- C2K Series 120V Page - 13 - Machine Specifications Model Code Number Voltage (Volts) Frequency (Hz) Current (Amps) Power (hp) Brush Diameter (inches) Block Diameter (inches) Brush Speed (rpm) Cord Length (feet) Weight (pounds) C2K-160 01196A 120 60 14 1 16 14 175 50 88 C2K-180 01197A 120 60 14 1 18 16 175 50 89 C2K-200 C2K-160HS 01198A 01202A 120 120 60 60 14 14 1 1 20 16 18 14 175 290 50 50 91 88 Model Code Number Voltage (Volts) Frequency (Hz) Current (Amps) Power (hp) Brush Diameter (inches) Block Diameter (inches) Brush Speed (rpm) Cord Length (feet) Weight C2K-1600 01199A 120 60 15 1.5 16 14 170 50 89 C2K-1800 01200A 120 60 15 1.5 18 16 170 50 90 C2K-2000 01201A 120 60 15 1.5 20 18 170 50 92 Page -14 - C2K-1600DS 01205A 120 60 15 1.5 16 14 180/320 50 81 C2K-200HS 01204A 120 60 14 1 20 18 290 50 91 C2K-2000DS 01206A 120 60 15 1.5 20 18 180/320 50 84 Clarke® Operator's Manual- C2K Series 120V Especificaciones de la pulidora C2K Modelo Número de código Tensión (V) Frecuencia (Hz) Corriente (A) Potencia (hp) Diámetro del cepillo (pulgadas) Diámetro del bloque (pulgadas) Velocidad del cepillo (rpm) Longitud del cable de añadido (pies) Peso (libras) Model Número de código Tensión (V) Frecuencia (Hz) Corriente (A) Potencia (hp) Diámetro del cepillo (pulgadas) Diámetro del bloque (pulgadas) Velocidad del cepillo (rpm) Longitud del cable de añadido (pies) Peso (libras) C2K-160 01196A 120 60 14 1 16 14 175 50 C2K-180 01197A 120 60 14 1 18 16 175 50 C2K-200 C2K-160HS C2K-200HS 01198A 01202A 01204A 120 120 120 60 60 60 14 14 14 1 1 1 20 16 20 18 14 18 175 290 290 50 50 50 88 89 91 88 91 C2K-1600 01199A 120 60 15 1.5 16 14 170 50 C2K-1800 01200A 120 60 15 1.5 18 16 170 50 C2K-2000 01201A 120 60 15 1.5 20 18 170 50 C2K-1600HD 01205A 120 60 15 1.5 16 14 180/320 50 C2K-2000DS 01206A 120 60 15 1.5 20 18 180/320 50 89 90 92 81 84 Clarke® Operator's Manual- C2K Series 120V Page - 15 - Spécifications de la cireuse de série C2K Modèle Numéro de code Tension (volts) Fréquence (Hz) Courant (Amps) Puissance (hp) Diamètre de brosse (pouces) Diamètre du bloc (pouces) Vitesse de brosse (rpm) Longueur du cordon (pieds) Poids (livers) C2K-160 01196A 120 60 14 1 16 14 175 50 88 C2K-180 01197A 120 60 14 1 18 16 175 50 89 C2K-200 01198A 120 60 14 1 20 18 175 50 91 C2K-160HS 01202A 120 60 14 1 16 14 290 50 88 Modèle Numéro de code Tension (volts) Fréquence (Hz) Courant (Amps) Puissance (hp) Diamètre de brosse (pouces) Diamètre du bloc (pouces) Vitesse de brosse (rpm) Longueur du cordon (pieds) Poids (livers) C2K-1600 01199A 120 60 15 1.5 16 14 170 50 89 C2K-1800 01200A 120 60 15 1.5 18 16 170 50 90 C2K-2000 01201A 120 60 15 1.5 20 18 170 50 92 C2K-1600DS 01205A 120 60 15 1.5 16 14 180/320 50 81 Page -16 - C2K-200HS 01204A 120 60 14 1 20 18 290 50 91 C2K-2000DS 01206A 120 60 15 1.5 20 18 180/320 50 84 Clarke® Operator's Manual- C2K Series 120V NOTES Clarke® Operator's Manual- C2K Series 120V Page - 17 - HOW TO PREPARE THE MACHINE FOR OPERATION WARNING: Always remove the electrical plug from the electrical outlet before installing or changing the pad or brush. How To Install The Brush Or Pad Driver To install the brush or pad driver, follow this procedure: 1. Put the handle in the vertical position. Figure 1 2. To lock the handle, push the locking lever down.See figure 1. 3. Tilt the machine backward until the handle is on the floor. See figure 2. 4. Put one foot on each side of the machine. See figure 2. 5. Align the lugs (1) on the locking plate into the pad driver adapter openings (2). See figure 3. 6. To lock the brush or pad into position, turn the brush or pad driver clockwise. 7. Turn the brush or pad counterclockwise to unlock and remove the brush. Figure 2 8. Lift the machine to the vertical position. NOTE: To prevent damage to the brush or pad driver, remove the accessory while not in use. Keep the brush in a cool, dry place. How To Adjust The Handle To adjust the handle, follow this procedure: 1. The locking lever is on the lower part of the handle tube. Use your foot to lift the lever. See figure 1. Figure 3 1. The lugs. 2. The drive adpater openings. 1. Espigas 2. Aberturas del acoplamiento 1. Ergots 2. Ouvertures de l'accouplement Page -18 - 2. Lower the handle to the best operating position. NOTE: For the best operating position, keep your back straight, bend only your arms. 3. Using your foot, push the locking lever down. 4. Hold the handle against your body for the best control. Clarke® Operator's Manual- C2K Series 120V PREPARACION DE LA MAQUINA PARA TRABAJAR AVISO : Desconecte siempre el enchufe de la caja de enchufe conectada con la red antes de instalar o cambiar el disco o el cepillo. PREPARATION DE LA MACHINE AVANT LA MISE EN SERVICE AVERTISSEMENT: Débranchez toujours la fiche de la prise réseau avant d’installer ou de changer le disque ou la brosse. Cómo instalar el cepillo o el portadisco Para instalar una cabeza de cepillo o un portadisco, sigue este procedimiento : 1. 2. 3. 4. 5. 6. 7. 8. Coloque la tobera en posición vertical. Para bloquear la tobera, empuje la palanca de bloqueo (hacia abajo). (Véase fig. 1) Vuelque la máquina hacia atrás hasta que la tobera toca el suelo. (Véase fig. 2). “Cabalgando” sobre la máquina (Véase fig. 2) Inserte el arrastre central del cepillo sobre el acoplamiento de la máquina. (Véase fig. 3) Fije el cepillo o el disco girando en el sentido de las agujas del reloj. Para quitar el cepillo o el disco, desbloquee el accesorio girando en el sentido contrario de las agujas del reloj, pues sáquelo. Coloque de nuevo la máquina en posición vertical. NOTA : Para evitar causar daños al cepillo o al portadisco, quite el accesorio cuando guarda la máquina. Guarde la máquina en un sitio seco y fresco. Comment installer la brosse ou le porte-disque Pour placer une tête de brosse ou un porte-disque, procéder comme suit: 1. Placer le timon en position verticale. 2. Pour verrouiller le timon, presser le levier de verrouillage (vers le bas) (Voir fig.1) 3. Incliner la machine vers l’arrière jusqu’à ce que le timon touche le sol. (Voir fig.2) 4. En “chevauchant” la machine (Voir fig. 2) 5. Insérer l’entraînement central de la brosse sur l’accouplement de la machine.(Voir fig. 3) 6. Fixer la brosse ou le disque par pivotement dans le sens horlogique. 7. Pour déposer la brosse ou le disque, débloquer l’accessoire par pivotement dans le sens antihorlogique, puis le retirer. 8. Redresser la machine en position verticale. NOTE: Pour éviter d’endommager la brosse ou le porte-disque, enlever l’accessoire lorsque vous entreposez la machine. Entreposer la machine dans un endroit sec et frais. Reglaje de la tobera Réglage du timon Para reglar la tobera, sigue este procedimiento : Pour régler le timon, procéder comme suit : 1. 1. Le levier de verrouillage se trouve sur la partie inférieure du montant du timon. Relever le levier avec le pied (Voir fig.1). 2. Abaisser le timon dans la position de travail la plus confortable. 2. La palanca de bloqueo se encuentra en la parte inferior del montante de la tobera. Levante la palanca con el pie. (Véase fig. 1). Baje la tobera en la posición de trabajo la más confortable. NOTA : La mejor posición de trabajo es cuando la espalda está recta y los brazos son doblados. 3. 4. Con el pie baje la palanca de bloqueo. Para controlar mejor la máquina, tenga el mango cerca del cuerpo mientras trabaja. Clarke® Operator's Manual- C2K Series 120V NOTE La meilleure position de travail est celle où le dos est bien droit et où seuls les bras sont fléchis. 3. Avec le pied, abaisser le levier de verrouillage. 4. Pour mieux contrôler la machine, tenir la poignée près du corps pendant le travail. Page - 19 - 120 VOLT MACHINES Instructions for connection to the power supply and the electrical ground. This product must be grounded. If it should malfunction or breakdown, grounding provides a path of least resistance for electric current to reduce the risk of electrical shock. This product is equipped with a cord having an equipment-grounding conductor and grounding plug. The plug must be inserted into an appropriate oulet that is properly installed and grounded in accordance with all local codes and ordinances. Grounded Outlet Grounded Outlet Box Grounding Pin (United States, Mexico and Canada) Figure 4 WARNING: Improper connection of the equipment-grounding conductor can result in a risk of electric shock. Check with a qualified electrician or service person if you are in doubt as to whether the outlet is properly grounded. Do not modify the plug provided with the product - if it will not fit the outlet, have a proper outlet installed by a qualified electrician. This product is for use on a nominal 120 volt circuit and has a grounding attachment plug that looks like the plug illustrated in Fig. 4. Make sure that the product is connected to an outlet having the same configuration as the plug. No adaptor should be used with this product. Toma corriente con polo de tierra. WARNING: To prevent possible electric shock, protect the machine from rain. Keep the machine in a dry building. Tapa del toma corriente con polo de tierra. Terminal de tierra Figure 4a WARNING: To prevent possible electric shock, always use a 3-wire electrical system connected to the electrical ground. For maximum protection against electrical shock, use a circuit that is protected by a ground fault circuit interrupter. Consult your electrical contractor. WARNING: Do not cut, remove or break the ground pin. If the outlet does not fit the plug, consult your electrical contractor. WARNING: Have worn, cut or damaged cords replaced by an authorized service person. EXTENSION CORDS Prise de courant avec mise à la terre Use only an approved extension cord with three conductors, a plug with three terminals, and a connector body with three holes. The machine has a power cord with wire size 14 AWG (AWG means American Wire Gauge). Boîte de sortie mise à la terre Broche de mise à la terre. WARNING: If you use an extension cord, use an extension cord with minimum wire size 12 AWG. Do not use an extension cord longer than 50 feet. Do not join two extension cords. Figure 4b Page -20 - Clarke® Operator's Manual- C2K Series 120V MAQUINAS 120 V. MACHINES 120 V. INSTRUCCIONES PARA LA CONEXION ELECTRICA DE LA MAQUINA INSTRUCTIONS POUR LE RACCORDEMENT ELECTRIQUE La máquina debe ser puesta a tierra. En caso de mal funcionamiento o de avería, el hilo de tierra es un camino de menor resistencia que permite el paso de corriente ; por lo cual se reduce el riesgo de choque eléctrico. La máquina tiene un cable de alimentación con tres conductores y un enchufe con tres clavijas de las cuales una está puesta a tierra. El enchufe sólo puede ser conectado con una caja de enchufe reglamentaria, puesta a tierra con todas las reglas del arte y conforme a los reglamentos locales. Cette machine doit être mise à la terre. En cas de dysfonctionnement ou de panne, le fil de terre constitue un chemin de moindre résistance qui permet le passage du courant, réduisant ainsi le risque de choc électrique. La machine est munie d’un câble d’alimentation à trois conducteurs et d’une fiche à trois broches, dont une sert à la mise à la terre. La fiche ne peut être branchée que dans une prise réglementaire, reliée à la terre selon les règles de l’art et qui satisfait à tous les règlements locaux. AVISO : Una conexión incorrecta del conductor de puesta a tierra puede causar un choque eléctrico. Acuda a un técnico autorizado o a un electricista si tiene alguna duda acerca de la puesta a tierra correcta de la caja de enchufe conectada con la red. Nunca modifique el enchufe suministrado con la máquina. Si no encaja el enchufe en la caja de enchufe conectada con la red, haga instalar una caja de enchufe adecuada por un electricista autorizado. AVERTISSEMENT: Une mise à la terre incorrecte peut provoquer un choc électrique. Si vous avez le moindre doute quant à la mise à la terre de votre prise réseau, faites-la vérifier par un électricien ou un technicien agréé. Ne modifiez jamais la fiche fournie avec la machine. Si la fiche ne rentre pas dans la prise réseau dont vous disposez, faites installer une prise adéquate par un électricien agréé. Esta máquina debe funcionar en un circuito de potencia nominal de 120 V. Tiene un enchufe con una clavija de puesta a tierra semejante al enchufe reproducido en la figura 4a. Compruebe que la máquina esté conectada con una caja de enchufe que tiene la configuración adecuada. No utilice ningún adaptador. Cette machine doit être utilisée sur un circuit d’une puissance nominale de 120 V. Elle est munie d’une fiche avec broche de mise à la terre semblable à celle illustrée à la figure 4b. Vérifiez que la prise à laquelle la machine doit être raccordée présente une configuration correspondant à la fiche. N’utilisez pas d’adaptateur. AVISO: Para evitar el peligro de choque eléctrico, proteja la máquina de la lluvia. Guárdela en un local seco. AVERTISSEMENT: Pour éviter tout risque de choc électrique, protégez la machine de la pluie. Entreposez-la dans un local sec. AVISO: Para evitar el peligro de electrocución, conecte la máquina con una red que tiene tres conductores, está puesta a tierra y tiene un diferencial. Si tiene alguna duda, diríjase a un electricista autorizado. AVERTISSEMENT: Pour éviter tout risque d’électrocution, connectez la machine sur un réseau à trois conducteurs, relié à la terre et muni d’un différentiel. En cas de doute, adressez-vous à un électricien agréé. AVISO: Nunca rompa, quite o corte la clavija de puesta a tierra. Si la caja de enchufe no corresponde al enchufe, acude a un electricista autorizado. AVERTISSEMENT:Ne jamais casser, enlever ou couper la broche de mise à la terre. Si la prise ne correspond pas à la fiche, faire appel à un électricien agréé. AVISO: Si el cable de alimentación está desgastado, dañado o cortado, hágalo cambiar inmediatamente por un técnico autorizado. AVERTISSEMENT:Si le câble d’alimentation est usé, endommagé ou entaillé, faites-le remplacer immédiatement par un technicien agréé. AÑADIDOS ALLONGES Use sólo un añadido con tres conductores, de los cuales uno está puesto a tierra, y con un enchufe con tres clavijas y un conector con tres aberturas. La máquina tiene un cable de alimentación de 14 AWG (American Wire Gauge) (Calibre estadounidense para alambre) de sección. N’utiliser qu’une allonge à trois conducteurs, dont un de mise à la terre, munie d’une fiche à trois broches et d’un connecteur à trois orifices. La machine est équipée d’un câble d’alimentation de 14 AWG (American Wire Gauge) de section. ¡ AVISO !Use un añadido de cable de 12 AWG de sección. No use ningún añadido de más de 50 pies de largo. Nunca conecte dos añadidos. Clarke® Operator's Manual- C2K Series 120V ! AVERTISSEMENT ! Utilisez un câble de rallonge d’une section de 12 AWG. N’utilisez pas de rallonge d’une longueur supérieure à 50 pieds. Ne raccordez jamais deux rallonges. Page - 21 - HOW TO OPERATE THE MACHINE How To Start/Stop The Machine 1 WARNING: Never start a polisher when the handle is in the vertical position. The following step applies to the C2K-1600DS and C2K2000DS only:Select high or low speed with the switch located on the motor cover. Moving the switch lever up selects high speed. Moving the switch lever down selects low speed. The following steps apply to all C2K series: 2 2 The switch to start and stop the machine is activated by the interlock switch (1) and the levers (2) under the handle grips. See figure 5. To start the machine, follow this procedure: Figure 5 1. Lower the handle 2. Lock the handle in the best position for operation. NOTE: Make sure you hold the handle with both hands. 3. Push the interlock switch (1), and apply pressure to the levers (2). See figure 5. How To Control The Machine NOTE: Make sure you hold the handle with both hands. The side to side movement of the machine is controlled by raising the handle and pressing down on the handle. To move the machine to the left, press down on the handle slightly. To move the machine to the right, raise the handle slightly. MAINTENANCE WARNING: Maintenance must be done by authorized personnel only. Maintenance Instructions Return the machine to a Clarke Authorized Service Location every 12 months for maintenance inspections. Page -22 - Clarke® Operator's Manual- C2K Series 120V FUNCIONAMIENTO DE LA MAQUINA MISE EN SERVICE DE LA MACHINE Arranque y parada Mise en Marche et Arrêt AVISO : Nunca arranque una pulidora cuando la tobera está en posición vertical. Sólo para el modelo C2K-1600DS, C2K-2000DS: Seleccione la velocidad (alta o moderada - high o low) por medio del interruptor situado en la tapa del motor. Velocidad alta : la palanca está empujada hacia arriba. Velocidad moderada : la palanca está empujada hacia abajo. Los siguientes pasos se aplican a toda la serie C2K: El interruptor de arranque/parada se opera empujando el botón de cierre de seguridad (1) y usando las palancas (2) situadas debajo del mango de mando (Véase fig. 5). Para arrancar la máquina, siga este procedimiento : 1. 2. Baje la tobera. Bloquee la tobera en la posición de trabajo la más confortable para el operador. NOTA : Siempre tenga el mango con ambas manos. 3. Empuje el botón de cierre (1) y presione con las manos sobre las palancas (2). (Véase fig. 5). DOMINIO DE LA MAQUINA NOTA : Siempre tenga el mango con ambas manos. Para ir de un lado al otro, levante o baje lentamente la tobera de la máquina. Para dirigir la máquina hacia la izquierda, presione la tobera. Para dirigir la máquina hacia la derecha, levante despacio la tobera. MANTENIMIENTO AVISO : El mantenimiento debe ser efectuado por untécnico autorizado. Instrucciones para el mantenimiento Cada 12 meses, la máquina debe ser mandada a un centro técnico autorizado Clarke para ser comprobada. AVERTISSEMENT: Ne jamais mettre une polisseuse en marche lorsque le timon est en position verticale. Uniquement pour le modèle C2K-1600DS, C2K2000DS : Sélectionnez la vitesse (élevée ou modérée - high ou low ) au moyen de l’interrupteur situé sur le couvercle du moteur. Vitesse élevée : levier poussé vers le haut. Vitesse modérée : levier poussé vers le bas. Les étapes suivantes s'appliquent à tous les modèles de la série C2K: L’interrupteur de marche/arrêt est activé par pression sur le bouton de verrouillage de sécurité (1) et par les leviers (2) situés sous la poignée de commande (Voir fig. 5). Pour mettre la machine en marche, procéder comme suit : 1. Abaisser le timon 2. Verrouiller le timon dans la position de travail la plus confortable pour l’opérateur. NOTE : Il faut toujours tenir la poignée des deux mains. 3. Pousser sur le bouton de verrouillage (1) et appliquer une pression des mains sur les leviers (2). (Voir fig. 5). MAITRISE DE LA MACHINE NOTE : Il faut toujours tenir la poignée des deux mains. Pour aller d’un côté à l’autre, lever ou abaisser lentement le timon de la machine. Pour faire aller la machine vers la gauche, appliquer une pression sur le timon. Pour faire aller la machine vers la droite, relever légèrement le timon. ENTRETIEN AVERTISSEMENT: L’entretien doit toujours être effectué par un technicien agréé. Instructions pour l’entretien Tous les 12 mois, la machine doit être renvoyée dans un centre technique agréé Clarke , pour vérification. Clarke® Operator's Manual- C2K Series 120V Page - 23 - NOTES Page -24 - Clarke® Operator's Manual- C2K Series 120V Division of C2K Series 120V Section II Parts and Service Manual (70081A) Clarke® Operator's Manual- C2K Series 120V Page - 25 - MAINTENANCE WARNING: Maintenance must be done by authorized personnel only. CAUTION: Keep all adjustments according to specifications. Maintenance Instructions Return the machine to a Clarke Authorized Service Location every 12 months for maintenance inspections. Switches WARNING: All electrical repairs must be done by authorized personnel only. The machine must be tested after electrical repairs to make sure it is safe to operate. Disconnect the electrical plug from the electrical outlet before doing any electrical repairs. The start and stop switch has an interlock which prevents the contacts from being closed. If any part of the switch is not operating, replace the part. If any part of the electrical system of the machine is not operating or is damaged, replace the part. Make sure all connections are tight. Return the machine to the Clarke Service Branch or a Clarke Authorized Service Center for electrical repairs or testing. Maintenance Of The Motor Induction type motors do not require motor brushes. C2K-1600DS and C2K-2000DS require motor brushes. If repairs to the gear unit or motor are needed, do not disassemble the gears and motor. Return the machine to the nearest Clarke Service Branch or Clarke Authorized Service Center. For safe operation, and longer life to your Clarke product, use only Clarke parts. NOTE: The grease (503802) for the gear box needs to be changed every year. The C2K-1600, C2K1600DS, C2K-1800, C2K-2000 and C2K-2000DS require 8 oz. of grease. All other C2K series require 9 oz. of grease. Page -26 - Clarke® Operator's Manual- C2K Series 120V MANTENIMIENTO ENTRETIEN AVISO: El mantenimiento debe ser efectuadopor un técnico autorizado. AVERTISSEMENT:L'entretien doit toujours être effectué par un technicien agréé. PRUDENCIA:Todos los reglajes deben ser realizados conforme a las indicaciones descritas en este libro. PRUDENCE: Tous les réglages doivent être réalisés conformément aux indications figurant dans ce manuel. Instrucciones para el mantenimiento Instructions pour l'entretien Cada 12 meses, la máquina debe ser mandada a un centro técnico autorizado Clarke para ser comprobada. Tous les 12 mois, la machine doit être renvoyée dans un centre technique agréé Clarke , pour vérification. Interruptores Interrupteurs AVISO: Todas las reparaciones eléctricas deben ser efectuadas por técnicos autorizados. Después de cada reparación, hay que comprobar el aislamiento eléctrico. Desconecte siempre el enchufe del cable de alimentación antes de realizar cualquier reparación eléctrica. AVERTISSEMENT:Toutes les réparations électriques doivent être effectuées par des techniciens agréés. Après toute réparation, l'isolation électrique doit être vérifiée. Débrancher toujours la fiche du câble d'alimentation avant de procéder à toute réparation électrique. El interruptor arranque/parada tiene un seguro que impide a los contactos que se cierren. Si un componente del interruptor no funciona, cambie este componente. Si une pieza del sistema eléctrico de la máquina no funciona o está dañada, cambie la pieza. Compruebe que todas las conexiones están bien fijadas. Mande la máquina a un centro técnico autorizado Clarke para cualquier reparación o comprobación del sistema eléctrico. L'interrupteur marche/arrêt est muni d'une sécurité qui empêche les contacts de se refermer. Si un élément de l'interrupteur ne fonctionne pas, remplacer cet élément. Si une pièce du système électrique de la machine ne fonctionne pas ou est endommagée, remplacez la pièce. Vérifiez que toutes les connexions sont bien fixées. Renvoyez la machine dans un centre technique agréé Clarke pour toute réparation ou vérification du système électrique. Mantenimiento del motor Entretien du moteur Los motores de inducción no requieren la utilización de escobillas. C2K-1600DS y C2K-2000DS requieren escobillas. Les moteurs à induction ne nécessitent pas l'utilisation de balais. Les modèles C2K-1600DS et C2K-2000DS nécessitent des balais de moteur. Si tiene que efectuar reparaciones al sistema de accionamiento o al motor, no desmonte la máquina, mándela a un centro técnico autorizado Clarke. Si des réparations doivent être faites au système d'entraînement ou au moteur, ne pas démonter la machine mais la renvoyer dans un centre technique agréé Clarke. Para alargar la longevidad de la máquina y garantizar su funcionamiento óptimo, use sólo recambios Clarke. NOTA: La grasa del sistema de accionamiento (503802) debe ser cambiada cada año. Los modelos C2K-1600, C2K-1600DS, C2K-1800, C2K-2000 y C2K2000DS necesitan 236 cm³ de grasa. Todos los demás sistemas de accionamiento de la serie C2K necesitan 266cm3 de grasa. Clarke® Operator's Manual- C2K Series 120V Pour prolonger la vie de la machine et garantir son fonctionnement optimal, n'utilisez que des pièces de rechange Clarke. NOTE : La graisse du système d'entraînement (503802) doit être changée chaque année. Les modèles C2K-1600, C2K-1600DS, C2K-1800, C2K2000 et C2K-2000DS il faut 236 cm3 de graisse. Tous les autres systèmes d'entraînement de la série C2K nécessitent 266cm3 de graisse. Page - 27 - Clarke® C2K-160, C2K-180, C2K-200, C2K-1600, C2K-1800, C2K-2000, C2K-160HS, C2K-200HS Assembly Drawing 2/04 1 2 5 4 3 4 6 46 3 10 40 47 7 1 8 13 1 9 11 41 10 31 39 21 38 22 43 20 19 17 24 23 29 1 44 16 37 14 26 18 42 30 25 26 22 15 35 28 48 25 35 32 1 23 27 33 24 34 36 Page -28 - Clarke® Operator's Manual- C2K Series 120V Clarke® C2K-160, C2K-180, C2K-200, C2K-1600, C2K-1800, C2K-2000, C2K-160HS, C2K-200HS Assembly Drawing Parts List 2/04 Ref. Part No. Description 1 2 3 4 5 6 7 8 9 10 11 13 14 15 16 17 18 19 20 21 22 23 24 25 26 27 28 29 30 85383A 30285A 50798A 50820A 50806A 40109A 50799A 50821A 50780A 920722 962957 10116A 461404 925592 441301 980349 50791A 50781A 50792A 980645 920342 87035A 50793A 87050A 50794A 80087A 57120A 44635A 40690A 53187A 40692A 52093A 53188A 31 50822A 50823A 32 33 34 35 36 37 38 40 41 42 43 44 45 46 47 48 50790A 50785A 50786A 50787A 50782A 50783A 50784A 80189A 85817A 50796A 50795A 50797A 10083A 441401 747553 70673A 980603 170686 50930A 70651A Clarke® Operator's Manual- C2K Series 120V Screw, 10-32 x 3/4 Handle, Front Lever, Switch Spring, Extension Button, Interlock Switch Interlock, Main Spring, Compression Handle, Rear Nut, 10-32 ESNA Screw Cord, Interconnect Cam, Locking (included in 42) Roll Pin, ¼ (included in 42) Bolt, Locking Cam (included in 42) Washer, Wear Cam Arm Link, RH Clamp, Handle Arm Link, LH Washer, Flat 3/8 Nut, 3/8 -16 ESNA Washer, Fender #10 SS Wheel, 5" Washer, 5/8 Nylon Bushing, Nylon Screw, 3/8 -16 x 6 Plug, Button Motor, 1 HP (160HS, 200HS) Motor, 1 HP (160, 180, 200) Motor, 1.5 HP (1600, 1800, 2000) Gearbox (160, 180, 200) Gearbox (160HS, 200HS) Gearbox (1600, 1800, 2000) Cover, Motor (160HS, 200HS) Cover, Motor (160, 180, 200, 1600, 1800, 2000) Frame, Main Shield, Brush (160, 1600) Shield, Brush (180, 1800) Shield, Brush (200, 2000) Bumper, (160, 1600) Bumper, (180, 1800) Bumper, (200, 2000) Washer, Wave Screw, 5/16-18 x 21/8 Bushing, Cord Tube, Handle Relief, Strain (included w/41) Cord Assembly (includes 40) Cam Assembly (incl. 14, 15 & 16) Strain Relief Label Lockwasher #10 Lock nut (not illustrated) Cord Retainer Label, Div. of ALTO Qty. 10 1 2 2 1 2 1 1 1 7 2 1 1 1 1 1 1 1 1 1 2 2 2 2 2 1 1 1 1 1 1 1 1 1 1 1 1 1 1 1 1 1 2 4 1 1 1 1 (1) 1 1 1 1 1 1 NOTE: indicates a change has been made since the last publication of this manual. Page - 29 - Clarke® C2K-1600DS and C2K-2000DS Assembly Drawing 4/03 1 2 3 55 5 4 6 3 41 7 10 40 4 42 9 57 8 1 56 13 54 44 43 49 39 46 21 38 22 50 47 31 20 1 24 23 19 17 16 37 14 52 26 51 18 25 26 15 25 22 58 35 28 30 35 1 30a 23 32 27 24 1 48 10 33 29 34 36 Page -30 - Clarke® Operator's Manual- C2K Series 120V Clarke® C2K-1600DS and C2K-2000DS Assembly Parts List 4/03 Ref. 1 2 3 4 5 6 7 8 9 10 13 14 15 16 17 18 19 20 21 22 23 24 25 26 27 28 29 30 30a 31 32 33 34 35 36 37 38 40 41 42 43 44 46 47 48 49 50 51 52 54 55 56 57 58 Part No. 85383A 30285A 50798A 50820A 50806A 40109A 50799A 50821A 50780A 920722 10084A 461404 925592 441301 980349 50791A 50781A 50792A 980645 920342 87035A 50793A 87050A 50794A 80087A 57120A 50825A 44651A 63602A 50824A 50790A 50785A 50787A 50782A 50784A 80189A 85817A 50796A 50795A 50797A 85517A 70677A 47402B 57165A 34259A 80201A 747553 77200A 70673A 441401 30605A 10083A 170686 962957 50930A 70651A Clarke® Operator's Manual- C2K Series 120V Description Qty. Screw, 10-32 x 3/4 8 Handle, Front 1 Lever, Switch 2 Spring, Extension 2 Button, Interlock 1 Switch 2 Interlock, Main 1 Spring, Compression 1 Handle, Rear 1 Nut, 10-32 ESNA 8 Cord, Interconnect 1 Cam, Locking (Included in 51) 1 Roll Pin, ¼ (Included in 51) 1 Bolt, Locking Cam (included in 51) 1 Washer, Wear Cam 1 Arm Link, RH 1 Clamp, Handle 1 Arm Link, LH 1 Washer, Flat 3/8 1 Nut, 3/8 -16 ESNA 2 Washer, Fender #10 SS 2 Wheel, 5" 2 Washer, 5/8 Nylon 2 Bushing, Nylon 2 Screw, 3/8 -16 x 6 1 Plug, Button 1 Bracket 1 Motor/Gearbox 1 Gearbox (1) Cover, Motor 1 Frame, Main 1 Shield, Brush (1600) 1 Shield, Brush (2000) 1 Bumper, (1600) 1 Bumper, (2000) 1 Washer, Wave 2 4 Screw, 5/16-18 x 21/8 Bushing, Cord 1 Tube, Handle 1 Relief, Strain (included w/54) 1 Screw 2 Label, Dual Speed 1 Switch SPDT 1 Plug, Nylon Hole 1 Light 1 Clip 1 Strain Relief 1 Label, (High-Low) 1 Label 1 Cam Assembly (incl. 14, 15, & 16) (1) Baffle 1 Cord Assembly (includes 40) 1 Locknut 1 Screw 1 Cord Retainer 1 Label, Div. of ALTO 1 Page - 31 - Clarke® C2K-160HS and C2K-200HS 120V - 60 Hz Motor Assembly Drawing & Parts List 9/99 Note: If your machine has motor #44635A refer to this drawing for service part replacement. 13 1 2 8 3 9 10 11 14 12 15 16 7 4 5 18 17 6 Ref. Part No. Description 1 2 3 4 5 6 7 8 9 58030A 52018A 52019A 54330A 737502 58028A 50400A 58029A 902550 Screw #10-32 x.31 LG. Capacitor Case Start Capacitor Gasket, Capacitor Case Strain Relief Stator Frame Asm Rotor and Shaft Assembly Centrifugal Switch Asm. 203 Bearing Qty. 2 1 1 1 1 1 1 1 1 Ref. Part No. Description 10 11 12 13 14 15 16 17 18 58673A 58032A 54713A 53523A 58911A 58912A 58034A 50691A 58031A Wave Spring Washer Stationary Switch Stationary Switch Insulation Bracket Opp. Shaft End Terminal Board Asm. Terminal Board Screw #10-32 x .31 Bolt, .250-28 x 6.75 LG Screw, #8-32 x .38 LG Qty. 1 1 1 1 1 1 2 4 2 120V Motor Electrical Schematic Page -32 - Clarke® Operator's Manual- C2K Series 120V Clarke® C2K-160HS and C2K 200HS Gearbox Assembly Drawing & Parts List 2/04 Note: If your machine has gearbox #52093A refer to this drawing for service part replacement. 1 3 4 5 6 7 8 9 20 10 11 13 12 13 14 15 16 Ref. Part No. Description 1 2 3 4 5 6 7 8 9 10 11 12 13 14 15 16 17 18 19 20 80141A Screw, Socket Hd. Cap Qty. 6 56922A 902606 58520A 53524A 962794 54858A 902736 58314A 69195A 50854A 902606 902737 50855A 50856A 58312A 902573 50857A 52093A Plate, Retainer Bearing Spacer, Sleeve Endshield Screw 10-24" x 1" Cover, Housing Bearing Retainer Coupling Gear, Pinion Bearing Bearing, Needle Cage Gear, Idler Shaft Bearing Housing, Drive Gearbox Asm., Complete 1 1 1 1 6 1 1 1 1 1 2 4 1 2 2 1 1 (1) NOTE: indicates a change has been made since the last publication of this manual. 17 14 18 19 Clarke® Operator's Manual- C2K Series 120V Page - 33 - Clarke® C2K-1600, C2K-1800, C2K-2000 Motor Assembly Drawing & Parts List 2/04 Note: If your machine has motor #40690A or #53187A refer to this drawing for service part replacements. 10 14 9 15 13 9 1 3 4 12 6 7 2b 8 5 2a 9 11 Ref. 1 2(a) 2(b) 3 4 5 6 7 8 9 10 11 12 13 14 15 MOTOR 40690A MOTOR 53187A Part # Part # Description Qty 902550 53190A 53195A 40693A 40694A 40695A 40696A 902606 53194A 85303A 40690A 40697A 80274A 40698A 40699A 70787A 902550 53190A 53195A 53193A 53192A 53191A 53189A 902606 53194A 85303A 53187A 40697A --------40698A 40699A 70787A Ball Bearing Stationary Switch Centrifugal Mechanism Rotor Capacitor, Start Capacitor, Run Stator Ball Bearing Mounting Plate Screw, 8-32 x 3/8 Motor , Complete Cover, Capacitor Through Bolt End Shield, Aluminum Cover, Wire Connection Label, Connection Diagram 1 1 1 1 1 1 1 1 1 11 (1) 2 1 1 1 1 120V Motor Connection Diagram NOTE: indicates a change has been made since the last publication of this manual. 120V Motor Schematic Clarke® C2K-1600, C2K-1800, C2K-2000 Gearbox Assembly Drawing & Parts List 2/04 NOTE: If your machine has gearbox #53188A or #40692A refer to this drawing for service part replacement. 18 17 19 16 4 11 4 12 13 10 8 13 14 15 9 7 6 5 4 3 NOTE: indicates a change has been made since the last publication of this manual. 1 Gearbox #40692A Gearbox #53188A Ref 1 3 4 5 6 7 8 9 10 11 12 13 14 15 16 17 18 19 Part No. 80141A 56922A 902606 58520A 53194A 962794 54858A 902736 58314A 69195A 58313A 902737 N/A 54408A 58312A 902573 54856A 53188A Page -35 - Description Screw, Socket Hd. Cap Retainer, Bearing Bearing, Ball Spacer, Sleeve Endshield Screw #10-24 x 1" Cover, Housing Bearing Retainer Coupling Gear, Pinion Bearing, Needle Cage Gear, Idler Shaft Bearing, Ball Housing, Drive Gearbox Asm., Complete Qty. 6 1 3 1 1 6 1 1 1 1 1 6 1 3 3 1 1 (1) Ref 1 3 4 5 6 7 8 9 10 11 12 13 14 15 16 17 18 19 Part No. 80141A 56922A 902606 58520A 53194A 962794 54858A 902736 58314A 69195A 58313A 902737 52020A 54408A 58312A 902573 54856A 40692A Description Screw, Socket Hd. Cap Retainer, Bearing Bearing, Ball Spacer, Sleeve Endshield Screw #10-24 x 1" Cover, Housing Bearing Retainer Coupling Gear, Pinion Bearing, Needle Cage Gear, Idler Shaft Bearing, Ball Housing, Drive Gearbox Asm., Complete Qty. 6 1 3 1 1 6 1 1 1 1 1 4 1 2 2 1 1 (1) Clarke® Operator's Manual- C2K Series 120V Clarke® C2K-1600DS and C2K-2000DS 120V Motor Assembly Drawing & Parts List 4/03 NOTE: If your machine has motor/gearbox #44651A, refer to this drawing for service part replacement. 1 1 2 3 20 15 4 10 14 6 6 5 19 6 6 7 16 18 9 11 8 7 9 9 17 12 13 Ref 1 2 3 4 5 6 7 8 9 10 11 12 13 14 15 16 17 18 19 20 Part No. 50717A N/A 56282A 912287 962399 448396 51405A 40410A 962310 980608 58057A 902550 40322A N/A N/A 55648A 980076 55647A 59606A 46735A Description Qty. Thru-Bolt 2 Commutator Bracket 1 Hex Nut 1 Rectifier 1 Screw 1 Spring (Included with #8) (4) Brush Asm., (Included w/#8) (4) Brush Board Asm. (incl #'s 6,7,16, 18,19) 1 Screw 4 #8 Flat Washer 1 Stator Frame 1 Bearing-Upper (Included w/#13) (1) Armature Asm. (Includes #12) 1 Strain Relief 1 Bushing 1 Red Lead (Included with #8) 1 Wave Washer 1 Yellow Lead (Included with #8) 1 Varistor (Included w/#8) (1) Speed Control 1 120V Motor Schematic Clarke® Operator's Manual- C2K Series 120V Page - 36 - Clarke® C2K-1600DS and C2K-2000DS Gearbox Assembly Drawing & Parts List 4/03 NOTE: If your machine has gearbox #63602A, refer to this drawing for service part replacement. 18 17 19 16 4 11 4 12 14 13 10 8 13 15 9 7 6 5 4 3 1 Ref 1 2 3 4 5 6 7 8 9 10 11 12 13 14 15 16 17 18 19 Page -37 - Part No. 80141A Description Screw, Socket Hd. Cap Qty. 6 56922A 902606 58520A 53539A 962794 54858A 902736 58314A 69195A 58313A 902737 N/A 54408A 58312A 902573 54856A 63602A Retainer, Bearing Bearing, Ball Spacer, Sleeve Endshield Screw 10-24" x 1" Cover, Housing Bearing Retainer Coupling Gear, Pinion Bearing, Needle Cage Gear, Idler Shaft Bearing, Ball Housing, Drive Gearbox Asm., Complete 1 3 1 1 6 1 1 1 1 1 6 1 3 3 1 1 (1) Clarke® Operator's Manual- C2K Series 120V Clarke® C2K-160, C2K-180, C2K-200, C2K-1600, C2K-1800, C2K-2000, C2K-160HS, C2K-200HS Wiring Diagram 120V-60Hz 2/04 Clarke® C2K-1600DS and C2K-2000DS Wiring Diagram 120V 9/99 WARNING: All electrical repairs must be performed by qualified personnel only. Clarke® Operator's Manual- C2K Series 120V Page - 38 - NOTES NOTES PRODUCT SUPPORT BRANCHES U. S. A. Locations HEAD OFFICE European Locations PRODUCTION FACILITIES ALTO U.S. Inc., St. Louis, Missouri 16253 Swingley Ridge Road, Suite 200 Chesterfield, Missouri 63017-1725 PRODUCTION FACILITIES Clarke®, Springdale, Arkansas 2100 Highway 265 Springdale, Arkansas 72764 (479) 750-1000 Customer Service - 1-800-253-0367 Technical Service - 1-800-356-7274 American Lincoln®, Bowling Green, Ohio 43402 1100 Haskins Road SERVICE FACILITIES Clarke®, Elk Grove, Illinois 60007 2280 Elmhurst Road (847) 956-7900 Clarke®, Denver, Colorado 80204 1955 West 13th Ave. (303) 623-4367 Clarke®, Houston, Texas 77040 7215 North Gessner Road SALES AND DISTRIBUTION CENTER Clarke®, Secaucus, NJ 07094 74 Henry Street (201) 864-5503 SALES AND SERVICE CENTER American Lincoln® / Clarke®, Madison Heights, Michigan 48071-0158 29815 John R. (810) 544-6300 American Lincoln® / Clarke®, Marietta, Georgia 30066 1455 Canton Road (770) 973-5225 Clarke® Clarke American Sanders A.L. Cook Customer Service Headquarters and Factory 2100 Highway 265 Springdale, Arkansas 72764 (479) 750-1000 Technical Service 1-800-356-7274 ALTO Danmark A/S, Aalborg Blytaekkervej 2 DK-9000 Aalborg +45 72 18 21 00 ALTO Danmark A/S, Hadsund Industrikvarteret DK-9560 Hadsund +45 72 18 21 00 SALES SUBSIDIARIES Clarke® Canada Ltd., Rexdale Ontario 24 Constellation Ct. (416) 675-5830 ALTO Overseas Inc., Sydney (Australia) 1B/8 Resolution Drive Caringbah NSW 2229 +61 2 9524 6122 ALTO Cleaning Systems Asia Pte Ltd., Singapore No. 17 Link Road Singapore 619034 +65 268 1006 ALTO Deutschland GmbH, Bellenberg (Germany) Guido-Oberdorfer-Straße 2-8 89287 Bellenberg +49 0180 5 37 37 37 ALTO Cleaning Systems (UK) Ltd., Penrith Gilwilly Industrial Estate Penrith Cumbria CA11 9BN +44 1768 868 995 ALTO France S.A. Strasbourg B.P. 44, 4 Place d’Ostwald F-67036 Strasbourg Cedex 2 +33 3 8828 8400 ALTO Nederland B.V. Postbus 65 3370 AB Hardinxveld-Giessendam The Netherlands +31 184 677 200 ALTO Sverige AB, Molndal (Sweden) Aminogatan 18 Box 4029 S-431 04 Molndal +46 31 706 73 00 ALTO Norge A/S, Oslo (Norway) Bjornerudveien 24 N-1266 +47 2275 1770 Clarke® LIMITED U.S. WARRANTY This Clarke Industrial/Commercial Product is warranted to be free from defects in materials and workmanship under normal use and service for a period of five years from the date of purchase, when operated and maintained in accordance with Clarke's Maintenance and Operations Instructions. This warranty is extended only to the original purchaser for use of the product. It does not cover normal wear parts such as electrical cable, rubber parts and motor brushes. Clarke's liability under this warranty is limited to repair of the product and/or replacement of parts and is given to purchaser in lieu of all other remedies, including INCIDENTAL AND CONSEQUENTIAL DAMAGES. THERE ARE NO EXPRESS WARRANTIES OTHER THAN THOSE SPECIFIED HEREIN. THERE ARE NO WARRANTIES WHICH EXTEND BEYOND THE DESCRIPTION OF THE FACE HEREOF. NO WARRANTIES, INCLUDING BUT NOT LIMITED TO WARRANTY OF MERCHANTABILITY, SHALL BE IMPLIED. A warranty registration card is provided with your Clarke floor machine. Return the card to assist Clarke in providing the performance you expect from your new floor machine. If a difficulty develops with the product, you should: (a) Contact the nearest authorized Clarke repair location or contact the Clarke Service Operations Department, 2100 Highway 265, Springdale, AR 72764, for the nearest authorized Clarke repair location. Only these locations are authorized to make repairs to the product under this warranty. (b) Return the product to the nearest Clarke repair location. Transportation charges to and from the repair location must be prepaid by the purchaser. Clarke will repair the product and/or replace any defective parts without charge within a reasonable time after receipt of the product. Clarke® , 2100 Highway 265, Springdale, Arkansas 72764. Clarke reserves the right to make changes or improvements to its machine without notice. Always use genuine Clarke Parts for repair. 2100 Highway 265 Springdale, Arkansas, 72764