1
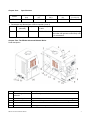
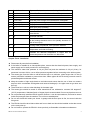
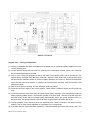
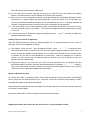
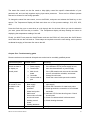
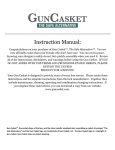
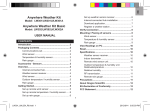
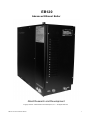
EB120
Advanced Ethanol Boiler
Allard Research and Development
Copyright © 2008 – Allard Research and Development, LLC. – All Rights Reserved
EB120 Advanced Ethanol Boiler
1
FOREWORD
Thank you for purchasing the Allard Research and Development EB120 – Advanced Ethanol Boiler.
Please take the time to read these instructions before you begin as they contain important information
about the installation and maintenance requirements, as well as safety instructions.
The EB120 is shipped with our intelligent remote control unit (the EB-A Controller), and a custom
temperature probe. With this remote, not only can you control the temperature and time duration of your
production run, but also control an external 120V 5A pump. The remote also allows for the manual
operation of the drain valve, a key-lock, and allows the selection of Fahrenheit or Centigrade for the
temperature reading; as well as displaying the EB120’s status via the 8 LEDs. Note also that one remote
control unit can control multiple EB120 boilers.
Every EB120 Advanced Ethanol Boiler is thoroughly tested before leaving the factory so there may be
small amounts of water inside the boiler when you receive the unit.
IMPORTANT
★
★
★
★
★
★
★
Read this manual before installation and operation.
This equipment must be installed by competent person.
Disconnect the power supply before exposing electrical connections.
Confirm the right voltage to the system.
This product is never to be operated by persons under the age of 21.
Ensure that you have obtained the proper permits before use.
Keep accurate and detailed records of your use of the EB120, and the ethanol produced.
SAFETY PRECAUTIONS for ethanol production
★
★
★
★
★
Do not smoke near the EB120, especially during operation.
Never operate the EB120 without the safety pressure relief valve installed.
Always ensure there is no blockage to the steam outlet line, or through the still.
Always operate the system in an area with plenty of ventilation.
Use caution, as the steam outlet, connecting pipes, and your still will reach high temperatures.
EB120 Advanced Ethanol Boiler
2
Chapter One :
Specifications
Model
Power
(kw)
Voltage
(V)
Phase
(N~)
Current
(A)
Dimensions
(W×W×H)
EB-120
12.0
230/400
1/3
52./17
20"×8.25"×19"
1. Parameters and dimensions of EB-A controller (chart 2)
Model
Timer Range
(minutes)
EB-A
15-240
Temperature
Dimension(mm)
L*W*H
Remarks
173 F
5.75"×3.5"× 1"
When the time widow displays ”Long”
the boiler will operate continuously until
it is switched off.
Chapter Two: The EB120 Advanced Ethanol Boiler.
Parts description
No.
Part
Description
1
ElectroMagnetic
solenoid
Automatically controls the beer in
2
Water level probe
Detect the water level
3
Pressure relief valve
4
Steam outlet
5
Overheat switch
EB120 Advanced Ethanol Boiler
Operates if the pressure in the boiler exceeds 1.2kg/ c m2
Steam outlet
Boil dry protector operates at 105℃
3
6
Heat element
Heat element
7
Proportional Solenoid
Automatically controls the cooling water flow
8
Cooling Water Out
Output that connects to the Still cooling water input
9
Cooling Water In
Connections for the cooling water output
10
Power entry
The rout of power wire
11
Control cable entry
The tout of control cable
12
Accessorial
board
Connect and control the heat element
13
terminal
Connection for power supply
14
Earth wire plug
Connection for earth wire
15
Drain valve
Drain valve
16
Pump
Pump
17
Beer in
Connect to pump for beer iput
18
Exhaust valve
Exhaust valve
19
Drain outlet
Outlet for drain
20
Main circuit board
Control center
circuit
Parts description of EB-A controller.
No.
Part
Description
1
On/Off
Turns the system On and Off
2
Pump
Operates an external (user supplied) pump
EB120 Advanced Ethanol Boiler
4
3
Drain Control
Operates Drain, and used to set Cooling Water Flow Rate
4
Set
Preset Run Time and Distillation Control Temperature
5
△
Increase button
6
▽
Decrease button
7
C/F & Enter
Enter Key. Also change from Fahrenheit to Centigrade
8
Time display
Displays the remaining time of the boiler operation
9
Temp display
Displays the detected temperature of distillation column
10
L1
Beer Input pump operating
11
L2
Cooling water inlet in operation
12
L3
Indicator LED for draining green is for auto drain, red is for
manual drain
13
L4
Overheat Indicator
14
L5
Tank Overheat Indicator. Red means the boiler was cut off
as the heating elements are too hot (usually because of a
lack of beer input)
15
L6
Cooling water proportional valve operation indicator
16
L7
Indicates the detected temperature is lower than the preset
temperature and boiler is heating.
17
L8
Indicates the detected temperature is higher than the
preset temperature and the boiler is in idle mode.
Chapter Three: Installation
★ Disconnect all power before installation.
★ If the boiler is installed in an inaccessible place, ensure that the electrical power, beer supply, and
water supply can be easily turned off in an emergency.
★ The minimum water inlet pressure is 3.6 psi (0.25 bar) and the maximum is 30 psi (2 bar), for
pressures in excess of this, use an inline pressure regulator before connecting to the boiler system.
★ The steam pipe from the boiler to still should be kept to a minimum, pipes longer than 10 feet (3
meters) should be insulated to prevent heat loss. Steam pipes will be hot during use and must be
protected against accidental contact.
★ Keep the number of right angle bends to a minimum and ensure that the run of does not create a
trap into which condensate would gather and cause a blockage (i.e. the pipe must not go down and
then up).
★ There must be no valve or other blockage in the steam pipe
★ The steam pipe should be metal of other material that can withstand a constant 350 degrees F
(150°C) temperature. Stainless Steel or Copper pipe is recommended. Do not use pipe that can rust.
★ Do not permanently install the EB120 system outdoors. It can be used outdoors, but must be stored
inside and protected from the weather. The unit is not weatherproof.
★ Do not use the EB120 inside your house. A garage with the door open is fine, but never inside the
living area.
★ The EB120 should be level side-to-side and front to back and should be installed so that the arrows
on the case point up.
★ Do not install or operate the EB120 in close proximity to flammable or hazardous substances.
EB120 Advanced Ethanol Boiler
5
Beer, Water, and Steam connections
a. The water supply pipe and steam pipe should comply with local standards.
b. Connect the cooling water inlet of the EB120 to the main water supply using a flexible hose with
3/4-inch fittings. Washing machine connection hoses are perfect for these connections, as they are
made to withstand high pressure without bursting. We recommend braided stainless steel washing
machine hoses, available at your local building supply store.
c. Connect the Cooling Water Out to the water input of the distillation. These connections should also
be made with either rigid copper pipe (at least ½ dia), or flexible washing machine hoses.
d. Steam outlet (3/4 inch) use the same dimension Stainless Steel or Copper pipe to connect to the
Distillation Column. During use the steam pipe will be very hot and must be protected against
accidental contact. Note that according to the location it may be necessary to attach an additional
length of pipe to the pressure relief valve in order to divert the steam flow to a safe direction should
the valve operate.
e. Connect the drain outlet to a suitable drain via a copper pipe with the appropriate fittings.
Installation of controller and temperature probe.
EB-A controller is waterproof and can be installed anywhere within close proximity of the distillation
system.
(1) Ideally the control panel should be installed at a height of approximately 5’for ease of use.
(2) Installation method: drill a 1.5”(40mm) hole on mounting surface. Open the front cover of steam
EB120 and connect the control cable (6 pin) and temperature sensor cable (2 pin) to the relevant
ports.
(3) Control panel installation: connect one end of the control cable to circuit board port in the boiler, and
connect the other end to the controller.
(4) Temperature probe installation: the temperature probe is installed into the distillation column at the
control temperature point. This varies according to the size and type of still being used. This probe
would be installed in the location normally used for a dial thermometer. The temperature probe has
½” male FIP fittings.
EB120 Advanced Ethanol Boiler
6
EB120 Temperature Probe
Installations of power supply and control cables
1. Confirm the correct voltage of power supply and wires.
2. Remove the knock out for the power cable entry and use a rubber grommet to protect the cable,
connect to the conductors to the correct terminals – for single phase power supply use the copper
bridge connectors, for 3 phase supply remove them.
3. Remove the knock out for the control cable entry and use a rubber grommet to protect the cable,
connect the cable to the relevant port on circuit board.
4. Ensure the power supply wire and control cable remain separated to prevent magnetic field of power
supply wire from disturbing control cable signal.
For typical electrical connection in single-phase 220-volt operation, bridge the L1, L2, and L3 terminal
connections together, and connect the AC Hot wire to one of the L connections. Next, bridge the 3
neutral (N) terminal strips together and connect the AC neutral to one of the N connections. Last,
connect the electrical ground to the ground terminal on the EB120 case.
EB120 Advanced Ethanol Boiler
7
EB120 Circuit Board
Chapter Four : Testing and operation
(1) Once the installation has been completed and checked, turn on power and water supplies and carry
out the following test.
(2) On the control panel press the on/off key, (the key has a time-lapse function, press it for I second),
the time and temp displays the data.
(3) Turn on your valve(s) to allow beer to flow to the boiler. The indicator LED is red on the remote. The
internal pump will begin filling the boiler with beer. When the beer level rises to the low beer level
sensor level the elements switch on and the heating indicator LED turns on. Several seconds later
when the high beer level sensor is reached, the internal pump will stop, and the indicator LED
changes to green.
(4) After a few minutes of heating, the unit will begin producing steam.
(5) Press the on/off key again to turn off the system. There will be no data on display and the boiler will
stop.
(6) Press the on/off key once more (temp and time display again), and after a few seconds the boiler will
begin producing steam again. Let the boiler operate for a short while - the beer level will fall to the
low beer level. Check that the internal pump automatically starts (the pump indicator LED (L1)
becomes red). The pump indicator LED will go back to green when the boiler tank is full.
(7) The time display counts down to show the remaining time, when it reaches 0 the boiler will stop
heating. The run time can be adjusted, or overridden to run continuously.
(8) 5 minutes after the system has been turned off, it will automatically go into the drain-down cycle. The
EB120 Advanced Ethanol Boiler
8
drain valve opens (drain indicator LED green).
(9) You can also drain the boiler manually by pressing the drain key when the system has stopped
heating. The drain indicator LED will indicate as red during this operation.
(10) Once you have set the temperature required, the boiler will operate on all heating elements until the
temperature is 4 degrees below the target temperature. Once the system is in full operation, the
computer maintains the boiler temperature and it will selectively turn on or off heating elements as
required. This approach helps to minimize the power consumption during operation.
(11) The pump switch on the remote operates a relay on the EB120 circuit board. This can be used to
control an external pump in your system. The maximum voltage that can be used through this relay
is 120V, 5A.
(12) Use the Enter key to change the temperature display between ℃ and ℉ and also to confirm the
time and temperature setting.
Setting Time and Control Temperature
When the EB120 leaves the factory the default settings are 173 degrees Fahrenheit and 4 hours of
operation. These can be adjusted as follows;
(1) Time setting : press “set” key – the time display will flash - press “△”,”▽” to adjust the time,
each press will increase or reduce 5 minutes. Once the desired setting is reached, press “enter” to
accept, and the time display will stop flashing. You can adjust from the time from 15 to 240 minutes,
or operate the unit with no time limitations or continuously. Note the controller has a memory
function, and if the power cord is not disconnected, the next time you turn on EB120, the time you
selected will be the default time.
(2) Temperature setting: if you press “set” once after you finish setting the time or otherwise twice the
temperature display will flash, enter the required temperature by pressing “△”,”▽” to adjust every press will increase or reduce 1 degree. Once the required temperature has been set, press the
“enter” key and the temperature display will stop flashing.
Steam on Demand function
To activate the steam on demand function, first preset the desired control temperature as described
above, then press and hold the drain key for 5 seconds, L4 will turn red and the time displays “LONG”
indicating that steam on demand is operational.
Once the steam on demand function has started, the unit will operate for 30 minutes, and then stop until
the function is started again.
Note that the auto drain function will operate every time the steam stops.
Adjusting the water flow control for the cooling coils in your distillation column
EB120 Advanced Ethanol Boiler
9
The water flow control can be fine tuned to help tightly control the specific characteristics of your
particular still, and can help regulate varying input water pressures. There are four different presets
that can be chosen for use during operation.
To change the water flow rate control, turn on the EB120, and press and release the Drain key on the
remote. The Temperature Display will flash and show one of four pressure settings; 1PS, 2PS, 3PS,
4PS.
Press the Drain key one or more times to cycle through the four choices. When you see the selection
you want, press the Enter key to confirm. The Temperature display will stop flashing and return to
displaying the temperature reading of the still.
Finally, you MUST now press the On/Off button and turn the EB120 off, then press the On/Off button
once more and turn the unit back on. These steps are required to store the new setting, and to prevent
accidental changing of the water flow rate to the still.
Chapter Five: Troubleshooting guide
Please note that we recommend all repairs are carried out be a suitably qualified person.
Trouble description
Possible Cause
Solution(s)
When the boiler is
turned on there is
no display on
control panel.
Check:
1. Power supply
2. Transformer
3. Main circuit
board
4. Controller
5. Control cable or
port
1. Check power supply voltage.
2. If the indicator LED of power supply isn’t on,
then check transformer or power supply.
3. If the LED remains red, remove the controller
turn off, reinstall the controller, and restart.
4. Change circuit board
5. Check the control cable port and controller.
System appears to
be turned on, but
the boiler is not
heating.
Check:
1. Beer supply.
2. Beer pump
operation.
3. Water level probe
4. Main board
5. Ground wire of boiler
and circuit board
6. Heating control
board
7. Heating elements
(1) Indicator LED for beer level is red. Check beer
input supply
(2) Check the connection of water level probe.
(3) Check ground wire connection of circuit board
and boiler.
(4) Indicator LED for beer level is green. Check
circuit board
(5) Check if overheat switch is disconnected
(6) Check heating elements
EB120 is turned on,
Check:
Possibly need to:
EB120 Advanced Ethanol Boiler
10
control panel is
normal, and
indicator LED for
heating is on, but
there is no steam
output
1. Main circuit board
2. Relay circuit board
3. Heating elements
* Change main circuit board
* Change relay circuit board
* Change heat elements
Temperature
displays “LC”
Check:
Beer level probe
connection
Check connection or change beer level probe.
Temperature
displays “HC”
Beer level probe detects
a short circuit
1. Check beer level probe connection
2. Check controller for short circuit
Turn off EB120, and
cooling water
continues to flow
through the system.
Check the proportional
solenoid control valve
1. Try turning the system on and off again, or
disconnect the system from the power
connection, and reconnect.
2. Check proportional valve. Clean it or change it
Unplug from power
supply, and cooling
water continues to
flow through the
system.
Check:
1. Water inlet valve
2. Circuit board
Change circuit board or water inlet valve
Turn off EB120, but
it continues to
operate.
Check:
f. Circuit board
g. Controller
h. Relays on accessory
circuit board
i. Water level probe
Unplug or disconnect the unit from power.
DO NOT CONTINUE TO USE WITHOUT FIRST
CONTACTING YOUR DEALER!
Chapter Six: Regular Use and Maintenance
The single biggest problem with boilers is the build up of scale resulting from dissolved solids within the beer.
Scaling can cause the heating elements to fail, the beer level sensors not to function, and premature failure of the
O-rings resulting in leaks from around the elements. The extent of the problem will vary according to the degree
of impurities in the beer.
* IMPORTANT NOTICE: DO NOT ATTEMPT TO RUN ANY MASH OR LIQUID WITH SUSPENDED
IMPURITIES DIRECTLY THROUGH THE EB120 WITHOUT FIRST STRAINING AND FILTERING.
DOING SO WILL CLOG THE BEER PUMP, SOLENOID VALVE, AND BOILER, AND WILL VOID
YOUR WARRANTY. WE RECOMMEND PRE-SCREENING WITH A FINE STAINLESS STEEL
SCREEN, THEN FILTERING WITH AT LEAST A 10-MICRON FILTER BEFORE ALLOWING YOUR
BEER TO BE PUMPED INTO THE EB120.
We also recommend descaling the boiler once every 50 to 100 hours of operation. To descale use a solution of
weak acid crystals (such as citric acid) mixed with water. Citric acid crystals are available in packets for descaling
EB120 Advanced Ethanol Boiler
11
kettles from most hardware stores, brew supply stores, and are available online from Allard Research and
Development. Follow the instructions supplied with the crystals and allow sufficient time for the solution to
dissolve the scale before flushing out the boiler.
System faults arising from a failure to descale the unit are not covered by warranty.
Because heating and cooling cause expansion and contraction, it is important to inspect all the water and steam
inlets and outlets as well as their pipes and connectors on a regular basis to ensure there are no leaks. The
condition of the wiring and electrical integrity of the boiler system should be checked regularly.
Warranty
The EB120 has a one-year warranty from the date of purchase. This warranty excludes consumable items such as
the electrical heating elements. Failures resulting from misuse or abuse, such as a failure to descale as above, or
using beer that has not been adequately strained and filtered, are not covered under the warranty.
EB120 Advanced Ethanol Boiler
12