1
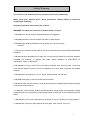
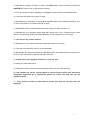
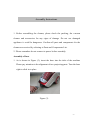
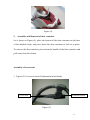
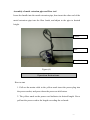
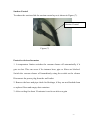
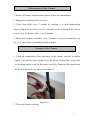
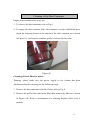
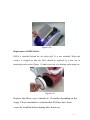
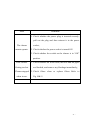
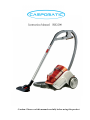
Instruction Manual RB2200
Caution: Please read this manual carefully before using this product
Safety Warning
1. 在装配和使用吸尘器前请阅读本说明书。
This cleaner is for domestic use only commercial use will void warranty
When using your Vacuum, basic safety precautions should always be observed,
including the following:
Read all instructions before using this vacuum.
WARNING: To reduce the risk of fire, electrical shock, or injury:
1. Do not leave vacuum cleaner unattended when it is plugged in.
2. Do not immerse the vacuum cleaner into water or other liquids.
3. Do not pickup building materials such as plaster dust, wood shavings,
Sand etc.
4. Use only as described in this manual. Use only manufacturer’s recommended attachments
and filters.
5. Do not use with damaged cord or plug. Do not use vacuum cleaner if it has been dropped,
damaged, left outdoors, or dropped into water. Return appliance to GODFREYS for
examination, repair or adjustment.
6. Do not pull or carry by cord. Do not use cord as a handle, close a door on cord, or pull cord
around sharp edges or corners. Do not run appliance over cord. Keep cord away from heated
surfaces.
7. Do not unplug by pulling on cord. To unplug, grasp the plug, not the cord.
8. Do not handle plug or vacuum cleaner with wet hands.
9. Do not use the vacuum cleaner to pick up large objects or objects that are likely to damage
or block the vacuum cleaner.
10. Keep hair, loose clothing, fingers, feet and all parts of body away from openings, rotating
agitator and other moving parts. Do not operate cleaner in bare feet or when wearing open toe
shoes.
11. Do not pick up hot coals, cigarette butts, matches or any hot, smoking, or burning objects.
12. Do not pick up hard or sharp objects such as glass, nails, screws, coins, etc.
-1-
13. Do not use without all filters in place. Use ONLY filters and accessories provided by
GODFREYS. Failure to do so will void the warranty.
14. Turn off all controls before plugging or unplugging vacuum cleaner into electrical outlet.
15. Use extra care when vacuuming on stairs.
16. Do not pick up flammable or combustible materials (lighter fluid, gasoline, kerosene, etc.)
or use in the presence of explosive liquids or vapor.
17. Do not pick up toxic material (chlorine bleach, ammonia, drain cleaner, etc.).
18. Do not use in an enclosed space filled with vapors given off by oil based paints, paint
thinner, moth proofing substances, flammable dust, or other explosive or toxic vapors.
19. Use only on dry, indoor surfaces.
20. Do not use for any purpose other than described in this user’s guide.
21. The use of an extension cord is not recommended.
22. Do not put any objects into openings. Do not use with any opening blocked. Keep free of
dust, lint, hair and anything else that may reduce air flow.
23. Always store your appliance indoors in a cool, dry area.
24. Keep your work area well lit.
25. Keep end of hose, wands and other openings away from your face and body.
26. Not intended for use by young children or infirm persons unless they have been
adequately supervised by a responsible person to ensure that they can use the
appliance safely.
27. Yong children should be supervised to ensure that they do not play with the
appliance
- 2-
Names of Parts and Components
6
5
7
4
3
8
2
9
1
10
-3-
1. Power plug
2. Cord rewind pedal
3. Cyclone dust container
4. Hose
5. Accessory bracket
6. Handle
7. Air escape pushbutton
8. Metal extension pipe
9. Switch Pedal
10. Air outlet grill and HEPA filter
11. Floor tool
Accessories:
1. Crevice nozzle
Figure (1)
2. Combination brush
Figure (2)
- 4-
Assembly Instructions
1. Before assembling the cleaner, please check the packing, the vacuum
cleaner and accessories for any signs of damage .Do not use damaged
appliance it could be dangerous. Confirm all parts and components for the
cleaner are received by referring to Parts and Components List.
2. Please remember do not connect to power before assembly.
Assembly of hose
1. As is shown in Figure (3), insert the hose into the inlet of the machine
Please pay attention to the alignment of two projecting parts. Turn the hose
right to click in to place
Figure (3)
- 5-
Figure (4)
2.
Assembly and Removal of dust container
As is shown in Figure (4), place the bottom of the dust container on the base
of the machine body, and press down the dust container to lock in to place.
To remove the dust container, press down the handle of the dust container and
pull away from the cleaner.
Assembly of accessories
1. Figure (5) Crevice tool and Combination brush holder
Crevice Tool
Combination Brush
Figure (5)
- 67 -
Assembly of metal extension pipe and floor tool
Insert the handle into the metal extension pipe, then insert the other end of the
metal extension pipe into the floor brush, and adjust to the pipe to desired
height.
Handle
Pipe
Floor Tool
Figure (6)
Operation Instructions
How to start
1. Pull out the mains cable to the yellow mark insert the power plug into
the power socket, and press down the power switch button.
2. The yellow mark on the power cord indicates its desired length. Never
pull out the power cord to the length exceeding the red mark.
- 7-
Suction Control
To reduce the suction slide the suction control up as is shown in Figure (7).
Suction Control
Figure (7)
Protective devices for motor
1. A temperature limiter switches the vacuum cleaner off automatically if it
gets too hot. This can occur if for instance hose, pipe or filters are blocked.
Switch the vacuum cleaner off immediately using the switch on the cleaner
Disconnect the power plug from the wall outlet
2. Remove the hose and pipe check for blockage, if they are not blocked clean
or replace filters and empty dust container
3. After cooling for about 30 minutes it can be switch on a gain
- 8-
Maintenance of the Cleaner
1. Switch off cleaner and disconnect power before any maintenance
2. Empty dust container after every use
3. Clean front filter every 3 months by washing it in mild dishwashing
solution and rinse well. Dry for 24 to 36 hours before refitting to the cleaner
refer to (Fig 10) Replace filter every 6 months
4. Wash dust container assembly every 6 months. It must be completely dry
for 2 to 3 days before reassembling back to gather.
Storage of the Cleaner
1. Upon the completion of the operation of the cleaner, turn off its power
supply, and pull the power plug out of the power socket, then step on the
cord reeling button to reel in the power cord fully. Hang the floor brush onto
the floor brush hook, as is shown in Figure (8).
Figure (8)
2. Place the cleaner in the dry indoor environment.
- 9-
Cleaning of the Dust Container
Empty dust container after every use
1. To remove the dust container refer to Fig 4
2. To empty the dust container Place the container over the rubbish bin press
down the releasing button at the bottom of the dust container as is shown
in Figure (9). And tap the container gently to release the fine dust
Figure (9)
Cleaning of front filter for motor:
Warning: please make sure the power supply to the cleaner has been
disconnected before carrying out the following steps:
1. Remove the dust container from the cleaner refer to Fig 4
2. Remove the grill of the front motor filter then remove the filter as is shown
in Figure (10). Refer to maintenance for cleaning Replace filter every 6
months
- 01 -
Figure (10)
Replacement of HEPA Filter
HEPA is installed behind the air outlet grill. It is not washable When the
surface is clogged by dust the filter should be replaced by a new one to
maintain good suction (Figure 11) and to prevent over heating and cutting out
Figure (11)
Replace this filter every 6 months to 12 months depending on the
usage. Please remember to confirm that all filters have been
correctly installed before turning the cleaner on
- 11 -
Fault
Treatment
1. Check whether the power plug is inserted securely;
pull out the plug and then reinsert it in the power
The cleaner
cannot operate.
socket;
2. Check whether the power socket is turned ON
3. Check whether the switch on the cleaner is in “ON”
position.
Poor suction.
1. Check whether the floor brush, the hose and the pipes
Getting too hot.
are blocked, and remove any blockage immediately;
Cleaner stopped
2. Check filters clean or replace filters Refer to
when in use.
Fig 10&11
- 12 -