1
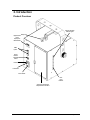
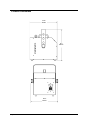
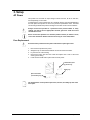
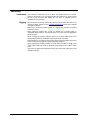
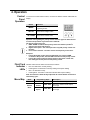
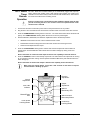
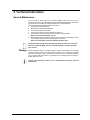
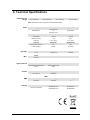
User Manual
Table of Contents
Table of Contents ............................................................................... 2
1. Before You Begin ........................................................................... 3
What Is Included ........................................................................................... 3
Unpacking Instructions .................................................................................. 3
Claims .................................................................................................................... 3
Manual Conventions ..................................................................................... 3
Symbols ........................................................................................................ 3
Document Information ................................................................................... 3
Product at a Glance ...................................................................................... 4
Safety Notes .................................................................................................. 4
2. Introduction .................................................................................... 5
Product Overview .......................................................................................... 5
Product Dimensions ...................................................................................... 6
3. Setup ............................................................................................... 7
AC Power ...................................................................................................... 7
Fuse Replacement ................................................................................................. 7
Mounting ....................................................................................................... 8
Orientation ............................................................................................................. 8
Rigging ................................................................................................................... 8
4. Operation ...................................................................................... 10
Control Panel Operation.............................................................................. 10
Fluid Tank Indicator LEDs ........................................................................... 10
Menu Map ................................................................................................... 10
HC-T Wired Timer Remote Operation ........................................................ 11
Configuration (Standalone Mode) ............................................................... 12
Manual Mode ....................................................................................................... 12
Configuration (DMX) ................................................................................... 12
Starting Address .......................................................................................... 12
DMX Channel Assignments and Values ..................................................... 12
2-CH ............................................................................................................ 12
5. Technical Information .................................................................. 13
General Maintenance .................................................................................. 13
Storage ........................................................................................................ 13
General Troubleshooting............................................................................. 14
6. Technical Specifications .............................................................. 15
Returns .............................................................................................. 16
Contact Us ........................................................................................ 16
Page 2 of 16
Hurricane™ Haze 3D User Manual Rev. 1
1. Before You Begin
What Is
Included
·
·
·
·
·
·
Hurricane™ Haze 3D
Power Cord
HC-T Wired Timer Remote
(15 ft length)
Warranty Card
Quick Reference Guide
Hanging Bracket with Mounting Hardware
Unpacking
Instructions
Immediately upon receiving this product, carefully unpack it and check the container in
which you received it.
Claims
If the container or the material inside the container (the product and included
accessories) appear damaged from shipping, or show signs of mishandling, upon
receipt notify the carrier immediately, not Chauvet. Failure to do so in a timely
manner may invalidate your claim with the carrier. In addition, keep the container and
all the packing material for inspection.
For other issues such as missing components or parts, damage not related to
shipping, or concealed damage, file a claim with Chauvet within seven (7) days of
receiving the merchandise.
Manual
Conventions
Convention
<Menu>
1–512
50/60
Settings
Menu > Settings
ON
Symbols
Convention
Meaning
A key to be pressed on the product’s control panel
A range of values
A set of values of which only one can be chosen
A menu option not to be modified (for example,
showing the operating mode/current status)
A sequence of menu options to be followed
A value to be entered or selected
Meaning
Critical installation, configuration, or operation
information. Failure to comply with this information
may render the product partially or completely
inoperative, cause damage to the product, or cause
harm to the user.
Important installation or configuration information.
Failure to comply with this information may prevent
the product from functioning correctly.
Useful information.
Document
Information
The information and specifications contained in this document are subject to change
without notice. Chauvet assumes no responsibility or liability for any errors or
omissions that may appear in this manual.
© Copyright 2014 Chauvet. All rights reserved.
Electronically published by Chauvet in the United States of America.
Author
Date
Editor
Date
M. Trouard
07/22/14
A. Leon
09/24/14
Hurricane™ Haze 3D User Manual Rev. 1
Page 3 of 16
Product at a
Glance
Use on Dimmer
Outdoor Use
Sound-Activated
DMX
Master/Slave
x
x
x
P
x
Auto Programs
Auto-ranging Power Supply
Replaceable Fuse
User-Serviceable
x
x
P
x
Safety Notes
Please read the following Safety Notes carefully before working with the
product. The Notes include important safety information about installation,
usage, and maintenance.
·
·
·
·
·
·
·
·
·
·
·
·
·
·
·
·
·
·
Not intended for permanent installations.
Always connect the product to a grounded circuit to avoid the risk of electrocution.
Always disconnect this product from the power source before cleaning it or
replacing the fuse.
Make sure the power cord is not crimped or damaged.
Never disconnect the power cord by pulling or tugging on the cord.
Do not touch the output nozzle on this product. It is very hot during operation and
it may remain hot for several hours after turning the unit off.
If mounting this product overhead, always secure it to a fastening device using a
safety cable.
Do not mount this product on a flammable surface (e.g., wood, linoleum, carton,
plastic, or carpet).
Do not drink the haze fluid. If you do, call your local emergency service
(911 in the US) for help.
Do not add perfume, alcohol, gasoline, or any other flammables to the haze fluid.
Always make sure that the voltage of the outlet to which you are connecting the
product is within the range stated in the decal or rear panel of the product.
Keep this User Manual for future consultation. If you sell this product to another
user, be sure that they also receive this document.
This product is for indoor use only! To prevent risk of fire or shock, do not expose
this product to rain or moisture.
Make sure there are no flammable materials close to the unit while operating
Always install this product in a location with adequate ventilation, at least
20 in (50 cm) from adjacent surfaces.
·
Be sure that no ventilation slots on the unit’s housing are blocked.
Make sure to replace the fuse with another of the same type and rating.
The maximum ambient temperature (Ta) is 104 °F (40 °C). Do not operate this
product at higher temperatures.
In the event of a serious operating problem, stop using the unit immediately.
Never try to repair this product. Repairs carried out by unskilled people can lead
to damage or malfunction. Please contact the nearest authorized technical
assistance center.
Never connect this product to a dimmer or rheostat.
Depending on the amount of haze generated, all haze machines may set off
smoke detectors.
In certain environment, haze fluid-based machines may leave a slippery residue
on floors and surfaces.
Do not use for space heating purposes.
·
Use only CHAUVET® DJ water-based haze fluid.
·
Drain the tank before transporting the product.
·
To eliminate unnecessary wear and improve its lifespan, during periods of nonuse completely disconnect the product from power via breaker or by unplugging it.
·
·
·
·
·
FCQ (Fog Cleaner Quart) was specifically developed by Chauvet to clean your
Hurricane™ Haze 3D. Make sure you use FCQ regularly to increase the life of
your product.
Page 4 of 16
Hurricane™ Haze 3D User Manual Rev. 1
2. Introduction
Product Overview
Internal Fluid Tank
Indicator Lights
Safety Loop
Digital Control
Panel
Display and
Menu Buttons
DMX
In/Out
Wired
Remote
Controller
Socket
Power In
Fuse Holder
Power Switch
Fluid
Level
Indicator
Access Door and Storage
Compartment for the HC-T
Hurricane™ Haze 3D User Manual Rev. 1
Page 5 of 16
Product Dimensions
13.4 in
340 mm
15 in
380 mm
12.9 in
328 mm
Page 6 of 16
Hurricane™ Haze 3D User Manual Rev. 1
3. Setup
AC Power
This product can work with an input voltage of either 120 VAC, 60 Hz or 230 VAC,
50 Hz depending on the model.
To determine the power requirements for a particular product, see the label affixed to
the back plate of the product or refer to the product’s specifications chart. The listed
current rating indicates the product’s average current draw under normal conditions.
Always connect this product to a protected circuit (circuit breaker or fuse),
making sure that it has an appropriate electrical ground to avoid the risk of
electrocution or fire.
Never connect this product to a rheostat (variable resistor) or dimmer circuit,
even if the rheostat or dimmer channel serves only as a 0 to 100% switch.
Fuse Replacement
Disconnect this product from the power outlet before replacing the fuse.
1.
2.
3.
4.
5.
Disconnect the product from power.
Wedge the tip of a flat-head screwdriver into the slot of the fuse holder.
Pry the fuse out of the housing.
Remove the blown fuse from the holder and replace with a fuse of the exact
same type and rating.
Insert the fuse holder back in place and reconnect power.
Installed fuse (held
by plastic clip)
Safety cap
Spare fuse holder
(inside safety cap)
The product does not ship with a spare fuse; however, the safety cap has room
for a spare.
Hurricane™ Haze 3D User Manual Rev. 1
Page 7 of 16
Mounting
Orientation
The Hurricane™ Haze 3D may not be tilted. This product should be mounted,
placed on the ground, or on any oblique surface at a less than 15° angle to avoid
the risk of the haze fluid tank leaking. Be sure there is adequate room for
ventilation and programming.
Rigging
Be sure that the structure or surface onto which you are mounting this product can
support its weight. Please see the Technical Specifications section of this manual
for weight information.
Make sure to mount the product securely to a rigging point, whether an elevated
platform or a truss.
When rigging this product onto a truss, you should use a mounting clamp of
appropriate weight capacity. The bracket has a 13 mm hole, which is appropriate
for this purpose.
When mounting this product overhead, always use a safety cable. Never mount
directly above people as condensation may drip and fluid may be hot.
Before deciding on a location for this product, always make sure that it will be easy
to access the unit for maintenance and programming purposes.
When power linking multiple products, you must always consider the length of the
power linking cable and mount the products close enough for the cable to reach
them.
Only loosen or tighten the bracket knobs using your bare hands. Using tools could
damage the knobs.
Page 8 of 16
Hurricane™ Haze 3D User Manual Rev. 1
Mounting Bracket
Mounting Clamp
(such as CLP-15N
clamp from Chauvet)
Safety Cable
Mounting Diagram
Bracket Adjustment
Knob (2)
<15°
Hurricane™ Haze 3D User Manual Rev. 1
Rubber Feet for
floor mounting
<15°
Page 9 of 16
4. Operation
Control
Panel
Operation
To access the control board functions, use the three buttons located underneath the
display.
Button
Function
<MENU>
Press to scroll through the
operating modes
<▲> UP
Press to find a higher value
<▼> DOWN
Press to find a lower value
Important note regarding the priority level for the three types of methods used
to control the operation of your Hurricane™ Haze 3D.
The priority control levels are:
1. DMX - A DMX contrtoller takes priority control over both the product’s
digital control panel and the HC-T.
2. Digital control panel - The control panel will only take priority control over
the HC-T.
3. HC-T remote controller - The HC-T has the lowest priority control level.
Examples:
·
If using the digital control panel and afterwards you connect a DMX
controller to the product, then the DMX controller will take priority control.
·
If using the remote controller and the digital control panel is used next,
then the digital control panel will take priority control.
Fluid Tank
Indicator
LEDs
Indicator LEDs show the status of the fill tank, as follows:
·
Red - the fluid tank is currently heating
·
Flashing Red - the fluid tank is currently heating and requires refilling
·
Blue - the fluid tank is ready
·
Flashing Blue - the heater is warmed but the fluid tank requires refilling
Note: The Hurricane™ Haze 3D may output haze for a short duration to allow for a
self-checking cycle.
Menu Map
Mode
DMX Mode
Manual
Mode
Page 10 of 16
Programming Steps
Description
d***
001–512
Selects the DMX starting address
Haze
Volume
h001–h005
Selects the volume of haze output,
low to high
Blower
Speed
f001–f005
Selects the blower fan speed,
low to high
Hurricane™ Haze 3D User Manual Rev. 1
HC-T Wired
Timer
Remote
Operation
The HC-T wired timer controller allows you to automatically trigger haze output by
setting interval and duration times. LED indicator lights display the machine and
controller’s current state. Rotary knobs set interval and duration times, while manual
and continuous buttons allow overriding control.
Using the Control Panel, set the Haze Volume and Blower Speed output to x000
prior to connecting the HC-T. You can then connect and operate the HC-T with
the Hurricane™ Haze 3D.
1.
Connect the Hurricane™ Haze 3D to power and turn the power switch to the on position.
2.
Plug the HC-T timer controller into the wired remote controller socket on the back of the haze machine.
3.
Press the <TIMER ON/OFF> latching button on the HC-T. The Timer LED Indicator above the button will
light up. The <TIMER ON/OFF> latching button will remain on until it is pressed again.
4.
Set the INTERVAL, DURATION, and OUTPUT adjustment knobs to the desired positions.
5.
·
INTERVAL knob sets the amount of time in between bursts of haze.
·
DURATION knob sets the length of time that the haze machine will run during the burst.
·
OUTPUT knob adjusts the haze output.
Press the <CONTINUOUS> latching button and the haze machine outputs haze until the button is
pressed again. The Manual/Power LED Indicator above the button will light up during continuous
operation.
Note: The duration of continuous haze output is based on the capability of the haze machine.
6.
Press the <MANUAL> button to momentarily output haze. The haze machine will output haze for as long
as you hold down the button. During manual operation the Manual Momentary LED Indicator above the
button will light up.
Note: The duration of manual haze output is based on the capability of the haze machine.
When using the manual button, it may take a few seconds for the hazer to respond
because the fan is building up speed.
Duration
Adjustment
Interval
Adjustment
Output
Adjustment
Timer LED
Indicator
OUTPUT
Manual/Power
LED
Timer On/Off
Latching Button
Hurricane™ Haze 3D User Manual Rev. 1
Manual
Momentary LED
Manual Control
Momentary Button
Continuous
Latching Button
Page 11 of 16
Configuration
(Standalone
Mode)
Set this product in one of the standalone modes to control it without a DMX controller.
1. Connect this product to a suitable power outlet.
2. Turn this product on.
Manual Mode
Never connect a product that is operating in any standalone mode, such as
Manual mode, to a DMX string connected to a DMX controller. Products in
standalone mode may transmit DMX signals that could interfere with the DMX
signals from the controller.
To enable the Manual mode, follow the instructions below:
1. Press <MENU> repeatedly until h*** shows on the display.
2. Use <UP> or <DOWN> to adjust the haze volume.
3. Press <MENU> repeatedly until f*** shows on the display.
4. Use <UP> or <DOWN> to adjust the blower speed.
Configuration
(DMX)
Starting
Address
Set this product in DMX mode to control it with a DMX controller.
1. Connect this product to a suitable power outlet.
2. Turn this product on.
3. Connect a DMX cable from the DMX output of the DMX controller to the DMX
input socket of this product.
The Hurricane™ Haze 3D has one DMX personality, a 2-channel mode for basic
control.
The Hurricane™ Haze 3D uses up to two channels in its 2-channel DMX mode, which
defines the highest configurable address to 511.
When selecting a starting DMX address, always consider the number of DMX
channels the DMX mode uses. If you choose a starting address that is too high, you
could restrict the access to some of the product’s channels.
If you are not familiar with the DMX protocol, download the DMX Primer from
www.chauvetlighting.com.
To select the starting address, do the following:
1. Press <MENU> repeatedly until d*** shows on the display.
2. Use <UP> or <DOWN> to select the starting address.
DMX Channel Assignments and Values
2-CH
Channel
1
2
Page 12 of 16
Function
Blower speed
Haze volume
Value
000 ó 255
000 ó 255
Setting
Low to high
Low to high
Hurricane™ Haze 3D User Manual Rev. 1
5. Technical Information
General Maintenance
Do not allow the haze machine to become clogged. After every 40 hours of
continuous operation, use CHAUVET® Fog Cleaner Quart (FCQ) through the system
to prevent the accumulation of particulate matter in the heating element.
The recommended cleaning procedure is as follows:
1. Unplug the product from power.
2. Empty all haze fluid from the machine.
3. Add cleaning solution to the tank.
4. Connect the product to power and allow it to warm up.
5. Run the unit in a well-ventilated area until the tank is almost empty.
Note: Do not allow the pump to run dry.
6. Refill with haze fluid to continue using the hazer. Run the machine briefly to clear
any remaining cleaning solution from the pump and heater.
Note: Do not operate the machine without fluid at any time.
Fog Cleaner Quart (FCQ) was specifically developed by Chauvet to clean your
Hurricane™ Haze 3D. Make sure you use FCQ regularly to increase the life of
your product.
Storage
Before storing the hazer, run FCQ through the system as described in the cleaning
procedure above; however, only follow steps 1 through 5. Do not refill the tank with
haze fluid if storing the hazer, but fluid can remain in the line. Cleaning the system
prior to storage will help prevent any particles from condensing inside the pump or
heater while not in use.
Test-run your Hurricane™ Haze 3D on a monthly basis to achieve the best
performance.
Hurricane™ Haze 3D User Manual Rev. 1
Page 13 of 16
General Troubleshooting
Symptom
Circuit breaker or fuse keeps
blowing
Product does not power up
Product does not respond to
DMX
Intermittent DMX Problems
Possible Cause
Possible Action
Excessive load on the circuit
Make sure that the total load does not exceed the recommended
capacity of the breaker or fuse’s nominal current
Short circuit along the power lines
Check the power lines and power cords
No energy on power outlet
Check power outlet
Change to another outlet
Loose or damaged power cord
Check the power cord
Blown fuse
Replace blown fuse with a good one of the same type and rating
Internal problem
Send product for repair
Wrong starting address on the
product
Set the correct starting address on the product
Wrong polarity setting on the DMX
controller
Change the signal polarity on the controller
Loose or damaged DMX cable
Check the DMX cable entering the faulty unit
Internal problem
Send product for repair
Signal cables are not DMX
compatible
Replace non-DMX cables with true DMX cables
Interference with AC or radio
signals
Keep DMX cables away from AC wires or radio equipment
DMX cable too long
Use a shorter DMX cable or install an optically coupled DMX
amplifier right before the product with intermittent problems
Terminator not connected
Install a terminator
Fill the tank.
Allow the unit to reach the normal operating temperature and for
the blue indicator to light.
Set the output to the highest level.
Power cycle the unit 1-2 times until the fluid reaches the sensor.
The blue tank indicator light stops flashing.
False Sensor Reading
(Priming)
Air bubbles in fluid line
Fill the tank.
While the unit is operating, pinch the fluid line between your
thumb and forefinger, and hold for 3 to 5 seconds creating a
vacuum in the system.
Release the pinched portion and allow the fluid to flow naturally.
Fill the tank.
While the unit is operating; remove but do not disconnect the
fluid tank and tilt the machine at a 45° angle.
Empty fluid tank
Refill tank with the correct CHAUVET® haze fluid
If you still experience problems after trying the solutions presented here, contact
Chauvet Technical Support.
Page 14 of 16
Hurricane™ Haze 3D User Manual Rev. 1
6. Technical Specifications
Dimensions and
Weight
Length
Width
Height
Weight
13.4 in (340 mm)
12.9 in (328 mm)
15 in (380 mm)
23 lb (10.5 kg)
Note: Dimensions in inches, rounded to the nearest decimal digit.
Power
Operation
Misc.
Power Supply Type
Range
Voltage Selection
Model-specific
120 VAC, 60 Hz
or
230 VAC, 50 Hz
Fixed voltage
Parameter
120 V, 60 Hz
230 V, 50 Hz
Consumption
1,300 W
1,462 W
Operating current
11 A
6.2 A
Fuse size
F 13 A, 250 V
F 7 A, 250 V
UK/Worldwide
Power I/O
US/Canada
Power input connector
IEC
IEC
Power cord plug
Edison
Local plug
Heat-up Time
Tank Capacity
Fluid Consumption
4 min
0.7 gal (2.5 l)
14 ml/min
Output
1,700 cfm
CHAUVET® DJ Haze Fluid (Gallon)
Approved Fluids
Thermal
High Performance Haze Fluid
(HFG)
Premium Haze Fluid
(PHF)
Maximum External Temp.
Cooling System
104 °F (40 °C)
Convection
DMX
DMX
Ordering
I/O Connectors
Connector Type
Channel Range
3-pin XLR
Sockets
2
Product Name
Item Code
UPC Number
Hurricane™ Haze 3D
05070795 (120 V)
05070798 (230 V)
781462211431
781462211462
Hurricane™ Haze 3D User Manual Rev. 1
Page 15 of 16
Returns
To return a product or request support:
·
In the U.S., contact Chauvet World Headquarters.
·
In the UK or Ireland, contact Chauvet Europe Ltd.
·
In Mexico, contact Chauvet Mexico.
·
In any other country, DO NOT contact Chauvet. Contact your distributor. See www.chauvetlighting.com for
distributors outside the U.S., United Kingdom, Ireland, or Mexico.
If you live outside the U.S., United Kingdom, Ireland, or Mexico, contact your distributor of record and follow
their instructions on how to return Chauvet products to them. Visit our website for contact details.
Call the corresponding Chauvet Technical Support office and request a Return Merchandise Authorization (RMA)
number before shipping the product. Be prepared to provide the model number, serial number, and a brief description of
the cause for the return.
You must send the merchandise prepaid, in its original box, and with its original packing and accessories. Chauvet will
not issue call tags.
Clearly label the package with the RMA number. Chauvet will refuse any product returned without an RMA number.
Write the RMA number on a properly affixed label. DO NOT write the RMA number directly on the box.
Before sending the product, clearly write the following information on a piece of paper and place it inside the box:
·
Your name
·
Your address
·
Your phone number
·
RMA number
·
A brief description of the problem
Be sure to pack the product properly. Any shipping damage resulting from inadequate packaging will be your
responsibility. FedEx packing or double-boxing is recommended.
Chauvet reserves the right to use its own discretion to repair or replace returned product(s).
Contact
Us
Page 16 of 16
WORLD HEADQUARTERS - Chauvet
General Information
Technical Support
Address:
5200 NW 108th Avenue
Voice: (954) 577-4455 (Press 4)
Sunrise, FL 33351
Fax:
(954) 756-8015
Voice:
(954) 577-4455
Email: [email protected]
Fax:
(954) 929-5560
World Wide Web www.chauvetlighting.com
Toll free:
(800) 762-1084
UNITED KINGDOM AND IRELAND - Chauvet Europe Ltd.
General Information
Technical Support
Address:
Unit 1C
Email: [email protected]
Brookhill Road Industrial Estate
World Wide Web www.chauvetlighting.co.uk
Pinxton, Nottingham, UK
NG16 6NT
Voice:
+44 (0)1773 511115
Fax:
+44 (0)1773 511110
MEXICO - Chauvet Mexico
General Information
Technical Support
Address:
Av. Santa Ana 30
Email: [email protected]
Parque Industrial Lerma
World Wide Web www.chauvet.com.mx
Lerma, Mexico C.P. 52000
Voice:
+52 (728) 285-5000
Outside the U.S., United Kingdom, Ireland, or Mexico, contact your dealer. Follow their instructions to request
support or to return a product. Visit our website for contact details.
Hurricane™ Haze 3D User Manual Rev. 1


![MX2 sync [final].vp](http://vs1.manualzilla.com/store/data/005975841_1-4533d2555e3004ab9339335fb150c7a8-150x150.png)