1
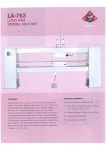
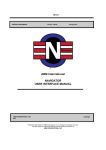
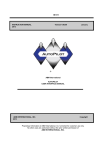
ABM International, Inc.
Model: Innova Longarm Quilting Machine
Series: 1018/1022/1026 V1.0
Stitch Regulation User Manual
ABM International, Inc.
Stitch Regulation User Manual
Proprietary information of ABM INTERNATIONAL, Inc. furnished for customer use only.
No other uses are authorized without the prior written permission of
ABM INTERNATIONAL, INC.
1
ABM International, Inc.
Model: Innova Longarm Quilting Machine
Series: 1018/1022/1026 V1.0
Stitch Regulation User Manual
1.0: Overview - Standard Stitch Regulation
The Innova is equipped with a machine controller that handles all of the electronic functions of the machine.
The controller performs the following tasks:
•
•
•
•
•
•
•
stop and start the sewing motor
maintain and adjust sewing speed
perform needle positioning - up and down
display sewing speed
display electronic error messages in case of failure
maintain stitches per inch (if equipped)
deactivation of stitch regulation if idle for more than 20 seconds (if equipped)
When the power switch is turned ON, the machine controller defaults to the main screen (Figure 1.0). From this
screen, the user can turn stitch regulation ON or OFF (if equipped), adjust needle stop position UP or DN and
adjust the sewing speed when in manual sewing mode.
Figure 1.0 – Main Screen
The needle stop position is toggled between up and down by pressing the button marked “4”. The upper right
section of the screen displays the current needle stop position “UP” or “dn” (down).
The stitch regulator, if equipped, is turned ON and OFF by pressing the button marked “5”. When stitch
regulation is active, “Sr” will appear on the display. When stitch regulation is turned OFF, the “Sr” will not be
visible and manual sewing mode is active.
Sewing speed in manual mode (SR off), can also be adjusted on the front of the control panel by using the
buttons marked 0,1,2, and 3. Each time the button is pressed, the digit which corresponds to that button will
increase by one. The 0 button adjusts speed from 0-9 in single digit increments. The 1 button adjusts speed
from 10-90 in increments of 10. The 2 button adjusts speed from 100-900 in increments of 100 and the 3 button
adjusts speed from 1000-3000 in increments of 1000. Any value entered that is less than 75 or greater than 3000
will revert to the closest default value, 75 or 3000.
Proprietary information of ABM INTERNATIONAL, Inc. furnished for customer use only.
No other uses are authorized without the prior written permission of
ABM INTERNATIONAL, INC.
2
ABM International, Inc.
Model: Innova Longarm Quilting Machine
Series: 1018/1022/1026 V1.0
Stitch Regulation User Manual
The “mode” button allows the user to navigate through various screens that provided technical assistance as well
as stitch regulation adjustment. The “mode” button may also be used to lock out the controller so that no
modifications can be made. This may be helpful when allowing inexperienced users to use the machine
unattended. Pressing and holding the “mode” button for more than 2 seconds will put the controller into
“LOCK” mode. The word “LOCK” will be visible on the screen when enabled. To disable the lock, press and
hold the “mode” button for more than 2 seconds. The word “LOCK” will turn off when the mode has been
canceled.
Before setting the stitch regulator the user should understand the basics of the system. Stitch regulation is used
to maintain stitches per inch during quilting. When in regulated mode the machine will automatically accelerate
and decelerate based on the quilting operator’s movements. This occurs when the encoders mounted on the
tracks send digital pulses to the controller which in turn increases and decreases the voltage to the motor running
the sewhead. The number of stitches per inch is fully adjustable from 5-15 stitches per inch. We recommend
that you set your machine between 8 and 12 stitches per inch to achieve the best results. The following steps
will walk you through setting the stitches per inch, adjusting minimum stitch speed and turning stitch regulation
(SR) on and off.
Figure 1.1 – Stitches per inch screen
From the main screen (Figure 1.0), press the “mode” button three times. The stitches per inch screen (Figure
1.1) will now be visible. From this screen, the user can adjust the stitches per inch between 5 and 15. Use
buttons 0 and 1 to modify the value. Pressing the 0 button will adjust the SPI value between 0-9 in increments
of 1. The 1 button will adjust the value between 0-90 in increments of 10 (NOTE: 15 is the maximum value
allowed). When the value is modified, it will begin to flash. To store the modified value in memory, press and
hold the “1/2/SET” button until the value stops flashing.
While in the stitches per inch screen (Figure 1.1), the operator may adjust the stitch regulator minimum speed
(SrSPD). Quickly press and release the “1/2/SET” button. The stitch regulation minimum speed screen (Figure
1.2) will now be displayed.
Proprietary information of ABM INTERNATIONAL, Inc. furnished for customer use only.
No other uses are authorized without the prior written permission of
ABM INTERNATIONAL, INC.
3
ABM International, Inc.
Model: Innova Longarm Quilting Machine
Series: 1018/1022/1026 V1.0
Stitch Regulation User Manual
Figure 1.2 – Stitch regulation minimum sew speed screen
The SrSPD value controls the speed at which the quilting machine motor runs when the head is at rest (no
movement). A value of zero would mean the head stops sewing when the operator stops moving the machine.
A value greater than zero, between 75 and 500, means the sewhead runs at that set speed when the machine is at
rest (no movement). ABM prefers to not use an SrSPD setting (factory set to 0). SrSPD has been used in the
industry to combat large stitches when accelerating the machine from a stand still or in sharp corners. If the
SrSPD is set too high, the user may notice a significant amount of very small stitches in sharp corners and starts
and stops. Adjusting the SrSPD to a lower setting may help solve this problem. Again, the 0,1, and 2 buttons are
used to set the value between 0 (off) and 75-500. The value will flash when it is being modified. Press and hold
the “1/2/SET” button until the vale stops flashing. This will lock the new value into memory. Quickly pressing
and releasing the “1/2/SET” button will toggle between the SPI menu and SrSPD menu. Pressing the “mode”
button once in either screen will bring the user back to the main screen (Figure 1.0).
Once all of the values are adjusted, the user may start stitch regulation. Press and release the green start button
on the handle bar. If SrSPD is set to zero, the machine starts to sew only when the head is moved, maintaining
the stitches per inch set. If SrSPD is set to some value other than zero, the machine will start to sew at the set
speed. Stitching speed will only increase if the machine is moved fast enough to require a speed increase to hold
the proper stitches per inch. (NOTE: Setting the SrSPD too high may result in poor stitches per inch
consistency).
Press and release the green button again to stop stitch regulation. This will allow the user to move the quilting
machine to a new position without sewing. The button marked “5” can be used to turn stitch regulation on and
off. If “Sr” is not visible on the main screen, the machine is in manual sewing mode.
Proprietary information of ABM INTERNATIONAL, Inc. furnished for customer use only.
No other uses are authorized without the prior written permission of
ABM INTERNATIONAL, INC.
4
ABM International, Inc.
Model: Innova Longarm Quilting Machine
Series: 1018/1022/1026 V1.0
Stitch Regulation User Manual
1.1: Quick Reference
Operating in manual mode –
Step 1: Quickly pressing and releasing the (Red) left hand button will toggle the machine between needle
up and down position.
Step 2: Press and release the (Green) right hand button and the sewhead will start to run
Step 3: Press and hold the (Green) right hand button and the sewhead will increase sewing speed.
Step 4: Press and hold the (Red) left hand button and the sewhead will decrease sewing speed.
Step 5: Press and release the (Green) right hand button again and the sewhead will stop.
Operating in stitch regulated mode –
Step 1: Quickly pressing and releasing the (Red) left hand button will toggle the machine between needle
up and down.
Step 2: Press the #5 button on the control panel and stitch regulation (SR) is activated. The main screen of
the display will show “Sr” when stitch regulation is activated.
Step 3: Press and release the (Green) right hand button and the sewhead will start to run
Step 4: The faster you move the machine the faster it will run.
Step 5: The slower you move the machine the slower it will run.
Step 6: Press and release the (Green) right hand button again and the sewhead will stop.
Step 7: Press the #5 button on the control panel and stitch regulation mode will turn off.
Proprietary information of ABM INTERNATIONAL, Inc. furnished for customer use only.
No other uses are authorized without the prior written permission of
ABM INTERNATIONAL, INC.
5
ABM International, Inc.
Model: Innova Longarm Quilting Machine
Series: 1018/1022/1026 V1.0
Stitch Regulation User Manual
2.0: Overview - Lightning Stitch Controller
The Innova Lightning Stitch kit provides the user with the most advanced stitch regulation system available today.
The system consists of two encoders, a controller, an amplifier, a motor and an operator interface. Together these
components provide a closed loop stitch regulation system that provides significant improvements in stitch length
accuracy.
The encoders, which are identical to the standard stitch regulation assembly, detect physical position and velocity of
the Innova quilting machine relative to the frame. As the operator moves the machine to the front, back, left or
right, the encoders relay digital information to the controller about the direction, velocity and position of the
machine.
The controller processes the incoming information from the encoders and makes informed decisions about how to
operate the Innova based on inputs, outputs and the operator interface. Once the controller has determined it is
necessary to change the motor speed, digital information is relayed from the controller to the amplifier.
The amplifier provides the controller the muscle needed to drive the motor. This allows the system to achieve
extremely high acceleration and deceleration rates and allows the controller to maintain constant speeds.
Additionally, the amplifier provides information of the motor position, velocity and state back to the controller
thereby closing the loop. The amplifier and control have built in LED arrays to aid in troubleshooting if problems
are encountered. However, for the majority of users, the encoders, controller, amplifier and motor are components
that will operate behind the scenes with no need for adjustment or in-depth knowledge. The last component of the
system is the operator interface (see Figure 2.0).
Figure 2.0 – Main operator screen of a Lightning Stitch
The operator interface provides the Innova user the ability to modify settings of the lightning stitch regulator as well
as maintain and troubleshoot problems if needed. When the Innova is turned on, the Lightning Stitch controller and
interface will take a few moments to boot – usually 30 seconds to 1 minute. The boot up procedure allows the
controller to check that all components of the system are functioning properly. If problems are detected, the
controller will notify the user through the operator interface. Though not required, it is recommended that the
machine be allowed to boot up completely before attempting to operate the machine. This will ensure that all
components function properly. Upon completion of a successful boot up, the main operator screen will be displayed.
Proprietary information of ABM INTERNATIONAL, Inc. furnished for customer use only.
No other uses are authorized without the prior written permission of
ABM INTERNATIONAL, INC.
6
ABM International, Inc.
Model: Innova Longarm Quilting Machine
Series: 1018/1022/1026 V1.0
Stitch Regulation User Manual
The system has been built in such a way that the interface is not imperative to the operation of the system. This
means that if the interface were to fail, the lightning stitch assembly would still function and operate based on its last
parameter settings for stitches per inch and quilting mode. However, without a working interface, the settings would
be unchangeable.
3.0: Lightning Stitch Operator Interface
The main operator screen provides all of the needed settings for quilting on a day-to-day basis. The screen also
contains buttons that allow access to additional screens where more technical parameters may be adjusted. The
version of Lightning Stitch screen software running on the machine can be found in the lower right corner of the
screen directly above the SETUP button.
Starting in the upper left corner of the screen below the Lightning Stitch Logo you will see the current speed. The
number directly below the text is the actual value of the Innova sewing machine during Regulated, Manual and Ecorder mode. To change the speed in manual mode, the operator has two choices. Pressing and holding the green
button on the front or rear handle bars of the Innova will increase the speed. Pressing and holding the white button
on the front or rear handle bars of the Innova will decrease the speed. Accessing the SETUP screen will also allow
the operator to manually enter a numeric value.
Figure 3.0 Main operator screen of a Lightning Stitch
Directly to the right of current speed is Bobbin % remaining. This is a valuable tool that helps to keep the operator
informed of the amount of thread left on the bobbin. The value is a countdown percentage based on the calculated
sewing distance recorded by the controller. Pressing the RESET button returns the value to 100% and signifies a
bobbin change to the controller. The Bobbin % remaining value is adjustable in the setup menu and will be
discussed later.
Directly to the right of the Bobbin % remaining value is the Stitch/Inch which stands for stitches per inch. Touching
the value below the text brings up the keypad (see Figure 3.1). Any value between 3 and 22 may be entered.
Touching the ENTER key will close the keypad and record the setting. Any value outside the range will be
disregarded. Setting a value of 5 or less puts the Lightning into AUTO-BASTE mode. This allows the operator to
move the machine at a slow speed and the machine will perform a rapid single stitch at the correct stitches per inch.
Proprietary information of ABM INTERNATIONAL, Inc. furnished for customer use only.
No other uses are authorized without the prior written permission of
ABM INTERNATIONAL, INC.
7
ABM International, Inc.
Model: Innova Longarm Quilting Machine
Series: 1018/1022/1026 V1.0
Stitch Regulation User Manual
Figure 3.1 Keypad on main operator screen.
Directly below the Stitch/Inch value is the TIEOFF button. Pressing the TIEOFF button will cause the machine to
make a pre-determined number of stitches while standing still. The value for the number of stitches is adjustable in
the SETUP screen.
To the left of the TIEOFF button is the JOG button. Pressing and holding this button will make the machine jog at a
slow constant speed. The speed of the JOG is not adjustable.
To the left of the JOG button is the PICKUP button. Pressing the PICKUP button will cause the machine to make a
single stitch in the material so that the bobbin thread can be brought to the top of the quilt.
Directly below the PICKUP button the Sensitivity slider. The adjustment is such that the closer the slider is to the
top, the more sensitive the motor will be to speed changes. The correct sensitivity is ultimately the user’s choice but
ABM recommends the lowest possible setting for everyday quilting. If small intricate work must be accomplished,
a higher sensitivity will help to ensure consistent stitches per inch. If higher speed work with long sweeping
movements is to be performed, a lower sensitivity will help to smooth out the machine speed adjustments creating a
smoother operating machine and more consistent stitch quality and look.
Directly to the left of the Sensitivity slider is the three position sewing mode toggle. The three selectable positions
from left to right are Regulated, Manual and E-corder. Touching the toggle switch will advance the switch by one
setting. When the toggle is pointing toward Regulated the Innova is set for stitch regulation mode. This mode will
vary the speed of the machine based on how fast or slow the machine is moved. In this mode, the controller will
maintain the set number of stitches per inch. If the toggle is set to point to Manual, the machine will be set to
manual sewing mode. The machine will run at a constant speed determined by the current speed value. Speeds may
be adjusted with the green and white buttons or by manually entering a value under manual speed in the SETUP
screen as discussed earlier. The final mode of the toggle switch is E-corder. When the toggle points to this label the
machine is in E-cording mode. If an E-cording unit is attached to the machine, the unit will enable and lay cord
down under the stitch as the machine is moved. The machine is limited to 1200 RPM in E-corder stitch regulated
mode. It is important to remember that even though the machine is equipped with a stitch regulator, it is possible to
over-speed the machine and cause big stitches. If the 3000 RPM limit in Regulated mode or the 1200 RPM limit in
E-corder mode is exceeded, stitches larger than selected will be produced.
Directly below the Sensitivity slider is the red box with an X. This box is the exit button that will allow the operator
to exit out of the operator interface software and access the screens operating software. Only access the operating
Proprietary information of ABM INTERNATIONAL, Inc. furnished for customer use only.
No other uses are authorized without the prior written permission of
ABM INTERNATIONAL, INC.
8
ABM International, Inc.
Model: Innova Longarm Quilting Machine
Series: 1018/1022/1026 V1.0
Stitch Regulation User Manual
software if instructed to do so by an ABM technician. If the button is accidently pressed, cycle the power of the
machine OFF and then back ON to re-boot the system.
The button directly to the right of the red X accesses the system status screen (see Figure 3.2). From this screen the
user may confirm the correct functioning of the pushbuttons and the X and Y axis encoders. Pressing and holding
the button will change the color of the specified lamp. Releasing the button will return the lamp back to its original
color. Moving the machine left or right will change the value of the X position. Moving the machine forward or
backward will change the value of the Y position.
Figure 3.2 System status screen
Touching the PREV button returns the user to the previous screen – in this case the main operator screen.
Proprietary information of ABM INTERNATIONAL, Inc. furnished for customer use only.
No other uses are authorized without the prior written permission of
ABM INTERNATIONAL, INC.
9
ABM International, Inc.
Model: Innova Longarm Quilting Machine
Series: 1018/1022/1026 V1.0
Stitch Regulation User Manual
On the main operator screen (Figure 3.0), the button located in the lower right corner is the SETUP button.
Touching this button will access the system setup screen (see Figure 3.3). The system setup screen allows the user to
adjust manual mode and stitch regulator mode values. All of the values are adjusted by touching the number below
the text and entering the desired numeric value with the keypad and pressing ENTER. Values outside the ranges of
the individual settings will be disregarded.
Figure 3.3 System Setup screen
The Bobbin Length value is the distance in yards of the thread on the bobbin. Larger thread sizes will allow less
thread to be wound on the bobbin and thinner threads will allow more. Adjust the value as needed. In most cases,
this will be an experimental value. An initial value of 100 to 120 is a good place to start. Make adjustments as
needed.
The Manual Speed value is the constant speed the Innova will operate when turned ON or OFF by the green button.
The user may enter any number between 75 and 3000 RPM.
The Start Speed value allows the user to set a minimum sewing speed for stitch regulated modes. Setting the value
to 100 will cause the Innova to run no slower than 100 RPM during regulated modes. Even when the machine is
standing still, the stitch regulator would maintain the minimum speed. Enter a value of 0 to disable the start speed.
When the value is 0, the regulator will come to a stop when the machine comes to a stop.
The Encoder Diameter value allows the user to fine tune the stitch regulators stitches per inch. The standard setting
is 1.25. If the user encounters a problem with the stitches per inch value not agreeing with the actual stitch amount,
it will be necessary to adjust the encoder diameter value. A smaller value will decrease the actual stitches per inch
and a larger value with increase the stitches per inch. Only small adjustments, plus or minus 0.02, should need to be
made if any. However, the value can be set for any desired result.
The Tie Offs value allows the user to set how many complete stitches the machine will make when the TIE OFF
button is pressed on the main operator screen.
The needle position displays the current setting. The needle out of the material is needle UP and the needle in the
material is needle down. The needle UP position may be adjusted by touching the HOME button and accessing the
home screen (see Figure 3.4).
Proprietary information of ABM INTERNATIONAL, Inc. furnished for customer use only.
No other uses are authorized without the prior written permission of
ABM INTERNATIONAL, INC.
10
ABM International, Inc.
Model: Innova Longarm Quilting Machine
Series: 1018/1022/1026 V1.0
Stitch Regulation User Manual
Figure 3.4 Home screen
The Lightning Stitch control system operates off of the motors known position. As a result, the user may adjust the
needle UP position electronically instead of mechanically as with other stitch regulators. To set the needle UP
position, touch the START button on the home screen. Press the JOG FWD button to advance the needle to the
desired position and then touch TEACH to set the value.
Touching the PREV button will return you to the main operator screen.
When the green button is pressed to begin sewing, the text “MACHINE RUNNING” will display across the main
operator screen (See Figure 3.5) . Pay close attention to the display. Certain stitch regulated modes will make the
machine appear as though it is in a “no sew” mode when in fact it is waiting for the machine to be moved. The
“MACHINE RUNNING” text will inform the user of the machines enabled condition.
Figure 3.5 Main operator screen while machine is sewing
Proprietary information of ABM INTERNATIONAL, Inc. furnished for customer use only.
No other uses are authorized without the prior written permission of
ABM INTERNATIONAL, INC.
11
ABM International, Inc.
Model: Innova Longarm Quilting Machine
Series: 1018/1022/1026 V1.0
Stitch Regulation User Manual
In addition to the standard screens, Lightning Stitch version 1.04 or higher contains fault screens that will help to
inform the user and ABM technicians of problems that the machine might encounter (See Figure 3.6). The fault
screen displays a list of descriptions proceeded by a fault code number and a white check box. If the machine has a
fault, the fault screen will appear and a check box will be marked next to the current problem. Pressing RESET will
attempt to clear the problem. If the fault screen disappears and does not return after pressing RESET, the problem
has been fixed. If the fault screen reappears, it is necessary to contact ABM directly.
Figure 2.6 Needle Fault screen
Proprietary information of ABM INTERNATIONAL, Inc. furnished for customer use only.
No other uses are authorized without the prior written permission of
ABM INTERNATIONAL, INC.
12
ABM International, Inc.
Model: Innova Longarm Quilting Machine
Series: 1018/1022/1026 V1.0
Stitch Regulation User Manual
3.0: Quick Reference
Operating in manual mode –
Step 1: Quickly pressing and releasing the (White) left hand button will toggle the machine between the
needle up and down position.
Step 2: Press and release the (Green) right hand button and the sewing head will start to run at a constant
speed determined by the MANUAL SPEED in the SETUP screen.
Step 3: Press and hold the (Green) right hand button and the sewing head will increase sewing speed.
Step 4: Press and hold the (White) left hand button and the sewing head will decrease sewing speed.
Step 5: Press and release the (Green) right hand button again and the sewing head will stop.
Operating in Regulated mode and E-corder mode –
Step 1: Quickly pressing and releasing the (White) left hand button will toggle the machine between
needle up and down.
Step 2: Press the toggle switch on the main operator screen to select Regulated or E-corder mode.
Step 3: Press and release the (Green) right hand button and the text MACHINE RUNNING will appear on
the main operator screen. Depending upon the START SPEED set on the SETUP screen, the needle will
either not move if the operator is not moving the machine or the machine will default to the START
SPEED if the operator is not moving the machine.
Step 4: The faster you move the machine the faster it will run, up to 3000 stitches per minute.
Step 5: The slower you move the machine the slower it will run. If the START SPEED is set to a value
greater than 0, the START SPEED will be the minimum speed the machine will run – the machine will
not stop.
Step 6: Press and release the (Green) right hand button again and the sewing head will stop at either the
needle UP or the needle DOWN position depending upon the selection in the SETUP screen.
Proprietary information of ABM INTERNATIONAL, Inc. furnished for customer use only.
No other uses are authorized without the prior written permission of
ABM INTERNATIONAL, INC.
13