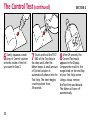
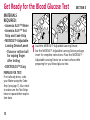
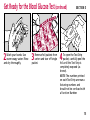
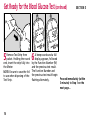
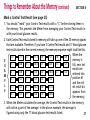
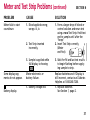
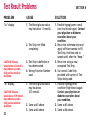
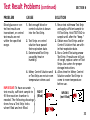
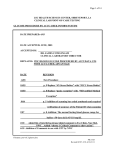
1
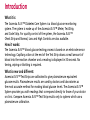
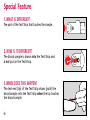
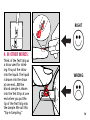
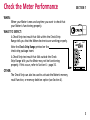
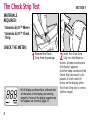
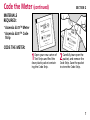
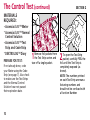
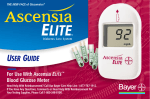
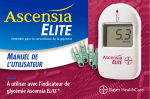
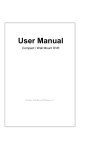
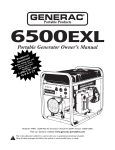
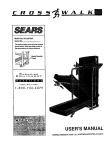
THE NEW FACE of Glucometer ® Diabetes Care System USER GUIDE For Use With Ascensia ELITE ™ Blood Glucose Meter Introduction What it is: The Ascensia ELITE ™ Diabetes Care System is a blood glucose monitoring system. The system is made up of the Ascensia ELITE ™ Meter, Test Strip, and Code Strip. For quality control of the system, the Ascensia ELITE ™ Check Strip and Normal, Low and High Controls are also available. How it works: The Ascensia ELITE ™ blood glucose testing process is based on an electrode sensor technology. Capillary action at the end of the Test Strip draws a small amount of blood into the reaction chamber and a reading is displayed in 30 seconds. No timing, wiping or blotting is required. What is new and different: Ascensia ELITE ™ Test Strips are calibrated to give plasma/serum equivalent glucose results. Plasma/serum results are used by doctors and laboratories as the most accurate method for reading blood glucose levels. The Ascensia ELITE ™ System provides you with readings that correspond directly to those of your doctor or clinic. Compare Ascensia ELITE ™ Test Strip results only to systems which use a plasma/serum calibration. TESTING MATERIALS 5 1 6 7 10 8 9 2 11 3 4 12 1 Test Slot – provides an opening for inserting strip into the Meter. 2 Icon – shows proper orientation and direction for inserting the Test Strip, Code Strip or Check Strip into the Meter. 3 Display – displays test results, current Code (Function) Number (F– #), or low battery indicator. 4 Batteries – provide power for the Meter. 5 Check Strip – confirms that the Meter electronics are working properly, and activates the memory recall and the delete option. 6 Code Strip – codes (calibrates) the Meter. 7 Test Strip – tests for glucose in blood and control solutions, and can be used to “mark” a control test or to delete a test result from the memory. 8 Test end – draws sample into the reaction chamber of the Test Strip. 9 Meter end – inserted into the Meter to activate power. 10 MICROLET® Adjustable Lancing Device and 11 lancet – for skin puncture. 12 Normal Control Solution – a solution with a known amount of glucose used to confirm that the system is working properly (Low and High Control Solutions are also available). i Introduction (continued) What you do: 1. Insert the Test Strip into the Test Slot located at the top, center of the Meter. 2. Touch the test end (tip) of the Test Strip to a drop of blood. Hold to drop until beep sounds. A “beep” sounds after the Test Strip reaction chamber is filled with blood. The test result is displayed in 30 seconds. The Meter turns on when the Test Strip is inserted and turns off when the Test Strip is removed, therefore, no operating buttons are required. The Meter automatically stores the last 20 test results, including both blood glucose and control test results. The Ascensia ELITE ™ System provides blood glucose results ranging from 1.1–33.3 mmol/L. The Meter is battery operated and approximately 1000 tests may be performed before replacing batteries. CAUTION: Before using any product to test your blood glucose (sugar), read all instructions and practice the test. Do all quality control checks as directed and consult with a diabetes health professional. ii Special Feature 1. WHAT IS DIFFERENT? The part of the Test Strip that touches the sample. 2. HOW IS IT DIFFERENT? The blood sample is drawn into the Test Strip and is not put on the Test Strip. 3. WHEN DOES THIS HAPPEN? The test end (tip) of the Test Strip draws (pulls) the blood sample into the Test Strip when the tip touches the blood sample. iii RIGHT 4. IN OTHER WORDS: Think of the Test Strip as a straw used for drinking. You put the straw into the liquid. The liquid is drawn into the straw at one end...SO the blood sample is drawn into the Test Strip at one end when you put the tip of the Test Strip into the sample. We call this “Sip-in Sampling.” WRONG iv Contents SECTION 1 – The Ascensia ELITE ™ System • Learn About the System . . . . . . . . . . • Install/Replace Batteries . . . . . . . . . . • Check the Meter Performance . . . . . • The Check Strip Test . . . . . . . . . . . . . . . . . . . . . . . . . . . . . . . . . . . . . . . . . . . . . . . . . . . . . . . . . . . . . . . . . . . . . . . . . . . . . . . . . . . . . . . . . . . . . . . . . . . . . . . . . . . . . . . . . . . . . 1 2 3 4 SECTION 2 – Prepare for the Blood Glucose Test • Code (Calibrate) the Meter . . . . . . . . . . . . . . . . . . . . . . . . . . . . . . . . . . 6 • The Control Test . . . . . . . . . . . . . . . . . . . . . . . . . . . . . . . . . . . . . . . . . . 9 SECTION 3 – The Blood Glucose Test • Get Ready for the Blood Glucose Test . . . . . . . . . . . . . . . . . . . . . . . . . . 14 • Perform the Blood Glucose Test . . . . . . . . . . . . . . . . . . . . . . . . . . . . . . 17 v Contents (continued) SECTION 4 – Learn About the Memory Feature • Introduction to Memory . . . . . . . . . . . . . . . . . • Recall Test Results from the Memory . . . . . . . • Delete All Test Results from the Memory . . . . • Delete a Single Test Result from the Memory • Mark a Control Test Result . . . . . . . . . . . . . . . • Things to Remember . . . . . . . . . . . . . . . . . . . . . . . . . . . . . . . . . . . . . . . . . . . . . . . . . . . . . . . . . . . . . . . . . . . . . . . . . . . . . . . . . . . . . . . . . . . . . . . . . . . . . . . . . . . . . . . . . . . . . . . . . . . . . . . . . . . . . . 20 22 23 24 25 26 SECTION 5 – Care of the Meter and Strips . . . . . . . . . . . . . . . . . . . . . . . . . 28 SECTION 6 – Solve Problems • Meter and Test Strip Problems . . . . . . . . . . . . . . . . . . . . . . . . . . . . . . . 30 • Test Result Problems . . . . . . . . . . . . . . . . . . . . . . . . . . . . . . . . . . . . . . . 32 SECTION 7 – Service the System • Service . . . . . . . . . . . . . . . . . • Check List . . . . . . . . . . . . . . . • Limitations of the Procedure • Specifications . . . . . . . . . . . . • Supplies . . . . . . . . . . . . . . . . • Warranty . . . . . . . . . . . . . . . . . . . . . . . . . . . . . . . . . . . . . . . . . . . . . . . . . . . . . . . . . . . . . . . . . . . . . . . . . . . . . . . . . . . . . . . . . . . . . . . . . . . . . . . . . . . . . . . . . . . . . . . . . . . . . . . . . . . . . . . . . . . . . . . . . . . . . . . . . . . . . . . . . . . . . . . . . . . . . . . . . . . . . . . . . . . . . . . . . . . . . . . . . . . . . . . . . . . . . 34 35 36 37 39 40 vi Learn About the System SECTION 1 ® of FACE NEW THE Gluc omet er Di ab et es Ca re Sy st em wash USER E GUID ™ TE dry ion Divis insert on stick last test result stroke wait 30 sec. record result Healthcare for detaile d instructions DIABETE S HELPLIN E 1-800-26 5018422 2 ©1999, 2002 8-7200 Bayer Corpora tion result USER GUIDE touch Quick Refere nce Guide LI sia E scen ith A eter M se W For U Glucose d o lo B cs nosti Diag Always refer to your Bayer Inc. Healthcare Division Toronto, Ontario M9W 1G6 Rev. 10/02 This booklet is designed to guide you through the operation of the Ascensia ELITE ™ System with detailed directions and illustrations. A Quick Reference Guide is provided, and can be carried in your Meter Carrying Case. Please read the entire User Guide before you begin testing. Before reading the User Guide, you will need to unpack and set up your testing materials. See the “Testing Materials” foldout, attached to the first page of this User Guide, to identify testing materials needed. Division DEXTROLOG Recording remove off TM 1 Install / Replace Batteries SECTION 1 THE BATTERIES: The Meter uses two (3-volt lithium) batteries. These are furnished with the Meter. WHEN TO REPLACE: When the battery voltage becomes weak (after approximately 1000 readings), the Meter will show a battery display ( ). When this display appears, it is time to replace the batteries (see page 39 for battery types). The Meter will continue to provide accurate results for a period of time until the batteries are exhausted. At this time, the Meter will “lock you out” from further testing. DIRECTIONS: 1. With the tip of a finger, press the battery compartment lid latch toward the word “open.” Lift the lid. 2. Place the two new batteries into the battery compartment with the “+” side up and close the lid. NOTE: If replacing batteries, remove the old batteries from the compartment and discard. Things to remember: • WARNING: Keep batteries away from children. Lithium batteries are poisonous. If swallowed, immediately contact your physician. • Discard batteries according to your local environmental regulations. 2 • The Meter memory will not be erased when batteries are changed. Check the Meter Performance SECTION 1 WHEN: When your Meter is new and anytime you want to check that your Meter is functioning properly. WHAT TO EXPECT: A Check Strip test result that falls within the Check Strip Range tells you that the Meter electronics are working properly. XXXXXXXXXXXXXXXXX XXXXXXXXXXXXX Note the Check Strip Range printed on the check strip package insert. A Check Strip test result that falls outside the Check Strip Range tells you the Meter may not be functioning properly. If this occurs, refer to Section 6 – page 30. OTHER: The Check Strip can also be used to activate the Meter’s memory recall function, or memory deletion option (see Section 4). 3 The Check Strip Test SECTION 1 MATERIALS REQUIRED: • • Ascensia ELITE ™ Meter Ascensia ELITE ™ Check Strip CHECK THE METER: 1 Remove the Check Strip from its package. *A full display, as shown here, indicates that all characters in the display are working properly. If ever all the display segments do not appear, see Section 6, page 31. 4 2 Insert the Check Strip fully into the Meter as shown. A beep sounds and a full display* appears. Another beep sounds and the Check Strip test result is displayed. A check mark (✔) shows on the display when the Check Strip test is correct (within range). The Check Strip Test (continued) SECTION 1 Things to remember: XXXXXXXXXXXXXXXXX 3 XXXXXXXXXXXXX If the Check Strip test result is within the range listed on the package insert found inside the Check Strip package, the Meter is functioning properly. If not, refer to the Problem Solving Chart in Section 6. Carefully remove the Check Strip from the Meter, and replace it in its package. • It is important to insert the Check Strip with a firm motion until it comes to a full stop. When inserted fully, the tab on the top right portion of the strip should be completely hidden within the Meter. • Always keep the Check Strip stored in its package when not in use. • Do not bend the Check Strip. • You can also use the Check Strip to recall the Meter’s memory, or to delete all of the stored test results from the memory (see Section 4). 5 Code (Calibrate) the Meter SECTION 2 WHY CODE THE METER? To match the Meter to the reactivity of the Test Strip, you must first code (calibrate) the Meter using the Code Strip provided in the carton of Ascensia ELITE ™ Test Strips now in use. Each lot of Test Strips is tested extensively and assigned a Function Number (0 through 12) identified on the Code Strip. WHEN TO CODE THE METER Reset the code for each new carton of Ascensia ELITE ™ Test Strips used, unless the new carton of Test Strips has the same Function Number as the previous one. 6 Code the Meter (continued) SECTION 2 MATERIALS REQUIRED: • • Ascensia ELITE ™ Meter Ascensia ELITE ™ Code Strip CODE THE METER: 1 Open your new carton of Test Strips and find the clear plastic packet containing the Code Strip. 2 Carefully tear open the packet, and remove the Code Strip. Save the packet to store the Code Strip. 7 Code the Meter (continued) SECTION 2 Things to remember: 3 Insert the Code Strip into the Test Slot (as shown). A beep sounds and a full display appears briefly. Another beep sounds and the Function Number (for example, F-4) appears in the Display. 8 • It is important to insert the Code Strip with a firm motion until it comes to a full stop. When inserted fully, the tab on the top right portion of the strip should be completely hidden within the Meter. • The Function Number appearing in the Display must match the number appearing: – on the Code Strip. – on the front of the Code Strip packet (see #2). – on the back of the Test Strip packet. • If the Function Numbers match as indicated above, the Meter may now be used to run a control test or blood glucose test. • The Meter must be coded again when a new carton of Test Strips is used unless the F# of the new carton is the same as the old carton. Use the new Code Strip found in the new carton of strips. • Store the Code Strip in the clear plastic packet until all the strips are used (in case you ever need to recode the meter). Throw away the old Code Strip when Test Strips are all used. The Control Test SECTION 2 To make sure your Ascensia ELITE ™ System is performing properly, a Control Test is performed using the Ascensia ELITE ™ Normal Control solution. WHY? A Control Test confirms that the system is functioning properly and you are using proper technique. When running a Control Test, the system is defined as: the Meter and the Test Strips. In addition to the Normal Control, an Ascensia ELITE ™ Low and High Control are also available for use with this system. WHEN TO RUN A CONTROL TEST: • Any time you want to confirm that the Meter system is working properly, and that your testing technique is correct. • Any time you question your blood glucose test results. • On the advice of your physician or healthcare professional. WHAT TO EXPECT: • When the Control Test is done properly, the Control Test result should fall within the range listed on the end flap of your Test Strip Carton. • A Control Test result that falls outside of the specified range means the system may not be functioning properly or your testing technique may not be correct. If this occurs, refer to Section 6 of this User Guide or the Ascensia ELITE ™ Control package insert for assistance. MARK THE CONTROL TEST RESULT (if using the memory feature): You should always “mark” a Control Test result with a “C” as described in the following procedure. Marking with a “C” keeps a Control Test result from being included in the average of your blood glucose tests. 9 The Control Test (continued) • DEXTROLOG™ Diary PREPARE FOR TEST: If not already done, code your Meter using the Code Strip (see page 7). Also check to make sure the Test Strips and the Normal Control Solution have not passed their expiration date. 10 nsia™ Asce With Use For “ ® 2. 3 XL E® ®/ELIT ELITE nsia™ Asce With Use For st St 1. Bloo st St 1. od Gl ucos e Te “ ® rip d Gl 2. ucos e Te “ ® rip 2. rs Mete n Japa 3. XL E® ®/ELIT ELITE nsia™ Asce With Use For 3. rs Mete n Japa ip Strip and Code Strip e In Mad XL E® ®/ELIT ELITE Control Solution • Ascensia ELITE ™ Test e In Mad nsia™ Asce With Use For • Ascensia ELITE ™ Meter • Ascensia ELITE ™ Normal rs Mete MATERIALS REQUIRED: SECTION 2 Remove foil packets from To open the Test Strip the Test Strip carton and 1 packet, carefully PEEL the 2 tear off a single packet. foil until the Test Strip is completely exposed (as shown). NOTE: The numbers printed on each Test Strip are manufacturing numbers and should not be confused with a Function Number. The Control Test (continued) 3 Remove the Test Strip from packet. Holding the round end, insert the strip fully into the Meter. NOTE: Save the empty foil packet for use in Step 6. 4 A beep sounds and a full display appears, followed by the Function Number (F#) and the previous test result. The Function Number and the previous test result begin flashing alternately. If you are not using the memory feature, go directly to Step 6. SECTION 2 5 Mark your Control Test result by pulling out the Test Strip, and quickly inserting it back into the Meter (within 2 seconds). A C- and the Function Number F# begin flashing in the Display. Marking a Control Test excludes the Control Test result from the average of stored Blood Glucose Test results. 11 The Control Test (continued) 6 Gently squeeze a small drop of Control solution onto the inside of the foil you saved in Step 3. 12 7 Touch and hold the TEST END of the Test Strip in the drop until after the Meter beeps. A small amount of Control solution is automatically drawn into the Test Strip. The timer begins counting down from 29 seconds. SECTION 2 8 After 29 seconds, the Control Test result appears in the Display. Compare the result to the range listed on the end flap of your Test Strip carton. Using a tissue, remove the Test Strip and discard. The Meter will turn off automatically. The Control Test (continued) SECTION 2 Things to remember: FOLLOW UP: Record and date all Control Test results in your DEXTROLOG™ Diary. CAUTION: If the Control Test result does not fall within the stated range, the system may not be operating properly. See Section 6 of this User Guide and the Ascensia ELITE ™ Control package insert for help. • Run a Control Test frequently to make sure that you are using good technique and that your system is working properly. • Always check the EXPIRATION DATE on the Test Strip foil packet or carton before using. Throw away expired Test Strips. Use only unexpired Test Strips. • Use the Test Strip immediately after removing from the foil packet. • Insert the Test Strip until it comes to a full stop. When inserted fully, the tab on the top portion of the strip should be completely hidden within the Meter. • If using the memory feature, be sure to “mark” the Control Test before running the test (see Section 4). • Remove the Test Strip immediately after use to turn off the Meter and preserve battery life. • The Meter turns off automatically after 3 minutes if the strip is left in the Meter. • Test Strips cannot be reused. • The end flap of your Test Strip carton lists specific Control Ranges for that carton of strips. Please keep this end flap until all the Test Strips in the carton are used. 13 Get Ready for the Blood Glucose Test SECTION 3 MATERIALS REQUIRED: • Ascensia ELITE ™ Meter • Ascensia ELITE ™ Test Strip and Code Strip • MICROLET ® Adjustable Lancing Device/Lancet - Tissue or cotton ball for wiping finger after testing • DEXTROLOG™ Diary PREPARE FOR TEST: If not already done, code your Meter using the Code Strip (see page 7). Also check to make sure the Test Strips have not passed their expiration date. 14 1 Load the MICROLET ® Adjustable Lancing Device: See the MICROLET ® Adjustable Lancing Device package insert for complete instructions. Place the MICROLET ® Adjustable Lancing Device on a clean surface while preparing for your blood glucose test. nsia™ Asce With Use For “ ® 2. 3 XL E® ®/ELIT ELITE nsia™ Asce With Use For SECTION 3 st St 1. ucos e Te “ ® rip 2. rs Mete XL E® ®/ELIT ELITE nsia™ Asce With Use For 2 Wash your hands. Use warm soapy water. Rinse and dry thoroughly. 3 Bloo st St 1. od Gl ip ucos e Te “ ® rip d Gl 2. rs Mete nsia™ Asce With Use For XL E® ®/ELIT ELITE n Japa 3. e In Mad n Japa 3. e In Mad rs Mete Get Ready for the Blood Glucose Test (continued) Remove foil packets from carton and tear off single packet. 4 To open the Test Strip packet, carefully peel the foil until the Test Strip is completely exposed (as shown). NOTE: The numbers printed on each Test Strip are manufacturing numbers and should not be confused with a Function Number. 15 Get Ready for the Blood Glucose Test (continued) 5 Remove Test Strip from packet. Holding the round end, insert the strip fully into the Meter. NOTE: Be sure to save the foil to use when disposing of the Test Strip. 16 SECTION 3 6 A beep sounds and a full display appears, followed by the Function Number (F#) and the previous test result. The Function Number and the previous test result begin flashing alternately. Proceed immediately (within 3 minutes) to Step 1 on the next page… Perform the Blood Glucose Test 1 Stick your finger with the MICROLET ® Adjustable Lancing Device and form a small drop of blood. 2 Touch and hold the test end (tip) of the Test Strip to the drop of blood until after the Meter beeps. See page iv for the correct method. Blood is automatically drawn into the Test Strip. The timer begins counting down from 29 seconds. SECTION 3 3 After 29 seconds, your blood glucose result appears in the display. The test result remains in the display. NOTE: If Lo appears in the display, your blood glucose value may be below 1.1 mmol/L. If Hı appears, your result may be above 33.3 mmol/L. See page 32 for other reasons Lo or Hı could occur. Follow the advice of your medical team for hypoglycemia (low blood sugar) if your blood glucose is below 2.8 mmol/L or hyperglycemia (high blood sugar) if your blood glucose is above 13.9 mmol/L. 17 Perform the Blood Glucose Test (continued) 4 If you want to store the test result, remove the Test Strip from the Meter as shown. The Meter turns off automatically and the test result is now stored in the memory. You may wish to use a tissue to remove the used strip. CAUTION: Dispose of the used Test Strip and lancet carefully to prevent injury or contamination to others. You may use the empty foil packet to dispose of the Test Strip. 18 5 If you do not want to store the test result in the memory, pull out the Test Strip and quickly insert it back into the Meter (within 2 seconds). dEL appears in the Display, and the test result will not be stored in the memory. Do not pull the Test Strip out of the Meter until the Display goes blank, or the test result will not be deleted. SECTION 3 FOLLOW UP: Record the result in your DEXTROLOG™ Diary. NOTE: If you do not remove the Test Strip, the test result remains in the Display for 3 minutes. Perform the Blood Glucose Test (continued) SECTION 3 Things to remember: • Never use a Test Strip beyond the printed expiration date (on the foil packet). • Use the Test Strip immediately after removing from the foil packet. • It is important to insert the Test Strip until it comes to a full stop. When inserted fully, the tab on the top portion of the strip should be completely hidden within the Meter. • After inserting Test Strip, wait until the F# and previous test result begin flashing before applying sample to strip. • Always make sure the Function Number printed on the Code Strip, Code Strip Packet and the Test Strip Foil matches the Function Number displayed in the Display. • To be sure your Test Strip fills completely, hold the test end of the Test Strip in the blood drop until after the “beep” sounds. • Remove the Test Strip immediately after use to turn off the Meter and preserve battery life. The Meter turns off automatically after 3 minutes if the strip is left in the Meter. • You can recall stored test results from the Meter memory by inserting a new Test Strip (before applying blood), and waiting 3 minutes. The memory recall function will then begin automatically. Do not recall results with a used Test Strip. • Teach another person to use the system so you will have someone to help should you ever need assistance. • If a problem occurs, refer to Section 6 or the Test Strip Package Insert. 19 Introduction to Memory SECTION 4 This section will instruct you on the use of the Ascensia ELITE ™ Meter’s memory feature. The following questions and answers should help you learn about this feature. How many test results does the memory store? The memory stores up to 20 test results, and also provides the “average” of the Blood Glucose Test results currently stored in the memory. Both Blood Glucose Test results and Control Test results can be stored in the memory. If 20 test results are stored and a new one is added, the oldest test result is automatically deleted. The newest one stored will now be #1 in memory recall. How do I recall the stored test results? By inserting an Ascensia ELITE ™ Check Strip into the Meter and waiting 10 seconds. After the 10 second period, an A- appears in the display followed by the average of all the stored test results. If a Check Strip is not available, you may use a new Test Strip to access the memory. When you use a Test Strip, you must wait 3 minutes after inserting the Test Strip to access the memory. 20 Introduction to Memory (continued) SECTION 4 Can I delete test results? Yes, you can delete either all of the test results stored in the memory, or a single test result before it goes into the memory. How will I know the difference between a stored Blood Glucose Test and a Control Test? A Control Test result in memory is preceded by a C- display. Since Control Test results should not be a part of the average blood glucose result, marking the Control Test result with a C- tells the Meter not to use that result when calculating the average. The C- is entered at the beginning of the Control Test. The following pages will instruct you on performing each one of these features. 21 Recall Test Results from the Memory 1 Insert the Check Strip fully into the Meter as shown. NOTE: If your Check Strip is not available, you can use a new Test Strip for this procedure. However, you have to wait 3 minutes for the memory sequence to begin. 22 2 A beep sounds and a full display appears briefly. Another beep sounds and the Check Strip result is displayed. 3 After 10 seconds, the memory sequence begins automatically. An A(for average) appears for 2 seconds, followed by the average test result value (for 4 seconds). 4 SECTION 4 The memory recall sequence continues. The most recent result is preceded by a 1- followed by all other stored results. The last result displayed is the oldest test result. NOTE: If no values are stored, three bars – – – appear after the average A-. Delete ALL Test Results from the Memory 1 Insert the Check Strip fully into the Meter. Wait 10 seconds for the memory sequence to begin. NOTE: You may also use a Test Strip to delete all test results from memory. However, you must wait 3 minutes for the memory sequence to begin. When you see the memory sequence begin, proceed to Steps 2 and 3. 2 Pull out the Check Strip, and quickly insert it back into the Meter (within 2 seconds). SECTION 4 3 The Display begins flashing dEL and ALL every second for 5 times, and then the Display goes blank. Do not pull the Check Strip out of the Meter until the Display goes blank, or the stored test results will not be deleted. 23 Delete a SINGLE Test Result from the Memory 1 A test result may be deleted at the end of a test during the 3 minutes it is displayed. Use a tissue to pull out the Test Strip and quickly insert it back into the Meter (within 2 seconds). NOTE: Single test results can only be deleted at the end of a test. 24 2 dEL appears in the Display for 2 seconds and then the Meter turns off. NOTE: Do not pull the Test Strip out of the Meter until the Display goes blank, or the test result will not be deleted. 3 SECTION 4 After the Meter turns off, remove and discard the used Test Strip. Mark a Control Test Result 1 To prevent the Control results from being included in the average, you should mark each Control Test with a “C.” This must be done before performing the Control Test. First, insert the Test Strip fully into the Meter. 2 A beep sounds and a full display appears briefly. The Function Number and the previous test result begin flashing alternately. SECTION 4 3 Pull out the Test Strip, and immediately insert it back into the Meter (within 2 seconds). A C- and the F# begin flashing alternately in the Display. You can now run the Control Test (see page 9). 25 Things to Remember About the Memory SECTION 4 Recall Test Results from the Memory (see page 22) • Low (below 1.1 mmol/L) and high (above 33.3 mmol/L) test results are displayed and stored in memory as Lo and Hı. In calculating the average, Lo is entered as 1.1 mmol/L, and Hı is entered as 33.3 mmol/L. • A C- display preceding a test result display indicates that the test result is a Control Test result. Delete Test Results from the Memory (see pages 23 and 24) • The only time you can delete a single test result (i.e., keep it from being stored in the memory) is at the end of a Control or Blood Glucose Test. • A test result is automatically stored in the memory if it is not deleted at the end of the test. • If you decide not to delete the test result after beginning the delete process, pull out the strip while dEL is still displayed. 26 Things to Remember About the Memory (continued) SECTION 4 Mark a Control Test Result (see page 25) 1. You should “mark” your Control Test results with a “C” before storing them in the memory. This prevents the Meter from averaging your Control Test results in with your blood glucose results. 2. Each Control Test result stored in memory will take up one of the 20 memory spaces that are available. Therefore, if you have 3 Control Test results and 17 blood glucose test results stored in the current memory, the memory sequence might look like this: When the A7.7 511.1 10 5.7 16 4.9 memory is E 1 6.4 6 10.5 11 8.5 17 5.1 full, new test X results are A 28.6 75.0 12 10.8 C5.5 entered into M position #1 3 5.7 C 5.7 13 5.2 P and the oldL C5.3 810.2 14 11.5 est result disE appears from 45.1 96.4 15 10.6 the memory. 3. When the Meter calculates the average, the Control Test results in the memory will not be a part of the average. In the above example, the average is figured using only the 17 blood glucose test results listed. 27 Care of the Meter and Strips SECTION 5 1. To help keep the Meter and Test Strips free of oils and other contaminants, wash hands and dry thoroughly before using. 2. Handle the Meter carefully. Dropping may damage the electronics or cause other malfunctions. 3. Do not expose the Meter, Test Strip, Code Strip or Check Strip to excessive humidity, heat, cold, dust or dirt. 4. If the Meter exterior needs cleaning, dampen a facial tissue with fresh water and wipe the Meter and Display carefully. Avoid spilling any liquids on the Meter. Liquids may damage the Meter’s electronics. 5. Store Meter in the case provided or a replacement case of your choosing whenever possible. 28 Care of the Meter and Strips (continued) SECTION 5 WARNING: Potential Biohazard: Healthcare professionals or persons using this system on multiple patients should be aware of the following and should follow the infection control procedure approved by their facility. All products or objects which come in contact with human blood, even after cleaning, should be handled as if capable of transmitting viral diseases. The user should follow the recommendations for prevention of blood-borne transmissible diseases in healthcare settings, as recommended for potentially infectious human blood specimens in National Committee for Clinical Laboratory Standards, Protection of Laboratory Workers from Infectious Disease Transmitted by Blood, Body Fluids, and Tissues —Approved Guideline, NCCLS document M29-A [ISBN 1-56238-339-6] NCCLS, 940 West Valley Road, Suite 1400, Wayne, Pennsylvania 19087-1898, USA, 1997. This document has complete information on the area of user protection and can be used as background material for instruction. 29 Meter and Test Strip Problems PROBLEM E-1 E-2 E-4 The Function Number displayed is different from the number printed on the Test Strip foil packet or carton. Check Strip test result out-of-range. 30 CAUSE SOLUTION Meter electronics failure. Immediately, contact the Diabetes Helpline at 1-800-268-7200. The meter will no longer function. 1. Install batteries correctly. display Display goes blank after Test, Code or Check Strip is inserted into the Meter. SECTION 6 1. Batteries are not installed correctly. 2. Strip is not fully inserted into the Meter. 3. Batteries are dead. 4. Too much time has passed since inserting the strip and the Meter has turned off. 1. Wrong Code Strip used. 2. Code Strip not inserted properly. 1. Check Strip (Meter end) dirty or damaged. 2. Meter electronics failure. 2. Insert Strip until tab is inside Meter. 3. Replace with new batteries. 4. Remove and reinsert the strip. 1. Use correct Code Strip. Discard incorrect one. 2. Reinsert Code Strip carefully, but firmly. 1. Wipe Check Strip thoroughly with clean dry tissue, and retest. 2. Contact Customer Service Department. Meter and Test Strip Problems (continued) SECTION 6 PROBLEM CAUSE SOLUTION Meter fails to start countdown. 1. Blood applied wrong; see pp. iii, iv. 1. Form a larger drop of blood or control solution and rerun test using a new Test Strip. Hold test end to sample until after the “beep.” 2. Insert Test Strip correctly (Meter end first). 2. Test Strip inserted incorrectly. Some display segments do not appear. 3. Sample is applied while full display is showing . Meter electronics or battery failure. 1. Battery voltage low. Battery display. 3. Wait for F# and last test result to begin flashing before applying sample to strip. Replace batteries and if Display is still incorrect, contact our Diabetes Helpline at 1-800-268-7200. 1. Replace batteries. See Section 1, page 2. 31 Test Result Problems SECTION 6 PROBLEM CAUSE SOLUTION “Lo” display. 1. The blood glucose value may be below 1.1 mmol/L. 1. Possible hypoglycemic condition (low blood sugar). Contact your physician or diabetes counselor about your condition. 2. Rerun test with new strip and apply sufficient sample to fill Test Strip. Hold test end to sample until after the “beep.” 3. Rerun test using a new, unexpired Test Strip. 4. Use correct Code Strip provided with carton of Test Strips being used. 1. Possible hyperglycemic condition (high blood sugar). Contact your physician or diabetes counselor about your condition. 2. Same as #3 above. 3. Same as #4 above. 2. Test Strip not filled completely. CAUTION: Glucose levels below 2.8 mmol/L may indicate a potentially serious medical condition. 3. Test Strip is defective or has deteriorated. 4. Wrong Function Number used. “Hı” display. 1. The blood glucose value may be above 33.3 mmol/L. CAUTION: Glucose levels above 13.9 mmol/L may indicate a potentially serious medical condition. 32 2. Same as #3 above. 3. Same as #4 above. Test Result Problems (continued) PROBLEM CAUSE SECTION 6 SOLUTION 1. Rerun test with new Test Strip and apply sufficient sample to fill Test Strip. Hold TEST END to sample until after the “beep.” 2. Obtain new Test Strips and/or 2. Test Strips or control Control Solution that are withsolution have passed in their expiration date. their expiration date. 3. Run a Control Test using a new 3. Deteriorated Test Strip Test Strip. If results are still out caused by heat or of range, replace carton of Test humidity. Strips. See carton for proper storage instructions. 4. Meter, Control Solution and/ 4. Allow time for Meter, Control Solution and/or Test Strips to or Test Strip are not at room come to room temperature temperature when used. before use. IMPORTANT: To have accurate RIGHT test results, sufficient sample to WRONG (filled) fill the reaction chamber is (not filled) needed. The following drawings show how a Test Strip looks when filled and not filled. 1. Not enough blood or control solution is drawn into the Test Strip. Blood glucose or control test results are inconsistent, or control test results are not within the specified range. 33 Service SECTION 7 If attempts to correct a problem fail, please call our Diabetes Helpline. We have trained specialists to assist you. Call toll free at: 1-800-268-7200 IMPORTANT: • Speak to a Technical Service Representative before returning your Meter for any reason. He/she will give you the information needed to get your problem handled correctly and efficiently. • Have your Ascensia ELITE ™ Meter, Ascensia ELITE ™ Check Strip, and a box of Ascensia ELITE ™ Test Strips (including the Code Strip) nearby when you phone. It would also be helpful to have a bottle of Ascensia ELITE ™ Normal Control available. • Fill out the check list on the following page before calling! 34 Check List SECTION 7 1. The Meter serial number is: 2. The date and time the problem occurred was: 3. I tested with both the Check Strip and with the Ascensia ELITE ™ Normal control: Yes No The Check Strip result was: • • The Normal Control result was: 4. The Normal Control Range listed on the end flap of the Test Strip carton is: to 5. The Function Number being displayed on the FMeter is: The Function Number on the Code Strip and on Fthe Test Strip foil packet currently being used is: 6. Please include the lot number and expiration date of the Test Strips and Controls currently being used. For the Test Strips, this information is printed on the carton as well as on the back of each foil packet. Test Strips Control For the Controls, this information is printed on the bottle. Lot Number: Expiration Date: 35 Limitations of the Procedure SECTION 7 1. PRESERVATIVES: • Fluoride – Do not use fluoride as a preservative for blood specimens. • Iodoacetic acid – Do not use iodoacetic acid as a preservative for blood specimens. 2. ARTERIAL SPECIMENS: The reference range for arterial pO2 is 83 to 108 mm Hg (11.1 to 14.4 kPa).1 In an arterial specimen study performed at a hospital site, mean biases obtained in comparison to results of a laboratory glucose method were –0.7% at pO2 of ≤108 mm Hg (n = 34, Mean pO2 = 91 mm Hg), –5.8% at pO2 between 109 to 200 mm Hg (n = 58, Mean pO2 = 150 mm Hg), and –11.8% at pO2 >200 mm Hg (n = 33, Mean pO2 = 307 mm Hg). 3. NEONATAL USE: This Ascensia ELITE ™ Blood Glucose Meter is not qualified for testing neonatal blood specimens. 4. METABOLITES: Reducing substances such as ascorbic acid and uric acid at normal blood concentrations do not significantly affect Ascensia ELITE ™ blood glucose test results. 5. HEMATOCRIT: At normal glucose levels, Ascensia ELITE ™ Test Strip results are not significantly affected by hematocrits in the range of 20% to 60%. At glucose levels above 300 mg/dL (16.7 mmol/L), hematocrit levels above 55% will cause lowered results. 6. LIPEMIC SPECIMEN: Cholesterol up to 500 mg/dL (13.0 mmol/L) or triglycerides up to 3000 mg/dL (33.9 mmol/L) do not significantly affect the results. Glucose values however, in specimens beyond these levels should be interpreted with caution. CONTRAINDICATION: Fingerstick blood glucose testing may not be clinically appropriate when peripheral blood flow is decreased. Shock, severe hypotension, hyperosmolar hyperglycemia and occurrence of severe dehydration are examples of clinical conditions which may adversely affect the measurement of glucose in peripheral blood.2 Carl Burtis and Edward Ashwood (eds.): Tietz Textbook of Clinical Chemistry. 3rd Ed., W.B. Saunders Co. Philadelphia, PA, 1999, p. 1827. Atkin S, Jaker MA, Chorost MI, Reddy S, Fingerstick Glucose Determination in Shock. Annals of Internal Medicine 1991. 114:1020-24. 1 2 36 Specifications Test Sample: Reaction Chamber Sample Volume: Measuring Range: Measuring Time: Calibration Curve: Memory Feature: Temperature Compensation: Battery Type: Battery Life: Operating Temperature Range: Humidity: Dimensions: Weight: Alarm: SECTION 7 Whole blood glucose 2 µL 1.1–33.3 mmol/L 30 Seconds Selected by use of the Code Strip Stores last 20 test results Automatic compensation with built-in thermistor 3-volt lithium batteries (DL or CR2032) – 2 Approximately 1000 Tests (1 year of average use) 50°–104° F (10°– 40° C) 20–80% RH 81 x 51 x 14 mm (311⁄32 x 2 x 9⁄16 in.) Approximately 50g (1.75 ounces) “Beeps” whenever a Check Strip, Code Strip or Test Strip is inserted into the Meter, when the Test Strip is completely filled with blood or Control Solution, and when a test result appears in the Display. 37 Specifications (continued) TURNING OFF THE ALARM: We strongly advise you to leave the alarm on, as it helps tell you when the Test Strip is adequately filled with blood or control solution. However, you can operate your Meter discreetly by turning off the alarm. MATERIALS REQUIRED: Ascensia ELITE ™ Check Strip or Test Strip (both strips will work). 1 Insert Check or Test Strip fully into Meter. 2 Turn the Meter over and open and shut the battery door. 3 Then quickly turn the Meter back over (display is blank), remove and reinsert strip within 10 seconds. on is displayed. Immediately pull the strip out within 2 seconds. off is displayed. The alarm is now off. To turn the alarm back on, repeat this procedure (#1-2-3). The Display sequence is reversed, off appears first and then on. 38 SECTION 7 Supplies SECTION 7 When calling or writing for supplies be sure to include the number with the name of the replacement part or accessory item. REPLACEMENT PARTS Part Number* Item 40030030 3-volt Lithium Battery (DL or CR2032) – 2 (Available at most Camera Stores) 99F39039 50184222 Ascensia ELITE ™ User Guide Quick Reference Card These parts are available in Canada from: Bayer Inc. Healthcare Division Diabetes Helpline 77 Belfield Road Toronto, Ontario M9W 1G6 Telephone: 1-800-268-7200 ACCESSORY ITEMS Product Number Item 3912A 3919A 3986A 3940A 3972A 6540B 6546BA 6550BA 6554A 6558A Ascensia ELITE ™ Test Strips – 25’s Ascensia ELITE ™ Test Strips – 50’s Ascensia ELITE ™ Test Strips – 100’s Ascensia ELITE ™ Low and High Controls Ascensia ELITE ™ Normal Control MICROLET® Adjustable Lancing Device MICROLET® Lancets (100’s) MICROLET® Lancets (200’s) MICROLET® Endcaps (10’s) Regular MICROLET® Endcaps (10’s) Super Accessory items may be obtained from Diabetes Care Centers, retail drug chains or other home healthcare distributors. *Part numbers are subject to change without notice 39 Warranty IMPORTANT: Bayer Corporation (“Bayer”) has no knowledge of the performance of the Ascensia ELITE ™ Blood Glucose Meter when used with any Test Strips other than Ascensia ELITE ™ Test Strips, and therefore makes no warranty of the performance of the Ascensia ELITE ™ instrument when used with any Test Strips other than Ascensia ELITE ™ Test Strips or when the Ascensia ELITE ™ Test Strip is altered or modified in any manner. MANUFACTURER’S WARRANTY Bayer Corporation warrants to the original purchaser that this instrument will be free from defects in materials and workmanship for a period of five (5) years from the date of original purchase (except as noted below). During the stated five-year period, Bayer shall replace a unit found to be defective, at no charge, with an equivalent or current version of the owner’s model. 40 SECTION 7 This warranty is subject to the following exceptions and limitations: 1. A 90 day warranty only will be extended for consumable parts and/or accessories. 2. This warranty is limited to replacement due to defects in parts or workmanship. Bayer shall not be required to replace any units which are necessitated by abuse, accidents, alteration, misuse, neglect, maintenance by other than Bayer, or failure to operate the instrument in accordance with instructions. Further, Bayer assumes no liability for malfunction or damage to Bayer instruments caused by the use of reagents (i.e., Ascensia ELITE ™ Test Strips) other than reagents manufactured or recommended by Bayer. Warranty (continued) SECTION 7 3. Bayer reserves the right to make changes in design of this instrument without obligation to incorporate such changes into previously manufactured instruments. THIS WARRANTY IS EXPRESSLY MADE IN LIEU OF ANY AND ALL OTHER WARRANTIES EXPRESS OR IMPLIED (EITHER IN FACT OR BY OPERATION OF LAW) INCLUDING THE WARRANTIES OF MERCHANTABILITY AND FITNESS FOR USE WHICH ARE EXPRESSLY EXCLUDED, AND IS THE ONLY WARRANTY GIVEN BY BAYER. Limitations of Liability: IN NO EVENT SHALL BAYER BE LIABLE FOR INDIRECT, SPECIAL OR CONSEQUENTIAL DAMAGES, EVEN IF BAYER HAS BEEN ADVISED OF THE POSSIBILITY OF SUCH DAMAGES. For warranty service, purchaser must contact Bayer Inc., Diabetes Helpline, by calling toll free 1-800-268-7200, for assistance and/or instructions for obtaining service of this instrument. Ascensia ELITE ™, DEXTROLOG®, and MICROLET® are trademarks of Bayer Corporation, used under license by Bayer Inc. Distributed by: Bayer Inc. Healthcare Division Toronto, Ontario M9W 1G6 99F39039 All Rights Reserved Printed in U.S.A. © 1999, 2002 Bayer Corporation Rev. 10/02 41