1
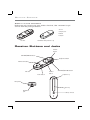
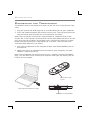
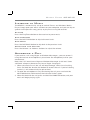
WIRELESS 2.4GHZ
PC MINI-BRIDGE
WITH STEREO HEADSET
USER
ARWH2
MANUAL
Important Information
CAUTION
RISK OF ELECTRIC SHOCK.
DO NOT OPEN.
Caution: To reduce the risk of electric shock, do not remove cover
(or back). No user serviceable parts inside. Refer servicing to qualified
service personnel.
WARNING: To reduce the risk of fire or electric shock, do not expose this product to rain or
moisture. The apparatus shall not be exposed to dripping or splashing. No objects filled with liquids,
such as vases, shall be placed on the apparatus.
FCC Regulations state that unauthorized changes or modifications to this equipment may void the
user’s authority to operate it.
This device complies with Part 15 of the FCC rules. Operation is subject to the following two conditions:
(1) This device may not cause harmful interference
(2) This device must accept any interference received, including interference that may cause
undesired operation.
RF Exposure Warning: This equipment must be installed and operated in accordance with provided
instructions and the antenna(s) used for this transmitter must be installed to provide a separation
distance of at least 20 cm from all persons and must not be co-located or operating in conjunction
with any other antenna or transmitter. End-users and installers must be provide with antenna
installation instructions and transmitter operating conditions for satisfying RF exposure compliance.
Industry Canada Regulatory Information
Operation is subject to the following two conditions:
(1) This device may not cause harmful interference
(2) This device must accept any interference received, including interference that may cause
undesired operation.
The user is cautioned that this device should be used only as specified within this manual to meet RF
exposure requirements. Use of this device in a manner inconsistent with this manual could lead to
excessive RF exposure conditions.
This Class B digital apparatus complies with Canadian ICES-003.
Cet appareil numérique de la classe B est conforme à la norme NMB-003 du Canada.
Important Safety Instructions
1.
2.
3.
4.
5.
6.
7.
Read these instructions.
Keep these instructions.
Heed all warnings.
Follow all instructions.
Do not use this apparatus near water.
Clean only with dry cloth.
Do not block any ventilation openings.
Install in accordance with the
manufacturer’s instructions.
8. Do not install near any heat sources such
as radiators, heat registers, stoves, or
other apparatus (including amplifiers) that
produce heat.
9. Protect the power cord from being walked
on or pinched particularly at plugs,
convenience receptacles, and the point
where they exit from the apparatus.
10. Unplug this apparatus during lightning storms
or when unused for long periods of time.
11. Refer all servicing to qualified service
personnel. Servicing is required when
the apparatus has been damaged in any
way, such as power-supply cord or plug is
damaged, liquid has been spilled or objects
have fallen into the apparatus, the apparatus
has been exposed to rain or moisture, does
not operate normally, or has been dropped.
Product Information
Keep your sales receipt to obtain warranty parts and service and for proof of purchase. Attach
it here and record the model number in case you need it. These numbers are located on the
product.
Model No.: _________________________________________________________
Purchase Date: _____________________________________________________
Dealer/Address/Phone: ______________________________________________
TABLE
OF
CONTENTS
Welcome! ...................................................................................... 3
Features ......................................................................................................................3
What’s in the package? .......................................................................................... 4
Receiver Buttons and Jacks ..................................................... 4
Transmitter Buttons and Jacks................................................ 5
Indicator Status ......................................................................... 5
Connecting the Transmitter ...................................................... 6
Listening to Music ...................................................................... 7
Playing ........................................................................................................................7
Skip Forward ..............................................................................................................7
Skip Back ....................................................................................................................7
Adjusting the Volume ..............................................................................................7
Charging ...................................................................................... 8
Setting Up Skype ........................................................................ 9
Troubleshooting.......................................................................10
Listen Safely! ...........................................................................10
Technical Specifications ..........................................................11
12 Month Limited Warranty ....................................................12
WELCOME!
Congratulations on your purchase of the 2.4GHz Wireless USB Mini-Bridge
Stereo Headset audio and communication system. The ARWH2 uses the latest
in wireless transmission, 2.4GHz digital technology, that lets you enjoy crystal
clear, uncompressed digital audio up to 30 feet away from the transmitter. Easy,
push-button wireless pairing makes it simple to get started.
This manual covers various connection options and detailed operating
instructions for setup and use of the ARWH2. If, after having reviewed the
instructions, you have any questions, please call toll-free 1-800-732-6866 or
visit www.araccessories.com.
Features
2.4GHz digital technology lets you enjoy crystal clear audio wirelessly up to 30
feet away from the transmitter*.
Convenient power, volume, and music and communication controls located on
the receiver
Listen to music from Windows Media Player® or iTunes® and control how it
plays right from the receiver
Answer calls from Windows Messenger® or Skype™
Easy pairing of transmitter and receiver
*Range may vary according to environment.
3
GETTING STARTED
What’s in the package?
Before you get started using your wireless headset, take a moment to get
familiar with the package contents.
Plus:
Carrying case
Earbuds
Lanyard
Receiver
Transmitter and protective cap
Receiver Buttons and Jacks
Volume –
button
SKIP FWD/HANG UP button
Play/Pause button
Answer Call button
Indicator
Power button
Volume +
button
SKIP BACK/MUTE MIC button
Lanyard loop
Microphone
Belt clip
Headphone
jack
4
Charge contacts
GETTING STARTED
TRANSMITTER BUTTONS
AND
JACKS
Charge contacts
Alignment
arrows
LINK button
Indicator
USB plug
Transmitter with protective
cap attached
INDICATOR STATUS
Receiver
Indicator Colors
Status
Blue (steady)
Power is on, units are linked
Blue (flashing)
Power is on, units not linked
Green (flashing)
Microphone is muted
Red/Blue (flashing)
Initial pairing setup
Red (steady)
Low battery
Red (flashing)
Charging
Note: When storing
or transporting the
transmitter, make sure to
put the protective cap back
on the USB plug.
Align the arrows on the
transmitter and cap as
shown above.
Transmitter
Indicator Colors
Status
Blue (steady)
Power is on, units are linked
Blue (flashing)
Power is on, units not linked
5
CONNECTIONS
CONNECTING
THE
TRANSMITTER
The ARWH2 requires no software to setup, so you can start using the unit right
away.
1. Plug the transmitter USB plug into an available USB port on your computer.
2. Press the Power button on the receiver to turn it on. The indicator comes on
and turns blue when the receiver and transmitter are linked.
Note: The transmitter and receiver are pre-linked for communication at the
factory, but if the indicator on the receiver flashes blue when you turn it on, the
units may need to be linked. To link them, press and hold the receiver’s Power
button and the transmitter’s LINK button for 3 seconds. The indicator turns
solid blue when both units are linked.
3. Plug your headphones or the included earbuds into the headphone jack on
the receiver.
4. Open your music or communication software on your computer, and your
ARWH2 is now ready to use.
Note: The headphone jack on the receiver uses a 3.5mm standard headphone
plug, so if you want to use a headset or earpiece from your cell phone, you will
need to use an adapter.
Power button on the
receiver
Connecting the transmitter to a laptop
LINK button on the transmitter
6
USING YOUR ARWH2
LISTENING
TO
MUSIC
The ARWH2 is automatically set up to control iTunes® and Windows® Media
Player. Simply open your music software on your computer, and you can skip or
go back to the previous song, pause, or play music using the receiver.
Playing
Press the Play/Pause button on the receiver to pause music.
Skip Forward
Press the SKIP FWD button to skip to the next track.
Skip Back
Press the SKIP BACK button to skip back to the previous track.
Adjusting the Volume
Press the Volume + or Volume – buttons to adjust the volume.
ANSWERING
A
CALL
If you receive a call using Skype™ or Windows Messenger®, you can answer it
using the receiver. A microphone is placed near the headphone jack for your
convenience.
Note: You’ll still need to use Skype or Windows Messenger to dial out. Some
additional setup may be necessary to use Skype. See page 9.
1. When you receive a call, the call will beep through, similar to call waiting.
Press and hold the Answer Call button to answer the call. If you’re listening
to music, it will automatically be put on hold.
2. To mute the microphone at any time during the call, press and hold the
MUTE MIC button. While muted, the indicator flashes green.
3. When finished with the call, press and hold the HANG UP button, and your
music will begin playing again.
7
USING YOUR ARWH2
CHARGING
1. Attach the ARWH2 receiver to the transmitter as shown below, making sure
the docking pins on the receiver match up to the holes on the transmitter,
until it clicks into place. Also make sure the charge contacts on both units
match up properly. You may need to move the belt clip slightly to do this.
2. Plug the combined ARWH2 unit into an available USB port on your computer.
The indicator on the receiver flashes red when charging.
Charging the battery fully takes a few hours and the battery should last about
4 hours per charge.
The indicator on the receiver turns solid red when the battery is low.
Docking
holes
Docking the receiver to the
transmitter for charging
Charging the ARWH2
8
USING YOUR ARWH2
SETTING UP SKYPE
Most of the settings for Skype™ are automatically configured by the ARWH2,
but in order to use all of the features on the receiver, the following few steps
must also be set up.
1. In the Skype Main menu at the top of the
screen, click Tools and then choose Options.
2. In the Options menu, click the Advanced tab
on the left side of the menu to open the
Advanced menu items beneath it.
3. Click Hotkeys under the Advanced menu. The
Hotkeys menu appears.
4. Check the Enable keyboard shortcuts box at the
top of the menu.
5. Finally, click the Save button at the bottom of
the window.
9
ADDITIONAL INFORMATION
TROUBLESHOOTING
The following troubleshooting guide takes you through some of the more
common problems associated with the installation and/or operation of a
wireless system. If the problem persists, please call toll-free 1-800-732-6866 or
visit www.araccessories.com.
NO
•
NO
•
•
•
•
POWER
Make sure the receiver is charged and that the transmitter is properly
connected to your computer. Try another USB port and use one directly on
your computer, if possible (e.g. not through a hub).
SOUND
Make sure the receiver is charged. If the indicator is red, the battery is low.
Check that your music or communications software is transmitting sound as
it normally should. Make sure the sound is not muted through the software.
The ARWH2 is not set as the default audio device in your PC’s system setup.
Use the audio settings in Windows® under Sounds and Audio Devices to
select the ARWH2 as the audio output.
Confirm that the receiver is turned on and linked to the transmitter (the
indicator is steady blue). If the indicator is flashing blue, the receiver is not
linked to the transmitter. Press and hold the LINK button on the transmitter
and the Power button on the receiver for 3 seconds to link the units.
INTERRUPTED
•
•
SKYPE
•
SOUND
Make sure the receiver is charged. If the indicator is red, the battery is low.
You may be out of range. Move closer to the transmitter. Sending the signal
through certain materials, such as glass, tile, and metal, can decrease the
effective transmitting distance of the system.
ISN’T WORKING RIGHT
Make sure Skype is set up correctly in the Tools menu. See page 9 for
details on how to enable keyboard shortcuts.
LISTEN SAFELY!
Enjoy your earphones at a safe volume. Avoid or limit the amount of time you
listen at higher volumes—permanent hearing loss may occur if the earphones
are used at too high a volume. If you experience a ringing in your ears, or
your own voice and other sounds seem muffled, stop using the earphones and
consult a hearing professional.
10
ADDITIONAL INFORMATION
TECHNICAL SPECIFICATIONS
Transmitter
Omni-directional 2.4GHz digital broadcast
Range
30 ft.*
USB type
USB A 2.0
Receiver
Headphone output
3.5 mm
Microphone
Integrated, omni-directional
Battery life
3 hours (at typical listening volume)
Battery type
190mAH Lithium polymer
Earbuds
Speaker drivers
15mm Neodymium
Impedance
16Ω ≤20% at 1kHz
Sensitivity
86dB ±2dB at 1kHz
Frequency response
20Hz-20kHz
Plug
3.5 mm stereo
Cord length
3.9’ (1.15 m)
* Maximum range; results may vary according to environment.
Windows Media Player is a registered trademark of Microsoft Corporation.
Windows Messenger is a registered trademark of Microsoft Corporation.
iTunes is a registered trademark of Apple Inc.
Skype is a trademark of Skype Limited.
11
12 MONTH LIMITED WARRANTY
Audiovox Electronics Corporation (the “Company”) warrants to the original retail purchaser of this
product that should this product or any part thereof, under normal use and conditions, be proven
defective in material or workmanship within 12 months from the date of original purchase, such
defect(s) will be repaired or replaced (at the Company’s option) without charge for parts and repair
labor. To obtain repair or replacement within the terms of this Warranty, the product along with any
accessories included in the original packaging is to be delivered with proof of warranty coverage
(e.g. dated bill of sale), specification of defect(s), transportation prepaid, to the Company at the
address shown below. Do not return this product to the Retailer.
This Warranty is not transferable and does not cover product purchased, serviced or used outside
the United States or Canada. The warranty does not extend to the elimination of externally
generated static or noise, to costs incurred for the installation, removal or reinstallation of the
product.
The warranty does not apply to any product or part thereof which, in the opinion of the company,
has suffered or been damaged through alteration, improper installation, mishandling, misuse,
neglect, accident or exposure to moisture. This warranty does not apply to damage caused by an
AC adapter not provided with the product, or by leaving non-rechargeable batteries in the product
while plugged into an AC outlet.
THE EXTENT OF THE COMPANY’S LIABILITY UNDER THIS WARRANTY IS LIMITED TO THE REPAIR
OR REPLACEMENT PROVIDED ABOVE AND, IN NO EVENT, SHALL THE COMPANY’S LIABILITY
EXCEED THE PURCHASE PRICE PAID BY PURCHASER FOR THE PRODUCT.
This Warranty is in lieu of all other express warranties or liabilities. ANY IMPLIED WARRANTIES,
INCLUDING ANY IMPLIED WARRANTY OF MERCHANTABILITY OR FITNESS FOR A PARTICULAR
PURPOSE, SHALL BE LIMITED TO DURATION OF THIS WARRANTY. ANY ACTION FOR BREACH
OF ANY WARRANTY HEREUNDER, INCLUDING ANY IMPLIED WARRANTY, MUST BE BROUGHT
WITHIN A PERIOD OF 24 MONTHS FROM THE DATE OF ORIGINAL PURCHASE. IN NO CASE SHALL
THE COMPANY BE LIABLE FOR ANY CONSEQUENTIAL OR INCIDENTAL DAMAGES WHATSOEVER.
No person or representative is authorized to assume for the Company any liability other than
expressed herein in connection with the sale of this product.
Some states/provinces do not allow limitations on how long an implied warranty lasts or the
exclusion or limitation of incidental or consequential damage so the above limitations or exclusions
may not apply to you. This Warranty gives you specific legal rights and you may also have other
rights which vary from state/province to state/province.
U.S.A.: Audiovox Electronics Corporation, 150 Marcus Blvd., Hauppauge, New York 11788
CANADA: Audiovox Return Center, c/o Genco, 6685 Kennedy Road, Unit 3, Door 16, Mississauga,
Ontario L5T 3A5
© 2007 Audiovox Accessories Corporation
111 Congressional Blvd., Suite 350
Carmel, IN 46032
www.araccessories.com
Trademark(s) ® Registered
ARWH2_US_IB_00