1
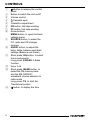
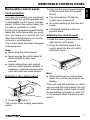
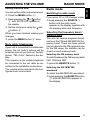
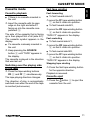
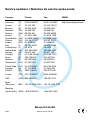
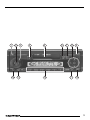
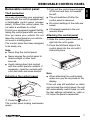
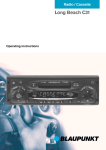
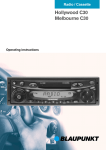
Radio / Cassette
St. Louis C33
7 642 183 110
(FM/MW/LW/DMS)
Operating instructions
http://www.blaupunkt.com
Open here
Ouvrir s.v.p.
2
1
14
2
3
13
4
5
12
6
7
9
11
10
PORTUGUÊS
8
3
ESPAÑOL
FRANÇAIS
ENGLISH
CONTROLS
1
2
3
4
5
6
7
8
9
:
;
<
=
>
4
button to release the control
panel
Button to switch the unit on/off
Volume control
Cassette eject
Cassette compartment
FR button, fast tape winding
FF button, fast tape winding
Arrow buttons
MENU button, to open the basic
settings menu
SOURCE button, to select the
CC, radio and CD changer
sources
AUDIO button, to adjust the
bass, treble, balance and fader
settings (Balance und Fader)
Short press: EQ button, to select
the sound presets
Long press: X-BASS, X-Bass
function
Keys 1 - 6
Short press: BAND button, to
select the FM memory bank
and the AM (MW/LW)
waveband, source selection to
radio mode
Long press: TS, to start the
Travelstore function.
button, to display the time
Removable control panel ......... 7
Theft protection ............................... 7
Detaching the control panel ............. 7
Attaching the control panel .............. 7
Switching on/off ...................... 8
Adjusting the volume ............... 8
Setting the power-on volume ........... 8
Instantaneously reducing
the volume (mute) ............................ 8
Mute while telephoning .................... 9
Radio mode .............................. 9
Switching to radio mode .................. 9
Selecting the frequency band /
memory bank ................................... 9
Tuning into a station ....................... 10
Setting the sensitivity of station
seek tuning .................................... 10
Storing station presets ................... 10
Storing stations automatically
(Travelstore) .................................. 10
Listening to station presets ............ 10
Cassette mode ....................... 11
Cassette playback ......................... 11
Switching over the playing
side of the tape ............................. 11
Fast tape winding .......................... 11
Cassette eject ............................... 11
Clock - Time ........................... 14
Displaying the time ........................ 14
Setting the clock ........................... 14
Selecting 12/24-hour clock mode .. 14
Displaying the time when the unit
is off and the ignition is on ............. 14
Sound and volume
distribution settings ............... 15
Adjusting the bass ......................... 15
Adjusting the treble ....................... 15
Adjusting the balance settings ....... 15
Adjusting the fader settings ........... 15
Equalizer and X-BASS ........... 16
X-BASS ........................................ 16
Selecting preset sound effect ........ 16
Specifications ........................ 17
Amplifier ........................................ 17
Tuner ............................................. 17
CC ................................................ 17
Installation instructions .......... 32
5
FRANÇAIS
Switching to CD changer mode ..... 12
Selecting CDs ............................... 12
Selecting tracks ............................ 12
Fast track selection ....................... 12
Fast searching (audible) ................ 12
Repeating individual tracks or
whole CDs (REPEAT) .................... 12
Random track play (MIX) ............... 13
Scanning all tracks on all CDs
(SCAN) ......................................... 13
Pausing playback (PAUSE) ............ 13
ESPAÑOL
CD changer mode .................. 12
Road safety ..................................... 6
Installation ....................................... 6
Accessories .................................... 6
PORTUGUÊS
Notes and accessories ............ 6
ENGLISH
CONTENTS
NOTES AND ACCESSORIES
Thank you for deciding to use a
Blaupunkt product. We hope you enjoy
using this new piece of equipment.
Please read these operating instructions
before using the equipment for the first
time. The Blaupunkt editors are constantly working on making the operating instructions clearer and easier to
understand. However, if you still have
any questions on how to operate the
equipment, please contact your dealer
or the telephone hotline for your country. You will find the hotline telephone
numbers printed at the back of this
booklet.
Road safety
Road safety has absolute priority. Only operate your radio unit if the
road and traffic conditions allow you
to do so. Familiarize yourself with the
unit before setting off on your journey.
You should always be able to hear
police, fire and ambulance sirens
from far. For this reason, set the volume of the program you are listening to at a reasonable level.
6
Installation
If you want to install your car radio by
yourself, please read the installation and
connection instructions that follow these
operating instructions.
Accessories
Only use accessories approved by
Blaupunkt.
Amplifier
All Blaupunkt and Velocity amplifiers can
be used.
CD changer
The Blaupunkt CD changer CDC A 01
(7607 700 022) can be connected to the
St. Louis C33 unit.
As a way of protecting your equipment
against theft, the unit is equipped with
a detachable control panel (release
panel). Without this control panel, the
car radio is worthless to a thief.
Protect your equipment against theft by
taking the control panel with you every
time you leave your vehicle. Do not
leave the control panel in your vehicle not even in a hiding place.
The control panel has been designed
to be easily use.
Note:
● Never drop the control panel.
● Never expose the control panel to
direct sunlight or other heat
sources.
● Avoid making direct skin contact
with the control panel’s contacts. If
necessary, clean the contacts with
a lint-free cloth and some alcohol.
Detaching the control panel
1
➮ Press the
●
●
●
off the unit and then out towards
the left.
The unit switches off after the
control panel is removed.
All current settings of the radio are
saved.
CD already inserted in the unit
remains there.
ESPAÑOL
Theft protection
FRANÇAIS
➮ First, pull the control panel straight
Attaching the control panel
➮ Slide the control panel from left to
right into the unit’s guide.
PORTUGUÊS
Removable control panel
ENGLISH
REMOVABLE CONTROL PANEL
➮ Press the left-hand edge of the
control panel into the unit until it
clicks into place.
Note:
● When attaching the control panel,
make sure you do not press on the
display.
If the unit was still switched on when
you removed the control panel, the unit
will automatically switch back on with
the last settings activated i.e. radio, CC
or CD changer when the panel is reinserted.
button 1.
The control panel locking mechanism
opens.
7
SWITCHING ON/OFF
ADJUSTING THE VOLUME
Switching on/off
Adjusting the volume
There are various ways of switching the
unit on/off:
The system volume can be adjusted in
steps from 0 (off) to 100 (maximum).
To increase the system volume,
➮ turn the volume control 3 clockwise.
To decrease the volume,
➮ turn the volume control 3 anticlockwise.
Switching on/off using the vehicle
ignition
If the unit is correctly connected to the
vehicle’s ignition and it was not switched
off using button 2, it will switch on/off
simultaneously with the ignition.
Switching on/off using the
removable control panel
➮ Remove the control panel.
The unit switches off.
➮ Attach the control panel again.
The unit switches on. The last settings
i.e. radio, CC or CD changer will be reactivated.
Setting the power-on volume
You can set the unit’s default power-on
volume.
➮ Press the MENU button 8.
➮ Keep pressing the or button
8 until “ON VOL” appears in the
display.
➮ Set the power-on volume using the
2.
The unit can only be switched on when
the ignition is turned on.
and buttons 8.
To help you adjusting the volume more
easily, the volume will be increased /
decreased as you make your changes.
When you have finished making your
changes,
➮ To switch the unit off, press button
➮ press the MENU button 8 twice.
Switching on/off using button 2
➮ To switch the unit on, press button
2 for longer than two seconds.
The unit switches off.
Instantaneously reducing the
volume (mute)
You can instantaneously reduce the
volume (mute) to a level preset by you.
➮ Briefly press button 2.
“MUTE” appears in the display.
8
8 until “MUTE LVL” appears in
the display.
➮ Set the mute level using the
and
buttons 8.
When you have finished making your
changes,
➮ press the MENU button 8 twice.
Mute while telephoning
If your unit is connected to a mobile telephone, the car radio’s volume will be
muted as soon as you “pick up” the telephone. “TEL CALL” flashes in the display.
This requires to the mobile telephone
be connected to the car radio as described in the installation instructions.
The volume will be reduced to the configured mute volume level.
If you are in CC or CD changer mode,
➮ keep pressing the SOURCE 9
button until the radio mode
appears in the display together with
the memory bank and frequency.
Selecting the frequency band /
memory bank
This unit can receive programs broadcast over the FM and AM (MW/LW) frequency band. There are three preset
memory bank for the FM range and one
for the AM range. Six stations can be
stored on each memory bank.
Selecting the FM memory bank
To switch between the FM memory bank
FM1, FM2 and FMT,
➮ press the BAND/TS button =.
Selecting the AM (MW/LW)
waveband
To select the AM (MW/LW) waveband,
➮ keep pressing the BAND/TS button
= until AM (MW/LW) appears in
the display.
9
ENGLISH
Switching to radio mode
FRANÇAIS
➮ Press the MENU button 8.
➮ Keep pressing the or button
Radio mode
ESPAÑOL
Setting the mute level
You can set the unit’s mute volume level.
RADIO MODE
PORTUGUÊS
ADJUSTING THE VOLUME
RADIO MODE
Tuning into a station
Storing station presets
There are various ways of tuning to a
station.
Storing stations manually
Automatic seek tuning
➮ Press the
or
button 8.
The unit tunes to the next receivable
station.
Setting the sensitivity of station
seek tuning
You can choose whether to tune only
to strong reception stations or to also
tune to those with a weak reception.
➮ Press the MENU button 8.
➮ Keep pressing the or button
➮ Select the required memory bank
(FM1, FM2 or FMT) or the AM
(MW/LW) waveband.
➮ Tune into the station.
➮ Press one of the station buttons
1-6 < for longer than one second
to store the station in that preset
memory.
Storing stations automatically
(Travelstore)
8 until “SENS HI” or “SENS LO”
appears in the display
“SENS HI” means that the tuner is set
high to sensitivity. “SENS LO” means it
is set to the low sensitivity setting. If
“SENS LO” is selected, “LOC” lights up
in the display.
You can automatically store the six stations with the strongest reception in the
region. The stations are stored in the
FMT or AM (MW/LW) memory depending on the selected frequency band.
Note:
● Any stations that were previously
stored on this memory bank are
deleted in the process.
➮ Set the required sensitivity using
➮ Press and hold the BAND/TS
the and buttons 8.
When you have finished making your
changes,
➮ press the MENU button 8.
button = until seek tuning begins.
The station storing procedure begins.
Once the procedure finishes, all the
stored stations are played briefly.
Tuning into stations manually
You can also tune into stations manually.
Listening to station presets
➮ Select the memory bank on which
➮ Press the
or
button 8.
the station was stored.
➮ Press the preset station button 1-6
< of the station you want to listen
to.
10
Cassette playback
Fast-forwarding
● To fast forward side A/1,
If there is no cassette inserted in
the unit.
➮ press the FF tape-winding button
➮ Insert the cassette with its open
edge on the right and side A/1
facing up into the cassette compartment 5.
The side of the cassette that is facing
up is then played first of all (side A/1).
The cassette symbol appears in the
display.
● If a cassette is already inserted in
the unit.
➮ Keep pressing the SOURCE
button 9 until “TAPE” appears in
the display.
The cassette is played in the direction
that was last set.
Switching over the playing side
of the tape
➮ Press the tape-winding buttons
FR 6 and FF 7 simultaneously.
The tape playing direction changes.
The direction of play is automatically
switched over when the end of the tape
is reached (autoreverse).
●
7 so that it clicks into position.
To fast forward side B/2,
➮ press the FR tape-winding button
6 so that it clicks into position.
“TAPE FF” appears in the display.
ESPAÑOL
●
Fast-rewinding
● To fast rewind side A/1,
➮ press the FR tape-winding button
●
FRANÇAIS
Fast tape winding
6 so that it clicks into position.
To fast rewind side B/2,
➮ press the FF tape-winding button
7 so that it clicks into position.
“TAPE FR” appears in the display.
Stopping tape winding
➮ Press the fast tape-winding button
for the opposite direction.
Playback is resumed.
Cassette eject
➮ Press the button 4 to eject the
cassette from the unit.
11
PORTUGUÊS
Cassette mode
ENGLISH
CASSETTE MODE
CD CHANGER MODE
CD changer mode
Fast searching (audible)
You can connect a CD changer (CDC A
01) to the St. Louis C33 unit. You can
obtain further information on available
CD changers from your dealer.
Note:
● Information on handling CDs,
inserting CDs and operating the
CD changer can be found in the
operating instructions supplied with
your CD changer.
To fast search backwards or forwards,
Switching to CD changer mode
➮ Keep pressing the SOURCE 9
button until the display shows, for
instance, “CDC 1--1”.
The first digit in this display represents
the CD number (in this case 1), and the
second digit represents the track number (in this case 1).
Playback begins with the first CD that
the CD changer detects.
Selecting CDs
To move up or down to another CD,
➮ press the
or
several times.
button 8 once or
Selecting tracks
To move up or down to another track on
the current CD,
➮ press the
or
several times.
12
button 8 once or
buttons 8
pressed until fast searching
backwards / forwards begins.
➮ keep one of the
Repeating individual tracks or
whole CDs (REPEAT)
To repeat the current track,
➮ briefly press button 3 (RPT) <.
“S--RPT” appears briefly in the display.
To repeat the current CD,
➮ keep the 3 (RPT) button <
pressed for longer than two
seconds.
“D--RPT” appears briefly in the display.
Deactivating REPEAT
To stop the current track or current CD
from being repeated,
➮ press button 3 (RPT) < until
“S--RPT” or “D--RPT” disappears
and the standard CD changer
display reappears.
Canceling MIX
To stop the tracks from being played in
random order,
➮ press button 4 (MIX) < until
“S--MIX” or “D--MIX” disappears
and the standard CD changer
display reappears.
Scanning all tracks on all CDs
(SCAN)
Scanning tracks on the current CD
To briefly play all the tracks on the current CD in ascending order,
➮ press button 2 (SCAN) <.
“S--SCN” appears in the display.
➮ keep the 2 (SCAN) button <
pressed for longer than two
seconds.
“D--SCAN” appears in the display.
Stopping SCAN
To stop scanning,
➮ briefly press the 2 (SCAN) button
< again.
The currently scanned track will then
continue to be played normally.
Note:
● You can set the scanning time
(scantime). For further details, read
the section entitled “Setting the
scantime” in the “CD mode”
chapter.
Pausing playback (PAUSE)
➮ Press button 1 ( ) <.
“S--PAUSE” appears in the display.
Canceling pause
➮ Press button 2 ( ) < while in
pause mode.
Playback is resumed.
13
FRANÇAIS
“S--MIX” appears briefly in the display.
To play the tracks on all inserted CDs in
random order,
➮ keep the 4 (MIX) button <
pressed for longer than two
seconds.
“D--MIX” appears briefly in the display.
Scanning the first track on all CDs
You can briefly play the first track all CDs
in the CD changer.
ESPAÑOL
To play the tracks on the current CD in
random order,
➮ briefly press button 4 (MIX) <.
PORTUGUÊS
Random track play (MIX)
ENGLISH
CD CHANGER MODE
CLOCK - TIME
CLOCK - Time
Selecting 12/24-hour clock
mode
➮ Press the MENU button 8.
➮ Keep pressing the or button
Displaying the time
To display the time,
➮ briefly press the
button >.
Setting the clock
➮ Press the MENU button 8.
➮ Keep pressing the or button
8 until “CLOCKSET” appears in
the display.
➮ Press the
button 8.
The time appears in the display. The
minutes flash on and off and can be
adjusted.
➮ Adjust the minutes using the
/
buttons 8.
Once the minutes are set,
➮ press the
button 8.
The hours flash on and off.
➮ Adjust the hours using the /
buttons 8.
When you have finished making your
changes,
➮ press the MENU button 8 twice.
14
8 until “24 H MODE” or “12 H
MODE” appears in the display.
or button 8 to
switch between the modes.
When you have finished making your
changes,
➮ press the MENU button 8.
➮ Press the
Displaying the time when the
unit is off and the ignition is on
To display the clock when the unit is off
and the ignition is on,
➮ press the MENU button 8 .
➮ Keep pressing the or button
8 until “CLOCK OFF” or “CLOCK
ON” appears in the display.
or button 8 to
switch between the displays.
When you have finished making your
changes,
➮ press the MENU button 8.
➮ Press the
➮ press the AUDIO button :.
“BAS” appears in the display.
To increase the bass,
➮ turn the volume control 3 clockwise.
To decrease the bass,
➮ turn the volume control 3 anticlockwise.
When you have finished making your
changes,
➮ wait 8 seconds, the settings are
saved and the audio source display
appears.
Adjusting the treble
To adjust the TREBLE,
➮ keep pressing the AUDIO :
button until “TRE” appears in the
display.
To increase the treble,
➮ turn the volume control 3 clockwise.
To decrease the treble,
➮ turn the volume control 3 anticlockwise.
When you have finished making your
changes,
➮ wait 8 seconds, the settings are
saved and the audio source display
appears.
➮ keep pressing the AUDIO :
button until “BAL” appears in the
display.
To move the volume distribution toward
the right,
➮ turn the volume control 3 clockwise.
To move the volume distribution toward
the left,
➮ turn the volume control 3 anticlockwise.
When you have finished making your
changes,
➮ wait 8 seconds, the settings are
saved and the audio source display
appears.
Adjusting the fader settings
To adjust the front/back volume distribution (fader),
➮ keep pressing the AUDIO :
button until “FAD” appears in the
display.
To move the volume distribution toward
the back,
➮ turn the volume control 3 clockwise.
To move the volume distribution toward
the front,
➮ turn the volume control 3 anticlockwise.
15
FRANÇAIS
To adjust the BASS,
To adjust the left/right volume distribution (balance),
ESPAÑOL
Adjusting the bass
Adjusting the balance settings
PORTUGUÊS
Sound and volume
distribution settings
ENGLISH
SOUND AND VOLUME
DISTRIBUTION SETTINGS
EQUALIZER AND
X-BASS
SOUND AND VOLUME
DISTRIBUTION SETTINGS
When you have finished making your
changes,
➮ wait 8 seconds, the settings are
saved and the audio source display
appears.
Equalizer and X-BASS
X-BASS
The X-BASS feature can be used to
boost the bass at low volume levels.
To activate X-BASS,
➮ keep the EQ/X-BASS button ;
pressed until “XBASS ON” appears
in the display.
“X-BASS” appears in the display.
To deactivate X-BASS,
➮ keep the EQ/X-BASS button ;
pressed until “XBASS OFF”
appears in the display.
“X-BASS” disappears.
Selecting preset sound effect
You can select preset sound effect for
the following styles of music:
● CLASSIC
● POP M
● ROCK M
The settings for these music styles have
already been programmed.
To select one of the sound presets,
➮ keep pressing the EQ/X-BASS
button ; until the required setting
appears in the display.
If you want to deactivate the sound preset,
➮ keep pressing the EQ/X-BASS
button ; until “DSP OFF” appears
in the display.
16
ENGLISH
SPECIFICATIONS
Specifications
Amplifier
4 x 15 watts sine
in accordance
with DIN 45 324
at 14.4 V 4 x 40
watts max. power
FRANÇAIS
Output power:
ESPAÑOL
Tuner
PORTUGUÊS
Frequency ranges US:
FM:
87.5 - 108 MHz
AM (MW):
522 - 1620 kHz
LW:
144 - 288 kHz
FM mono sensitivity:
15 dBf
FM frequency response:
35 - 16.000 Hz
CC
Frequency response:
30 - 18.000 Hz
Subject to changes!
17
Service numbers / Numéros du service après-vente
Country:
Phone:
Fax:
WWW:
http://www.blaupunkt.com
Germany
(D)
0180-5000225
05121-49 4002
Austria
Belgium
Denmark
Finland
France
Great Britain
Greece
Ireland
Italy
Luxembourg
Netherlands
Norway
Portugal
Spain
Sweden
Switzerland
(A)
(B)
(DK)
(FIN)
(F)
(GB)
(GR)
(IRL)
(I)
(L)
(NL)
(N)
(P)
(E)
(S)
(CH)
01-610 390
02-525 5454
44 898 360
09-435 991
01-4010 7007
01-89583 8880
210 94 27 337
01-4149400
02-369 62331
40 4078
023-565 6348
66-817 000
01-2185 00144
902-120234
08-7501500
01-8471644
01-610 393 91
02-525 5263
44-898 644
09-435 99236
01-4010 7320
01-89583 8394
210 94 12 711
01-4598830
02-369 62464
40 2085
023-565 6331
66-817 157
01-2185 11111
916-467952
08-7501810
01-8471650
Czech. Rep. (CZ)
Hungary
(H)
Poland
(PL)
02-6130 0441
01-333 9575
0800-118922
02-6130 0514
01-324 8756
022-8771260
Turkey
(TR)
0212-3350677
0212-3460040
USA
(USA) 800-2662528
708-6817188
Brasil
(Mercosur)
(BR)
+55-19 3745 2773
+55-19 3745 2769
Malaysia
(Asia Pacific) (MAL) +604-6382 474
+604-6413 640
Blaupunkt GmbH
02/04
CM/PSS 8 622 404 081
Radio / Cassette
St. Louis C33
7 642 183 110
(FM/MW/LW)
Operating instructions
http://www.blaupunkt.com
Open here
2
1
14
2
3
13
4
5
12
6
7
9
11
10
PORTUGUÊS
8
3
ESPAÑOL
FRANÇAIS
ENGLISH
CONTROLS
1
2
3
4
5
6
7
8
9
:
;
<
=
>
4
button to release the control
panel
Button to switch the unit on/off
Volume control
Cassette eject
Cassette compartment
FR button, fast tape winding
FF button, fast tape winding
Arrow buttons
MENU button, to open the basic
settings menu
SOURCE button, to select the
CC and radio sources
AUDIO button, to adjust the
bass, treble, balance and fader
settings (Balance und Fader)
Short press: EQ button, to select
the sound presets
Long press: X-BASS, X-Bass
function
Keys 1 - 6
Short press: BAND button, to
select the FM memory bank
and the AM (MW/LW)
waveband, source selection to
radio mode
Long press: TS, to start the
Travelstore function.
button, to display the time
Setting the power-on volume ........... 8
Instantaneously reducing the
volume (mute) .................................. 8
Mute while telephoning .................... 9
Radio mode .............................. 9
Switching to radio mode .................. 9
Selecting the frequency band /
memory bank ................................... 9
Tuning into a station ....................... 10
Setting the sensitivity of station seek
tuning ............................................ 10
Storing station presets ................... 10
Storing stations automatically
(Travelstore) .................................. 10
Listening to station presets ............ 10
Adjusting the bass ......................... 13
Adjusting the treble ....................... 13
Adjusting the balance settings ....... 13
Adjusting the fader settings ........... 13
Equalizer and X-BASS ........... 14
X-BASS ........................................ 14
Selecting preset sound effect ........ 14
Specifications ........................ 14
Amplifier ........................................ 14
Tuner ............................................. 14
CC ................................................ 14
FRANÇAIS
Switching on/off ...................... 8
Adjusting the volume ............... 8
Sound and volume
distribution settings ............... 13
ESPAÑOL
Theft protection ............................... 7
Detaching the control panel ............. 7
Attaching the control panel .............. 7
PORTUGUÊS
Removable control panel ......... 7
ENGLISH
CONTENTS
Cassette mode ....................... 11
Cassette playback ......................... 11
Switching over the playing
side of the tape ............................. 11
Fast tape winding .......................... 11
Cassette eject ............................... 11
Clock - Time ........................... 12
Displaying the time ........................ 12
Setting the clock ........................... 12
Selecting 12/24-hour clock mode .. 12
Displaying the time when the unit
is off and the ignition is on ............. 12
5
NOTES AND ACCESSORIES
Thank you for deciding to use a
Blaupunkt product. We hope you enjoy
using this new piece of equipment.
Please read these operating instructions
before using the equipment for the first
time. The Blaupunkt editors are constantly working on making the operating instructions clearer and easier to
understand. However, if you still have
any questions on how to operate the
equipment, please contact your dealer
or the telephone hotline for your country. You will find the hotline telephone
numbers printed at the back of this
booklet.
Road safety
Road safety has absolute priority. Only operate your radio unit if the
road and traffic conditions allow you
to do so. Familiarize yourself with the
unit before setting off on your journey.
You should always be able to hear
police, fire and ambulance sirens
from far. For this reason, set the volume of the program you are listening to at a reasonable level.
6
Installation
If you want to install your car radio by
yourself, please read the installation and
connection instructions that follow these
operating instructions.
Accessories
Only use accessories approved by
Blaupunkt.
Remote control
The St. Louis C33 unit cannot be
remotely controlled.
Amplifier
All Blaupunkt and Velocity amplifiers can
be used.
CD changer
No CD changer can be connected to
the St. Louis C33 unit.
As a way of protecting your equipment
against theft, the unit is equipped with
a detachable control panel (release
panel). Without this control panel, the
car radio is worthless to a thief.
Protect your equipment against theft by
taking the control panel with you every
time you leave your vehicle. Do not
leave the control panel in your vehicle not even in a hiding place.
The control panel has been designed
to be easily use.
Note:
● Never drop the control panel.
● Never expose the control panel to
direct sunlight or other heat
sources.
● Avoid making direct skin contact
with the control panel’s contacts. If
necessary, clean the contacts with
a lint-free cloth and some alcohol.
Detaching the control panel
1
➮ Press the
●
●
●
off the unit and then out towards
the left.
The unit switches off after the
control panel is removed.
All current settings of the radio are
saved.
CD already inserted in the unit
remains there.
ESPAÑOL
Theft protection
FRANÇAIS
➮ First, pull the control panel straight
Attaching the control panel
➮ Slide the control panel from left to
right into the unit’s guide.
PORTUGUÊS
Removable control panel
ENGLISH
REMOVABLE CONTROL PANEL
➮ Press the left-hand edge of the
control panel into the unit until it
clicks into place.
Note:
● When attaching the control panel,
make sure you do not press on the
display.
If the unit was still switched on when
you removed the control panel, the unit
will automatically switch back on with
the last settings activated i.e. radio or
CC when the panel is reinserted.
button 1.
The control panel locking mechanism
opens.
7
SWITCHING ON/OFF
ADJUSTING THE VOLUME
Switching on/off
Adjusting the volume
There are various ways of switching the
unit on/off:
The system volume can be adjusted in
steps from 0 (off) to 100 (maximum).
To increase the system volume,
➮ turn the volume control 3 clockwise.
To decrease the volume,
➮ turn the volume control 3 anticlockwise.
Switching on/off using the vehicle
ignition
If the unit is correctly connected to the
vehicle’s ignition and it was not switched
off using button 2, it will switch on/off
simultaneously with the ignition.
Switching on/off using the
removable control panel
➮ Remove the control panel.
The unit switches off.
➮ Attach the control panel again.
The unit switches on. The last settings
i.e. radio or CC will be reactivated.
Switching on/off using button 2
➮ To switch the unit on, press button
2.
The unit can only be switched on when
the ignition is turned on.
➮ To switch the unit off, press button
2 for longer than two seconds.
The unit switches off.
Setting the power-on volume
You can set the unit’s default power-on
volume.
➮ Press the MENU button 8.
➮ Keep pressing the or button
8 until “ON VOL” appears in the
display.
➮ Set the power-on volume using the
and buttons 8.
To help you adjusting the volume more
easily, the volume will be increased /
decreased as you make your changes.
When you have finished making your
changes,
➮ press the MENU button 8 twice.
Instantaneously reducing the
volume (mute)
You can instantaneously reduce the
volume (mute) to a level preset by you.
➮ Briefly press button 2.
“MUTE” appears in the display.
8
8 until “MUTE LVL” appears in
the display.
➮ Set the mute level using the
and
buttons 8.
When you have finished making your
changes,
➮ press the MENU button 8 twice.
Mute while telephoning
If your unit is connected to a mobile telephone, the car radio’s volume will be
muted as soon as you “pick up” the telephone. “TEL CALL” flashes in the display.
This requires to the mobile telephone
be connected to the car radio as described in the installation instructions.
The volume will be reduced to the configured mute volume level.
ENGLISH
Switching to radio mode
If you are in CC mode,
➮ keep pressing the SOURCE 9
button until the radio mode
appears in the display together with
the memory bank and frequency.
Selecting the frequency band /
memory bank
This unit can receive programs broadcast over the FM and AM (MW/LW) frequency band. There are three preset
memory bank for the FM range and one
for the AM range. Six stations can be
stored on each memory bank.
Selecting the FM memory bank
To switch between the FM memory bank
FM1, FM2 and FMT,
➮ press the BAND/TS button =.
Selecting the AM (MW/LW)
waveband
To select the AM (MW/LW) waveband,
➮ keep pressing the BAND/TS button
= until AM (MW/LW) appears in
the display.
9
FRANÇAIS
➮ Press the MENU button 8.
➮ Keep pressing the or button
Radio mode
ESPAÑOL
Setting the mute level
You can set the unit’s mute volume level.
RADIO MODE
PORTUGUÊS
ADJUSTING THE VOLUME
RADIO MODE
Tuning into a station
Storing station presets
There are various ways of tuning to a
station.
Storing stations manually
Automatic seek tuning
➮ Press the
or
button 8.
The unit tunes to the next receivable
station.
Setting the sensitivity of station
seek tuning
You can choose whether to tune only
to strong reception stations or to also
tune to those with a weak reception.
➮ Press the MENU button 8.
➮ Keep pressing the or button
➮ Select the required memory bank
(FM1, FM2 or FMT) or the AM
(MW/LW) waveband.
➮ Tune into the station.
➮ Press one of the station buttons
1-6 < for longer than one second
to store the station in that preset
memory.
Storing stations automatically
(Travelstore)
8 until “SENS HI” or “SENS LO”
appears in the display
“SENS HI” means that the tuner is set
high to sensitivity. “SENS LO” means it
is set to the low sensitivity setting. If
“SENS LO” is selected, “LOC” lights up
in the display.
You can automatically store the six stations with the strongest reception in the
region. The stations are stored in the
FMT or AM (MW/LW) memory depending on the selected frequency band.
Note:
● Any stations that were previously
stored on this memory bank are
deleted in the process.
➮ Set the required sensitivity using
➮ Press and hold the BAND/TS
the and buttons 8.
When you have finished making your
changes,
➮ press the MENU button 8.
button = until seek tuning begins.
The station storing procedure begins.
Once the procedure finishes, all the
stored stations are played briefly.
Tuning into stations manually
You can also tune into stations manually.
Listening to station presets
➮ Select the memory bank on which
➮ Press the
or
button 8.
the station was stored.
➮ Press the preset station button 1-6
< of the station you want to listen
to.
10
Cassette playback
Fast-forwarding
● To fast forward side A/1,
If there is no cassette inserted in
the unit.
➮ press the FF tape-winding button
➮ Insert the cassette with its open
edge on the right and side A/1
facing up into the cassette compartment 5.
The side of the cassette that is facing
up is then played first of all (side A/1).
The cassette symbol appears in the
display.
● If a cassette is already inserted in
the unit.
➮ Keep pressing the SOURCE
button 9 until “TAPE” appears in
the display.
The cassette is played in the direction
that was last set.
Switching over the playing side
of the tape
➮ Press the tape-winding buttons
FR 6 and FF 7 simultaneously.
The tape playing direction changes.
The direction of play is automatically
switched over when the end of the tape
is reached (autoreverse).
●
7 so that it clicks into position.
To fast forward side B/2,
➮ press the FR tape-winding button
6 so that it clicks into position.
“TAPE FF” appears in the display.
ESPAÑOL
●
Fast-rewinding
● To fast rewind side A/1,
➮ press the FR tape-winding button
●
FRANÇAIS
Fast tape winding
6 so that it clicks into position.
To fast rewind side B/2,
➮ press the FF tape-winding button
7 so that it clicks into position.
“TAPE FR” appears in the display.
Stopping tape winding
➮ Press the fast tape-winding button
for the opposite direction.
Playback is resumed.
Cassette eject
➮ Press the button 4 to eject the
cassette from the unit.
11
PORTUGUÊS
Cassette mode
ENGLISH
CASSETTE MODE
CLOCK - TIME
CLOCK - Time
Selecting 12/24-hour clock
mode
➮ Press the MENU button 8.
➮ Keep pressing the or button
Displaying the time
To display the time,
➮ briefly press the
button >.
Setting the clock
➮ Press the MENU button 8.
➮ Keep pressing the or button
8 until “CLOCKSET” appears in
the display.
➮ Press the
button 8.
The time appears in the display. The
minutes flash on and off and can be
adjusted.
➮ Adjust the minutes using the
/
buttons 8.
Once the minutes are set,
➮ press the
button 8.
The hours flash on and off.
➮ Adjust the hours using the /
buttons 8.
When you have finished making your
changes,
➮ press the MENU button 8 twice.
12
8 until “24 H MODE” or “12 H
MODE” appears in the display.
or button 8 to
switch between the modes.
When you have finished making your
changes,
➮ press the MENU button 8.
➮ Press the
Displaying the time when the
unit is off and the ignition is on
To display the clock when the unit is off
and the ignition is on,
➮ press the MENU button 8 .
➮ Keep pressing the or button
8 until “CLOCK OFF” or “CLOCK
ON” appears in the display.
or button 8 to
switch between the displays.
When you have finished making your
changes,
➮ press the MENU button 8.
➮ Press the
Adjusting the treble
Adjusting the fader settings
To adjust the TREBLE,
➮ keep pressing the AUDIO :
button until “TRE” appears in the
display.
To increase the treble,
➮ turn the volume control 3 clockwise.
To decrease the treble,
➮ turn the volume control 3 anticlockwise.
When you have finished making your
changes,
➮ wait 8 seconds, the settings are
saved and the audio source display
appears.
To adjust the front/back volume distribution
(fader),
➮ keep pressing the AUDIO :
button until “FAD” appears in the
display.
To move the volume distribution toward
the back,
➮ turn the volume control 3 clockwise.
To move the volume distribution toward
the front,
➮ turn the volume control 3 anticlockwise.
When you have finished making your
changes,
➮ wait 8 seconds, the settings are
saved and the audio source display
appears.
Adjusting the bass
To adjust the BASS,
➮ press the AUDIO button :.
13
FRANÇAIS
“BAS” appears in the display.
To increase the bass,
➮ turn the volume control 3 clockwise.
To decrease the bass,
➮ turn the volume control 3 anticlockwise.
When you have finished making your
changes,
➮ wait 8 seconds, the settings are
saved and the audio source display
appears.
To adjust the left/right volume distribution (balance),
➮ keep pressing the AUDIO :
button until “BAL” appears in the
display.
To move the volume distribution toward
the right,
➮ turn the volume control 3 clockwise.
To move the volume distribution toward
the left,
➮ turn the volume control 3 anticlockwise.
When you have finished making your
changes,
➮ wait 8 seconds, the settings are
saved and the audio source display
appears.
ESPAÑOL
Adjusting the balance settings
PORTUGUÊS
Sound and volume
distribution settings
ENGLISH
SOUND AND VOLUME DISTRIBUTION SETTINGS
EQUALIZER AND X-BASS
SPECIFICATIONS
Equalizer and X-BASS
Specifications
X-BASS
Amplifier
The X-BASS feature can be used to
boost the bass at low volume levels.
To activate X-BASS,
➮ keep the EQ/X-BASS button ;
pressed until “XBASS ON” appears
in the display.
“X-BASS” appears in the display.
To deactivate X-BASS,
➮ keep the EQ/X-BASS button ;
pressed until “XBASS OFF”
appears in the display.
“X-BASS” disappears.
Output power:
Selecting preset sound effect
You can select preset sound effect for
the following styles of music:
● CLASSIC
● POP M
● ROCK M
The settings for these music styles have
already been programmed.
To select one of the sound presets,
➮ keep pressing the EQ/X-BASS
button ; until the required setting
appears in the display.
If you want to deactivate the sound preset,
➮ keep pressing the EQ/X-BASS
button ; until “DSP OFF” appears
in the display.
Tuner
Frequency ranges:
FM:
87.5 - 108 MHz
AM (MW):
522 - 1620 kHz
LW:
144 - 288 kHz
FM mono sensitivity:
15 dBf
FM frequency response:
35 - 16.000 Hz
CC
Frequency response:
30 - 18.000 Hz
Subject to changes!
14
4 x 40 watts sine
in accordance
with DIN 45 324
at 14.4 V
4 x 50 watts max.
power
Service numbers / Numéros du service après-vente
Country:
Phone:
Fax:
WWW:
http://www.blaupunkt.com
Germany
(D)
0180-5000225
05121-49 4002
Austria
Belgium
Denmark
Finland
France
Great Britain
Greece
Ireland
Italy
Luxembourg
Netherlands
Norway
Portugal
Spain
Sweden
Switzerland
(A)
(B)
(DK)
(FIN)
(F)
(GB)
(GR)
(IRL)
(I)
(L)
(NL)
(N)
(P)
(E)
(S)
(CH)
01-610 390
02-525 5454
44 898 360
09-435 991
01-4010 7007
01-89583 8880
0030 210 57 85 350
01-4149400
02-369 6331
40 4078
023-565 6348
66-817 000
01-2185 00144
902-120234
08-7501500
01-8471644
01-610 393 91
02-525 5263
44-898 644
09-435 99236
01-4010 7320
01-89583 8394
0030 210 57 69 473
01-4598830
02-369 6464
40 2085
023-565 6331
66-817 157
01-2185 11111
916-467952
08-7501810
01-8471650
Czech. Rep. (CZ)
Hungary
(H)
Poland
(PL)
02-6130 0441
01-333 9575
0800-118922
02-6130 0514
01-324 8756
022-8771260
Turkey
(TR)
0212-3350677
0212-3460040
USA
(USA) 800-2662528
708-6817188
Brasil
(Mercosur)
(BR)
+55-19 3745 2773
+55-19 3745 2769
Malaysia
(Asia Pacific) (MAL) +604-6382 474
+604-6413 640
Blaupunkt GmbH
09/03
CM/PSS 8 622 403 894