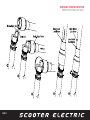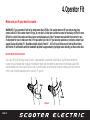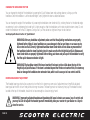
1
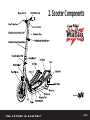
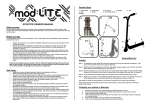
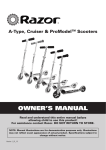
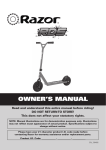
Owner’s Manual
1. Introduction
Page 1
2. Scooter Components
Page 5
3. Charging & Assembly
Page 6
4. Operator Fit
Page 10
5. Riding Instructions
Page 13
6. Safety Equipment & Safe Riding
Page 14
7. Mechanical Safety Check
Page 19
8. Use & Mechanical Adjustment
Page 22
9. Battery Maintenance
Page 32
10. Service & Maintenance
Page 35
11. Specifications
Page 37
12.Warranty & Contacting
Page 38
13. About Your Dealer
Page 40
Table of Contents
1. Introduction
Welcome to the world of Electric Powered Scooters and the Cap’n Billy’s Whiz Bang Scooter Electric.
With the feel of a skateboard and the convenience of motor-driven/rechargeable power, the Cap’n Billy’s
Whiz Bang Scooter Electric will give you hours of riding enjoyment at a very low cost. By following
the simple instructions in this manual, you will find that you can prepare your scooter within minutes.
Although its lightweight design is capable of supporting a 250-lb. person, it can be folded quickly,
carried safely and stored with ease. To enjoy your scooter safely and to obtain optimum performance
and durability, please read and understand this manual completely.
For technical questions or customer service, please contact EWI at 1-408-270-3724 or [email protected].
In the USA, you may call toll-free 1-888-808-4382.
IMPORTANT NOTICE:
Your scooter is designed with a safety push-to-start feature.To prevent false starts, you must manually push-off to
a speed of about 3 mph before the motor can be engaged.The Thumb-Action Speed Control activates the motor
only when the scooter is in motion.
PAGE 1
1a. ABOUT THIS MANUAL
Why you should read this manual before you ride your new electric scooter:
This manual was written to help you understand and enjoy your new electric scooter and to assist you in riding
it safely and responsibly.
By reading this manual before you go out on your first scooter ride, you’ll know how to get the most from your new electric scooter.
This Cap’n Billy’s Whiz Bang Scooter Electric owner’s manual contains important safety warnings, as well as helpful
performance, operation and maintenance information. Please read this manual completely before taking your first ride on
your new scooter.You should use caution and care while getting used to your scooter’s riding characteristics.
Keep this manual handy for future reference.
1b. IMPORTANT NOTICES
• Make sure your scooter is properly fitted to you as described in Section 4,“Operator Fit.”
• Perform the Mechanical Safety Check described in Section 7,“Safety Equipment & Safe Riding,” before each ride.
• Please read the Charging Instructions in Section 9,“Battery Maintenance,” before charging the batteries.
• Fully charge your batteries and inflate your tires before your first ride.
• Always fully recharge the batteries after each ride.
• During periods of prolonged storage, the batteries should be charged at least once every 90 days.
• Always store the scooter in a cool and dry place.
• You must manually push-off to a speed of about 3 mph before the motor can be engaged.The Thumb-Action Speed
Control activates the motor only when the scooter is in motion.
• Scooter theft is a problem everywhere. Always lock your scooter whenever your scooter is left unattended.
PAGE 2
1c. GENERAL WARNING
Like any sport, scootering involves risk of injury and damage. By choosing to ride a scooter, you assume the responsibility for that
risk, so you need to know — and to practice — the rules of safe and responsible scootering and of proper use and maintenance.
Proper use and maintenance of your scooter reduce risk of injury.
This Manual contains many “Warnings” and “Cautions” concerning the consequences of failure to maintain or inspect your scooter
and of failure to follow safe scootering practices.
• The word WARNING indicates a potentially hazardous situation that,if not avoided,could result in serious injury or death.
• The word CAUTION indicates a potentially hazardous situation,which,if not avoided,may result in minor or moderate injury,
serious damage to the scooter or the voiding of your warranty,or is an alert against unsafe practices.
Many of the Warnings and Cautions say,“you may lose control and fall.” Because any fall can result in serious injury
or even death, we do not always repeat the warning of possible injury or death. Because it is impossible to anticipate
every situation or condition that can occur while scootering, this Manual makes no representation about the safe use
of the scooter under all conditions.There are risks associated with the use of any scooter which cannot be predicted
or avoided and which are the sole responsibility of the rider.
1d. A SPECIAL NOTE FOR PARENTS, ADULTS AND OPERATORS OF THE ELECTRIC SCOOTER
As a parent or guardian, you are responsible for the activities and safety of your minor child. Among these responsibilities is
making sure that your child always wears a CPSC approved helmet.The responsibilities include making sure that the scooter is
properly fitted to the child; that it is in good repair and safe operating condition; that you and your child have learned and understand the safe operation of the scooter; and that you and your child have learned, understand and obey not only the applicable
local motor vehicle, scooter and traffic laws, but also the common-sense rules of safe and responsible scootering. As a parent,
you should read this manual, as well as review its warnings and the scooter’s functions and operating procedures with your child,
before letting your child ride the scooter. We have designed the electric scooter for riders age 13 and older. Check local regulations.
PAGE 3
Even if you’ve been riding a scooter all your life, you may need an updating of your scooter riding habits, knowledge and
assumptions. Why? Because scooters and the rules of safe scooter riding may have changed since the last time you thought
about it. We have tried to make this Manual interesting and instructive for all associated with the ownership of the scooter.
If you have any questions, feel you do not understand this Manual, are having any mechanical difficulties or require assistance
in assembling the scooter, please contact EWI at 1-408-270-3724 or [email protected]. In the USA, you may
call toll-free 1-888-808-4382. We’re here to assist.
WARNING: Make sure that your child or any rider always wears a CPSC approved helmet when
scootering; but also make sure that the rider understands that the helmet is for scootering only,
and must be removed when not riding.This helmet must not be worn while playing, in play areas,
on playground equipment, while climbing trees or at any time while not riding a scooter. Failure
to follow this warning could result in serious injury or death.
Some states’ laws allow electric scooters to be ridden on public streets by anyone age 16 and over, on roads with posted speed
limits of 25 mph or less. Many local laws require riders to wear approved bike helmets and obey all rules of the road. Some states
allow scooter riders access to bicycle paths and bicycle lanes. Laws vary in different regions. Check with your local law enforcement
agency regarding laws in your area. (This information is current as of this manual print date).
Riding an electric scooter can be a hazardous activity even under the best of circumstances. Proper maintenance of your electric
scooter is your responsibility as it helps reduce the risk of injury.This Manual contains many “Warnings” and “Cautions”
concerning the consequences of failure to maintain or inspect your electric scooter.
PAGE 4
2. Scooter Components
Riser Handlebar
PAGE 5
3. Charging & Assembly
Proper assembly, folding and unfolding of the scooter are essential. Always fold and unfold your scooter on a level, stable surface,
in an area which allows you plenty of room to work.
Your new scooter MUST be fully charged before its first use and after each successive use. Please read the instructions
carefully and follow them fully. Always charge your electric scooter indoors in a well-ventilated area.The charging area should
be non-flammable, dry, level, with good ventilation, and in an area that cannot be reached by children or animals. Do not place
the scooter and Charging Transformer in direct sunlight, near a heat source (water heater, furnace, fireplace, etc.), or in contact
with moisture while charging.
1. Remove your electric scooter from the shipping carton.
2. Place your electric scooter on a level, dry surface and fold the kickstand down.
PRIOR TO CHARGING
• Make sure the power cord, charging cable and charging port are in good condition.
• Do not plug the supplied transformer into AC outlets with multiple sockets while other power cords are plugged in.
• Verify that your Charging Transformer is designed for the voltage in your country.
• We highly recommend that you use only GFCI outlets, or use an adapter to convert standard outlets to GFCI.
These inexpensive adapters are available at most hardware stores.
• If you notice a strange smell, vapors or smoke coming from the Charging Transformer or Batteries, unplug the
Charging Transformer cord immediately! Take your scooter and transformer to your Dealer for service.
PAGE 6
TO CHARGE
1. Place scooter on the kickstand on a level and dry surface.
2. Connect charging cable to charging port on left side of scooter.
3. Connect power plug to a standard AC outlet.
4.Verify voltage requirements as specified on your supplied transformer.
5. RED light at the charging port – batteries are charging. (Batteries will fully charge within 5 hours.)
6. GREEN light – batteries fully charged, adjusting to trickle mode.
7. Disconnect power plug from the AC outlet. GREEN light off.
8. Disconnect the transformer cable from the charging port.
NOTE:To maximize the life of your batteries, avoid charging the batteries for more than 12 hours continuously on a regular basis.
Battery Warnings & Cautions
WARNING: Risk of electrical shock. Do not charge the batteries with the Deck Lid
removed. Do not store objects in the battery compartment.The Charging Transformer
is intended for indoor, dry location use only.
WARNING: Use only the manufacturer supplied Charging Transformer. Use of different
chargers may cause serious injury to you and may damage the batteries.
WARNING: Using your Charging Transformer on other types of batteries may cause a
fire or explosion.Charge only Cap’n Billy’s Whiz Bang batteries with the supplied transformer.
CAUTION: Do not attempt to charge Cap’n Billy’s Whiz Bang batteries in temperatures
below 32º Fahrenheit/0º Centigrade or above 110º F/40º C.
PAGE 7
READY-HINGE™ OPERATION INSTRUCTION
Reference the following instructions.
PAGE 8
ATTACHING HANDLEBAR EXTENSION TO SCOOTER
1. Slide the Stem Slot onto the Ready-Hinge Tab.
2. Slide the Ready-Hinge Cover over the Stem Slot.
3. Raise the Stem (including the Handlebar) to the upright Position.
4. Slide the Ready-Hinge Cover down over the Ready-Hinge. The Detent Lock Button will hold the Ready-Hinge Cover in place.
5. Rotate the Ready-Hinge Cover until it stops – to tighten completely.
TO FOLD THE HANDLEBAR DOWN
1. Depress only the lower Detent Lock Button.
2. Rotate the Ready-Hinge Cover completely to loosen.
3. Slide the Ready-Hinge Cover up next to the upper Detent Lock Button.
4. Fold the Handlebar down.
Using the tire pump provided, inflate the tires to a pressure within the range marked on the tire.Tires with pressure closer
to the maximum listed in the range will improve performance by giving lower rolling resistance.
Check the brakes, cables and fittings for proper connections. See Section 7,“MECHANICAL SAFETY CHECK.”
Parking the Cap’n Billy’s Whiz Bang Scooter Electric is easy and quick with its full-kickstand design, allowing the rider easy
access from either side.The full-kickstand also allows a more stable footing on difficult and uneven surfaces.
It is your responsibility to read – and to understand – this Manual. If you have even the slightest doubt as to
whether you understand something in this manual, talk to your Dealer or contact EWI at 1-408-270-3724 or
[email protected].
In the USA, you may call toll-free 1-888-808-4382.
PAGE 9
4. Operator Fit
Make sure you fit your electric scooter.
WARNING: If you are under 4 feet tall or weigh more than 250 lbs., this scooter does not fit you and you may lose
control and fall. If this scooter doesn’t fit you, do not ride it.A rider who is either too small or too heavy will find it more
difficult to control the scooter and the scooter can be dangerous to ride. If someone else selected the scooter for you,
it’s important for you to make sure that it fits you before you ride it. If you have any questions or concerns, contact your
nearest Dealer.Adjustable Fit – Handlebar height adjusts from 34" – 40" to fit most riders over 4 feet tall. Most riders
will find the fit comfortable with the handlebar adjusted to approximately hip height when standing on the scooter deck.
HEIGHT ADJUST QUICK RELEASE
Your Cap’n Billy’s Whiz Bang Scooter Electric is equipped with a convenient Height Adjust Quick Release mechanism.
Loosen the Quick Release lever to adjust the handlebar height, and then tighten as described on the following page. While
a quick release looks like a long bolt with a lever on one end and a nut on the other, the quick release uses a cam-action to
firmly clamp the height adjustable stem in position. (Figure 4)
Figure 4
PAGE 10
WARNING: Riding with an improperly tightened handlebar or stem can allow the handlebar to turn
or move and cause you to lose control and fall.
THEREFORE:
1. Before you ride the scooter, check that the handlebar and stem are securely clamped.
2. Understand and apply the correct technique for clamping your Height Adjust Quick Release.
Otherwise, ask your Dealer or contact EWI at 1-408-270-3724 or [email protected].
USING THE HEIGHT ADJUST QUICK RELEASE MECHANISM
The action of the Quick Release cam squeezes a collar to hold the stem securely in place.The tension-adjusting nut controls
the amount of clamping force.Turning the tension-adjusting nut clockwise, while keeping the cam lever from rotating, increases
clamping force; turning it counterclockwise while keeping the cam lever from rotating reduces clamping force. Less than half
a turn of the tension-adjusting nut can make the difference between safe and unsafe clamping force.
WARNING:The full force of the cam action is needed to clamp the stem securely.You can not
clamp the stem safely by holding the nut with one hand and turning the lever like a wing nut
with the other hand until everything is as tight as you can get it.
WARNING: If you can fully close the Quick Release without wrapping your fingers around the
stem extension tube for leverage, and the lever does not leave a clear imprint in the palm of your
hand, the tension is insufficient. Open the lever; turn the tension-adjusting nut clockwise a quarter
turn; then try again.
PAGE 11
CHANGING THE HANDLEBAR POSITION
You can change the height of the handlebar by opening the Quick Release lever and pushing down or pulling up on the
handlebar. Once the handlebar is at the desired height, simply tighten the lever as described above.
You can change the angle of the handlebar by loosening the handlebar stem binder bolt(s), rotating the bar to the desired angle,
re-centering it and re-tightening the binder bolt(s) tight enough so that the handlebar can't rotate inside the stem clamp. Do not
rotate the handlebar more that 25 degrees. Doing so will pull the cables too tight and impair brake function.
See Torque Specifications in Section 11,“Specifications.”
WARNING:After any handlebar adjustment, make sure that the adjusting mechanisms are properly
tightened before riding.A loose handlebar can cause damage to the bar and stem, or can cause you to
lose control and fall. Correctly tightened handlebar stem binder bolts will not allow any movement of
the handlebar inside the stem. Routinely check to make sure that the Height Adjust Quick Release and
stem binder bolts are properly tightened. Before riding, push down and pull up on the handlebar to verify
that the quick release mechanism is tight.
WARNING:The handlebar stem’s Minimum Insertion Mark must not be visible above the top of the
Height Adjust Quick Release. If the stem is extended beyond the Minimum Insertion Mark, the stem may
break or damage the handlebar stem extension tube, which could cause you to lose control and fall.
MAINTAINING HEADSET ADJUSTMENT
The Headset bearings, which allow a person to turn the fork to steer, may come out of adjustment over time. Well-adjusted
bearings allow the fork to turn freely without strong resistance.The bearings must not have any free play.The headset locknut,
located at the top of the headset, should not be loose enough to allow turning by hand.
WARNING: Improperly adjusted headsets and headsets with loose locknuts can cause a loss of control and
you may fall. Do not adjust the headset yourself. Immediately take your scooter to your Dealer or a bicycle
store for service.
PAGE 12
5. Riding Instructions
IMPORTANT NOTICE:
Your scooter is designed with a safety push-to-start feature.To prevent false starts, you must manually push-off to a
speed of about 3 mph before the throttle will power the scooter.The Thumb-Action Speed Control activates the motor
only when the scooter is in motion.
• Place both hands on the handlebar and push the scooter forward to release the kickstand.
• Lightly press the Thumb-Action Speed Control located on the right side of the handlebar.
• Place one foot near the center of the deck. Push off from the ground with the other foot to a speed of about 3 miles per hour.
The speed control will activate the motor only when the scooter is in motion.
• Place your other foot on the deck.
• To slow down, reduce your thumb pressure on the Thumb-Action Speed Control, or release it completely.
• To stop, remove your thumb from the throttle and squeeze both brake levers.
See Section 8C,“Brakes,” for more information about using the hand brakes.
PAGE 13
6. Safety Equipment & Safe Riding
A. SAFETY EQUIPMENT
WARNING: Many states and localities require specific safety features and devices. It is your
responsibility to familiarize yourself with the laws where you ride and to comply with all
applicable laws, including properly equipping yourself and your scooter as the law requires.
WARNING: Make sure that your child or any rider always wears a CPSC approved helmet when
scootering; but also make sure that the rider understands that the helmet is for scootering only,
and must be removed when not riding.This helmet must not be worn while playing, in play areas,
on playground equipment, while climbing trees or at any time while not riding a scooter. Failure
to follow this warning could result in serious injury or death.
B. NIGHT RIDING
Your electric scooter is not equipped with lights.
THEREFORE,THE SCOOTER SHOULD NEVER BE RIDDEN AT DAWN, AT DUSK OR AT NIGHT.
WARNING: Do not remove the front or rear reflectors or reflector brackets from your scooter.
Removing the reflectors may reduce your visibility to others using the roadway. Being struck by
other vehicles may result in serious injury or death. Check reflectors and their mounting brackets
regularly to make sure that they are clean, straight, unbroken and securely mounted. Have your
Dealer replace damaged reflectors and straighten or tighten any that are bent or loose.
PAGE 14
C. WET WEATHER RIDING
CAUTION:Wet weather impairs traction, braking and visibility, both for the scooter rider and for other
vehicles sharing the road.The risk of accident is dramatically increased in wet conditions. AVOID RIDING IN WET WEATHER WHENEVER POSSIBLE.
Under wet conditions, the stopping power of your brakes (as well as the brakes of other vehicles sharing the road) is dramatically
reduced and your tires don't grip nearly as well.This makes it harder to control speed and easier to lose control.To make sure
that you can slow down and stop safely in wet conditions, ride more slowly and apply your brakes earlier and more gradually
than you would under normal, dry conditions.
CAUTION: Like any sport, riding a scooter involves risk of injury and damage. By choosing to ride
scooter, you assume the responsibility for that risk. By riding this scooter you accept the legal
responsibility associated with personal injury and property damage.
WARNING: It is recommended (and your local law may require it) that the vehicle operator wear
a helmet, kneepads, elbow pads and wrist guards when riding this vehicle.
IMPORTANT REMINDER:Your scooter is designed with a safety push-to-start feature.To prevent
false starts, you must manually push-off to a speed of about 3 mph before the throttle will power
the scooter.The Thumb-Action Speed Control activates the motor only when the scooter is in motion.
PAGE 15
D. RIDING SAFELY & RESPONSIBLY
1. Always perform a Mechanical Safety Check before you get on any scooter.
2. Be thoroughly familiar with the controls of the scooter you are going to ride.
3. Be careful to keep body parts and other objects away from wheels and other moving parts.
4. Always wear a helmet that meets the latest CPSC standard.
5. Always wear shoes that will stay on your feet and will grip the Scooter Deck.
6. Never ride barefoot or wearing sandals.
7. Wear bright, visible clothing that is not so loose that it can catch on the scooter moving parts.
8.To prevent false starts, you must manually push-off to a speed of about 3 mph before the throttle will
power the scooter.
WARNING:This scooter was not designed for jumping. Don't jump with your scooter. Riders who
insist on jumping their scooters risk serious damage, to their scooters as well as to themselves
and others. Using your scooter for jumping will void the Warranty.
E. RULES OF THE ROAD
1. Learn the local scooter laws and regulations. Many communities have specific regulations about licensing of scooters, riding
on sidewalks, laws regulating bike path and trail use and so on. Many states have helmet laws and special scooter traffic laws.
In the USA and in most foreign countries, a scooter rider is required to obey the same traffic laws as the driver of a car or
motorcycle. It's your responsibility to know and obey these laws.
2.You are sharing the road or the path with others – motorists, pedestrians and others on scooters and bicycles. Respect their
rights and be tolerant if they infringe on yours.
3. Ride defensively. Assume that the people with whom you are sharing the road are unaware of your presence.
PAGE 16
4. Look ahead to where you’re going, and be ready to avoid
• Vehicles slowing or turning in front of you, entering the road or your lane ahead of you, or coming up behind.
• Parked car doors opening in front of you.
• Pedestrians stepping in front of you.
• Children playing near the road.
• Pot holes, sewer gratings, railroad tracks, expansion joints, road or sidewalk construction, debris and other obstructions that could cause
you to swerve into traffic, catch your wheel or otherwise cause you to lose control and have an accident.
• Other hazards and distractions which can occur at any time on a scooter ride. Be alert and ride defensively.
5. If your local laws allow the riding of a scooter on a public road
• Ride in designated bike lanes or on the right side of the road.
• Ride on designated bike paths.
• Ride in the same direction as car traffic.
• Stay as close to the edge of the road as possible.
• Stop at stop signs and obey traffic lights.
• Slow down and look both ways at street intersections.
• Remember that a scooter has no protection in a collision with a motor vehicle, so be prepared to yield even if you have the right of way.
• Learn the local vehicle code for the correct hand signals.
6. Never ride while wearing headphones or while operating hand-held devices.They mask traffic sounds and emergency vehicle
sirens, distract you from concentrating on what's going on around you, and their wires can tangle in the moving parts of the
scooter, causing you to lose control.
7. Never carry a passenger.This scooter is designed for one person only.
8. Never carry anything which obstructs your vision or your complete control of the scooter, or which could become entangled
in the moving parts of the scooter.
PAGE 17
9. Never hitch a ride by holding onto another vehicle.
10. Do not tow or pull the scooter behind any vehicle, bicycle or pedestrian.
11. Do not use this scooter to pull or tow anything.
12. Do not do stunts, wheelies or jumps.They can cause you injury and damage your scooter.
13. Do not weave through traffic or make any moves that may surprise people with whom you are sharing the road.
14. Observe and yield the right of way.
15. Never ride your scooter while under the influence of alcohol or drugs.
16. Avoid riding in bad weather, when visibility is obscured, at dusk or in the dark, or when extremely tired. Each of these
conditions increases the risk of an accident.
17.This scooter is designed to be ridden on smooth, hard, dry, flat surfaces.
WARNING: A crash can put extraordinary stress on scooter components, causing them to fatigue
prematurely. Components suffering from stress fatigue can fail suddenly and catastrophically,
causing loss of control and serious injury.
CAUTION: If you have any doubt about the condition of the scooter or any of its parts, take it
to your Dealer for a thorough check.
PAGE 18
7. Mechanical Safety Check
Here is a simple, mechanical safety check that you should get in the habit of doing every time you’re about to get on your scooter.
NUTS, BOLTS & STRAPS:
• Lift the front wheel off the ground by two or three inches, and then let it bounce on the ground. Does anything sound, feel or look loose?
• Do a visual and tactile inspection of the whole scooter. Are there any loose parts or accessories? If so, secure them.
See Torque Specifications, Section 11, “Specifications.”
If you're not sure, ask someone with scooter experience to check.
BRAKES: (SEE SECTION 8C,“BRAKES,” FOR DETAILED INFORMATION)
Check the brakes for proper operation. Squeeze the brake levers.
• Are all the cables seated and securely engaged?
• Are the front brake pads correctly aligned with the rim?
• Do the front brake pads touch the rim within 1/2 inch of brake lever movement?
• Can you apply full braking force at the levers without having them touch the handlebar?
If you are unsure, or if you suspect the brake pads are worn or adjustments are required, do not ride the scooter until you have your
scooter inspected at a qualified shop.
TIRES & WHEELS: (SEE SECTIONS 8D, E & F FOR DETAILED INFORMATION)
• Are the tires correctly inflated? Check by standing on the deck, then bouncing your weight on the scooter while looking at tire deflection. Compare what
you see with how it looks when you know the tires are correctly inflated; and adjust if necessary.
• Are the tires in good shape? Spin each wheel slowly and look for cuts in the tread and sidewall. Replace damaged tires before riding the scooter.
• Are the wheels true? Spin each wheel and check for brake clearance and side-to-side wobble. Have a qualified shop replace any broken spokes before
riding. If a wheel wobbles side to side or hits the brake pads, take the scooter to a qualified shop to have the wheel inspected.
• Are the front and rear wheels straight and secure in the dropouts? If not, re-align them.
• Are the wheel nuts properly tightened? If not, tighten them. See Torque Specifications, Section 11,“Specifications.”
If not, do not ride until they are inflated, properly secured or repaired.
PAGE 19
HANDLEBAR:
To allow for a maximum safe turning radius, make sure that the cables are installed and secured correctly. Allow sufficient
lengths between the handlebar and the connection points at the brakes and the deck. Make sure that the cables are secured closely to the frame by using the supplied cable clamps/ties.The cables must not droop or remain under tension.They must not impede
you while riding, or touch any moving parts of the scooter. If any cable appears to be damaged, it must be replaced and properly
installed before you ride.
HANDLEBAR END CAPS:
• Are the handlebar grips and end caps secure and in good condition?
• Are the handlebar end caps protecting the handlebar ends properly? If not, replace the handlebar grips and end caps before you ride.
HEIGHT ADJUST QUICK RELEASE:
Make sure Height Adjust Quick Release is properly adjusted and in the locked position.
See Section 4,“Operator Fit.”
FOLDING HANDLEBAR STEM SLEEVE:
Make sure the Ready-Hinge cover is positioned below the lower Detent Lock Button and fully tightened. If not, tighten it.
See Section 3, “Assembly.”
HANDLEBAR ALIGNMENT:
Make sure the handlebar stem is clamped tight enough so that you can’t twist it out of alignment. If not, align and tighten it.
See Section 4,“Operator Fit.”
HEADSET ADJUSTMENT:
• Will the fork turn freely without strong resistance?
• Can you turn the headset locknut, located at the top of the headset, by hand?
• When you apply the front brake and attempt to move the scooter back and forth, is there any free play?
• If you are unsure or if you suspect adjustments are required, do not ride the scooter until you have your scooter inspected at a qualified shop.
PAGE 20
WARNING: Improperly adjusted headsets and headsets with loose locknuts can cause a loss of
control and you may fall. Do not adjust the headset yourself. Immediately take your scooter to
your dealer or a bicycle store for service.
WARNING: Riding with an improperly tightened handlebar or stem can allow the handlebar to
turn or move and cause you to lose control and fall.
Therefore:
1. Before you ride the scooter, check that the handlebar and stem are securely clamped.
2. Understand and apply the correct technique for clamping your Height Adjust Quick Release.
Otherwise, ask your Dealer or contact us.
WARNING: Riding with improperly adjusted and secured brakes or worn brake shoes is dangerous
and can result in serious injury.
WARNING: Riding with improperly installed or insufficiently tightened wheels can cause the
wheels to wobble or disengage from the scooter, which can cause damage to the scooter and
serious injury.
WARNING: Loose or damaged handlebar grips can cause you to lose control and fall. Handlebar
without the end caps properly installed and secured can cut like a knife-edge and can cause
serious injury in an otherwise minor accident. Replace loose, damaged or missing handlebar
grips and end caps before you ride.
WARNING:The front wheel must be true for the brake to work effectively.Wheel truing is a skill
that requires special tools and experience. Do not attempt to true a wheel unless you have the
knowledge, experience and tools needed to do the job correctly.
PAGE 21
8. Use & Mechanical Adjustment
A. FOLDING HANDLEBAR STEM SLEEVE
Your scooter is equipped with a folding handlebar stem for easy storage and transportation. Be sure that you understand how to
secure your scooter’s folding handlebar stem. Review the instructions and drawings which follow:
TO FOLD THE HANDLEBAR DOWN:
1. Depress the lower Detent Lock Button.
2. Rotate the Ready-Hinge Cover
completely to loosen.
3. Slide the Ready-Hinge Cover up next
to the upper Detent Lock Button.
4. Fold the Handlebar down until
they stop above the deck.
TO FOLD THE HANDLEBAR UP:
1. Raise the Stem (including the
Handlebar) to the upright Position.
2. Slide the Ready-Hinge Cover down over
the Ready-Hinge.
3. Rotate the Ready-Hinge Cover until it
stops – to tighten completely.
PAGE 22
B. HANDLEBAR HEIGHT ADJUSTMENT
Adjustable Fit – Handlebar height adjusts from 34" – 40" to fit most riders over 4 feet tall. Most riders will find the fit
comfortable with the handlebar height in the range of the rider’s hips when standing on the scooter deck.
HEIGHT ADJUST QUICK RELEASE
Your scooter is equipped with a Height Adjust Quick Release that allows you to quickly change the height of your handlebar.
See Section 4,“Operator Fit,” for details.
C. BRAKES
Your scooter is equipped with front and rear brakes. Be sure that you understand how your scooter’s brakes work before you take
your first ride. Reading and understanding the information below will assist you.
WARNING: Sudden or excessive application of the front brake may throw the rider over the handlebar,
causing serious injury. For the most effective braking, use both brakes and apply them at the same time.
1. HOW THE BRAKES WORK
It’s important for your safety that you instinctively know which brake lever controls which brake on your scooter. On your
scooter, the right brake lever controls the rear brake, and the left brake lever controls the front brake.
The braking action of a scooter is a function of the friction between the brake surfaces – usually the brake shoes to the wheel
rim or a band brake to a wheel/hub assembly. Regardless, you need to make sure that you have maximum friction available.
Keep your wheel rims and brake shoes clean and free of lubricants, waxes or polishes.
Make sure that your hands can reach and squeeze the brake levers comfortably. If your hands are too small to operate the
levers comfortably, do not ride the scooter.
Brakes are designed to control your speed, not just to stop the scooter. Maximum braking force for each wheel occurs at the
point just before the wheel “locks up” (stops rotating) and starts to skid. Once the tire skids, you actually lose most of your
stopping force and all directional control.You need to practice slowing and stopping smoothly without locking up a wheel.
PAGE 23
The technique is called progressive brake modulation. Instead of jerking the brake lever to the position where you think
you'll generate appropriate braking force, squeeze the lever, smoothly increasing the braking force. If you feel the wheel begin
to lock up, release brake lever pressure just a little to keep the wheel rotating just short of lock-up. It's important to develop
a feel for the amount of brake lever pressure required for each wheel at different speeds and on different surfaces.To better
understand this, experiment a little by walking your scooter and applying different amounts of pressure to each brake lever,
until the wheel locks.
When you apply one or both brakes, the scooter begins to slow, but your body wants to continue at the speed at which it was
going.This causes a transfer of weight to the front wheel (or, under heavy braking, around the front wheel hub), which could
send you over the handlebar.
A wheel with more weight on it will accept greater brake pressure before lock-up; a wheel with less weight will lock up
with less brake pressure. So, as you apply brakes and your weight shifts forward, you need to shift your body toward the
rear of the scooter, to transfer weight back onto the rear wheel. At the same time, you need to both decrease rear braking
and increase front braking force.This is even more important on steep hills, because descents shift rider weight forward.
The keys to effective speed control and safe stopping are controlling wheel lock-up and weight transfer. Practice braking
and weight transfer techniques where there is no traffic or other hazards and distractions.
Everything changes when you ride on loose surfaces or in wet weather.Tire adhesion is reduced, so the wheels have
less cornering and braking traction and can lock up with less brake force. Moisture or dirt on the brakes reduces their
ability to grip.
The way to maintain control on loose or wet surfaces is to begin cautiously and travel more slowly.
PAGE 24
CAUTION: Before each ride, make sure that the brakes are working properly. If they are not working properly,
have the scooter checked by your Dealer before you ride it.
2. ADJUSTING YOUR BRAKES
BRAKE CABLE FREE PLAY ADJUSTMENT (REAR BAND BRAKE)
If the right brake lever fails the mechanical safety check, restore brake
lever travel by adjusting the brake lever free play as described below. (Figure 8-A)
1. Pull the brake lever to simulate a panic stop, and then release the brake lever.
Repeat this at least ten times.This assures that all components are properly seated.
2. Pull the brake lever until it stops.
3.The amount of lever travel from A to B should be 15 mm / 1/2 in. to begin
brake band movement.
4. Loosen the adjuster locknut, and turn the barrel adjuster as necessary to
adjust clearance to within specification.Turning the adjuster out tightens the
inner wire; turning the adjuster in loosens the wire.When the brake lever is
within specification, tighten the adjuster locknut.
Figure 8-A
WARNING: Brake cable length will need to be adjusted once the barrel adjuster’s travel is fully used.
See your Dealer or a bicycle dealer for this service. If the brake lever still fails your Mechanical Safety
Check, (See Section 7,“Mechanical Safety Check”) have your Dealer or a bicycle dealer check the
brakes before riding again.
PAGE 25
BRAKE CABLE FREE PLAY ADJUSTMENT (FRONT V-BRAKE)
If the left brake lever fails the mechanical safety check, restore
brake lever travel by adjusting the brake lever free play as described below.
Warning: If the lever still fails your
Mechanical Safety Check, have your
Dealer check the brakes.
1. Pull the brake lever to simulate a panic stop, and then release
the brake lever. Repeat this at least ten times.This assures that
all components are properly seated.
2. Pull the brake lever until the brake pads just touch the rim.
(Figure 8-B)
3.The amount of lever travel from A to B should be 15 mm / 1/2 in.
to begin brake pad movement. (Figure 8-B)
4. Loosen the adjuster locknut (Figure 8-B), and turn the barrel adjuster
as necessary to adjust clearance to within specification. (Turning the
adjuster out tightens the inner wire; turning the adjuster in loosens
the wire.) When the brake lever is within specification, tighten the
adjuster locknut.
Figure 8-B
5. Squeeze the caliper arms together (Figure 8-C), and remove the cable
guide from the bracket on the left caliper arm.The brake lever free
play is properly adjusted if the cable guide can be easily removed
from the bracket.
6. If you cannot easily release the cable guide from the bracket,
perform the following:
a.Turn the adjusting barrel, at the brake lever, in (clockwise)
one full turn.Try to remove the cable guide again.
b. If you still cannot release the cable guide, turn the adjusting
barrel clockwise an additional turn.
c. If the cable guide still does not release, loosen the pinch bolt
(Figure 8-C) and release 2-3 mm (0.079 – 0.118 in.)
of inner wire from the pinch bolt mechanism.
d.Tighten the pinch bolt.
e. Repeat the adjusting procedure.
PAGE 26
Figure 8-C
Figure 8-D
Front Fork
Index Hole
Retension Washer
Axle Nut
D. FRONT WHEEL
1. FRONT WHEEL RETENTION DEVICE
The front fork of your scooter utilizes a wheel retention washer that indexes into the fork.This keeps the wheel from
disengaging if the axle nuts are insufficiently tightened. See Torque Specifications, Section 11, “Specifications.”
CAUTION:The retention washers are not a substitute for correct wheel installation. Failure to
properly tighten the axle nuts can allow the wheels to wobble or disengage, which could cause
you to lose control and fall, causing serious injury.
CAUTION: Removing or disabling the retention device is extremely dangerous and may lead to
serious injury. Do not remove this device. If removed, the warranty is void.
PAGE 27
2. REMOVING THE BOLT-ON FRONT WHEEL
A. Open the front brake:The brake pads of the V-style brakes can
be quickly opened so the pads can clear the tire when the wheel
is removed or installed. To open the front brake pads, squeeze
the caliper arms together (Figure 8-E), and remove the cable
guide from the bracket on the left caliper arm.
B. With a 15-mm box wrench or a six inch adjustable wrench,
loosen the two axle nuts.
C. Disengage the retention washers.
D. Raise the front wheel a few inches off the ground and tap
the top of the wheel with the palm of your hand to knock the
wheel out of the fork ends.
3. INSTALLING THE BOLT-ON FRONT WHEEL
A. With the steering fork facing forward, insert the wheel between
the fork blades so that the wheel axle seats firmly at the top
of the slots. Install the axle retention washer, then hand-tighten
the axle nuts. Assemble both sides in this method.
(See Figure 8-D)
B. While pushing the wheel firmly to the top of the slots in the fork dropouts, and at the same time centering
the wheel rim in the fork, use a 15 mm box wrench or six inch adjustable wrench to tighten the axle nuts securely.
See Torque Specifications, Section 11, “Specifications.”
C. Once the wheel is reinstalled, close the brake pads by performing the following:
1. Squeeze the caliper arms together (Figure 8-E).
2. Connect the cable guide to the bracket on the left caliper arm (Figure 8-E).
3. Test brake functionality before riding the scooter.
PAGE 28
Figure 8-E
E. REAR WHEEL,TIRE,TUBE & DRIVE BELT REPLACEMENT
Drive belts, tires and tubes may fail after time.
Replacement parts may be available from your Dealer,
or can be ordered from EWI at 1-408-270-3724 or
www.eletricwheelsintl.com. In the USA, you may
call toll-free 1-888-808-4382.
Figure 8-G
Figure 8-F
Check the drive belt tension frequently and keep it
adjusted so that the belt cannot be easily deflected
more that 1/8" up or down. Excessive tension or
incorrect alignment can cause rapid belt wear
and reduce performance.
1. Place the scooter upside down on a sturdy surface,
using cloth or cardboard to protect the scooter from
scratches. Be sure the scooter is stable and does not
rock. (Figure 8-F)
2. Remove the Rear Wheel Covers by inserting a flat
blade screwdriver between the Mount Tabs and rear
dropout Tab Slots. Remove the rear wheel Axle Nuts
and Retainer Washers. (Figure 8-G)
3. Loosen the 4 Motor Mount Bolts and slide the motor
towards the rear. Slip the drive belt off the Motor
Drive Pulley. (Figure 8-F)
4. Remove the Rear Brake Mount Screw. (Figure 8-H)
5. Lift the rear wheel out of the rear dropouts. (Figure 8-I)
6. Remove the old drive belt. See (Figure 8-J) for tire/tube replacement.
7. Install a new belt around the Wheel Gear. Replace the wheel into the Rear Dropouts. Slip the new drive belt off the wheel gear. Place the
belt over the Motor Drive Pulley. Install the belt around the wheel gear. It may be necessary to rotate the wheel to ease in this installation.
8. Install the rear wheel Retainer Washers and Axle Nuts. (Figure 8-G) Tighten Axle Nuts. See Torque Specifications, Section 11, “Specifications.”
PAGE 29
9. Install the Rear Brake Mount Screw. (Figure 8-H)
10. Slide the motor forward by placing a flat blade
screwdriver into the Belt Adjustment Slot. Pull the
screwdriver towards the rear tire. The belt should
be tight with +/-1/8" play. While holding the belt in
tension, secure the 4 Motor Mount Bolts.
(Figure 8-F & Figure 8-J).
Figure 8-H
Figure 8-I
11. Replace the rear wheel covers by pressing the
mount tabs into the tab slots in the rear dropouts.
(Figure 8-G)
12. Test Rear Brake functionality before riding scooter.
TIRE AND/OR TUBE REPLACEMENT
To replace the tire or tube, follow
steps 1 through 6 above, then:
1. Remove the Rear Brake Retainer Nut with a 17mm
box wrench.
2. Holding brake housing, unthread wheel from brake.
3. Replace tire and/or tube with the same size and
specification parts.
4. Reattach the rear brake housing to the rear wheel.
5. Replace the Rear Brake Retainer Nut. See Torque Specifications, Section 11, “Specifications.”
6. Assemble the rear wheel assembly following steps 7 through 12 above.
F. TIRES AND TUBES
Your scooter has been equipped with tires that the scooter’s manufacturer believes are the best balance of performance and value
for the use for which the scooter is intended. If a tire needs replacing for any reason, contact your Dealer or EWI for a genuine
replacement tire, at 1-408-270-3724 or [email protected]. In the USA, you may call toll-free 1-888-808-4382.
PAGE 30
Figure 8-J
A Scooter Tire Pump is supplied – The best way
to inflate a scooter tire to the correct pressure
is with the scooter tire pump supplied with
your scooter.
For the best performance, set tire pressure at
or near the maximum recommended pressure
indicated on the tire sidewall.
The valve is just like the valve on a car tire.To inflate
the tire, remove the valve cap and push the air hose
or pump fitting onto the end of the valve stem.To let
air out of a valve, press the pin in the end of the valve
stem with the end of a key or other appropriate object.
Motor Drive Pulley
CAUTION: Never inflate a tire beyond the maximum pressure marked on the tire’s sidewall.
Exceeding the maximum recommended pressure may blow the tire off the rim, which could cause
damage to the scooter and injury to the rider and bystanders.
CAUTION: Gas station air hoses move a large volume of air very rapidly and will raise the pressure
in your tire very rapidly.To avoid over-inflation when using a gas station air hose, put air into your
tire in short, spaced bursts.
CAUTION: Riding your scooter with a flat or under inflated tire can seriously damage the tire,
tube and scooter, and cause you to lose control and fall.
CAUTION: Gas station air hose pressure gauges are often inaccurate and should not be depended
on for consistent, accurate pressure. Instead, use a good quality pencil or dial gauge.
PAGE 31
9. Battery Maintenance
Generally, the batteries can be recharged up to 300–350 times with a life of approximately two years. Proper care of your
batteries will help you maximize battery life and capacity.
IMPORTANT: To maximize the life and performance of your scooter batteries, fully charge them immediately after each use.
If your scooter is not used for prolonged periods of time, charge them at least every 90 days.
CARING FOR THE CHARGING TRANSFORMER:
• This Charging Transformer is designed for indoor use with proper ventilation only.
• Do not subject the Transformer to vibration or shock.
• Do not use an electrical plug or outlet that has become wet or moist.
• Store the Transformer in an area with a normal temperature of 60-85º (Fahrenheit), ~15-30º (Centigrade), with a humidity of 10% to 70%.
If you require technical assistance or have questions, please contact your Dealer or contact EWI at 1-408-270-3724 or
[email protected]. In the USA, you may call toll-free 1-888-808-4382.
Always charge your scooter indoors in a well-ventilated area.The charging area should be non-flammable, dry, level, with good
ventilation, and in an area that cannot be reached by children or animals. Do not place the scooter and Charging Transformer in
direct sunlight, near a heat source (water heater, furnace, fireplace, etc.), or in contact with moisture while charging.
A. PRIOR TO CHARGING
• Make sure the power cord, charging cable and charging port are in good condition.
• Do not plug into outlets with multiple sockets while other power cords are plugged in.
• Verify that your Charging Transformer is designed for the AC voltage in your country.
• We highly recommend that you use only GFCI outlets, or use an adapter to convert
standard outlets to GFCI.These inexpensive adapters are available at most hardware stores.
• If you notice a strange smell, vapors or smoke coming from the Charging Transformer or Batteries,
unplug the Charging Transformer cord immediately! Take your scooter and transformer to your Dealer for service.
PAGE 32
B. TO CHARGE
1. Place scooter on the kickstand on a level and dry surface.
2. Connect charging cable to charging port on left side of scooter.
3. Connect power plug to a standard AC outlet.
4.Verify voltage requirements as specified on your supplied transformer.
5. RED light at the charging port – batteries are charging. (Batteries will fully charge within 5 hours.)
6. GREEN light – batteries fully charged, adjusting to trickle mode.
7. Disconnect power plug from the AC outlet. GREEN light off.
8. Disconnect the transformer cable from the charging port.
NOTE:To maximize the life of your batteries, avoid charging the batteries for more than 12 hours continuously on a regular basis.
C. BATTERY WARNINGS & CAUTIONS
WARNING: Risk of electrical shock. Do not charge the batteries with the Deck Lid
removed. Do not store objects in the battery compartment.The Charging Transformer
is intended for indoor, dry location use only.
WARNING: Use only the manufacturer supplied Transformer. Use of different chargers may
cause serious injury to you and may damage the batteries. Charge only Cap’n Billy’s Whiz Bang
Batteries with the supplied Transformer. Using your transformer on other types of batteries
may cause fire or explosion.
CAUTION: Do not attempt to charge Cap’n Billy’s Whiz Bang batteries in temperatures below
32º F/0º C or above 110º F/40º C.
PAGE 33
D. BATTERY REPLACEMENT
To replace the batteries, unscrew the Deck Lid D-Ring Fastener located on top of the deck lid by turning it counterclockwise until
the fastener becomes disengaged from the Deck. Pull the D-Ring up and the Lid towards the rear of the scooter.This will disengage
the Lid from the Indexing Slot in the Deck.To reinstall the Lid, reverse the process. Make sure that the Lid is positioned securely
into the Indexing Slot and that the D-Ring is screwed down tightly.
See the complete instructions supplied with your Genuine ETC Replacement Batteries.
ALWAYS RECYCLE OR DISPOSE OF BATTERIES PROPERLY.
Warning: Batteries have Explosive gases – keep away from heat, flames and sparks.
Provide adequate ventilation during charging.
• To extend the life of your batteries, fully charge after each use.
• Always insert the charging plug of the Charging Transformer into the charging socket (located on the left side
of the scooter deck) BEFORE connecting the Transformer to the supply power source. Plug the Transformer into
a grounded outlet only.
• Recharge the batteries only with the Charging Transformer supplied.
• If you replace the batteries, be sure that the new replacements are ETC Genuine Replacement Batteries ONLY.
• If the Scooter is to be disposed of, please remove and recycle the batteries.
PAGE 34
10. Service And Maintenance
NOTE: In order to minimize the chances of an accident and possible injury, it is critical that you have any repair or maintenance
which is not specifically described in this manual performed by your Dealer.
Equally important is that your individual maintenance requirements will be determined by everything from your riding style
to geographic location and the weather. Consult your Dealer for help in determining your maintenance requirements.
How much of your scooter's service and maintenance you can do yourself depends on your level of skill and experience,
and on whether you have the special tools required.
CAUTION: Many scooter service and repair tasks require special training, skill, knowledge and tools.
Do not begin any adjustments or service on your scooter unless you know that you can properly complete
them. Improper adjustment or service may result in damage to the scooter or in an accident that can cause
serious injury. Prior to any repair work being performed on the scooter, the Charging Transformer must be
disconnected (unplugged).
IF YOU WANT TO LEARN HOW TO DO MAJOR SERVICE AND REPAIR WORK ON YOUR SCOOTER,YOU HAVE THREE OPTIONS:
1. Ask your Dealer whether copies of the manufacturer's installation and service instructions for the components on your scooter are available.
2. Ask your Dealer to recommend a book on scooter repair.
3. Ask your Dealer about the availability of scooter repair courses in your area. Regardless of which option you select, it is your
responsibility to make sure that the work is performed correctly.We recommend that you ask your Dealer to check the quality of
your work the first time you work on a scooter and before you ride the scooter, just to make sure that you did everything correctly.
As that may require the time of a scooter mechanic, there may be a modest charge for this service.
After every 25 (hard use) to 50 (average) hours of riding, take your scooter to your Dealer for a checkup.
PAGE 35
A. SERVICE & MAINTENANCE SCHEDULE
The scooter owner can and should perform some service and maintenance, which require no special tools or knowledge
beyond what is presented in this Manual.The following are examples of the types of service you should perform yourself.
All other service, maintenance and repair should be performed in a properly equipped facility by a qualified scooter
mechanic using the correct tools and procedures specified by the manufacturer. Please contact your Dealer.
1. Break-in Period: Your scooter will last longer and perform better if you break it in before riding it on a consistent basis. Control cables
may stretch or “seat” when a new scooter is first used and may require readjustment by your Dealer. Your Mechanical Safety Check
will help you identify things that need readjustment. But even if everything seems fine to you, it's best to take your scooter back to the
Dealer for a checkup. Dealers typically suggest you bring the scooter in for a 30 day checkup. Another way to judge when it's time for
the first checkup is to bring the scooter in after 10 hours of use. But if you think something is wrong with the scooter, take it to your
Dealer before riding it again.
2. Before Every Ride: Perform your Mechanical Safety Check. See Section 7, “Mechanical Safety Check.”
3. After the Scooter has been exposed to water or grit, or at least every 50 miles: clean the scooter and perform your Mechanical
Safety Check. Talk to your Dealer about the best lubricants and the recommended lubrication frequency suggested for your climate.
4. Cleaning: The components must NEVER be cleaned with a steam jet cleaner, water-jet cleaner, water hose or any system which would
allow water to penetrate the electrical components, thus leading to short circuits, damages and corrosion. Clean with a damp cloth.
Do not use strong cleaning solutions or solvents.
5. After 10 (hard use) to 20 (average) hours of accumulated riding: Hold the front wheel firmly between your feet and rock the scooter
forward and back. Does everything feel solid? If you feel a clunk with each forward or backward movement of the scooter, you probably
have a loose headset. Have your Dealer check it.
• Lift the front wheel off the ground and swing it from side to side. Does it feel smooth? If you feel any binding or roughness in
the steering, your headset may be too tight. Have your Dealer check it.
• Check the frame, particularly in the area around all tube joints and handlebar for any deep scratches, cracks or discoloration.
These may be signs of stress-caused fatigue, indicating that a part is at the end of its useful life and needs to be replaced.
• Check to make sure that all parts and accessories are secure, and tighten any which are loose.
See Torque Specifications, Section 11,“Specifications.”
CAUTION: Like any mechanical device, a scooter and its components are subject to wear and stress. Different
materials and mechanisms wear or fatigue from stress at different rates and have different life cycles. If a
component's life cycle is exceeded, the component can suddenly and catastrophically fail, causing serious
injury to the rider. Some scratches, cracks and discoloration may be signs of stress-caused fatigue, indicating
that a part is at the end of its useful life and needs to be replaced.
PAGE 36
11. Specifications
Model:
Drive:
Brakes:
Batteries:
Electronic Control:
Safety Start:
Maximum Speed:
Charging Transformer:
Full Recharge:
Thumb-Action Speed Control:
Operating Temperature:
Weight:
Dimensions:
Cap’n Billy’s Whiz Bang
Belt
V-style front, 80 mm band brake rear. Levers have safety power cutoff switches
Dual 12 volt, 10 amp hr sealed lead acid
Current response power manager to optimize performance and battery life
3 MPH (5 KPH) Push to start required
13 MPH (20 KPH)
120 VAC 60 Hz @ 1 Amp Built-in self-regulating to prevent over-charging
Within 5 hours
Handlebar-mounted control operating at speeds above 3 MPH (5 KPH)
40 F (4.5 C) to 100 F (38 C)
50 Lbs. (22.7Kg)
51" long X 10" wide X 40" high (Maximum)
TORQUE SPECIFICATIONS
Handlebar binder bolt:
Stem binder bolt:
Stem-to-steerer binder:
Wheel axle nuts:
Rear Brake Retainer Nut:
150-180 lb. in
175-260 lb. in
100-120 lb. in
130-210 lb. in
100-120 lb. in
170-200 kgf cm
200-300 kgf cm
115-140 kgf cm
150-250 kgf cm
115-140 kgf cm
PAGE 37
12. Electric Transportation Company
Scooter Limited Warranty
WHAT IS COVERED AND FOR HOW LONG?
Your Cap’n Billy’s Whiz Bang Scooter Electric, manufactured by the Electric Transportation Company, LLC (“ETC”),
is warranted to be free from manufacturing and material defects. All warranties are extended to the original owner
from the date of purchase.
The scooter frame and all components, including motor, controller and power adapter, are warranted for one year from the date
of purchase. Batteries are warranted for six months.
WHAT IS NOT COVERED?
This warranty does not cover any damage, failure or loss due to:
• Normal wear and tear.
• Accident, misuse, neglect, abuse or improper assembly.
• Failure to follow care and use instructions in the ETC owner’s manual.
• Improper use that includes stunt riding, off-road usage, jumping, racing or other similar activities.
• Modifications of any sort made to ETC products and damage caused by modifications.
• Repairs performed outside our factory or authorized dealer service centers.
NOTE:YOUR INSURANCE POLICIES MAY NOT PROVIDE COVERAGE FOR ACCIDENTS INVOLVING THE USE OF
THIS SCOOTER. TO DETERMINE IF COVERAGE IS PROVIDED YOU SHOULD CONTACT YOUR INSURANCE
COMPANY OR AGENT.
PAGE 38
Electric Wheels International, LLC (“EWI”), the distributor of ETC electric scooters, will have sole discretion to determine
whether the damage, failure or loss is due to defect or otherwise.
WHAT WILL WE DO IF YOUR ELECTRIC TRANSPORTATION COMPANY SCOOTER FAILS?
EWI will, at our sole option and expense, repair or replace any defective ETC electric scooter part, subject to the stated
warranty periods. Shipping cost to return items to EWI is the responsibility of the consumer.
HOW DO YOU GET WARRANTY SERVICE?
If your ETC electric scooter is not working properly because of a defect, you may direct your questions to an authorized ETC
repair center or EWI. Contact EWI at 1-408-270-3724 or [email protected]. In the USA, you may call toll-free
1-888-808-4382. Do not return goods without first obtaining a Return Merchandise Authorization (RMA) number from EWI.
DO YOU HAVE ANY OTHER REMEDIES?
NO.THIS REMEDY IS THE SOLE AND EXCLUSIVE REMEDY AND IS IN LIEU OF ALL OTHER REMEDIES,
INCLUDING CONSEQUENTIAL AND INCIDENTAL DAMAGES.
HOW DOES STATE LAW APPLY?
Some states do not allow the exclusion or limitation of incidental or consequential damages, so the above limitation or exclusion
may not apply to you.This warranty gives you specific legal rights that may vary from state to state.
WHY SHOULD I MAIL MY REGISTRATION CARD?
Should you ever need batteries after your warranty expires, mailing your warranty registration card within 30 days from purchase
date entitles you to a 10% discount on genuine ETC replacement batteries ordered from Electric Wheels International.
For your records, we suggest attaching your receipt and recording the following information:
Serial Number (found on head tube at front of scooter) _____________________________
Retailer Name __________________________________________________
Phone number _____________________Purchase Date _________________
PAGE 39
13 .About Your Dealer
Your Dealer is there to help you get the scooter, components and accessories that are most appropriate for the kind of riding
that you intend to do and to help you maintain your equipment so that you can get the maximum enjoyment.Your scooter
dealer’s staff has the knowledge, tools and experience to give you reliable advice and competent service.
WARNING: Failure to install and operate any component or accessory properly can result in serious damage
to the scooter, and may cause serious injury.
Now fasten on your helmet and enjoy your scooter ride!
PAGE 40
DISTRIBUTED BY:
ELECTRIC WHEELS INTERNATIONAL, LLC
2240 QUIMBY ROAD – SAN JOSE, CA 95122 – USA
1.408.270.3724 OR 1.888.808.4382 (USA TOLL-FREE)
Email: [email protected] – Web: www.electricwheelsintl.com
THE INFORMATION IN THIS MANUAL IS CORRECT TO THE BEST OF OUR KNOWLEDGE.
IT IS SUBJECT TO CHANGE WITHOUT NOTICE. CAP’N BILLY’S WHIZ BANG, READY-HINGE,THE ETC LOGO &
THE FUTURE IS ELECTRIC ARE TRADEMARKS OF THE ELECTRIC TRANSPORTATION COMPANY, LLC. PATENTED
PATENTS PENDING. COPYRIGHT © 2002 THE ELECTRIC TRANSPORTATION COMPANY, LLC.
www.etcbikes.com
CAP’N BILLY’S WHIZ BANG SCOOTER ELECTRIC / OWNER’S MANUAL REV: A – 05/23/02