1
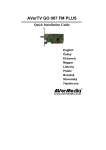
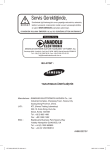
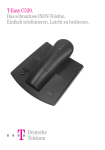
FCC NOTICE (Class B) This device complies with Part 15 of the FCC Rules. Operation is subject to the following two conditions: (1) this device may not cause harmful interference, and (2) this device must accept any interference received, including interference that may cause undesired operation. ® AVerMedia AVerTV BoxW7 User’s Manual English Română Lietuvių Türkçe P/N 300AACJ2 Made in Taiwan Federal Communications Commission Statement NOTE- This equipment has been tested and found to comply with the limits for a Class B digital device, pursuant to Part 15 of the FCC Rules. These limits are designed to provide reasonable protection against harmful interference in a residential installation. This equipment generates, uses and can radiate radio frequency energy and, if not installed and used in accordance with the instructions, may cause harmful interference to radio communications. However, there is no guarantee that interference will not occur in a particular installation. If this equipment does cause harmful interference to radio or television reception, which can be determined by tuning the equipment off and on, the user is encouraged to try to correct the interference by one or more of the following measures: ‧ Reorient or relocate the receiving antenna. ‧ Increase the separation between the equipment and receiver. ‧ Connect the equipment into an outlet on a circuit different from that to which the receiver is connected. ‧ Consult the dealer or an experienced radio/television technician for help. CAUTION ON MODIFICATIONS To comply with the limits for the Class B digital device, pursuant to Part 15 of the FCC Rules, this device must be installed in computer equipment certified to comply with the Class B limits. All cables used to connect the computer and peripherals must be shielded and grounded. Operation with non-certified computers or non-shielded cables may result in interference to radio or television reception. Changes and modifications not expressly approved by the manufacturer could void the user’s authority to operate this equipment. European Community Compliance Statement Class B This product is conformity with the protection requirements of EU Council Directives 89/336/EEC amended by 92/31/EEC on the laws of the Member States relating to electromagnetic compatibility. DISCLAIMER No warranty or representation, either expressed or implied, is made with respect to the contents of this documentation, its quality, performance, merchantability, or fitness for a particular purpose. Information presented in this documentation has been carefully checked for reliability; however, no responsibility is assumed for inaccuracies. The information contained in this documentation is subject to change without notice. In no event will AVerMedia be liable for direct, indirect, special, incidental, or consequential damages arising out of the use or inability to use this product or documentation, even if advised of the possibility of such damages. TRADEMARKS AVerMedia is registered trademarks of AVerMedia TECHNOLOGIES, Inc. IBM PC is a registered trademark of International Business Machines Corporation. Macintosh is a registered trademark of Apple Computer, Inc. Microsoft is a registered trademark and Windows is a trademark of Microsoft Corporation. All other products or corporate names mentioned in this documentation are for identification and explanation purposes only, and may be trademarks or registered trademarks of their respective owners. COPYRIGHT © 2007 by AVerMedia TECHNOLOGIES, Inc. All rights reserved. No part of this publication may be reproduced, transmitted, transcribed, stored in a retrieval system, or translated into any language in any form by any means without the written permission of AVerMedia TECHNOLOGIES, Inc. THE MARK OF CROSSED-OUT WHEELED BIN INDICATES THAT THIS PRODUCT MUST NOT BE DISPOSED OF WITH YOUR OTHER HOUSEHOLD WASTE. INSTEAD, YOU NEED TO DISPOSE OF THE WASTE EQUIPMENT BY HANDING IT OVER TO A DESIGNATED COLLECTION POINT FOR THE RECYCLING OF WASTE ELECTRICAL AND ELECTRONIC EQUIPMENT. FOR MORE INFORMATION ABOUT WHERE TO DROP OFF YOUR WASTE EQUIPMENT FOR RECYCLING, PLEASE CONTACT YOUR HOUSEHOLD WASTE DISPOSAL SERVICE OR THE SHOP WHERE YOU PURCHASED THE PRODUCT. English Română Lietuvių Türkçe What’s in the Package Continutul pachetului Pakuotės turinys Paket İçeriği • User’s Manual • Manual de Utilizare • Naudotojo instrukcija • Kullanıcı Elkitabı • Vertical Stand • Stand Vertical • Vertikalus stovas • Dikey Ayak AV e r M e d i a AV e r T V B o x W 7 • Remote Control (with batteries) • Telecomanda (cu baterii) • Nuotolinio valdymo pultas (su baterijomis) • Uzaktan Kumanda Aleti (Pilleri İle Birlikte) • VGA Cable • Cablu VGA • VGA kabelis • VGA Kablosu • Audio Cable • Cablu Audio • Garso signalų perdavimo kabelis • Ses Kablosu • Power Adapter • Adaptor Alimentare • Maitinimo adapteris • Enerji Kablo Adaptörü The AVerMedia AVerTV BoxW7 Unit Unitatea AVerMedia AVerTV BoxW7 „AVerMedia AVerTV BoxW7“ blokas AVerMedia AVerTV BoxW7 Ünitesi Touch Button Control Panel Panou de Control cu butoane Valdymo mygtukai ant korpuso Dokunmatik Düğmeli Kumanda Panosu The Touch Button Panel found on the top side of the AVerTV BoxW7 provides quick access to commonly used functions. Panoul amplasat pe partea de sus a dispozitivlui ofera acces rapid la functiile cele mai utilizate. Valdymo skydelio mygtukais, įrengtais viršutinėje „AVerTV BoxW7“ korpuso dalyje, galima greitai pasiekti dažniausiai naudojamas funkcijas. AVerTV BoxW7’ün tepesinde bulunan Dokunmatik Düğmeli Kumanda Panosu, genel olarak kullanılan işlevlere kolay erişim sağlar. 1 2 3 4 1 POWER Turn the unit on /off Porneste / Opreste Prietaiso įjungimas/išjungimas Üniteyi devreye al/devre dışı et 2 SOURCE Press this button to toggle between TV/Video and PC display Apasati acest buton pentru a comuta intre TV/Video si PC Paspaudus šį mygtuką perjungiamas televizijos/vaizdo sistemos arba kompiuterio vaizdo rodymo režimas TV/Video ve Kişisel Bilgisayar arasından geçiş yapmak için bu düğmeye bas 3 VOLUME S/T Press Volume ▲ to increase and Volume ▼ to decrease the volume level Apasati Volume ▲ pentru a mari si Volume ▼pentru a micsora volumul Paspaudus VOLUME ▲ garso stiprumas padidinamas, o VOLUME ▼ – sumažinamas Sesin arttırılması için basılır / Sesin azaltılması için basılır 4 CHANNEL S/T Press Channel ▲ to go up and Channel ▼ to go down to the next active TV channel Apasati Channel ▲ si Channel ▼ pentru a comuta intre canalele TV active Paspaudus CHANNEL ▲ įjungiamas tolimesnis, o CHANEL ▼ – ankstesnis (sąraše) aktyvus TV kanalas Yukarı, bir sonraki çalışan TV kanalına gitmek için basılır/ Aşağı, bir sonraki çalışan TV kanalına gitmek için basılır Infrared Sensor Senzor Infrarosu Infraraudonųjų spindulių jutiklis Kızılötesi Algılayıcı When using the remote control, aim it at the In-frared Sensor which is located at the front panel of the AVerTV BoxW7. Cand folositi telecomanda indreptati-o catre senzorul infrarosu situat pe panoul frontal al dispozitivului Naudodami nuotolinio valdymo pultą nukreipkite jį į infraraudonųjų spindulių jutiklį, kuris įrengtas „AVerTV BoxW7 “ korpuso priekiniame skydelyje. Uzaktan kumanda aleti ile, AVerTV BoxW7 ön panosuna konmuş bulunan Kızıl Ötesi algılayıcıya kumanda edilir. S - IN A / V IN 1▼ EAR PHONE Connection Ports Porturi pentru conectare Prijungimo prievadai Bağlantı Kapıları The port connectors allow connection of your TV antenna, Intrarile permit conectarea antenei TV; PC-ului; monitorului Per šiuos jungiamuosius prievadus galima prijungti PC, VGA monitor or LCD projector, speakers, video, or s- VGA sau a proiectorul LCD; boxelor; sursei video sau Stelevizinę anteną, asmeninį kompiuterį, VGA monitorių video source etc. Video; etc. arba LCD projektorių, garsintuvus, įprastą arba „svideo“ vaizdo atkūrimo įtaisą ir pan. Kapı bağlantıları; TV anteninin, kişisel bilgisayarın, VGA ekranının veya LCD projektörünün, hoparlörlerin, videonun veya Süper Video kaynaklarının vs bağlaması olanağını verir. AVerMedia AVerTV BoxW7 Back Panel AVerMedia AVerTV BoxW7 Arka Panosu 1. 2. 3. 4. 5. 6. Panou spate AVerMedia AVerTV BoxW7 VGA OUTPUT to MONITOR AUDIO INPUT from PC’s SOUND CARD TV ANTENNA(75Ω) POWER ADAPTER VGA INPUT from PC SPEAKER CONNECTION 1. 2. 3. 4. 5. 6. AVerMedia AVerTV BoxW7 Front Panel „AVerMedia AVerTV BoxW7 “ užpakalinis skydelis Iesire VGA pentru MONITOR Intrare AUDIO de la PLACA de SUNET a PC-ului Antena TV (75Ω) Adaptor Alimentare Intrare VGA de la PC Conectare Boxe 1. VGA IŠVESTIS į MONITORIŲ 2. GARSO ĮVESTIS iš KOMPIUTERIO GARSO PLOKŠTĖS 3. TV ANTENA (75Ω) 4. MAITINIMO ADAPTERIS 5. VGA ĮVESTIS iš KOMPIUTERIO 6. GARSINTUVŲ JUNGTIS Panou frontal AVerMedia AVerTV BoxW7 7. COMPOSITE VIDEO INPUT 8. Left & Right AUDIO INPUT 9. S-VIDEO INPUT 10. EARPHONE JACK „AVerMedia AVerTV BoxW7 “ priekinis skydelis 7. Intrare video Composite 8. Intrare audio Stanga & Dreapta 9. Intrare S-Video 10. Mufa casti 1. VGA Monitör Çıkışı 2. KİŞİSEL BİLGİSAYAR SES KARTINDAN GELEN SES GİRİŞİ 3. TV Anteni (75Ω) 4. Enerji Kablo Adaptörü 5. Kişisel Bilgisayardan Gelen VGA Girişi 6. Oparlör Bağlantısı AVerMedia AVerTV BoxW7 Ön Panosu The Installation and Setup section provides more information on cable connections. Sectiunea de instalare si configurare ofera mai multe informatii cu privire la modul de conectare a cablurilor 7. SUDĖTINIŲ (COMPOSITE) VAIZDO SIGNALŲ ĮVESTIS 8. Kairiojo ir dešiniojo kanalų GARSO ĮVESTIS 9. S-VIDEO ĮVESTIS 10. LIZDAS AUSINIŲ KIŠTUKUI Daugiau informacijos apie kabelių prijungimą pateikta skyrelyje „Įrengimas ir nustatymas“. Installation and Setup Instalare si configurare Įrengimas ir nustatymas The figure below shows the proper cable connections for installing AVerTV BoxW7 and connecting it to your audio/video equipment. Figura de mai jos arata modalitatea corecta de instalare a cablurilor pentru AVerTV BoxW7 si conectarea la echipamentul audio/video Toliau pateiktame paveikslėlyje pavaizduota, kaip įrengiant AVerMedia AVerTV BoxW7 ve ses/video donatımı montesi „AVerTV BoxW7 “ įtaisą ir prijungiant jį prie garso/vaizdo ile ilgili uygun kablo bağlantıları aşağıdaki şekilde sistemų reikia tinkamai sujungti kabelius. gösterilymiiştir. 4 7. VIDEO GİRİŞİ 8. Sol ve Sağ Ses Girişi 9. Süper Video GİRİŞİ 10. KULAKLIK JAKI Kablo bağlantıları ile ilgili daha fazla bilgi, Montaj ve Ayarlar Bölümünde verilmiştir. Montaj ve Ayaarylar OUT 14 1 12 Wall Outlet IBM Compatible PC 2 VGA Cable(supplied) 3 Earphone or headphone (not supplied) Audio Cable (supplied) 5 PC Sound Card 15 OUT 16 Example: 13 POWER ADAPTER S -I N A /V IN EA R PHONE 20 Audio Cable(not supplied) 17 6 11 Video Game TV ANTENNA (75Ω ) 21 Video Cable (not supplied) 18 Camcorder VGA Monitor 9 10 OR 7 VGA Cable (not supplied) 8 External Amplified Speaker 22 LCD PROJECTOR 2► 19 S-Video Cable (not supplied) VCR/ VCD/ DVD Player English Română Lietuvių Türkçe 1. IBM Compatible PC 2. VGA Cable (supplied) 3. Audio Cable (supplied) 4. OUT 5. PC Sound Card 6. TV ANTENNA (75Ω) 7. External Amplified Speaker 8. LCD PROJECTOR 9. VGA Cable (not supplied) 10. OR 11. VGA Monitor 12. Wall Outlet 13. POWER ADAPTER 14. Earphone or headphone (not supplied) 15. OUT 16. Example: 17. Video Game 18. Camcorder 19. VCR/ VCD/ DVD Player 20. Audio Cable(not supplied) 21. Video Cable (not supplied) 22. S-Video Cable (not supplied) 1. PC compatibil IBM 2. Cablu VGA (inclus) 3. Cablu Audio (inclus) 4. Iesire 5. Placa audio a PC-ului 6. Antena TV (75Ω) 7. Boxa externa cu amplificatory 8. Proiector LCD 9. Cablu VGA (nu este inclus) 10. sau 11. Monitor VGA 12. Priza de perete 13. Adaptor Alimentare 14. Casti (nu sunt incluse) 15. Iesire 16. Exemplu: 17. Joc Video 18. Camera video 19. VCR/ VCD/ DVD Player 20. Cablu Audio (nu este inclus) 21. Cablu Video (nu este inclus) 22. Cablu S-Video (nu este inclus) 1. IBM standarto kompiuteris 2. VGA kabelis (komplekte) 3. Garso signalų kabelis (komplekte) 4. Išvesties jungtis (OUT) 5. Kompiuterio garso plokštė 6. TV ANTENA (75Ω) 7. Išoriniai garsintuvai su stiprintuvu 8. LCD PROJEKTORIUS 9. VGA kabelis (komplekte nėra) 10. ARBA 11. VGA monitorius 12. Elektros tinklo lizdas 13. MAITINIMO ADAPTERIS 14. Ausinės (komplekte nėra) 15. Išvesties jungtis (OUT) 16. Pavyzdys: 17. Žaidimų kompiuteris 18. Vaizdo kamera 19. Vaizdajuosčių/ VCD/ DVD grotuvas 20. Garso signalų kabelis (komplekte nėra) 21. Vaizdo signalų kabelis (komplekte nėra) 22. „S-Video“ kabelis (komplekte nėra) 1. IBM Uyumlu Kişisel Bilgisayar 2. VGA Kablosu (Verilmiş) 3. Ses Kablosu (verilmiş) 4. ÇIKIŞ 5. PC Ses Kartı 6. TV Anteni (75W) 7. Kuvvetlendirilmiş Dış Oparlör 8. LCD PROJEKTÖRÜ 9. VGA Kablosu (Ünite ile verilmemiş) 10. VEYA 11. VGA Monitörü 12. Duvar Çıkışı 13. Enerji Kablo Adaptörü 14. Kulaklik veya başlıklı kulaklık (Ünite ile verilmemiş) 15. ÇIKIŞ 16. Örnek: 17. Video Oyunu 18. Kamera ve kayıt gereci 19. Video Kaset Kayıt Gereci 20. Ses Kablosu (Ünite ile verilmemiş) 21. Video Kablosu (Ünite ile verilmemiş) 22. Süper Video Kablosu (Ünite ile verilmemiş) Using the AVerMedia AVerTV BoxW7 Folosirea AVerMedia AVerTV BoxW7 Different countries have different TV systems, for example, PAL-BG, PAL-DK, NTSC-J, NTSC-M…etc. AVerTV BoxW7 functions only with the TV system of the country it is manufactured for and originally distributed in. Each column in the table below corresponds to a different type of TV system. Only one of these TV systems (only one column) will appear as your SET AREA. Make sure that you select the correct country signal from the menu. To change the area setting, refer to SET AREA (page 7). In functie de tara, exista diferite sisteme TV, ca de exemplu, PAL-BG, PAL-DK, NTSC-J, NTSC-M…etc. AVerTV BoxW7 functioneaza doar cu sistemul TV al tarii pentru care a fost produs si distribuit. Fiecare coloana a tabelului de mai jos corespunde unui tip de sistem TV diferit. Doar un singur tip de system TV (doar o coloana) va aparea ca SET AREA (ARIE DE INSTALARE). Asigurati-va ca selectati semnalul corect corespunzand tarii dumneavoastra din meniu. Pentru a schimba aria de setare, mergeti la sectiunea SET AREA (ARIA DE INSTALARE) (pagina 7). „AVerMedia AVerTV BoxW7“ naudojimas Skirtingose valstybėse naudojamos ir skirtingos televizijos signalų sistemos, pvz., PAL-BG, PAL-DK, NTSC-J, NTSCM ir pan. „AVerTV BoxW7 “ įtaisas pritaikytas veikti tik su tos valstybės, kurioje jis pagamintas arba kurioje yra oficialiai parduodamas, televizijos signalų sistema. Kiekvienas žemiau pateiktos lentelės stulpelis atitinka skirtingą televizijos signalų tipą. Parametru SET AREA (nustatyta sritis) gali būti išrinkta tik viena iš šių sistemų (nurodyta viename stulpelyje). Patikrinkite, ar meniu pasirinkote tinkamą toje valstybėje naudojamų televizijos signalų tipą. Informaciją apie srities pakeitimą žr. SET AREA (srities nustatymo) funkcijos apraše (7 psl.) To ensure that you can select and watch all active Pentru a va asigura ca puteti selecta si privi toate canalele Kad būtumėte tikri, jog galėsite pasirinkti ir žiūrėti visus channels, refer to section CH SCAN (page 6) on how to active, mergeti la sectiunea Cautare Canale (pagina 6) ce aktyvius kanalus, žr. skyrelį CH SCAN (kanalų automatically scan and memorize all active TV channels in se refera la modul de cautare si memorare a canalelor skenavimas, 6 psl.), kur pateikta informacija apie your area. active din aria dumneavoastra de acoperire. automatinį jūsų vietovėje galimų priimti kanalų skenavimą ir įsiminimą. PAL-N PAL-M NTSC-M ARGENTINA BRAZIL KOREA PHILIPPINES TAIWAN USA-HRC USA-IRC USA-STD SECAM-DK BULGARIA UKRAINE SECAM-L FRANCE PAL-I UK HK PAL-BG AUSTRALIA AUSTRIA BANGLADESH BELGIUM CYPRUS DENMARK EGYPT FINLAND GERMANY GREECE HUNGARY INDIA INDONESIA IRAN ISRAEL_ZAHAV ISRAEL_MATAV ISRAEL_IDAN ISRAEL_GVANIM 3▼ TURKEY ITALY MALTA NETHERLANDS NETHERLANDS_1 NETHERLANDS_2 NORWAY PORTUGAL RUMANIA SINGAPORE SLOVENIA SPAIN SWEDEN SWITZERLAND SYRIA THAILAND UAE YUGOSLAVIA AVerMedia AVerTV BoxW7 Kullanımı Farklı ülkelerin farklı TV sistemleri bulunmaktadır. Örneğin, PAL-BG, PAL-DK, NTSC-J, NTSC-M…vb. AVerTV BoxW7 , hangi ülke içn üretilmişse ya da hangi ülkede orijinal olarak dağıtılıyosa sadece o ülkenin TV sistemiyle uyumlu olarak çalışmaktadır. Aşağıdaki tabloda bulunan her sütun farklı bir TV sistemine karşılık gelmektedir. Sadece bu sistemlerden biri (sadece bir sütun) sizin TV sisteminizdir. Menüden doğru ülke sinyalinizi seçtiğinizden emin olun. TV system ayarlarını değiştirmek için , SET AREA bölümüne bakınız.(sayfa 7). Bölgede çalışan tüm TV kanallarının seçilmesi, otomatik olarak taranması, belleğe alınması ve seyredilmesi ile ilgili bilgiler için Sayfa 6’daki KANAL TARAMA (CH SCAN) Bölümüne bakınız. PAL-DK CHINA CZECH MACEDONIA POLAND-1 POLAND-2 POLAND-3 SLOVAKIA VIETNAM Accessing TV Controls Accesarea Comenzilor TV Prieiga prie TV valdymo funkcijų TV Kumandalarına Erişim To access various TV controls, open up the menu displays Pentru a accesa diferite comenzi TV, deschideti meniul or press on the remote control buttons. sau apasati butoanele telecomenzii Pasiekti įvairias TV valdymo funkcijas galite atidarę meniu Çeşitli TV kumandalarına erişmek için, Mönü Ekranı açılır langus arba spausdami nuotolinio valdymo pulto veya uzaktan kumanda aleti düğmelerine basılır. mygtukus. The Remote Control Telecomanda Nuotolinio valdymo pultas Uzaktan kumanda aleti The diagram below shows the remote control unit layout. Diagrama de mai jos prezinta telecomanda Toliau pateiktame paveikslėlyje pavaizduotas nuotolinio valdymo pulto funkcijų paskirstymas Aşağıdaki diyagram uzaktan kumanda ünitesinin göstermektedir. 1 12 2 13 3 14 4 15 5 6 7 8 16 17 9 18 19 10 11. PC BGM/ Res. 12. SOURCE 13. PREVIEW 14. PICTURE 15. CH▲/▼ 16. MUTE 17. PIP 18 TELETEXT (option) 19. MTS/ STEREO (option) 20. AV/PC 5. VOL ◄/► 6. MENU 7. SLEEP • Prietaiso įjungimas/išjungimas • TV kanalo pasirinkimas Turn the unit on/off To select a TV channel Porneste/Opreste unitatea Pentru a selecta un Canal TV Go to the previously selected channel Mergi la canalul selectat anterior Allows you to instantly switch to three (3) brightness level. * To increase and decrease volume level * Use these button to adjust the menu or picture setting * In adjusting the OSD position, use these buttons to move the menu display to the left and right of the screen Poti comuta intre trei (3) nivele de Vieno iš trijų (3) vaizdo šviesumo lygių stralucire. pasirinkimas * Pentru a mari si micsora nivelul volumului * Garso stiprumo lygio padidinimas arba * Folositi aceste butoane pentru a ajusta sumažinimas setarile meniul sau imaginii * Šiais mygtukais taip pat galima pakeisti * in ajustarea pozitiei OSD, folositi aceste meniu arba vaizdo parametrų nustatymą butoane pentru a muta afisaj-ul meniului la • * Reguliuojant ekrane rodomo meniu (OSD) dreapta sau stanga ecranului padėtį šiais mygtukais meniu ekrane galima perkelti kairiau ir dešiniau Pentru afisarea meniului • Meniu lango iškvietimas To call up the menu display Üniteyi aç/kapat TV kanalýnýn seçilmesi Perėjimas prie anksčiau žiūrėto kanalo Daha önce seçilmiþ kanala git Üç (3) parlaklık seviyesine anında geçişi sağlar. * Sesin yükseltilmesi ve azaltılması için * Bu düğmeyi menü ve görüntü ayarında kullan * Ekranda Gösterim ile ilgili konum ayarında mönü görüntüsünün ekranın soluna ve sağına hareket ettirilmesinde bu düğmeyi kullan Mönü görüntüsünün çaðýrýlmasý To automatically turn off the unit after 30, Pentru inchiderea automata a unitatii dupa Automatinis išjungimas po 30, 60, 90, 120 Üniteyi 30, 60, 90, 120 veya 150 dakikadan 60, 90, 120 or 150 minutes. 30,60, 90, 120 sau 150 de minute. ar 150 min. sonra otomatik olarak kapatmak için. 8. PIP CH To use the normal function of the CH▲, Pentru a folosi functiile normale ale Įprastų CH▲, CH▼, VOL◄ ir VOL► CH▲, CH▼, Vol◄, ve Vol► standart iþlev 11 CH▼, Vol◄, and Vol► buttons in PIP butoanelor CH▲, CH▼, Vol◄ si Vol► in funkcijų naudojimas PIP režimu. düðmelerinin kullanýlmasý. mode. modul PIP. 9. PIP Pos. To move the small TV/Video screen using Pentru a muta ecranul TV/Video mic Mažojo TV/vaizdo sistemos vaizdo lango Küçük TV/Video ekranýnýn CH▲, CH▼, the CH▲, CH▼, Vol◄, and Vol► buttons folosind butoanele CH▲, CH▼, Vol◄ si perkėlimas CH▲, CH▼, VOL◄ ir VOL► Vol◄, ve Vol► düðmelerini kullanmak in PIP mode. Vol►in modul PIP. mygtukais PIP režimu. suretiyle hareket ettirilmesi. To temporarily freeze the image on the screen. Pentru a opri pe imagine, temporar, imaginea pe Laikinai sustabdykite vaizdą. Paspauskite klavišą, Ekrandaki görüntüyü geçici olarak dondurmak için. Press the button again to unfreeze the image. ecran. Apasati butonul din nou pentru a reporni norėdami vėl paleisti vaizdą. Görüntüyü normale döndürmek için düğmeye yeniden imaginea. basın. - Switch the audio source from the AVerTV BoxW7 - Schimbati sursa audio de la AVerTV BoxW7 cand - Garso šaltinio perjungimas, kai „AVerTV BoxW7 -Kişisel Bilgisayar, modu gösterdiğinde; AVerTV when in PC display mode sunteti in modul de display PC “ veikia kompiuterio vaizdo rodymo režimu BoxW7'den ses kaynağına bağlan - Switch display resolution setting to 1024x768 when -A schimba rezolutia imaginii la 1024x768 cand este -Nustatykite rezoliuciją 1024x768 TV/Video rėžime - Ekran çözünürlüğünü TV/Video modunda 1024x768 in TV/Video mode modul TV/Video olarak değiştirin Switch between TV or external video sources Comuta intre sursa TV si video externa Šaltinio – televizijos imtuvo arba išorinių vaizdo signalų TV veya harici video kaynaðý arasýnda geçiþ yap šaltinio – pasirinkimas Continuously display the next consecutive TV Afisare continua a canalelor TV care urmeaza Automatinis tolimesnių TV kanalų perjungimas. TV kanallarını, biri biri ardına sıra ile, sürekli olarak channels. gösterir To adjust brightness, contrast, color, tint or Pentru a modifica stralucirea, contrastul, culoarea, Šviesumo, kontrastingumo, spalvingumo, atspalvių Parlaklık, kontrast, renk, renk tonu veya netlik ayarının sharpness nuanta sau profunzimea. arba vaizdo aštrumo reguliavimas yapılması * Go to the next or previous TV channel line up *Comuta intre urmatoarea sau grila TV anterioara * Perėjimas prie tolimesnio arba ankstesnio (sąraše) * Bir sonraki veya bir önceki TV kanalýna git * Use these buttons to make the selection in the menu *Folositi aceste butoane pentru a selecta o setare din televizijos kanalo * Bu düðmeyi, menüde veya resim ayarlarýnda seçim or picture setting meniu sau meniu imagine * Šiais mygtukais taip pat galima pasirinkti meniu arba yapmada kullan * In adjusting the OSD position, use these buttons to *Pentru ajustarea pozitiei OSD, folositi butoanele pentru vaizdo parametrų nustatymą * Ekran Gösterimi ile ilgili konum ayarýnda hareket için move the menu display up and down of the screen a muta meniul in sus si in jos pe ecran * Reguliuojant ekrane rodomo meniu (OSD) padėtį šiais bu düðmeyi kullan mygtukais meniu ekrane galima perkelti aukščiau ir žemiau To turn off /on the sound Pentru a Porni/Opri sunetul Garso išjungimas/įjungimas Sesin açýlýp kapatýlmasý için Switch between PIP*, and Full Screen mode Pentru a comuta intre modurile PIP* si Full Screen Pasirinkite PIP*, PIP See-thur* ir Full Screen rėžimus PIP*. PIP see-thru** ve tam ekran modları arasında seçim * To watch TV/Video in a small screen on an always *Pentru a viziona TV/Video intr-un ecran mic care *Televizijos/vaizdo sistemos vaizdo peržiūra mažame yapın on top of the PC display. ramane mereu in fata celorlalte ferestre ale PC-ului. ekrane ir visuomet virš kompiuterio vaizdo. *TV ve Videonun, her saman için Kişisel Bilgisayar ekranının tepesine konmuş bulunan küçük ekrandan izlenmesi. Press to view teletext, and disable teletext. Se apasa pentru afisare teletext si inchidere teletext Pasirinkite žiūrėti arba žiūrėti teletekstą Teletexti görmek veya kapatmak için basın. 10 20 1. POWER 2. NUMBER BUTTONS 3. CHANNEL RETURN 4. PIC MODE If the channel offers multi-language feature, press this button to toggle between languages. Daca, canalul ofera setari in mai multe limbi, apasati butonul pentru a schimba limba To toggle between TV/ Video or PC display Pentru a trece de la TV/Video la dosplay PC si invers 4► Jei tuo kanalu garsas transliuojamas iš karto keliomis kalbomis, paspaudus šį mygtuką kalbas galima pasirinkti. Televizijos/vaizdo sistemos arba asmeninio kompiuterio monitoriaus vaizdo pasirinkimas Kanalın çok dil özelliğine sahip bulunması halinde, diller arasında geçiş yapmak için bu düğmeye bas. TV/Video veya harici video kaynaðý arasýnda geçiþ yapmak için English Română Teletext Control Buttons (Optional) Lietuvių Butoane de control teletext (Optional) Teletext Control Buttons (Optional) The figure and descriptions in this section show how to use the Imaginea si descrierea arata modul de utilizare a functiei teletext function using the remote control. teletext folosind telecomanda 1 NUMBER BUTTONS 1 2 CHS/T 3 FASTEXT LINK / VOL X 5 3 2 5 7 6 3 4 4 FASTEXT LINK 5 FASTEXT LINK / VOL◄ 6 TELETEXT 7 FASTEXT LINK ) ) Türkçe Teletekst Kontrol Düğmeleri (İsteğe bağlı) Paveikslėliai ir aprašymai, čia nurodo kaip naudotis teleteksto Bu bölümdeki şekil ve açıklamalar, uzaktan kumanda funkcija, nuotolinio valdymo pultelio pagalba. kullanılarak teletekst fonksiyonunun nasıl kullanılacağını gösterir. To select a teletext page Selectare pagina teletext Pasirinkite teletex puslapį Bir teletekst sayfası seçmek için Use the CH▲ and CH▼ buttons to go to the next upper or lower teletext page. Folosire butoane CH▲ si CH▼ pentru a merge la paginile teletext de mai sus sau mai jos. Transfer la pagina de teletext a culorii verzi Naudokite CH▲ ir CH▼ norėdami vaikščioti po teleteksto puslapius Pereikite į teleteksto puslapį kuris atitinka žalią spalvą. Bir sonraki üst veya alt teletekst sayfasına gitmek için CH▲ ve CH▼ düğmelerini kullanınız. Yeşil rengin ilgili olduğu teletekst sayfasına atlar. Jump to the teletext page which the blue color corresponds to. Transfer la pagina de teletext a culorii albastre Pereikite į teleteksto puslapį kuris atitinka mėlyną spalvą. Mavi rengin ilgili olduğu teletekst sayfasına atlar. Jump to the teletext page which the red color corresponds to. Transfer la pagina de teletext a culorii rosii Pereikite į teleteksto puslapį kuris atitinka raudoną spalvą. Kırmızı rengin ilgili olduğu teletekst sayfasına atlar. Press to view teletext, overlay text over video and disable teletext A se apasa pentru vedere teletext, text suprapus peste video si dezactivare teletext. Transfer la pagina de teletext a culorii galbene Pasirinkite View, Overlay ar Disable teleksto funkciją. Teleteksti izlemek, teksti video üzerinde görüntülemek ve teleteksti kapatmak için basın Sarı rengin ilgili olduğu teletekst sayfasına atlar. Jump to the teletext page which the green color corresponds to. Jump to the teletext page which the yellow color corresponds to. Pereikite į teleteksto puslapį kuris atitinka geltoną spalvą. Customizing the Picture Setting Personalizati setarile imaginii Vaizdo parametrų suderinimas Görüntü Ayarının İsteğe Göre Yapılması If you want to adjust the picture quality, press the PICTURE button on the remote. Then, you can use the CH▲ or CH▼ buttons to select the items in the PICTURE menu; and the Vol◄ or Vol ► buttons to make the adjustment. To restore the picture default setting, select RESET and then press Vol ►. Daca doriti sa modificati calitatea imagini, apasati butonul de Imagine (Picture) de pe telecomanda. Apoi, puteti folosi butoanele CH▲ sau CH▼ pentru a selecta o sectiune din meniul Imagine; si butoanele Vol◄ or Vol► pentru a modifica. Pentru a reveni la setarile initiale, selectati Resetare (Reset) si apoi Vol►. Jei norite tinkamai sureguliuoti vaizdo kokybę, paspauskite nuotolinio valdymo pulto mygtuką PICTURE. Tada mygtukais CH▼ arba CH▲ galima pasirinkti elementus meniu PICTURE meniu, o mygtukais VOL◄ arba VOL► nustatyti pageidaujamą parametro vertę. Jei norite atkurti standartinius vaizdo parametrus, pasirinkite RESET, o tada paspauskite mygtuką VOL►. V veya video görüntü kalite ayarı yapılmak istendiğiinde, uzaktan kumanda aleti üzerindeki PICTURE düğmesine basılır. Bundan sonra, PICTURE Mönüsündeki kalemlerin seçilmesi için, CH▲ veya CH▼ ve ayar yapmak için Vol◄ veya Vol► düğmeleri kullanılr. Varsayılan görüntü ayarının yeniden yüklenmesi için, RESET seçilir ve bundan sonra Vol► düğmesine basılır. Calling Up a Menu Display Afisarea meniului pe ecran Meniu lango iškvietimas Mönü Ekranının Çağırılması Press the MENU button on the remote control to call up and exit the main menu or submenu display. Then, you can use the CH▲ or CH▼ buttons to select the items in the menu list; and the Vol◄ or Vol► buttons to adjust or to make a selection. The table on the next page lists the different functions you will find in the menu. Apasati butonul MENU de pe telecomanda pentru a afisa si a inchide meniul principal sau submeniul. Apoi, puteti folosi butoanele CH▲ sau CH▲ pentru a selecta o sectiune din lista de meniu; si butoanele Vol◄ sau Vol► pentru a ajusta sau a face o modificare. Tabelul de pe pagina urmatoare arata diferitele functii pe care le veti gasi in meniu. Paspaudus MENU mygtuką nuotolinio valdymo pulte galima įjungti meniu langą arba išjungti pagrindinio arba submeniu langą. Tada mygtukais CH▼ arba CH▲ galima pasirinkti elementus meniu sąraše, o mygtukais VOL◄ arba VOL► nustatyti pageidaujamą parametro vertę arba išsirinkti reikiamą funkciją. Tolimesniame puslapyje pateiktoje lentelėje aprašytos įvairios meniu funkcijos. Ana mönü veya alt mönü ekranlarını çağırmak ve bu ekranlardan çıkmak için, uzaktan kumanda aleti üzerindeki MÖNÜ düğmesine basılır. Bundan sonra, mönü listesindeki kalemlerin seçilmesi için, CH▲ veya CH▼ ve ayar veya seçim yapılması için Vol◄ veya Vol► düğmeleri kullanılır. Mönü tarafından içerilmen değişik işlevler bir sonraki sayfadaki tabloda verilmiştir. Supported Display Setting in PIP Mode Setari pentru afisaj suportate de modul PIP Palaikomi monitoriaus parametrai PIP režimu The reference table below lists the monitor display resolution and refresh rate settings that AVerTV BoxW7 supports when viewing in PIP mode: Tabelul de mai jos indica rezolutiile monitoarelor si setarile ratei de refresh pe care AVerTV BoxW7 le suporta cand vizionati in modul PIP: Toliau pateiktoje lentelėje išvardyti galimi monitoriaus skyros ir AVer TV BoxW7 PIP modundayken referans tablosundaki atnaujinimo dažnio deriniai, palaikomi „AVerTV BoxW7“ įtaiso, ekran çözünürlüğü ve ekran tazeleme oran ayarlarını kai šis rodo vaizdą PIP režimu. destekler : PIP mod’ da display ayarlarını destekler Resolution / Rezolutie / Skyra / Çözünürlük Refresh Rate (Hz)/ Rata de Refresh (Hz) / Atnaujinimo dažnis (Hz) / Ekran yenileme hızı (Hz ) 1024 x 768 1280 x 768 1280 x 1024 1440 x 900 60, 70, 75, 85 60 60 60 5▼ English Main Menu TV SOURCE On Screen Display ) CH FINE TUNE CH SCAN MORE.. DEFAULT FAVORITE CH ) Română Usage Use the CH▲ or CH▼ buttons to select between antenna TV or cable TV source, then press Vol► button to make the selection. Mygtukais CH▲ ar CH▼ pasirinkite įprastą arba kabelinę televiziją, o tada mygtuku VOL► šį savo pasirinkimą patvirtinkite. Kullanım Kablolu ve kablosuz TV kaynakları CH▲ veya CH▼ düğmeleri kullanılmak suretiyle seçilir ve sonra da Vol► düğmesine basılır. Daca receptia nu este clara, selectati CH FINE TUNE apoi apasati Vol◄ sau Vol► pana cand imaginea devine clara. Jei vaizdo, formuojamo pagal priimamus televizijos signalys, kokybė prasta, pasirinkite CH FINE TUNE, tada paspauskite VOL◄ ir VOL► mygtukus, kol televizijos transliacijos vaizdas taps kokybiškas. TV alındısının temiz olmaması halinde, CH FINETUNE seçilir ve sonra da, görüntü berrak oluncaya kadar Vol◄ ve Vol► düğmelerine basılır. Use CH▲ or CH▼ buttons to select between CH Scan or All FREQ SCAN. Press Vol► button to make the selection. If you want to interrupt or cancel the scanning process, press MENU button, but this will only memorize the scanned channel. These two types of channel-preset functions enable you to memorize all active channels in your area. Use the CH SCAN function first. If there are channels missing after you perform CH SCAN, use ALL FREQ SCAN function and repeat the searching process. NOTE: All freq Scan is a very time consuming process. If the default frequency table already includes all active TV channels in your area, then avoid using the All freq Scan. Folositi butoanele CH▲ sau CH▼ pentru a selecta CH Scan sau All FREQ SCAN. Apasati Vol► pentru a selecta. Daca doriti sa intrerupeti sau sa anulati procesul de scanare, apasati butonul MENIU, dar aceasta actiune va pastra in memorie doar canalele scanate pana in acel moment. Aceste doua modalitati de selectare a canalelor va va permite sa memorati toate canalele active din zona dumneavoastra. Folositi mai intai functia CH SCAN. Daca sunt canale care lipsesc dupa ce faceti aceasta operatiune, folositi functia ALL FREQ SCAN (SCANAREA TUTUROR FRECVENTLOR) pentru a repeta procesul de cautare. NOTA: Procesul de SCANARE a TUTUROR FRECVENTLOR este un process ce consuma mult timp. Daca tabelul de frecvente standard include deja toate canalele TV active din zona dumneavoastra, atunci evitati folosirea functiei SCANAREA TUTUROR FRECVENTLOR. Apasati butonul Vol► pentru a afisa lista de meniu cu mai multe optiuni Mygtukais CH▲ arba CH▼ pasirinkite CH SCAN arba ALL FREQ SCAN. Kad pasirinkimą patvirtintumėte, paspauskite mygtuką VOL►. Jei norite nutraukti arba atšaukti skenavimo procesą, paspauskite MENU mygtuką. Tačiau taip bus įsiminti tik nuskenuoti kanalai. Šiomis dviem kanalų nustatymo funkcijomis įtaisas gali įsiminti visus aktyvius kanalus, kurių signalus galima priimti jūsų vietovėje. Visų pirma panaudokite CH SCAN funkciją. Jei atlikus CH SCAN procesą dar trūksta kanalų, pasirinkite ALL FREQ SCAN funkciją ir pakartokite paieškos procesą. PASTABA: ALL FREQ SCAN funkcija trunka labai ilgai. Jei standartinėje dažnių lentelėje jau yra visi aktyvūs televizijos kanalai, kurių signalus galima priimti jūsų vietovėje, tuomet funkcijos ALL FREQ SCAN patariame vengti. CH Scan veya All FREQ SCAN işlevlerinin seçilmesi için CH▲ veya CH▼ düğmeleri kullanılır ve bundan sonra, seçimin yapılması için Vol► düğmesine basılır. Tarama işlemine ara verilmesi veya tarama işleminin iptal edilmesi istendiğinde, MÖNÜ düğmesine basılır. Bu işlem, bu halde sadece taranmış olan kanalı belleğe alır. Bu her iki tipteki kanalı önceden bağlama işlevi, bulunulan bölgedeki çalışan kanalların tümünü belleğe alır. CH SCAN işlevi ilk olarak kullanılır. CH SCAN işleminin yapılmasından sonra noksan kanalların bulunması halinde ALL FREQ SCAN İşlevi ulgulanılır ve arama işlemi tekrarlanır. Not: ALL FREQ SCAN, çok zaman isteyen bir işlem olup, varsayılan frekanslar tablosunun, bölgedeki tüm TV kanallarını içermesi halinde, All freq Scan işlemi yapılmaz. Paspaudus VOL► mygtuką galite iškviesti MORE... meniu sąrašą. MORE... Mönü Listesinin çağırılması için Vol► düğmesine basılır. ) ) Folositi butoanele CH▲ sau CH▼ pentru a selecta Antena TV sau Cablu TV, apoi apasati Vol► pentru a selecta. Türkçe Naudojimas If the TV reception is not clear, choose CH FINE TUNE then press Vol◄ and Vol► buttons until the TV picture becomes clear. Press Vol► button to call up MORE.. menu list. ) Lietuvių Folosire Use the CH▲ or CH▼ buttons to select YES to clear all the preset channels and to restore the original factory default picture setting or NO to exit. Then press Vol►. Folositi butoanele CH▲ sau CH▼ pentru a selecta; YES (DA) pentru a sterge toate canalele memorate si pentru a reveni la setarile din fabrica; sau NO (NU) pentru a iesi. Apoi apasati Vol► Mygtukais CH▲ arba CH▼ pasirinkite YES, kad visi jau nustatyti kanalai būtų išvalyti ir tuo pačiu visiems parametrams būtų grąžintos gamykloje nustatytos standartinės vertės, arba pasirinkite NO, jei norite išeiti iš meniu. Tada paspauskite VOL►. Önceden bağlanmış bütün kanalların silinmesi ve esas fabrika varsayım görüntü ayarlarının yeniden yüklenmesi amacıyla YES’in seçilmesi için CH▲ veya CH▼ düğmesi kullanılır veya mönüden çıkmak için NO seçilir ve bundan sonra, Vol► düğmesine basılır. This function enables you to add, remove, reprogram or reassign the TV channels with channel numbers that are easier to remember. In the selected USER CH, enter the new channel number you want to assign or the channel number you want to remove/add to the channel line up. Then, in the CATV CH or TV CH, enter the channel number you want to remap or the channel number you want to remove/add. Use the CH▲ or CH▼ buttons to select ADD to include or DEL to remove the channel number in the channel line up and then press Vol►. Note: To browse through channels while setting the Aceasta functie iti permite adaugarea, stergerea, reprogramarea, sau alocarea canalelor TV, numarul de canal dorit. In optiunea USER CH introduceti noul numar pe care vreti sa il atribuiti sau numarul canalului pe care doriti sa il stergeti/adaugati la lista de canale. Apoi, in CATV CH sau TV CH introduceti numarul canalului pe care doriti sa il alocati sau sa il stergeti/adaugati. Folositi butoanele CH▲ sau CH▼ pentru a selecta; ADD pentru a include; sau DEL pentru a sterge numarul canalului in lista de canale si apoi apasati Vol►. Pentru a naviga intre canale in timp ce setati User CH si numarul CATV, apasati butoanele CH▲ sau Šia funkcija galima pridėti, pašalinti, iš naujo suprogramuoti arba iš naujo priskirti televizijos kanalams kitus kanalų numerius, kuriuos būtų lengviau prisiminti. Pasirinkus USER CH įveskite naująjį kanalo numerį, kurį pageidaujate priskirti, arba kanalo, kurį norite pašalinti/pridėti prie kanalų sąrašo, numerį. Tada laukuose CATV CH arba TV CH įveskite pageidaujamo peradresuoti kanalo numerį arba kanalo, kurį pageidaujate pridėti/pašalinti, numerį. Mygtukais CH▲ arba CH▼ pasirinkite ADD, jei norite įterpti, arba DEL, jei norite pašalinti kanalą, EN ÇOK BEĞENİLEN KANAL işlevi kolayca hatırlanması için numaralı olan TV kanallarının ilave edilmesi, silinmesi, yeniden programlanması veya yeniden atanması olanağını verir. Bu maksatla; KULLANICI KANALI seçilir ve atanmak istenen yeni kanal numarası veya silinmesi veya ilave edilmesi istenen kanal numarası, seçilmiş bulunan KULLANICI KANALIK’na girilir ve bundan sonra; atanması, veya seçili kanallardan silinmesi veya bu kanallara ilave edilmesi istenen kanal numarası CATV CH’ına veya TV CH’ına girilir. Seçili kanallar içerisindeki kanal numarasının silinmesi amacıyla ADD’in ilave edilmesi amacıyla 6► User CH and CATV number, press the CH▲ or CH▼ buttons. CH▼. kurio numeris įtrauktas į kanalų sąrašą, ir tada paspauskite VOL►. Pastaba: naršyti po kanalus nustatinėdami USER CH ir CATV numerius galite CH▲ arba CH▼ mygtukais. DEL’in seçilmesi için, CH▲ veya CH▼ Düğmesi kullanılır ve bundan sonra Vol► düğmesie basılır. Not: KULLANICI KANALI ve KABLOLU TV numarası bağlanırken, tüm kanallara gözatmak için CH▲ veya CH▼ düğmelerine basılır. Press the MENU button, select MORE, select SET AREA in the MORE, list items, use the CH▲ or CH▼ buttons to choose the appropriate country signal, then press Vol► button to make the selection. If your country is not listed, choose another country with the same TV system as yours. Apasati butonul MENU, selectati MORE, selectati SET AREA in lista sectiunii MORE, folositi butoanele CH▲ sau CH▼ pentru a alege semnalul adecvat regiunii, apoi apasati butonul Vol► pentru a selecta. Daca tara dumneavoastra nu este in lista , alegeti alta tara ce foloseste acelasi sistem ca tara dumneavoastra. Paspauskite MENU mygtuką, pasirinkite MORE, šiame meniu pasirinkite SET AREA, peržiūrėkite sąrašą ir CH▲ arba CH▲ mygtukais pasirinkite pageidaujamą valstybę/signalų tipą ir patvirtinkite šį veiksmą paspausdami VOL► mygtuką. Jei jūsų valstybės sąraše nėra, pasirinkite kitą valstybę, kurioje televizijos signalų sistema yra tokia pat, kaip ir valstybėje, kurioje esate jūs. OSD POSITION Use the CH▲, CH▼, Vol◄, and Vol► buttons to move the frame where you want to set the position of the MENU, then press MENU. Folositi butoanele CH▲, CH▼, Vol◄ si Vol► pentru a muta incadrarea pe pozitia unde doriti sa asezati meniul, apoi apasati MENIU. Mygtukais CH▲, CH▼, VOL◄ ir VOL► perkelkite rėmelį į vietą, kurioje norėtumėte matyti meniu, o tada paspauskite MENU. MÖNÜ düğmesine basılır, MORE... ve MORE... Mönüsü içerisinde SET AREA Listesinden uygun ülkenin seçilmesi için CH▲ veya CH▼ düğmesi kullanılır. Seçimin yapılması için, bundan sonra, Vol► düğmesine basılır. Ülke isminin listede bulunmaması halinde, AVerMedia® AVerTV Box7 Live’ın kullanılacağı ülke ile aynı TV Sistemini kullanan ülkelerin herhangi birisi seçilir. Çerçevenin MÖNÜ’de istenilen yere getirilmesinde, CH▲, CH▼, Vol◄, ve Vol► düğmeleri kullanılır ve bundan sonra MÖNÜ’ye basılır. RESOLUTION Use the CH▲ or CH▼ buttons to select NO to restore the original resolution setting or YES to accept the new resolution setting then press Vol►. If the monitor can not support the new setting, the original setting will be automatically restored after 10 seconds or press PC BGM/Res. button of the remote control to switch to different resolution setting of 1024x768. Folositi butoanele CH▲ sau CH▼ pentru a selecta; NO (NU) pentru a reveni la setarea rezolutiei initiale; sau YES (DA) pentru a accepta noua rezolutie apoi apasati Vol►. Monitorul nu suporta noile setari, in 10 secunde setarile initiale vor fi restabilite sau apasati butonul PC BGM/Res. al telecomenzii pentru a comuta catre alta rezolutie decat 1024x768. LANGUAGE Use the CH▲ or CH▼ buttons to select from different languages then press Vol►. Folositi CH▲ sau CH▼ pentru a selecta o limba apoi apasati Vol►. SET AREA ) ) 12 NOTE For Bulgaria, Romania and Slovakia area setting, the unit can set each channel to watch in BG or DK TV system. To do it, follow the instructions below: 1. Select the desired channel to change the TV system setting. 2. Use the remote control and press the RED button. 3. Press the YELLOW button of the remote control, to change it to BG and BLUE button to DK. The selected TV system appears in RED. 4. To continue changing the TV system of other channel, use the CH ▲ and CH ▼ then follow step 3. Press the RED button again to exit. Nota Pentru Bulgaria, Romania si Slovacia - setari regionale, unitatea seteaza fiecare canal pentru vizualizare in sistem TV BG sau DK. Pentru realizare sa, se urmaresc instructiunile: 1. Selectare canal dorit pentru schimbare sistem TV. 2. Folosire telecomanda si apasare buton rosu. 3. Apasare buton GALBEN de pe telecomanda pentru schimbare in BG si ALBASTRU pentru DK. Siatemul TV selectat apare in ROSU 4. Pentru continuarea schimbarii sistemului TV ale altor canale, se foloseste CH▲ si CH▼ apoi urmareste pasul 3. Apasare buton ROSU din nou pentru iesire. 7 Mygtukais CH▲ arba CH▼ pasirinkite NO, jei norite atkurti pradinį skyros nustatymą arba YES, jei norite patvirtinti naująjį skyros nustatymą, o tada paspauskite VOL►. Jei monitorius nepalaiko naujų nustatymų, tai orginalūs nustatymai bus automatiškai atsatyti per 10 s arba pasirinkite PC BGM/Res mygtuką, nuotlinio valdymi pultelyje, norėdami perjunkti rezoliucija 1024x768. Mygtukais CH▲ arba CH▼ pasirinkite reikiamą kalbą ir paspauskite VOL►. CH▲ or CH▼ butonlarını kullanarak orijinal çözünürlük için NO’yu seçin veya YES’I seçerek yeni çözünürlük ayarlarını onaylayın sonra Vol►’e basın. Eğer monitörünüz yeni ayarları desteklemezse original ayarlar otomatik olarak 10 sn. içinde tekrar saklanacaktır veya 1024 x 768 in farklı çözünürlüklerini kullanmak istediğinizde kumandanızın PC BGM / Res. düğmesine basın Pastaba Bugarija, Rumunija ir Slovakija regionuose, galima kiekvieną kanalą žiūrėti BG ir DK TV. Žiūrėti esančią instrukciją žemiau. 1. Pasirinkite norimą kanalą, norėdami pakeisti TV sistemos nustatymus. 2. Naudokitės nuotolinio valdymo pulteliu, paspauskite raudona klavišą. 3. Paspauskite geltoną klaviša nuotolinio valdymo pultelyje, norėdami pakeisti I BG ir paspauskite mėlyną klaviša, tai patvirtindami. Pasirinkta TV sistema matysis raudonajam klaviše. 4. Norėdami užbaigti, naudokite CH▲ ir CH▼ klavišais. Paspauskite raudona klavišą kad išeiti. NOT Bulgaristan, Romanya ve Slovakya bölgesi ayarı için, unite her kanalı BG veya DK TV sistemi modunda izlenmek üzere ayarlayabilir. Bunun için aşağıdaki talimatları izleyin: 1. TV sistemi ayarını değiştirmek istediğiniz kanalı seçin. 2. Uzaktan kumandayı kullanarak KIRMIZI düğmesine basın. 3. BG olarak değiştirmek için SARI düğmeye ve DK olarak değiştirmek için de MAVİ düğmeye basın. Seçilen TV sistemi KIRMIZI olarak belirir. 4. Başka bir kanalın TV sistemini değiştirmek için, use CH ▲ ve CH ▼ tuşlarını kullandıktan sonra 3. adımı izleyin. Çıkmak için KIRMIZI düğmeye tekrar basın. Farklı diller, CH▲ veya CH▼düğmeleri kullanılmak suretiyle seçilir ve sonra Vol► düğmesine basılır