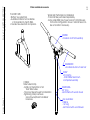
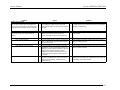
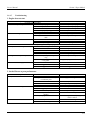
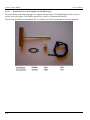
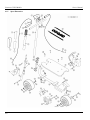
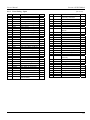
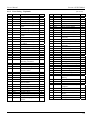
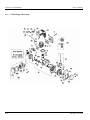
1
Patmont Motor Werks
Introduction
Introduction
This manual is divided into seven sections, which cover specific Go-Ped® Models, gas and electric powered
and detailed complete parts lists and illustrations for each. Also, most sections include troubleshooting
information to assist your PMW dealership and technicians in providing customers with the best service.
For additional assistance, please feel free to contact Patmont Motor Werks Warranty Department by phone at
925-456-7052 or by email at [email protected].
No part of this publication may be reproduced, stored in a retrieval system, or transmitted, in any form by
any means, electronic, mechanical, photocopying, recording, or otherwise without the prior written
permission of the publisher.
The information contained in this manual may change at any time without notice.
All information contained in this manual is based on the latest product information available at the time of
printing.
First Printing - March 2002.
Revised – November 2005
i
Introduction
Patmont Motor Werks
Workshop Procedures
Detailed descriptions of standard workshop procedures, safety principles and service operations are
not included in this manual. This manual does contain warnings and cautions against some specific
service methods, which could cause personal injury, or could damage a machine or make it unsafe.
Anyone using service procedures or tools whether or not recommended by Patmont Motor Werks Inc.
must satisfy themselves thoroughly that neither personal safety or machine safety will be jeopardized.
ii
1
2
Strato charged Models
GZ25N14 Engine
ESR 750
ESR750Ex
3
Super X-Ped
Super Bigfoot
G230RC Engine
4
Sport
Bigfoot
X-Ped
Liquimatic
G23LH Engine
5
GSR40
6
Super Go-Quad 30
7
Go-Ped® Trail Ripper
GTR40
Service Manual
Section 1 Strato – GSR25 Models
SECTION 1. STRATO-GSR 25 MODELS
The following machines are powered by the GZ25N23 Strato-Charged engine.
There are four models in the 25 line, The GSR 25, the GSR-Sport, the X25 and the S25.
This section contains parts illustrations, parts lists, disassembly, assembly, frequently asked questions and
troubleshooting information for each machine.
Paragraph
1.1
1.2
1.3
1.4
1.5
1.6
1.7
1.8
1.9
1.10
1.11
1.11.1
1.11.2
1.11.3
1.11.4
1.11.5
1.11.6
1.11.7
1.11.8
1.12
1.13
Page
GSR 25 PARTS ILLUSTRATION........................................................................................ 1-2
PARTS LISTING – GSR 25 (REV 03-05) ............................................................................ 1-3
GSR-SPORT PARTS ILLUSTRATION ............................................................................... 1-4
PARTS LISTING – GSR-SPORT (REV 03-05) ................................................................... 1-5
X25 ILLUSTRATION ........................................................................................................... 1-6
PARTS LISTING – X25 (REV 02-04) .................................................................................. 1-7
SPORT S25 ILLUSTRATION .............................................................................................. 1-8
PARTS LISTING – SPORT S25 (REV 02-04) ..................................................................... 1-9
GZ25N14 ENGINE PARTS ILLUSTRATION................................................................... 1-10
PARTS LISTING – GZ25N14 ENGINE............................................................................. 1-11
DISASSEMBLY AND REASSEMBLY ............................................................................. 1-12
Removing the T-Bar and Lower Hinge Fitting Assembly ......................................... 1-12
Removing and Reinstalling the Front Fork ................................................................ 1-12
Replacing the Lower Hinge Fitting Assembly ........................................................... 1-13
Reinstalling the T-Bar ................................................................................................ 1-13
Replacing and Adjusting the Clutch Cable................................................................. 1-13
Replacing the Wheels because of tire wear ................................................................ 1-15
Replacing the Throttle Cable...................................................................................... 1-15
Engine Mounting Bolt adjustment.............................................................................. 1-15
FREQUENTLY ASKED QUESTIONS .............................................................................. 1-17
GSR 25, GSR-SPORT AND S25 FLAT RATE SCHEDULE ............................................ 1-18
1-1
Section 1 Strato – GSR25 Models
1.1
1-2
GSR 25 Parts Illustration
Service Manual
Service Manual
1.2
Item
1.
2.
3.
4.
5.
6.
7.
8.
9.
10.
11.
12.
13.
Section 1 Strato – GSR25 Models
Parts Listing – GSR 25
(Revised November 3, 2005)
Part No.
1061
1064
1063
1081
1048L
Description
Reflective T-Bar Pad
Red Warning Label
Yellow Warning Label
Brake Cable Assembly
Brake Lever Assembly
Qty
1
1
1
1
1
BF1050
1051
1049
1412
Throttle Cable Assembly
Throttle Lever
Grips/set
Carry Loop, nylon (GSR25)
1
1
1
1
3123
1
14.
1088
15.
16.
17.
18.
19.
GSR1041
1060
1022
Kill Switch Assembly
(includes kill switch, nut,
washer)
Bolt 3/8-24 x 3.5” Low Hex
Head; front wheel assembly
T-bar, anodized – 24.75”
Safety Spring
Slide Tube
MD1027A
- color
1090
1083A
Front Fork assembly w/axle
Mad Dog - Lefty
Bolt, maddog caliper mount
Caliper, Front Mad Dog Brake
1
1028
2026M
BF1033
1008
2
2
2
4
GBF1006
1068
1011
1009
1010
Bearing kit; front fork
Wheel; 10”PT; 2pcs. Mag.
Bolt, Axle 5/8-18 x 6 HHCS
Bolt, Deck ¼-20 x 1-3/4
FHCS
Deck w/Grit
Sticker, Made in U.S.A.
Grommet, Deck
Washer, Deck
Nut, Deck
1025
Bolt, Gas Tank Mount
1
2113
1087
45171
1026
BF1036
BF1059O
BF1058T
Gas Tank Assembly
Spacer, Disc Brake, maddog
Gas Cap
Nut, Gas Tank Mount
Washer, Axle
Tire, Rubber “TT” Power Play
Tube, 10” Inner
1
4
1
3
2
2
2
20.
21.
22.
23.
24.
25.
26.
27.
28.
29.
30.
31.
32.
33.
34.
35.
36.
37.
38.
39.
40.
4
1
1
1
1
1
1
1
8
4
4
41.
42.
43.
44.
45.
46.
47.
48.
49.
50.
51.
52.
53.
1401
1454A
Bolt, Engine Mount M6x35
Motor Mount w/ Clutch drum
4
1
GSR1026
GSR1027
4801B
Muffler Connect Tube
Clamp, Exhaust tube
Engine, GZ25N23, 25.4cc
1
1
1
1072A
1074A
8634C
1
1
1
54.
55.
56.
57.
1635
2001
1407
251001
- color
1024
1043
Retaining Ring, Kickstand
Washer, Kickstand
Kickstand Assembly, New
Style
Spring, Kickstand, New Style
Grip Tape, Go-Ped Die Cut
U-bolt; motor mount
Frame Assembly (unpainted)
Options A,B,BK,G,SB,P,Y,R
Spacer, Gas Tank
Lower Hinge Fitting Assy,
(Alum), inc bolt, wedge nut
Grommet, Exhaust frame
Wheel Bearing
Fender with silver decal
Fender/Tank Rear Bracket
Handle Hinge Pin
58.
59.
60.
61.
62.
63.
64.
65.
66.
67.
68.
69.
GSR1028
BF1038A
GSR1022A
GSR1019
1056
70.
71.
72.
73.
74.
75.
76.
77.
BF1037
1055
GSR1003
3120
3118
GSR1004.1
6007
GSR1045
8008
8003SS
GSR1004.84
GSR1014
Go Snuffer Silencer
Bolt, Rear Wheel
Nut, Hub
Rotor, Front Stainless Steel
Disc Brake
Nut, Axle 5/8-18 NTF
Cable, End Crimp
Chain, # 25 Heavy 94 link
Fuel Filter
Fuel Line Return Fitting
Sprocket, 6 tooth
Sprocket; 84 tooth (GSR's)
Spacer; rear wheel to sprocket
Available Assemblies
MD1058TT Wheel Assy Front (Mag.)
1458TT
Wheel Assy Rear (Mag.)
1446A
T-Bar complete – 24.75”
1
1
1
1
3
1
1
4
1
1
1
1
4
8
1
2
1
1
1
1
1
1
4
1
1
1-3
Section 1 Strato – GSR25 Models
1.3
Service Manual
GSR-Sport Parts Illustration
Illustration unavailable, please check back.
1-4
Service Manual
1.4
Item
1.
2.
3.
4.
5.
6.
Section 1 Strato – GSR25 Models
Parts Listing – GSR-Sport
(Rev 12-02)
Part No.
1061
1064
1054
1063
1047
1069
Description
Reflective T-Bar Pad
Red Warning Label
Brake Cable Assembly
Yellow Warning Label
Brake Lever Assembly
Nut, Throttle Clamp
8-32 Nylok
11.
12.
1050
1051A
1049
1062
KN1005
1051B
1
1
1
1
1
1
13.
14.
15.
3123
1056
1447A
Throttle Cable Assembly
Throttle Lever
Grips/set
Safety Spring & Grip Kit
Latch, T-Bar
Throttle Lever Assembly
(includes items – 9, 18, 20, 6)
Kill Switch Assembly
Handle Hinge Pin
T-Bar w/Upper Hinge-28.75”
16.
17.
18.
1060
1022
1067
1
1
1
19.
1027
Safety Spring
Slide Tube
Screw, Throttle Clamp 8-32 x
½ SHCS
Front Fork w/axle
Designate color w/ Part #
Clamp, Throttle Lever
Caliper, Front Brake
Nut, Axle 3/8-24
Front Fork Bearing Kit
Wheel Assembly, Mach 12
(replaces #1059)
Axle Bolt 3/8-24 x 3-1/2
Bolt, Deck
Deck w/grit
Fender, Rear
Fender Mount Hardware Kit
Fender Kit, Rear
Grommet, Deck
Washer, Deck
Nut, Deck
Rear Brake
1
1
1
1
1
7.
8.
9.
10.
20.
21.
22.
23.
24.
1066
1030
1037
1028B
1158
25.
26.
27.
28.
1033
1008
GS1006
1410
1310B
1310
1011
1009
1010
1311B
29.
30.
31.
32.
Qty
1
1
1
1
1
1
1
1
1
33.
34.
35.
36.
37.
38.
39.
40.
41.
42.
43.
1458
44.
45.
46.
8014
8016
GSR1026
47.
48.
6007
4801A
1018
1014
1013GS
1072A
1074A
8634C
49.
50.
51.
52.
53.
1025
2025
1055
BF3113
45171
1026
1036
1053
1
2
4
1
1
1
1
8
4
4
1
54.
55.
56.
57.
1635
2001
1312
58.
59.
1024
1043A
60.
61.
62.
63.
64.
65.
66.
67.
8020
1038A
1068
1303
3120
3118
1306D
1413
Bolt, Gas Tank Mount
Cable Barrel w/nut
Cable, End Crimp
Gas Tank Assembly
Gas Cap
Nut, Gas Tank Mount
Washer, Axle
Plastic Cable Tie (8”)
Screw, Engine Mount
Engine Mount Bracket
Wheel Assy, Rear w/ 56T
sprocket
Nut, Engine Bracket
Washer, Swivel Damper
Muffler Connect Tube
Assembly
Go Snuffer Silencer
Engine, GZ25N23, 25.4cc
Engine Hardware Kit
Bolt, Drive Spindle M6x55
Drive Spindle w/grit
Retaining Ring, Kickstand
Washer, Kickstand
Kickstand Assembly, New
Style
Spring, Kickstand, New Style
Grip Tape, Go-Ped Die Cut
Bolt, Motor Mount
Frame Assembly
Spacer, Gas Tank
Lower Hinge, FTG
Assembly, Aluminum
Fender Retaining Washer
Wheel Bearing
Sticker, Made in U.S.A.
Fender/Tank Rear Bracket
Fuel Filter
Fuel Line Return Fitting
Spacer, Motor Pivot
Bolt, Rear Axle
3
1
1
1
1
3
4
1
4
1
1
1
1
1
1
1
1
1
1
1
1
1
1
1
1
1
3
1
1
4
1
1
1
1
1
1
1-5
Section 1 Strato – GSR25 Models
1.5
1-6
X25 Ped Illustration
Service Manual
Section 1 Strato – GSR25 Models
Service Manual
1.6
Parts Listing – X25 Ped
(Rev 02-04)
Item
1.
2.
3.
4.
5.
6.
Part No.
1061
1064
1054
1063
1047
1069
Description
Reflective T-Bar Pad
Red Warning Label
Brake Cable Assembly
Yellow Warning Label
Brake Lever Assembly
Nut, Throttle Clamp
8-32 Nylok
Qty
1
1
1
1
1
1
7.
8.
9.
10.
11.
12.
13.
1050
1051A
2049
KN1005
XS1006
1051B
14.
15.
1056
2043
16.
17.
18.
1060
1022
1067
19.
20.
21.
22.
23.
24.
25.
1127BK
2025
1030
7008
1028
X1058
1131
26.
27.
28.
1008
1006XSA
Throttle Cable Assembly
Throttle Lever Assembly
Pro Grip set
Latch, T-Bar
Slide Deck
Throttle Lever Assembly
(includes items – 9, 18, 34, 6)
Handle Hinge Pin
Handlebar Assembly
Complete 24.75”
Safety Spring
Slide Tube, Silver
Screw, Throttle Clamp 8-32 x
½ SHCS
Front Fork, Bothy Black
Cable Barrel w/nut
Brake Caliper, Front
Nut, Axle, Rear ½-20
Front Fork Bearing Kit
Wheel Assembly, Aluminum
Axle Assembly, for Bothy
Fork
Bolt, Deck
Deck, Billet AL. w/Grit
29.
30.
31.
32.
33.
1317
1009
1010
Bolt, Rear Axle ½-20 x 5
Washer, Deck
Nut, Deck
1
8
8
1025
Bolt, Gas Tank Mount
M6x60
3
1
1
1
1
1
1
1
1
1
1
1
1
2
1
1
1
2
1
8
1
34.
35.
36.
37.
38.
39.
40.
41.
42.
43.
44.
45.
46.
1066
1053
3113
3116
1026
7009
1055
1023
Clamp, Throttle Lever
Plastic Cable Tie (8”)
Gas Tank w/ Fuel Lines
Gas Cap
Nut, Gas Tank Mount M6
Washer, Axle 1/2”
Cable, End Crimp
Screw, Engine Mount M5 x
1
3
1
1
3
6
1
4
1019GS
1
47.
48.
6007
4801
1018
1016
1013B
1072
1074
8633
Muffler Connect Tube
Assembly
Plug, Go Snuffer Silencer
Engine, GZ25N14, 25.4cc
Engine Hardware Kit
Bolt, Drive Spindle M6 x 55
Drive Spindle w/grit
E-Clip, Kickstand 5/16
Washer, Kickstand 5/16
Kickstand Assembly, New
Style
Spring, Kickstand, New Style
Grip Tape, Go-Ped Die Cut
49.
50.
51.
52.
53.
54.
55.
56.
57.
58.
59.
60.
61.
62.
63.
64.
65.
66.
67.
1635
2001
CX1001BK
1024
X1043
Q1038A
1068
1303
1053S
3120
3118
1
1
1
1
1
1
1
1
1
1
Frame Assembly, Black
Spacer, Gas Tank
Lower Hinge, Fitting
Assembly, Steel
1
3
1
Wheel Bearing
Sticker, Made in U.S.A.
Fender/Tank Rear Bracket
Plastic Cable Tie (4”)
(not shown)
Fuel Filter
Fuel Line Return Fitting
1
1
1
1
1-7
Section 1 Strato – GSR25 Models
1.7
1-8
Sport S25 Illustration
Service Manual
Service Manual
1.8
Section 1 Strato – GSR25 Models
Parts Listing – Sport S25
Item
1.
2.
3.
4.
5.
6.
Part No.
1061
1064
1054
1063
1047
1069
7.
8.
9.
10.
11.
12.
13.
3123
1050
1051A
1049
KN1005
1017
1051B
14.
15.
1056
1046CL
16.
17.
18.
1060
1022
1067
19.
20.
21.
22.
23.
24.
25.
1128
(R,B or
BK)
2025
1030
1037
1028B
1158
KN1012
26.
27.
28.
29.
30.
1008
S1006
1015
1012
1009
Description
Reflective T-Bar Pad
Red Warning Label
Brake Cable Assembly
Yellow Warning Label
Brake Lever Assembly
Nut, Throttle Clamp
8-32 Nylok
Kill Switch Assembly
Throttle Cable Assembly
Throttle Lever Assembly
Grip Set
Latch, T-Bar
Wing Nut, Quick Release
Throttle Lever Assy
Complete
Handle Hinge Pin
Handlebar Assembly
Complete 28.75”
Safety Spring
Slide Tube, Black
Screw, Throttle Clamp 8-32 x
½ SHCS
Fork, Bothy Front
(Rev 02-04)
Qty
1
1
1
1
1
1
1
1
1
1
1
1
1
1
1
1
1
1
P/N should be followed by R, B or
BK for color
Cable Barrel w/nut
Brake Caliper, Front
Nut, Axle, Front 3/8-24
Bearing, Front Fork
Wheel Assembly, Mach 12
Bolt, Axle Front 3/8-24 x 41/2
Bolt, Deck
Deck
Quick Release E.P W.
Quick Release Axle Bolt
Washer, Deck
2
1
1
2
2
1
4
1
1
1
4
31.
32.
33.
1010
1011
1025
34.
35.
36.
37.
38.
39.
40.
41.
42.
43.
44.
45.
46.
1066
1053
3113
3116
1026
1036
1055
1023
3118
3120
1068
1038A
1019A
47.
1043
48.
49.
50.
51.
4801
1016
1013GS
1072
52.
53.
1074
8633
54.
55.
56.
57.
1635
2001
1024
C1001
(R,B or
BK)
1053S
58.
Nut, Deck
Grommet, Deck
Bolt, Gas Tank Mount
M6x60
Clamp, Throttle Lever
Plastic Cable Tie (8”)
Gas Tank w/ Fuel Lines
Gas Cap
Nut, Gas Tank Mount M6
Washer, Axle 3/8
Cable, End Crimp
Screw, Engine Mount M5x
Fuel Line Return Fitting
Fuel Filter
Sticker, Made in U.S.A.
Wheel Bearing
Muffler Connect Tube
Assembly
Lower Hinge, Fitting
Assembly, Aluminum
Engine, GZ25N14, 25.4cc
Bolt, Drive Spindle M6x55
Drive Spindle w/grit
Retaining Ring, Kickstand
5/16
Washer, Kickstand 5/16
Kickstand Assembly, New
Style
Spring, Kickstand, New Style
Grip Tape, Go-Ped Die Cut
Spacer, Gas Tank
Frame Assembly, R, B or BK
Plastic Cable Tie (4”)
(not shown)
4
8
3
1
3
1
1
3
6
3
4
1
1
1
1
1
1
1
1
1
1
1
1
1
1
3
1
2
1-9
Section 1 Strato – GSR25 Models
1.9
1-10
GZ25N23 Engine Parts Illustration
Service Manual
Service Manual
1.10
Item
1.
2.
3.
4.
5.
6.
7.
8.
9.
10.
11.
12.
13.
14.
15.
16.
17.
18.
19.
20.
21.
22.
23.
24.
25.
26.
27.
28.
29.
Section 1 Strato – GSR25 Models
Parts Listing – GZ25N23 Engine
Part No.
3020
3021
3022
3039
3040
3044
4057
4501
4502
4503
4505
4505
4506
4507
4508
45101
45012
45110
45111
45113
45125
4513
45130
45137
4514
45140
45144
45145
45146
Description
Bearing Set, Crankcase
Ring, Crankcase
Key, Flywheel
Bearing, Piston
Pin Washer Set
Nut, Flywheel
Spacer, Ignition Coil
Cylinder
Gasket, Cylinder Base
Bolt, Torx, Cylinder
Insulator, Manifold
Gasket, Insulator
Gasket, Carburetor
Bolt, Torx, Insulator
Reed Valve Assembly (F)
Bolt, Torx, Muffler
Gasket, Muffler
Cover, Engine
Screw, Engine Cover
Bolt, Torx, Cylinder Plate
Spark Plug
Pipe, Air (F)
Recoil Starter Assembly
Bolt, Torx, Starter
Reed Valve Assembly (S)
Air Filter, Rear Housing
Air Filter Element
Air Filter Screen
Air Filter Cover Assembly
Qty
1
1
1
1
1
1
1
1
1
1
1
1
1
1
1
1
1
1
1
1
1
1
1
30.
31.
32.
33.
34.
45171
4519
4520
4521
4529
35.
36.
4532
4538A
37.
38.
39.
40.
41.
42.
43.
44.
45.
46.
47.
48.
49.
50.
4540
4541
4542
4546
4549
4551
4552
4553
4554
4555
4559
4570
4585
4019
51.
52.
53.
54.
4012
4504
4801
Gas Cap
Pipe, Air (S)
Gasket, Reedvalve
Bolt, Torx, Reedvalve
Crankcase Assembly with
Bearings and Seals
Gasket, Crankcase
Bolt, M5 x 30 SHCS
Crankcase
Piston
Piston Ring Set
Pin, Piston
Crankshaft Complete
Flywheel
Pawl, Starter
Screw, Pawl Locator
Washer, Pawl Spacer
Spring, Pawl
Ignition Coil Assembly
Bolt, Torx, Coil Mount
Carburetor Assembly
Bolt, Torx, Carburetor
Oil Seal Set (separate from
bearings)
Muffler
Manifold, Carburetor
Engine, GZ25N14, 25.4cc
Cylinder Plate
1
1
2
1
1
1
1
1
1
1
1
1
1
1
1
1
1
1-11
Section 1 Strato – GSR25 Models
1.11
Service Manual
Disassembly and Reassembly
IMPORTANT: The Warranty card must be completely filled out and returned to Patmont
Motor Werks. If the Warranty card is not returned, there is NO Warranty on the machine.
IMPORTANT: Modification of the machine or the engine VOIDS the Warranty. If any parts
are replaced on the machine that are not Genuine Go-Ped® replacement parts, the Warranty
is VOID.
1.11.1 Removing the T-Bar and Lower Hinge Fitting Assembly
1. Fold the handlebars to the carrying position.
2. Place the machine on its side with a solid object (such as a 2x6 piece of wood) under the fork.
3. Using a drift, drive the hinge pin out of the Lower Hinge Fitting assembly until the T-Bar can be
removed.
CAUTION: The slide tube is spring loaded. Be sure it does not fly off and cause injury.
4. Remove the T-Bar from the Lower Hinge Fitting assembly.
5. Using a ¼” Allen wrench, loosen the Lower Hinge Fitting bolt.
6. Using a drift or insert the ¼” Allen wrench, hit the top of the Allen bolt to loosen the Wedge Nut.
NOTE: If the Wedge Nut is stuck in the Fork, spray a lubricant in the bottom of the fork to
help loosen it. Thread the Lower Hinge Bolt into the Wedge to extract the Wedge from the
Fork.
7. When the Wedge Nut becomes loose, the Lower Hinge Fitting may be removed from the Front Fork.
1.11.2 Removing and Reinstalling the Front Fork
1. Use a large ViseGrip® or ChannelLock® pliers to remove the Fork Nut.
CAUTION: If the Fork Nut is Loctited in place it may be necessary to clamp and hold the
front wheel in place in order to turn the Fork Nut.
2. Pull the Front Fork out of the frame.
3. Before removing the bearings from the races, notice how the bearings are seated in the races. They must
be replaced in the same orientation to avoid bearing damage.
4. Clean and inspect the bearings and races.
5. If the bearings or races are damaged or show signs of wear, install a new Front Fork Bearing Kit.
6. Grease the bearings and bearing surfaces using a lithium based grease.
7. Reinstall the bearings and fork into the frame.
8. Clean and inspect the Fork Nut. If the Fork Nut is worn or damaged, replace it.
1-12
Service Manual
Section 1 Strato – GSR25 Models
9. Install the Fork Nut.
10. Adjust the Fork Nut so there is no play in the bearings. Do not over-tighten.
1.11.3 Replacing the Lower Hinge Fitting Assembly
1. Assemble the pieces of the Lower Hinge Fitting Assembly. Do not completely tighten the Wedge Nut.
2. Push the Lower Hinge Fitting Assembly into the Front Fork, making sure the Fitting is seated properly.
The Lower Hinge Fitting Assembly should be in contact with the Fork Nut.
3. Align the Lower Hinge Fitting Assembly with the Front Wheel as shown. (GSR Sport shown)
4. Securely tighten the Allen Bolt.
1.11.4 Reinstalling the T-Bar
1. Replace the spring and slide tube on the T-Bar.
NOTE: Replacing the T-Bar may require two persons, one to hold the slide tube in place and
the other to drive the hinge pin in place.
2. Position the T-Bar in place on the fork and drive the hinge pin back in place.
3. Apply grease to the areas where the Slide Tube slides on the T-Bar and Lower Hinge Fitting assembly
when the T-Bar is extended to the riding position.
4. Extend the T-Bar to the riding position and check that the slide tube properly engages the Fork Nut.
5. After reassembly, check that there is no play or binding in the bearings and that the T-Bar folds properly
into the carrying position.
6. Check that the Lower Hinge Fitting Assembly is securely fastened to the Front Fork.
7. With the engine disengaged from the rear wheel, push the Go-Ped® around and check that the steering is
working properly.
1.11.5 Removing the Engineplacing and Adjusting the Clutch Cable
1. Using (2) 15/16” wrenches remove the rear axle nut.
2. Using a 9/16” wrench or socket loosen the (2) Engine mount nuts located under the Engine, push the
Engine and mount reward enough to loosen the chain
1-13
Section 1 Strato – GSR25 Models
Service Manual
3. Now pivot the Fender/Gas tank assy forward
4. Remove the Throttle cable from the Carburator. Save the nut that clamps the cable to the engine.
5. Remove the Fuel Lines and either plug them or fold the fuel lines over to pinch off and use a plastic tie to
secure the fold and seal.
6. Using a ? size Allen wrench remove the (4) ? Socket head cap screws (Allen bolts) equally.
7. There are (2) aluminum spacers Pull the new cable out of its casing.
8. Feed the cable through the clutch lever and hook the end in the clutch handle.
9. Start feeding the cable through the casing and grease it as it is being fed through.
10. When the cable is completely fed through the casing, grease the cable that extends through the casing and
pull it partially back through the casing.
NOTE: This part of the cable needs to be well greased because it takes the most wear.
11. Push the clutch handle to the fully engaged position.
12. Be sure the cable is completely pulled through the casing.
13. Feed the end of the cable through the adjusting barrel and around the clamping bolt on the engine
bracket.
14. With the drive spindle resting on the tire, tighten the cable clamping bolt.
15. Position the clutch lever to the disengaged position.
16. Check that the drive spindle is lifted free of the tire.
IMPORTANT: When the clutch cable is properly adjusted the drive spindle is lifted slightly
from the tire when the clutch lever is set to the disengaged position. If the clutch cable is not
correctly adjusted, the drive spindle will not make proper contact with the tire and the tire will
be ruined.
17. Test drive the machine and check that the drive spindle properly engages the tire.
NOTE: Spindles and tires wear as a result of normal operation and will eventually need to be
replaced.
1-14
Service Manual
Section 1 Strato – GSR25 Models
1.11.6 Replacing the Wheels because of Tire Wear
IMPORTANT: If the tires wear down to the wear dimple on the side of the tire they must be
replaced. Driving the machine after the tires are worn beyond the wear dimple is dangerous
and may damage the machine. Failure to replace the tires after they are worn down to the
wear dimple will VOID the warranty.
1. Check tire wear.
2. If the tire is worn down to the wear dimple, it must be replaced.
3. Remove the axle. Note the position of any washers on the axle.
4. Remove the old wheel from the axle.
5. Install the new wheel, replacing any washers in the same position they were removed from.
1.11.7 Replacing the Throttle Cable
NOTE: If the engine will not start it may be because the throttle cable is grounding on the
frame. To check for unintentional grounding, disconnect the electrical plug from the engine to
the throttle cable. If the engine starts with the throttle cable disconnected, you will most likely
need to replace the throttle cable.
1. Disconnect the plugs on the throttle cable at the kill switch and the engine.
2. Disconnect the throttle cable from the carburetor.
3. Remove the throttle cable (notice the cable routing).
4. Remove the new cable from the throttle casing.
5. Grease the cable and reinsert it into the casing.
6. Replace the throttle cable using the same routing as the original throttle cable.
7. Reconnect the throttle cable to the carburetor.
8. Reconnect the plugs at the kill switch and engine.
9. Check to be sure the throttle cable is properly adjusted.
10. Start the engine and check for proper throttle operation.
11. Drive the machine
1.11.8 Engine Mounting Bolt adjustment
IMPORTANT: Inspect and tighten the Engine Mounting Bolt prior to riding the Geo
machines. Through normal operation this bolt may loosen and rub against the tire.
1-15
Section 1 Strato – GSR25 Models
1.
2.
3.
4.
Service Manual
Inspect the clearance between the engine mounting bolt and rear tire (Older Geo Sport models).
Be sure the mounting bolt has no play.
If there is play or looseness in the engine mounting bolt, retighten securely.
Check to be sure the engine pivots freely to allow proper engagement on the tire.
1-16
Service Manual
1.12
Section 1 Strato – GSR25 Models
Frequently Asked Questions
IMPORTANT: The Warranty card must be completely filled out and returned to Patmont
Motor Werks. If the Warranty card is not returned there is NO Warranty on the machine.
IMPORTANT: Modification of the machine or the engine VOIDS the Warranty. If any parts
are replaced on the machine that are not Genuine Go-Ped® replacement parts the Warranty
is VOID.
Q. What is an FTG? What is a steel FTG?
A. FTG is short for Fitting. The FTG is the piece that the end of the T-Bar connects to. The Stock FTG is
Aluminum. An optional Steel FTG is available. It is much stronger.
Q. What should I look for in an oil?
A. Use a fully Synthetic oil in your Go Ped®. Go-Mix II premixed oil packets are recommended and
available through your Go-Ped® Dealer.
Q. What is a Rocket Key and what does it do?
A. A Rocket Key is an OFFSET key that replaces the stock timing key that is in your motor. The Rocket Key
advances the engines timing 10 degrees to give it more power.
Q. What oil ratio should I use?
A. Use a fully synthetic oil for a stock motor with no modifications – 50:1 ratio. For a semi modded – 32:1
ratio. For a super moded motor – 25:1 ratio. For a crazy moded motor – 20:1 ratio.
Q. How many ounces of oil is 50:1, 32:1, 25:1?
A. Oil ratios – 50:1 = 3.2 oz/gal – 32:1 = 4.0 oz/gal – 25:1 = 5.3 oz/gal
Q. How to change the tire skin?
A. From www.pswsports.com
1. Remove the back tire from the Go-Ped®
2. Carefully take a hacksaw or sharp utility knife and cut the old tire off of the rim
3. Take the new tire and spray 2 (two) squirts of glass cleaner or water inside of the new tire. Rub around the
inside of the tire with your finger to lubricate the inside of the tire.
4. Now take the rim and place it on a hard surface and press the new tire onto one side of the rim. (Just get it
1-17
Section 1 Strato – GSR25 Models
Service Manual
started)
5. Finally, place the tire on the ground and jump on the tire to force it completely onto the rim.
6. Now install the wheel & tire back onto the Go-Ped®
1.13
1-18
Geo-Bigfoot and Geo-Sport Flat Rate Schedule
Remove and Replace
Time
Frame Change
1 ½ hr
T-Handle with cables
¾ hr
T-Handle without cables
1 hr
Engine Rebuild
1-½ hr
Engine Top End
½ hr
Engine
½ hr
Crankshaft
1 hr
Carburetor
¼ hr
Front or Rear Wheel complete
¼ hr
Clutch Cable
½ hr
Grip Shifter with Cable
¾ hr
Exhaust Tube
¼ hr
Deck
¼ hr
Hinge Assembly
½ hr
Brake Cable
¼ hr
Throttle Cable
¾ hr
Front Brake Caliper with Cable
½ hr
Front or Rear Tire change
½ hr
Motor Mount
1 hr
Motor Mount Spring/Clutch
½ hr
Service Manual
Section 1 Strato – GSR25 Models
1.12.1 S25 Flat Rate Schedule
Remove and Replace
Time
Engine
½ hr
Engine Top End
½ hr
Engine Rebuild
1 ½ hr
Crankshaft
1 hr
Carburetor
¼ hr
Wheel complete
¼ hr
Tire change
½ hr
T-Handle with cables
½ hr
T-Handle without cables
¾ hr
Frame Change
1 hr
Exhaust Tube
¼ hr
Deck
¼ hr
Hinge Assembly
½ hr
Brake Cable
¼ hr
Brake Cable with Caliper
½ hr
Throttle Cable
¼ hr
1-19
Service Manual
Section 2 ESR750 & ESR750Ex
SECTION 2: ESR 750 ELECTRIC MODEL
This section contains parts illustrations, parts lists, as well as troubleshooting information for
the Electric Go-Ped® models, ESR750, ESR750Ex and their motor.
Paragraph
Page
2.1
ESR750 & ESR750Ex Motor Service............................................................................ 2-1
2.2
ESR750 & ESR750 Ex Parts Illustration ....................................................................... 2-7
2.3
ESR750 and Batterty Upgrade Kit Parts Illustration...................................................... 2-8
2.4
ESR seat attachment Parts Illustration ........................................................................... 2-8
2.5
ESR accessories.............................................................................................................. 2-9
2.6
ESR Parts lists ............................................................................................................. 2-10
2.7
ESR troubleshooting guide........................................................................................... 2-12
2.1. ESR750 & ESR750Ex Motor Service
The ESR750 motor is a brush DC motor. It consists of a Field (steel tube and magnets) an
Armature (rotating portion) and Comm End (brush assembly and finned heat sink).
Figure #1 shows the major motor components disassembled.
Figure 1
2-1
Service Manual
Section 2 ESR750 & ESR750Ex
To remove the motor from the ESR frame first turn off the ON/OFF switch, then disconnect
the motor wires from the Comm End shown in Figure #2.
You will need to pull back the rubber boots and remove the two outer ¼-20 nuts. Do NOT
remove the two inner nuts which are behind the two terminal rings.
Next, disconnect the small plastic two-wire connector which is for the motor thermostat. The
connector has a locking tab which can easily be released with a small flat head screwdriver or
even a small zip tie.
Figure 2
Next remove the fender and look at the Drive End as shown in Figure #3.
Remove the chain and drive sprocket. The sprocket is held on with a small set screw. Once the
set screw is removed you might need a sprocket puller to easily slide it off the shaft.
Now remove the M6x35 bolt (shown black in this photo) which retains the motor into the
frame.
Last, slide the motor out of the frame. A piece of adhesive-backed plastic may have been used
between the motor and the inside of the tube to shim the motor in the frame. You will need to
reuse or replace that shim. It is used to prevent the motor from vibrating or rattling in the
frame.
You may need to twist the motor or tap GENTLY with a rubber mallet to remove the motor.
Be careful with the motor. The brush card holder and the magnets can both be broken if
abused.
Figure 3
2-2
Service Manual
Section 2 ESR750 & ESR750Ex
Once the motor is removed, you should scribe lines on the motor field and the motor end caps
for easy reassembly. On the bottom of the motor simply scribe small marks across the joint
between each end cap and the motor Field. Those marks will help you re-align the rotation of
the end caps during re-assembly. Proper alignment is important for good motor performance.
If the end caps are improperly twisted the motor will run less efficiently.
Now you are ready to open the motor up. Looking again at Figure #3 you will see two small
hex nuts which are part of the motor. Remove those nuts and the lock washers behind them.
Now you can pull the motor apart into three parts as shown in Figure #1. You might need to
tap GENTLY on the finned Comm End to separate it from the Motor Field.
When you separate the motor the brushes will be pushed out of the holder by the four brush
springs. Be careful not to lose the springs.
Figure 4
Inspect the armature. The epoxy which is orange in this photo will probably be much darker in
color. This is a normal effect caused by brush dust. Inspect the face of the commutator for any
bad segments. The segments are the pie-shaped copper portions of the commutator. A bad
segment will look much different than the rest of the commutator. It will be blackened or
discolored. That is indicative of a broken connection in the winding.
Also check the bearing which is in the billet aluminum Drive End plate.
Figure 5
2-3
Service Manual
Brush Spring
Section 2 ESR750 & ESR750Ex
Brushes
Brush Holder
Now inspect the Comm End (Figure 5). The four brushes should have been pushed up and
possibly out of the brush holder by the four springs. Make sure the brushes are moving freely
and are not stuck in the holder.
Inspect the brushes. When new they are ½” tall. If the brushes are less than .225” tall, they
should be replaced. Brush life will probably be at least 750 hours of use.
Inspect the brush holder for cracks or signs of overheating or deformation.
If necessary, disassemble the Comm End.
First turn the Comm End over to the finned side and remove the two ¼-20 flanged nuts from
the terminal studs. Remove and save the two black plastic flanged washers which are below
the nuts.
Next turn the comm end back over and remove the two Philips Head screws from the brush
holder. Be sure to save the washers, and remember their locations. The Comm End is now
fully disassembled. Note the location and routing of the brushes and wires before removing
them!
FYI - The small electrical component epoxied into the end cap is the thermostat. It should not
be removed.
Comm End Reassembly:
- Place the brush holder into the end cap.
- Place the brushes in their holders the way you found them, and place the terminal studs
through the holes in the end cap. If you install the brushes wrong the motor may run in reverse
or not at all. *Don’t install the brush springs yet.
- Hold the parts in place with your hand and flip the end cap over. Install the two black plastic
flanged washers, and then install the two ¼-20 flanged nuts. That will hold the brushes and
brush holder in place. Tighten the nuts to 20-25 in-lbs. Over tightening can break the brush
holder.
- Flip the comm end back over. Reinstall the Philips head screws and washers the way you
found them. Torque the screws to 20-25 in-lbs. It is very important that the wires be routed
correctly. Where the two long brush wires cross, they are retained by the washer under one of
the Philips head screws. Make sure that the white plastic insulating sleeves are correctly
placed to prevent the copper wires from contacting the aluminum end cap. Make sure that the
bushes can freely slide in the holder. If a brush cannot move freely, the motor will fail after a
small amount of use!
2-4
Service Manual
Section 2 ESR750 & ESR750Ex
>>As the motor spins the commutator gradually wears down the brushes. The brush
springs insure that the brushes stay in constant contact with the commutator. If a brush
becomes stuck, it will gradually lose contact with the face and electricity will begin
arcing to the commutator. This will gradually degrade the commutator. It will also
cause overheating which could damage the brushes, the wires, or the brush holder.
When a stuck brush occurs the rider will feel his power diminish to about 50% of
normal as the motor begins to malfunction.
- When you are ready to reassemble the motor you can reinstall the brush springs. It can be
difficult to hold the brushes in place while you assemble the motor. Using the drawing below
you can make a simple tool to make this task easier. Simply cut the shape out of a rigid metal
or plastic sheet perhaps 1/8” thick. Make sure you clean the tool off thoroughly so that no
particles are left behind in the motor.
Figure 6 & 7
Motor Reassembly:
- With the Comm End reassembled, drop the four brush springs into the holder, and then push
the brushes down on top of the springs. Use the tool described above (or something similar) to
hold the brushes in place as shown in Figure #6.
2-5
Service Manual
Section 2 ESR750 & ESR750Ex
- Put the Armature through the Field, and place them both down onto the Comm End as shown
in Figure #7. Make sure that you have both end oriented correctly. Use the marks you scribed
across the Field and End Caps to realign the ends with the Field.
- Pull the tool out, and allow the field to drop all the way down onto the Comm End.
*You may need to help guide the two long threaded-rods through the holes on the Drive End.
You may also need to help align the end of the armature into the bronze bushing in the Comm
end.
- Once the three sections are assembled, recheck your rotation to make sure your scribed marks
are aligned. Then install the lock washers and nuts. Torque to 25-39 in-lbs.
Turn the output shaft and make sure the motor spins. There will be drag from the magnets, but
you should be able to turn the shaft by hand.
Motor Reinstallation:
- Reinstall the motor in the scooter frame. Reinstall the plastic shim between the motor and the
inside of the frame tube to keep the motor from vibrating in the frame.
- Install the M6x35 socket head bolt, which both mounts the chain tensioner AND retains the
motor in the frame. Torque to 8 ft-lbs. The original bolt has a locking nylon patch, which is
only good for one or two installations. If the patch is worn out, use a new bolt or Blue Loctite.
- Reinstall the sprocket and chain. You might need to clean up the end of the motor shaft to
allow the sprocket to easily reinstall. Sandpaper or a file can quickly accomplish this.
- Hook the small plastic 2-wire thermostat connector back together.
- Hook the motor wires back up. Make sure the terminal rings are not left close to the
aluminum end cap, or a short could occur. Torque the two outer ¼-20 nuts to 20-25 in-lbs.
Overtightening could break the brush holder! Those nuts have a nylon locking insert which
can only be reused a couple of times. If the nuts are not locking properly, replace them with
new ones!
- With the rear wheel OFF THE GROUND turn on the scooter and apply the throttle. Make
sure the rear wheel is spinning the correct direction. If it is spinning backwards, reverse the
two motor wires.
-Reinstall the rubber boots over the terminals.
-Reinstall the fender.
Motor Testing:
You can test the motor in the following way:
-With the motor installed in a scooter remove the chain.
-Either hook up a Go-prammer to the scooter, or place a clamp type amperage probe over one
of the two motor wires (but not both wires!) You may need to remove the deck to install the
clamp probe.
-If using the Go-prammer, use the instruction manual to switch to the “CURRENT” parameter
under the Debug Menu.
-Run the motor at full throttle with no load and measure the amperage draw. It should be less
than 4.2amps. If you are using the Go-prammer to measure current, use the chart in the
instruction manual to translate the reading on the screen into amperage.
2-6
2-7
2-8
! " #$
% !%
("
) " *" +
&
#$
'
'
2-9
.
!"
&
#
% #
$%"
(
'
/#&
#
(&
$%" # !
-&
/
% (
!
0
&
&
!
**14
# !
)%" **1
2
&# &#
*
#(
3
#(
*
%
7&
#(
#
7
7
7-
%
#&
&
-
#
&# &#
# !
#
#( #
8
)%" *+,
*
-
5
*+
6
-
Service Manual
Item
-
Part #
-
4
5
6
1028
1028N
1028B
7
8
9
10
11
15
16
17
-
1028C
1411
6109,
6110A,
6110B
1049
1048L
GSR1041
1060
1022
-
19
MD1027CR
MD1027BK
20
21
-
1090
1083A
-
23
6128
24
25
27
GSR1035
1076
BF1033
28
6114
29
33
38
E1006
KN1009
1026
39
BF1036
40
6133
41
1401
42
43
44
TB1028
6102
6800
Section 2.2 – ESR750
Description
Front fork bearing kit, 2
bearings, 2 cups, 1 nut
Head set; Fork nut
Head set; bearing (single)
Head set; Bearing cup
(single)
Carry Loop, nylon
ESR Throttle Lever, See
identification chart to select
correct model
Grip Set
Brake Lever (Left)
T-bar anodized, 24.75”
Safety Spring
Slide Tube Assmbly
Front Fork, single sided,
10” wheel, Maddog brake,
Candy Red or BlacK
Bolt; Maddog Brake Mount;
M6x12
Maddog Brake Caliper
Kickstand; complete; black
with spring and rubber foot
Bolt; ¼-20 x 1.5” Button
Head for kickstand mount
Washer, ¼” SAE flat
Bolt; front axle; 5/8-18 x 6"
Bolt; deck mount; 1/4-20 x
1-3/4 Torx Flat Head thread
cutting (tool size T30)
Deck, with grip tape and
foam, (ESR750 & ESR
Sport, Not EX deck)
Nut; 1/4-20 Nylock
Nut, M6 low nylock
Washer; axle; 1"OD x 5/8"
ID x .060"
Bolt; motor mount; M6x18
Socket head
Bolt; motor mount; M6x35
SHCS
Steel Tube, inserts into
plastic chain guide,
3/8”x.78”
Chain guide, plastic
Electric Motor
Revised on 11/3/2005
Qty
0
1
2
2
1
1
1
1
1
1
1
-
1
2
1
1
2
3
1
4
1
4
1
2
1
1
1
1
1
45
6113A
46
6115
47
6148
48
6118A
49
50
51
6013
6108A
6136
52
6016
53
54
55
57
-
6015
6008
2001
ESR1001CR
ESR1001BK
-
60
BF1038B
61
BF1038A
62
63
64
-
2026M
BF1058T
BF1059O
-
66
1087
67
68
1088
8008
69
70
8003SS
BF1037
71
6127
72
73
GSR1045
GSR1014
74
75
76
-
6006
6009.15
GSR1013.1
-
78
6003
Controller board (left side of
pan, with attached wires)
**This is the current version
of controller which works
with Throttle 6110B. Older
controllers available.
Ask Customer Service.
Screw; controller mount;
6 x 5/8" Hex washer head
Wire; DC interconnect;
Controller to NEW charger
Charger (New style with
aluminum “U” housing)
Screw; Charger Mount;
10-32 x 5/16 hex wshr head
A/C Inlet; (for new charger)
Pop rivet; for A/C Inlet
Bolt; fender mount; 10-32 x
½” Philips Head (type F)
Bolt; fender mount; M4x12
Socket Head
Fender; rear; ESR750 &EX
Deck Grip Tape Set
Frame, ESR750
Candy Red or BlacK
Spacer, wheel bearing,
Mag Rim (10" PT)
Bearing; Mag Wheel; 10"
(PT)
Wheel; 10"PT, 2pcs.
Magnesium
Inner Tube; 10"PT
Tire; no tube, Powerplay TT
Spacer; front wheel to
brake disk
Bolt 3/8-24 x 3.5" Low hex
head; front wheel assy
Nut; 3/8-24 center lock
Brake Disc, hardened
stainless steel
Nut; axle, 5/8-18 nylock
Spacer; rear axle, stepped
for fender
Bolt; Rear wheel assembly;
3/8"-24 x 3" Button Head
Spacer; Wheel to sprocket
Set screw for sprocket;
M5 x 8
Sprocket, 15 tooth, #25
Sprocket; 76 tooth (alum)
Rubber Plug; installs into
rear of pan; holds data plug
1
4
1
1
4
1
2
1
1
1
1
1
2
4
2
2
2
4
4
8
2
2
1
4
4
1
1
1
1
2-10
Service Manual
79
6107R
6107
80
6120C
81
6131
82
6121
83
6119C
84
6005
85
87
-
6126
1404
-
100
1043
101
1044
102
1043A
103
104
-
1045
1056
-
106
6103
Section 2.2 – ESR750
Battery Pan; ESR750 and
EX, not Sport. Red or Black
Foam Pad; 1/8” thick
installs under batteries
Rubber pan dust shield.
Square 2”x2” w/ center hole
Plastic insulation tape;
white; prevents short
between pan & batteries
Foam Rubber Tape; 1/4"x
1/2"; sold per ft.
Also used on deck.
Battery; HR6-12 T2 SLA
(ESR750 & Sport, Not EX)
Battery connector; Joins
each pair of batteries. Old
style was 4” long wire. Now
a small metal tab is used.
Bolt; rear axle 5/8-18 x 7.5"
Lower hinge FTG. assy;
Aluminum
Bolt; lower hinge FTG.
5/16-24
Lower hinge FTG; clear
anodized aluminum
Wedge lug; lower hinge
FTG.
Handle hinge pin
Chain; #25 Hard, 106 link
(ESR750 & EX; not Sport)
1
2
4
2
88”
4
6005B
1006ES
E1006F
111
114
115
116
6114B
9004
1094
1095
ESR9002BK
ESR9002CR
6305
1097
7025
6119
117
118
119
120
121
Battery; HR9-12 T2 (larger
battery; EX and upgrade)
Deck Spacer; 1” thick wood
Deck; no grip tape; ¼” thick
Bolt; deck mount; 1/4-20 x
2-1/4 Torx Flat Head thread
cutting (tool size T30)
Seat with hardware
Seat post; aluminum
Seat post collar
Seat frame,
Black or Candy Red
Neoprene rubber foot
Bolt; 5/16-24 x 1.5 SHCS
Nut; 5/16-24 nylock
Toe Guard; black
Revised on 11/3/2005
1081
1063
1064
1061
1053
1053S
1065
1068
6002
6010
2
1
-
6011
6012
6022
6033
1
6108
1
1
6110
1
1
-
6116
1
THE FOLLOWING ITEMS ARE ON PAGE 2-15
108
109
110
ITEMS NOT SHOWN ON PARTS ILLUSTRATION
4
1
1
6118
6129
6160
9031
GSR1055
Brake Cable, 38"H / 48"C
Yellow Warning Sticker
Red Warning Sticker
Sticker; Reflective T-Bar
pad
Large Zip Tie (black; 8")
Small Zip Tie (black; 4")
Sticker; www.goped.com
Sticker; made in USA
A/C power cord, 72”
Sticker; Goped decal,
metallic; for side of pan
Sticker; ESR750 (installs
on tail of frame)
Sticker; Chrome Decal
(ESR750) for slide tube
Heat Shrink tubing for
throttle wire connection
Sticker; “CE” for europe
Old A/C inlet. Used on early
ESRs with Old charger.
Old On/Off Switch. Used on
early ESRs, placed on left
side of T-bar.
Old Charger LED board.
Used on early ESRs.
Installed between Old
charger and controller
Old Charger. Used on early
ESRs. This charger does
not have “U” shaped
aluminum housing
Sticker; “HOT” for motor
White/Red warning sticker
User Manual (ESR)
Sticker; Goped (Installs on
fender)
1
1
1
1
1
2
1
1
1
2
1
1
1
1
0
0
0
0
1
1
1
1
4
1
1
1
1
1
1
1
1
2-11
Service Manual
Section 2 ESR750 & ESR750Ex
Problem
Acceleration and hill climbing greatly reduced
from when scooter was new. Change was rapid
and power loss may be %50.
Range is extremely low. May have reduced
suddenly from one trip to the next.
Motor is making noise, but scooter will not move
or operates intermittently
Action
Disconnect chain from motor. Use an amp meter to
measure amp draw at full throttle, and no load, at a
full charge. Draw should not exceed 4.2amps.
1 A motor malfunction could cause abnormally high
current draw. Use amp meter to measure draw as
described above.
2 A battery wire could have become disconnected,
causing the scooter to run on only 2 batteries instead
of 4.
3 Batteries could be old and need replacement. In this
case the range degradation would be gradual, not
immediate.
Check drive sprocket set screw. If the screw has
loosened up, it could be slipping on the motor shaft.
This problem is sometimes be misdiagnosed as
electrical.
Solution
If draw exceeds 4.2amps, motor is malfunctioning.
If draw exceeds 4.2amps, motor is malfunctioning.
Open Pan and inspect for disconnected battery wires.
Replace batteries.
Put drop of Blue Loctite on set screw and re-tighten.
Deck Removal:
While working on an ESR you might find it necessary to remove the deck. The first several hundred ESRs which were produced have had the decks sealed to the aluminum pans with
clear silicone. It is pretty easy to remove the deck, but the first time you do it can be a little tricky. First remove the four deck bolts. Now start by running a razor blade all the way
around the scooter in the joint between the wood deck and the aluminum pan. This will begin to cut the silicone. Next take a long flat blade screw driver and start to pry the deck up at
the FRONT of the scooter. (The electronics are all the rear of the scooter.) As you pry the deck up you will be able to see more of the silicone. Cut the silicone with the razor. The
more you cut, the more you'll be able to raise the deck. Gradually work your way around the deck until enough of the silicone it cut for the deck to be removed.
2-12
Service Manual
Section 2 ESR750 & ESR750Ex
Action
Solution
Scooter will not operate
A) Throttle LEDs DO turn on and clicking IS heard
from pan when on/OFF switch IS operated. (The
clicking noise is the relay on the controller board. It
should click when the ON/OFF switch is operated.)
Problem
(1)Check to make sure wires are correctly attached to
motor. (2)Measure voltage at motor wires while
operating throttle. Make sure reading is about 24V at
full throttle.
If 24V is found and wires are properly connected, motor must
be malfunctioning. If 24V is NOT found at motor, then throttle or
controller is malfunctioning.
B) Throttle LEDs do NOT turn on and/or clicking is
NOT heard from pan when on/OFF switch IS
operated.
(1)Check for throttle or ON/OFF switch malfunction.
(2)Open pan and check if power is getting to
controller. Controller should be receiving about 24V.
If problem wasn't found with step 1 or 2, controller may be
malfunctioning.
Faulty throttle suspected.
Disconnect throttle at 8 pin connector, and install new
throttle. If that does not solve the problem, the fault
may be in the controller.
If the controller is suspected, install a known good controller to
see if the problem is solved.
Faulty ON/OFF switch suspected.
Disconnect ON/OFF at 2 pin connector, and install
new ON/OFF If a known good ON/OFF switch isn't
available you can short the two metal pins in the wire
coming from the controller. When the circuit is
completed, the controller should click and turn on. If
that does not solve the problem, the fault may be in
the controller.
Remove deck. Inspect wires to be sure that all
connections are still attached. With meter measure
voltage across each battery. Voltage should be
approximately 12V.
If the controller is suspected, install a known good controller to
see if the problem is solved.
Batteries bad or disconnected.
If connectors are off, reinstall and glue with silicone to insure
that they do not come back off. If batteries are bad, replace the
entire battery pack, not just one cell.
2-13
Service Manual
Section 2 ESR750 & ESR750Ex
Problem
Action
Solution
Charger problems
Background: Power flows from the inlet plug (110V or 220V AC) to the charger. Then 24V DC power flows from the charger to the small LED board. Then 24V DC power flows from
the LED board to the Controller. The power passes through the controller to the batteries. The batteries are wired into two individual 24V battery packs which are in parallel. There are
short connection wires between each set of batteries. If one of those wires is disconnected the scooter WILL run on half the batteries with 50% of normal range. Those connection
wires should have silicone adhering them in place to prevent accidental disconnection.
Testing the charging system: When testing the charging system for proper operation it is a good idea to first disconnect the batteries so that you do not get a false voltage reading from
the batteries. After the batteries are disconnected, you can individually measure the voltage across both sets of battery wires. With the charger plugged in, the voltage to the batteries
should be about 24V. If you do not read approximately 24V going to the batteries, then there is a breakdown somewhere in the system.
A) LED on side of pan will not light when cord
plugged in.
1 The outlet in the wall may be off. Plug in a lamp to
make sure it is live.
2 The A/C cord may be bad. Try using a cord known to
be good, or test the cord with a multimeter.
3 Charger may be malfunctioning. Remove deck, and
with scooter plugged in carefully measure for 24V
output from Charger. (2 wire connector, not 3 wire.)
B) LED goes to green immediately after plugging in
scooter, even though batteries are known to be
discharged.
4 Charger LED board may be malfunctioning. Measure
for 24V output from LED board to controller. It will be
necessary to disconnect the LED board from the
controller to perform this test.
There is probably a disconnection somewhere
between the LED board and the batteries. The LED
board may be disconnected from controller; the
controller may be disconnected from batteries; or the
short wires connecting the batteries may be off. Check
all those connections.
If no 24V output, carefully check 110V A/C wires between
charger and plug receptacle. If no problem found, replace
charger. If 24V present go to next test.
Replace LED board if necessary.
Error Codes
The ESR controller is very advanced and has self-diagnostic features. If the ESR senses a problem it will alert the rider, similar to a "check engine" light in a car. The warning comes in
the form of flashing codes on the Flux Capacitor LEDs. The codes are listed below for your reference. These codes can also be retrieved and reset using the Go-Prammer.
Fault Code
21
22
32
41
42
51
53
62
Problem
Motor Short
Motor Open
Overtemperature
Charger Overvoltage
Charge Mode Time Out
Internal Controller Fault
Throttle Failband
Internal Controller Fault
Possible Cause
Bad motor, shorted connection to motor or controller
Bad motor, Loose/broken connection to motor or controller
Excessive Use, Excessive ambient temperature, or controller
Battery Charger
Probably a bad battery
Controller
Throttle control is malfunctioning, loose/broken cable, controller
Controller
2-14
Service Manual
Section 3 Super Models
SECTION 3. SUPER MODELS
3.1 SUPER MODELS
There are two scooters in the Super line, The Super X-Ped and the Super Bigfoot.
This section contains parts illustrations, parts lists, disassembly, assembly, frequently asked questions and
troubleshooting information for each machine.
Paragraph
Page
3.1.1
Super X-Ped Illustration.............................................................................................................. 3-2
3.1.2
Parts Listing – Super X-Ped (Rev 02-04) ................................................................................... 3-3
3.1.3
Super Bigfoot Illustration............................................................................................................ 3-4
3.1.4
Parts Listing – Super Bigfoot (Rev 02-04) ................................................................................. 3-5
3.1.5
G230RC Engine Illustration........................................................................................................ 3-6
3.1.6
G230RC Parts Listing ................................................................................................................. 3-7
3.1.7
Disassembly and Reassembly ..................................................................................................... 3-8
3.1.7.1 Removing the T-Bar and Lower Hinge FTG Assembly .......................................................... 3-8
3.1.7.2 Removing and Reinstalling the Front Fork............................................................................ 3-8
3.1.7.3 Replacing the Lower Hinge FTG Assembly ........................................................................... 3-8
3.1.7.4 Reinstalling the T-Bar ............................................................................................................ 3-8
3.1.7.5 Replacing the Wheels because of tire wear............................................................................ 3-8
3.1.8
Super X-Ped and Super Bigfoot Frequently Asked Questions ................................................... 3-8
3.1.9
G230RC Engine ........................................................................................................................ 3-10
3.1.9.1 Specifications ....................................................................................................................... 3-10
3.1.9.2 Fuel ...................................................................................................................................... 3-10
3.1.9.3 Engine Starting..................................................................................................................... 3-10
3.1.9.4 Operation ............................................................................................................................. 3-11
3.1.9.5 Maintenance......................................................................................................................... 3-11
3.1.9.6 Service Guide ....................................................................................................................... 3-13
3.1.9.7 Troubleshooting ................................................................................................................... 3-15
3.1.9.8 Repair and Service items shipped with G230RC Engine ..................................................... 3-16
3-1
Section 3 Super Models
3.1.1
3-2
Super X-Ped Illustration
Service Manual
Service Manual
3.1.2
Parts Listing – Super X-Ped
Item
1.
2.
3.
4.
5.
6.
Part No.
1061
1064
1054
1068
1048L
1067
7.
8.
9.
10.
11.
12.
13.
14.
15.
16.
17.
18.
X1001S
1050
1051A
2049
KN1005
2001
1056
XS1006
2043
1060
X1022
1069
19.
1127S
20.
21.
22.
23.
24.
1066
1030
1037
1028B
X1058
1058O
KN1012
1131
KN1008
X1006
X1007
25.
26.
27.
1007
28.
29.
Section 3 Super Models
3118
X1043
(Rev 02-03)
Description
Reflective T-Bar Pad
Red Warning Label
Brake Cable Assembly
Sticker, Made in U.S.A.
Brake Lever Assembly
Screw; Throttle Clamp 8-32
x ½ SHCS
Frame Assembly, Orange
Throttle Cable Assembly
Throttle Lever
Grips/set
Latch, T-Bar
Grip Tape, Go-Ped Die Cut
Handle Hinge Pin
Slide Deck
T-Bar Complete 24.75”
Safety Spring
Slide Tube
Nut, Throttle Clamp 8-32
Nylok
Fork, Front Orange
Qty
1
1
1
1
1
1
Clamp, Throttle Lever
Brake Caliper, Front
Nut, Axle
Bearing, Front Fork
Wheel Assembly, Aluminum
Tire, Go-Active Rubber
Axle Bolt - Front
Axle Assembly, Front
Bolt, Deck
Deck w/Grit
Hardware Kit, Deck Mount
without Grommets
Hardware Kit, Deck Mount
with Grommets
Fuel Line Return Fitting
Lower Hinge, FTG
1
1
1
2
2
2
2
1
8
1
1
1
1
1
1
1
1
1
1
1
1
1
1
30.
31.
32.
1009
1010
1012
1032
33.
34.
35.
36.
37.
1025
5018
1017
1015A
3113
1021
1026
1036
3120
1023
2020
2025
2019
2018
1019
38.
39.
40.
41.
42.
43.
44.
45.
46.
1
1
47.
48.
49.
50.
51.
52.
53.
54.
55.
2027B
4802B
1016
1013X
1038A
1038
1053
1055
1051B
1063
56.
57.
58.
2006
2010
2027
Assembly, Steel
Washer, Deck
Nut, Deck
Quick Release Axle Bolt
Axle Assembly, Quick
Release
Bolt, Gas Tank Mount
Spacer, Gas Tank
Wing Nut
Quick Release E.P.W.
Gas Tank w/Fuel Lines
Gas Tank Hardware Kit
Nut, Gas Tank Mount
Washer, Axle
Fuel Filter
Screw, Engine Mounting
Swivel, Throttle (not shown)
Barrel, Cable w/Nut
Spring, Throttle Return
Linkage Arm, Throttle
Muffler Connect Tube
Assembly
Clamp, Handlebar (Front)
Engine, G260RC
Bolt, Drive Spindle
Drive Spindle no Grit
Wheel Bearing
Wheel Bearing Kit, Mach 12
Plastic Cable Tie (8”)
Cable, End Crimp
Throttle Lever Assy
Sticker, Yellow Warning
Label
Bolt, Handlebar Mount
Drag Handlebar
Clamp, Handlebar (Rear)
4
4
1
1
3
3
1
2
1
1
3
6
1
4
1
2
1
1
1
1
1
1
1
4
2
6
1
1
1
3
1
1
1
1
3-3
Section 3 Super Models
3.1.3
3-4
Super Bigfoot Illustration
Service Manual
Service Manual
3.1.4
Parts Listing – Super Bigfoot
Item
1.
2.
3.
4.
5.
6.
7.
8.
9.
10.
11.
12.
13.
14.
15.
16.
17.
18.
19.
Part No.
2046L
1064
1055
1054
1047
1051A
1068
BF1050
8002A
2049
2012
2021N
2013
2014
2040
1060
6017
1037
BF1127SA
20.
21.
22.
23.
24.
2025
8018A
8005
1028B
SBF1058D
SBF1058
BF1059O
BF1058O
BF1058T
2018
2019
BF1006
1007
X1007
25.
26.
27.
28.
29.
30.
31.
32.
2020
1011
1009
KN1009
8013
33.
34.
35.
36.
1025
8003
8004
2113
1021
8016
1026
BF1036
X1022
37.
38.
39.
40.
Section 3 Super Models
Description
Handlebar Assy, Complete
Red Warning Label
Cable End Crimp
Brake Cable Assembly
Brake Lever Assembly
Throttle Lever
Sticker, Made in U.S.A.
Throttle Cable Assembly
O-Ring, Brake Motion
Grips/set
Rod End, 3/8-24 Rt. Thread
Nut, Rod End Jam (Rt.)
Rod End, 3/8-24 Lft. Thread
Turn Down Lockout
T-Bar w/Upper Hinge
Safety Spring
Bolt, Motor Mt. Lockout
Nut, Axle 5/8-18
Front Fork w/cable barrel
Orange (double sided)
Cable Barrel w/nut
Brake Caliper, Front
Spring, Return
Bearing, Front Fork
Wheel, Front Complete (Mag.)
Wheel, Rear Complete (Mag.)
Tire, Rubber Power Play TT
Rubber Tire, All Terrain
Tube/only
Linkage Arm Throttle
Spring, Throttle Return
Deck
Hardware Kit; Deck Mount
Hardware Kit; Deck Mount
without Grommets
Swivel, Throttle (not shown)
Grommet, Deck
Washer, Deck
Nut, Deck Mount ¼-20
Bushing, Motor Mount (not
shown)
Bolt, Gas Tank Mount M6 x 60
Disc, Front Brake
Spacer, Front Brake
Gas Tank w/Fuel Lines
Gas Tank Hardware Kit
Washer, Swivel Damper
Nut, Gas Tank Mount M6 Nylon
Washer, Axle 1 x .641 x .060
Slide Tube
(Rev 02-04)
Qty
1
1
1
1
1
1
1
1
2
1
1
1
1
1
1
1
1
2
1
1
1
1
2
1
1
2
1
1
1
1
1
1
8
4
4
1
3
1
4
1
1
1
3
2
1
41.
42.
43.
1023
8012B
8015
44.
8014
45.
1067
46.
47.
48.
49.
50.
51.
52.
53.
54.
BF1019A
1053
4802B
5012
BF1013
1072A
1074A
8633
1635
55.
56.
2001
1069
57.
58.
59.
60.
61.
62.
70.
SBF1001
1024
X1043
1066
BF1038A
8010C
8010B
8019
1056
8021
6007
8009
8008
8025
BF1033
BF1031
8024
71.
72.
1008
1051B
73.
74.
75.
76.
77.
78.
79.
80.
1053S
SBF1058
1063
3118
3120
8050
Screw, Engine Mount
Engine Mount Bracket
Bolt, Motor Bracket Mount 3/824 x 2-1/2
Nut, Motor Bracket Mount 3/824 Locknut
Screw; Throttle Clamp 8-32 x
½ SHCS
Muffler Connect Tube Assy
Plastic Cable Tie (8”)
Engine, G260RC
Bolt, Drive Spindle M6-80 SHCS
Drive Spindle w/grit
E-Clip, Kickstand, 5/16”
Washer, Kickstand 5/16”
Kickstand Assembly (’02)
Spring, Kickstand (’02 New
Style)
Grip Tape, Go-Ped Die Cut
Nut, Throttle Clamp 8-32
Nylok
Frame Assembly, Orange
Spacer, Gas Tank
Lower Hinge, FTG Assy, Steel
Clamp, Throttle Lever
Wheel Bearing
Fender, Rear w/ Chrome Decal
Fender Mount Hardware Kit
Fender/Tank Rear Bracket
Handle Hinge Pin
Washer, Front Wheel
Plug, Go Snuffer Silencer
Bolt, Rear Wheel
Nut, Wheel 3/8-24
Wheel Hardware Kit (rear)
Bolt, Axle, Rear
Axle Assembly
Bolt, Disc Mount, Front 3/8-24
x 3-1/2
Bolt, Deck Mount ¼-20
Throttle Lever Assembly
Complete
Plastic Cable Tie (4”)
Wheel Assembly, Rear
Sticker, Yellow Warning Label
Fuel Line Return Fitting
Fuel Filter
Bolt, Axle, Front 5/8-18 x 9
8013
Bushing, Motor Mount
63.
64.
65.
66.
67.
68.
69.
4
1
1
1
1
1
1
1
1
1
1
1
1
1
1
1
1
3
1
1
3
1
1
1
1
4
1
4
8
1
1
1
1
4
1
2
1
1
1
1
1
1
3-5
Section 3 Super Models
3.1.5
3-6
G230RC Engine Illustration
Service Manual
Service Manual
3.1.6
Item
1.
2.
3.
4.
5.
6.
7.
8.
9.
10.
11.
12.
13.
14.
15.
16.
17.
18.
19.
20.
21.
22.
23.
24.
25.
26.
27.
28.
Section 3 Super Models
G230RC Parts Listing
Part No.
4301
4302
4303
4304
4305
4306
4008
3012
4002
3011
4359A
2018
2019
2020
2016
3021
4018
4023
4320
4321
3037
3038
3039
3040
4326
4313
3022
4019
Description
Cylinder
Gasket, Cylinder Base
Bolt, Cylinder
Insulator Manifold
Gasket, Insulator
Gasket, Carburetor
Screw, Insulator
Muffler
Bolt, Muffler, M5 x 50 SHCS
Gasket, Muffler
Carburetor Assembly
Linkage Arm; Throttle (Bracket)
Spring, Throttle Return
Swivel, Throttle
Cable Barrel Nut
Ring, Crankcase
Gasket, Crankcase
Bolt, Crankcase
Piston
Piston Ring
Piston Pin
Piston Pin Clip (Set)
Bearing, Piston Pin
Pin Washer (Set)
Crankshaft Complete
Crankcase Assembly
Key, Flywheel
Seal Set, Crankcase
Qty
1
1
2
1
1
1
1
2
1
1
1
1
1
1
1
1
1
1
1
1
1
1
1
1
1
1
29.
30.
31.
32.
33.
34.
35.
36.
37.
38.
39.
40.
41.
42.
43.
44.
45.
46.
47.
48.
49.
50.
51.
52.
53.
54.
55.
56.
4315
4338
3044
4346
43113
4057
43107
43108
4340
2021
3107
3111
3108
3109
3110
4399
4347
4358
43109
4034
43112
3116
BF3114
3118
3113
3115B
3115Y
3120
Bearing Set, Crankcase
Flywheel
Nut, Flywheel
Bolt Coil Mount
Kill Switch Assembly
Spacer, Ignition Coil
Fan Cover
Bolt, Fan Cover
Ignition Coil Assembly
Bolt, Carburetor
Air Filter Assembly
Air Filter Rear Housing
Screen, Air Filter
Air Filter Element
Air Filter Cover
Spacer, Carburetor
Recoil Starter Assembly
Screw, Recoil Starter
Engine Cover
Screw, Engine Cover
Spark Plug
Gas Cap
Gas Tank Assembly
Fuel Line Return Fitting
Gas Tank with Fuel Lines
Fuel Line (Blue)(1 ft)
Fuel Line (Yellow)(1 ft)
Fuel Filter
1
1
1
2
1
2
1
6
1
2
1
1
1
2
1
1
1
4
1
1
1
1
1
1
1
1
1
1
3-7
Section 3 Super Models
3.1.7
Service Manual
Disassembly and Reassembly
IMPORTANT: The Warranty card must be completely filled out and returned to Patmont
Motor Werks. If the Warranty card is not returned there is NO Warranty on the machine.
IMPORTANT: Modification of the machine or the engine VOIDS the Warranty. If any parts
are replaced on the machine that are not Genuine Go-Ped replacement parts the Warranty is
VOID.
3.1.7.1
Removing the T-Bar and Lower Hinge FTG Assembly
Refer to Removing the T-Bar text in Section 1.
3.1.7.2
Removing and Reinstalling the Front Fork
Refer to Reinstalling the Front Fork text in Section 1.
3.1.7.3
Replacing the Lower Hinge FTG Assembly
Refer to Replacing the Lower Hinge FTG Assembly text in Section 1.
3.1.7.4
Reinstalling the T-Bar
Refer to Reinstalling the T-Bar text in Section 1.
3.1.7.5
Replacing the Wheels because of tire wear
IMPORTANT: If the tires wear down to the wear dimple on the side of the tire they must be
replaced. Driving the machine after the tires are worn beyond the wear dimple is dangerous
and may damage the machine. Failure to replace the tires after they are worn down to the
wear dimple will VOID the warranty.
Refer to Replacing Wheels text in Section 1.
3.1.8
Super X-Ped and Super Bigfoot Frequently Asked Questions
IMPORTANT: The Warranty card must be completely filled out and returned to Patmont
Motor Werks. If the Warranty card is not returned there is NO Warranty on the machine.
IMPORTANT: Modification of the machine or the engine VOIDS the Warranty. If any parts
are replaced on the machine that are not Genuine Go-Ped replacement parts the Warranty is
VOID.
3-8
Service Manual
Section 3 Super Models
Q. What is an FTG? What is a steel FTG?
A. FTG is short for Fitting. The FTG is the piece that the end of the T-Bar connects to. The Stock FTG is
Aluminum. An optional Steel FTG is available. It is much stronger.
Q. How to change the tire skin?
A. From www.pswsports.com
1. Remove the back tire from the Go-Ped®
2. Carefully take a hacksaw or sharp utility knife and cut the old tire off of the rim
3. Take the new tire and spray 2 (two) squirts of glass cleaner or water inside of the new tire, rub around the
inside of the tire with your finger to lubricate the inside of the tire.
4. Now take the rim and place it on a hard surface and press the new tire onto one side of the rim. (Just get it
started)
5. Finally, place the tire on the ground and jump on the tire to force it completely onto the rim.
6. Now install the wheel & tire back onto the Go-Ped®
Q. How to remove and install a spindle?
A. From www.pswsports.com
1. Remove the back tire.
2. Remove the 3 nuts holding the gas tank on.
3. No need to remove the gas lines, just clear the tank of the studs and swing it back out of the way onto the
deck.
4. Now that the tank is off and you can see the drive spindle, in the end of it you can see the allen bolt. Keep
the spindle from spinning by using a pair of vise grips at the very top of the spindle. Remove the allen bolt.
5. The spindle is a wedge-mated fit on the crank and is on very tight. DO NOT HIT IT WITH A
HAMMER. Stick a Phillps Head screwdriver in the end where the Allen bolt came out and rotate
screwdriver in a circular motion( like mixing in a mixing bowl) while applying pressure. This should
loosen the spindle until it falls off.
Now Install the New Spindle, Hold it with the vise grips while tightening the allen bolt.
*Note: This is how it is done by qualified PSWS Technicians everyday!
3-9
Section 3 Super Models
3.1.9
Service Manual
G230RC Engine
The G230RC engine is used on the Super X-Ped, Super Bigfoot and Super Go-Quad models.
3.1.9.1
Specifications
Overall Size (LxWxH)
Weight
Engine Type
Displacement
Clutch Engagement
Carburetor Type
Spark Plug
Spark Plug Gap
Rotating Direction
3.1.9.2
167 x 204 x 195mm
2.07kg
G230RC
22.5cm3
6000rpm (STD Spring)
WT-603
Champion RZ7C
0.65mm
Counter-Clockwise (View from PTO)
Fuel
Mix high-octane (over 95) gasoline and high grade 2 cycle oil (JASO FC Grade oil or ISO EGC grade) in the
ratio of 25:1.
WARNING: Never use any alcohol fuel or alcohol added fuel, or the rubber parts in the
carburetor and engine will be damaged.
Gasloine is very flammable. Avoid smoking, bringing ant fires near fuel.
3.1.9.3
Engine Starting
Push the primer pump several times until
overflow fuel flows out.
Close the choke lever (Fig. 2) and move the
throttle lever ¼ ~ 1/3 open position.
Pull the starter knob quickly until the first firing
noise is heard.
Open the choke (Fig. 2), throttle idle~ ¼ open.
Pull the starter quickly.
Operate the engine for a few minutes to warm it
up.
IMPORTANT:
If the engine is warm, chocking may not be
necessary.
3-10
Service Manual
Section 3 Super Models
Over choking may cause starting difficulty due
to a wet spark plug. In this case change the spark
plug or dry it out and remove excess fuel in the
cylinder by pulling the starter knob with the
spark plug removed.
3.1.9.4
Operation
This engine is tuned at the factory to maximum power and speed and needs correct maintenance to keep it in
top performance.
Follow the operating procedures described in the owner’s manual.
Be sure to allow the engine to idle for at least 30 seconds after running for extended periods at full throttle.
This will allow the engine to cool down before shutting it off.
3.1.9.5
Maintenance
1. Maintenance Chart
Items
Action
Before
Use
Every 25
hours
Every 100
hours
Note
Leakage,
Damage/Cracks
Idling Speed
Check
Check/Adjust
Air-Cleaner
Check/Clean
Replace if necessary
Spark Plug (gap)
Check/Adjust
Replace if necessary
Cylinder (barrel)
Check/Clean
Replace if necessary
Piston, Ring
Check/Clean
Replace if necessary
Muffler & Bolt
Check/Clean
Replace if necessary
Bearings
Check/Clean
Replace if necessary
Crank Shaft
Check/Alignment
Replace if necessary
3-11
Section 3 Super Models
Service Manual
2. Specifications and Technical Data
Items
Bore x Stroke
Displacement
Effective Compression Ratio
Carburetor
Clutch Engagement Speed
No load max Speed
Idling Speed
Max. Power
Rpm
Rpm
Rpm
kW/rpm
Specifications
32x28
22.5
8.8
Walbro WT
12.7
Recoil Starter
TCI
BTC 30deg/8000 rpm
RZ7C
CR6HVX
with Terminal Nut
6000
19500
4000
2.10/14,000
Max. Torque
N.m/rpm
1.72/10,000
Fuel Consumption
g/kW h
680 (500g/ps h)
Carburetor
Standard setting
H
L
1 3/8 ± ¼
1 ¼ ± 1/4
Starting
Ignition
Spark Plug
Unit
mm
cm3
Type
Venture (mm)
Type
Timing
Standard
Option (For Race)
Remarks
Champion
NGK
Without Air Cleaner
and Muffler
Without Air Cleaner
and Muffler
Without Air Cleaner
and Muffler
3. Maintenance Specifications
Cylinder
Piston
Piston
Ring
Items
Compression (kg/cm3)
Bore (mm)
Diameter (mm)
Standard
8.8
32
31.97
Limit
7.3
Plating damaged
31.87
Measuring Device
Compression Gage
Eye Checking
Micro Meter
Piston Ring
Groove width (mm)
Piston Pin Hole (mm)
Clearance between
Piston and Cylinder (mm)
Clearance between
Groove and Piston Ring (mm)
End Gap (mm)
1.01
1.11
Thickness Gauge
8.01
0.03~0.06
8.05
0.15
0.02~0.04
0.1
Cylinder Gauge
Micro Meter
Cylinder Gauge
Thickness Gauge
0.05~0.25
0.5
Thickness Gauge
0.98
8
11
12
-
0.93
7.98
11.05
11.98
0.07
0.5
Gritty or
Feels Flat Spot
Micro Meter
Micro Meter
Cylinder Gauge
Micro Meter
Dial Gauge
Thickness Gauge
-
Width (mm)
Piston Pin Diameter (mm)
Connecting Rod Small end (mm)
Crankshaft Dia. At Main Bearing (mm)
Eccentricity (mm)
Axial Play (mm)
Main Bearing
3-12
Remarks
At the skirt end
and right angle to
the piston pin
When inserted in a
new cylinder
Service Manual
Section 3 Super Models
4. Carburetor
Items
Metering Lever set (mm)
Inlet Valve Opening Pressure (kg/cm3)
Inlet Valve Closing Pressure (kg/cm3)
Standard
1.65
1.3~2.3
0.7~1.7
Limit
±0.16
Measuring Device
Vanier
Leak Tester
Leak Tester
Remarks
5. Ignition System
Items
Spark Plug Air Gap (mm)
Ignition Coil/Flywheel Air Gap (mm)
Coil Resistance
Primary
(ohms)
Secondary
Standard
0.6~0.7
0.3
0.7
Limit
0.7
0.4
-
Measuring Device
Thickness Gauge
Thickness Gauge
Volt Meter
6100
-
Volt Meter
Remarks
Reading between primary
terminal and iron core
Reading between sparking
cord end and iron core
6. Tightening Torque
Items
Carburetor
Insulator
Clutch
Rotor
Cylinder
Crankcase
Spark Plug
Muffler
Fan Cover
Ignition Coil
Starter Case
Tapping Screw
3.1.9.6
Screw Size
M5 (P=0.8)
M5 (P=0.8)
M6 (P=1.0)
M8 (P=1.0)
M5 (P=0.8)
M5 (P=0.8)
M10 (P=1.0)
M5 (P=0.8)
M5 (P=0.8)
M4 (P=0.7)
M4 (P=0.7)
TP 4.3
Standard (kg cm)
35
35
65
130
70
65
110
90
35
33
13
25
Limit (kg cm
30~40
30~40
50~80
100~150
60~80
50~80
100~120
70~100
30~40
25~40
10~15
20~30
Remarks
With Locktight glue
Service Guide
Removing Clutch Shoe
1. Remove the housing and plug cap
2. Remove the spark plug and fit the stopper into the plug hole.
3. Remove clutch bolts.
Removing Rotor Fan
4. Remove the rotor nut.
5. Remove the rotor using the puller assembly. Apply 8mm puller bolts.
3-13
Section 3 Super Models
Service Manual
Assembling Rotor
Insert the gauge between the rotor magnet metal and the coil. Tighten screws
while pressing the coil against the rotor.
GAP Specification 0.3 ~ 0.4mm
Removing Piston Pin
1. Remove snap rings from both sides of the piston pin.
2. Engage the rod assembly to the piston pin and gently tap with a plastic
hammer to push out the pin while holding the piston firmly.
NOTE: Hard hammering may damage the big end of the connecting
rod.
Installing Piston
1. Make sure the arrow is pointed to the exhaust side.
2. Fit the circlip in the groove so as to face the end gap below.
NOTE: A deformed circlip may come off during engine operation and
damage the engine.
Carburetor Adjustment
The carburetor is optimally adjusted at the factory. It may be readjusted
depending on current barometric and climatic conditions.
Idle rpm: 4000 300 rpm (STD Spring)
H needle: 1 3/8 ± ¼
L needle 1 ¼ ± 1/4
3-14
Service Manual
3.1.9.7
Section 3 Super Models
Troubleshooting
1. Engine does not start
Description
Cause
No spark in the Spark Plug
Spark Plug
1. Wet spark plug electrodes
2. Carbon deposited on the electrodes
3. Insulation failure by insulator damage
4. Improper spark gap
5. Burn out of electrodes
Magneto
1. Ignition coil inside failure
2. Damaged cable sheath or disconnected
cable
Switch
3. Switch is OFF
4. Switch failure
5. Primary wiring grounded
Sparks appear in the spark plug
Compression and fueling is normal
1. Over sucking of fuel
2. Too rich fuel
3. Overflow
4. Clogging of air cleaner
5. Faulty fuel
Fueling normal but poor compression
1. Worn out cylinder, piston or piston
ring
2. Gas leakage from cylinder and crank
case gasket
No fuel supply
1. Choked breather air hole
2. Clogged carburetor
3. Clogged fuel filter
Countermeasure
Dry the spark plug
Clean the spark plug
Replace worn parts
Adjust to 0.6~0.7mm
Replace spark plug
Replace Ignition coil
Replace worn parts
Turn switch ON
Replace the switch
Repair ground
Drain excess fuel
Adjust carburetor
Carburetor adjust or exchange
Wash with mixed gasoline
Change with proper fuel
Replace worn parts
Apply liquid gasket and reassemble
Clean breather
Clean carburetor
Clogged fuel filter
2. Lack of Power or poor performance
Description
Compression is normal and no misfire
Overheating
Others
Cause
1. Air leaks in fuel line
2. Air penetration from intake tube joint
or carburetor joint
3. Water fuel
4. Piston seizure
5. Muffler chocked with carbon
1. Fuel too lean
2. Clogged cylinder fins
3. Poor fuel quality
4. Carbon deposits in combustion
chamber
5. Spark plug electrode red hot
1. Dirty air cleaner
2. Overloading
Countermeasure
Tighten connections
Change gasket or tighten screws
Replace with clean
Replace piston and cylinder
Clean muffler
Adjust carburetor
Clean fins
Replace with good fuel
Clean carbon deposits
Thoroughly clean, adjust gap
0.023~0.028 in
Wash with mixed gasoline
Reduce load
3-15
Section 3 Super Models
3.1.9.8
Service Manual
Repair and Service items shipped with G230RC Engine
The items shown in the following figure are shipped with the engine. The Sparkplug/Screwdriver may be
used to service the engine. The Muffler gasket may be used as a replacement if needed.
The Fuel line and Filter are intended for RC Car or Plane use and are not needed on the Super machines.
3-16
Service Manual
Section 4 G23LH Models
SECTION 4. G23LH MODELS
4.1 G23LH MODELS
There are four scooters in the G23LH line, The X-Ped, Bigfoot, Liquimatic and Sport.
This section contains parts illustrations, parts lists, disassembly, assembly, frequently asked questions and
troubleshooting information for each machine.
Paragraph
Page
4.1.1
X-Ped Illustration ........................................................................................................................ 4-2
4.1.2
Parts Listing – X-Ped (Rev 02-04).............................................................................................. 4-3
4.1.3
Bigfoot Illustration ...................................................................................................................... 4-4
4.1.4
Parts Listing – Bigfoot (Rev 02-04)............................................................................................ 4-5
4.1.5
Sport Illustration ......................................................................................................................... 4-6
4.1.6
Parts Listing – Sport (Rev 02-04) ............................................................................................... 4-7
4.1.7
Liquimatic Illustration................................................................................................................. 4-8
4.1.8
Parts Listing – Liquimatic (Rev 02-04) ...................................................................................... 4-9
4.1.9
G23LH Engine Illustration........................................................................................................ 4-10
4.1.10 G23LH Parts Listing ................................................................................................................. 4-11
4.1.11 Liquimatic Hydraulic Torque Converter Installation Instructions ............................................ 4-12
4.1.12 Disassembly and Reassembly ................................................................................................... 4-13
4.1.12.1 Removing the T-Bar and Lower Hinge FTG Assembly ........................................................ 4-13
4.1.12.2 Removing and Reinstalling the Front Fork.......................................................................... 4-13
4.1.12.3 Replacing the Lower Hinge FTG Assembly ......................................................................... 4-13
4.1.12.4 Reinstalling the T-Bar .......................................................................................................... 4-13
4.1.12.5 Replacing the Wheels because of tire wear.......................................................................... 4-13
4.1.13 Sport, X-Ped, Liquimatic and Bigfoot Frequently Asked Questions ........................................ 4-13
4.1.14 G23LH Engine .......................................................................................................................... 4-15
4.1.14.1 Specifications ....................................................................................................................... 4-15
4.1.14.2 Oil and Fuel mixing instructions.......................................................................................... 4-16
4.1.15 Sport Flat Rate .......................................................................................................................... 4-16
4.1.16 Bigfoot Flat Rate ....................................................................................................................... 4-17
4.1.17 Liquimatic Flat Rate.................................................................................................................. 4-18
4-1
Section 4 G23LH Models
4.1.1
4-2
X-Ped Illustration
Service Manual
Service Manual
4.1.2
Parts Listing – X-Ped
Item
1.
2.
3.
4.
5.
6.
7.
8.
9.
10.
11.
12.
Part No.
1061
1064
1054
1063
1047
2001
5018
1050
1051
2049
KN1005
1051B
13.
14.
15.
1068
XS1006
2043
16.
1060
1062
X1022
1067
17.
18.
19.
20.
21.
22.
23.
24.
25.
26.
Section 4 G23LH Models
X1027
1027X
1056
1030
1037
1028B
X1058
1058O
1033
1031
1008
Description
Reflective T-Bar Pad
Red Warning Label
Brake Cable Assembly
Warning Label, Yellow
Brake Lever Assembly
Grip Tape, Go-Ped Die Cut
Spacer, Gas Tank
Throttle Cable Assembly
Throttle Lever with Clamp
Grips/set
Latch, T-Bar
Throttle Lever Assembly
(includes items - 9, 18, 42, 45)
Sticker, Made in U.S.A.
Slide Deck
T-Bar Complete 24.75”
(includes Brake, Throttle and
cables)
Safety Spring
Safety Spring and Grip Set
Slide Tube
Screw; Throttle Clamp 8-32
x ½ SHCS
Front Fork w/axle, Sky Blue
Front Fork, Sky Blue
Handle Hinge Pin
Brake Caliper, Front
Nut, Axle
Bearing, Headset
Wheel Assembly, Aluminum
Go Active Rubber (tire only)
Axle Bolt - Front
Axle Assembly, Front
Bolt, Deck Mount
(Rev 02-04)
Qty
1
1
1
1
1
1
3
1
1
1
1
1
1
1
1
1
1
1
1
1
1
1
1
1
2
2
2
27.
X1006
X1007
28.
29.
30.
31.
32.
33.
34.
35.
36.
37.
38.
39.
40.
41.
42.
43.
1015A
1038A
1038
1009
1010
1011
1025
1012
1017
X1001
3113
1026
1036
2025
1023
1066
X1043
44.
45.
1055
1069
46.
47.
48.
49.
50.
51.
52.
53.
54.
1019A
X4067
4800
1016
1013X
1053
3120
3118
1020X
Deck w/Grit
Hardware Kit, Deck Mount
without Grommets
Quick Release E.P.W.
Wheel Bearing
Kit, Wheel Bearing
Washer, Deck
Nut, Deck
Grommet, Deck
Bolt, Gas Tank Mount
Bolt, Quick Release Axle
Wing Nut
Frame Assembly, Sky Blue
Gas Tank w/Fuel Lines
Nut, Gas Tank Mount
Washer, Axle
Cable Barrel with Nut
Screw, Engine
Clamp, Throttle Lever
Lower Hinge, FTG Assembly
Steel
Cable, End Crimp
Nut, Throttle Clamp 8-32
Nylok
Muffler Connect Tube Assy
Block Off Plate
Engine, G23LH
Bolt, Drive Spindle
Drive Spindle no Grit
Plastic Cable Tie (8”)
Fuel Filter
Fuel Line Return Fitting
Sticker, Chrome decal
1
1
2
1
4
4
4
3
1
1
1
1
3
4
2
4
1
1
1
1
1
1
1
1
1
3
1
1
1
4
4-3
Section 4 G23LH Models
4.1.3
4-4
Bigfoot Illustration
Service Manual
Service Manual
4.1.4
Section 4 G23LH Models
Parts Listing – Bigfoot
Item
1.
2.
3.
4.
5.
6.
Part No.
1061
1064
1063
1054
1047
1069
7.
8.
9.
10.
11.
12.
13.
8006C
BF1050
1051A
1049
1062
KN1005
3120
3123
14.
15.
16.
17.
18.
BF1037
BF1046L
1060
1022
1067
19.
20.
21.
22.
23.
24.
BF1027Y
2025
8018A
8005
1028
SBF1058
Description
Reflective T-Bar Pad
Red Warning Label
Yellow Warning Label
Brake Cable Assembly
Brake Lever Assembly
Nut, Throttle Clamp 8-32
Nylok
Grip Shift (Post 2002 model)
Throttle Cable Assembly
Throttle Lever
Grips/set
Safety Spring & Grip Kit
Latch, T-Bar
Fuel Filter
Kill Switch Assembly (includes
(Rev 02-04)
Qty
1
1
1
1
1
1
1
1
1
1
1
1
1
1
bracket, washer, nut, kill switch)
SBF1058D
25.
26.
27.
BF1058O
BF1058T
1025
1008
BF1006
1007
28.
29.
30.
31.
32.
33.
34.
1068
1011
1009
1010
8011A
8002
1051B
35.
36.
37.
8003
8004
8024
Nut, Axle
T-Bar Complete 24.75”
Safety Spring
Slide Tube
Screw; Throttle Clamp 8-32 x
½ SHCS
Front Fork w/axle, Yellow
Barrel Cable w/nut
Caliper, Brake Front
Spring, Return, Brake
Front Fork Bearing Kit
Wheel, Complete Rear (Mag.)
Wheel, Comp. Front (Mag.)
Tire w/Tube, “AT” All Terrain
Tube/only
Bolt, Gas Tank Mount
Bolt, Deck
Deck w/Grit
Hardware Kit, Deck Mount
w/Grommets
Sticker, Made in U.S.A.
Grommet, Deck
Washer, Deck
Nut, Deck
Rear Brake
Bushing, Brake Motion
Throttle Lever Assembly
(includes items - 9, 18, 42, 45)
Disc, Front Brake
Spacer, Front Brake
Bolt, Front Wheel, Disc
2
1
1
1
1
1
1
1
1
1
1
1
2
2
3
4
1
1
1
8
4
4
1
1
1
1
4
4
38.
39.
40.
41.
42.
43.
44.
45.
46.
1026
1036
1066
1023
8012B
8017
8014
8016
BF1019A
47.
48.
49.
50.
51.
52.
53.
8633
4800
5012
BF1013
1074A
1072A
1635
54.
55.
56.
57.
58.
59.
BF3113
1021
2001
8015
BF1001Y
1024
1043
60.
61.
62.
8020
BF1038A
8010C
63.
64.
65.
66.
67.
68.
69.
70.
71.
72.
73.
74.
75.
76.
8010
8019
1056
8021
6007
8009
8008
BF1033
BF1058D
BF1038B
1053
1055
3118
1053S
8013
Mount
Nut, Gas Tank Mount
Washer
Clamp, Throttle Lever
Screw, Engine Mounting
Engine Mount Bracket
Spring, Torsion “Motor Mount”
Nut, Motor Mount
Washer, Swivel Damper
Muffler Connect Tube
Assembly
Kickstand Assembly (’02)
Engine, G23LH
Bolt, Drive Spindle
Drive Spindle w/grit
Washer, Kickstand 5/16
E-Clip, Kickstand 5/16
Spring, Kickstand (’02 New
Style)
Gas Tank Assembly
Gas Tank Hardware Kit
Grip Tape, Go-Ped Die Cut
Bolt, Motor Mount
Frame Assembly, Yellow
Spacer, Gas Tank
Lower Hinge, FTG Assembly,
Aluminum
Fender Retaining Washer
Wheel Bearing
Fender, Rear w/ Chrome Decal
(fits BF & SBF)
Fender Kit, Rear
Fender/Tank Rear Bracket
Handle Hinge Pin
Washer, Front Wheel
Plug, Go Snuffer Silencer
Bolt, Rear Wheel
Nut, Wheel
Bolt, Axle
Wheel Assembly w/Disk, Front
Wheel Bearing Spacer
Plastic Cable Tie (8”)
Cable, End Crimp
Fuel Line Return Fitting
Plastic Cable Tie (4”)
Bushing, Motor Mount
3
6
1
4
1
1
1
1
1
1
1
1
1
1
1
1
1
1
1
1
1
3
1
1
4
1
1
1
1
1
4
2
4
4
2
1
2
3
2
1
1
1
4-5
Section 4 G23LH Models
4.1.5
4-6
Sport Illustration
Service Manual
Service Manual
4.1.6
Item
1.
2.
3.
4.
5.
6.
7.
8.
9.
10.
11.
12.
13.
14.
15.
16.
17.
18.
19.
20.
21.
22.
23.
24.
25.
26.
27.
Section 4 G23LH Models
Parts Listing – Sport
Part No.
1061
1064
1054
1063
1047
1067
1060
1062
1050
1051
1049
1068
2001
1005
3123
1046L
1056
1022
1069
1027B
1027R
1038A
1038
1030
1037
1028B
1158
1058O
1058H
1033
1031
1008
1006
1007
Description
Reflective T-Bar Pad
Red Warning Label
Brake Cable Assembly
Warning Label, Yellow
Brake Lever Assembly
Screw, Throttle Clamp
Safety Spring
Safety Spring and Grip Set
Throttle Cable Assembly
Throttle Lever Assy (pre ’03)
Grips/set
Sticker, Made in USA
Grip Tape, Go-Ped Die Cut
Latch, Plastic
Kill Switch Assembly
T-Bar Complete 28.75”
Handle Hinge Pin
Slide Tube, Black Anodized
Nut, Throttle Clamp
Front Fork w/axle, Blue
Front Fork, w/axle Red
Wheel Bearing
Kit, Wheel Bearing
Brake Caliper, Front
Nut, Front Axle 3/8-24
Front Fork Bearing
Wheel Assembly, Mach 12
Go Active Rubber (tire only)
Hub, Mach 12 (not shown)
Axle Bolt, Frnt 3/8-24x3-1/2
Axle Assembly, Front
Bolt, Deck Mount
Deck w/Grit
Hardware Kit, Deck Mount
with Grommets
(Rev 02-04)
Qty
1
1
1
1
1
1
1
1
1
1
1
1
1
1
1
1
1
1
1
1
4
1
1
2
2
2
4
1
28.
29.
3118
1043
30.
31.
32.
33.
34.
3120
1010
1011
1009
1012
1032
35.
36.
37.
45.
46.
1017
1015
3113
1021
1026
1036
1066
1023
1025
8633
1001B
1001R
4800
1019
47.
48.
49.
50.
51.
52.
53.
54.
55.
56.
1024
1635
1014
1013
1053
1055
1072A
1074A
1051B
2025
38.
39.
40.
41.
42.
43.
44.
Fuel Line Return Fitting
Lower Hinge, FTG
Assembly, Aluminum
Filter, Fuel
Nut, Deck
Grommet, Deck
Washer, Deck
Bolt, Quick Release Axle
Axle Assembly, Quick
Release
Wing Nut 3/8-24
Quick Release E.P.W.
Gas Tank w/Fuel Lines
Gas Tank Hardware Kit
Nut, Gas Tank Mount
Washer, Axle 3/8 x 11/16
Clamp, Throttle Lever
Screw, Engine Mount
Bolt, Gas Tank Mount
Kickstand Assembly (’02)
Frame Assembly, Blue
Frame Assembly, Red
Engine, G23LH
Muffler Connect Tube
Assembly
Spacer, Gas Tank, Plastic
Spring, Kickstand
Bolt, Drive Spindle M6x45
Drive Spindle
Plastic Cable Tie (8”)
Cable, End Crimp
E-Clip, Kickstand
Washer, Kickstand
Throttle Lever Assembly
Barrel, Cable w/Nut
1
1
1
4
4
4
1
1
1
1
1
3
5
1
4
3
1
1
1
1
1
3
1
1
1
1
1
1
1
1
2
4-7
Section 4 G23LH Models
4.1.7
4-8
Liquimatic Illustration
Service Manual
Service Manual
4.1.8
Parts Listing – Liquimatic
Item
1.
2.
3.
4.
5.
6.
Part No.
1061
1064
1054
1063
1047
1069
7.
8.
9.
1060
1062
1050
1051B
10.
11.
12.
1049
1068
1067
13.
14.
15.
16.
17.
18.
19.
20.
1005
3123
1046L
1051B
1022
2025
1027Y
1127Y
1043
21.
22.
23.
24.
1030
1037
1028B
1158
25.
26.
27.
28.
29.
30.
31.
32.
33.
34.
Section 4 G23LH Models
1058O
1033
1031
1008
1006
1007
1055
1056
1009
1010
1011
5015
1012
1032
Description
Reflective T-Bar Pad
Red Warning Label
Brake Cable Assembly
Warning Label, Yellow
Brake Lever Assembly
Nut, Throttle Clamp 8-32
Nylok
Safety Spring
Safety Spring and Grip Set
Throttle Cable Assembly
Throttle Lever Assy with
Clamp
Grips/set
Sticker, Made in U.S.A.
Screw; Throttle Clamp 8-32
x ½ SHCS
Latch, Plastic
Kill Switch Assembly
T-Bar Complete 28.75”
Throttle Lever Assembly
Slide Tube, Black Anodized
Cable Barrel with Nut
Front Fork w/axle, Yellow
Front Fork, Yellow
Lower Hinge, FTG
Assembly, Aluminum
Brake Caliper, Front
Nut, Axle
Front Fork Bearing
Wheel Assembly, Mach 12
(Replaces 1059)
Go Active Rubber (tire only)
Axle Bolt - Front
Axle Assembly, Front
Bolt, Deck Mount
Deck w/Grit
Hardware Kit, Deck Mount
with Grommets
Cable, End Crimp
Handle Hinge Pin
Washer, Deck
Nut, Deck
Grommet, Deck
Support Plug Assembly
Bolt, Quick Release Axle
Axle Assembly, Quick
Release
(Rev 02-04)
Qty
1
1
1
1
1
1
1
1
1
1
1
1
1
1
1
1
1
2
1
1
1
1
1
2
2
1
4
1
1
1
4
4
4
1
1
1
35.
36.
37.
38.
39.
40.
41.
42.
43.
44.
45.
46.
1017
1015
3113
1021
1026
1036
3120
1023
1025
8633
3115B
3115Y
1019
47.
48.
49.
3118
4800
5125
50.
51.
52.
53.
54.
55.
56.
57.
58.
59.
60.
61.
62.
63.
64.
65.
5017
1038A
1038
5018
1001Y
1072A
2001
5001
5002
5003
5004
5005
5006
5007
5008
5009
5010
66.
67.
68.
69.
5011
5012
5013
5123
70.
71.
5227
1053
1635
72.
73.
1074A
1066
Wing Nut
Quick Release E.P.W.
Gas Tank w/Fuel Lines
Gas Tank Hardware Kit
Nut, Gas Tank Mount
Washer, Axle
Fuel Filter
Screw, Engine Mount
Bolt, Gas Tank Mount
Kickstand Assembly (’02)
Fuel Line, Blue (1 ft.)
Fuel Line, Yellow (1 ft.)
Muffler Connect Tube
Assembly
Fuel Line Return Fitting
Engine, G23LH
Outboard Support Plate
Assembly
Spacer Washer
Wheel Bearing
Kit, Wheel Bearing
Spacer, Gas Tank
Frame Assembly, Yellow
E-Clip, Kickstand 5/16
Grip Tape, Go-Ped Die Cut
Shaft, Heat Treated
O-Ring, Shaft
Two-Way Roller Bearing
Turbine Roller, Gritted
Main Seal
Main Bearing
Turbine O-Ring
Pump, Core Ring
Pump, Machined
One-Way Roller Clutch
Bearing
Cover
Bolt, M6 x 80 SHCS
O-Ring, Turbine Plug
Turbine Clutch Assembly
Complete
Torque Converter Retro Kit
Plastic Cable Tie (8”)
Spring, Kickstand (’02 New
Style)
Washer, Kickstand
Clamp, Throttle Lever
1
1
1
3
6
1
4
3
1
1
1
1
1
1
1
1
1
3
1
1
1
1
1
1
1
1
1
1
1
1
1
1
4
1
1
1
2
1
1
1
4-9
Section 4 G23LH Models
4.1.9
4-10
Service Manual
G23LH Engine Illustration
December 15, 2001
Service Manual
Section 4 G23LH Models
4.1.10 G23LH Parts Listing
Item
1.
2.
3.
4.
5.
6.
7.
8.
9.
10.
11.
12.
13.
14.
15.
16.
17.
18.
19.
20.
21.
22.
23.
24.
25.
26.
27.
28.
29.
30.
31.
32.
33.
34.
35.
36.
37.
38.
39.
40.
41.
42.
43.
44.
Part No.
4001
4002
4003
4004
4005
4006
4007
4008
3009
Description
Cylinder
Muffler Bolt
Gasket, Cylinder Base
Bolt, Cylinder
Gasket, Insulator
Insulator, Manifold
Gasket, Carburetor
Screw, Insulator
Screw, Carburetor
4011
4012
Muffler Gasket
Muffler
1
1
4016
1
4017
Crankcase complete
(no bearings or seals)
Crank with bearings and seals
4018
4019
3020
3021
3022
4023
Gasket, Crankcase
Seal Set, Crankcase
Bearing Set
Ring Crankcase
Key, Flywheel
Bolt, Crankcase
1
1
1
1
1
4
4026
Fan, Cover
Qty
1
2
1
2
1
1
1
1
1
1
1
4032
4033
4034
3035
3036
3037
3038
3039
3040
4041
Fan, Cover Screw
Engine Cover
Screw, Engine Cover
Piston
Piston Ring Set
Piston Pin
Piston Pin Clip Set
Bearing, Piston Set
Pin Washer Set
Crankshaft Complete
4
1
1
1
1
1
1
1
1
1
3044
Nut, Flywheel
1
December 15, 2001
45.
46.
47.
48.
49.
50.
51.
52.
53.
54.
55.
56.
57.
58.
59.
60.
61.
62.
63.
64.
65.
66.
67.
4045
Screw, Fan Cover
1
4054
4055
Flywheel
Ignition Coil
1
1
4057
4058
4059
Spacer Ignition
Wire Grommet
Cord Complete
1
1
1
4061
Bolt, coil mount
2
4015
4067
Spark Plug
Recoil Start Assy.
1
78.
79.
80.
4079
Screw, Starter
1
87.
88.
89.
4088
Carburetor assembly
1
107.
108.
109.
110.
111.
3107
3108
3109
3110
3111
Air Filter Assembly
Air Filter Screen
Air Filter Element
Air Filter Cover
Air Filter Rear Housing
1
1
1
1
1
3115B
4300
4800
4988
X4067
Fuel Line - Blue
Gasket Set
Engine, G23LH
Carburetor Rebuild Kit
Block Off Plate
4-11
Section 4 G23LH Models
Service Manual
4.1.11 Liquimatic Hydraulic Torque Converter Installation Instructions
1. Lay the Go-Ped on its left side. Remove the gas tank, rear wheel and drive spindle.
2. Install the clutch assembly on the crankshaft.
3. Tighten the shaft bolt on the crank to approximately 8 to 12 ft. lbs.
4. Spin the clutch by hand to check the clearance. The clutch should spin freely in a counterclockwise direction.
5. Fill the clutch inner pump half way with automatic transmission fluid. High temperature automatic
transmission fluid may be purchased at a local auto parts store. Remove the spark plug and pull the starter cord
several times. The purpose of this is to bleed the air out of the small cavities in the clutch. Air in the pump will
cause poor acceleration. Repeat the filling and pull starting process until the fluid level in the clutch is stable.
The correct fluid level is the top of the shaft bolt.
6. Secure the clutch with a vice grips on the spanner wrench lugs as shown in the following figure.
7. Install the Plug.
8. Install the support plate. The plate should fit freely on the gas tank studs. If the studs bind on the plate, remove
the plate and bend the studs accordingly. Refer to the following figure for proper support plate clearance. A
9/64 Allen wrench can be used as a gauge.
9. Thread the fuel lines through the plate and the frame. Install the gas tank on the studs. Before tightening the
gas tank studs, the rear must be installed and tightened without adjusting it to the clutch in order to tension the
frame. When the gas tank is installed and the gas tank nuts are tightened, attach the fuel lines to the carburetor
and zip tie the fuel lines to the gas tank studs to prevent the fuel lines from rubbing on the clutch. Adjust the
rear tire to the clutch.
WARNING: The support plate clearance should be 9/64 inch from the plate to the top of the
Plug. If the clearance too deep or too shallow, the stud may be damaged. Proper adjustment
is critical. Use washers on the gas tank studs to adjust this dimension to the proper depth.
4-12
Service Manual
Section 4 G23LH Models
4.1.12 Disassembly and Reassembly
IMPORTANT: The Warranty card must be completely filled out and returned to Patmont
Motor Werks. If the Warranty card is not returned there is NO Warranty on the machine.
IMPORTANT: Modification of the machine or the engine VOIDS the Warranty. If any parts
are replaced on the machine that are not Genuine Go-Ped replacement parts the Warranty is
VOID.
4.1.12.1
Removing the T-Bar and Lower Hinge FTG Assembly
Refer to Removing the T-Bar text in Section 1.
4.1.12.2
Removing and Reinstalling the Front Fork
Refer to Reinstalling the Front Fork text in Section 1.
4.1.12.3
Replacing the Lower Hinge FTG Assembly
Refer to Replacing the Lower Hinge FTG Assembly text in Section 1.
4.1.12.4
Reinstalling the T-Bar
Refer to Reinstalling the T-Bar text in Section 1.
4.1.12.5
Replacing the Wheels because of tire wear
IMPORTANT: If the tires wear down to the wear dimple on the side of the tire they must be
replaced. Driving the machine after the tires are worn beyond the wear dimple is dangerous
and may damage the machine. Failure to replace the tires after they are worn down to the
wear dimple will VOID the warranty.
Refer to Replacing Wheels text in Section 1.
4.1.13 Sport, X-Ped, Liquimatic and Bigfoot Frequently Asked Questions
IMPORTANT: The Warranty card must be completely filled out and returned to Patmont
Motor Werks. If the Warranty card is not returned there is NO Warranty on the machine.
IMPORTANT: Modification of the machine or the engine VOIDS the Warranty. If any parts
are replaced on the machine that are not Genuine Go-Ped replacement parts the Warranty is
VOID.
4-13
Section 4 G23LH Models
Service Manual
Q. What is an FTG? What is a steel FTG?
A. FTG is short for Fitting. The FTG is the piece that the end of the T-Bar connects to. The Stock FTG is
Aluminum. An optional Steel FTG is available. It is much stronger.
Q. How to change the tire skin?
A. From www.pswsports.com
1. Remove the back tire from the Go-Ped®
2. Carefully take a hacksaw or sharp knife and cut the old tire off of the rim
3. Take the new tire and spray 2 (two) squirts of WD-40 inside of the new tire, rub around the inside of the
tire with your finger to lubricate the inside of the tire.
4. Now take the rim and place it on a hard surface and press the new tire onto one side of the rim. (Just get it
started)
5. Finally, place the tire on a towel on the ground and jump on the tire to force it completely onto the rim.
6. Now install the wheel & tire back onto the Go-Ped®
Q. How to remove and install a spindle?
A. From www.pswsports.com
1. Remove the back tire.
2. Remove the 3 nuts holding the gas tank on.
3. No need to remove the gas lines, just clear the tank of the studs and swing it back out of the way onto the
deck.
4. Now that the tank is off and you can see the drive spindle, in the end of it you can see the allen bolt. Keep
the spindle from spinning by using a pair of vise grips at the very top of the spindle. Remove the allen bolt.
5. The spindle is a wedge-mated fit on the crank and is on very tight. DO NOT HIT IT WITH A
HAMMER. Stick a Phillps Head screwdriver in the end where the Allen bolt came out and rotate
screwdriver in a circular motion( like mixing in a mixing bowl) while applying pressure. This should
loosen the spindle until it falls off.
Now Install the New Spindle, Hold it with the vise grips while tightening the allen bolt.
*Note: This is how it is done by qualified PSWS Technicians everyday!
4-14
Service Manual
Section 4 G23LH Models
4.1.14 G23LH Engine
The G23LH engine is used on the X-Ped, Sport, Liquimatic Bigfoot models.
4.1.14.1
Specifications
Item
Unit
Engine
Specifications
G23LH-48
Engine Type
Air cooled 2-cycle single cylinder
piston valve gasoline engine
Cylinder Layout
Piston Port
Upright
Cylinder Bore x Stroke
mm (in)
32x28 (1.260 x 1.102)
Displacement
cc
(cu. in)
22.5 (1.37)
Compression Ratio
7.7
Fuel Mixing Ratio
2-cycle oil premixed gasoline
25:1
Carburetor
Use JASO FC or
ISO EDG grade
2-cycle engine oil
Diaphram Rotary valve
WYJ-138A
Starting Method
Recoil starter
Ignition System
Transistor Control
Spark Plug
NGK:BPMR7A
Stopping Method
Primary coil short-circuiting
Cooling Fan
Sirocco Fan
Air Cleaner
Dry type
Rotation Direction
Counter clockwise view from
PTO
Overall Size
LxWxH
mm
(in)
141 x 239 x 175
(5.66 x 9.40 x 6.88)
Dry Weight
Kg (lbs)
1.9
(4.18 lbs)
Operating Speed
rpm
5000~10000
Idling Speed
rpm
2600~3000
Max. Speed
rpm
11500
Max. Output
Kw/rpm
(hp/rpm)
0.87/8000
(1.2 HP/8000)
Max. Torque
Nm/rpm
(kg.m/rpm)
1.13/6500
(0.115/6500)
g/kW.h
(g/ps.h)
789
(580)
Specific Fuel Consumption
Remarks
4-15
Section 4 G23LH Models
4.1.14.2
Service Manual
Oil and Fuel mixing instructions
NOTE: For proper engine operation and maximum reliability, pay strict attention to the oil and
fuel mixing instruction. Use a 40:1 fuel/oil ratio. Using improperly mixed fuel can severely
damage the engine.
Use the following procedure to ensure proper mixing:
1.
Put a small amount of fresh gasoline into a clean 1(U.S.) gallon (3.875-liter) fuel can.
2.
Add 3.2 ounces of 2-cycle oil (Go-Mix II recommended).
3.
Fill the remainder of the fuel can with gasoline (1 gallon).
4.
Screw the fuel can cap on tight and SHAKE THE CAN VIGOROUSLY FOR 30 SECONDS.
4.1.15 Sport Flat Rate
4-16
Remove and Replace
Time
Engine
½ hr
Engine Top End
½ hr
Engine Rebuild
1 ½ hr
Crankshaft
1 hr
Carburetor
¼ hr
Wheel complete
¼ hr
Tire change
½ hr
T-Handle with cables
½ hr
T-Handle without cables
¾ hr
Frame Change
1 hr
Exhaust Tube
¼ hr
Deck
¼ hr
Hinge Assembly
½ hr
Brake Cable
¼ hr
Brake Cable with Caliper
½ hr
Throttle Cable
¼ hr
Service Manual
Section 4 G23LH Models
4.1.16 Bigfoot Flat Rate
Remove and Replace
Time
Frame Change
1 ½ hr
T-Handle with cables
¾ hr
T-Handle without cables
1 hr
Engine Rebuild
1-½ hr
Engine Top End
½ hr
Engine
½ hr
Crankshaft
1 hr
Carburetor
¼ hr
Front or Rear Wheel complete
¼ hr
Clutch Cable
½ hr
Grip Shifter with Cable
¾ hr
Exhaust Tube
¼ hr
Deck
¼ hr
Hinge Assembly
½ hr
Brake Cable
¼ hr
Throttle Cable
¾ hr
Front Brake Caliper with Cable
½ hr
Front or Rear Tire change
½ hr
Motor Mount
1 hr
Motor Mount Spring/Clutch
½ hr
4-17
Section 4 G23LH Models
Service Manual
4.1.17 Liquimatic Flat Rate
4-18
Remove and Replace
Time
Engine Rebuild
1-½ hr
Engine Top End
½ hr
Engine
½ hr
Crankshaft
1 hr
Carburetor
¼ hr
Front or Rear Wheel complete
¼ hr
Tire change
½ hr
T-Handle with cables
½ hr
T-Handle without cables
¾ hr
Frame Change
1 hr
Exhaust Tube
¼ hr
Deck
¼ hr
Hinge Assembly
½ hr
Brake Cable
¼ hr
Brake Cable with Caliper
½ hr
Throttle Cable
¾ hr
Turbine R & R
1 hr
Turbine Rebuild
1 ½ hr
Outboard Support Bearing Assy & Plate
½ hr
Outboard Support Bearing Assy
¼ hr
Outboard Support Plate Assy
¼ hr
Turbine Oil Change
½ hr
Service Manual
Section 5 GSR40 Models
SECTION 5. GSR40 MODELS
5.1 GSR40 MODELS
This section contains parts illustrations, parts lists, disassembly, assembly, frequently asked questions and
troubleshooting information for the GSR40 and the GSR40-TS Interceptor.
Paragraph
Page
5.1.1
GSR40 Illustration ...................................................................................................................... 5-2
5.1.2
Parts Listing – GSR40 (Rev 02-04) ............................................................................................ 5-3
5.1.3
G43L-D Engine Illustration ........................................................................................................ 5-4
5.1.4
G43L-D Engine Parts Listing...................................................................................................... 5-5
5.1.5
Replacing Chain and Sprockets .................................................................................................. 5-6
5.1.6
Checking Sprocket Alignment .................................................................................................... 5-6
5.1.7
Adjusting the Chain Tensioner.................................................................................................... 5-7
5.1.8
Chain Lubrication ....................................................................................................................... 5-7
5.1.9
Disassembly and Reassembly ..................................................................................................... 5-8
5.1.9.1 Removing the T-Bar and Lower Hinge FTG Assembly .......................................................... 5-8
5.1.9.2 Removing and Reinstalling the Front Fork............................................................................ 5-8
5.1.9.3 Replacing the Lower Hinge FTG Assembly ........................................................................... 5-8
5.1.9.4 Reinstalling the T-Bar ............................................................................................................ 5-8
5.1.10 Frequently Asked Questions ....................................................................................................... 5-8
5.1.11 G43L-D Engine........................................................................................................................... 5-9
5.1.11.1 Fuel ........................................................................................................................................ 5-9
5.1.11.2 Engine Starting....................................................................................................................... 5-9
5.1.11.3 Operation ............................................................................................................................. 5-10
5.1.11.4 Maintenance......................................................................................................................... 5-10
5.1.11.5 Specifications and Technical Data....................................................................................... 5-11
5.1.11.6 Tightening Torque................................................................................................................ 5-11
5.1.11.7 Service Guide ....................................................................................................................... 5-12
5.1.11.8 Troubleshooting ................................................................................................................... 5-14
5.1.12
GSR40 and GSR40TSi Flat Rate Schedule........................................................................... 5-15
5-1
Section 5 GSR40 Models
5.1.1
5-2
GSR40 Illustration
Service Manual
Service Manual
5.1.2
Section 5 GSR40 Models
Parts Listing – GSR40
(Rev 02-04)
Item
Part No.
Description
1.
2.
3.
4.
5.
6.
7.
8.
9.
10.
11.
12.
13.
1061
1064
1063
1054
1048
GSR1046L
GSR1030
BF1050
1051A
1049
1062
GSR1016
1051B
3123
1
1
1
1
1
1
1
1
1
1
1
4
1
1
14.
8024
15.
16.
17.
18.
GSR1041
1060
1022
1067
19.
20.
21.
22.
23.
24.
BF1027RA
2025
8018A
8005
1028B
GSR1059
25.
GSR1059
GBF1058D
Sticker; Reflective T-Bar Pad
Sticker; Red Warning Label
Sticker; Yellow Warning Label
Brake Cable; Front
Brake Lever Assembly
Handlebar Assy Complete - 24.75”
Cable, Brake Rear
Throttle Cable Assembly
Throttle Lever
Grip set
Safety Spring & Grip Kit
Spacer; Sprocket to Disc
Throttle Lever Assy
Kill Switch Assy (includes bracket,
washer, nut, kill switch)
Bolt; Disc Mount 3/8-24 x 3-1/4
HHCS Grade 5
T-Bar w/Upper Hinge
Safety Spring
Slide Tube; Black
Screw; throttle clamp 8-32 x ½
SHCS
Fork Assembly; Lefty, Red
Cable Barrel w/nut
Brake Assy; Disc Caliper
Spring; Return
Bearing, Head Set
Wheel Assy; Rear complete
(includes items – 11,14, 25, 26, 33,
41, 44, 61, 65, 68, 70, 71)
Wheel, Complete Rear (Mag.)
Wheel, Complete Front (Mag.)
Qty
26.
27.
28.
29.
30.
31.
32.
33.
34.
35.
BF1059O
BF1058O
BF1033
GSR1031
GSR1006
1068
1011
1009
KN1009
GSR1025
1025
2
2
1
4
1
1
12
4
4
4
3
36.
2113
37.
38.
39.
40.
41.
42.
8004
3116
1026
BF1036
GSR1014
GSR1017
43.
GSR1012
Tire Power Play TT (standard)
Dirt Tire w/Tube (optional)
Bolt; Axle, 5/8-18 x 6 HHCS
Bolt; Deck ¼-20 x 2-1/4
Deck w/ Grip Tape Logo
Sticker, Made in U.S.A.
Grommet; Deck
Washer; Deck Mount
Nut; Deck and Rear Disc ¼-20
Washer; Engine Mount
Bolt, Gas Tank Mount M6 x 60
HHCS
Gas Tank w/ 20.5” fuel lines,
Extended Range
Spacer; Front Disc
Gas Cap
Nut, Gas Tank Mt. M6 Nylok
Washer; Axle 1 x .641 x .06
Spacer; Wheel to Sprocket
Bolt; Rear Axle 5/8-18 x 8.5
HHCS Grade 8
Bolt; Clutch Mount, Lower M6-1 x
8
1
1
1
1
3
2
2
2
1
1
1
1
4
1
3
2
4
1
44.
GSR1035
45.
46.
47.
48.
49.
50.
GSR1028
GSR1026
GSR1027
4803
BF1037
GSR1011
51.
52.
53.
54.
55.
56.
1072A
1074A
GSR1037
1636
2001
4538A
57.
58.
59.
GSR1001R
1024
1043
60.
61.
62.
63.
64.
65.
66.
67.
GSR1009
BF1038A
GSR1022A
GSR1019
1056
1036
6007
GSR1023
68.
69.
70.
71.
72.
73.
74.
75.
8008
8003
GSR1044
GSR1013
GSR1003
GSR1005
GSR1007
GSR1004.1
GSR1002.1
GSR1021
GSR1018
GSR1008.1
8022
3115B
3115Y
3120
3118
1053
1053S
1055
1069
1066
GSR1124
8002A
GSR1045
76.
77.
78.
79.
80.
81.
82.
83.
84.
85.
86.
87.
88.
89
90.
91.
Bolt; Disc Mount ¼-20 x 1-1/2
BHCS Alloy
Exhaust Frame Grommet
Exhaust Tube
Exhaust Clamp; 5/8”
Engine, G43, 41.5cc
Nut; Axle 5/8-18 Lock Nut
Bolt; Clutch Mount, Upper M6-1
x 40 SHCS
E-Clip, Kickstand 5/16
Washer, Kickstand
Kickstand Assembly, GSR40
Spring; Kickstand
Grip Tape, Go-Ped Die Cut
Bolt; Outboard, Engine Mount M5.8 x 30 SHCS
Frame Assembly, Red
Spacer, Gas Tank, Plastic
Lower Hinge FTG Assembly;
Aluminum
Spacer; ½ x .560 Aluminum
Wheel Bearing
Fender; Rear w/ Chrome Decal
Fender/Tank Rear Bracket
Handle Hinge Pin
Washer, Universal 3/8 x 11/16
Go Snuffer Silencer
Bolt, Engine Mount Inboard M5-.8
x 16 SHCS
Nut; Wheel
Disc; Front
Disc; Rear
Sprocket; 76 tooth
Chain; #25 Hard, 94 Link
Chain Tensioner Guide
Quick Release; Chain Tensioner
Sprocket; Engine, 6 Tooth
Sprocket; 7 Tooth (Optional)
Spacer; Wheel to Fender
Spacer; Wheel to Frame
Chain Guide Mt. Bracket/Latch
Cable Fasten Bolt and Nut
Fuel Line (Blue)(1ft)
Fuel Line (Yellow)(1ft)
Fuel Filter
Fuel Line Return Fitting
Plastic Cable Tie (8”)
Plastic Cable Tie (4”)
Cable, End Crimp
Nut; throttle clamp 8-32 Nylok
Clamp; throttle lever
Outer Clutch Housing Assembly
O-Ring, Brake Motion
Bolt, Rear Sprocket Mount
4
1
1
1
1
2
2
1
1
1
1
1
2
1
3
1
4
4
1
1
1
8
1
2
8
1
1
1
1
1
1
1
1
1
2
1
2
1
1
1
1
3
1
2
1
1
1
2
4
2
5-3
Section 5 GSR40 Models
5.1.3
5-4
G43L-D Engine Illustration
Service Manual
Service Manual
5.1.4
Section 5 GSR40 Models
G43L-D Engine Parts Listing
Item
1.
2.
3.
4.
Part No.
4701
4004
4703
4705
5.
6.
7.
8.
9.
10.
11.
12.
13.
14.
15.
16.
17.
18.
19.
20.
21.
22.
23.
24.
25.
26.
4704
4706
4718
4754
4755
4023
4711
4712
4713
4714
4715
4716
4717
4719
4721
4722
4723
4724
4725
4346
3044
3022
4735
4735HP
27.
4737
Description
Cylinder
Bolt, Cylinder
Gasket, Cylinder Base
Crankcase Assembly
(includes bearings and seals)
Crankcase Assembly (cases only)
Gasket, Crankcase
Crankshaft Complete
Main Bearing and Seal Kit
Oil Seal set
Bolt, Crankcase
Snap Ring
Piston
Piston Ring (set of 2)
Piston Pin
Piston Pin Clip (set of 2)
Bearing, Piston Pin
Pin Washer (set of 2)
Clutch Shoes and Spring Kit
Bolt, Clutch (shoe mount)
Washer, Clutch
Washer, Clutch, Bevelled
Flywheel (Rotor)
Ignition Coil Assembly
Bolt, Coil
Nut, Flywheel
Key, Flywheel
Muffler (GSR40)
Muffler, Modified
(GSR40-TS Interceptor)
Bolt, Muffler
Qty
1
4
1
1
1
1
1
1
1
4
1
1
1
1
1
1
1
1
2
2
2
1
1
2
1
1
1
1
28.
29.
30.
31.
32.
33.
34.
35.
36.
37.
38.
39.
40.
41.
4738
4739
4742
43108
4745
4746
4747
4748
4751
4752
4761
4762
4764
4765
4763
42.
43.
44.
45.
4766
4767
4768
4769
4771
46.
47.
48.
49.
50.
51.
4798
3107
3111
3109
3108
3110
4799
Bolt, Muffler Stabilizer
Gasket, Muffler
Cover, Fan
Bolt, Fan Cover
Cover, Engine
Screw, Engine Cover
Guard, Plastic
Spark Plug
Clamp
Recoil Starter Assembly
Pulley, Starter
Screw, Starter Mount
Spacer, Pulley
Insulator Manifold (GSR40)
Insulator Manifold
(GSR40-TS Interceptor)
Screw, Insulator
Gasket, Insulator
Gasket, Carburetor
Carburetor Assembly (GSR40)
Carburetor Assembly
(GSR40-TS Interceptor)
Screw, Carburetor
Air Filter Assembly
Air Filter Rear Housing
Air Filter Element (set of 2)
Screen, Air Filter
Cover, Air Filter
Gasket Set (includes items 3, 5,
29, 43, 44)
1
1
1
4
1
4
1
1
1
1
1
4
1
1
1
2
1
1
1
1
2
1
1
1
1
1
1
2
5-5
Section 5 GSR40 Models
5.1.5
Service Manual
Replacing Chain and Sprockets
IMPORTANT: It is recommended to replace the sprockets and chain at the same time.
Otherwise the newly replaced sprocket/chain will wear rapidly when running on the old
sprocket/chain.
Remove the GoLube™ chain tensioner. Remove the chain by loosening the engine mounting screws.
Remove the rear wheel. Remove the rear sprocket and disk from the rear wheel. Remove the drive sprocket
from the engine shaft.
Install new sprockets and chain in reverse order of removal. Be sure to align the rear sprocket on the axle
center and the drive sprocket as shown below.
Reinstall the GoLube™ chain tensioner and tension it as described below.
5.1.6
Checking Sprocket Alignment
If the rear sprocket has been replaced, it must be aligned to the center of the wheel bearings as shown.
Use a caliper or the Go-Tool® alignment tool to center the sprocket and rear disk brake.
IMPORTANT: The sprocket must be properly aligned to the rear axle. Excessive chain wear,
chain skipping, and excessive chain noise will result if the sprocket is not properly aligned to
the axle.
Securely tighten the sprocket and rear disk hardware. Spin the rear wheel and visually inspect that the
sprocket and rear disk are properly aligned.
5-6
Service Manual
Section 5 GSR40 Models
With the chain removed, use a straight edge tool to visually check that the rear sprocket and drive sprocket
are in alignment as shown.
If the sprockets are out of alignment, reposition the engine on the engine mounting bracket and securely
tighten the engine mounting hardware.
5.1.7
Adjusting the Chain Tensioner
The GoLube™ chain tensioner is designed to help maintain proper chain tension and alignment.
During normal scooter use, the chain will wear and stretch. Also, the chain tensioner will wear to match the
path of the chain.
To adjust the chain tensioner, release the quick release and press down on the tensioner to create a smooth
straight chain path between the sprockets.
Tension the chain just enough to prevent chain slap and avoid skipping cogs while allowing the wheel to spin
freely without excessive drag.
IMPORTANT: If the chain tensioner shows excessive wear , it should be replaced.
5.1.8
Chain Lubrication
The chain should be periodically cleaned and lubricated to avoid excessive wear.
Use a solvent that is safe for paint (citrus cleaner recommended) and a brush to clean the chain.
Use compressed air or spray cleaner such as WD40 to clean the chain.
NOTE: Spray cleaners such as WD40 do not provide sufficient lubrication for this type of
drive system.
5-7
Section 5 GSR40 Models
5.1.9
Service Manual
Disassembly and Reassembly
IMPORTANT: The Warranty card must be completely filled out and returned to Patmont
Motor Werks. If the Warranty card is not returned there is NO Warranty on the machine.
IMPORTANT: Modification of the machine or the engine VOIDS the Warranty. If any parts
are replaced on the machine that are not Genuine Go-Ped replacement parts the Warranty is
VOID.
5.1.9.1
Removing the T-Bar and Lower Hinge FTG Assembly
Refer to Removing the T-Bar text in Section 1.
5.1.9.2
Removing and Reinstalling the Front Fork
Refer to Reinstalling the Front Fork text in Section 1.
5.1.9.3
Replacing the Lower Hinge FTG Assembly
Refer to Replacing the Lower Hinge FTG Assembly text in Section 1.
5.1.9.4
Reinstalling the T-Bar
Refer to Reinstalling the T-Bar text in Section 1.
5.1.10 Frequently Asked Questions
IMPORTANT: The Warranty card must be completely filled out and returned to Patmont
Motor Werks. If the Warranty card is not returned there is NO Warranty on the machine.
IMPORTANT: Modification of the machine or the engine VOIDS the Warranty. If any parts
are replaced on the machine that are not Genuine Go-Ped replacement parts the Warranty is
VOID.
Q. What is an FTG? What is a steel FTG?
A. FTG is short for Fitting. The FTG is the piece that the end of the T-Bar connects to. The Stock FTG is
Aluminum. An optional Steel FTG is available. It is much stronger.
5-8
Service Manual
Section 5 GSR40 Models
5.1.11 G43L-D Engine
The G43L-D engine is used on the GSR40.
5.1.11.1
Fuel
Mix fuel (Leaded or Unleaded) 92 octane or higher gasoline and high grade 2 cycle oil (JASO FC Grade oil
or ISO EGC grade) in the ratio of 50:1.
WARNING: Never use any alcohol fuel or alcohol added fuel, or the rubber parts in the
carburetor and engine will be damaged.
Gasoline is very flammable. Avoid smoking, bringing any fires near fuel.
5.1.11.2
Engine Starting
Push the primer bulb on the bottom of the
carburetor several times until overflow fuel
flows out.
Close the choke lever (Fig. 2) and move the
throttle lever ¼ ~ 1/3 open position.
Pull the starter knob quickly until the first firing
noise is heard.
Open the choke (Fig. 2), throttle idle~ ¼ open.
Pull the starter quickly.
Operate the engine for a few minutes to warm it
up.
IMPORTANT:
If the engine is warm, chocking may not be
necessary.
Over choking may cause starting difficulty due
to a wet spark plug. In this case change the spark
plug or dry it out and remove excess fuel in the
cylinder by pulling the starter knob with the
spark plug removed.
5-9
Section 5 GSR40 Models
5.1.11.3
Service Manual
Operation
This engine is tuned at the factory to maximum power and speed and needs correct maintenance to keep it in
top performance.
Follow the operating procedures described in the owner’s manual.
Be sure to allow the engine to idle for at least 30 seconds after running for extended periods at full throttle.
This will allow the engine to cool down before shutting it off.
5.1.11.4
Maintenance
Maintenance Chart
Items
Action
Before
Use
Every 25
hours
Every 100
hours
Note
Leakage,
Damage/Cracks
Idling Speed
Check/Adjust
Air-Cleaner
Check/Clean
Replace if necessary
Spark Plug (gap)
Check/Adjust
Replace if necessary
Cylinder (barrel)
Check/Clean
Replace if necessary
Piston, Ring
Check/Clean
Replace if necessary
Muffler & Bolt
Check/Clean
Replace if necessary
Bearings
Check/Clean
Replace if necessary
Crank Shaft
Check/Alignment
Replace if necessary
5-10
Check
Service Manual
5.1.11.5
Section 5 GSR40 Models
Specifications and Technical Data
Items
Overall Size (LxWxH)
Unit
In (mm)
Weight
Engine Type
Clutch Type
Bore x Stroke
Displacement
Effective Compression Ratio
Carburetor Type
Starting
Ignition Type
Spark Plug
Spark Plug Gap
Rotor Gap
Rotating Direction
Clutch Engagement Speed
No load max Speed
Idling Speed
Max. Power
Max. Torque
Fuel Consumption
Mix Ratio
Air Cleaner
Lbs (kg)
5.1.11.6
In (mm)
In3 (cm3)
Standard
In (mm)
In (mm)
Rpm
Rpm
Rpm
Hp/rpm (kW/rpm)
Lb ft/rpm (N.m/rpm)
g/kW h
Specifications
6.34 x 10.75 x 8.03
(161 x 273 x 204)
6.61 (3.0)
Two Stroke Cycle
Centrifugal
1.57 x 1.30 (40 x 33)
2.53 (41.5)
7.5
Diaphragm
Recoil Starter
CDI Control
BPMR7A
.023 ~ .027 (0.6 ~ 0.7)
.013 (0.34)
Counter Clockwise (PTO View)
3500
12000
2500
1.97/7500 (1.47/7500)
1.66/5500 (2.25/5500)
612
50:1
Dry
Remarks
NGK
After Full Break-in
Tightening Torque
Items
Carburetor
Insulator
Clutch
Rotor
Cylinder
Crankcase
Spark Plug
Muffler
Fan Cover
Ignition Coil
Starter Case
Tapping Screw
Screw Size
M5 (P=0.8)
M5 (P=0.8)
M6 (P=1.0)
M8 (P=1.0)
M5 (P=0.8)
M5 (P=0.8)
M10 (P=1.0)
M5 (P=0.8)
M5 (P=0.8)
M4 (P=0.7)
M4 (P=0.7)
TP 4.3
Standard lb in (kg cm)
30.4 (35)
30.4 (35)
56.4 (65)
113 (130)
60.8 (70)
56.4 (65)
95.5 (110)
78.1 (90)
30.4 (35)
28.6 (33)
11.3 (13)
21.7 (25)
Limit lb in (kg cm)
26~34.7 (30~40)
26~34.7 (30~40)
43.4~69.4 (50~80)
86.8~130 (100~150)
52~69.4 (60~80)
43.4~69.4 (50~80)
86.8~104 (100~120)
60.8~86.8 (70~100)
26~34.7 (30~40)
21.7~43.7 (25~40)
8.68~13 (10~15)
17.4~26 (20~30)
Remarks
With Locktight glue
5-11
Section 5 GSR40 Models
5.1.11.7
Service Manual
Service Guide
Removing Clutch Shoe
1. Remove the housing and plug cap
2. Remove the spark plug and fit the stopper into the plug hole.
3. Remove clutch bolts.
Removing Rotor Fan
4. Remove the rotor nut.
5. Remove the rotor using the puller assembly. Apply 8mm puller bolts.
Assembling Rotor
Insert the gauge between the rotor magnet metal and the coil. Tighten screws
while pressing the coil against the rotor.
GAP Specification .013 in (0.34 mm)
Removing Piston Pin
1. Remove snap rings from both sides of the piston pin.
2. Engage the rod assembly to the piston pin and gently tap with a plastic
hammer to push out the pin while holding the piston firmly.
NOTE: Hard hammering may damage the big end of the connecting
rod.
5-12
Service Manual
Section 5 GSR40 Models
Installing Piston
1. Make sure the arrow is pointed to the exhaust side.
2. Fit the circlip in the groove so as to face the end gap below.
NOTE: A deformed circlip may come off during engine operation and
damage the engine.
5-13
Section 5 GSR40 Models
5.1.11.8
Service Manual
Troubleshooting
1. Engine does not start
Description
Cause
No spark in the Spark Plug
Spark Plug
1. Wet spark plug electrodes
2. Carbon deposited on the electrodes
3. Insulation failure by insulator damage
4. Improper spark gap
5. Burn out of electrodes
Magneto
1. Ignition coil inside failure
2. Damaged cable sheath or disconnected
cable
Switch
3. Switch is OFF
4. Switch failure
5. Primary wiring grounded
Sparks appear in the spark plug
Compression and fueling is normal
1. Over sucking of fuel
2. Too rich fuel
3. Overflow
4. Clogging of air cleaner
5. Faulty fuel
Fueling normal but poor compression
1. Worn out cylinder, piston or piston
ring
2. Gas leakage from cylinder and crank
case gasket
No fuel supply
1. Choked breather air hole
2. Clogged carburetor
3. Clogged fuel filter
Countermeasure
Dry the spark plug
Clean the spark plug
Replace worn parts
Adjust to .023~.027in
Replace spark plug
Replace Ignition coil
Replace worn parts
Turn switch ON
Replace the switch
Repair ground
Drain excess fuel
Adjust carburetor
Carburetor adjust or exchange
Wash with mixed gasoline
Change with proper fuel
Replace worn parts
Apply liquid gasket and reassemble
Clean breather
Clean carburetor
Clogged fuel filter
2. Lack of Power or poor performance
Description
Compression is normal and no misfire
Overheating
Others
5-14
Cause
1. Air leaks in fuel line
2. Air penetration from intake tube joint
or carburetor joint
3. Water in fuel
4. Piston seizure
5. Muffler chocked with carbon
1. Fuel too lean
2. Clogged cylinder fins
3. Poor fuel quality
4. Carbon deposits in combustion
chamber
5. Spark plug electrode red hot
1. Dirty air cleaner
2. Overloading
Countermeasure
Tighten connections
Change gasket or tighten screws
Replace with clean
Replace piston and cylinder
Clean muffler
Adjust carburetor
Clean fins
Replace with good fuel
Clean carbon deposits
Thoroughly clean, adjust gap
0.023~0.027 in
Wash with mixed gasoline
Reduce load
Service Manual
Section 5 GSR40 Models
5.1.12 GSR40 & GSR40TSi Flat Rate Schedule
Remove and Replace
Time
Frame Change
1 ½ hr
T-Handle with cables
¾ hr
T-Handle without cables
1 hr
Engine Rebuild
1-½ hr
Engine Top End
½ hr
Engine R & R
½ hr
Crankshaft
1 hr
Carburetor
¼ hr
Front or Rear Wheel complete
¼ hr
Rear Tire change
¾ hr
Front Tire change
½ hr
Exhaust Tube
¼ hr
Deck
¼ hr
Hinge Assembly
½ hr
Front or Rear Brake Cable
½ hr
Throttle Cable
1 hr
Front Brake Caliper
½ hr
Rear Brake Caliper
¾ hr
Countershaft Sprocket
¾ hr
Rear Sprocket
½ hr
Chain
½ hr
Countershaft/Rear Sprocket & Chain
1 ½ hr
Clutch Assy
Rear Fender
½ hr
Front Fork
¾ hr
5-15
Service Manual
Section 6 - Super Go-Quad 30
SECTION 6 – SUPER GO-QUAD 30
This section contains parts illustrations, parts lists, as well as a drawing highlighting the needed parts to
upgrade a Super Go-Quad 30 with the new GP420RS, 41.5cc Go-Ped® Engine.
Paragraph
Page
Super Go-Quad 30 Illustration .................................................................................................... 6-2
Optional 41.5cc Motor Upgrade ................................................................................................. 6-3
Parts Listing – Super Go-Quad 30 .............................................................................................. 6-4
6-1
6-2
6-3
!
"
#
Service Manual
Item
Part #
3
4
5
7008
7009
7023
6
7010
7
10370
8
9
10
11
7018
1051
1049
1048L
12
7065
13
3123
14
15
16
17
18
19
7026
7025
7064
7003
7024A
7024
20
21
Q1158
1030
22
7059
23
24
1158H
1058O
25
26
27
28
Q1038A
7072
7071
7073
29
7057
30
7060
31
32
7054
1013.64
33
1408
34
35
37
1458H
3113
45171
38
39
40
1026
7053
7035A
Section 6 – Super Go-Quad 30
Description
Nut, 1/2-20 Low Nylock
Washer, Axle, 1/2"
Steering control arm, black
Bolt; 3/8-24 x 2-3/4" HHCS
GR5
Nut; axle, 6"SRT, 3/8-24
nylock
Seat, Folding Type (7018A is
old NON Folding seat)
Throttle Lever
Grip Set
Brake Lever (Left Side)
Nut, 5/16-24 (GQs) Jam nut
on tie rod
Kill Switch with lockwasher
and nut
Bolt; 5/16-24 x 1-1/2 HHCS
GR8
Nylock Nut, 5/16-24
Bolt; 5/16-24 x 1 HHCS GR5
Tie Rod End (GQ's)
Tie Rod (threaded rod only)
Tie Rod Assembly, complete
Wheel COMP; 6"SRT,
Mach12, 1/2" Bearings
Brake Caliper, 6"SRT, front
Spacer, wheel bearing
[6"SRT]
Wheel; 6"SRT, Mach 12, No
Rubber, No Bearings
Tire; Go-active rubber only
Bearing, wheel, 6"SRT,
1/2"ID
Bolt; 1/4 x 2-1/4" HH Lag Bolt
Bolt; 1/4 x 1-3/4" HH Lag Bolt
Bolt; 1/4 x 3-1/2" HH Lag Bolt
Drive Hub, painted black, no
rubber
Rubber Tubing; 5/16"ID for
hubs
Spacer, 12mm ID x1.125"OD
x.375” width; Aluminum
Sprocket; 64 tooth (SGQ30)
Screw, Go Active Sprocket
Mnt
Wheel, 6"SRT, Mach 12 w/
standoffs
Fuel Tank (1L) with fuel lines
Gas Cap
Nut; gas tank mount; M6 low
nylock
Bearing w/snap ring (SGQ30)
Axle Shaft; 12mm x 28.375"
Revised on 10/26/2005
Qty
2
6
2
2
2
1
1
1
1
2
1
2
4
2
4
2
2
2
1
4
3
4
4
2
2
2
2
11"
4
1
6
1
1
1
41
1401
42
1454A
43
44
45
1457
1454
1455
46
47
48
56
57
58
1456
1125
4900
1407
7070S
1024
59
65
68
72
75
1025
1036
8008
GSR1003.1
GSR1004.1
Bolt; engine mount; M6x35
SHCS
Motor mount assy w/drum,
Cast MM, bearing, snap rings
Snap Ring, Small, clutch
housing
Motor Mount, 54mm, Cast
Bearing, clutch housing
Snap Ring, Large, clutch
housing
Clutch drum; 54mm
Engine; 29cc (GP290RS)
U Bolt; motor mount
Frame, Silver SGQ30
Spacer, gas tank, plastic
Bolt, Gas Tank Mount, m6 x
60 HHCS
Washer, universal, 3/8 x11/16
Nut; 3/8-24 center lock
Chain; #25 Hard; 80 Link
Sprocket; 6 tooth (GSR's)
THE FOLLOWING ITEMS ARE ON PAGE 6-2
80
4901 Engine; 41.5cc (GP420RS)
78mm Motor mount
assembly; BILLET w/drum,
216130001 bearing, snap rings
81
78mm Motor mount
assembly; CAST w/drum,
216130002 bearing, snap rings
82
121130002 Clutch Drum, 78mm
212130007 Motor Mount, 78mm, Billet
83
212130012 Motor Mount, 78mm, Cast
84
212130001 Chain Guard; Upper
85
4503 screw; M5 x 22
86
131130007 Nut; 3/8-16, jam nut
87
131130006 Bolt; Carriage; 3/8-16 x 1.5"
4
1
1
1
1
1
1
1
1
1
2
3
8
2
1
1
1
1
0
1
1
0
1
2
0
0
ITEMS NOT SHOWN ON PARTS ILLUSTRATION
1054 Brake Cable, 34"H / 40"C
Throttle Cable Assembly, PBF1050 301 (long)
1063 Yellow Warning Sticker
1064 Red Warning Sticker
1053 Large Zip Tie (black; 8")
1053S Small Zip Tie (black; 4")
1065 Sticker; www.goped.com
1068 Sticker; made in USA
3
2
1
6-4
1
1
1
1
1
1
Service Manual
Item
Part #
3
4
5
7008
7009
7023
6
7010
7
10370
8
9
10
11
7018
1051
1049
1048L
12
7065
13
3123
14
15
16
17
18
19
7026
7025
7064
7003
7024A
7024
20
21
Q1158
1030
22
7059
23
24
1158H
1058O
25
26
27
28
Q1038A
7072
7071
7073
29
7057
30
7060
31
32
7054
1013.64
33
1408
34
35
37
1458H
3113
45171
38
39
40
1026
7053
7035A
Section 6 – Super Go-Quad 30
Description
Nut, 1/2-20 Low Nylock
Washer, Axle, 1/2"
Steering control arm, black
Bolt; 3/8-24 x 2-3/4" HHCS
GR5
Nut; axle, 6"SRT, 3/8-24
nylock
Seat, Folding Type (7018A is
old NON Folding seat)
Throttle Lever
Grip Set
Brake Lever (Left Side)
Nut, 5/16-24 (GQs) Jam nut
on tie rod
Kill Switch with lockwasher
and nut
Bolt; 5/16-24 x 1-1/2 HHCS
GR8
Nylock Nut, 5/16-24
Bolt; 5/16-24 x 1 HHCS GR5
Tie Rod End (GQ's)
Tie Rod (threaded rod only)
Tie Rod Assembly, complete
Wheel COMP; 6"SRT,
Mach12, 1/2" Bearings
Brake Caliper, 6"SRT, front
Spacer, wheel bearing
[6"SRT]
Wheel; 6"SRT, Mach 12, No
Rubber, No Bearings
Tire; Go-active rubber only
Bearing, wheel, 6"SRT,
1/2"ID
Bolt; 1/4 x 2-1/4" HH Lag Bolt
Bolt; 1/4 x 1-3/4" HH Lag Bolt
Bolt; 1/4 x 3-1/2" HH Lag Bolt
Drive Hub, painted black, no
rubber
Rubber Tubing; 5/16"ID for
hubs
Spacer, 12mm ID x1.125"OD
x.375” width; Aluminum
Sprocket; 64 tooth (SGQ30)
Screw, Go Active Sprocket
Mnt
Wheel, 6"SRT, Mach 12 w/
standoffs
Fuel Tank (1L) with fuel lines
Gas Cap
Nut; gas tank mount; M6 low
nylock
Bearing w/snap ring (SGQ30)
Axle Shaft; 12mm x 28.375"
Revised on 10/26/2005
Qty
2
6
2
2
2
1
1
1
1
2
1
2
4
2
4
2
2
2
1
4
3
4
4
2
2
2
2
11"
4
1
6
1
1
1
41
1401
42
1454A
43
44
45
1457
1454
1455
46
47
48
56
57
58
1456
1125
4900
1407
7070S
1024
59
65
68
72
75
1025
1036
8008
GSR1003.1
GSR1004.1
Bolt; engine mount; M6x35
SHCS
Motor mount assy w/drum,
Cast MM, bearing, snap rings
Snap Ring, Small, clutch
housing
Motor Mount, 54mm, Cast
Bearing, clutch housing
Snap Ring, Large, clutch
housing
Clutch drum; 54mm
Engine; 29cc (GP290RS)
U Bolt; motor mount
Frame, Silver SGQ30
Spacer, gas tank, plastic
Bolt, Gas Tank Mount, m6 x
60 HHCS
Washer, universal, 3/8 x11/16
Nut; 3/8-24 center lock
Chain; #25 Hard; 80 Link
Sprocket; 6 tooth (GSR's)
THE FOLLOWING ITEMS ARE ON PAGE 6-2
80
4901 Engine; 41.5cc (GP420RS)
78mm Motor mount
assembly; BILLET w/drum,
216130001 bearing, snap rings
81
78mm Motor mount
assembly; CAST w/drum,
216130002 bearing, snap rings
82
121130002 Clutch Drum, 78mm
212130007 Motor Mount, 78mm, Billet
83
212130012 Motor Mount, 78mm, Cast
84
212130001 Chain Guard; Upper
85
4503 screw; M5 x 22
86
131130007 Nut; 3/8-16, jam nut
87
131130006 Bolt; Carriage; 3/8-16 x 1.5"
4
1
1
1
1
1
1
1
1
1
2
3
8
2
1
1
1
1
0
1
1
0
1
2
0
0
ITEMS NOT SHOWN ON PARTS ILLUSTRATION
1054 Brake Cable, 34"H / 40"C
Throttle Cable Assembly, PBF1050 301 (long)
1063 Yellow Warning Sticker
1064 Red Warning Sticker
1053 Large Zip Tie (black; 8")
1053S Small Zip Tie (black; 4")
1065 Sticker; www.goped.com
1068 Sticker; made in USA
3
2
1
6-5
1
1
1
1
1
1
Service Manual
Section 7 – Trail Ripper – GTR40
SECTION 7: Trail Ripper – GTR40
This section contains parts illustrations and parts list for the Go-Ped® Trail Ripper, GTR40.
Paragraph
Page
GTR40 Parts Illustration ................................................................................................ 7-2
GTR40 Parts List............................................................................................................ 7-3
7-1
7-2
!
Service Manual
Item
Part #
4
5
6
1028
1028N
1028B
7
8
9
10
11
12
1028C
GSR2009C
1051
1049
1048
-
13
3123
14
2009D
15
16
17
18
2041A
1060
1022
1022C
19
216010002
20
21
22
23
24
25
26
27
1090
1083A
212130005
6133
215010005
BF1033
28
29
30
1008
212130003
-
31
1011
32
33
34
1009
KN1009
-
35
36
37
2113
45171
38
1026
39
40
BF1036
-
Section 7 – Trail Ripper – GTR40
Description
Front fork bearing kit, 2
bearings, 2 cups, 1 nut
Head set; Fork nut
Head set; bearing (single)
Head set; Bearing cup
(single)
Riser Handlebar
Throttle Lever
Grip Set
Brake Lever Set (L & R)
Kill Switch with lockwasher
and nut
Crossbar / clamps / pad
assembly
Handlebar stem w/W.D.16"
(SBf)
Safety Spring
Slide Tube Assmbly
Slide Tube Clamp
Front Swing Arm Assembly,
Upper & Lower Arms,
rubber, aluminum comp
block, 4 set screws, 1/2-20
Nylock & washer
Bolt; Maddog Brake Mount;
M6x12
Maddog Brake Caliper
Fender; front (TR)
Bolt; M6x18 SHCS
Side stand; Red (TR)
Bolt; front axle; 5/8-18 x 6"
Bolt; deck mount; 1/4-20
x1.75" Flat Head
Deck, no grip tape, (TR)
Deck Grommet; black
rubber
Washer; deck mount; 1/4ID
x 1.25" OD
Nut; 1/4-20 Nylock
Gas tank, 1.5L, w/ 24" Fuel
Lines
Gas Cap
Nut; gas tank mount; M6
low nylock
Washer; axle; 1"OD x 5/8"
ID x .060"
-
Revised on 11/3/2005
Qty
0
1
2
2
1
1
1
1
1
1
1
1
1
1
1
4
2
1
1
1
1
4
1
8
4
6
1
1
3
1
-
41
1401
42
216130001
216130002
43
45
1457
212130007
212130012
1455
46
47
48
1456
121130002
4901
49
50
51
52
53
54
55
56
215010006
GSR1025
GSR1023
215110001
GSR1022
2001
1407
57
58
216010001
1024
59
1025
60
BF1038B
61
BF1038A
62
63
64
2026M
BF1058T
111130002
65
1036
66
1087
67
68
1088
8008
69
70
71
72
73
74
8003SS
BF1037
131130007
131130006
4503
212130001
44
Bolt; engine mount; M6x35
SHCS
78mm Motor mount
assembly; BILLET w/drum,
bearing, snap rings
78mm Motor mount
assembly; CAST w/drum,
bearing, snap rings
Snap Ring, Small, clutch
housing
Motor Mount, 78mm, Billet
Motor Mount, 78mm, Cast
Bearing, clutch housing
Snap Ring, Large, clutch
housing
Clutch Drum, 78mm
Engine; 41.5cc (GP420RS)
Engine Protection Bar; Red
(TR)
5mm Washer
Screw; M5 x 16
Fender/Tank Bracket (TR)
Fender; Rear (GSR's,GBf)
Deck Grip Tape Set
U Bolt; motor mount
Frame & rear swingarm
assy; rubber, aluminum
comp block, 4 set screws,
1/2-20 Nylock & washer
Spacer, gas tank, plastic
Bolt, Gas Tank Mount, m6
x 60 HHCS
Spacer, wheel bearing,
Mag Rim (10" PT)
Bearing; Mag Wheel; 10"
(PT)
Wheel; 10"PT, 2pcs. Magn.
Silv
Inner Tube; 10"PT
Tire; Badlands (TR)
Washer, universal, 3/8 x
11/16
Spacer; front wheel to
brake disk
Bolt 3/8-24 x 3.5" Low hex
head; front wheel assy
Nut; 3/8-24 center lock
Brake Disc, hardened
stainless steel
Nut; axle, 5/8-18 nylock
Nut; 3/8-16, jam nut
Bolt; Carriage; 3/8-16 x 1.5"
screw; M5 x 22
Chain Guard; Upper (TR)
4
1
0
1
1
0
1
1
1
1
1
2
2
1
1
1
1
1
3
3
2
4
2
2
2
8
4
4
2
2
2
1
1
2
1
7-3
Service Manual
75
76
GSR1004.1
7008
77
78
7009
131130004
79
212130004
80
212130008
81
1089
82
GSR1016.2
83
212130002
84
212130010
85
212130011
86
87
1405
GSR1017
88
212130006
89
90
91
GSR1031
1076
-
92
2004
93
94
95
96
97
98
99
1014
5017
2027
212130009
-
100
X1043
101
102
1044
X1043A
103
104
-
1045
1056
-
120
111130004
Section 7 – Trail Ripper – GTR40
Sprocket; 6 tooth (GSR's)
1/2-20 Nylock Nut
Washer, Axle, 1/2" AN FLT
ZY
Set Screw; 5/8-11x1"
Compression Block; Billet
Aluminum (TR)
.625 x 3.375" rubber rod
(TR)
Bolt 3/8-24 x 4" Low head
hex; for rear wheel assy
Spacer, sprocket to brake
disc
Spacer, wheel to sprocket
(TR)
spacer; rear axle; tank side;
7/8"OD x 1" long
spacer; rear axle; sprocket
side; 7/8"OD 1.5" long
Washer; Rear axle shim
(use 0 to 2 as needed)
Bolt; rear axle 5/8-18 x 8.5"
Chain/sprocket guard;
Lower (TR)
Bolt; 1/4-20 x 2-1/4" Flat
head screw
Washer; 1/4" SAE flat
Bolt; M6 x 22 SHCS
w/patch
Bolt; Pro Clamp mount,
M6x45 SHCS
Washer; 1/4" ss
Pro Clamp complete
Sprocket; 98 tooth (TR)
Lower hinge FTG. assy;
Steel
Bolt; lower hinge FTG.
5/16-24
Lower hinge FTG; plated, S
Wedge lug; lower hinge
FTG.
Handle hinge pin
Chain; #25HG, 120 link
(TR)
Revised on 11/3/2005
1
2
2
8
2
ITEMS NOT SHOWN ON PARTS ILLUSTRATION
1081
4
1082
1050N
1063
1064
4
1061
4
1053
1
1053S
8
1
1
1
131130003
1077
2019
Brake Cable, 38"H / 48"C
Brake Cable, 68"H / 82"C
Rear, inc noodle
Throttle Cable assy; P-201
Yellow Warning Sticker
Red Warning Sticker
Sticker; Reflective T-Bar
pad
Large Zip Tie (black plastic;
8")
Small Zip Tie (black plastic;
4")
Tool; 5/16" hex key; for
suspension set screws
CARB SORE sticker for
engine
Spring; throttle return
1
1
1
1
1
1
3
3
1
1
1
1
2
3
4
2
4
1
1
1
1
1
1
1
1
7-4